
CARE INSTRUCTIONS
Rinse the product with clear water.
Dry the product with a soft cloth.
DO NOT:
Use abrasive cleansers, cloths, or
paper towels. Use any cleaning agents
containing acid, polish, wax, alcohol,
ammonia, bleach, solvent or any other
corrosive or harsh chemical cleansers.
INSTRUCTIONS D’ENTRETIEN
Rincer le robinet avec de l’eau claire
et l’essuyer avec un tissu doux.
À NE PAS FAIRE :
Utiliser des tissus ou essuie-tout
abrasifs, produits nettoyants contenant
de l’acide, agent polisseur, cires, alcool,
ammoniaque, eau de Javel, solvants ou
tout autres produits chimiques corrosifs.
Customer Service
Monday to Friday:
8 a.m. - 4:30 p.m. E.S.T.
Tel: 1-800-361-5960
Service à la clientèle
Lundi au vendredi :
8 h 00 à 16 h 30 H.N.E.
Fax : 1-888-533-8313
clientinf[email protected]
Replacement parts are available on order
Les pièces de remplacement sont disponibles sur commande
IBKAR12CP_v171108
LAVATORY SINK FAUCET - WALL MOUNT INSTALLATION
ROBINET POUR LAVABO DE SALLE DE BAIN -
INSTALLATION MURALE
KAR12CP
No Description Part
Pièce
1Handle kit Ensemble de poignée FCKTS2099
2Cap Capuchon FCHDL4027
3Allen screw Vis Allen 923001
4Trim cap Garniture d’écrou FCDEC7011
5Retainer nut Écrou de retenu N/A
6Ceramic cartridge
(35 mm) Cartouche céramique
(35 mm) FC9M6
7Face plate kit Ensemble de plaque
de finition FCDEC7065
8Spout O-ring
(16mm x 2.5mm) Joint torique pour bec
(16mm x 2.5mm) FCORA1026
9Spout kit Ensemble de bec FCKTS1011
10 Aerator and key kit Ensemble
d’aérateur et clé FCAER3015
4
5
6
8
2
3
10 1
7
9
For warranty and to register your product
Garantie et enregistrement de votre produit
belangerH2O.com

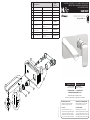
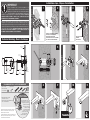
Installation steps - Étapes d’installation
Technical drawing - Dessin technique
IMPORTANT
Bélanger recommends using a professional plumber for all
installation and repair. Please inform yourself about the Canadian
Plumbing Code’s regulations and your local municipality plumbing
codes before installation. The Canadian Plumbing Code requires the
installation of surge arresting devices to eliminate water hammering.
ALLOW AN
ADEQUATE OPENING IN ORDER TO EASILY ACCESS CONNECTIONS OR OTHER
PLUMBING DEVICES FOR MAINTENANCE OR REPAIR.
Bélanger recommande de faire appel à un plombier compétent pour l’installation et
la réparation de ce produit. Veuillez vous informer des différentes règles du Code
Canadien de plomberie et des exigences de votre localité avant l’installation. Le Code
Canadien de plomberie exige l’installation d’un dispositif anti-bélier a n d’amortir les
coups de bélier dans la plomberie. PRÉVOIR UNE OUVERTURE SUFFISANTE POUR
FACILITER L’ACCÈS AUX RACCORDEMENTS OU À TOUT AUTRE DISPOSITIF DE
PLOMBERIE EN VUE DE L’ENTRETIEN OU DE LA RÉPARATION.
The model shown in the installation steps may differ
from the one in box however connection type and
installation steps are the same.
Le modèle démontré dans les étapes d’installation peut
différer du produit en boîte, mais le type de connexions
et d’installation demeure le même.
RECOMMENDED TOOLS / OUTILS RECOMMANDÉS
* Apply Bélanger thread seal tape
on threaded connections.
Appliquez du ruban d’étanchéité Bélanger
sur les connexions letées.
CONNECTION ADVICE
CONSEIL RACCORDEMENT
Firmly hand tighten the hose
to the valve and add a quarter-
turn using the proper wrench.
Tighten more if needed.
Raccordez le connecteur
exible à la valve
en serrant fermement
à la main puis ajoutez
un quart de tour à l’aide
de la clé appropriée.
Serrez plus au besoin.
Thread seal tape
Ruban d’étanchéité
pour joints letés *
Included / Inclus
CONNECTION ADVICE
CONSEIL RACCORDEMENT
DOWN
UP
INLET / ENTRÉE
HOT / CHAUD
INLET / ENTRÉE
COLD / FROID
KAR12CP
Finished wall
mur ni
Floor
Plancher
3-15/16”
(100 mm)
3-9/16”
(90 mm)
4-5/16”
(110 mm)
7-7/8”
(200 mm)
3-15/16”
(100 mm)
6-15/16”
(176 mm)
MIN
1-3/16”
(30 mm)
MAX
1-11/16”
(43 mm)
7-7/8”
(200 mm)
6-5/16”
(160 mm)
2-3/8”
(61 mm)
1”
(25 mm)
2
1
DRILLING GUIDE
GABARIT
DE PERÇAGE
REFER TO TECHNICAL DRAWING
FOR ROUGH ADJUSTMENT
SE RÉFÉRER AU DESSIN
TECHNIQUE POUR L’AJUSTEMENT
DE L’INSTALLATION PRIMAIRE
111098
76
5
4321
Rough-in - Installation primaire
Trim - Garniture
-
 1
1
-
 2
2


em outras línguas
- français: H2flo KAR12CP Guide d'installation
- English: H2flo KAR12CP Installation guide