Hama 00 012306 Manual do usuário
- Categoria
- Controles remotos
- Tipo
- Manual do usuário

E
SK
F
D
GB
I
S
PL
RUS
H
BG
CZ
TR
FIN
RO
GR
NL
P
Operating Instructions
Bedienungsanleitung
Mode d‘emploi
Instrucciones de uso
Gebruiksaanwijzing
Istruzioni per l‘uso
Instrukcja obsługi
Használati útmutató
Manual de utilizare
Návod k použití
Návod na použitie
Manual de instruções
Bruksanvisning
Руководство по эксплуатации
Работна инструкция
Οδηγίες χρήσης
Kullanma kılavuzu
Käyttöohje
4in1 / 8in1Universal Remote Control
Universal Fernbedienung
00
012306
012307


TV DVD STB SOUND
EPG
SHIFT
GUIDE
OK
MENU
VP
EXIT
FAV
SETUP
1 2 3
4 5 6
7 8 9
0
AV
SMART TV APPS
4in1
Art.Nr.: 00012306
8in1
Art.Nr.: 00012307
TV DVD STB
SOUND
EPG
SHIFT
GUIDE
OK
MENU
VP
EXIT
SETUP
MODE
1 2 3
4 5 6
7 8 9
0
AV
SMART TV APPS
AUX DVBT CBL AMP
AAA
2 2
1 1
10 10
8
4 4
9 9
3 3
6 6
7 7
11 11
12 12
13 13
18 18
19 19
20 20
14 14
15 15
17 17
16 16
5 5

2
GOperating Instructions
Universal remote control
Thank you for choosing a Hama product.
Take your time and read the following instructions and
information in full. Please keep these instructions in a
safe place for later reference.
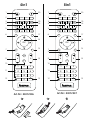
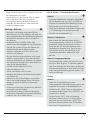
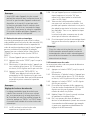
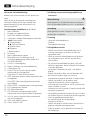
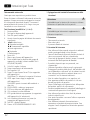
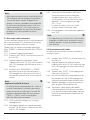
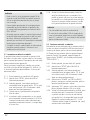
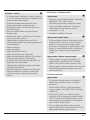
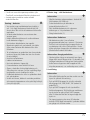
Function keys (4 in 1, 8 in 1 models)
1. Mute switch
2. Buttons for device selection
3. Text ON: Switch on Teletext
4. Hold: Hold current Teletext page
5. ◄◄ Rewind/red
►Play/yellow
►► Fast forward/blue
●Start recording
■Stop/green
ll Pause/magenta
6. Shift key
7. Menu: Open the device menu
8. Mode key for selecting the secondary device group
(only 8 in 1 model: AUX,DVBT,CBL,AMP)
9. Vol+/Vol-: Volume control
10. Setup: Remote control settings
11. Number keys 0-9
12. Smart TV: Open the Smart TV menu (if supported
by the device)
Shift+Smart TV: Select external AV source
13. APPS: Open the App menu (if supported by the
device)
Shift+APPS: Switch to two-digit channel numbers
14. PROG+/PROG-: Programme selection, up / down
15. EXIT: Exit the device menu
16. OK: Conrm selection
17. EPG: Electronic Programme Guide (if supported by
the selected AV device)
18. Info: On-screen information (if supported by the
AV device)
19. Text OFF: Exit Teletext
20. Power: ON/OFF / LED
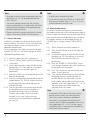
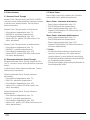
1. Explanation of warning symbols and notes
Warning
This symbol is used to indicate safety instructions or to
draw your attention to specic hazards and risks.
Note
This symbol is used to indicate additional information
or important notes.
2. Supplied package
•Universal remote control
•List of codes
•These operating instructions
3. Safety instructions
•Do not use the universal remote control in damp
environments and avoid contact with splashing water.
•Keep the universal remote control away from heat
sources and do not expose it to direct sunlight.
•As with all electrical products, the universal remote
control should be kept out of the reach of children.
•This product is intended for private, non-commercial
use only.
•Use the product only for the intended purpose.
•Protect the product from dirt, moisture and
overheating and use it in dry rooms only.
•Do not use the product in areas in which electronic
products are not permitted.
•Do not drop the product and do not expose it to any
major shocks.
•Do not modify the product in any way. Doing so voids
the warranty.
•Keep the packaging material out of the reach of
children due to the risk of suffocation.
•Dispose of packaging material immediately in
accordance with the locally applicable regulations.
•Do not operate the product outside the power limits
specied in the technical data.
•Do not open the device or continue to operate it if it
becomes damaged.
•Do not attempt to service or repair the product
yourself. Leave any and all service work to qualied
experts.
•Only use the article under moderate climatic
conditions.

3
Warning - Batteries
•When inserting batteries, note the correct polarity
(+ and - markings) and insert the batteries
accordingly. Failure to do so could result in the
batteries leaking or exploding.
•Only use batteries (or rechargeable batteries) that
match the specied type.
•Before you insert the batteries, clean the battery
contacts and the polarity contacts.
•Do not allow children to change batteries without
supervision.
•Do not mix old and new batteries, or batteries of
different types or from different manufacturers.
•Remove the batteries from products that are not
being used for an extended period (unless these are
being kept ready for an emergency).
•Do not short-circuit batteries.
•Do not charge batteries.
•Do not burn batteries.
•Keep batteries out of the reach of children.
•Never open, damage or swallow batteries or allow
them to enter the environment. They can contain
toxic, environmentally harmful heavy metals.
•Remove spent batteries from the product and
dispose of them without delay.
•Avoid storing, charging and using in extreme
temperatures and at extremely low atmospheric
pressures (such as at high altitudes).
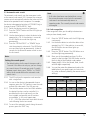
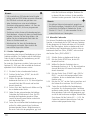
4. First steps - Inserting the batteries
Note
•Alkaline batteries are recommended. Use two
batteries of the type "AAA" (LR 03/Micro).
•Remove the battery cover on the back of the
universal remote control (A).
•Insert the batteries, observing the "+/-" marks for
polarity (B).
•Close the battery compartment (C).
Note: Code memory
•When replacing the batteries, all the codes you
have programmed remain stored for up to 10
minutes. Make sure that you do not press any
buttons until the new batteries are inserted in the
remote control. If you press a button and there are
no batteries in the remote control, all codes will
be deleted.
Note: Energy saving function
•The remote control switches itself off automatically
if a button is pressed for longer than 15 seconds.
This prolongs the life of the batteries if the remote
control is stuck in a place where the buttons are
pressed permanently, e.g. between sofa cushions.
5. Setup
Note
•For proper infra-red transmission, always hold the
remote control in the approximate direction of the
device to be operated.
•Press the "MODE" button to select the secondary
device group: AUX, AMP,DVB-T, CBL (8 in 1 model
only).
•Press the "SHIFT" key to control the blue function
keys. The shift function is deactivated by pressing
the "SHIFT" key again or automatically after 30
seconds if no key is pressed.
•If no entry is made within 30 seconds, SETUP mode
is automatically terminated. The LED ashes six
times and then goes out.

4
Note
•Each type of device can be programmed under any
device key, e.g. a TV can be programmed under
DVD, AUX, etc.
•You cannot operate a device with the universal
remote control while it is in Setup mode. Exit Setup
mode and select the device to be operated using
the device selection buttons.
•Please note that the remote control emits infra-red
signals. These are not visible to the human eye.
5.1 Direct code entry
A code list is included in the universal remote control's
extent of delivery. The code list contains ve-digit codes
for setting the remote control to work with most AV
equipment manufacturers.
For easy orientation, the codes are sorted rst by type
of device (TV, DVD, etc.) and within the type of device
alphabetically by brand name.
5.1.1 Switch the device you wish to operate on.
5.1.2 Press the "SETUP" button until the LED lights up
continuously.
5.1.3 Use the device button to select the device to be
operated (e.g. TV). If the selection is successful,
the LED flashes once and then lights up
permanently.
5.1.4 Search the code list for the brand and type of the
device to be operated.
5.1.5 Enter the corresponding five-digit code using the
number buttons 0-9. The LED confirms the entry
of each digit with a short flash and goes out
after the fifth digit.
5.1.6 Then test the remote control and check whether
the desired functions can be controlled. It is
possible that the first code is not the most
suitable, and possibly not all functions are
available. In this case, try the next code
mentioned for the selected device type/brand
from the list.
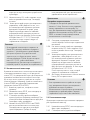
Note
•A valid code is automatically saved.
•If the code is invalid, the LED ashes six times and
then goes out. Repeat steps 5.1.1 to 5.1.5, or use
another method to enter the code.
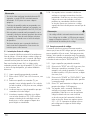
5.2 Manual code search
The universal remote control has an internal memory
that already contains up to 350 codes per device type for
the most common AV devices. You can go through these
codes until the device to be operated shows a response.
For example, the device to be operated switches off
("POWER" key) or changes channel ("PROG+/PROG-"
key).
5.2.1 Switch the device you wish to operate on.
5.2.2 Press the SETUP button until the LED lights up
permanently.
5.2.3 Use the device button to select the device to be
operated (e.g. TV). If the selection is successful,
the LED flashes once and then lights up
permanently.
5.2.4 Press the "POWER" or "PROG+/PROG-" key to
scroll through the preset codes until the device to
be operated shows a response.
5.2.5 Press "OK" to save the code and exit the code
search. The LED goes out.
5.2.6 Then test the remote control and check whether
the desired functions can be controlled. It is
possible that the first code found is not the
most suitable, and possibly not all functions are
available. In this case, repeat steps 5.2.1.–5.2.5.
The code search starts with the next code
following the last one saved.
Note
•A maximum of 350 codes of the most common
devices can be stored in the internal memory.
Due to the numerous AV devices available on
the market, it may happen that only the most
common main functions are available. If this is the
case, repeat steps 5.2.1 to 5.2.5 to nd a more
compatible code. A code may not be available for
some specic device models.

5
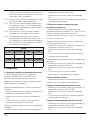
5.3 Automatic code search
The automatic code search uses the same preset codes
as the manual code search (5.2). However, the universal
remote control automatically searches the codes until the
device to be operated shows a response. For example,
the device to be operated switches off ("POWER" key) or
changes channel ("PROG+/PROG-" keys).
5.3.1 Switch the device you wish to operate on.
5.3.2 Press the "SETUP" button until the LED lights up
continuously.
5.3.3 Use the device button to select the device to be
operated (e.g. TV). If the selection is successful,
the LED flashes once and then lights up
permanently.
5.3.4 Press the "PROG+/PROG-" or "POWER" key to
start the automatic code search. The LED flashes
once and then lights up permanently. It takes 6
seconds for the universal remote control to start
the first search.
Note:
Setting the search speed
•The default setting for the search time per code is
1 second. If this does not suit you, you can change
to a search time of 3 seconds per code. To switch
between search times, press "PROG+" or "PROG-"
within the 6 seconds before the automatic code
search starts.
5.3.5 The LED confirms the respective code searches
with a single flash.
5.3.6 As soon as the device to be operated shows a
response, press the "OK" button to save the code
and exit the code search. The LED goes out.
5.3.7 Then test the remote control and check whether
the desired functions can be controlled. It is
possible that the first code found is not the
most suitable, and possibly not all functions
are available. In this case, repeat steps
5.3.1.–5.3.6.The code search starts with the next
code following the last one saved.
5.3.8 To cancel the automatic search during the search
process, press the "EXIT" key.
Note
•If all codes have been searched without success,
the universal remote control exits the automatic
code search and automatically returns to
operating mode. The currently stored code remains
unchanged.
5.4 Code recognition
Code recognition offers you the ability to determine a
code you have already saved.
5.4.1 Press the "SETUP" button until the LED lights up
continuously.
5.4.2 Use the device button to select the device to be
operated (e.g. TV). If the selection is successful,
the LED flashes once and then lights up
permanently.
5.4.3 Press the "SETUP" button. The LED flashes once
and then lig
hts up permanently.
5.4.4 Press one of the number keys from 0 to 9 to
search for the first digit. The LED flashes once for
the first digit of the five-digit code number.
5.4.5 Repeat step 5.4.4 for the second, third, fourth
and fifth digits respectively.
5.4.6 You can then enter the determined code in the
table below if you need it ag
ain at a later time
(e.g. after accidentally deleting the remote control
settings).
CODES
TV SOUND SAT DVD
AUX AMP CBL DVBT

6
6. Special functions
6.1 Station punch-through
With the station punch-through function, the PROG+ or
PROG- commands can bypass the currently controlled
device and change the stations of a second device. All
other commands are unaffected.
To activate the station punch-through function:
•Press the desired device key (e.g. TV).
•Press and hold the "PROG+" button.
•Press the desired device key (e.g. SAT).
•Release the "PROG+" key again (the LED ashes once
when the setting is activated).
To deactivate the station punch-through function:
•Press the desired device key (e.g. TV).
•Press and hold the "PROG-" button.
•Press the desired device key (e.g. SAT).
•Release the "PROG-" key again (the LED ashes twice
when the setting is deactivated).
6.2 Volume punch-through
With the volume punch-through function, the VOL+ or
VOL- commands can bypass the device currently being
controlled
and adjust the volume of a second device. All other
commands are unaffected.
To activate the volume punch-through function:
•Press the desired device key (e.g. TV).
•Press and hold the "VOL+" button.
•Press the desired device key (e.g. SAT).
•Release the "VOL+" key again (the LED ashes once
when the setting is activated).
To deactivate the station punch-through function:
•Press the desired device key (e.g. TV).
•Press and hold the "VOL-" button.
•Press the desired device key (e.g. SAT).
•Release the "VOL-" key again (the LED ashes twice
when the setting is deactivated).
6.3 Macro Power
Macro Power allows you to switch two AV devices on/
off simultaneously.
To activate the Macro Power function:
•Press the desired device key (e.g. TV).
•Press and hold the "POWER" button.
•Press the desired device key (e.g. SAT).
•Release the "POWER" button again (the LED ashes
once when the setting is activated).
To deactivate the Macro Power function:
•Press the desired device key (e.g. TV).
•Press and hold the "POWER" button.
•Press the desired device key (e.g. SAT).
•Release the "POWER" button again (the LED ashes
twice when the setting is deactivated)
7. Maintenance
•Never use old and new batteries in the universal
remote control at the same time, as old batteries tend
to leak and can lead to a loss of performance.
•Never clean the universal remote control with
scouring agents or harsh cleaning agents.
•Keep the universal remote control free of dust by
cleaning it with a dry soft cloth.

7
8. Troubleshooting
Q.My universal remote control does not work!
A.Check the AV device. If the main switch on the device
is off, the universal remote control cannot operate the
device.
A.Check that the batteries are inserted correctly and that
the polarity has been observed.
A.Check that you have pressed the appropriate device
button for the device.
A.Replace the batteries if the battery level is low.
Q.If there are multiple device codes listed for the brand
of my AV device, how do I select the correct device
code?
A.To determine the correct device code for the AV
device, test the codes one after the other until most of
the buttons work properly.
Q.My AV device only responds to some key commands.
A.Try other codes until most of the buttons work
properly.
Q.The brand of my AV device is not mentioned in the
code list.
A.In this case, use the manual code search (Section 5.2)
or the automatic code search (Section 5.3). During
the code search, all codes for a device type are tested
across manufacturers, e.g. all codes for SAT receivers
regardless of the manufacturer.
Q.I have tried all the available codes for the brand of my
AV device from the code list, but none of the codes
mentioned work.
A.In this case, use the manual code search (Section 5.2)
or the automatic code search (Section 5.3). During
the code search, all codes for a device type are tested
across manufacturers, e.g. all codes for SAT receivers
regardless of the manufacturer.
9. Warranty disclaimer
Hama GmbH & Co KG assumes no liability and provides
no warranty for damage resulting from improper
installation/mounting, improper use of the product or
from failure to observe the operating instructions and/
or safety notes.

8
DBedienungsanleitung
Universal-Fernbedienung
Danke, dass Sie sich für den Kauf eines Hama-Produkts
entschieden haben.
Nehmen Sie sich die Zeit, und lesen Sie die folgenden
Anweisungen und Informationen vollständig durch.
Bitte bewahren Sie diese Anleitung zum späteren
Nachschlagen an einem sicheren Platz auf.
Funktionstasten (Modelle 4 in 1, 8 in 1)
1. Stummschalter
2. Tasten zur Geräteauswahl
3. Text EIN: Teletext einschalten
4. Halten: Aktuelle Teletextseite halten
5. ◄◄ Rücklauf/rot
►Wiedergabe/gelb
►► Schneller Vorlauf/blau
●Aufnahme starten
■Stopp/grün
ll Pause/magenta
6. Shift-Taste
7. Menu: Gerätemenü öffnen
8. Modustaste zur Auswahl der sekundären
Gerätegruppe (nur Modell 8in1:
AUX,DVBT,CBL,AMP)
9. Vol+/Vol-: Lautstärkeregulierung
10. Setup: Einstellungen der Fernbedienung
11. Zifferntasten 0-9
12. Smart TV: Smart TV Menü öffnen (wenn vom
Endgerät unterstützt)
Shift+Smart TV: externe AV Quelle wählen
13. APPS: App-Menü öffnen (wenn vom Endgerät
unterstützt)
Shift+APPS : Zu zweistelligen Sendernummern
wechseln
14. PROG+/PROG-: Programmauswahl, nach oben/
nach unten
15. EXIT: Gerätemenü verlassen
16. OK: Auswahl bestätigen
17. EPG: Elektronischer Programmführer (wenn vom
ausgewählten AV-Gerät unterstützt)
18. Info: On-Screen-Informationen (wenn vom AV-Gerät
unterstützt)
19. Text AUS: Teletext verlassen
20. Power: EIN/AUS / LED
1. Erklärung von Warnsymbolen und Hinweisen
Warnung
Wird verwendet, um Sicherheitshinweise zu
kennzeichnen oder um Aufmerksamkeit auf besondere
Gefahren und Risiken zu lenken.
Hinweis
Wird verwendet, um zusätzlich Informationen oder
wichtige Hinweise zu kennzeichnen.
2. Lieferumfang
•Universal-Fernbedienung
•Codeliste
•Diese Bedienungsanleitung
3. Sicherheitshinweise
•Verwenden Sie die Universal-Fernbedienung nicht in
feuchten Umgebungen, und vermeiden Sie Kontakt
mit Spritzwasser.
•Halten Sie die Universal-Fernbedienung von
Wärmequellen fern, und setzen Sie sie keinem
direkten Sonnenlicht aus.
•Die Universal-Fernbedienung gehört wie alle
elektrischen Geräte nicht in Kinderhände.
•Das Produkt ist für den privaten, nicht-gewerblichen
Gebrauch vorgesehen.
•Verwenden Sie das Produkt ausschließlich für den
dazu vorgesehenen Zweck.
•Schützen Sie das Produkt vor Schmutz, Feuchtigkeit
und Überhitzung und verwenden Sie es nur in
trockenen Räumen.
•Benutzen Sie das Produkt nicht in Bereichen, in denen
elektronische Produkte nicht erlaubt sind.
•Lassen Sie das Produkt nicht fallen und setzen Sie es
keinen heftigen Erschütterungen aus.
•Nehmen Sie keine Veränderungen am
Produkt vor. Dadurch verlieren Sie jegliche
Gewährleistungsansprüche.
•Halten Sie Kinder unbedingt von dem
Verpackungsmaterial fern, es besteht Erstickungsgefahr.
•Entsorgen Sie das Verpackungsmaterial sofort gemäß
den örtlich gültigen Entsorgungsvorschriften.
•Betreiben Sie das Produkt nicht außerhalb
seiner in den technischen Daten angegebenen
Leistungsgrenzen.

9
•Öffnen Sie das Produkt nicht und betreiben Sie es bei
Beschädigungen nicht weiter.
•Versuchen Sie nicht, das Produkt selbst zu warten
oder zu reparieren. Überlassen Sie jegliche
Wartungsarbeit dem zuständigen Fachpersonal.
•Verwenden Sie den Artikel nur unter moderaten
klimatischen Bedingungen.
Warnung – Batterien
•Beachten Sie unbedingt die korrekte Polarität
(Beschriftung + und -) der Batterien und legen Sie
diese entsprechend ein. Bei Nichtbeachtung besteht
die Gefahr des Auslaufens oder einer Explosion
der Batterien.
•Verwenden Sie ausschließlich Akkus (oder
Batterien), die dem angegebenen Typ entsprechen.
•Reinigen Sie vor dem Einlegen der Batterien die
Batteriekontakte und die Gegenkontakte.
•Gestatten Sie Kindern nicht ohne Aufsicht das
Wechseln von Batterien.
•Mischen Sie alte und neue Batterien nicht, sowie
Batterien unterschiedlichen Typs oder Herstellers.
•Entfernen Sie Batterien aus Produkten, die längere
Zeit nicht benutzt werden (außer diese werden für
einen Notfall bereit gehalten).
•Schließen Sie die Batterien nicht kurz.
•Laden Sie Batterien nicht.
•Werfen Sie Batterien nicht ins Feuer.
•Bewahren Sie Batterien außerhalb der Reichweite
von Kindern auf.
•Batterien nie öffnen, beschädigen, verschlucken
oder in die Umwelt gelangen lassen. Sie können
giftige und umweltschädliche Schwermetalle
enthalten.
•Entfernen und entsorgen Sie verbrauchte Batterien
unverzüglich aus dem Produkt.
•Vermeiden Sie Lagerung, Laden und Benutzung
bei extremen Temperaturen und extrem niedrigem
Luftdruck (wie z.B. in großen Höhen).
4. Erste Schritte – Einsetzen der Batterien
Hinweis
•Es werden Alkalibatterien empfohlen. Verwenden
Sie zwei Batterien vom Typ „AAA” (LR 03/Micro).
•Entfernen Sie die Batteriefachabdeckung auf der
Rückseite der Universal-Fernbedienung (A).
•Setzen Sie die Batterien unter Berücksichtigung der
„+/-”-Markierungen für die Polarität ein (B).
•Schließen Sie das Batteriefach (C).
Hinweis: Codespeicher
•Beim Ersetzen der Batterien bleiben alle von
Ihnen programmierten Codes bis zu 10 Minuten
gespeichert. Achten Sie darauf, dass Sie keine
Tasten drücken, bis die neuen Batterien in der
Fernbedienung eingesetzt sind. Wenn Sie eine
Taste drücken und sich keine Batterien in der
Fernbedienung benden, werden alle Codes
gelöscht.
Hinweis: Energiesparfunktion
•Die Fernbedienung schaltet sich automatisch aus,
wenn eine Taste länger als 15 Sekunden gedrückt
wird. Dies verlängert die Lebensdauer der Batterien,
sollte die Fernbedienung an einer Stelle feststecken,
an der die Tasten dauerhaft gedrückt werden, z. B.
zwischen Sofakissen.
5. Setup
Hinweis
•Halten Sie die Fernbedienung für eine
ordnungsgemäße Infrarotübertragung immer in die
ungefähre Richtung des zu bedienenden Geräts.
•Drücken Sie die „MODE“-Taste zur Auswahl der
sekundären Geräte-Gruppe: AUX, AMP,DVB-T, CBL
(nur beim 8in1 Modell).
•Drücken Sie die „SHIFT“-Taste zur Steuerung
der blauen Funktions-Tasten. Die Shift-Funktion
wird durch erneutes Drücken der „SHIFT“-Taste
deaktiviert oder automatisch nach 30 Sekunden
wenn keine Taste gedrückt wird.

10
Hinweis
•Falls innerhalb von 30 Sekunden keine Eingabe
erfolgt, wird der SETUP-Mode automatisch beendet.
Die LED blinkt sechsmal und geht dann aus.
•Jeder Gerätetyp kann unter einer beliebigen
Gerätetaste programmiert werden, z. B. kann ein
Fernseher unter DVD, AUX usw. programmiert
werden.
•Sie können mit der Universal-Fernbedienung kein
Gerät bedienen, solange sich diese im Setup-Modus
bendet. Verlassen Sie den Setup-Modus, und
wählen Sie das zu bedienende Gerät über die
Tasten zur Geräteauswahl aus.
•Bitte beachten Sie, dass die Fernbedienung
Infrarotsignale aussendet. Diese sind für das
menschliche Auge nicht sichtbar.
5.1 Direkte Codeeingabe
Im Lieferumfang der Universal-Fernbedienung ist eine
Codeliste enthalten. Die Codeliste enthält fünfstellige
Codes für die Einstellung der Fernbedienung auf die
meisten AV-Gerätehersteller.
Zur einfachen Orientierung sind die Codes zuerst nach
Geräteart (TV, DVD usw.) und innerhalb der Geräteart
alphabetisch nach Markennamen sortiert.
5.1.1 Schalten Sie das zu bedienende Gerät ein.
5.1.2 Drücken Sie die Taste „SETUP”, bis die LED
dauerhaft leuchtet.
5.1.3 Wählen Sie über die Gerätetaste das zu
bedienende Gerät aus (z. B. TV). Bei erfolgreicher
Auswahl blinkt die LED einmal und leuchtet
danach dauerhaft.
5.1.4 Suchen Sie in der Codeliste nach Marke und Typ
des zu bedienenden Geräts.
5.1.5 Geben Sie den entsprechenden fünfstelligen
Code über die Zifferntasten 0-9 ein. Die LED
bestätigt die Eingabe der einzelnen Ziffern
jeweils mit einem kurzen Blinken und erlischt
nach der fünften Ziffer.
5.1.6 Testen Sie anschließend die Fernbedienung und
prüfen Sie, ob die gewünschten Funktionen
gesteuert werden können. Möglicherweise ist
der erste Code nicht der geeignetste, ggf. sind
nicht alle Funktionen verfügbar. Probieren Sie
in diesem Fall den nächsten, für die gewählte
Geräteart/-marke genannten Code aus der Liste.
Hinweis
•Ein gültiger Code wird automatisch gespeichert.
•Bei einem ungültigen Code blinkt die LED sechsmal
und erlischt anschließend. Wiederholen Sie die
Schritte 5.1.1 bis 5.1.5, oder verwenden Sie eine
andere Methode zur Codeeingabe.
5.2 Manuelle Codesuche
Die Universal-Fernbedienung verfügt über einen internen
Speicher, in dem bereits bis zu 350 Codes pro Gerätetyp
für die gängigsten AV-Geräte enthalten sind. Sie können
diese Codes durchgehen, bis das zu bedienende Gerät
eine Reaktion zeigt. Beispielsweise schaltet sich das zu
bedienende Gerät aus (Taste „POWER”) oder wechselt
den Sender (Taste „PROG+/PROG-”).
5.2.1 Schalten Sie das zu bedienende Gerät ein.
5.2.2 Drücken Sie die SETUP-Taste, bis die LED
dauerhaft leuchtet.
5.2.3 Wählen Sie über die Gerätetaste das zu
bedienende Gerät aus (z. B. TV). Bei erfolgreicher
Auswahl blinkt die LED einmal und leuchtet
danach dauerhaft.
5.2.4 Drücken Sie die Taste „POWER” oder „PROG+/
PROG-”, um durch die voreingestellten Codes
zu blättern, bis das zu bedienende Gerät eine
Reaktion zeigt.
5.2.5 Drücken Sie „OK”, um den Code zu speichern und
die Codesuche zu verlassen. Die LED erlischt.
5.2.6 Testen Sie anschließend die Fernbedienung
und prüfen Sie, ob die gewünschten Funktionen
gesteuert werden können. Möglicherweise ist der
erste gefundene Code nicht der geeignetste, ggf.
sind nicht alle Funktionen verfügbar. Wiederholen
Sie in diesem Fall die Schritte 5.2.1.–5.2.5. Die
Codesuche startet mit dem nächsten Code, der
auf den zuletzt gespeicherten folgt.

11
Hinweis
•Im internen Speicher können maximal 350 Codes
der gängigsten Geräte gespeichert werden.
Aufgrund der zahlreichen auf dem Markt
erhältlichen AV-Geräte kann es passieren, dass nur
die gängigsten Hauptfunktionen verfügbar sind. Ist
dies der Fall, wiederholen Sie die Schritte 5.2.1 bis
5.2.5, um einen kompatibleren Code zu nden. Für
einige spezielle Gerätemodelle ist möglicherweise
kein Code verfügbar.
5.3 Automatische Codesuche
Die automatische Codesuche verwendet dieselben
voreingestellten Codes wie die manuelle Codesuche
(5.2). Die Universal-Fernbedienung durchsucht die
Codes jedoch automatisch, bis das zu bedienende Gerät
eine Reaktion zeigt. Beispielsweise schaltet sich das zu
bedienende Gerät aus (Taste „POWER”) oder wechselt
den Sender (Tasten „PROG+/PROG-”).
5.3.1 Schalten Sie das zu bedienende Gerät ein.
5.3.2 Drücken Sie die Taste „SETUP”, bis die LED
dauerhaft leuchtet.
5.3.3 Wählen Sie über die Gerätetaste das zu
bedienende Gerät aus (z. B. TV). Bei erfolgreicher
Auswahl blinkt die LED einmal und leuchtet
danach dauerhaft.
5.3.4 Drücken Sie die Taste „PROG+/PROG-” oder
„POWER”, um die automatische Codesuche
zu starten. Die LED blinkt einmal und leuchtet
danach dauerhaft. Es dauert 6 Sekunden, bis die
Universal-Fernbedienung mit der ersten Suche
beginnt.
Hinweis:
Einstellen der Suchgeschwindigkeit
•Die Standardeinstellung für die Suchzeit pro Code
ist 1 Sekunde. Wenn Ihnen dies nicht zusagt,
können Sie zu einer Suchzeit von 3 Sekunden pro
Code wechseln. Um zwischen den Suchzeiten zu
wechseln, drücken Sie „PROG+” oder „PROG-”
innerhalb der 6 Sekunden vor dem Beginn der
automatischen Codesuche.
5.3.5 Die LED bestätigt die jeweiligen Codesuchen mit
einem einzelnen Blinken.
5.3.6 Sobald das zu bedienende Gerät eine Reaktion
zeigt, drücken Sie die Taste „OK“, um den Code
zu speichern und die Codesuche zu verlassen. Die
LED erlischt.
5.3.7 Testen Sie anschließend die Fernbedienung und
prüfen Sie, ob die gewünschten Funktionen
gesteuert werden können. Möglicherweise ist der
erste gefundene Code nicht der geeignetste, ggf.
sind nicht alle Funktionen verfügbar. Wiederholen
Sie in diesem Fall die Schritte 5.3.1.–5.3.6.
Die Codesuche startet mit dem nächsten Code,
der auf den zuletzt gespeicherten folgt.
5.3.8 Um die automatische Suche während des
Suchvorgangs abzubrechen, drücken Sie die Taste
„EXIT”.
Hinweis
•Wenn alle Codes ohne Erfolg durchsucht
wurden, verlässt die Universal-Fernbedienung die
automatische Codesuche und kehrt automatisch in
den Betriebsmodus zurück. Der aktuell gespeicherte
Code bleibt unverändert.
5.4 Codeerkennung
Die Codeerkennung bietet Ihnen die Möglichkeit, einen
bereits von Ihnen gespeicherten Code zu ermitteln.
5.4.1 Drücken Sie die Taste „SETUP”, bis die LED
dauerhaft leuchtet.
5.4.2 Wählen Sie über die Gerätetaste das zu
bedienende Gerät aus (z. B. TV). Bei erfolgreicher
Auswahl blinkt die LED einmal und leuchtet
danach dauerhaft.
5.4.3 Drücken Sie die Taste „SETUP”. Die LED blinkt
einmal und leuchtet danach dauerhaft.
5.4.4 Drücken Sie zur Suche der ersten Ziffer eine der
Nummerntasten von 0 bis 9. Die LED blinkt einmal
für die erste Ziffer der fünfstelligen Codenummer.
5.4.5 Wiederholen Sie den Schritt 5.4.4 jeweils für die
zweite, dritte, vierte und fünfte Ziffer.
5.4.6 Den ermittelten Code können Sie anschließend in
untenstehender Tabelle eintragen, falls Sie diesen
zu einem späteren Zeitpunkt nochmals benötigen
(z.B. nach einem versehentlichen Löschen der
Fernbedienungseinstellungen).

12
CODES
TV SOUND SAT DVD
AUX AMP CBL DVBT
6. Sonderfunktionen
6.1 Sender-Punch-Through
Mit der Sender-Punch-Through-Funktion können die
Befehle PROG+ oder PROG- das aktuell gesteuerte
Gerät umgehen, und die Sender eines zweiten Gerätes
wechseln. Alle anderen Befehle sind davon nicht
betroffen.
So aktivieren Sie die Sender-Punch-Through-Funktion:
•Drücken Sie die gewünschte Gerätetaste (z.B. TV).
•Halten Sie die Taste „PROG+” gedrückt.
•Drücken Sie die gewünschte Gerätetaste (z.B. SAT).
•Lassen Sie die Taste „PROG+” wieder los (die LED
blinkt einmal bei aktivierter Einstellung).
So deaktivieren Sie die Sender-Punch-Through-Funktion:
•Drücken Sie die gewünschte Gerätetaste (z.B. TV).
•Halten Sie die Taste „PROG-” gedrückt.
•Drücken Sie die gewünschte Gerätetaste (z.B. SAT).
•Lassen Sie die Taste „PROG-” wieder los (die LED
blinkt zweimal wenn die Einstellung deaktiviert wird).
6.2 Lautstärke-Punch-Through
Mit der Lautstärke-Punch-Through-Funktion können die
Befehle VOL + oder VOL- das aktuell gesteuerte Gerät
umgehen, und die Lautstärke eines zweiten Gerätes
einstellen. Alle anderen Befehle sind davon nicht
betroffen.
So aktivieren Sie die Lautstärke-Punch-Through-Funktion:
•Drücken Sie die gewünschte Gerätetaste (z.B. TV).
•Halten Sie die Taste „VOL+” gedrückt.
•Drücken Sie die gewünschte Gerätetaste (z.B. SAT).
•Lassen Sie die Taste „VOL+” wieder los (die LED blinkt
einmal bei aktivierter Einstellung).
So deaktivieren Sie die Sender-Punch-Through-Funktion:
•Drücken Sie die gewünschte Gerätetaste (z.B. TV).
•Halten Sie die Taste „VOL-” gedrückt.
•Drücken Sie die gewünschte Gerätetaste (z.B. SAT).
•Lassen Sie die Taste „VOL-” wieder los (die LED blinkt
zweimal wenn die Einstellung deaktiviert wird).
6.3 Macro Power
Mit Macro Power können Sie zwei AV-Geräte gleichzeitig
ein-/ausschalten.
So aktivieren Sie die Macro Power-Funktion:
•Drücken Sie die gewünschte Gerätetaste (z.B. TV).
•Halten Sie die Taste „POWER” gedrückt.
•Drücken Sie die gewünschte Gerätetaste (z.B. SAT).
•Lassen Sie die Taste „POWER” wieder los (die LED
blinkt einmal bei aktivierter Einstellung).
So deaktivieren Sie die Macro Power-Funktion:
•Drücken Sie die gewünschte Gerätetaste (z.B. TV).
•Halten Sie die Taste „POWER” gedrückt.
•Drücken Sie die gewünschte Gerätetaste (z.B. SAT).
•Lassen Sie die Taste „POWER” wieder los (die LED
blinkt zweimal wenn die Einstellung deaktiviert wird)
7. Wartung
•Verwenden Sie nie gleichzeitig alte und neue Batterien
in der Universal-Fernbedienung, da alte Batterien
zum Auslaufen neigen und zu einem Leistungsverlust
führen können.
•Reinigen Sie die Universal-Fernbedienung keinesfalls
mit Scheuermitteln oder scharfen Reinigungsmitteln.
•Halten Sie die Universal-Fernbedienung frei von
Staub, indem Sie sie mit einem trockenen weichen
Tuch reinigen.

13
8. Fehlerbehebung
F. Meine Universal-Fernbedienung funktioniert nicht!
A.Überprüfen Sie das AV-Gerät. Wenn der Hauptschalter
des Geräts ausgeschaltet ist, kann die Universal-
Fernbedienung das Gerät nicht bedienen.
A.Überprüfen Sie, dass die Batterien korrekt eingesetzt
sind und die Polarität beachtet wurde.
A.Überprüfen Sie, ob Sie die entsprechende Gerätetaste
für das Gerät gedrückt haben.
A.Tauschen Sie die Batterien bei niedrigem Batteriestand
aus.
F. Wenn für die Marke meines AV-Geräts mehrere
Gerätecodes aufgelistet sind, wie wähle ich den
korrekten Gerätecode aus?
A.Um den korrekten Gerätecode für das AV-Gerät zu
bestimmen, testen Sie die Codes nacheinander, bis die
meisten Tasten ordnungsgemäß funktionieren.
F. Mein AV-Gerät reagiert nur auf einige Tastenbefehle.
A.Probieren Sie andere Codes, bis die meisten Tasten
ordnungsgemäß funktionieren.
F. Die Marke meines AV-Gerätes ist nicht in der Codeliste
genannt.
A.Verwenden Sie in diesem Fall die manuelle Codesuche
(Kapitel 5.2) oder die automatische Codesuche
(Kapitel 5.3). Beim Codesuchlauf werden alle Codes
für einen Gerätetyp herstellerübergreifend getestet,
also z.B. alle Codes für SAT Receiver unabhängig vom
Hersteller.
F. Ich habe alle vorhandenen Codes für die Marke
meines AV-Gerätes aus der Codeliste ausprobiert, aber
keiner der gennannten Codes funktioniert.
A.Verwenden Sie in diesem Fall die manuelle Codesuche
(Kapitel 5.2) oder die automatische Codesuche
(Kapitel 5.3). Beim Codesuchlauf werden alle Codes
für einen Gerätetyp herstellerübergreifend getestet,
also z.B. alle Codes für SAT Receiver unabhängig vom
Hersteller.
9. Haftungsausschluss
Die Hama GmbH & Co KG übernimmt keinerlei
Haftung oder Gewährleistung für Schäden, die
aus unsachgemäßer Installation, Montage und
unsachgemäßem Gebrauch des Produktes oder einer
Nichtbeachtung der Bedienungsanleitung und/oder der
Sicherheitshinweise resultieren.

14
FMode d‘emploi
Télécommande universelle
Nous vous remercions d’avoir acheté un produit Hama.
Veuillez prendre le temps de lire l’ensemble des
instructions et des informations suivantes. Veuillez
conserver ce manuel dans un endroit sûr pour pouvoir
vous y référer ultérieurement.
Touches de fonction (modèles 4 en 1, 8 en 1)
1. Mise en sourdine
2. Touches de sélection de l’appareil
3. Texte EIN : activer le télétexte
4. Conserver : conserver la page de télétexte actuelle
5. ◄◄ Retour/rouge
►Lecture/jaune
►► Avance rapide/bleu
●Démarrer l’enregistrement
■Arrêt/vert
ll Pause/magenta
6. Touche Shift
7. Menu : ouvrir le menu de l’appareil
8. Touche Mode pour sélectionner le groupe
d’appareils secondaires (modèle 8 en 1 uniquement
: AUX, DVBT, CBL, AMP)
9. Vol+/Vol- : réglage du volume
10. Paramétrage : réglage de la télécommande
11. Touches numériques 0-9
12. Smart TV : ouvrir le menu Smart TV (si l’appareil
le permet)
Shift+Smart TV : sélectionner la source AV externe
13. APPS : ouvrir le menu Applications (si l’appareil
le permet)
Shift+APPS : pour accéder à des numéros de
chaînes à deux chiffres
14. PROG+/PROG- : sélection du programme, haut/bas
15. EXIT : quitter le menu de l’appareil
16. OK : conrmer votre choix
17. EPG : guide électronique des programmes (si
l’appareil audiovisuel sélectionné le permet)
18. Info : informations à l’écran (si l’appareil
audiovisuel le permet)
19. Texte AUS : quitter le télétexte
20. Mise sous tension : EIN/AUS/LED
1. Explication des symboles d’avertissement et
des remarques
Avertissement
Ce symbole est utilisé pour indiquer des consignes
de sécurité ou pour attirer votre attention sur des
dangers et risques particuliers.
Remarque
Ce symbole est utilisé pour indiquer des informations
supplémentaires ou des remarques importantes.
2. Lieferumfang
•Télécommande universelle
•Liste des codes
•Le présent mode d’emploi
3. Consignes de sécurité
•Veuillez ne pas utiliser la télécommande universelle
dans des environnements humides et évitez tout
contact avec des éclaboussures d’eau.
•Conservez la télécommande universelle à l’écart
de toute source de chaleur et ne l’exposez pas à la
lumière directe du soleil.
•La télécommande universelle comme tout appareil
électrique doit être gardée hors de portée des enfants.
•Ce produit est destiné à un usage domestique non
commercial.
•L’emploi du produit est exclusivement réservé à sa
fonction prévue.
•Protégez le produit de toute saleté, humidité,
surchauffe et utilisez-le uniquement dans des locaux
secs.
•N’utilisez pas le produit dans des zones où les
produits électroniques ne sont pas autorisés.
•Protégez le produit des secousses violentes et évitez
tout choc ou toute chute.
•N’apportez aucune modication au produit. Des
modications vous feraient perdre vos droits de
garantie.
•Tenez les emballages d’appareils hors de portée des
enfants, risque d’étouffement.
•Recyclez les matériaux d’emballage conformément
aux prescriptions locales en vigueur.

15
•N’utilisez pas le produit en dehors des limites
de puissance indiquées dans les caractéristiques
techniques.
•Ne tentez pas d’ouvrir le produit en cas de
détérioration et cessez de l’utiliser.
•Ne tentez pas de réparer le produit vous-même ni
d’effectuer des travaux d’entretien. Déléguez tous
travaux d’entretien à des techniciens qualiés.
•Utilisez l’article dans des conditions climatiques
modérées uniquement.
Avertissement - Piles
•Respectez impérativement la polarité des piles
(indications + et -) lors de leur insertion dans le
boîtier. Risques d’écoulement et d’explosion des
piles si tel n’est pas le cas.
•Utilisez exclusivement des batteries (ou des piles)
du type indiqué.
•Avant d’insérer les piles, nettoyez-en les contacts,
ainsi que les contacts d’accouplement.
•N’autorisez pas des enfants à remplacer les piles
d’un appareil sans surveillance.
•N’utilisez pas simultanément des piles usagées et
des piles neuves ou des piles de différents types.
•Retirez les piles des produits que vous ne comptez
pas utiliser pendant un certain temps (à l’exception
de ceux qui peuvent être utilisés en cas d’urgence).
•Ne court-circuitez pas les piles.
•Ne tentez pas de recharger les piles.
•Ne jetez pas de piles au feu.
•Conservez les piles hors de portée des enfants.
•Ne tentez pas d’ouvrir les piles, faites attention à ne
pas les endommager, les jeter dans l’environnement
et à ce que des jeunes enfants ne les avalent pas.
Les piles sont susceptibles de contenir des métaux
lourds toxiques et nocifs pour l’environnement.
•Retirez les piles usagées immédiatement du produit
et mettez-les au rebut immédiatement.
•Évitez le stockage, le chargement et l’utilisation
du produit à des températures extrêmes et à des
pressions atmosphériques extrêmement basses
(comme en haute altitude par exemple).
4. Première étape - Mise en place des piles
Remarque
•Des piles alcalines sont recommandées. Utilisez
deux piles de type "AAA" (LR 03/Micro).
•Retirez le couvercle des piles situé à l’arrière de la
télécommande universelle (A).
•Insérez les piles en respectant les marques "+/-"
pour la polarité (B).
•Fermez le compartiment des piles (C).
Remarque : Mémoire des codes
•Lorsque vous remplacez les piles, tous les codes
que vous avez programmés restent mémorisés au
maximum pendant 10 minutes. Veillez à n’appuyer
sur aucune touche jusqu’à ce que les nouvelles
piles soient mises en place dans la télécommande.
Si vous appuyez sur une touche et qu’aucune pile
ne se trouve dans la télécommande, tous les codes
seront alors supprimés.
Remarque : Fonction d’économie
d’énergie
•La télécommande s’éteint automatiquement dès
qu’une touche est maintenue enfoncée pendant
plus de 15 secondes. Cela permet de prolonger la
durée de vie des piles si jamais la télécommande se
retrouvait coincée dans un endroit où les touches
pouvaient rester enfoncées de manière durable, par
ex. entre les coussins du canapé.
5. Paramétrage
Remarque
•Pour obtenir une transmission infrarouge correcte,
tenez toujours la télécommande en direction de
l’appareil que vous souhaitez faire fonctionner.
•Appuyez sur la touche "MODE" pour sélectionner le
groupe d’appareils secondaires : AUX, AMP, DVB-T,
CBL (uniquement pour le modèle 8 en 1).
•Appuyez sur la touche "SHIFT" pour contrôler les
touches de fonctions bleues. La fonction SHIFT
est désactivée en appuyant de nouveau sur la
touche "SHIFT" ou de manière automatique si vous
n’appuyez sur aucune touche pendant 30 secondes.

16
Remarque
•Si dans les 30 secondes, vous n’effectuez aucune
saisie, le mode SETUP (Paramétrage) se termine
automatiquement. La LED clignote six fois puis
s’éteint.
•Chaque type d’appareil peut être programmé sous
n’importe quelle touche de l’appareil, par exemple
un téléviseur peut être programmé sous DVD,
AUX, etc.
•Vous ne pouvez utiliser aucun appareil avec la
télécommande universelle si elle se trouve en
mode Setup (Paramétrage). Quittez le mode Setup
(Paramétrage) et sélectionnez l’appareil que vous
souhaitez utiliser à l’aide des touches de sélection
de l’appareil.
•Veuillez noter que la télécommande émet des
signaux infrarouges. Ceux-ci ne sont pas visibles à
l’œil humain.
5.1 Saisie directe des codes
Avec la télécommande universelle, vous trouverez une
liste de codes. La liste de codes contient des codes à
cinq chiffres permettant de paramétrer la télécommande
pour la plupart des fabricants d’équipements
audiovisuels.Pour une identication plus aisée, les codes
sont d’abord classés par type d’appareil (TV, DVD, etc.),
puis dans le type d’appareil, par ordre alphabétique
de marque.
5.1.1 Allumez l’appareil que vous souhaitez utiliser.
5.1.2 Appuyez sur la touche "SETUP" jusqu’à ce que la
LED reste fixe.
5.1.3 Sélectionnez, à l’aide de la touche, l’appareil que
vous souhaitez utiliser (par ex. TV). Si la sélection
est réussie, la LED clignote une fois puis reste
fixe.
5.1.4 Dans la liste des codes, recherchez l’appareil à
utiliser par marque et par type.
5.1.5 Saisissez le code correspondant à cinq chiffres à
l’aide des touches numériques de 0 à 9. La LED
confirme la saisie des différents chiffres par un
bref clignotement et s’éteint après le cinquième
chiffre.
5.1.6 Testez ensuite la télécommande et vérifiez si
vous avez accès aux fonctions souhaitées. Il est
possible que le premier code ne soit pas le plus
adapté ou que toutes les fonctions ne soient pas
disponibles. Dans ce cas, essayez le code indiqué
pour le/la type/marque d’appareil sélectionné(e)
dans la liste.
Remarque
•Un code valide est automatiquement mémorisé.
•Si le code n’est pas valide, la LED clignote six fois
puis s’éteint. Répétez les étapes 5.1.1 à 5.1.5 ou
utilisez une autre méthode pour saisir vos codes.
5.2 Recherche manuelle des codes
La commande universelle dispose d’une sauvegarde
interne qui contient jusqu’à 350 codes par type
d’appareils pour les appareils audiovisuels les plus
courants. Vous pouvez faire déler ces codes jusqu’à
ce que l’appareil que vous souhaitez utiliser réponde.
Par exemple, l’appareil que vous souhaitez utiliser
s’éteint (touche "POWER") ou change de chaîne (touche
"PROG+/PROG-").
5.2.1
Allumez l’appareil que vous souhaitez utiliser.
5.2.2 Appuyez sur la touche "SETUP" jusqu’à ce que la
LED reste fixe.
5.2.3 Sélectionnez, à l’aide de la touche, l’appareil que
vous souhaitez utiliser (par ex. TV). Si la sélection
est réussie, la LED clignote une fois puis reste fixe.
5.2.4 Appuyez sur la touche "POWER" OU "PROG+/
PROG-" pour faire défiler les codes prédéfinis
jusqu’à ce que l’appareil que vous souhaitez
utiliser réponde.
5.2.5 Appuyez sur la touche "OK" pour sauvegarder
le code et quitter la recherche de codes. La LED
s’éteint.
5.2.6 Testez ensuite la télécommande et vérifiez si
vous avez accès aux fonctions souhaitées. Il est
possible que le premier code trouvé ne soit pas le
plus adapté ou que toutes les fonctions ne soient
pas disponibles. Dans ce cas, répétez les étapes
5.2.1.–5.2.5. La recherche de codes commence
avec le code suivant qui est le dernier code
mémorisé.

17
Remarque
•Jusqu’à 350 codes d’appareils les plus courants
peuvent être mémorisés dans la mémoire interne. En
raison d’un grand nombre d’appareils audiovisuels
disponibles sur le marché, il se peut que seules
les fonctions principales les plus courantes soient
disponibles. Si tel est le cas, renouvelez les étapes
5.2.1 à 5.2.5 pour trouver un code plus compatible.
Pour certains modèles spéciques d’appareils, il se
peut qu’aucun code ne soit disponible.
5.3 Recherche de codes automatique
La recherche automatique de codes utilise les mêmes
codes prédénis que la recherche de codes manuelle (5.2).
La télécommande universelle recherche cependant les
codes de manière automatique jusqu’à ce que l’appareil
que vous souhaitez utiliser réponde. Par exemple,
l’appareil que vous souhaitez utiliser s’éteint (touche
"POWER") ou change de chaîne (touches "PROG+/
PROG-").
5.3.1 Allumez l’appareil que vous souhaitez utiliser.
5.3.2 Appuyez sur la touche "SETUP" jusqu’à ce que la
LED reste fixe.
5.3.3 Sélectionnez, à l’aide de la touche, l’appareil que
vous souhaitez utiliser (par ex. TV). Si la sélection
est réussie, la LED clignote une fois puis reste fixe.
5.3.4 Appuyez sur la touche "PROG+/PROG-" ou
"POWER" pour débuter la recherche de codes
automatique. La LED clignote une fois puis reste
fixe. Il faut 6 secondes avant que la télécommande
universelle ne puisse commencer la première
recherche.
Remarque :
Réglage de la vitesse de recherche
•Le réglage standard du temps de recherche par
code est d’une seconde. Si cela ne vous convient
pas, vous pouvez passer à un temps de recherche
de 3 secondes par code. Pour modier le temps de
recherche, appuyez sur "PROG+" ou "PROG" durant
6 secondes avant le début de la recherche de codes
automatique.
5.3.5 La LED confirme les recherches de codes
respectives en clignotant une fois.
5.3.6 Dès que l’appareil que vous souhaitez utiliser
répond, appuyez sur la touche "OK" pour
mémoriser le code et quitter la recherche de
codes. La LED s’éteint.
5.3.7 Testez ensuite la télécommande et vérifiez si
vous avez accès aux fonctions souhaitées. Il est
possible que le premier code trouvé ne soit pas le
plus adapté ou que toutes les fonctions ne soient
pas disponibles. Dans ce cas, répétez les étapes
5.3.1.–5.3.6.
La recherche de codes commence avec le code
suivant qui est le dernier code mémorisé.
5.3.8 Pour interrompre la recherche automatique durant
le processus de recherche, appuyez sur la touche
"EXIT".
Remarque
•Si tous les codes ont été recherchés sans succès,
la télécommande universelle quitte la recherche
automatique de codes et revient automatiquement
au mode de fonctionnement. Le code actuellement
mémorisé reste inchangé.
5.4 Reconnaissance des codes
La reconnaissance des codes vous permet de déterminer
un code déjà mémorisé.
5.4.1 Appuyez sur la touche "SETUP" jusqu’à ce que la
LED reste fixe.
5.4.2 Sélectionnez, à l’aide de la touche, l’appareil que
vous souhaitez utiliser (par ex. TV). Si la sélection
est réussie, la LED clignote une fois puis reste fixe.
5.4.3 Appuyez sur la touche "SETUP". La LED clignote
une fois puis reste fixe.
5.4.4 Pour rechercher le
premier chiffre, appuyez sur
l’une des touches numérotées de 0 à 9. La LED
clignote une fois pour le premier chiffre du
numéro de code à cinq chiffres.
5.4.5 Répétez l’étape 5.4.4 pour le second, troisième
et quatrième et cinquième chiffre.
5.4.6 Puis, vous pouvez saisir dans le tableau ci-
dessous le code déterminé si jamais vous en avez
à nouveau besoin ultérieurement (par exemple
si jamais vous supprimez accidentellem
ent les
réglages de la télécommande).

18
CODES
TV SOUND SAT DVD
AUX AMP CBL DVBT
6. Fonctions spéciales
6.1 Punch-Through des chaînes
Avec la fonction Punch-Through des chaînes, les
commandes PROG+ ou PROG- peuvent ignorer l’appareil
actuellement commandé et changer les chaînes d’un
second appareil. Toutes les autres commandes ne sont
pas concernées.
Pour activer la fonction Punch-Through des chaînes :
•appuyez sur la touche de l’appareil souhaitée (par
ex. TV).
•Maintenez enfoncée la touche "PROG+".
•appuyez sur la touche de l’appareil souhaitée (par
ex. SAT).
•Relâchez la touche "PROG+" (la LED clignote une fois
lorsque le réglage est activé).
Pour désactiver la fonction Punch-Through des chaînes :
•appuyez sur la touche de l’appareil souhaitée (par
ex. TV).
•Maintenez enfoncée la touche "PROG-".
•appuyez sur la touche de l’appareil souhaitée (par
ex. SAT).
•Relâchez la touche "PROG-" (la LED clignote deux
fois, une fois le réglage désactivé).
6.2 Punch-Through du volume sonore
Avec la fonction Punch-Through du volume sonore, les
commandes VOL + ou VOL- peuvent ignorer l’appareil
actuellement commandé
et modier le volume sonore d’un second appareil.
Toutes les autres commandes ne sont pas concernées.
Pour activer la fonction Punch-Through du volume
sonore :
•appuyez sur la touche de l’appareil souhaitée (par
ex. TV).
•Maintenez enfoncée la touche "VOL+".
•appuyez sur la touche de l’appareil souhaitée (par
ex. SAT).
•Relâchez la touche "VOL+" (la LED clignote une fois
lorsque le réglage est activé).
Pour désactiver la fonction Punch-Through des chaînes :
•appuyez sur la touche de l’appareil souhaitée (par
ex. TV).
•Maintenez enfoncée la touche "VOL-".
•appuyez sur la touche de l’appareil souhaitée (par
ex. SAT).
•Relâchez la touche "VOL-" (la LED clignote deux fois,
une fois le réglage désactivé).
6.3 Macro Power
Avec Macro Power, vous pouvez allumer/éteindre deux
appareils audiovisuels simultanément.
Pour activer la fonction Macro Power :
•appuyez sur la touche de l’appareil souhaitée (par
ex. TV).
•Maintenez enfoncée la touche "POWER".
•appuyez sur la touche de l’appareil souhaitée (par
ex. SAT).
•Relâchez la touche "POWER" (la LED clignote une fois
lorsque le réglage est activé).
Pour désactiver la fonction Macro Power :
•appuyez sur la touche de l’appareil souhaitée (par
ex. TV).
•Maintenez enfoncée la touche "POWER".
•appuyez sur la touche de l’appareil souhaitée (par
ex. SAT).
•Relâchez la touche "POWER" (la LED clignote deux
fois, une fois le réglage désactivé).
A página está carregando...
A página está carregando...
A página está carregando...
A página está carregando...
A página está carregando...
A página está carregando...
A página está carregando...
A página está carregando...
A página está carregando...
A página está carregando...
A página está carregando...
A página está carregando...
A página está carregando...
A página está carregando...
A página está carregando...
A página está carregando...
A página está carregando...
A página está carregando...
A página está carregando...
A página está carregando...
A página está carregando...
A página está carregando...
A página está carregando...
A página está carregando...
A página está carregando...
A página está carregando...
A página está carregando...
A página está carregando...
A página está carregando...
A página está carregando...
A página está carregando...
A página está carregando...
A página está carregando...
A página está carregando...
A página está carregando...
A página está carregando...
A página está carregando...
A página está carregando...
A página está carregando...
A página está carregando...
A página está carregando...
A página está carregando...
A página está carregando...
A página está carregando...
A página está carregando...
A página está carregando...
A página está carregando...
A página está carregando...
A página está carregando...
A página está carregando...
A página está carregando...
A página está carregando...
A página está carregando...
A página está carregando...
A página está carregando...
A página está carregando...
A página está carregando...
A página está carregando...
A página está carregando...
A página está carregando...
A página está carregando...
A página está carregando...
A página está carregando...
A página está carregando...
A página está carregando...
A página está carregando...
A página está carregando...
A página está carregando...
A página está carregando...
A página está carregando...
A página está carregando...
A página está carregando...
A página está carregando...
A página está carregando...
A página está carregando...
A página está carregando...
A página está carregando...
A página está carregando...
A página está carregando...
A página está carregando...
A página está carregando...
A página está carregando...
A página está carregando...
A página está carregando...
A página está carregando...
A página está carregando...
A página está carregando...
A página está carregando...
A página está carregando...
A página está carregando...
A página está carregando...
A página está carregando...
-
 1
1
-
 2
2
-
 3
3
-
 4
4
-
 5
5
-
 6
6
-
 7
7
-
 8
8
-
 9
9
-
 10
10
-
 11
11
-
 12
12
-
 13
13
-
 14
14
-
 15
15
-
 16
16
-
 17
17
-
 18
18
-
 19
19
-
 20
20
-
 21
21
-
 22
22
-
 23
23
-
 24
24
-
 25
25
-
 26
26
-
 27
27
-
 28
28
-
 29
29
-
 30
30
-
 31
31
-
 32
32
-
 33
33
-
 34
34
-
 35
35
-
 36
36
-
 37
37
-
 38
38
-
 39
39
-
 40
40
-
 41
41
-
 42
42
-
 43
43
-
 44
44
-
 45
45
-
 46
46
-
 47
47
-
 48
48
-
 49
49
-
 50
50
-
 51
51
-
 52
52
-
 53
53
-
 54
54
-
 55
55
-
 56
56
-
 57
57
-
 58
58
-
 59
59
-
 60
60
-
 61
61
-
 62
62
-
 63
63
-
 64
64
-
 65
65
-
 66
66
-
 67
67
-
 68
68
-
 69
69
-
 70
70
-
 71
71
-
 72
72
-
 73
73
-
 74
74
-
 75
75
-
 76
76
-
 77
77
-
 78
78
-
 79
79
-
 80
80
-
 81
81
-
 82
82
-
 83
83
-
 84
84
-
 85
85
-
 86
86
-
 87
87
-
 88
88
-
 89
89
-
 90
90
-
 91
91
-
 92
92
-
 93
93
-
 94
94
-
 95
95
-
 96
96
-
 97
97
-
 98
98
-
 99
99
-
 100
100
-
 101
101
-
 102
102
-
 103
103
-
 104
104
-
 105
105
-
 106
106
-
 107
107
-
 108
108
-
 109
109
-
 110
110
-
 111
111
-
 112
112


Hama 00 012306 Manual do usuário
- Categoria
- Controles remotos
- Tipo
- Manual do usuário
em outras línguas
- français: Hama 00 012306 Manuel utilisateur
- slovenčina: Hama 00 012306 Používateľská príručka
- română: Hama 00 012306 Manual de utilizare
Artigos relacionados
-
Hama 00221054 Manual do usuário
-
Hama 00011413 Manual do proprietário
-
-
-
-
-
-