
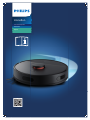
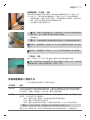
Aqua
3000 Series
Vacuum & Mop Robot
HomeRun


English
6English
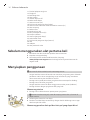
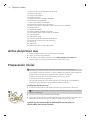
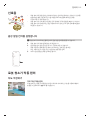
Contents
Introduction ______________________________________________________________________________ 6
Product overview __________________________________________________________________________ 7
Before first use_____________________________________________________________________________ 8
Preparing for use___________________________________________________________________________ 8
Audible signals_____________________________________________________________________________ 12
How your robot works ______________________________________________________________________ 13
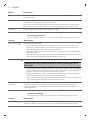
Using your robot ___________________________________________________________________________ 17
Cleaning and maintenance __________________________________________________________________ 19
User interface signals and their meaning ______________________________________________________ 25
Reset/restore the robot _____________________________________________________________________ 26
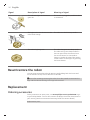
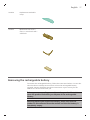
Replacement ______________________________________________________________________________ 26
Warranty and support ______________________________________________________________________ 28
Disposal and recycling ______________________________________________________________________ 28
Troubleshooting ___________________________________________________________________________ 29
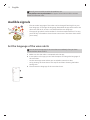
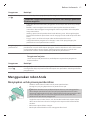
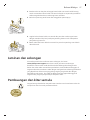
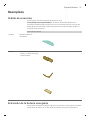
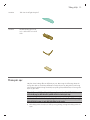
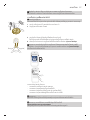
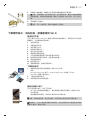
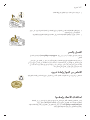
Introduction
Congratulations on your purchase of a Philips HomeRun Vacuum and Mop robot
3000 Series Aqua! To get the most out of your robot and access all the advanced
functions you can download and install the Philips HomeRun robot app. You can
also find support videos and frequently asked questions in the app or visit
www.philips.com/myrobot3000.
Read the separate safety booklet carefully before you use the robot for the first
time and save it for future reference.

7
English
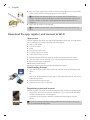
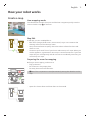
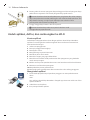
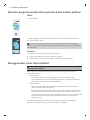
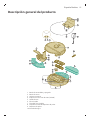
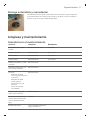
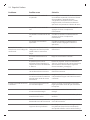
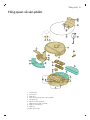
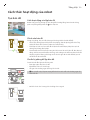
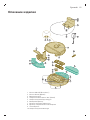
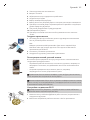
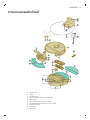
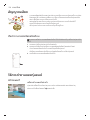
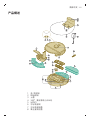
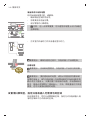
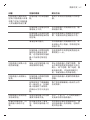
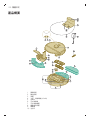
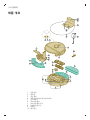
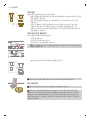
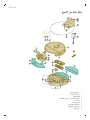
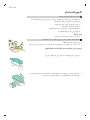
Product overview
1 32
6
7
8
9
5
13
14
15
16
22
23
10
11
12
25
24
26
29
27
28
20
4
19
21
17
18
30
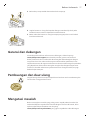
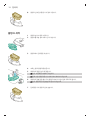
1 On/off button
2 Home button
3 Top cover
4 360° laser navigation (LiDAR)
5 Air outlet
6 Washable filter
7 Lid of the washable filter
8 Dust bin empty lid
9 Dust bin
10 Water inlet

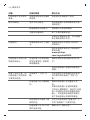
8English
11 Release button of the water tank
12 Water tank
13 Brush cover
14 Main brush
15 Power on/off switch
16 Front caster wheel
17 Anti-drop sensor (3x)
18 Charging contact points (robot)
19 Sensor to guide the robot back to the station (3x)
20 Side brush
21 Main wheels
22 Mop pad holder
23 Washable mop pad (2x)
24 Indicator light
25 (Charging) station
26 Power cord socket
27 Charging contact points (station)
28 Placemat
29 Adapter
30 Brush cleaning tool
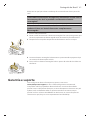
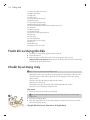
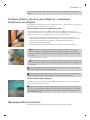
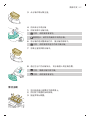
Before first use
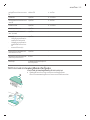
1Take the appliance out of the box and remove all packaging.
2Remove the protection covers.
3If you see any sign of visible damage, go to www.philips.com/support or
contact the Consumer Care Center in your country.
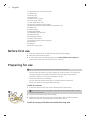
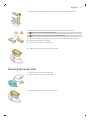
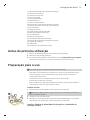
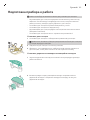
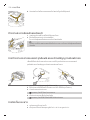
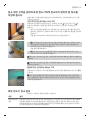
Preparing for use
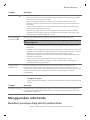
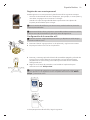
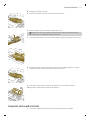
Tips for choosing the best location for installing the station:
-Do not place the station in bright sunlight or under furniture. This will block
the infrared signal that helps the robot find its way back to the station.
-Install the station on a level surface against a wall.
-Install the station on a hard floor.
-Do not place the station near stairs or a heating source (radiator).
-Install in a location with good WiFi coverage.
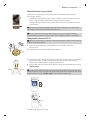
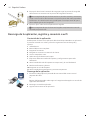
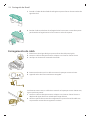
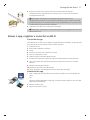
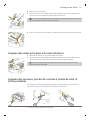
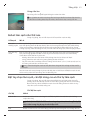
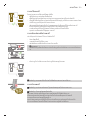
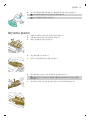
Install the station
0.5m
0.5m
1.5m
1Install the station within the correct dimensions for placement.
Note: Keep 0.5 meters of space on the sides of the station and 1.5 meters
in front of the station.
2Connect the station to the power supply.
3Make sure that the remaining part of the power cable is well concealed
behind the station so that the robot cannot drive over it.
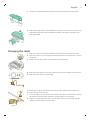
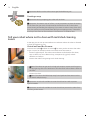
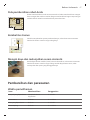
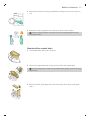
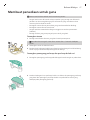
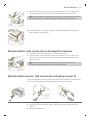
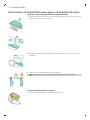
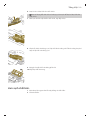
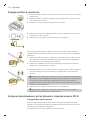
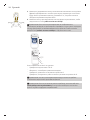
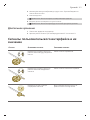
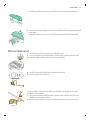
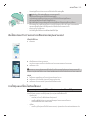
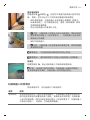
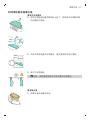
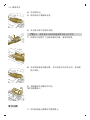
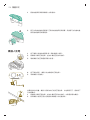
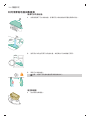
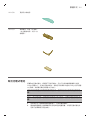
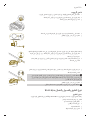
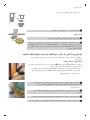
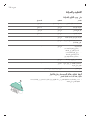
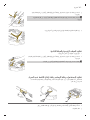
Install the mop pad holder and washable mop pad

9
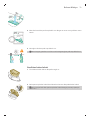
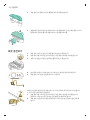
English
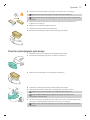
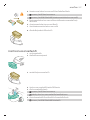
1Attach the mop pad holder to the bottom of the water tank of the robot.
2
1
2Slide the straight side of the washable mop pad in the correct slot of the mop
pad holder and attach the washable mop pad to the velcro material of the
mop pad holder.
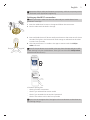
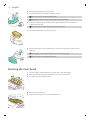
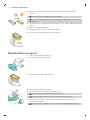
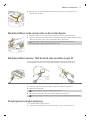
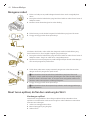
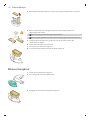
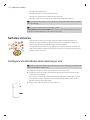
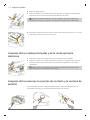
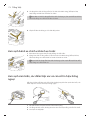
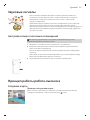
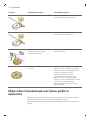
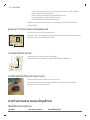
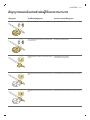
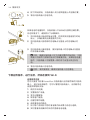
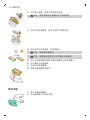
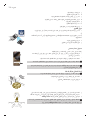
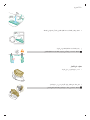
Charging the robot
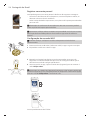
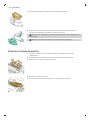
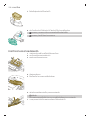
1Press the on/off switch on the bottom of the robot to switch on the robot.
2Turn the robot to its correct position and put the robot on the floor in front of
the station.
3Make sure that the station is connected to the wall socket.
2
1
4Press the home button. The robot drives to the correct position in the station.
5Wait until the robot is fully charged.
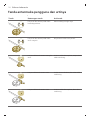
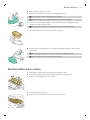
If the battery is empty, the robot will not drive itself to the correct position. In
this case, follow the next steps:
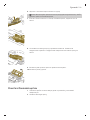
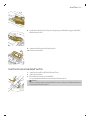
1Turn the robot to its correct position and put the robot on the floor in front of
the station. The water tank should be facing away from the station.
2Align the charging contact points on the front bottom of the robot with the
charging contact points on the station.

10 English
3Push the robot against the station so that the charging contacts of the robot
make contact with the charging contacts of the station.
Note: Make sure that the robot is in its correct position and starts to
charge. The lights in the two buttons on top of the robot flash slowly. If the
battery is empty, it may take a while before the robot indicates that it is
charging.
4Wait until the robot is fully charged.
Note: Make sure the robot is fully charged before you use it for the first
time.
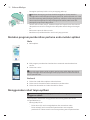
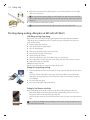
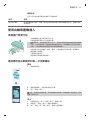
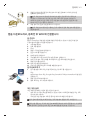
Download the app, register, and connect to Wi-Fi
App content
You can operate the robot with the Philips HomeRun robot app. The app allows
you to manage your robot and offers help and support:
1How-to-use videos.
2Full user manual.
3FAQs.
4Contact Consumer Care.
5Create a map of your home.
6Select which rooms to clean.
7Choose between different cleaning modes and settings for each room.
8View the status of the cleaning run in real time and see the battery level.
9Receive notifications and alerts.
10 Schedule a cleaning run.
11 See the maintenance status and find replacement parts.
Downloading the app
1Scan the QR code on the cover of this user manual or on the package of the
robot.
Or:
Search for 'Philips HomeRun robot app' in the Apple App Store or one of the
Android App Stores.
2Download and install the app.
3Follow the instructions in the app.
Registering a personal account
You can register a personal account and benefit from the following advantages:
-Control the robot from more than one device, e.g. a smart phone and tablet,
or add multiple users in the household.
-Save back-up of important data like customized cleaning plans for your
home.
Note: If you change your phone and you don't have an account, then you'll
lose all customized cleaning plans.

11
English
Important: Philips values and respects your privacy. A link to our privacy notice
can be found in the app before registering.
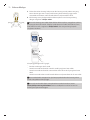
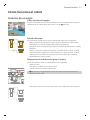
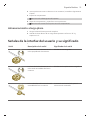
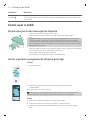
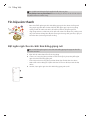
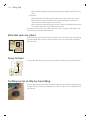
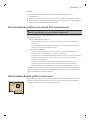
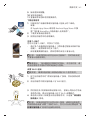
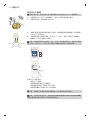
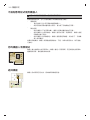
Setting up the Wi-Fi connection
Before you begin: make sure that the robot and your mobile device have
good Wi-Fi coverage.
1Press the 'Add robot' button in the app and follow the instructions.
2Pair the robot with the WiFi in the app.
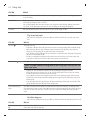
3
sec
3Press and hold the on/off button and home button at the same time for three
seconds. The lights in the buttons will flash orange to indicate that the robot
is in Wi-Fi set-up mode.
4Click the join button if it's visible in the app to connect with the 'Philips
robot' network.
Note: If the join button is not visible in the app, leave the app and go to WiFi
under 'Settings' on your mobile device. There you can select the 'Philips robot'
network and connect to it).
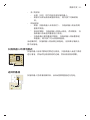
Philips HomeRun
Philips robot_XXXX
Settings
WLAN
If the Wi-Fi pairing fails:
-Check your Wi-Fi connection.
-Check if you selected the correct model.
-Check if you entered the correct Wi-Fi password.
-Check if the robot is still in Wi-Fi set-up mode.
Note: You can recognize this if the lights in the two buttons on the robot are
still flashing orange.

12 English
Note: If you are unable to solve the problem, visit
www.philips.com/myrobot3000 for support information and the contact
details of Consumer Care.
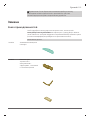
Audible signals
hello
-The voice alert language of the robot can be changed from English to your
local language. To change the language, download the app and connect the
robot with the Wi-Fi, so that it can download the new language.
-The app will give alerts and reminders if the robot needs attention. This way
you'll be fully informed on the real-time status even if the robot cleans while
you're away.
Set the language of the voice alerts
You can set the language of the voice alerts immediately after you have
connected the robot to Wi-Fi
1Make sure that the robot is connected with the app.
2In two places in the app you can find the option to change the language of
the voice alert.
-On the same app screen where you are asked to name the robot
-Or by pressing the three lines at the top left and then choosing the Robot
settings tab.
3Then choose the language of the voice alert there.

13
English
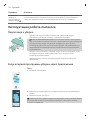
How your robot works
Create a map
How mapping works
The robot drives through the rooms and the laser navigation quickly scans the
rooms to build a map of the floor.
Map Edit
In the app, you can use Map Edit to:
-Edit rooms (merge/divide rooms, name rooms) so you can customize the
cleaning routine of the robot per room.
-Set up restricted areas to specify where the robot is allowed to clean and
where it is not.
-Create a map for each floor of your home and store up to 5 maps. When you
use the appliance, it generates a new map in a new environment. If you have
maps that you use frequently and do not want to accidentally overwrite, you
can lock up to 3 maps.
Preparing the room for mapping
Before you start mapping, make sure to:
-Tidy up the area.
-Put furniture in the proper place.
-Put away loose and small obstacles.
Note: This is important to avoid permanently storing the obstacles on the
map.
-Open all in-house doors and close doors to the outside.

14 English
Important: Make sure the robot cannot get blocked during use.
Creating a map
Important: During mapping your robot will not clean.
Important: To create a map of a floor, it is very important to place the station
on the floor that you want to map because the robot must be in the station
when starting and ending the mapping. If you want to create a map of the 2nd
floor, the station must be placed there during the mapping process. Thereafter
the map of this floor can be used even if the station is on another floor.
Tell your robot where not to clean with restricted cleaning
zones
In the app you can set up restricted areas to indicate where the robot is allowed
to clean and where it is not.
Virtual wall and No-Go zone
Create virtual walls and No-Go zones for areas you do not want the robot
to go. You can for example create virtual walls or No-Go zones to:
-Protect fragile objects. The robot cannot detect small obstacles like shoes,
toys or cables, nor can it detect shiny, transparent (e.g. glass) or dark
obstacles or surfaces.
-Prevent the robot from getting stuck while cleaning.
Note: The robot can get stuck on high pile carpets, carpets with fringes or
or very light rugs like in the bathroom. Also the robot cannot detect cables on
the floor.
-Protect the robot.
Note: The robot should be kept away from liquids and wet areas such as
pet bowls and plant trays.
Important: virtual walls and No-Go zones should not be used to protect
against hazards.
Important: virtual walls and No-Go zones should not prevent the robot from
returning to the station.

15
English
No-Mop zone
Create No-Mop zones to prevent the robot from mopping carpets or rugs.
Note: The robot will avoid the No-Mop zones when the mop pad holder is
attached. When the mop pad holder is not attached to the robot, the robot will
vacuum the No-Mop zone.
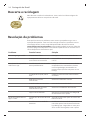
How your robot cleans
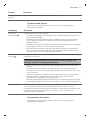
In the app, the following cleaning routines can be selected:
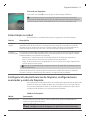
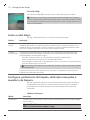
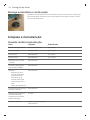
Routine Description
Regular
cleaning Regular cleaning is intended for your normal daily cleaning routines. The robot cleans each
room according to the settings you specified and saved in the cleaning plan. If the
environment is not recognized, the robot maps the environment and simultaneously
vacuums it (the robot does not mop in this case). After completion, it returns to the station.
Custom
cleaning Custom cleaning can be used to have the robot perform cleaning actions at unique
occasions. You can customize the cleaning routine of your robot to your wishes. You can
set the following three options.
- Room: the robot cleans one or more rooms in an order you specify.
- Zone: the robot cleans a zone in a room you specify.
- Spot: the robot cleans in a square of 1.5 by 1.5 meter in a specific spot in your house
that you want to have cleaned.
Note: with spot cleaning, place the robot in the middle of the square you want the
robot to clean.
After selecting one of the above options, you can select a cleaning mode and fine-tune
your cleaning preferences and advanced settings.
Set cleaning preferences, advanced settings and cleaning order
In the app, you can select five different cleaning modes for each room. These are
standard modes that can be used in most situations. You can customize your
cleaning mode by fine-tuning cleaning preferences and advanced settings.
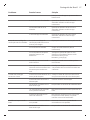
Cleaning modes
Mode Description
Wet & dry The robot vacuums and mops the floor at the same time. This mode is intended for
regular cleaning of hard floors.
IMPORTANT: For mopping sensitive hard floors, such as parquet
floors, set the water level in the app to the lowest level.
Dry The robot only vacuums the floor. This mode can be used for areas that shouldn't be
mopped.

16 English
Mode Description
Quiet The robot cleans with minimal noise. The suction power is lowered and the voice
alerts are muted.
Intensive The robot vacuums and mops the floor at the same time and at full power. This mode
is intended for thorough cleaning of small areas.
Note that it is not recommended to clean large areas in this mode. The robot passes
the area 5 times, so the cleaning time and battery usage will increase significantly.
Individual For this mode you can select all settings from scratch.
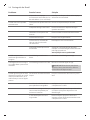
Cleaning preferences
For each cleaning mode, you can fine-tune the following cleaning preferences:
Setting Description
Suction power Change the suction power:
- Eco: for efficient cleaning with low energy consumption and low noise level.
- Normal: for regular cleaning and effective removal of fine dust on hard floors
with optimal balance between power and efficiency.
- High: for a thorough cleaning of large floors. Can clean more on a single charge
than max mode.
- Max: ideal for removing large dirt like crumbs. The strong suction power removes
fine dust particles hidden deep inside carpets and crevices.
Mopping wetness Determine the flow rate that is pumped from the electric water tank onto the mop:
IMPORTANT: Do not add hot water or cleaning detergents to the
water tank.
- None: Switch off the mopping wetness for uncoated wooden floors and carpets.
- Low: to mop a sensitive floor e.g. parquet. The combination of vacuuming and
mopping removes more fine dust than vacuuming alone.
- Medium: optimal for a regular wet & dry cleaning. The mop removes superficial
dirt and bacteria to keep your home sanitized and healthy.
- High: for a spotlessly clean home. It is recommended to combine this setting with
2 or 5 cleaning path repetitions for an intensive cleaning.
Cleaning path
repetition Specify the number of cleaning passes. One pass is sufficient for normal cleaning. It is
possible to program the robot to make 2 or 5 passes for intensive cleaning. It is
recommended to select this option only for specific cleaning areas as it impacts
cleaning duration.
Advanced settings
For each cleaning mode, you can fine-tune the following advanced setting:
Setting Description
Carpet boost Turn the carpet boost on or off. The robot automatically increases the suction power
when it has driven onto a carpet or rug. It is recommended to enable this setting.

17
English
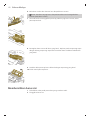
Using your robot
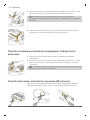
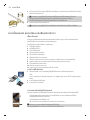
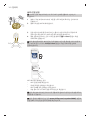
Preparing for a cleaning run
-Before you start the robot on its cleaning run:
2
1
-Attach the washable mop pad to the mop pad holder.
IMPORTANT: The mop pad holder can be removed. But when using the
robot with mop pad holder, the washable mop pad must always be attached
to the mop pad holder, even if you use the robot without mopping. This is to
prevent damage to the floor and the mop holder during use.
-Remove all cables, wires, cords and small objects such as shoes and toys from
the floor to prevent the robot from getting entangled in them.
-Open all in-house doors.
-Pre-wet the mop for optimal results.
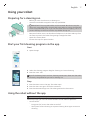
Start your first cleaning program via the app
Start
1Open the app.
2Select the cleaning program: Regular cleaning or Custom cleaning.
3Press the 'start' icon.
Note: If the battery level is too low, cleaning cannot start. Wait until the robot
is sufficiently charged before you start a cleaning run.
Stop
1Press the Pause icon in the app. The robot stops.
2Press the Start icon again. The robot continues.
3Press the Home & charge icon. The robot goes back to the station.
Using the robot without the app
Note: For an optimal experience, we recommend using the app.
Without the app, you can use the two buttons on the robot to operate it:
-On/off button
-Long press (3s) to turn the robot on and off.
-Short press to start cleaning or to pause cleaning. Press again to resume
cleaning.

18 English
-Home button
-Short press (when the robot is not cleaning): the robot will find the station
and charge.
-Short press while cleaning: the robot will stop cleaning. Short press again:
the robot returns to the station to charge.
-Short press when the robot is driving back to the station: the robot will
pause returning to the station. Press again to let it drive back to the
station.
When operating the robot manually, it will vacuum and mop. However, if the
water tank is empty it won't mop.
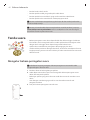
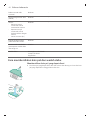
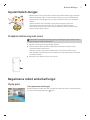
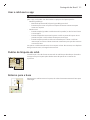
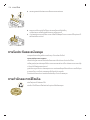
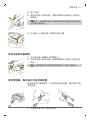
Your robot's cleaning pattern
1
2
3
The robot cleans the home in a structured way. The robot cleans room by room
and always starts by cleaning the edges of the room first before covering the
remaining surface.
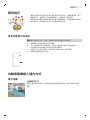
Returning to the station
1 2
3
E D
A
F
B
C
After the robot has completed its cleaning run, the robot will automatically drive
back to the station to recharge.
Auto recharge and resume
When the battery runs low (<20%) while cleaning, the robot automatically
returns to the station to recharge. After the battery has been charged, the robot
continues where it has left off.

19
English
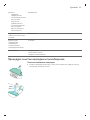
Cleaning and maintenance
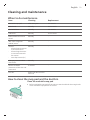
When to do maintenance
Item Cleaning Replacement
Washable mop pad After every use 3-6 months
Main brush Monthly 6-12 months
Washable filter Monthly 3-6 months
Side brush Monthly 6-12 months
Main wheels & universal
wheel Monthly -
360° laser navigation
(LiDAR) sensor Monthly -
Sensors:
- Infrared signal receiver
to find the station
- Infrared signal emitter
to communicate with
the station
- Anti-drop sensor (3x)
Monthly -
Charging contacts robot
and station Monthly -
Sensors to detect
placement of dust bin and
water tank
6 months -
Dust bin Empty the dust bin after
each use
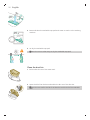
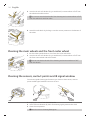
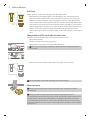
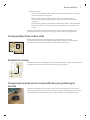
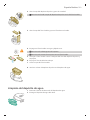
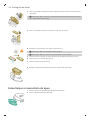
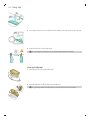
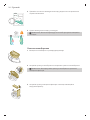
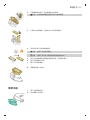
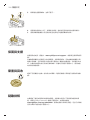
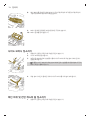
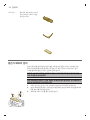
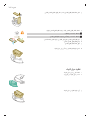
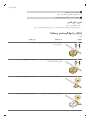
How to clean the mop pad and the dust bin
Clean the washable mop pad
1
2
1Pull the washable mop pad off the velcro material and slide the straight side
of the washable mop pad out of the slot.

20 English
MAX
60 °C
MAX
60 °C
2Rinse and clean the washable mop pad with water or wash it in the washing
machine.
3Air dry the washable mop pad.
Note: Do not use other ways to dry the washable mop pad.
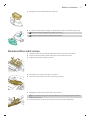
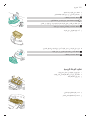
Clean the dust bin
1Pull the dust bin out of the water tank.
1
2
2Open the lid of the dust bin and and let the dirt out of the dust bin.
Note: Do not confuse the lid of the dust bin with the lid of the washable
filter.

21
English
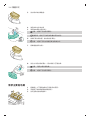
1
2
3Open the lid of the washable filter and pull the washable air filter out.
4Rinse the washable filter with water and air dry the washable filter.
Note: Do not use cleaning detergents.
Note: Do not use other ways to dry washable filter.
5Put the washable filter against the filter lock of the dust bin and push it in.
6Push the washable filter down.
7Close the lid of the washable filter.
8Slide the dust bin back into the water tank.
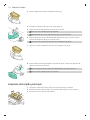
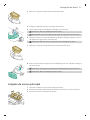
Cleaning the water tank
1Push the water tank release button.
2Pull the water tank out of the robot.
3Remove the dust bin from the water tank.

22 English
1
2
4Rinse the water tank with tap water
5Dry the outside of the water tank with a cloth.
Note: Do not use cleaning detergents.
IMPORTANT:Do not wash water tank in the dishwasher.
6Keep the sealing cap of the water tank open and allow the inside of the
water tank to air dry.
Note: Do not use other ways to dry the water tank.
7Put the dust bin back to the water tank.
2
1
8Fill the water tank from the water inlet. Insert the water tank in the correct
location.
Note: Make sure that the outside of the water tank is dry.
Note: Do not use cleaning detergents.
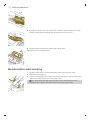
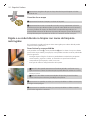
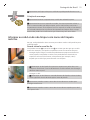
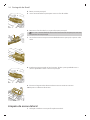
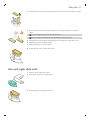
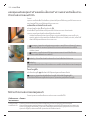
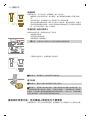
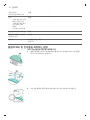
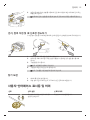
Cleaning the main brush
1Put the robot upside down on a surface that is flat and stable.
1
2
2Push the release buttons of the brush cover at the same time.
3Lift and remove the brush cover.
4Pull the main brush out.
5Use the cleaning tool to cut through the hairs.

23
English
6Remove the hairs and dirt from the main brush.
Tip: Use the brush end of the cleaning tool to remove the dirt on the main
brush.
7If you have removed the cap on the end of the main brush, push it back.
8Install the main brush in the correct location. Match the square shaped peg
with the square shape hole and insert the brush into position.
1
2
9Put the lips of the brush cover in the correct cutouts.
10 Push the brush cover in.
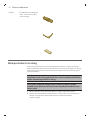
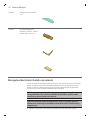
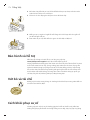
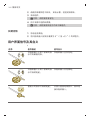
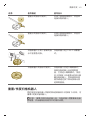
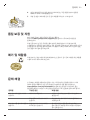
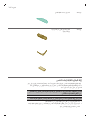
Cleaning the side brush
1Put the robot upside down on a surface that is flat and stable.
2Remove the side brush.
A página está carregando...
A página está carregando...
A página está carregando...
A página está carregando...
A página está carregando...
A página está carregando...
A página está carregando...
A página está carregando...
A página está carregando...
A página está carregando...
A página está carregando...
A página está carregando...
A página está carregando...
A página está carregando...
A página está carregando...
A página está carregando...
A página está carregando...
A página está carregando...
A página está carregando...
A página está carregando...
A página está carregando...
A página está carregando...
A página está carregando...
A página está carregando...
A página está carregando...
A página está carregando...
A página está carregando...
A página está carregando...
A página está carregando...
A página está carregando...
A página está carregando...
A página está carregando...
A página está carregando...
A página está carregando...
A página está carregando...
A página está carregando...
A página está carregando...
A página está carregando...
A página está carregando...
A página está carregando...
A página está carregando...
A página está carregando...
A página está carregando...
A página está carregando...
A página está carregando...
A página está carregando...
A página está carregando...
A página está carregando...
A página está carregando...
A página está carregando...
A página está carregando...
A página está carregando...
A página está carregando...
A página está carregando...
A página está carregando...
A página está carregando...
A página está carregando...
A página está carregando...
A página está carregando...
A página está carregando...
A página está carregando...
A página está carregando...
A página está carregando...
A página está carregando...
A página está carregando...
A página está carregando...
A página está carregando...
A página está carregando...
A página está carregando...
A página está carregando...
A página está carregando...
A página está carregando...
A página está carregando...
A página está carregando...
A página está carregando...
A página está carregando...
A página está carregando...
A página está carregando...
A página está carregando...
A página está carregando...
A página está carregando...
A página está carregando...
A página está carregando...
A página está carregando...
A página está carregando...
A página está carregando...
A página está carregando...
A página está carregando...
A página está carregando...
A página está carregando...
A página está carregando...
A página está carregando...
A página está carregando...
A página está carregando...
A página está carregando...
A página está carregando...
A página está carregando...
A página está carregando...
A página está carregando...
A página está carregando...
A página está carregando...
A página está carregando...
A página está carregando...
A página está carregando...
A página está carregando...
A página está carregando...
A página está carregando...
A página está carregando...
A página está carregando...
A página está carregando...
A página está carregando...
A página está carregando...
A página está carregando...
A página está carregando...
A página está carregando...
A página está carregando...
A página está carregando...
A página está carregando...
A página está carregando...
A página está carregando...
A página está carregando...
A página está carregando...
A página está carregando...
A página está carregando...
A página está carregando...
A página está carregando...
A página está carregando...
A página está carregando...
A página está carregando...
A página está carregando...
A página está carregando...
A página está carregando...
A página está carregando...
A página está carregando...
A página está carregando...
A página está carregando...
A página está carregando...
A página está carregando...
A página está carregando...
A página está carregando...
A página está carregando...
A página está carregando...
A página está carregando...
A página está carregando...
A página está carregando...
A página está carregando...
A página está carregando...
A página está carregando...
A página está carregando...
A página está carregando...
A página está carregando...
A página está carregando...
A página está carregando...
A página está carregando...
A página está carregando...
A página está carregando...
A página está carregando...
A página está carregando...
A página está carregando...
A página está carregando...
A página está carregando...
A página está carregando...
A página está carregando...
A página está carregando...
A página está carregando...
A página está carregando...
A página está carregando...
A página está carregando...
A página está carregando...
A página está carregando...
A página está carregando...
A página está carregando...
A página está carregando...
A página está carregando...
A página está carregando...
A página está carregando...
A página está carregando...
A página está carregando...
A página está carregando...
A página está carregando...
A página está carregando...
A página está carregando...
A página está carregando...
A página está carregando...
A página está carregando...
A página está carregando...
A página está carregando...
A página está carregando...
A página está carregando...
A página está carregando...
A página está carregando...
A página está carregando...
A página está carregando...
A página está carregando...
A página está carregando...
A página está carregando...
A página está carregando...
A página está carregando...
A página está carregando...
A página está carregando...
A página está carregando...
A página está carregando...
A página está carregando...
A página está carregando...
A página está carregando...
A página está carregando...
A página está carregando...
A página está carregando...
A página está carregando...
A página está carregando...
A página está carregando...
A página está carregando...
A página está carregando...
A página está carregando...
A página está carregando...
A página está carregando...
A página está carregando...
A página está carregando...
A página está carregando...
A página está carregando...
A página está carregando...
A página está carregando...
A página está carregando...
A página está carregando...
A página está carregando...
A página está carregando...
A página está carregando...
A página está carregando...
A página está carregando...
A página está carregando...
A página está carregando...
A página está carregando...
A página está carregando...
A página está carregando...
A página está carregando...
A página está carregando...
A página está carregando...
A página está carregando...
A página está carregando...
A página está carregando...
A página está carregando...
A página está carregando...
A página está carregando...
A página está carregando...
A página está carregando...
A página está carregando...
A página está carregando...
A página está carregando...
A página está carregando...
A página está carregando...
A página está carregando...
A página está carregando...
A página está carregando...
A página está carregando...
A página está carregando...
A página está carregando...
A página está carregando...
A página está carregando...
A página está carregando...
A página está carregando...
A página está carregando...
A página está carregando...
A página está carregando...
A página está carregando...
A página está carregando...
A página está carregando...
A página está carregando...
A página está carregando...
A página está carregando...
A página está carregando...
A página está carregando...
A página está carregando...
A página está carregando...
A página está carregando...
A página está carregando...
A página está carregando...
A página está carregando...
A página está carregando...
A página está carregando...
A página está carregando...
A página está carregando...
A página está carregando...
A página está carregando...
A página está carregando...
A página está carregando...
A página está carregando...
A página está carregando...
A página está carregando...
A página está carregando...
A página está carregando...
A página está carregando...
A página está carregando...
A página está carregando...
A página está carregando...
A página está carregando...
A página está carregando...
A página está carregando...
A página está carregando...
A página está carregando...
A página está carregando...
A página está carregando...
A página está carregando...
A página está carregando...
A página está carregando...
A página está carregando...
A página está carregando...
A página está carregando...
A página está carregando...
A página está carregando...
A página está carregando...
A página está carregando...
A página está carregando...
A página está carregando...
A página está carregando...
A página está carregando...
A página está carregando...
A página está carregando...
A página está carregando...
A página está carregando...
A página está carregando...
A página está carregando...
A página está carregando...
A página está carregando...
A página está carregando...
A página está carregando...
A página está carregando...
A página está carregando...
A página está carregando...
A página está carregando...
A página está carregando...
-
 1
1
-
 2
2
-
 3
3
-
 4
4
-
 5
5
-
 6
6
-
 7
7
-
 8
8
-
 9
9
-
 10
10
-
 11
11
-
 12
12
-
 13
13
-
 14
14
-
 15
15
-
 16
16
-
 17
17
-
 18
18
-
 19
19
-
 20
20
-
 21
21
-
 22
22
-
 23
23
-
 24
24
-
 25
25
-
 26
26
-
 27
27
-
 28
28
-
 29
29
-
 30
30
-
 31
31
-
 32
32
-
 33
33
-
 34
34
-
 35
35
-
 36
36
-
 37
37
-
 38
38
-
 39
39
-
 40
40
-
 41
41
-
 42
42
-
 43
43
-
 44
44
-
 45
45
-
 46
46
-
 47
47
-
 48
48
-
 49
49
-
 50
50
-
 51
51
-
 52
52
-
 53
53
-
 54
54
-
 55
55
-
 56
56
-
 57
57
-
 58
58
-
 59
59
-
 60
60
-
 61
61
-
 62
62
-
 63
63
-
 64
64
-
 65
65
-
 66
66
-
 67
67
-
 68
68
-
 69
69
-
 70
70
-
 71
71
-
 72
72
-
 73
73
-
 74
74
-
 75
75
-
 76
76
-
 77
77
-
 78
78
-
 79
79
-
 80
80
-
 81
81
-
 82
82
-
 83
83
-
 84
84
-
 85
85
-
 86
86
-
 87
87
-
 88
88
-
 89
89
-
 90
90
-
 91
91
-
 92
92
-
 93
93
-
 94
94
-
 95
95
-
 96
96
-
 97
97
-
 98
98
-
 99
99
-
 100
100
-
 101
101
-
 102
102
-
 103
103
-
 104
104
-
 105
105
-
 106
106
-
 107
107
-
 108
108
-
 109
109
-
 110
110
-
 111
111
-
 112
112
-
 113
113
-
 114
114
-
 115
115
-
 116
116
-
 117
117
-
 118
118
-
 119
119
-
 120
120
-
 121
121
-
 122
122
-
 123
123
-
 124
124
-
 125
125
-
 126
126
-
 127
127
-
 128
128
-
 129
129
-
 130
130
-
 131
131
-
 132
132
-
 133
133
-
 134
134
-
 135
135
-
 136
136
-
 137
137
-
 138
138
-
 139
139
-
 140
140
-
 141
141
-
 142
142
-
 143
143
-
 144
144
-
 145
145
-
 146
146
-
 147
147
-
 148
148
-
 149
149
-
 150
150
-
 151
151
-
 152
152
-
 153
153
-
 154
154
-
 155
155
-
 156
156
-
 157
157
-
 158
158
-
 159
159
-
 160
160
-
 161
161
-
 162
162
-
 163
163
-
 164
164
-
 165
165
-
 166
166
-
 167
167
-
 168
168
-
 169
169
-
 170
170
-
 171
171
-
 172
172
-
 173
173
-
 174
174
-
 175
175
-
 176
176
-
 177
177
-
 178
178
-
 179
179
-
 180
180
-
 181
181
-
 182
182
-
 183
183
-
 184
184
-
 185
185
-
 186
186
-
 187
187
-
 188
188
-
 189
189
-
 190
190
-
 191
191
-
 192
192
-
 193
193
-
 194
194
-
 195
195
-
 196
196
-
 197
197
-
 198
198
-
 199
199
-
 200
200
-
 201
201
-
 202
202
-
 203
203
-
 204
204
-
 205
205
-
 206
206
-
 207
207
-
 208
208
-
 209
209
-
 210
210
-
 211
211
-
 212
212
-
 213
213
-
 214
214
-
 215
215
-
 216
216
-
 217
217
-
 218
218
-
 219
219
-
 220
220
-
 221
221
-
 222
222
-
 223
223
-
 224
224
-
 225
225
-
 226
226
-
 227
227
-
 228
228
-
 229
229
-
 230
230
-
 231
231
-
 232
232
-
 233
233
-
 234
234
-
 235
235
-
 236
236
-
 237
237
-
 238
238
-
 239
239
-
 240
240
-
 241
241
-
 242
242
-
 243
243
-
 244
244
-
 245
245
-
 246
246
-
 247
247
-
 248
248
-
 249
249
-
 250
250
-
 251
251
-
 252
252
-
 253
253
-
 254
254
-
 255
255
-
 256
256
-
 257
257
-
 258
258
-
 259
259
-
 260
260
-
 261
261
-
 262
262
-
 263
263
-
 264
264
-
 265
265
-
 266
266
-
 267
267
-
 268
268
-
 269
269
-
 270
270
-
 271
271
-
 272
272
-
 273
273
-
 274
274
-
 275
275
-
 276
276
-
 277
277
-
 278
278
-
 279
279
-
 280
280
-
 281
281
-
 282
282
-
 283
283
-
 284
284
-
 285
285
-
 286
286
-
 287
287
-
 288
288
-
 289
289
-
 290
290
-
 291
291
-
 292
292
-
 293
293
-
 294
294
-
 295
295
-
 296
296
-
 297
297
-
 298
298
-
 299
299
-
 300
300
-
 301
301
-
 302
302
-
 303
303
-
 304
304
-
 305
305
-
 306
306
-
 307
307
-
 308
308
-
 309
309
-
 310
310
-
 311
311
-
 312
312
-
 313
313
-
 314
314
-
 315
315
-
 316
316
-
 317
317
-
 318
318
-
 319
319
-
 320
320
-
 321
321
-
 322
322
-
 323
323
-
 324
324
-
 325
325
-
 326
326
-
 327
327
-
 328
328
-
 329
329
-
 330
330
-
 331
331
-
 332
332
-
 333
333
-
 334
334
-
 335
335
-
 336
336
-
 337
337
-
 338
338
-
 339
339
-
 340
340
-
 341
341
-
 342
342
-
 343
343
-
 344
344
-
 345
345
-
 346
346
-
 347
347
-
 348
348
-
 349
349
-
 350
350


em outras línguas
Outros documentos
-
Mi Mi Robot Vacuum-Mop 2 Pro Manual do usuário
-
Rowenta ROWRR8567WH Guia de usuario
-
Cecotec Conga 7490 Manual do usuário
-
Cecotec 7490 Manual do usuário
-
 JBM 54020 Guia de usuario
-
Shark RV2600WDEU Instruções de operação
-
Blaupunkt Bluebot XPRO Robbot Vacuum Cleaner Manual do usuário
-
Rowenta RR7987 Guia de usuario
-
 V-TAC VT-5555 Manual do usuário

