
NEDERLANDS
1
Conceptronic CPSERVU
Snelstart handleiding
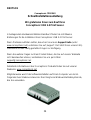
Hartelijk gefeliciteerd met de aanschaf van uw
Conceptronic USB 2.0 Print Server.
In de bijgaande Snelstart handleiding wordt stap voor stap uitgelegd hoe u de
Conceptronic USB 2.0 Print Server installeert.
In geval van problemen adviseren wij u onze support-site te bezoeken (ga naar:
www.conceptronic.net en klik op ‘Support’). Hier vindt u een database met
veelgestelde vragen waar u hoogstwaarschijnlijk de oplossing voor uw probleem
kunt vinden.
Heeft u andere vragen over uw product die u niet op de website kunt vinden, neem
dan contact met ons op via e-mail: support@conceptronic.net
Voor meer informatie over Conceptronic producten kunt u terecht op de
Conceptronic website: www.conceptronic.net.
Bij software/drivers installatie: Het is mogelijk dat onderstaande installatie iets
afwijkt van de installatie op uw computer. Dit is afhankelijk van de Windows versie
die u gebruikt.

NEDERLANDS
2
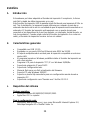
1. Introductie
Gefeliciteerd met de aanschaf van de Conceptronic Print Server, een simpele en
snelle manier om printers aan uw netwerk toe te voegen.
Deze USB 2.0 Print Server zorgt ervoor dat u gemakkelijk een USB printer kunt
toevoegen aan uw netwerk. Na de installatie kan elke gebruiker in het netwerk de
printer gebruiken zonder dat de printer op een computer geïnstalleerd moet zijn.
De Print Server is uitgerust met een netwerkpoort zodat u een netwerkapparaat
(bijvoorbeeld een switch, netwerk kaart of hub) kunt aansluiten. Wanneer u de Print
Server aansluit op een draadloze router, is het zelfs mogelijk dat de draadloze pc’s
(notebooks) worden aangesloten met de print Server.
2. Algemene specificaties
• Compatible met USB 1.1/2.0 Hi-speed
• Voorzien van een 10/100 auto-MDIX Fast Ethernet netwerkaansluiting
• Multi protocol support. Ideaal voor gedeeld printer gebruik in een gemixte
netwerkomgeving.
• Windows-gebaseerde software om de Print Server in een paar minuten te
configureren.
• LPR ondersteuning voor Windows 95/98/Me TCP/IP printen
• Ondersteuning voor IP toewijzing door DHCP server
• Ondersteuning voor configuratie via de Webbrowser
• Flash memory voor eenvoudige firmware upgrade’s
• IPP ondersteuning voor Windows 2000/XP
• Ondersteuning voor een 2e http poort voor configuratie en IPP printen.
• Ondersteuning voor Mac OS 10.2 "Rendezvous" zero-configuration
3. Minimale Systeemvereisten
Besturingssysteem:
• Microsoft Windows 95/98/ME/NT/2000/XP/2003.
• Apple Mac OS X of hoger
Voor Web Configuratie:
• Web browser met Java ondersteuning, zoals Microsoft® Internet
Explorer 5.0, Netscape Navigator 6.0 of Mozilla Firefox 1.x

NEDERLANDS
3
4. Inhoud van de verpakking
De volgende onderdelen vindt u in de verpakking met de Conceptronic Print Server:
• Conceptronic Print Server
• Voedingsadapter 5V DC, 2,5A
• Meertalige snelstarthandleiding
• CD-ROM met software
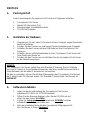
5. Hardware installatie
1. Zorg ervoor dat uw printer correct functioneert voordat u verder gaat.
2. Zet de printer uit en koppel deze los van de computer.
3. Sluit de printer met de USB kabel aan op uw Conceptronic Print Server.
4. Sluit een netwerkkabel aan op uw Conceptronic Print Server en op uw switch of
router.
5. Zet de printer aan en sluit de spanningsadapter van de Conceptronic Print Server
aan.
LET OP: Uw Conceptronic Print Server is voorzien van een standaard IP adres. Dit IP
adres kan verschillen met de IP reeks die u in uw netwerk gebruikt, of het
kan een conflict geven met een ander netwerkapparaat. Om dit te
voorkomen kunt u de Conceptronic Print Server Utility gebruiken om het IP
adres van de Print Server te wijzigen.
Het standaard IP adres van de Print Server is: 192.168.0.2
6. Software Installatie
1. Plaats de meegeleverde CD-ROM van uw Conceptronic Print Server
in uw CD-ROM speler.
2. Start Windows Verkenner, navigeer naar de CD-ROM en open de
map “PS Utility”.
3. Voer het programma “Setup.exe” in de map “PS Utility” uit en volg
de stappen op het scherm om de installatie te voltooien.
4. Na de installatie kunt u de Configuratie applicatie voor uw Print
Server vinden in het “Start Menu”.

NEDERLANDS
4
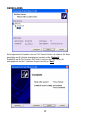
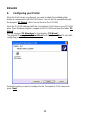
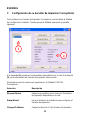
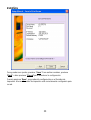
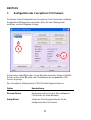
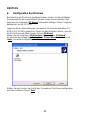
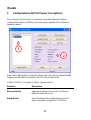
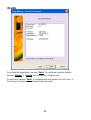
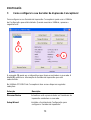
7. Uw Conceptronic Print Server Configureren
Om uw Conceptronic Print Server te configureren kunt u de geïnstalleerde
Configuratie applicatie gebruiken. Als u de applicatie opstart krijgt u het volgende
scherm te zien:
1
2
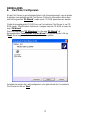
Aan de linkerkant (1) ziet u de gevonden Print Servers in uw netwerk. Aan de
rechterkant (2) ziet u de informatie van de geselecteerde Print Server.
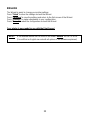
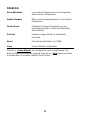
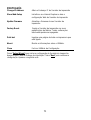
Binnen de Conceptronic CPSERVU applicatie heeft u de volgende opties:
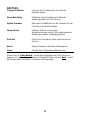
Optie Beschrijving
Discover Device Ververst het scherm en zoekt opnieuw naar alle
aanwezige Print Servers in uw netwerk.
Setup Wizard Opent de Setup Wizard om de Print Server te
configureren.
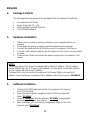
Change IP Address Verandert het IP Adres van de Print Server.

NEDERLANDS
5
Show Web-Setup Start Internet Explorer en opent de webconfiguratie
voor uw Print Server.
Update Firmware Voert een firmware update voor uw Print Server
uit.
Factory Reset Herstelt de Print Server naar de
fabrieksinstellingen. Alle gemaakte wijzigingen
worden gewist.
Print test Print een testpagina uit op de aangesloten printer.
About Informatie over de Configuratie applicatie.
Close Sluit de Configuratie applicatie.
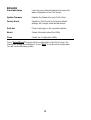
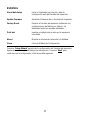
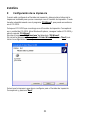
Klik op “Setup Wizard” om de configuratie van de Print Server te beginnen. Een
introductie dialoogvenster zal tevoorschijn komen. Klik op “Next” om de
configuratie voort te zetten. U zult het volgende scherm zien:

NEDERLANDS
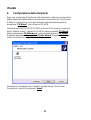
6
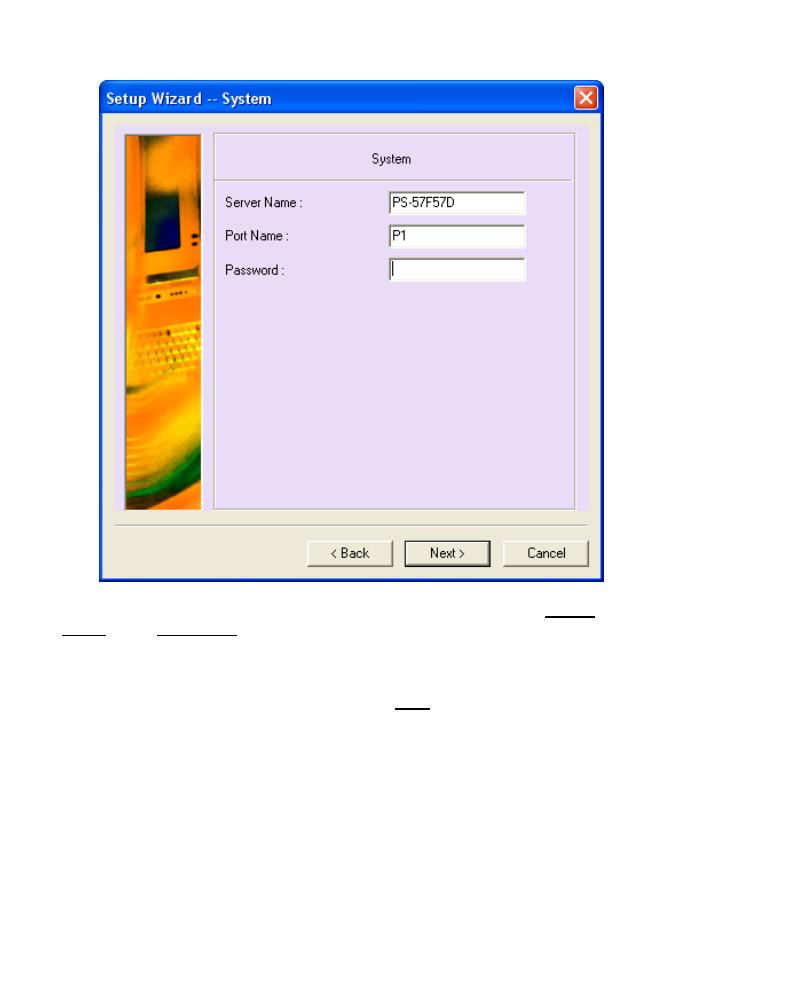
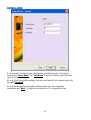
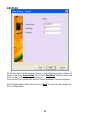
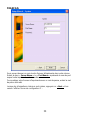
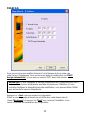
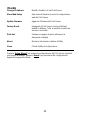
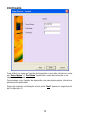
U kunt hier de Print Server een naam binnen uw netwerk geven. Deze kunt u
invoeren bij “Server Name”. De “Port Name” is voor de naam van de USB poort
op de Print Server.
Als u de Print Server wilt beveiligen met een wachtwoord kunt u deze invoeren bij
het veld “Password”.
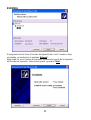
Als u de bovenstaande informatie heeft ingevuld kunt u de configuratie
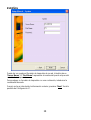
voortzetten met “Next”. U krijgt het venster met de IP Configuratie te zien:

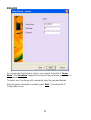
NEDERLANDS
7
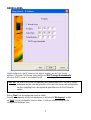
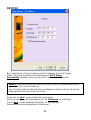
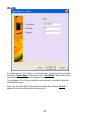
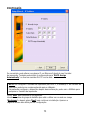
Indien nodig kunt u het IP adres en het subnet masker van de Print Server
wijzigen. U kunt de Print Server ook instellen op “DHCP Assign Automatically”
als u een DHCP server in uw netwerk heeft.
LET OP: Als u de Print Server configureert voor gebruik met DHCP zal het IP adres
onbekend worden voor de gebruiker. Als u de Print Server wilt configureren
na deze instelling kunt u de applicatie gebruiken om de Print Server te
vinden.
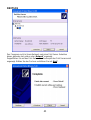
Klik op “Next” om de configuratie voort te zetten.
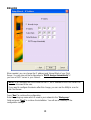
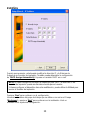
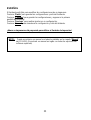
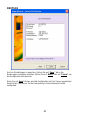
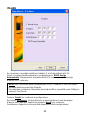
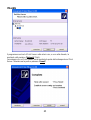
Voer bij het volgende scherm uw werkgroep in bij het veld “Workgroup” en klik
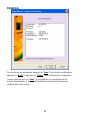
op “Next” om de configuratie voort te zetten. U zult een samenvatting van de
configuratieinstellingen zien:

NEDERLANDS
8
Om de instellingen te bewaren, klik op “Save”. Om wijzigingen te maken in de
configuratie, klik op “Back” of klik op “Cancel” als u de configuratie wilt afbreken.
Als u op “Save” klikt wordt de configuratie opgeslagen in de Print Server. De Print
Server is nu correct geconfigureerd voor uw netwerk.

NEDERLANDS
9
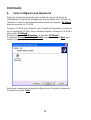
8. Uw Printer Configureren
Als de Print Server is geconfigureerd dient u de stuurprogramma’s van de printer
te wijzigen voor gebruik met de Print Server. Dit kunt u automatisch laten doen
met het programma “PS Wizard”, welke op de CD-ROM gevonden kan worden.
Plaats de meegeleverde CD-ROM van uw Conceptronic Print Server in uw CD-
ROM speler. Start Windows Verkenner, navigeer naar de CD-ROM en open de
map “PS Wizard”.
Voer het programma “PS Wizard.exe” in the map “PS Wizard” uit.
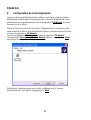
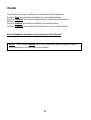
Het programma “Conceptronic Printer Wizard” zal gestart worden. Klik op
“Next” om te beginnen met de configuratie van uw printer:
Selecteer de printer die u wilt configureren voor gebruik met de Conceptronic
Print Server en klik op “Next”.

NEDERLANDS
10
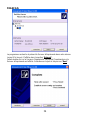
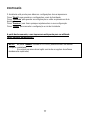
Het programma zal zoeken naar uw Print Server binnen uw netwerk. Als deze
gevonden wordt zal deze weergegeven worden onder “Network”.
Dubbelklik op de Print Server. De Printer Poort van de Print Server zal
weergegeven worden. Selecteer de poort en klik op “Next”.

NEDERLANDS
11
De Wizard is nu klaar om uw printerinstellingen te wijzigen.
Klik op “Finish” om de instellingen op te slaan en de Wizard af te sluiten.
Klik op “Continue” om de instellingen op te slaan en terug te keren naar het
begin van de Wizard.
Klik op “Previous” om wijzigingen te maken in de voorgaande configuratie.
Klik op “Cancel” om de configuratie af te breken en de Wizard af te sluiten.
Uw printer is nu klaar voor gebruik met de Print Server
LET OP: Een uitgebreide handleiding kan gevonden worden in de map “Manual” op
de CD-ROM. (U kunt hier een Engelse handleiding vinden met daarin een
uitleg van alle opties van de software)

ENGLISH
12
Conceptronic CPSERVU
Quick Installation Guide
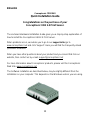
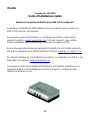
Congratulations on the purchase of your
Conceptronic USB 2.0 Print Server.
The enclosed Hardware Installation Guide gives you a step-by-step explanation of
how to install the Conceptronic USB 2.0 Print Server.
When problems occur, we advise you to go to our support-site (go to
www.conceptronic.net and click ‘Support’. Here you will find the Frequently Asked
Questions Database.
When you have other questions about your product and you cannot find it at our
website, then contact us by e-mail: support@conceptronic.net
For more information about Conceptronic products, please visit the Conceptronic
Web Site: www.conceptronic.net
The Software installation as described below, may be slightly different from the
installation on your computer. This depends on the Windows version you are using.

ENGLISH
13
1. Introduction
Congratulations on purchasing the Conceptronic Print Server, the easiest and fastest
way to deploy printers on your network.
This USB Print Server enables you to easily add a USB printer to your network. After
installation, the printer can be used by any computer user inside the network without
the need to have the printer connected to a computer.
The Print Server is equipped with a network port in order to connect to network
devices (for example a switch, network card or hub).
When you connect the Print Server to a wireless router, the Print Server even works
wireless!
2. General Features
• Compliant with USB 1.1/2.0 Hi-speed
• Equipped with a 10/100 auto-MDIX Fast Ethernet LAN port
• Multi protocol support is ideal for shared printing in mixed-LAN environments
• Windows-based program makes it possible to set up the Print Server in just a few
minutes.
• LPR program for Windows 95/98/Me TCP/IP printing
• IP assignment support for DHCP
• Support Web configuration
• Flash memory for easy firmware upgrade
• Support IPP for Windows 2000/XP
• Support second http port for remote web configuration and IPP printing.
• Support Mac OS 10.2 "Rendezvous" zero-configuration feature
3. System Requirements
Operating System:
• Microsoft Windows 95/98/ME/NT/2000/XP/2003.
• Apple Mac OS X or above
For Web Configuration:
• Java-enabled web browser, such as Microsoft® Internet Explorer 5.0,
Netscape Navigator 6.0 or Mozilla Firefox 1.x

ENGLISH
14
4. Package Contents
The following items are present in the package of the Conceptronic Print Server:
• Conceptronic Print Server
• Power Supply 5V DC, 2,5A
• Multi Language Quickstart Manual
• CD-ROM with software
5. Hardware installation
1. Make sure your printer is working normally on your computer before you
proceed.
2. Power down the printer and disconnect the printer from the computer.
3. Connect the printer with the USB cable to your Conceptronic Print Server.
4. Connect a LAN network cable to your Conceptronic Print Server and your switch
or router.
5. Power-on the Printer and connect the power supply to the Conceptronic Print
Server.
NOTE:
Your Conceptronic Print Server is equipped with a default IP address. This IP address
can be different than the IP Range in your network, or it can give a conflict with a device
in your network with the same IP Address.
To prevent this, you can use the Conceptronic Print Server Utility to change the IP
address of the Print Server. By default, the IP address of the Print Server is: 192.168.0.2
6. Software Installation
1. Place the CD-ROM delivered with the Conceptronic Print Server in
your CD-ROM drive.
2. Open Windows Explorer, navigate to the CD-ROM and open the
folder “PS Utility”.
3. Execute “Setup.exe” from the directory “PS Utility” and complete
the installation steps on your screen.
4. After installation, you can find the Configuration Utility for the Print
Server in your ‘Start Menu”.

ENGLISH
15
7. Configuring your Conceptronic Print Server
To configure your Conceptronic Print Server, you can use the installed
Configuration Utility. When you execute the Utility, you will get the following
screen:
1
2
At the left (1), you can see the discovered devices in your network. At the right
(2), you see the information of the selected Print Server.
You have the following selections in the Conceptronic CPSERVU Utility:
Selection Description
Discover Device Refreshes the screen and searches for all
available Print Servers in your network.
Setup Wizard Launches the Setup Wizard to configure the Print
Server.
Change IP Address Changes the IP Address of the Print Server

ENGLISH
16
Show Web-Setup Launches your Internet Explorer and opens the
web configuration of the Print Server.
Update Firmware Updates the firmware for your Print Server.
Factory Reset Resets the Print Server to its factory default
settings. All changes made will be erased.
Print test Prints a test page on the connected printer.
About Shows information about the Utility
Close Closes the Configuration Utility.
Press “Setup Wizard” to begin with the configuration of the Print Server. An
introduction Dialog Box will appear. Press “Next” to continue the configuration.
You will see the following screen:
ENGLISH
17
You can give the Print Server a name in your network. Enter this at “Server
Name”. The “Port Name” represents the name of the port where your printer is
connected to.
To protect your Print Server with a password, enter the password desired.
When the above information is entered, press “Next”. You will see the IP
Configuration screen.

ENGLISH
18
When needed, you can change the IP address and Subnet Mask of your Print
Server. You can also set the configuration to “DHCP Assign Automatically” if
you have a DHCP server in your network.
NOTE: If you configure the Print Server for DHCP, the IP address of the Print Server can
become unknown to the user.
If you want to configure the device after this change, you can use the Utility to scan for
the Print Server.
Press “Next” to continue the configuration.
Enter the workgroup name which is used in your network in the “Workgroup”
Field and press “Next” to continue the installation. You will see a summary of the
configuration settings:

ENGLISH
19
To save your settings, press “Save”. To make any changes, press “Back”, or
press “Cancel” to abort the configuration.
When you press “Save”, the configuration will be saved in the Print Server. The
Print Server is now correctly configured for your network.

ENGLISH
20
8. Configuring your Printer
When the Print Server is configured, you need to adjust the installed printer
drivers to communicate with the Print Server. You can do this automatically with
the program “PS Wizard”, which can be found on the CD-ROM.
Place the CD-ROM delivered with the Conceptronic Print Server in your CD-ROM
drive. Open Windows Explorer, navigate to the CD-ROM and open the folder “PS
Wizard”.
Run the program “PS Wizard.exe” in the directory “PS Wizard”.
The program “Conceptronic Printer Wizard” will start. Press “Next” to start with
configuring your printer:
Select the printer you want to configure for the Conceptronic Print Server and
press “Next”.
A página está carregando...
A página está carregando...
A página está carregando...
A página está carregando...
A página está carregando...
A página está carregando...
A página está carregando...
A página está carregando...
A página está carregando...
A página está carregando...
A página está carregando...
A página está carregando...
A página está carregando...
A página está carregando...
A página está carregando...
A página está carregando...
A página está carregando...
A página está carregando...
A página está carregando...
A página está carregando...
A página está carregando...
A página está carregando...
A página está carregando...
A página está carregando...
A página está carregando...
A página está carregando...
A página está carregando...
A página está carregando...
A página está carregando...
A página está carregando...
A página está carregando...
A página está carregando...
A página está carregando...
A página está carregando...
A página está carregando...
A página está carregando...
A página está carregando...
A página está carregando...
A página está carregando...
A página está carregando...
A página está carregando...
A página está carregando...
A página está carregando...
A página está carregando...
A página está carregando...
A página está carregando...
A página está carregando...
A página está carregando...
A página está carregando...
A página está carregando...
A página está carregando...
A página está carregando...
A página está carregando...
A página está carregando...
A página está carregando...
A página está carregando...
A página está carregando...
-
 1
1
-
 2
2
-
 3
3
-
 4
4
-
 5
5
-
 6
6
-
 7
7
-
 8
8
-
 9
9
-
 10
10
-
 11
11
-
 12
12
-
 13
13
-
 14
14
-
 15
15
-
 16
16
-
 17
17
-
 18
18
-
 19
19
-
 20
20
-
 21
21
-
 22
22
-
 23
23
-
 24
24
-
 25
25
-
 26
26
-
 27
27
-
 28
28
-
 29
29
-
 30
30
-
 31
31
-
 32
32
-
 33
33
-
 34
34
-
 35
35
-
 36
36
-
 37
37
-
 38
38
-
 39
39
-
 40
40
-
 41
41
-
 42
42
-
 43
43
-
 44
44
-
 45
45
-
 46
46
-
 47
47
-
 48
48
-
 49
49
-
 50
50
-
 51
51
-
 52
52
-
 53
53
-
 54
54
-
 55
55
-
 56
56
-
 57
57
-
 58
58
-
 59
59
-
 60
60
-
 61
61
-
 62
62
-
 63
63
-
 64
64
-
 65
65
-
 66
66
-
 67
67
-
 68
68
-
 69
69
-
 70
70
-
 71
71
-
 72
72
-
 73
73
-
 74
74
-
 75
75
-
 76
76
-
 77
77


em outras línguas
- español: Support Conceptronic Guía de instalación
- français: Support Conceptronic Guide d'installation
- italiano: Support Conceptronic Guida d'installazione
- Nederlands: Support Conceptronic Installatie gids
- Deutsch: Support Conceptronic Installationsanleitung
Outros documentos
-
Conceptronic C54NETCAM Guia de instalação
-
-
-
-
-
Conceptronic CM3GD1T Manual do usuário
-
Conceptronic Media Giant Pro, 500GB Manual do usuário
-
-
-
Conceptronic C300RU V3 Manual do usuário