
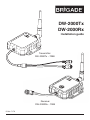
DW-2000Tx
DW-2000Rx
Installation guide
IG No. 7170
Transmitter
DW-2000Tx - 7088
Receiver
DW-2000Rx - 7089

1 Kit Contents & Specications
DW-2000Tx Transmitter Kit - 7088
Digital Wireless System -
Transmitter Kit DW-2000Tx 7088
Digital Wireless System -
Transmitter Only DW-2000Tx-M 7123
WiFi Antenna for DW-2000Tx
& DW-2000Rx DW-2000-WiFi 7092
Fixing Kit for DW-2000Tx
& DW-2000Rx DW-2000-Fix 7125
Digital Wireless Installation Guide DW-2000-IG 7170
Power Cable for DW-2000Tx DW-2000Tx-PC 7093
DW-2000Rx Receiver Kit - 7089
Digital Wireless System -
Receiver Kit DW-2000Rx 7089
Digital Wireless System -
Receiver Only DW-2000Rx-M 7124
WiFi Antenna for DW-2000Tx
& DW-2000Rx DW-2000-WiFi 7092
Fixing Kit for DW-2000Tx
& DW-2000Rx DW-2000-Fix 7125
Digital Wireless Installation Guide DW-2000-IG 7170
DW-2000Tx Transmitter - Specications
TV System (AV IN) AHD720P/1080P/CVBS - AUTO
Power Supply 12-32Vdc
Power Out 12V out to Camera
Power Consumption 12W (at 12Vdc)
Current Consumption 1040mA
Operating Frequency 2400-2483.5MHz
RF Bit Rate 6 Mbps
Spread Spectrum FHSS
Time Delay 200ms
Ingress Protection IP69K
Operating Temperature -20°C - +70°C
Storage Temperature -30°C - +80°C
Weight 460g
Dimensions (W x H x D) 105mm x 106mm x 25.2mm
(Excluding Antenna)
DW-2000Rx Receiver - Specications
TV System (AV IN) AHD/CVBS
Power Supply 12-24Vdc (From Monitor or DVR)
Power Consumption 1.5W (at 12Vdc)
Current Consumption 124mA
Operating Frequency 2400-2483.5MHz
RF Bit Rate 6 Mbps
Spread Spectrum FHSS
Time Delay 200ms
Ingress Protection IP69K
Operating Temperature -20°C - +70°C
Storage Temperature -30°C - +80°C
Weight 420g
Dimensions (W x H x D) 105mm x 106mm x 25.2mm
(Excluding Antenna)
2 Product Features
DW-2000Tx - 7088 Transmitter LED Indications
Power The “POWER” indicator turns red when
power is on.
Pairing mode “PAIRING” indicator turns blue and ashes.
Pairing success The “PAIRING” indicator turns blue and stays on.
DW-2000Rx - 7089 Receiver LED Indications
Power The “POWER” indicator turns red when
power is on.
Pairing mode Press “PAIR” button for 3 seconds, the “PAIRING”
indicator turns blue and ashes.
Pairing success The “PAIRING” indicator turns blue and stays on.
3 Storage & Operating Precautions
Storage and Keeping
1. Do not expose the device to excessive heat or cold. The storage temperature of this
device is -30~+80℃,and the operating temperature is -20~+70℃.The humidity is
Rh90﹪.
2. Avoid dropping or striking this device.
3. Avoid using this device in enclosed spaces, areas with excessive vibration or subjecting
this device to severe impacts.
4. Do not place cables where they may be pinched or stepped on.
5. The device is designed to be water-resistant, but not for underwater application.
Operating Precautions
1. The device may be powered by a 12 or 24 volt automotive battery or vehicle electrical
system.
2. Make sure all cables are connected properly. Observe polarity. Improper cable
connections may damage the device.
Hereby, Brigade Electronics Group PLC declares that the radio equipment
type DW-2000Tx & DW-2000Rx is in compliance with Directive 2014/53/EU
and Regulation S.I.
2017/1206.The full text of the EU and UK declaration of conformity is
available by scanning the QR code:
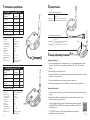
"PAIR" button
Scan for more
information
2 3

Monitor
Camera
CameraTransmitterReceiver
Example Set Up:
Receiver
Monitor Camera Input
System Diagram:
Red Cable (Input Power)
Black (GND)
Note: Auxiliary Power Cable required for Transmitter (Supplied in kit)
Red Cable
Black Cable
Transmitter
Camera
4 Operating Instructions
4 5

6 7
1. Connect the camera to the transmitter. Connect 12-32V DC to the transmitter. When the
transmitter is powered, the red POWER LED will turn on.
2. Connect the receiver to the monitor via one of the video inputs. When the receiver is
powered, the red POWER LED will turn on.
3. When the receiver or transmitter is powered on, it will always try to connect to the last
paired device. It will attempt to do this for 8 seconds. If either cannot nd a previously
paired device, both will stay in pair mode for 20 seconds and look for another device.
To pair, both devices need to be in pair mode.
To reinstate pair mode on the transmitter, you must cycle the power. For the receiver,
either cycle the power or press the PAIR button for 3 seconds.
4. When either device is in pair mode, the blue PAIRING LED ashes. The monitor should
show the below. After 20 seconds of searching in pair mode, the blue PAIRING LED will
go o.
If pairing was successful then the blue PAIRING light will stay on.
4 Operating Instructions - Continued
5
4) If the receiver does not pair with a transmitter, or if the receiver
cannot receive signal from the transmitter, the receiver will display a
picture which indicates “LOST LINK”.
5) If the transmitter does not have a connected camera, or if the camera
is broken, the receiver will display a picture which indicates “NO
INPUT”.
6) The video output of the receiver will automatically match the format of
the camera which is connected to the transmitter (e.g., if a 1080P
camera is connected to the transmitter, the transmitter will output a
AHD 1080P video signal).
7) Double-click the "PAIR" button to switch the mirror image.
5. If the receiver does not pair with the transmitter, or if the receiver cannot receive signal
from the transmitter, the receiver will display the below, with LOST LINK on the monitor.
6. If the transmitter and receiver are paired, but no camera is connected/broken,
the receiver will display the below on the monitor, with NO INPUT shown.
7. The video output from the receiver to the monitor will automatically match the format of
the camera connected to the transmitter. For example, if a 1080P camera is connected
to the transmitter, the receiver will output a AHD 1080P video signal to the monitor.
8. To mirror the image, double click the “PAIR” button on the receiver. This may also be
changed via the monitor settings.
5
4) If the receiver does not pair with a transmitter, or if the receiver
cannot receive signal from the transmitter, the receiver will display a
picture which indicates “LOST LINK”.
5) If the transmitter does not have a connected camera, or if the camera
is broken, the receiver will display a picture which indicates “NO
INPUT”.
6) The video output of the receiver will automatically match the format of
the camera which is connected to the transmitter (e.g., if a 1080P
camera is connected to the transmitter, the transmitter will output a
AHD 1080P video signal).
7) Double-click the "PAIR" button to switch the mirror image.

DW-2000Tx - 7088, DW-2000Rx - 7088_9 Installation Guide
www.brigade-electronics.com
Serial No: Part No:
Specications subject to change. Sous réserve de modications techniques. Änderungen an den technischen
Daten vorbehalten. Speciche soggette a variazioni. Las especicaciones están sujetas a cambios. Wijzigingen in
specicaties voorbehouden. As especicações estão sujeitas a alterações. Спецификация может изменяться.
Disclaimer
Camera monitor systems are an invaluable driver aid
but do not exempt the driver from taking every normal
precaution when conducting a manoeuvre. No liability
arising out of the use or failure of the product can in any
way be attached to Brigade or to the distributor.
Dénégation
Les systèmes de moniteurs des caméras sont une aide
précieuse pour le conducteur, mais celui-ci doit toutefois
prendre toutes les précautions nécessaires pendant les
manœuvres. Brigade ou ses distributeurs n’assument
aucune responsabilité résultant de l’utilisation ou d’un
défaut du produit.
Haftungsausschluss
Kamera-Monitor-Systeme sind für den Fahrer eine
unschätzbare Hilfe, ersetzen aber beim Manövrieren
keinesfalls die üblichen Vorsichtsmaßnahmen. Für
Schäden aufgrund der Verwendung oder eines Defekts
dieses Produkts übernehmen Brigade oder der
Vertriebshändler keinerlei Haftung.
Condizioni di Utilizzo
I sistemi di telecamere e monitor costituiscono un
prezioso ausilio alla guida, ma il conducente deve
comunque assicurarsi di prendere tutte le normali
precauzioni quando esegue una manovra. Né Brigade
né il suo distributore saranno responsabili per eventuali
danni di qualsiasi natura causati dall’utilizzo o dal
mancato utilizzo del prodotto.
Aviso legal
Aunque los sistemas de cámaras con pantalla
constituyen una valiosa ayuda, no eximen al conductor
de tomar todas las precauciones normales al hacer una
maniobra. Brigade y sus distribuidores comerciales no se
responsabilizan de cualquier daño derivado del uso o de
un mal funcionamiento del producto.
Declinación de responsabilidad
Os sistemas de monitoria da câmera são uma ajuda
incalculável ao motorista, mas não dispensam o
motorista de tomar todas as precauções normais ao
realizar uma manobra. Nenhuma responsabilidade
decorrente do uso ou falha do produto pode de forma
alguma ser atribuída ao Brigade ou ao distribuidor.
Verwerping
De camera-monitorsystemen zijn een waardevolle
hulp voor de bestuurder, maar ontheen hem echter
niet van de verplichting om het voertuig zorgvuldig te
manoeuvreren. Brigade en zijn distributeurs zijn niet
aansprakelijk voor schade door gebruik of het niet
functioneren van het product.
Отказ от обязательств
Системы камерного слежения являются крайне
полезным средством помощи водителю, но не
освобождают водителя от обязанности соблюдения
всех необходимых мер предосторожности при
совершении маневра. На компанию Brigade или
распространителя продукции не налагается
никакая ответственность, возникающая по причине
использования или неисправности данного продукта.
-
 1
1
-
 2
2
-
 3
3
-
 4
4
-
 5
5


Brigade DW-2000TX (7088) Guia de instalação
- Tipo
- Guia de instalação
- Este manual também é adequado para
em outros idiomas
Outros documentos
-
BABYMOOV A014411 Instructions For Use Manual
-
-
 Vieta Audio VHP-WT400BK Manual do usuário
-
Voyager WVRXCAMTC Manual do proprietário
-
 ASA Electronics WVOM713AP Manual do usuário
-
Dometic VT150DIG Instruções de operação
-
 Oliver Travel Trailers Voyager Rear Camera Manual do proprietário
-
Yamaha Audio WX-010BL Manual do usuário
-
Yamaha RX-V385 Manual do proprietário
-
Avantree BTTC-6190 Manual do usuário


