Panasonic CZ-RE2C2 Manual do usuário
- Categoria
- Aquecedores de ambiente
- Tipo
- Manual do usuário
Este manual também é adequado para

Save These Instructions!
Conserver ce mode d’emploi!
Diese Anleitung aufbewhren!
Conservare queste istruzioni!
Guarde estas instruções!
Εκτός αττό αυτές τις οδηγίες!
Guarde estas instruccónes!
Сохраните эту инструкцию!
Збережіть ці інструкції!
MANUAL DI ISTRUZIONI
ΟΔΗΓΙΕΣ ΧΡHΣHΣ
INSTRUCTION MANUAL
MANUEL D’INSTRUCTIONS
BEDIENUNGSANLEITUNG
MANUAL DE INSTRUCCIONES
CZ-RE2C2
MANUAL DE INSTRUÇÕES
ИНСТРУКЦИЯ ПО ЭКСПЛУАТАЦИИ
ПОСІБНИК КОРИСТУВАЧА
EN
RU
UK
FR
DE
IT
PT
GR
ES
Simplified Remote Controller For Split System
Air Conditioner
Télécommande simplifiée pour climatiseur à
deux blocs
Vereinfachte Fernbedienung für Split-System-
Klimagerät
Telecomando semplificato per condizionatore
d’aria a sistema split
Controlador remoto simplificado para o
aparelho de ar condicionado de sistema split
Απλοποιημένο Τηλεχειριστήριο Για Κλιματιστικό
Αέρος Διαιρετού Συστήματος
Mando a distancia simplificado para el sistema
de aire acondicionado de dos unidades
Упрощенный пульт дистанционного управления
для сплит-системы кондиционирования
Спрощений пульт дистанційного керування
для кондиціонерів роздільного типу
85464609074024

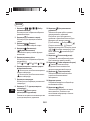
Contents
Содержание
Зміст
1. Important Safety Instructions.....................EN-1 3. Outing Function ...................................EN-4
2. Names and Operations .............................EN-2
1. Важные инструкции по безопасности ....RU-1 3. Функция выключения.........................RU-4
2. Названия и операции ..............................RU-2
1. Важливі заходи безпеки ..........................UK-1 3. Режим «Порожня кімната»................ UK-4
2.
Елементи управління, режими роботи та індикації
...UK-2
1.
Instrucciones de seguridad importantes
....ES-1 3. Función de control de la temperatura...ES-4
2. Nombres y funciones.................................ES-2
1. Σημαντικές οδηγίες για την ασφάλεια ........GR-1 3. Λειτουργία εξόδου αέρα....................... GR-4
2. Ονομασίες και λειτουργίες .........................GR-2
1. Instruções de segurança importantes .......PT-1 3. Função de controlo.............................. PT-4
2. Nomes e operações ..................................PT-2
1. Importanti istruzioni di sicurezza ...............IT-1 3. Funzione stanza vuota ........................IT-4
2. Nomi e operazioni .....................................IT-2
1. Wichtige Sicherheitshinweise....................DE-1 3. Outing-Funktion ................................... DE-4
2. Bezeichnungen und Funktionen................DE-2
1. Mesures de sécurité importantes ..............FR-1 3. Fonction de maintien ........................... FR-4
2. Noms et fonctionnement ...........................FR-2
Indice
Índice
índice
EN
FR
DE
IT
PT
GR
ES
RU
UK
Table des matières
Inhalt
Πίνακας περιεχομένων

EN-1
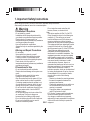
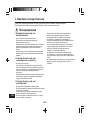
1. Important Safety Instructions
Before using the system, be sure to read these “Important Safety Instructions”.
After reading this manual, save it in a convenient place.
Warning
・Do not wipe the remote controller with
benzine, thinner, or chemical cloth.
Note:
・
This device complies with Part 15 of the FCC
Rules. Operation is subject to the following two
conditions: (1) This device may not cause
harmful interference, and (2) this device must
accept any interference received, including
interference that may cause undesired operation.
・ This equipment has been tested and found to
comply with the limits for a Class B digital
device, pursuant to part 15 of the FCC Rules.
These limits are designed to provide
reasonable protection against harmful
interference in a residential installation. This
equipment generates, uses and can radiate
radio frequency energy and, if not installed
and used in accordance with the instructions,
may cause harmful interference to radio
communications. However, there is no
guarantee that interference will not occur in a
particular installation. If this equipment does
cause harmful interference to radio or
television reception, which can be determined
by turning the equipment off and on, the user
is encouraged to try to correct the interfer-
ence by one or more of the following
measures:
・ Reorient or relocate the receiving antenna.
・ Increase the separation between the
equipment and receiver.
・ Connect the equipment into an outlet on a
circuit different from that to which the
receiver is connected.
・ Consult the dealer or an experienced
radio/TV technician for help.
・
FCC Caution: To assure continued compliance,
follow the attached installation instructions.
Any changes or modifications not expressly
approved by the party responsible for compliance
could void the user’s authority to operate this
equipment.
*Installation Precautions
・Do not install by yourself.
Installation should always be performed by
your dealer or a professional service provider.
Electric shock or fire may result if an
inexperienced person performs any installation
or wiring procedures incorrectly.
・Use only specified air conditioners.
Always use only air conditions specified by the
dealer.
*Moving and Repair Precautions
・Do not repair.
Never repair the system by yourself.
・
Contact your dealer before moving the system.
Contact your dealer or a professional service
provider about moving and reinstalling the system.
Electric shock or fire may result if an
inexperienced person performs any installation
procedures incorrectly.
*Precautions for Use
・Do not touch switches with wet hands.
Electric shock and damage to the system can
result.
・Protect the remote controller from water.
Damage to the system can result.
・Stop the system and turn the power off if you
sense unusual smells or other irregularities.
Continuing operation when the system is out
of order can result in electric shock, fire,and
damage to the system. Contact your dealer.
・Do not turn the air conditioner on and off from
the power mains switch. Use the ON/OFF
operation button.
・Do not stick anything into the air outlet of the
air conditioner. Doing so is dangerous
because the fan is rotating at high speed.
・
Do not let children play with the air conditioner.
・Do not cool or heat the room too much if
babies or invalids are present.
EN

EN-2
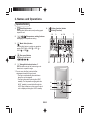
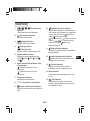
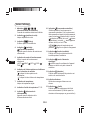
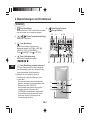
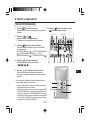
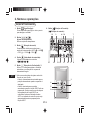
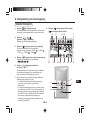
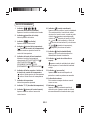
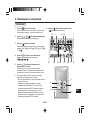
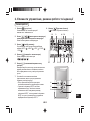
2. Names and Operations
Operation Section
1. (Start/Stop) button
Pushing this button starts, and pushing again
stops the unit.
2. (Temperature setting) buttons
Changing the temperature setting.
3. (Mode Select) button
Pushing this button to select an operation
mode. (AUTO → HEAT → DRY →
COOL → FAN ).
4. (Fan speed) button
Changing the fan speed.
( / / / )
5. (Swing/Air direction) button *1
Use this button to set the auto swing or air
direction to a specific angle.
*1 Do not move the flap (vertical airflow
adjustment board) with your hand.
・The flap is automatically directed down
when the unit is stopped.
・The flap is directed up during the HEAT
standby. The flap starts swinging after the
HEAT standby is cancelled, although the
AUTO flap indication on the remote control
unit is displayed during the HEAT standby.
6. (Outing function) button
( Outing Function)
4
5
6
3
2
1
14 12
5
7
3
8
6
910
4
1113
1
15
2
EN

EN-3
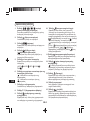
14. Alarm indication
This displays alarm messages when an error
occurs.
5. Operation Mode indication
Displays the selected operation mode.
(AUTO /HEAT /DRY /COOL /
FAN ).
7. Temperature indication
Indicates the set temperature.
8. °F / °C (Temperature unit) indication
Display Section
1.
(Fan mode select)
indication
The selected fan mode is displayed.
/ / /
4. (Outing) indication
( Outing Function)
Appears when the outing function is set.
2. (Flap position) indication
Indicates the flap position.
6. Upper and lower limit indication of the
outing function
: Indicates the upper limit of the
temperature
: Indicates the lower limit of the
temperature
9. (Remote control sensor) indication
Appears when the remote control sensor is
used.
10. (Centralized control) indication
Appears when operated in centralized control.
If the remote control operation is not permitted
to the remote unit, when the (Start/Stop)
button, (Mode select) button,
(Fan speed) button, (Swing/Air direction)
button or (Temperature setting)
buttons are pressed, flashes and
rejects the change.
11. (Disabled feature) indication
Displayed if the selected feature was disabled
during installation.
13. (Caution) indication
Appears when the protective device is
activated or when an abnormality occurs.
15. (Oil) indication
Appears when the engine oil needs to be
changed. (Appears when the gas heat pump
air conditioner is used.)
3. (Swing) indication
Appears while the flap swings.
12. (Heating standby mode) indication
appears when the fan of the indoor unit is
stopped or in low fan speed.
EN

EN-4
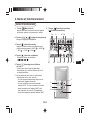
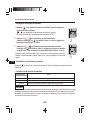
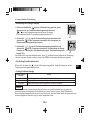
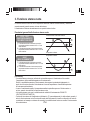
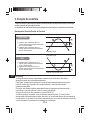
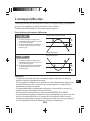
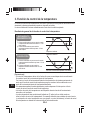
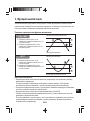
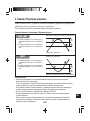
Outing function is a function that prevents the room temperature from increasing too much (or
decreasing too much) when no one is in the room.
An air conditioner works automatically if this function is set effective.
3. Outing Function
COOL / DRY
① The air conditioner starts operation when the room
temperature increases up to –1°C of the upper
limit.
② The air conditioner stops operation when the room
temperature decreases up to –2°C of the upper
limit.
Room temperature
Outing function upper limit
HEAT
① The air conditioner starts operation when the room
temperature decreases up to +1°C of the lower
limit.
② The air conditioner stops operation when the room
temperature increases up to +2°C of the lower
limit.
Room temperature
Outing function Lower limit
General Performance of the Outing Function
[Precautions]
・The outing control only starts/stops the air conditioner. It does not change the operation mode/
temperature setting.
Therefore, the operation mode/temperature needs to be set beforehand so that the outing function
turns on the air conditioner with your desired operation mode/ temperature setting.
・If the room temperature rapidly changes, the room temperature may get over the upper or lower limit
when the outing function is activated.
・The outing function is invalid during FAN/AUTO operation mode.
・The air conditioner’s stop order (stated in ② ⁄ above) is valid only when the outing function is
operated.
If operated using other remote control units (or a centralized control device such as a system control),
the outing function will not stop air conditioner operation.
EN
EN

EN-5
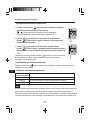
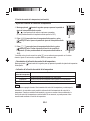
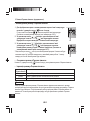
• Canceling the outing function
Press and hold for more than 4 seconds while the outing function is set.
• Outing function indication
Outing function
indication
Off
Flashing
Lighting
Status
The outing function is not set.
The outing function is now being set, or under operation.
Although the outing function is set, not under operation.
• Setting the Outing Function
Note
If a blackout occurs during outing function operation and power is cut, the remote controller will lose
the information for outing function operation. It reverts from the blackout, and an air conditioner does not
drive in outing function when operation is started. At this time, an air conditioner does not stop at outing
function.
3. Outing Function (Continued)
1.Press and hold for more than 4 seconds to display the upper limit
temperature setting screen.
, and the upper limit temperature start flashing.
(The default value of the upper limit temperature is 38 °C.)
2.Press / to select the upper limit temperature, and press to
fix the value. The lower limit temperature setting screen is displayed.
3.Press / to select the lower limit temperature, and press to
fix the value. The outing function setting is completed. (The default value of
the lower limit temperature is 10 °C.)
*The unit returns to the normal mode if is pressed or there is no operation made for
3 minutes during the setting. In this case, all the settings in progress will be lost.
2
3
EN

FR-1
1. Mesures de sécurité importantes
Lire attentivement ces “Conseils de sécurité” avant d’utiliser le système.
Après la lecture de ce mode d’emploi, le conserver à portée de la main.
Avertissement
*Précautions relatives à
l’installation
*Précautions concernant le
fonctionnement
*Précautions pour le déplacement
et la réparation
・
Ne pas installer soi-même.
L’installation doit toujours être exécutée par le
revendeur ou un agent de service spécialisé.
Une électrocution ou un incendie peut survenir si une
personne inexpérimentée exécute incorrectement les
procédures d’installation ou de câblage.
・
Utiliser uniquement les climatiseurs spécifiés.
Utilisez toujours les climatiseurs spécifiés par le
concessionnaire.
・
Ne pas réparer.
Ne jamais réparer le système soi-même.
・
Contacter son revendeur avant de déplacer le système.
Contacter le revendeur ou un agent de service
professionnel pour le déplacement et la réinstallation du
système.
Une électrocution et des dégâts au système pourraient
survenir si une personne inexpérimentée exécute les
procédures d’installation incorrectement.
・
Ne pas toucher les interrupteurs avec les mains
mouillées.
Une électrocution et des dégâts au système pourraient
en résulter.
・
Protéger la télécommande contre l’eau.
Le système pourraient être endommagé.
・
Arrêter le système et mettre hors tension en cas d’odeur
inhabituelle ou d’autre anomalie.
Poursuivre le fonctionnement quand le système est
hors service peut provoquer une électrocution, un
incendie et des dégâts au système. Contacter le
revendeur.
・
Ne pas mettre le climatiseur sous et hors tension en le
branchant et en le débranchant. Utiliser la touche de
marche/arrêt de fonctionnement (ON/OFF).
・
Ne rien introduire dans la sortie d’air de l’élément
extérieur. Cela est très dangereux car le ventilateur
marche à grande vitesse.
・
Ne pas laisser les enfants jouer avec le climatiseur.
・
Ne pas trop refroidir ou chauffer une pièce où se
trouvent des bébés ou des malades.
・
Ne pas essuyer la télécommande avec de la benzine, un
diluant ou un chiffon imbibé de produit chimique.
FR

6. Touche (Fonction de maintien)
FR-2
2. Noms et fonctionnement
Section de fonctionnement
1. Touche (Marche/Arrêt)
Appuyer sur cette touche pour mettre l’appareil
en marche, appuyer à nouveau pour l’arrêter.
2. Touches (réglage de température)
Change le réglage de température.
3. Touche (sélection de mode)
Appuyer sur cette touche pour sélectionner le
mode de fonctionnement. (AUTO → HEAT
→ DRY → COOL → FAN ).
4. Touche (vitesse du ventilateur)
Change la vitesse de ventilation.
( / / / )
5. Touche (basculage/sens diffusion
de l’air)*1
Cette touche sert à régler le basculage
automatique ou le sens de diffusion de l’air à
un angle spécifique.
*1 Ne pas déplacer de la main le volet (plaque
d’ajustement du flux d’air vertical).
• Le volet est automatiquement dirigé vers le
bas quand l’appareil est arrêté.
• Le volet est dirigé vers le haut pendant
l’attente HEAT. Le volet commence à osciller
après l’annulation de l’attente HEAT, bien
que l’indication de volet AUTO apparaisse
sur la télécommande pendant l’attente HEAT.
( Fonction de maintien)
4
5
6
3
2
1
14 12
5
7
3
8
6
910
4
1113
1
15
2
FR

4. Indication (maintien)
(Fonction de maintien)
Apparaît quand la fonction de maintien est
sélectionnée.
FR-3
14. Indication d’alarme
Affiche des messages d’alarme en cas
d’erreur.
7. Indication de température
Indique la température réglée.
8. Indication d’unité de température °F / °C
Section d’affichage
1. Indication
(sélection de mode de ventilation)
Le mode de ventilation sélectionné s’affiche.
/ / /
2. Indication (position du volet)
Indique la position du volet.
3. Indication (Swing)
S’affiche quand le volet bascule.
6. Indication de limites supérieure et inférieure
pour la fonction de maintien
: Indique la limite supérieure de
température
: Indique la limite inférieure de température
5. Indication du mode de fonctionnement
Affiche le mode de fonctionnement
sélectionné.
(AUTO- /HEAT- /DRY- /COOL- /
FAN- ).
9. Indication (détecteur de la
télécommande)
Apparaît quand le détecteur de la
télécommande est utilisé.
10. Indication (commande centralisée)
S’affiche pendant le fonctionnement en
commande centralisée. Si le fonctionnement
télécommandé est interdit à la télécommande,
quand la touche (Marche/Arrêt), la touche
(sélection de mode), la touche (vitesse
du ventilateur), la touche (basculage/sens
diffusion de l’air) ou les touches
(réglage de température) sont
pressées, clignote et rejette le changement.
11. Indication (fonction invalidée)
S’affiche si la fonction sélectionnée a été
invalidée pendant l’installation.
13. Indication (attention)
S’affiche quand le dispositif de protection est
activé ou en cas d’anomalie.
15. Indication (huile)
S’affiche quand le remplacement de l’huile
moteur est nécessaire. (S’affiche quand un
climatiseur à thermopompe au gaz est utilisé.)
12. Indication (mode d’attente de
chauffage)
s’affiche quand le ventilateur de l’appareil
intérieur est arrêté ou à petite vitesse de
ventilation.
FR

FR-4
3. Fonction de maintien
REFROIDISSEMENT/
DESHUMIDIFICATION
① Le climatiseur se met en marche quand la
température ambiante augmente à –1˚C de la
limite supérieure.
② Le climatiseur s’arrête quand la température
ambiante diminue à –2˚C de la limite
supérieure.
Température ambiante
Limite supérieure de la fonction de maintien
CHAUFFAGE
① Le climatiseur se met en marche quand la
température ambiante diminue à +1˚C de la limite
inférieure.
② Le climatiseur s’arrête quand la température
ambiante augmente à +2˚C de la limite inférieure.
Température ambiante
Limite inférieure de la fonction de maintien
Exécution générale de la fonction de maintien
[Précautions]
・Le contrôle de la sortie contrôle seulement la mise en marche/arrêt du climatiseur. Il ne change
pas le réglage de mode opératoire/température.
Aussi, le mode opératoire/température doit être préalablement réglé de sorte que la fonction de
maintien démarre le climatiseur au réglage de mode opératoire/température souhaité.
・Si la température ambiante change rapidement, elle peut dépasser la limite supérieure ou
inférieure quand la fonction de maintien est activée.
・La fonction de maintien est invalidée en mode de fonctionnement FAN/AUTO.
・L’ordre d’arrêt du climatiseur (défini en / ci-dessus) est valide seulement quand la fonction de maintien
est activée. En opération avec d’autres télécommandes (ou un dispositif de contrôle centralisé comme
système de contrôle), la fonction de maintien n'arrêtera pas le fonctionnement de l’air conditionné.
La fonction de maintien est une fonction qui empêche un augmentation (ou diminution) excessive de la
température ambiante quand quelqu’un se trouve dans la pièce.
Un climatiseur fonctionne automatiquement si cette fonction est réglée efficacement.
FR

FR-5
• Annulation de la fonction de maintien
Maintenez pressé plus de 4 secondes pour afficher l’écran de réglage de la température limite
supérieure.
• Indication de la fonction de maintien
Indication de la
fonction de maintien
Désactivée
Clignotante
Allumée
Etat
La fonction de maintien n’est pas réglée.
La fonction de maintien est en cours de réglage ou activée.
Bien que la fonction de maintien soit réglée, elle n’est pas activée.
• Réglage de la fonction de maintien
Remarque
Si une panne de courant se produit pendant le fonctionnement de maintien et que l’électricité est coupée,
la télécommande perd les informations de fonctionnement de maintien. Elle se rétablit du blackout,et le
climatiseur ne fonctionne pas avec la fonction de maintien au démarrage. A ce moment-là, le climatiseur
ne s’arrête pas aux limites de maintien.
3. Fonction de maintien (suite)
1.Maintenir pressé pendant 4 secondes pour afficher l’écran de réglage de la
température limite supérieure.
, et la température limite supérieure se mettent à clignoter.
(La valeur par défaut de la température limite supérieure est 38°C.)
2.Appuyer sur / pour sélectionner la température limite
supérieure et appuyer sur pour définir la valeur. L’écran de réglage de la
température limite inférieure s’affiche.
3.Appuyer sur / pour sélectionner la température limite inférieure,
et appuyer sur pour définir la valeur. Le réglage de la fonction de maintien
est achevé. (La valeur par défaut de la température limite inférieure est 10°C.)
*L’appareil revient en mode normal si est pressé ou si aucune opération n’est faite
pendant 3 minutes pendant le réglage. Dans ce cas, tous les réglages en cours seront
perdus.
2
3
FR

DE-1
1. Wichtige Sicherheitshinweise
Lesen Sie vor dem Gebrauch des Systems unbedingt diesen Abschnitt „Wichtige Sicherheitshinweise“.
Bewahren Sie diese Anleitung an einem geeigneten Ort auf, nachdem Sie sie gelesen haben.
Warnhinweisen
*Vorsichtsmaßnahmen bei der
Installation
*Hinweise vor dem Gebrauch
*Hinweise für die Neuinstallation
und die Reparatur
・
Nicht selbst installieren.
Die Installation sollte stets von Ihrem Händler oder
einem Fachkundendienst vorgenommen werden.
Eine nicht fachgerecht ausgeführte Installation oder
Verkabelung kann Stromschlag oder Brand
verursachen.
・
Nur die aufgeführten Klimaanlagen verwenden.
Verwenden Sie stets nur die von dem Händler
vorgeschriebenen Klimaanlagen.
・
Führen Sie keine Reparaturen durch.
Versuchen Sie nie, das System selbst zu reparieren.
・
Kontaktieren Sie Ihren Fachhändler, bevor Sie das
System neu installieren.
Kontaktieren Sie Ihren Fachhändler oder eine
professionelle Reparaturwerkstatt, wenn Sie das
System umstellen oder neu installieren möchten. Eine
nicht fachgerecht ausgeführte Installation kann einen
Stromschlag oder Brand verursachen.
・
Berühren Sie keine Tasten mit nassen Händen.
Es könnten Stromschläge entstehen und das System
könnte beschädigt werden.
・
Bringen Sie die Fernbedienung nicht mit Wasser in
Kontakt.
Das System könnte beschädigt werden.
・
Halten Sie das System an und schalten Sie den Strom
ab, wenn ungewöhnliche Gerüche oder andere nicht
ordnungsgemäße Vorgänge auftreten sollten.
Sollten Sie das System trotz einer Störung weiter
benutzen, können Stromschläge, Feuer und
Schäden am System verursacht werden.
Kontaktieren Sie Ihren Fachhändler.
・
Schalten Sie das Klimagerät nicht mit Hilfe des
Netztrennschalters ein und aus.
Verwenden Sie dazu grundsätzlich die
Betriebstaste(ON/OFF).
・
Stecken Sie keine Gegenstände in den Luftauslaß
der Außeneinheit. Dies ist gefährlich, weil das
Gebläse mit hoher Drehzahl rotiert.
・
Lassen Sie nicht zu, daß Kinder mit diesem Gerät
spielen.
・
Achten Sie stets darauf, den Raum nicht zu stark zu
kühlen oder heizen, wenn Kleinkinder oder Kranke
anwesend sind.
・
Fernbedienung nicht mit Benzin, Verdünnung, oder
chemischen Tüchern abwischen.
DE

DE-2
2. Bezeichnungen und Funktionen
Bedienung
1. -Taste (Start/Stopp)
Drücken Sie diese Taste, um das Gerät zu starten
und noch einmal, um es wieder zu stoppen.
2. -Tasten(Temperatureinstellung)
Ändern der Temperatur.
3. -Taste (Betriebsart)
Durch Drücken dieser Taste wird eine
Betriebsart gewählt. (AUTO → HEAT
(HEIZEN) → DRY (TROCKNEN) →
COOL (KÜHLEN) → FAN (LÜFTER)).
4. -Taste (Lüftungsleistung)
Ändern der Lüftergeschwindigkeit.
( / / / )
5. -Taste (Einstellung Lamellen/Luftstrom) *1
Mit dieser Taste können Sie die automatische
Lamellenbewegung oder die Luftstromrichtung
in den gewünschten Winkel ausrichten.
*1 Bewegen Sie die Lamellen (Leisten zur
Einstellung des vertikalen Luftstroms) nicht
mit der Hand.
• Die Lamellen werden automatisch abwärts
gerichtet, wenn das Gerät ausgeschaltet wird.
• Während des HEAT (HEIZEN)-
Bereitschaftsmodus werden die Lamellen
aufwärts gerichtet. Wenn der HEAT
(HEIZEN)-Bereitschaftmodus abgebrochen
wird, schwenken die Lamellen auf und ab,
auch wenn die AUTO-Anzeige auf der
Fernbedienung erscheint.
6. -Taste (Outing-Funktion)
( Outing-Funktion)
4
5
6
3
2
1
14 12
5
7
3
8
6
910
4
1113
1
15
2
DE

DE-3
14. Alarmanzeige
Hier werden bei Auftreten eines Fehlerzustands
Alarmmeldungen angezeigt.
7. Temperatur-Anzeige
Zeigt die eingestellte Temperatur an.
8. °F / °C -Anzeige (Temperatureinheit)
Anzeige
-Anzeige (Lüftungsleistung)
Die gewählte Betriebsart wird angezeigt.
1.
/ / /
2. -Anzeige (der Lamellenposition)
Zeigt die Position der Lamellen an.
3. -Anzeige (Schwenk)
Wird angezeigt, wenn die Lamellen in
Bewegung sind.
4. -Anzeige (Outing )
( Outing-Funktion)
Wird angezeigt, wenn die Outing-Funktion
eingestellt ist.
6. Anzeige der Ober- und Untergrenze der
Outing-Funktion
: Zeigt die Obergrenze der Temperatur an
: Zeigt die Untergrenze der Temperatur an.
5. Betriebsartanzeige
Zeigt die gewählte Betriebsart an. (AUTO
/HEAT (HEIZEN) /DRY (TROCKNEN)
/COOL (KÜHLEN)/FAN (LÜFTER)).
9. -Anzeige (Fernbedienungssensor)
Wird angezeigt, wenn der
Fernbedienungssensor benutzt wird.
10. -Anzeige (Zentralkontrol)
Wird angezeigt, wenn mit Zentralkontrolle
gesteuert wird. Falls die Fernbedienung nicht
für die Bedienung der Einheit zugelassen ist
und eine der Tasten für (Start/Stopp),
(Betriebsart), (Lüftungsleistung),
(Einstellung Lamellen/Luftstrom) oder
(Temperatureinstellung) gedrückt
wird, blinkt , und die Änderung wird
nicht übernommen.
11. -Anzeige (der deaktivierten Funktionen)
Wird angezeigt, wenn eine Funktion gewählt
wird, die während der Installation deaktiviert
wurde.
13. -Anzeige (Vorsicht)
Wird angezeigt, wenn eine geschützte Funktion
aktiviert wird oder eine Fehlfunktion auftritt.
15. -Anzeige (Öl)
Wird angezeigt, wenn das Motoröl ausgewechselt
werden muss. (Erscheint nur,wenn ein
Gasheizungs-Klimagerät verwendet wird.)
12. -Anzeige (des
Heizungsbereitschaftsmodus)
erscheint, wenn der Lüfter der Raumeinheit
angehalten wird oder langsam läuft.
DE

DE-4
Die Outing-Funktion verhindert, dass sich die Zimmertemperatur zu sehr aufheizt (oder abkühlt) wenn
keine Person im Zimmer ist.
Das Klimagerät arbeitet automatisch, wenn diese Funktion richtig eingestellt ist.
3. Outing-Funktion
COOL (KÜHLEN)/
DRY (TROCKNEN)
① Das Klimagerät wird eingeschaltet, wenn die
Zimmertemperatur bis auf –1°C der Obergrenze
steigt.
② Das Klimagerät wird ausgeschaltet, wenn die
Zimmertemperatur bis auf –2°C der Obergrenze
fällt.
Zimmertemperatur
Outing-Funktion Obergrenze
HEAT (HEIZEN)
① Das Klimagerät wird eingeschaltet, wenn die
Zimmertemperatur bis auf +1°C der Untergrenze
fällt.
② Das Klimagerät wird ausgeschaltet, wenn die
Zimmertemperatur bis auf +2°C der Untergrenze
steigt.
Zimmertemperatur
Outing-Funktion Untergrenze
Funktionsweise der Outing-Funktion
[Hinweise]
・Die Outing-Kontrolle startet und stoppt das Klimagerät nur. Sie ändert weder die Betriebsart noch die
Temperatureinstellung.
Deshalb muss die Betriebsart oder die Temperatur zuvor eingestellt werden, sodass die Outing-
Funktion das Klimagerät in der gewünschten Betriebsart und Temperatureinstellung einschalten kann.
・Sollte sich die Zimmertemperatur rapide verändern, kann sie die Ober- oder Untergrenze trotz
eingeschalteter Outing-Funktion überschreiten.
・Während des FAN(Gebläse-)/AUTO-Betriebs ist die Outing-Funktion nicht anwählbar.
・Der Stopp-Befehl des Klimageträts (wie in ② ⁄ oben beschrieben) ist nur während des Outing-Betriebs
gültig. Wenn das Gerät mit anderen Fernbedienungen (oder einem Zentralkontrollgerät z.B. bei einer
Systemkontrolle) gesteuert wird, kann die Klimaanlage nicht mit der Outing-Funktion angehalten werden.
DE

DE-5
• Die Outing-Funktion abbrechen
Drücken Sie und halten Sie mehr als 4 Sekunden lang gedrückt, damit die Obergrenze auf der
Temperatureinstellungsanzeige erscheint.
• Outing-Funktion-Anzeige
Outing-Funktion-
Anzeige
Aus
Blinkend
Erleuchtet
Status
Die Outing-Funktion ist nicht eingestellt.
Die Outing-Funktion wird gerade eingestellt oder ist in Betrieb.
Obwohl die Outing-Funktion eingestellt ist, ist sie nicht in Betrieb.
• Einstellung der Outing-Funktion
Hinweis
Wenn es während der Verwendung der Outing-Funktion zu einem Stromausfall kommt, gehen die
Informationen der Fernbedienung für den Betrieb der Outing-Funktion verloren. Nach Rückkehr des
Stroms läuft das Klimagerät nicht mit der Outing-Funktion an, wenn der Betrieb wieder aufgenommen wird,
da das Klimagerät nicht mit der Outing-Funktion angehalten wurde.
3. Outing-Funktion (Fortsetzung)
1.Drücken und halten Sie mehr als 4 Sekunden lang gedrückt, damit
Obergrenze auf der Temperatureinstellungsanzeige erscheint.
, und die Temperaturobergrenze fangen an zu blinken.
(Die Werkeinstellung der Temperaturobergrenze beträgt 38°C.)
2.Drücken Sie / , um die Temperaturobergrenze anzuwählen und
drücken Sie , um die Temperatur einzustellen. Die Untergrenze der
Temperatureinstellungsanzeige erscheint.
3.Drücken Sie / , um die Temperaturuntergrenze anzuwählen und
drücken Sie , um die Temperatur einzustellen. Die Einstellung der Outing-
Funktion ist damit beendet. (Die Werkeinstellung der Temperaturuntergrenze
beträgt 10°C.)
*Das Gerät kehrt in den Normalbetrieb zurück, wenn gedrückt wird oder während der Einstellung 3
Minuten lang keine Eingabe erfolgt. In diesem Fall werden alle laufenden Einstellungen gelöscht.
2
3
DE

IT-1
1. Importanti istruzioni di sicurezza
Prima di usare il sistema, leggere queste “Istruzioni importanti per la sicurezza”.
Dopo aver letto il presente manuale, conservarlo in un luogo adeguato.
Avviso
*Precauzioni per l’installazione
*Precauzioni per l’uso
*Precauzioni per lo spostamento e
la riparazione
・
Non installare da soli.
L’installazione deve essere eseguita sempre da
vostro rivenditore o dal servizio tecnico
specializzato.
Se l’installazione viene eseguita da personale
inesperto o se si esegue l’allacciamento
scorrettamente si possono provocare incendi o
cortocircuiti.
・
Usare solo i condizionatori d’aria specificati.
Usare sempre i condizionatori d’aria specificati da
dal rivenditore.
・
Non riparare.
Non riparare mai il sistema da soli.
・
Contattare il rappresentante di zona prima di
spostare il sistema.
Per operazioni di spostamento e di reinstallazione
del sistema, contattare il rappresentante di zona o
un servizio professionale.
Se un individuo inesperto effettua procedure di
installazione errate, potrebbero verificarsi scosse
elettriche o incendi.
・
Non toccare gli interruttori con le mani bagnate.
Potrebbero verificarsi scosse elettriche e danni al
sistema.
・
Proteggere dall’acqua il telecomando.
Potrebbero verificarsi danni al sistema.
・
Interrompere il sistema e bloccare
l’alimentazione se si notano odori strani o altre
irregolarità.
Un funzionamento prolungato del sistema, in caso di
guasto, può causare scosse elettriche, incendi e
danni al sistema stesso. Contattare il rappresentante
di zona.
・
Non accendete e spegnete il condizionatore d’aria
mediante l’interruttore principale. Usate sempre il
pulsante di funzionamento per
accensione/spegnimento (ON/OFF).
・
Non inserite alcun oggetto nell’uscita d’aria del
condizionatore. Ciò è molto pericoloso, perché la
ventola gira ad alta velocità.
・
Non lasciate giocare i bambini con il condizionatore
d’aria.
・
Non raffreddate o riscaldate eccessivamente la
stanza se ci sono bambini molto piccoli o degli
invalidi.
・Non pulire il telecomando con benzina, diluenti o
panni imbevuti di prodotti chimici.
IT

IT-2
2. Nomi e operazioni
Sezione del funzionamento
1. Pulsante (Avvio/Interruzione)
L’apparecchio si avvia e si interrompe premendo questo
pulsante.
2. Pulsanti
(impostazione della temperatura)
Cambiamento dell’impostazione della temperatura.
3. Pulsante (selezione della modalità)
Premendo questo pulsante si seleziona una modalità
di funzionamento.
(AUTO(AUTOMATICO) → HEAT (RISCALDAMENTO )
→ DRY (DEUMIDIFICAZIONE) → COOL
(RAFFREDDAMENTO) → FAN (VENTILATORE) ).
4. Pulsante (velocità ventilatore)
Cambiamento della velocità del ventilatore.
( / / / )
5. Pulsante (Oscillazione/direzione aria)*1
Usare questo pulsante per impostare l’oscillazione
automatica o la direzione dell’aria, in base ad un angolo
specifico.
*1 Non muovere il deflettore (piastra di regolazione del
flusso d’aria verticale) con la mano.
• Quando l’apparecchio si ferma, il deflettore si sposta
automaticamente verso il basso.
• Il deflettore si sposta verso l’alto durante l’attesa HEAT
(RISCALDAMENTO). Il deflettore inizia ad oscillare
dopo che l’attesa HEAT (RISCALDAMENTO) è stata
annullata, anche se appare l’indicazione del deflettore
in AUTO (AUTOMATICO), sul telecomando, durante
l’attesa HEAT (RISCALDAMENTO).
6. Pulsante (Funzione stanza vuota)
( Funzione stanza vuota)
4
5
6
3
2
1
14 12
5
7
3
8
6
910
4
1113
1
15
2
IT

IT-3
7. Indicazione della temperatura
Indica la temperatura impostata.
8. Indicazione °F / °C (unità di temperatura)
Sezione del display
Indicazione
(selezione della modalità del ventilatore)
Appare la modalità del ventilatore selezionata.
1.
/ / /
4. Indicazione (stanza vuota)
( Funzione stanza vuota)
Appare quando viene impostata la funzione
stanza vuota.
2. Indicazione (posizione del
deflettore)
Indica la posizione del deflettore.
5. Indicazione di modalità di funzionamento
Mostra la modalità di funzionamento
selezionata. (AUTO /HEAT /DRY /
COOL /FAN ).
9. Indicazione (sensore del telecomando)
Appare quando viene utilizzato il sensore del
telecomando.
10. Indicazione (controllo centralizzato)
Appare quando l’apparecchio funziona con
controllo centralizzato. Se l’azionamento
tramite telecomando non è consentito, quando
si premono i pulsanti di (Avvio/Interruzione),
(selezione della modalità),
(velocità ventilatore),
(Oscillazione/direzione aria) o
(impostazione
della temperatura),
lampeggia e la modifica viene rifiutata.
3. Indicazione (oscillazione)
Appare quando il deflettore oscilla.
14. Indicazione di allarme
Visualizza i messaggi di allarme quando si
verifica un errore.
11. Indicazione (funzione disattivata)
Appare se la funzione selezionata è stata
attivata durante l’installazione.
13. Indicazione (avvertimento)
Appare quando il dispositivo protettivo è
attivato o quando si verifica un’anomalia.
15. Indicazione (olio)
Appare quando l’olio del motore deve essere
cambiato. (Appare quando si utilizza un
condizionatore d’aria di una pompa di calore
a gas).
12. Indicazione (modalità di attesa del
riscaldamento)
appare quando il ventilatore
dell’apparecchio interno viene interrotto o in
caso di bassa velocità del ventilatore.
6. Indicazione di limite superiore e inferiore
della funzione stanza vuota
: Indica il limite superiore della temperatura
: Indica il limite inferiore della temperatura
IT
A página está carregando ...
A página está carregando ...
A página está carregando ...
A página está carregando ...
A página está carregando ...
A página está carregando ...
A página está carregando ...
A página está carregando ...
A página está carregando ...
A página está carregando ...
A página está carregando ...
A página está carregando ...
A página está carregando ...
A página está carregando ...
A página está carregando ...
A página está carregando ...
A página está carregando ...
A página está carregando ...
A página está carregando ...
A página está carregando ...
A página está carregando ...
A página está carregando ...
A página está carregando ...
A página está carregando ...
A página está carregando ...
A página está carregando ...
A página está carregando ...
A página está carregando ...
A página está carregando ...
A página está carregando ...
-
 1
1
-
 2
2
-
 3
3
-
 4
4
-
 5
5
-
 6
6
-
 7
7
-
 8
8
-
 9
9
-
 10
10
-
 11
11
-
 12
12
-
 13
13
-
 14
14
-
 15
15
-
 16
16
-
 17
17
-
 18
18
-
 19
19
-
 20
20
-
 21
21
-
 22
22
-
 23
23
-
 24
24
-
 25
25
-
 26
26
-
 27
27
-
 28
28
-
 29
29
-
 30
30
-
 31
31
-
 32
32
-
 33
33
-
 34
34
-
 35
35
-
 36
36
-
 37
37
-
 38
38
-
 39
39
-
 40
40
-
 41
41
-
 42
42
-
 43
43
-
 44
44
-
 45
45
-
 46
46
-
 47
47
-
 48
48
-
 49
49
-
 50
50


Panasonic CZ-RE2C2 Manual do usuário
- Categoria
- Aquecedores de ambiente
- Tipo
- Manual do usuário
- Este manual também é adequado para
em outros idiomas
- español: Panasonic CZ-RE2C2 Manual de usuario
- français: Panasonic CZ-RE2C2 Manuel utilisateur
- italiano: Panasonic CZ-RE2C2 Manuale utente
- Deutsch: Panasonic CZ-RE2C2 Benutzerhandbuch
Artigos relacionados
-
Panasonic CZ-RE2C2 Manual do proprietário
-
-
-
-
-
-
-
-
-