
Hoja de Características
Folha de Caracteristicas
Feature List
Feuille de Caractéristiques
Datenblatt
HE-720/HE-720 E
HE-735/HE-735 E
A página está carregando...
A página está carregando...
A página está carregando...
A página está carregando...

11
PORTUGUÉS
10
6 Prima qualquer tecla para parar o sinal acús-
tico, ligando-se o forno de novo.
7 Coloque os comandos na posição para
desligar o forno.
A qualquer momento pode visualizar a hora de
finalização do cozinhado, premindo as teclas
ou até o símbolo piscar, e pre-
mindo de seguida a tecla . Neste momen-
to, pode modificar a hora de finalização selec-
cionada premindo as teclas ou . A
seguir ouvirá 2 beeps seguidos, como confir-
mação da alteração.
Pode usar esta função mesmo que já esteja a
utilizar o forno. Para tal, siga as instruções
indicadas, excepto a número 4.
Programação da Duração e Fim do Cozinhado
1 Prima as teclas ou até o símbolo
iluminar-se. De seguida prima a tecla
.
2 Seleccione a duração, premindo as teclas
ou .
3 Posteriormente soarão 2 beeps seguidos,
será mostrada a hora actual e o símbolo
permanecerá iluminado.
4 Prima as teclas ou até o símbolo
se iluminar. A seguir prima a tecla
.
5 Seleccione a hora de finalização do cozin-
hado, premindo as teclas ou .
6 Posteriormente soarão 2 beeps seguidos,
será mostrada a hora actual e o símbolo
permanecerá iluminado.
7 Seleccione uma função e uma temperatura
de cozinhado.
8 O forno permanecerá desligado, ficando ilu-
minados os símbolos e . O seu
forno está programado.
9 Quando alcançar a hora de início do cozin-
hado, o forno entrará em funcionamento e
realizar-se-á o cozinhado durante o tempo
seleccionado.
10 Alcançada a hora final que tinha sido pro-
gramada, o forno desligar-se-á, soará um
sinal acústico e os símbolos
e
piscarão.
11 Prima qualquer tecla para parar o sinal
acústico, ligando-se o seu forno de novo.
12 Coloque os comandos na posição para
desligar o forno.
Se desejar modificar a hora de finalização,
prima as teclas ou até se iluminar o
símbolo , e prima a tecla . A partir
deste momento, pode modificar a hora selec-
cionada premindo as teclas ou . A
seguir ouvirá 2 beeps seguidos, como confir-
mação da modificação.
Atenção
No caso de um corte de fornecimento eléctri-
co, será eliminada toda a programação do
relógio electrónico e aparecerá a indicação
00:00 a piscar no relógio. Deverá acertá-lo e
programá-lo de novo.
Funções do Relógio Electrónico
Avisador: Gera um sinal acústico ao fim de
algum tempo, para tal, não é necessário que o
forno esteja a cozinhar.
Duração do Cozinhado: Permite cozinhar
durante um tempo seleccionado; de seguida,
o forno desligar-se-á de forma automática.
Hora de Finalização do Cozinhado: Permite
cozinhar até a uma hora estabelecida, de
seguida, o forno desligar-se-á de forma auto-
mática.
Duração e Fim do Cozinhado: Permite progra-
mar a duração e a hora de finalização do cozin-
hado. Com esta função, o forno colocar-se-á
em funcionamento de forma automática à
hora necessária para cozinhar durante o
tempo seleccionado (Duração), finalizando de
forma automática à hora anteriormente indica-
da. (Fim do Cozinhado).
Programação do Avisador
1 Prima a tecla até o símbolo ilumi-
nar-se. A seguir prima a tecla .
2 Seleccione o tempo após o qual deseja que o
relógio avise, premindo as teclas ou .
3 Posteriormente, soarão 2 beeps seguidos,
será mostrada a hora actual e o símbolo
permanecerá iluminado, indicando que
o avisador já está programado.
4 Decorrido o tempo programado, soará um
sinal acústico e o símbolo começará a
piscar.
5 Prima qualquer tecla para parar o sinal acús-
tico, o símbolo desligar-se-á.
Em qualquer momento, pode visualizar o
tempo restante, premindo as teclas ou
até o símbolo piscar, e premindo de
seguida a tecla . Neste momento, pode
alterar o tempo seleccionado premindo as
teclas ou . A seguir ouvirá 2 beeps
seguidos como confirmação da alteração.
Se desejar ver de forma permanente o tempo
restante até à finalização prima as teclas
ou até o simbolo piscar e prima a tecla
de forma prolongada. O símbolo pis-
cará. Para voltar à hora actual, basta premir de
novo a tecla de forma prolongada.
Programação da Duração do Cozinhado
1 Prima as teclas ou até o símbolo
iluminar-se. De seguida prima a tecla
.
2 Seleccione a duração, premindo as teclas
ou .
3 Posteriormente soarão 2 beeps seguidos,
será mostrada a hora actual e o símbolo
permanecerá iluminado, indicando que
o forno desligar-se-à de forma automática.
4 Seleccione uma função e uma temperatura
de cozinhado.
5 Decorrida a duração do cozinhado, o forno
desligar-se-á, soará um sinal acústico e o
símbolo piscará.
6 Prima qualquer tecla para parar o sinal acús-
tico, ligando-se o forno de novo.
7 Coloque os comandos na posição para
desligar o forno.
A qualquer momento, pode visualizar o tempo
restante de cozinhado, premindo as teclas
ou até o símbolo piscar, e premindo
de seguida a tecla . Neste momento, pode
modificar o tempo seleccionado premindo as
teclas ou . A seguir ouvirá 2 beeps
seguidos, como confirmação da alteração.
Se desejar ver de forma permanente o tempo
restante até à finalização prima as teclas
ou até o simbolo piscar e prima a tecla
de forma prolongada. O símbolo pis-
cará. Para voltar à hora actual, basta premir de
novo a tecla de forma prolongada.
Programação da Hora de Finalização do
Cozinhado
1 Prima as teclas ou até o símbolo
iluminar-se. De seguida prima a tecla .
2 Seleccione a hora de finalização do cozinha-
do, premindo as teclas ou .
3 Posteriormente soarão 2 beeps seguidos,
será mostrada a hora actual e o símbolo
permanecerá iluminado, indicando que
o forno desligar-se-à de forma automática.
4 Seleccione uma função e uma temperatura
de cozinhado.
5 Alcançada a hora seleccionada, o forno des-
ligar-se-á, soará um sinal acústico e o sím-
bolo piscará.

13
ENGLISH
HE-720/HE-720 E/HE-735/HE-735 E
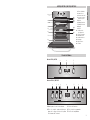
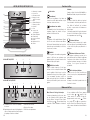
1 Control knobs for the hob.
2 Cooker indicator light. It indicates that one
or more of the electric hotplates are on.
3 Function selector.
4 Electronic clock.
5 Temperature selector.
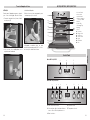
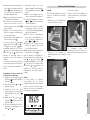
Control Panel
Model HE-720/HE-735
Model HE-720 E/HE-735 E
43 5
31 21 4 5 1 1
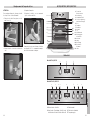
1 Control Panel
2 Oven Seal
3 Grill element
4 Chrome Support +
Telescopic Guide
5 Grid
6 Cake Tray
7 Roasting Tray
8 Hinge
9
Door
10 Air Outlet
11 Fixing to Unit
12 Grill Screen
13 Smoke Outlet
14 Light
15 Rear Panel
16 Fan
2
3
5
6
7
8
9
4
11
10
12
14
13
15
16
1
12
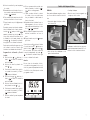
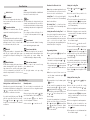
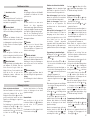
Troca da lâmpada do forno
ATENÇÃO
Para trocar a lâmpada, assegure-se primeiro
que o forno está desligado da rede eléctrica.
• Desmonte as guias telescópicas, soltando-
as da porca (A).
• Solte a lente do porta-lâmpadas com a
ajuda de uma ferramenta.
• Substitua a lâmpada.
• Monte de novo a lente, assegurando que a
encaixa na posição correcta.
A lâmpada a substituir deve ter uma
resistência à temperatura até 300 °C, solicite-
a no serviço de assistência técnica.
A

15
ENGLISH
14
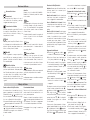
Functions of the Electronic Clock
Alarm: Creates an alarm signal when the peri-
od of time finishes; the oven does not need to
be in use in order to use this function.
Cooking Time: To cook for a selected length of
time; the oven turns itself off automatically
when the time finishes.
End Cooking Time: To cook until a set time;
the oven turns itself off automatically when
the time finishes.
Cooking time and End Cooking Time: To cook
for a selected length of time and end at a set
time. When this function is set, the oven
comes on automatically at the time required in
order to cook for the set length of time
(Cooking time) and end automatically at the
indicated time (End Cooking Time)
Programming the Alarm
1 Press until symbol lights up. Press
.
2 Set the period of time after which you wish
the alarm to sound by pressing or .
3 The clock beeps twice, the current time is
displayed and symbol lights up perma-
nently to indicate that the alarm has been
set.
4 When the set period of time comes to an
end, the alarm sounds and symbol
starts to flash.
5 Press any button to stop the alarm; symbol
goes out.
You can consult the remaining time at any
moment by pressing or until symbol
flashes and then pressing . You can
also modify the set time at this point by press-
ing or . The clock beeps twice to con-
firm the change.
If you wish the remaining time to be displayed
until the end of the set period of time, press
or until symbol flashes and then
press and keep it pressed in. Symbol
flashes. Keep pressed in again to
return to the real time.
Setting the Cooking Time
1 Press or until symbol lights up.
Press .
2 Select the period of time you wish to cook
for by pressing or .
3 The clock beeps twice, the current time is
displayed and symbol lights up perma-
nently to indicate that the oven will turn
itself off automatically.
4 Select a cooking function and temperature.
5 When the cooking time comes to an end, the
oven turns itself off, the alarm sounds and
symbol flashes.
6 Press any button to stop the alarm and turn
the oven back on again.
7 Set the controls to to turn the oven off.
You can consult the remaining cooking time at
any moment by pressing or until sym-
bol flashes and then pressing . You
can also modify the set time at this point by
pressing or . The clock beeps twice to
confirm the change.
If you wish the remaining time to be displayed
until the end of the set period of time, press
or until symbol flashes and then
press OK and keep it pressed in. Symbol
flashes. Keep pressed in again to return
to the real time.
Setting the End Cooking Time
1 Press or until symbol lights up.
Press .
2 Select the time you wish the cooking
process to finish at by pressing or .
3 The clock beeps twice, the current time is
displayed and symbol lights up perma-
nently to indicate that the oven will turn
itself off automatically.
4 Select a cooking function and temperature.
5 When the set time is reached, the oven
turns itself off, the alarm sounds and sym-
bol flashes.
6 Press any button to stop the alarm and turn
the oven back on again.
Setting the time on the Electronic Clock
When the oven is connected to the power supply,
the indication 00:00 flash on the display. Press
or to set the time on the clock. The clock
beeps twice to confirm the selected time.
If you wish to modify the time, press or
until the current time flash on the screen.
Press . Then press or to modify
the time. The clock beeps twice to confirm the
modification.
Manual Operation
The oven is ready to be used when the clock
has been set. Select a cooking function and a
temperature.
When you begin cooking, symbol lights
up to indicate that the oven is heating the con-
tents; the symbol goes out when the
selected temperature is reached.
Set the controls to to turn the oven off.
Use of the Oven
Oven Functions
Switch off oven
Conventional
It is used for sponges and cakes where the
heat received must be uniform to achieve a
spongy texture.
Conventional with fan
Appropriate for roasts and cakes. The fan
spreads the heat uniformly inside the oven.
Grill
For preparing dishes with superficial roasting.
It allows the outer layer to be browned without
affecting the inside of the food. Ideal for flat
food, such as steaks, ribs, fish, toast.
MaxiGrill
Allows greater surfaces to be prepared, than
with the grill, together with higher power
reducing the time required for browning of the
food.
MaxiGrill with fan
Allows uniform roasting at the same time as
surface browning. Ideal for grills. Special for
large volume pieces, such as poultry, game
etc. It is recommended to put the item on a
rack with a tray beneath to collect the stock
and juices.
Caution
While using the Grill, MaxiGrill or MaxiGrill with
fan, the door must be kept closed.
Turbo
The fan distributes the heat produced by an
element located at the rear of the oven. Due to
the uniform heat distribution, it allows roasting
and baking to take place at two heights at the
same time.
This cooking mode allows defrosting of food.
To do this, set the temperature selector to
position.
Lower element
Heats only from beneath. Suitable for heating
dishes and raising pastry and similar.
Lower element with fan
It distributes the heat from the lower part of
the oven and is ideal for cakes with jam or fruit
filling, which only require heating from
beneath. Pre-heating is always necessary.
Grill and Lower element
Special for roasts. It can be used for any
piece, whatever its size.
Note
The pilot light remains on in any cooking
function.
A página está carregando...
A página está carregando...
A página está carregando...
A página está carregando...
A página está carregando...
A página está carregando...

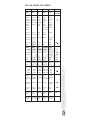
Clase de
eficiencia
energética,
en una escala
que abarca
de A (más
eficiente)
a G (menos
eficiente).
Función de
calentamiento.
Calentamiento
convencional.
Convección
forzada.
Consumo
de energía.
Calentamiento
convencional.
Convección
forzada.
Volumen neto
(litros).
Tipo:
Pequeño
Medio
Grande
Tiempo de
cocción con
carga normal.
Calentamiento
convencional.
Convección
forzada.
Superficie de
cocción.
Ruido (dB (A)
re 1 pW).
Classe de efi-
ciência ener-
gética, numa
escala de A
(eficiente) a G
(ineficiente).
Função de
aquecimento.
Convencional.
Convecção
forçada de ar.
Consumo
de energia.
Convencional.
Convecção
forçada de ar.
Volume útil
(litros).
Tipo:
Pequeno
Médio
Grande
Tempo de
cozedura da
carga-padrão.
Convencional.
Convecção
forçada de ar.
Zona de
cozedura.
Nível de ruído
dB(A) re 1 pW.
Energy
efficiency
class on a
scale of A
(more efficient)
to G (less
efficient).
Heating
function.
Conventional.
Forced air
convection.
Energy
consumption.
Conventional.
Forced air
convection.
Usable volume
(litres).
Size:
Small
Medium
Large
Time to cook
standard load.
Conventional.
Forced air
convection.
Baking area.
Noise (dB (A)
re 1 pW).
Classement
selon son
efficacité
énergétique
sur une
échelle
allant de A
(économe) à G
(peu économe).
Fonction
chauffage.
Classique.
Convection
forcée.
Consommation
d´énergie.
Classique.
Convection
forcée.
Volume utile
(litres).
Type:
Faible volume
Volume moyen
Grand volume
Temps de
cuisson en
charge normale.
Classique.
Convection
forcée.
Surface de
cuisson.
Bruit (dB (A) re
1 pW).
Energieeffizienz-
klasse auf
einer Skala
von A
(niedriger
Verbrauch)
bis G (hoher
Verbrauch).
Beheizung.
Konventionelle
Beheizung.
Umluft /
Heißluft.
Energiever-
brauch.
Konventionelle
Beheizung.
Umluft /
Heißluft.
Netto-volumen
(liter).
Typ:
Klein
Mittel
Groß
Kochzeit bei
Standardbela-
dung.
Konventionelle
Beheizung.
Umluft /
Heißluft.
Backfläche
Geräusch (dB
(A) re 1 pW).
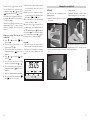
A
0,85
Kwh
0,79
Kwh
52
41 min.
45 min.
1300 cm
2
FICHA / FICHA / BROCHURE / FICHE / DATENBLATT
Fabricante Fabricante Manufacturer Fabricant Hersteller TEKA
Modelo Modelo Model Modèle Modell
HE-720/HE-735
HE-720 E/HE-735 E
Nuestra aportación a la protección del medio-ambiente: utilizamos papel reciclado.
A nossa contribução para a protecção do ambiente: utilizamos papel reciclado.
Our contribution to enviromental protection: we use recycled paper.
Notre contribution à la protection de l’environnement : nous utilisons du papier recyclé.
Unser Beitrag zum Umweltschutz: wir verwenden umweltfreundliches Papier.
Cod.: 83172329/3172329-000
-
 1
1
-
 2
2
-
 3
3
-
 4
4
-
 5
5
-
 6
6
-
 7
7
-
 8
8
-
 9
9
-
 10
10
-
 11
11
-
 12
12
-
 13
13
-
 14
14
-
 15
15


Teka HE-720 E Manual do proprietário
- Categoria
- Microondas
- Tipo
- Manual do proprietário
em outras línguas
- español: Teka HE-720 E El manual del propietario
- français: Teka HE-720 E Le manuel du propriétaire
- English: Teka HE-720 E Owner's manual
- Deutsch: Teka HE-720 E Bedienungsanleitung
Artigos relacionados
-
Teka HPE-735 Manual do proprietário
-
Teka HM-815 ME Manual do proprietário
-
-
-
-
Teka HPE 635 Manual do proprietário
-
-
-
Teka HSB 610 Manual do proprietário
-
Teka HLF 840 Manual do usuário