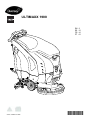
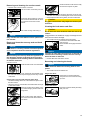
Taski ULTIMAXX 1900 AM Instruções de operação
- Categoria
- Máquina de chão
- Tipo
- Instruções de operação


EC Декларация за съответствие | EU prohlášení o shodě | EUoverensstemmelseserklæring | EU-Konformitätserklärung | EU Declaration of Conformity | Declaración UE de
conformidad | ELi vastavusdeklaratsioon | EY-vaatimustenmukaisuusvakuutus | Déclaration UE de conformité | Δήλωση Συμμόρφωσης των ΕE | EU izjava o usklađenosti | EU
konformitási nyiltakozat | Dichiarazione di conformità UE | ES atitikties deklaracija | ES Atbilstības deklarācija | EU-conformiteitsverklaring | EU-samsvarserklæring | Deklaracja
zgodności UE | Declaração UE de conformidade | Declaraţie UE de conformitate | Заявление о соответствии ЕU | EÚ Vyhlásenie o zhode | Izjava EU o skladnosti | EU-försäkran
om överensstämmelse | AB uygunluk bildirisi | Izjava o usklađenosti sa propisima EU
BG
С настоящото декларираме, че цитираната по-долу машина съответства по концепция и конструкция, както и по начин на производство, прилаган от нас, на съответните
основни изисквания за техническа безопасност и безвредност на Директивите на ЕC. При изменение на продукта, което не е съгласувано с нас, тази декларация губи
своята валидност.
CZ
Tímto prohlašujeme, že níže označené stroje odpovídají jejich základní koncepcí a konstrukčním provedením, stejně jako námi do provozu uvedenými konkrétními provedeními,
příslušným zásadním požadavkům o bezpečnosti a ochraně zdraví směrnic EU. V případě změny výrobku, která nebyla námi odsouhlasena,ztrácí toto prohlášení svou platnost.
DA
Hermed erklærer vi, at den nedenfor nævnte maskine i design og konstruktion og i den af os i handlen bragte udgave overholder de gældende grundlæggende sikkerhedsog
sundhedskrav i EU-direktiverne. I tilfælde af ændringer af produktet, som vi ikke har godkendt, bortfalder gyldigheden af denne erklæring.
DE
Hiermit erklären wir, dass die nachfolgend bezeichnete Maschine aufgrund ihrer Konzipierung und Bauart sowie in der von uns in Verkehr gebrachten Ausführung den einschlägigen
grund-legenden Sicherheits- und Gesundheitsanforderungen der EU-Richtlinien entspricht. Bei einer nicht mit uns abgestimmten Änderung des Produktes verliert diese Erklärung ihre
Gültigkeit.
EN
We hereby declare that the machine described below complies with the relevant basic safety and health requirements of the EU Directives, both in its basic design and construction as
well as in the version put into circulation by us. In the event of a product amendment which was not cleared by us, this declaration shall no longer be valid.
ES
Por la presente declaramos que la máquina designada a continuación cumple, tanto en lo que respecta a su diseño y tipo constructivo como a la versión puesta a la venta por
nosotros, las normas básicas de seguridad y sobre la salud que figuran en las directivas comunitarias correspondientes. En caso de realizar una modificación no autorizada por
nosotros, esta declaración pierde su validez.
ET
Käesolevaga kinnitame, et allpool kirjeldatud seade vastab meie poolt turule toodud mudelina oma kontseptsioonilt ja konstruktsioonilt EL direktiivide asjakohastele põhilistele ohutus-
ja tervisekaitsenõetele. Käesolev kinnitus kaotab kehtivuse, kui toodet muudetakse meiega kooskõlastamata.
FI
Vakuutamme, että alla mainitut tuotteet vastaavat suunnittelultaan ja rakenteeltaan sekä valmistustavaltaan EU-direktiivien asianomaisia turvallisuus- ja terveysvaatimuksia. Mikäli
tuotetta muutetaan ilman meidän antamaa lupaa, tämä ilmoitus lakkaa olemasta voimassa.
FR
Nous certifions par la présente que la machine spécifiée ci-après répond de par sa conception et son type de construction ainsi que de par la version que nous avons mise sur le
marché aux prescriptions fondamentales stipulées en matière de sécurité et d’hygiène par les directives européennes en vigueur. Cette déclaration perd sa validité si le produit est
modifié sans notre consentement.
GR
Δια της παρούσης δηλώνουμε ότι το μηχάνημα που χαρακτηρίζεται παρακάτω, με βάση τη σχεδίαση και την κατασκευή του, υπό τη μορφή που διατίθεται στην αγορά, πληροί στις
σχετικές βασικές απαιτήσεις ασφαλείας και υγιεινής των οδηγιών της ΕE. Σε περίπτωση τροποποίησης του προϊόντος χωρίς τη συγκατάθεσή μας, η παρούσα δήλωση θα καταστεί
άκυρη.
HR
Izjavljujemo da navedeni uređaj u svojoj zamisli i konstrukciji te kod nas korištenoj izvedbi odgovara osnovnim sigurnosnim i zdravstvenim zahtjevima u skladu s niže navedenim
direktivama Europske Zajednice. U slučaju neovlaštene izmjene proizvoda prestaje valjanost ove izjave.
HU
Ezennel tanúsítjuk, hogy az alábbiakban megnevezett gép tervezése és építési módja alapján az általunk forgalomba hozott kivitelben megfelel az EU irányelvek vonatkozó, alapvető
biztonsági és egészségügyi követelményeinek. Amennyiben olyan módosítás történik a terméken, amelyet előzetesen nem egyeztettek velünk, akkor a jelen nyilatkozat érvényét
veszti.
IT
Con la presente si dichiara che la macchina qui di seguito indicata, in base alla sua concezione, al tipo di costruzione e nella versione da noi introdotta sul mercato, è conforme ai
requisiti fondamentali di sicurezza e di sanità delle direttive UE. In caso di modifica del prodotto senza la nostra autorizzazione, questa dichiarazione non sarà più valida.
LT
Šiuo pareiškiame, kad toliau aprašyto aparato brėžiniai ir konstrukcija bei mūsų į rinką išleistas modelis atitinka pagrindinius ES direktyvų saugumo ir sveikatos apsaugos
reikalavimus. Ši deklaracija netenka galios, jei gaminys pakeičiamas nesuderinus jo pakeitimų su mumis.
LV
Ar šo mēs paziņojam, ka turpmāk minētā iekārta, pamatojoties uz tās konstrukciju un izgatavošanas veidu, kā arī mūsu apgrozībā laistajā izpildījumā atbilst ES direktīvu attiecīgajām
galvenajām drošības un veselības aizsardzības prasībām. Ja tiek veikta ar mums nesaskaņota izstrādājuma izmainīšana, šī deklarācija nav derīga.
NL
Hierbij verklaren wij dat de hierna vermelde machine door haar ontwerp en bouwwijze en in de door ons in de handel gebrachte uitvoering voldoet aan de betreffende fundamentele
veiligheids- en gezondheidseisen, zoals vermeld in de desbetreffende EU-richtlijnen. In geval van een niet met ons overeengekomen wijziging van het product, verliest deze verklaring
haar geldigheid.
NO
Vi erklærer hermed at maskinen angitt nedenfor oppfyller de grunnleggende sikkerhetsog helsekravene i de relevante EU-direktivene, med hensyn til både design, konstruksjon og
type markedsført av oss. Ved endringer av produkter som ikke er godkjent fra oss, bortfaller denne erklæringen.
PL
Niniejszym oświadczamy, że określone poniżej urządzenie odpowiada pod względem koncepcji, konstrukcji oraz wprowadzonej przez nas do handlu wersji obowiązującym wymogom
dyrektyw UE dotyczącym wymagań w zakresie bezpieczeństwa i zdrowia. W przypadku dokonania nieuzgodnionych z nami zmian w produkcie niniejsza deklaracja traci ważność.
PT
Declaramos que a máquina a seguir designada corresponde às exigências de segurança e de saúde básicas estabelecidas nas Directivas UE por quanto concerne à sua concepção
e ao tipo de construção assim como na versão lançada no mercado. Em caso de uma alteração do produto que não tenha sido autorizada por nós, esta declaração perde a sua
validade.
RO
Prin prezenta declarăm că aparatul desemnat mai jos corespunde cerinţelor fundamentale privind siguranţa în exploatare şi sănătatea incluse în directivele UE aplicabile, datorită
conceptului şi a modului de construcţie pe care se bazează, în varianta comercializată de noi. La o modificare a produsului care nu a fost aprobată de noi în prealabil, această
declaraţie îşi pierde valabilitatea.
RU
Настоящим мы заявляем, что нижеуказанный прибор по своей концепции и конструкции, а также в осуществленном и допущенном нами к продаже исполнении отвечает
соответствующим основным требованиям по безопасности и здоровью согласно директивам ЕU. В случае несогласованного с нами изменения изделия настоящее
заявление становится недействительным.
SK
Týmto vyhlasujeme, že ďalej označený stroj zodpovedá na základe jeho koncepcie a konštrukcie a takisto vyhotovenia, ktoré sme dodali, príslušným základným požiadavkám na
bezpečnost' a ochranu zdravia uvedeným v smerniciach EÚ. V prípade zmeny výrobku, ktorá s nami nebola konzultovaná, stráca toto vyhlásenie svoju platnosť.
SL
S to izjavo potrjujemo, da spodaj omenjeni stroj zaradi svoje zasnove in načina izdelave ustreza temeljnim varnostnim in zdravstvenim zahtevam EU-standardov. V primeru
spremembe izdelka, ki ni bila potrjena z naše s strani, ta izjava ni več veljavna.
SV
Härmed försäkrar vi att nedanstående betecknade maskin i ändamål och konstruktion samt i den av oss levererade versionen motsvarar EU-direktivens tillämpliga grundläggande
säkerhets- och hälsokrav. Vid av oss ej godkända ändringar på produkten upphör denna förklaring att gälla.
TR
İşbu belge ile aşağıda tanımlanan makinenin konsepti ve tasarımı ve tarafımızdan piyasaya sürülen modeliyle AB yönetmeliklerinin temel teşkil eden ilgili güvenlik ve sağlık
yükümlülüklerine uygun olduğunu bildiririz. Üründe yapılan herhangi bir değişiklik bu beyanı geçersiz kılar.
YU
Ovim izjavljujemo da ovde opisana mašina po svojoj koncepciji i načinu izrade, sa svim njenim modelima koje smo izneli na tržište, odgovara osnovnim zahtevima dole navedenih
propisa Evropske Zajednice o sigurnosti i zdravstvenoj zaštiti. U slučaju izmena na proizvodu koje nisu dogovorene s nama, ova izjava ne važi.
Item description:
Scrubber drier for commercial use
Model:
ULTIMAXX 1900
Type:
ULTIMAXX 1900
Serial Number:
Refer to the rating label on the machine
Trademark: TASKI®
Manufacturer: Diversey Europe Operations B.V., Maarssenbroeksedijk 2, NL - 3542 DN Utrecht
Produced by: Diversey Switzerland Production GmbH, Eschlikonerstrasse, 9542 Münchwilen TG, Switzerland
Applicable EU Directives:
Directive 2006/42/EC | Directive 2014/30/EU
Harmonised standards:
EN 60335-1: 2012 + AC:2014 + A11:2014 + A13:2017 + A1:2019 + A14:2019 + A2:2019 / EN 60335-2-72: 2012 / EN 55012: 2007+A1: 2009 / EN 55014-2: 2021 / EN
62233: 2008 /
Authorized signatory:
Responsible for technical file:
Andreas Bosch
Executive Director Machines and Robotics
Diversey Europe B.V. Utrecht
Zweigniederlassung Münchwilen
Eschlikonerstrasse
9542 Münchwilen - Switzerland
Andreas Bosch
Executive Director Machines and Robotics
Münchwilen,
16.05.2021
CE first applied:
10.2021
The signatories act on behalf of company management and with full power of attorney.

2
EN Translation of the original instruc-
tions of use
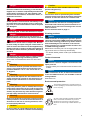
Legend:
Danger:
This sign designates important information. Failure
to follow these instructions may endanger persons
and/or cause extensive property damage!
Warning:
This sign designates important information. Failure
to follow these instructions may endanger persons,
result in malfunctions, and cause property damage!
Caution:
This sign designates important information. Failure
to follow these instructions may result in malfunc-
tions and property damage!
Notice:
This sign designates important information regard-
ing the efficient use of the product. Failure to follow
these instructions may cause malfunctioning!
Content
Safety instructions. . . . . . . . . . . . . . . . . . . . . . . . . . . . . . . . . . . 2
Cleaning products . . . . . . . . . . . . . . . . . . . . . . . . . . . . . . . . . . . 3
Further documents . . . . . . . . . . . . . . . . . . . . . . . . . . . . . . . . . . 3
Environmental protection . . . . . . . . . . . . . . . . . . . . . . . . . . . . . 3
Symbols affixed to the device . . . . . . . . . . . . . . . . . . . . . . . . . . 4
Structural layout of machines . . . . . . . . . . . . . . . . . . . . . . . . . . 4
Structural layout of brush units . . . . . . . . . . . . . . . . . . . . . . . . . 5
Structural layout of control panel/touchscreen . . . . . . . . . . . . . 6
Batteries . . . . . . . . . . . . . . . . . . . . . . . . . . . . . . . . . . . . . . . . . . 6
Prior to commissioning . . . . . . . . . . . . . . . . . . . . . . . . . . . . . . . 8
Beginning work with the machine . . . . . . . . . . . . . . . . . . . . . . . 11
End of operation . . . . . . . . . . . . . . . . . . . . . . . . . . . . . . . . . . . . 12
Service, maintenance and care. . . . . . . . . . . . . . . . . . . . . . . . . 14
Malfunctions . . . . . . . . . . . . . . . . . . . . . . . . . . . . . . . . . . . . . . . 16
Technical information . . . . . . . . . . . . . . . . . . . . . . . . . . . . . . . . 17
Accessories. . . . . . . . . . . . . . . . . . . . . . . . . . . . . . . . . . . . . . . . 19
Transport. . . . . . . . . . . . . . . . . . . . . . . . . . . . . . . . . . . . . . . . . . 20
Disposal . . . . . . . . . . . . . . . . . . . . . . . . . . . . . . . . . . . . . . . . . . 20
Intended use
The machine is intended for commercial use (e.g. in hotels, schools,
hospitals, factories, shopping centers, offices, etc.).
Subject to strict compliance with the instructions of use, these ma-
chines are used for the wet cleaning of hard flooring.
Caution:
The machine must not be used for polishing, oiling,
the application of wax, carpet cleaning or dust re-
moval. The wet cleaning of parquet and laminate
flooring with this machine is at your own risk.
Caution:
This machine is for indoor use only.
Caution:
This machine shall be stored indoors only.
Danger:
Changes to the machine without authorization from
Diversey will invalidate the safety marks and CE
conformity. Using the machine in a way contrary to
the intended purpose can cause personal injury as
well as damage to the machine and the working en-
vironment. Such cases will usually result in the ter-
mination of any warranty and any possible
guarantee claims.
Safety instructions
Due to their design and construction, TASKI machines comply with
the relevant essential health and safety requirements of the EC direc-
tives; they therefore have the CE sign.
Danger:
The machine may only be used by persons who are
adequately trained to use the machine or who have
provided proof of their skills for using the machine
and who are explicitly tasked with using the ma-
chine.
Danger:
The machine must not be used by people with re-
duced physical, sensory, or mental capacities, in-
cluding children or people who lack experience or
knowledge.
Children must be supervised to ensure that they do not
play with the machine.
Danger:
Do not use the machine in rooms where explosive
or highly combustible substances (e.g. gas, sol-
vents, heating fuel, dust, etc.) are stored or pro-
cessed.
These substances could be ignited by the electrical or
mechanical components of the machine.
Danger:
Do not use the machine to vacuum up toxic, harm-
ful, corrosive or irritant substances (e.g. dangerous
dust, etc.) or flammable liquids. The filter system
does not adequately filter out these kinds of sub-
stances.
Possible impacts on the health of the user or third per-
sons cannot be ruled out.
Danger:
Pay attention to conditions in the area as well as
third persons and children! In the vicinity of blind
spots, such as doors or curves, it is important to re-
duce speed.
Danger:
Do not transport additional persons and objects
with this machine.
Always read the instructions of use and the safety instruc-
tions before using the machine for the first time. The in-
structions of use must be kept in a safe and well-
accessible place so that you can refer to them at any
time.

3
Danger:
If the machine malfunctions, there is a defect, the
machine collides with something, or the machine
topples over, it must be inspected by an authorized
expert before restarting. The same applies if the
machine was left outdoors, immersed in water, or
exposed to moisture.
Danger:
Cease operation of the machine immediately if safe-
ty-related parts such as brush covers, power sup-
ply cords, or covers that enable access to live parts
are damaged!
Danger:
Do not stop, park, or store the machine on slopes.
Danger:
Whenever work is performed on the machine, it
must be switched off and the key must be removed.
Danger:
The machine can be used on slopes <2%. Be sure
to drive slowly on slopes using the "turtle mode" in
order to ensure the machine can be stopped safely.
Sharp cornering on slopes can affect the stability of
the machine and is therefore prohibited. Danger of
accident.
Danger:
The machine may only be used on a paved, stable
and sufficiently strong load-bearing surface.
In the case of non-adherence there is a risk of acci-
dents.
Warning:
The machine must be operated and stored exclu-
sively in a dry and low-dust environment at tem-
peratures between +10°C / + 50 °F and +35°C/ + 95
°F degrees.
Warning:
Only authorized experts who are familiar with all
safety instructions relevant to this machine are al-
lowed to repair mechanical or electrical machine
parts.
Warning:
Only tools (brushes, pads or similar) that are spec-
ified in these instructions of use under accessories,
or which have been recommended by a TASKI con-
sultant, may be used. Any other brushes might im-
pair the safety and functions of the machine.
Warning:
National regulations for personal protection and ac-
cident prevention, as well as the manufacturer's in-
structions for the use of cleaning solutions, must
be consistently observed.
Caution:
In case of foam or liquid leakage from the machine,
the suction unit must be switched off immediately.
Caution:
Use this machine with suitable batteries and ap-
proved chargers only.
Caution:
The machine must be protected against unautho-
rized use. Always pull out the key before leaving the
machine or store the machine in a locked room.
Notice:
TASKI machines and devices are designed such
that health risks caused by noise emissions or vi-
brations can be ruled out according to the current
state of science.
See the technical data on page 17.
Cleaning products
Notice:
TASKI machines are designed to produce optimal
cleaning results when TASKI cleaning products are
used. Other cleaning products may cause malfunc-
tions and damage to the machine or the environ-
ment. Therefore, we recommend the exclusive use
of TASKI cleaning products.
Malfunctions caused by the use of inappropriate clean-
ing products are not covered by the warranty.
- For further details, please contact your TASKI service
partner.
Further documents
Notice:
The machine’s electric diagram can be found in the
spare parts list.
- Please contact your customer service for further infor-
mation.
Notice:
These instructions of use, as well as all instructions
of use for TASKI machines, are available on the fol-
lowing website:
www.taski.com
Environmental protection
The packaging materials are recyclable. Please do
not throw packaging in the domestic waste but pass
it on for recycling.
Old units contain valuable recyclable materials. Bat-
teries, oil and similar substances may not be re-
leased into the environment. Therefore please
dispose of old units through suitable collection sys-
tems.

4
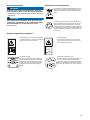
Symbols affixed to the device
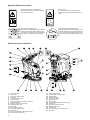
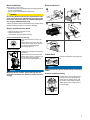
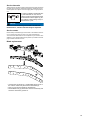
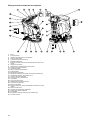
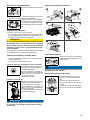
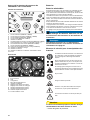
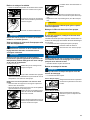
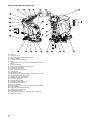
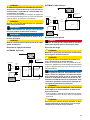
Structural layout of machines
1Driving handle
2Tank cover
3Tank cover folding stand
4Dirt sieve
5Variant: Foot pedal tool
6Suction nozzle
7Lever for reduction of brush/tool pressure
8Transport wheel
9Battery compartment unlocking
10 Deflecting roller, right
11 Brush unit
12 Fresh water tank filter
13 Foot pedal suction nozzle
14 Suction hose
15 Drain hose cleaning solution (blue cover)
16 Tools (brushes, pads, etc.)
17 Filling level indicator
18 Control panel or touch screen
19 Driving switch
20 Fresh water tank
21 Tank cover release
22 Recovery tank
23 Suction filter
24 Float (Overfill protection recovery tank)
25 Dosage cup
26 Space for automatic dosing
27 Deflecting roller, left
28 Cable rewind
29 Drain hose waste water (red cover)
30 Key switch
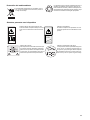
Read first instruction manual symbol:
Read the instructions of use before starting
work with the machine.
Use on slope:
Do not use the device on surfaces with a
steeper slope than that indicated on the ma-
chine.
Recommended products only:
This machine is designed to produce optimal
cleaning results when TASKI cleaning prod-
ucts are used. Therefore, we recommend the
exclusive use of TASKI cleaning products.
Max. permissible water temperature:
Diversey recommends using cold water, as hot
water will adjust to the ground temperature as
soon as it comes into contact with the ground.
Thus there are no advantages to using hot wa-
ter.
2 %
1
2
3
4
5
6
7 8 9 10 11 12 13 14 15 16
17
1819202123 22
25
30
29
28
26
27
24
MAX
3/4
2/4
1/4
max.60°C
max.140°F

5
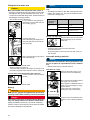
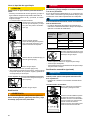
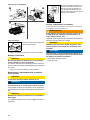
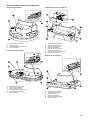
Structural layout of brush units
Single disc Deck
1Brush unit
2Deflecting roller
3Tools (brushes, pads, etc.)
4Brush holder
Double disc Deck
1Bruch unlocking
2Brush unit
3Deflecting roller, right
4Tools (brushes, pads, etc.)
5Deflecting roller, left
6Brush holder
Roller brush Deck
1Tool unlocking
2Deflecting roller, right
3Brush unit
4Distribution channel
5Deflecting roller, left
6Solids tank
7Tools (brushes, pads, etc.)
8Tool holder
Orbital Deck
1Brush unit
2Deflecting roller, right
3Tool (pad)
4Distribution channel
5Deflecting roller, left
6Brush holder
1
2
3
4
2
3
16
4 5
1
2
8
3
4
5
7
6
1
2
3 4
5
6

6
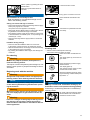
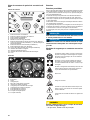
Structural layout of control panel/touchscreen
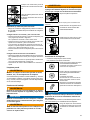
Control panel
1ECO mode button (ON/OFF)
2Suction unit button (ON/OFF)
3IntelliDose button (ON/OFF)
4Twister button (ON/OFF)
5Battery level indicator
6Cleaning solution supply button (ON/OFF)
7Cleaning solution supply amount button (+/-)
8Brush drive button (ON/OFF)
9Slow approach button (ON/OFF)
10 Service buttons (also for IntelliDose dosing)
11 Battery display loading
12 Service display
13 Battery/PSU fault display
14 Display
Touchscreen
1Home
2Help
3Settings
4Menu
5Battery display
6Speed settings
7Cleaning solution settings
8Statistics (optional)
9Statistics (optional)
10 Quick selection
11 Start / Stop
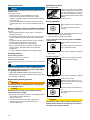
Batteries
Permissible batteries
Traction batteries must be used in this machine (no wet battery sets,
starter or device batteries). We recommend the use of pure traction
batteries. Only these batteries can ensure a long service life.
Traction batteries are produced as closed and maintenance-free (VR-
LA) batteries (gel and AGM, Pure Lead, and lithium). The machine
must be adjusted accordingly for each design type and manufacturer.
Each battery has a different service life and performance.
The machine and charger must be programmed after the batteries
have been inserted, when the battery type and/or the manufacturer
are changed, and prior to starting the machine.
Incorrect adjustment may result in early battery failure.
Notice:
Do not use different, old batteries with new or de-
fective batteries.
Notice:
Old and/or defective batteries must be disposed of
properly. See the information on page 20
Safety measures to be taken when handling
batteries
Caution:
Keep batteries clean and dry. Immediately wipe off
leaking acid or water.
- Wear protective gloves for this purpose.
114 13 12 11 10 9
8
765
2
3
4
1
10
5
6
7
4
2
11
83
9
Batteries contain acid. Always wear safety goggles
when performing maintenance, installing, or remov-
ing wet battery sets.
Rinse acid splashes in your eyes or on your skin with
plenty of clear water. Then immediately consult a
doctor. Wash your clothes with water!
Charging batteries creates a dangerous gas mixture.
Keep away from open fire or glowing embers.
Do not smoke!
Danger of acid burns!
Attention! The battery poles are always energized,
therefore do not place any objects on the batteries!
The supply terminals are not to be short-circuited!

7
Caution:
Batteries may only be installed by service agencies
or experts approved by Diversey; they must be in-
stalled in compliance with the connection diagram.
Installation and/or connection errors may result in se-
vere injury, explosion and major damage to the ma-
chine and the environment.
Caution:
Ensure adequate ventilation when charging the bat-
tery.
Notice:
The product safety data sheet provided by the bat-
tery manufacturer must be observed.
Notice:
The operating instructions provided by the battery
manufacturer must be met.
Caution:
Always disconnect the batteries from the machine
before starting maintenance work.
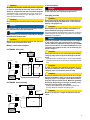
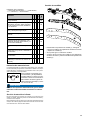
Battery connection diagram
ULTIMAXX 1900 (Gel)
ULTIMAXX 1900 (Lithium)
In an emergency
Danger:
In the event of an emergency (incorrect functioning
of the machine), the key must be pulled out.
Charging process
Caution:
Please pay careful attention to the instructions of
use provided by the manufacturer of the external
battery charging device.
Caution:
Each battery type and/or battery manufacturer re-
quires different charging characteristics.
Incorrect charging characteristics or the use of inappro-
priate chargers may result in early failure or the quick
destruction of batteries.
Notice:
Optionally available on-board chargers are adapted
to the battery size and contain several charging
curves, which are adjusted ex factory or by a TASKI
service technician for recommended batteries. This
regulation also applies for the use of stationary (ex-
ternal) chargers.
Caution:
Persistent short-term use with subsequent battery
charging may cause long-term damage to the bat-
teries.
- Standard value: At least approx. 20% of the available
capacity should be used up before recharging the bat-
tery.
Caution:
In order to achieve the maximum possible service
life, traction batteries must run through a complete
charging cycle (12-16 hours) twice a week.
Caution:
Before decommissioning the machine for a longer
period, the batteries must run through a complete
charging cycle. The charger is then disconnected
from the machine and/or mains. Batteries gradually
discharge. Depending on the type of battery, they
must be recharged after 3-6 months.
- Before recommissioning, the batteries should run
through another complete charging cycle.
Caution:
Remove the key for a longer shutdown of the ma-
chine.
12 V 12 V
Battery
plug
Power Board
Drive direction
Forward
Charger
internal
Mains
red
black
Charger
external
Mains
25.6 V
Battery
plug
Power Board
Drive direction
Forward
Charger
internal
Mains
red
black
Charger
external
Mains

8
Charging procedure with external charger
Notice:
Only chargers recommended by the battery manu-
facturer and certified according to SELV (safety ex-
tra-low voltage) may be used.
Danger:
Do not plug the charger into the machine while it is
under tension (charger switched on).
The user may be injured by electric shock.
Warning:
Charging cables transfer high currents. Do not use
the charger if there are any signs of damage to the
plug, cable, or device connection.
Notice:
Make sure that the plug is inserted up to the stop in
order to ensure a good electrical contact.
Notice:
Check whether the plugged-in charger has started
the charging process.
Notice:
All machine functions are deactivated during
charging.
Charging procedure with (optional) on-board
charger
Caution:
The machine must be switched off. Remove the key.
After charging
Warning:
Switch off the charger before disconnecting it from
the batteries.
Disconnecting the charger while it is still switched on
may cause an explosion in the battery compartment.
Maintenance and care of open (wet-cell) batter-
ies
Notice:
Caring for maintenance-free batteries only entails
following proper charging procedures and config-
uring the charging curve correctly.
Open battery compartment for maintenance
Warning:
Before opening the battery compartment make sure
that both tank areas are empty.
Warning:
After maintenance, carefully bring the tank back to
its initial position and reattach the screws.
Notice:
Lift the suction nozzle again
Notice:
Put the key back in place.
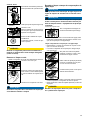
Prior to commissioning
Relocation drive
• Connect the external battery charger with the battery
charging plug of the machine.
• Take the power cord and connect it with a socket (with slow
fuse).
• Stow away the power cord for (optional) on-board chargers
in the provided compartment.
• Store the charging cable in a dry place where it is protected
against damage.
• The machine must be switched off and the key must be re-
moved.
• Disconnect the battery from the machine at the battery dis-
connection socket.
• Lower the suction nozzle.
• At the bottom left and right on the
front side of the machine you will find
the battery compartment release.
• Unscrew both screws and remove
them.
• Stand on the left side of the machine.
• Hold the recessed grip (1) with one
hand and the driving handle (2) with
the other and carefully open the bat-
tery compartment until the driving
handle lies on the ground.
• Switch on the machine (key switch).
• Take the driving handle and position the hands in such a
way that you can work easily with them.
• By gently pushing the driving switch
into the direction of movement, the
machine is set into motion. If you let
go of the driving switch, the machine
will stop.
1
2

9
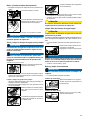
Brush installation
Before inserting, please check:
• that the brush does not fall below the red marking (bristles)
or 1cm of bristle length.
• the pad for wear and cleanliness before use.
Caution:
Do not use brushes which have reached their wear
limit. The wear limit is indicated by the length of the
red bristle. Do not use worn or contaminated pads.
Use original TASKI brushes only.
Failure to observe these instructions may result in inad-
equate cleaning results or even floor damage.
Single- and Double disc Deck
Variant: Automatic brush lowering
Variant: Foot pedal
Notice:
When the brush is down, gently moving the ma-
chine back and forth can make the clutch easier to
engage.
Roller brush Deck
Orbital Deck
Notice:
Make sure that the pad is placed evenly on the pad
holder.
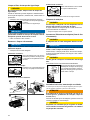
Suction nozzle assembly
• Position the tools under the tool unit.
• Switch the machine on.
The indicator elements lights up briefly.
• Press the Brush drive button ON/
OFF.
While lowering the brush drive will
slowly start to pulse. In this way the
tool is centered and engaged.
The display lights up.
• Unlock the foot pedal and lower the
tool slowly.
While lowering the brush drive will
slowly start to pulse. In this way the
tool is centered and engaged.
The brush drive display lights up
• Press the orbital pad on the pad hold-
er.
• Position the suction nozzle [A2] be-
low the suction nozzle holder [A1].
• Press the foot pedal [1] down until
the suction nozzle holder engages.
• Attach the suction hose [B1] to the
connector [B2].
1 2
3 4
5
A
1
1
A
1
A
2
A
2
B
1
B
2

10
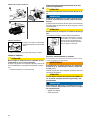
Filling the fresh water tank
Caution:
Max. permissible water temperature 60 °C/140 °F.
- Diversey recommends using cold water, as hot water
will adjust to the ground temperature as soon as it
comes into contact with the ground. Thus there are no
advantages to using hot water.
Fill fresh water tank with Aquastop filter (optional)
Dosing:
Warning:
Wear gloves, goggles and appropriate (protective)
working clothes when handling chemical products!
Danger:
Use chemical products recommended by Diversey
only and always observe the product information.
Using unsuitable products (e.g. products containing
chlorine, acids or solvents) may cause harm to health
and severe damage to the machine.
Notice:
For a precise dosing, use the scale in the dosing
cup.
- The filling level mark on the tank corresponds to the
mark in the dosing cup. The type of machine is also
noted in the dosing cup!
Dosage cup application
Automatic dosing (optional)
Notice:
TASKI offers an automatic dosing (IntelliDose) fea-
ture as an option. It is possible to mount it addition-
ally.
- Please contact your customer service.
IntelliDose fill / empty
• The machine must be switched off.
• Put your hand into the opening be-
tween tank cover and tank and pull
the unlocking grip [A].
• Open the tank cover.
• Swivel the folding stand [B2] out of
the holder [B1] and place it into the
tank recess [C].
• Remove the dosage cup [D] and the
fresh water filter [E]
• Fill the fresh water tank with water.
Maximum filling level (page 4).
• Swivel the folding stand into the holder, tip the tank cover
back into its original position and press it down until it locks.
• Connect a water hose to the Aquas-
top filter.
• Fill the fresh water tank with water.
A
B
1
B
2
C
D
E
Information on
the package of
the product
Tank capacity Dosage cup
0.5% 1/2 1 x 1/2
MAX 1 x MAX
1% 1/2 1 x MAX (2 x 1/2)
MAX 2 x MAX
• Fill the product you have measured
with the dosage cup into the fresh
water tank.
• Slightly lift the tank cover.
• Swivel the folding stand back into the holder.
• Close the tank cover.
• By pushing gently on the front part of the tank cover you
lock the tank.
• Open the automatic dosing cover
and remove the concentrate bag.
• Press and hold the IntelliDose button
(see page 6) for 2 seconds.
• Press again the IntelliDose button in
order to get to the setting for empty-
ing the system.
• Confirm the start of emptying by
pressing the right service button.
• Insert the new concentrate bag and
close the cover of the automatic dos-
ing.

11
Notice:
The IntelliDose is now ready for use.
- Note the settings for concentrate and high concen-
trate in the following section.
Setting concentrate and high concentrate
IntelliDose dosing settings
Pre-cleaning
Warning:
Remove any objects (wooden, metal parts etc.)
from the cleaning surface.
The objects could be catapulted by the rotating tool, and
thereby cause injuries to people and damage to the en-
vironment.
Beginning work with the machine
Warning:
Always wear slip-resistant shoes and appropriate
working clothes when working with this machine!
Notice:
To ensure safe operation, always keep both hands
on the steering wheel/driving handle while operat-
ing the machine.
Warning:
When driving the machine for the first time, test it
out in an empty space to get familiar with the ma-
chine.
Warning:
If there is a danger of falling objects during use of
the machine, the necessary safety precautions
must be taken or adhered to in accordance with na-
tional regulations.
Variant: Automatic brush lowering (Option ULTIMAXX 1900 Premi-
um)
Variant: Foot pedal
Cleaning start
Notice:
Diversey recommends sustainable working by de-
termination of the correct product dosing quantity.
Overdosing or underdosing will lead to unsatisfactory
cleaning results.
• Fill the system by pressing the Intel-
liDose button.
• Filling the system takes about 18.
seconds.
• Press and hold the Eco-Mode and Cleaning solution supply
button (see page 6) for 2 seconds.
The power user menu appears in the display.
• Press again the Eco-Mode button in order to get to the set-
ting between concentrate and high concentrate.
• The Cleaning solution supply amount buttons can be used
to select between concentrate (0.2% - 0.5%) and high con-
centrate (1% - 2.5%).
• Press the Cleaning solution supply button to confirm the
selection.
• Press and hold the IntelliDose button for 2 seconds.
In the display, appear the menu for setting the dosage.
• With the service buttons, the dosage can be set according
to the preferences of the concentrate.
• By pressing the IntelliDose button again, the settings are
confirmed.
• Lower the suction nozzle.
• Press the Brush drive button ON/
OFF.
• Unlock the foot pedal and lower the
tool slowly.
• Switch on the machine (Push in the key).
The indicator elements lights up briefly.
• Press the suction unit ON/OFF but-
ton.
The display lights up; the suction en-
gine starts.
• Press the Cleaning solution supply
ON/OFF button.
The display lights up.
The cleaning solution supply is start-
ed when the brushes rotate.
• Select the intended dosing by press-
ing the cleaning solution inflow quan-
tity buttons +/-.
• By gently pushing the driving switch
into the direction of movement the
machine is set into motion.

12
Power off function
Notice:
The machine turns itself off after 5 minutes when no
longer in use.
During these 5 minutes:
Battery capacity - end of operational readiness
The battery level indicator provides information on the available oper-
ating time.
• If the red indicator begins to flash, approx. 2 minutes of
working time are left.
• At machines with automatic brush lowering unit, the brush
motor is switched off and the brush unit is automatically
raised.
At machines with foot pedal, the brush motor is switched
off and the brush unit remains on the ground.
• The red display switches to a continuous light.
• Now you have 10 minutes to drive the machine to the
charging station. Then the machine is automatically
switched off.
• In order to restart, the batteries must be fully charged.
Cleaning method
Direct working method:
Scrubbing and suction in one work step.
Indirect working method:
Applying the cleaning solution, scrubbing and suction in several work
steps.
Notice:
In some circumstances, certain combinations of
flooring/soiling and cleaning products may impair
the guiding of the machine.
- Optionally available wheels can improve the ma-
chine’s traction on the floor. Please contact your TAS-
KI customer consultant.
Replenishing cleaning solvent
Warning:
The flooring may be damaged when working with-
out cleaning solution.
Caution:
A rattling sound of the pump indicates that the
fresh water tank is empty.
- The pump must never run dry for an extended period.
Draining dirty water
Recovery tank full:
End of operation
Variant: Automatic brush lowering (Option ULTIMAXX
1900 Premium)
Variant: Foot pedal
Caution:
The machine must now be emptied and cleaned.
Switch off the machine (remove key) and remove
the plug from the mains socket.
• the brushes may not be manipulated in any way.
• the user must not leave the machine out of sight.
• sucked in or jammed objects may be cleaned from the suc-
tion nozzle only.
• the user is only allowed to leave the machine in order to
clear the work space. The user must maintain visual con-
tact.
• The machine must be switched off.
• Open the tank cover.
• Fill the fresh water tank with water, see page 10.
• Add the cleaning product using the dosing cup.
• Close the tank cover.
• If the recovery tank is full, the floater
will be sucked onto the suction filter.
This will be indicated by a change of
the noise by increasing the suction
speed as well as residual water at the
bottom.
• Drain the recovery tank, see page 13.
• Press the Brush drive ON/OFF but-
ton.
The cleaning solution supply is
stopped.
• Drive on for a few meters so that the brushes keep on ro-
tating for a short time to avoid dripping.
Very important for TASKI contact pads!
• Press the Brush drive button ON/
OFF.
The display lights up and the brush
unit is stopped and lifted.
• Drive on for a few meters in order to absorb the remaining
drain water.
• To lift the tool, push the foot pedal
downwards until it engages.
• Drive on for a few meters in order to absorb the remaining
drain water.
• Lift the suction nozzle.
Allow the suction unit to run on so
that the remaining waste water in the
hose is sucked up.
• Press the suction unit ON/OFF but-
ton.
The display lights up; the suction en-
gine stops.
• Switch off the machine.

13
Removing and cleaning the suction nozzle
Notice:
Only cleaned and intact blades ensure optimal suc-
tion results!
Empty and clean the recovery tank and fresh
water tank
Notice:
Drain water or cleaning solution must be disposed
of in compliance with the national regulations.
Notice:
When draining the recovery tank, the regulations of
the detergent supplier regarding personal protec-
tive equipment of the cleaning solution manufactur-
er must be observed.
Proceed as follows:
Cleaning the recovery tank and fresh water tank
Caution:
Clogged suction filters may impair the suction per-
formance.
Cleaning the fresh water tank filter
Caution:
Clean the fresh water tank filter after the end of op-
eration.
Clogged filters can inhibit the supply of detergents and
thus lead to surface damage.
Notice:
The filter is lower than the drain hole of the tank. A
rest amount of cleaning solution will run out only
when the filter is removed.
Removing and cleaning the brush
Notice:
Clean the brush whenever cleaning work is com-
pleted.
Single disc Deck:
Double disc Deck:
• Pull the suction hose from the connector.
• Lift the suction nozzle with your foot.
• Compress the lock springs. The suc-
tion nozzle is released and can be re-
moved from the suction nozzle
holder.
• Clean the suction nozzle under running water using a
brush.
• Take the drain hose out of the holder.
• Open the red or blue cover at the level of the handle, lower
the end of the hose slowly and empty the recovery or fresh
water tank.
• Swivel the folding stand out of the holder and place it into
the tank recess.
• Rinse the recovery tank and the fresh water tank thorough-
ly with clean water.
• Remove the dirt sieve (yellow), emp-
ty it and thoroughly rinse it under run-
ning water.
• Take out the suction filter (yellow)
and remove the dirt with a cloth or a
soft brush.
• Check the float to make sure it is fully
functional and repair any fault
• After you have finished emptying the tanks, close the red
and blue cover back on and hang the hoses on the holder.
• Reassemble the dirt sieve (yellow) and the suction filter.
• The machine must be switched off (main switch).
• Unscrew the fresh water tank filter
and remove it.
• Rinse the filter thoroughly with clean
water.
• Put the filter back and twist it closed.
• The machine must be switched off.
• Rotate the tool counterclockwise
away from the tool connection using
your foot.
• Push the tool ejector briefly but firmly
with your foot.

14
Roller brush Deck:
Orbital Deck:
Cleaning the machine
Caution:
Never clean the machine with a high-pressure
cleaner or water jet.
Water ingress in the machine may cause considerable
damage to the mechanical or electrical parts.
Storing / parking the machine (not in opera-
tion)
Caution:
The machine must be switched off. Remove the key.
Notice:
Store the machine with a lifted suction nozzle, lifted
brush and open tank cover.
Thus, the tank can dry, and the generation of mold and
unpleasant odors is prevented.
Caution:
Never store the machine with uncharged batteries.
Otherwise, the batteries will be damaged beyond repair.
Service, maintenance and care
The maintenance of the machine is a prerequisite for impeccable op-
eration and a long service life.
Warning:
This machine may only be lifted using lifting gear
(e.g. hoist, loading ramp, etc.).
The heavy weight of the machine, can cause injuries by
lifting.
Caution:
Use original TASKI parts only; otherwise any war-
ranty and liability claims will be invalidated.
Notice:
In order to rule out unintended machine functions,
the following must always be carried out before
starting maintenance works
- the machine must be switched off,
- the key can be removed.
• Manually remove the orbital pad from
the pad holder.
• Remove the brushes and clean them under running water.
• Wipe the machine with a moist cloth.
• Open the tank cover, carefully push
om the tank cover release [1] and
lower the tank cover [2] until it rests
on the tank.
1 2
3
1
2
Legend:
◊ = after every cleaning, ◊◊ = every week,
◊◊◊ = every month, ⊗ = service light
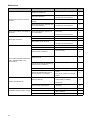
Activity
◊
◊◊
◊◊◊
⊗
Page
Charge batteries ● 8
Replenishing distilled water (wet-cell
batteries). Observe the service sheet of
the battery supplier! ●8
Draining and cleaning the recovery and
fresh water tanks ●13
Clean all parts marked in yellow ●
Clean the brushes ● 13
Clean the suction nozzle, check the
blades for wear and change them if
necessary ●13
Wipe the machine using a damp cloth ● 14
Clean the gasket of the tank cover,
check for cracks and replace it if neces-
sary ●
Check HEPA filter and replace it if nec-
essaey. ●
Maintenance and service program car-
ried out by Diversey service techni-
cians ●

15
Service intervals
TASKI machines are high-quality machines that have been inspected
for safety at the factory by authorized inspectors. Electrical and me-
chanical parts are subject to wear and aging after a longer period of
use.
Notice:
In case of extraordinary use and/or insufficient
maintenance, shorter intervals may be required.
Service center
Please always indicate the type and number of the machine whenev-
er you contact us to place an order or in case of malfunctions.
You can find this information on the nameplate of your machine. The
address of your closest TASKI service partner is provided on the last
page of these instructions of use.
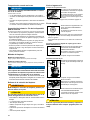
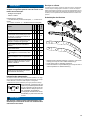
Blade replacement
• In order to maintain operational safe-
ty and readiness for use, the ma-
chine must be serviced whenever the
maintenance indicator lights up (fac-
tory setting is 550 working hours) or
at least once a year.
• Unscrew the star knobs (1), pull the blade body (2) out of
the suction nozzle body and remove the blades (3).
• Now you can turn the blades or replace them.
• Put the blade body (2) back in the suction nozzle body and
screw the star knobs (1) back on.
1
2
3

16
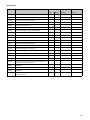
Malfunctions
Malfunction Possible causes Troubleshooting Page
Machine not functional, cannot be
turned on
Machine is switched off • Push the key 4
Main fuse is defective • Check/replace fuse
• Contact your service partner
Immobilizer activated or fault in the
controls • Contact your service partner
Battery discharged or defective, Bat-
tery charger defective
• Charge batteries
• Contact your service partner 8
Batteries defective • Contact your service partner
Brush unit or suction unit cannot be
turned off Error in the electronic system or in
the control panel
• Switch off the machine by pulling
out the key
• Contact your service partner
4
Brush does not rotate
Brush drive switched off • Press Brush button 4
Main fuse is defective • Replace fuse
Motor rotates, brush does not • Drive belt broken
• Contact your service partner
Poor suction performanceGround re-
mains wetSoiled water is not
vacuumed up
Suction unit not switched on • Press suction unit button 4
Suction hose not connected • Connect suction hose 9
Suction nozzle on the floor
• Check suction nozzle suspension
for functionality 9
Blades worn out
• Replace blades
15
Hose or suction nozzle clogged (e.g.
pieces of wood, remnants)
• Remove any foreign matter
Suction filter clogged • Remove any foreign matter 4
Suction unit indicator lights up but
vacuum cleaner is not running
• Check fuse and replace it, if nec-
essary
• Fuse is OK, contact your service
partner
9
Suction unit switches off
Recovery tank full
• Drain recovery tank
• Check battery monitoring
• Check fuse
13
Recovery tank contaminated • Check recovery tank and clean it, if
necessary 13
Insufficient cleaning solution supply
Cleaning solution tank empty • Check cleaning solution tank 12
Cleaning solution volume set too low • Adjust cleaning solution volume
with +/- buttons 4
Cleaning solution button switched off • Press cleaning solution button 4

17
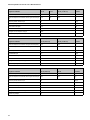
Technical information
Brush deck Single disc Double disc
Working width 43 cm 50 cm 55 cm (2x28 cm) Unit
Theoretical performance 1935 2250 2475 m/s2
Suction nozzle width 72 82 cm
Length 122 125 120 cm
Width 70 60 cm
Height 111 cm
Maximum weight of operational machine 188 192 193 kg
Rated voltage 24 V DC
Rated power, nominal 1340 W
Fresh water tank, nominal +/- 5% 43 l
Brush deck Double disc Roller brush
Working width 65 cm (2x33 cm) 55 cm (2x55 cm) Unit
Theoretical performance 2475 2475 m/s2
Suction nozzle width 72 82 cm
Length 126 121 cm
Width 70 64 cm
Height 111 cm
Maximum weight of operational machine 196 204 kg
Rated voltage 24 V DC
Rated power, nominal 1340 1590 W
Fresh water tank, nominal +/- 5% 43 l
Brush deck Roller brush Orbital
Working width 65 cm (2x65 cm) 50 cm Unit
Theoretical performance 2925 2250 m/s2
Suction nozzle width 820 cm
Length 122 123 cm
Width 74 53 cm
Height 111 cm
Maximum weight of operational machine 206 197 kg
Rated voltage 24 V DC
Rated power, nominal 1590 990 W
Fresh water tank, nominal +/- 5% 43 l

18
Values according to IEC 60335-2-72
Brush deck Single disc Double disc
Working width 43 cm 50 cm 55 cm (2 x 28 cm) Unit
Machine weight with batteries Gel (transport weight) 146 150 151 kg
Machine weight with batteries Lithium (transport weight) 135 138 140 kg
Sound pressure level LpA 63 dB(A)
Uncertainty KpA 2.5 dB(A)
Total vibration <2.5 m/s2
Uncertainty K 0.25 m/s2
Splash water guard IPX3
Protection class III
Brush deck Double disc Roller brush
Working width 65 cm (2x33 cm) 55 cm (2 x 55 cm) Unit
Machine weight with batteries Gel (transport weight) 154 162 kg
Machine weight with batteries Lithium (transport weight) 143 151 kg
Sound pressure level LpA 63 dB(A)
Uncertainty KpA 2.5 dB(A)
Total vibration <2.5 m/s2
Uncertainty K 0.25 m/s2
Splash water guard IPX3
Protection class III
Brush deck Roller brush Orbital
Working width 65 cm (2x65 cm) 50 cm Unit
Machine weight with batteries Gel (transport weight) 164 155 kg
Machine weight with batteries Lithium (transport weight) 153 143 kg
Sound pressure level LpA 63 dB(A)
Uncertainty KpA 2.5 dB(A)
Total vibration <2.5 m/s2
Uncertainty K 0.25 m/s2
Splash water guard IPX3
Protection class III

19
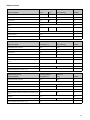
Accessories
No. Item Single disc Double disc Double disc
43 cm 50 cm 2x28 cm 2x33 cm
7510829 Pad drive harpoon grip 43 cm 1x
8504750 Scrubbing brush, nylon, 43 cm 1x
8504780 Scrubbing brush, abrasive, 43 cm 1x
8504800 Scrubbing brush, washed concrete, 43 cm 1x
7510830 Pad drive harpoon grip 50 cm 1x
8504770 Scrubbing brush, nylon, 50 cm 1x
8505130 Scrubbing brush, nylon, abrasive, 50 cm 1x
8505120 Scrubbing brush, washed concrete, 50 cm 1x
7510634 Pad drive harpoon grip 28 cm 2x
7519395 Scrubbing brush, nylon, 28 cm 2x
7510632 Scrubbing brush, washed concrete, 28 cm 2x
7510633 Scrubbing brush, abrasive, 28 cm 2x
7515515 Pad drive harpoon grip 33 cm 2x
7515516 Scrubbing brush, nylon, 33 cm 2x
7515517 Scrubbing brush, washed concrete, 33 cm 2x
7515518 Scrubbing brush, abrasive, 33 cm 2x
7524965 HEPA 13 filter x x x x
7525084 Auto FillStop x x x x
8502830 Filling hose with universal water coupling x x x x
7525083 IntelliDose + x x x x
7525081 IntelliTrail 2.0 x x x x
7525082 IntelliTouch x x x x
Various pads, (polyester brown, blue, red and contact pad) x x x
A página está carregando...
A página está carregando...
A página está carregando...
A página está carregando...
A página está carregando...
A página está carregando...
A página está carregando...
A página está carregando...
A página está carregando...
A página está carregando...
A página está carregando...
A página está carregando...
A página está carregando...
A página está carregando...
A página está carregando...
A página está carregando...
A página está carregando...
A página está carregando...
A página está carregando...
A página está carregando...
A página está carregando...
A página está carregando...
A página está carregando...
A página está carregando...
A página está carregando...
A página está carregando...
A página está carregando...
A página está carregando...
A página está carregando...
A página está carregando...
A página está carregando...
A página está carregando...
A página está carregando...
A página está carregando...
A página está carregando...
A página está carregando...
A página está carregando...
A página está carregando...
A página está carregando...
A página está carregando...
A página está carregando...
A página está carregando...
A página está carregando...
A página está carregando...
A página está carregando...
A página está carregando...
A página está carregando...
A página está carregando...
A página está carregando...
A página está carregando...
A página está carregando...
A página está carregando...
A página está carregando...
A página está carregando...
A página está carregando...
A página está carregando...
A página está carregando...
A página está carregando...
A página está carregando...
A página está carregando...
A página está carregando...
A página está carregando...
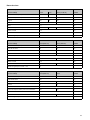
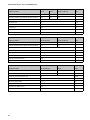
-
 1
1
-
 2
2
-
 3
3
-
 4
4
-
 5
5
-
 6
6
-
 7
7
-
 8
8
-
 9
9
-
 10
10
-
 11
11
-
 12
12
-
 13
13
-
 14
14
-
 15
15
-
 16
16
-
 17
17
-
 18
18
-
 19
19
-
 20
20
-
 21
21
-
 22
22
-
 23
23
-
 24
24
-
 25
25
-
 26
26
-
 27
27
-
 28
28
-
 29
29
-
 30
30
-
 31
31
-
 32
32
-
 33
33
-
 34
34
-
 35
35
-
 36
36
-
 37
37
-
 38
38
-
 39
39
-
 40
40
-
 41
41
-
 42
42
-
 43
43
-
 44
44
-
 45
45
-
 46
46
-
 47
47
-
 48
48
-
 49
49
-
 50
50
-
 51
51
-
 52
52
-
 53
53
-
 54
54
-
 55
55
-
 56
56
-
 57
57
-
 58
58
-
 59
59
-
 60
60
-
 61
61
-
 62
62
-
 63
63
-
 64
64
-
 65
65
-
 66
66
-
 67
67
-
 68
68
-
 69
69
-
 70
70
-
 71
71
-
 72
72
-
 73
73
-
 74
74
-
 75
75
-
 76
76
-
 77
77
-
 78
78
-
 79
79
-
 80
80
-
 81
81
-
 82
82


Taski ULTIMAXX 1900 AM Instruções de operação
- Categoria
- Máquina de chão
- Tipo
- Instruções de operação