RecPro SALIA 125 KID Child Car Seat Guia de usuario
- Categoria
- Assentos de carro
- Tipo
- Guia de usuario

www.recaro-kids.com
SALIA 125 KID
Bedienungsanleitung / User guide /
Istruzioni per l’uso/ Gebruiksaanwijzing /
Instrukcja obsługi / Notice d’utilisation /
Manual de instrucciones / Manual de instruções /
Használati útmutató / Instrucțiuni de utilizare /
Οδηγίε λειτουργία
UN R129/03, i-Size
61 – 125 cm
3 M – 7 Y
DE
6
PL
51
IT
7
ES
94
HU
95
EN
7
FR
51
NL
50
PT
95
RO
138
EL
139

2
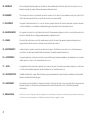
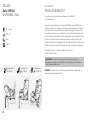
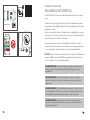
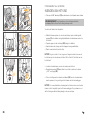
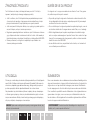
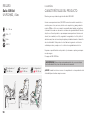
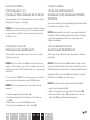
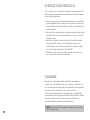
DE – WARNUNG! Die nachfolgende Kurzanleitung dient nur der Übersicht. Um das Maximum an Sicherheit und Komfort zu erreichen, ist es un-
bedingt notwendig, die gesamte Gebrauchsanweisung aufmerksam lesen.
EN – WARNING! The following short instruction is intended to provide an overview only. In order to achieve maximum security and comfort for the
child it is absolutely imperative that you read the whole instruction manual carefully.
IT – AVVERTENZA! Le seguenti istruzioni brevi hanno il solo scopo di fornire uno sguardo d’insieme. Per ottenere la massima sicurezza e il massimo
comfort per il bambino, è assolutamente indispensabile leggere attentamente l’intero manuale di istruzioni.
NL – WAARSCHUWING! De volgende korte instructie is slechts bedoeld als overzicht. Om maximale veiligheid en comfort voor uw kind te bereiken is het
absoluut noodzakelijk dat u de volledige gebruiksaanwijzing zorgvuldig doorleest.
PL – UWAGA! Poniższa krótka instrukcja ma na celu tylko przedstawienie ogólnych informacji. Aby zapewnić największe bezpieczeństwo i
wygodę twojemu dziecku musisz koniecznie przeczytać uważnie całą instrukcję.
FR–AVERTISSEMENT! La brève instruction suivante n’a pour but que de donner un aperçu. Afin d’obtenir une sécurité et un confort maximum pour
votre enfant, il est absolument impératif de lire attentivement l’ensemble du manuel d’instructions.
ES – ¡ADVERTENCIA! La siguiente guía breve constituye una introducción general. Para lograr la máxima seguridad y comodidad para su hijo es impres-
cindible que lea con atención todo el manual de instrucciones.
PT — AVISO! A seguinte breve instrução destina-se apenas a fornecer uma visão geral. A fim de alcançar a máxima segurança e conforto para
o seu filho, é absolutamente imperativo que leia atentamente todo o manual de instruções.
HU – FIGYELMEZTETÉS! Az alábbi rövid tájékoztató csupán áttekintő jellegű. A gyermek maximális biztonsága és kényelme érdekében a teljes használati
útmutató elolvasása feltétlenül szükséges.
RO – AVERTISMENT! Instrucțiunile succinte prezentate în continuare sunt menite să ofere doar informații cu caracter general. Pentru a asigura un nivel
maxim de siguranță și confort pentru copilul dumneavoastră, este absolut imperativ să citiți cu atenție întregul manual
de instrucțiuni.
EL – ΠΡΟΕΙΔΟΠΟΙΗΣΗ! Οι ακόλουθε σύντοε οδηγίε προορίζονται να παρέχουν όνο ια επισκόπηση. Προκειένου να επιτευχθεί η έγιστη ασφάλεια και άνεση για
το παιδί σα, είναι απολύτω απαραίτητο να διαβάσετε προσεκτικά ολόκληρο το εγχειρίδιο οδηγιών.

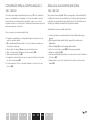
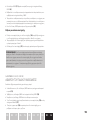
90°
≤18kg
1 2 3 4 5
6 7 8 10
11 12 13 14 15
9
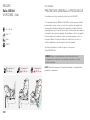
3
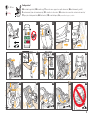
DE: rückwärtsgerichtet / EN: rear facing / IT: uso nel senso opposto a quello di marcia / NL: achterwaarts gericht /
PL: ustawienie tyłem do kierunku jazdy / FR: orienté dos à la route / ES: orientación en sentido contrario a la marcha /
PT: posição voltada para trás / HU: hátra néző / RO: orientat înapoi / EL: ε κατεύθυνση προ τα πίσω
Configuration 1
61 -105 cm

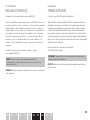
90°
≤18kg
1 2 3 4 5
6 7 8 10
11 12 13
9
14 15
4
76 -105 cm
DE: vorwärtsgerichtet / EN: forward facing / IT: uso nel senso di marcia / NL: voorwaarts gericht /
PL: ustawienie przodem do kierunku jazdy / FR: orienté dos à la route / ES: orientación en sentido de la marcha /
PT: posição voltada para a frente / HU: előre néző / RO: orientat înapoi / EL: ε κατεύθυνση προ τα πίσω
Configuration 2

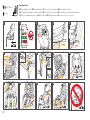
100 -125 cm
1 2 3 4 5
6 7 8 10
11 12 13 14 15
9
5
DE: vorwärtsgerichtet / EN: forward facing / IT: uso nel senso di marcia / NL: voorwaarts gericht /
PL: ustawienie przodem do kierunku jazdy / FR: orienté dos à la route / ES: orientación en sentido de la marcha /
PT: posição voltada para a frente / HU: előre néző / RO: orientat înapoi / EL: ε κατεύθυνση προ τα πίσω
Configuration 3

6
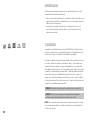
DE - DEUTSCH
PRODUKTÜBERSICHT
Vielen Dank, dass Sie sich für einen Kindersitz von RECARO
entschieden haben.
Dank einzigartiger Erfahrung revolutioniert RECARO seit über 100 Jahren
das Sitzen im Auto, im Flugzeug, im Rennsport und Gaming Bereich. Dieses
konkurrenzlose Know-how fließt auch in die Entwicklung jedes unserer Kin-
dersicherheitssysteme ein. Unser Ziel ist es, Ihnen Produkte zu bieten, die in
puncto Design, Funktionalität, Komfort und Sicherheit neue Maßstäbe setzen.
Bei der Entwicklung dieses Kindersitzes standen Sicherheit, Komfort und
Bedienfreundlichkeit im Vordergrund. Das Produkt wird unter besonderer Qua-
litätsüberwachung hergestellt und erfüllt strengste Sicherheitsanforderungen.
Wir wünschen Ihnen viel Spaß und allzeit sichere Fahrt.
Ihr RECARO Kids Team
WARNUNG! Damit Ihr Kind richtig geschützt werden kann, ist es
unbedingt notwendig, den Kindersitz so zu verwenden, wie es in dieser
Anleitung beschrieben wird.
HINWEIS! Bewahren Sie die Anleitung immer griffbereit in dem dafür vor-
gesehenen Fach am Kindersitz auf.
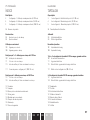
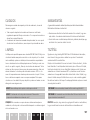
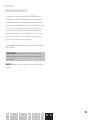
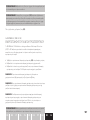
Configuration 1
61 -105 cm
Configuration 2
76 -105 cm
Configuration 3
100 -125 cm
RECARO
Salia 125 Kid
UN R129/03, i-Size
61 – 125 cm
3 M – 7 Y
i-Size
ISOFIX

7
DE PLIT ES HUEN FRNL PT RO EL
EN - ENGLISH
PRODUCT OVERVIEW
Thank you for choosing a child seat from RECARO.
With over 100 years of unique experience, RECARO has revolutionized seating
in cars, airplanes, racing and gaming. This unrivaled know-how also feeds into
the development of each of our child safety systems. Our goal is to provide
you with products that set new standards in terms of design, functionality,
comfort and safety. In the development of this car seat the emphasis was put
on safety, comfort and ease of use. The product is manufactured under careful
quality control and meets the strictest safety requirements.
We wish you lots of fun and safe rides at all times.
Your RECARO Kids Team
WARNING! In order for your child to be properly protected, it is absolutely
necessary to use the car seat as described in these instructions.
NOTE! Always keep this manual at hand in the designated compartment of
the car seat.
IT - ITALIANO
PANORAMICA PRODOTTO
Ti ringraziamo per aver scelto un seggiolino per bambini RECARO.
Con oltre 100 anni di esperienza unica, RECARO ha rivoluzionato il mondo dei
sedili per il settore automobilistico, aereo, delle auto da corsa e del gaming.
Questo know-how senza pari confluisce anche nello sviluppo di ogni nostro
singolo sistema di sicurezza per bambini. Il nostro obiettivo è mettere a tua
disposizione prodotti che definiscono nuovi standard in termini di design,
funzionalità, comfort e sicurezza. Nella creazione di questo seggiolino auto,
è stato posto l’accento su sicurezza, comfort e facilità di utilizzo. Il prodotto è
stato creato seguendo un minuzioso controllo qualità e soddisfa i più rigorosi
requisiti di sicurezza.
Ti auguriamo viaggi sempre divertenti e sicuri.
Il tuo team RECARO Kids
AVVERTENZA! Per garantire un’adeguata protezione del bambino, è
assolutamente necessario usare il seggiolino auto come descritto nelle
presenti istruzioni.
NOTA! Tenere questo manuale sempre a portata di mano conservandolo
nell’apposito vano del seggiolino auto.

8
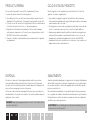
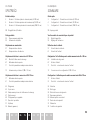
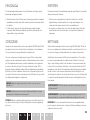
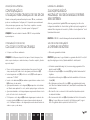
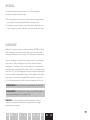
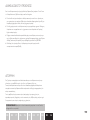
DE - DEUTSCH
INHALTSVERZEICHNIS
Kurzanleitung
3 Konfiguration 1: Rückwärtsgerichtete Verwendung (61-105 cm)
4 Konfiguration 2: Vorwärtsgerichtete Verwendung (76-105 cm)
5 Konfiguration 3: Vorwärtsgerichtete Verwendung (100-125 cm)
6 Produktübersicht
Funktionen
10 Einstellen der Kopfstütze
12 Sitz und Liegeverstellung
Gebrauch im Fahrzeug
12 Sicherheit im Fahrzeug
16 Sicherheit für das Kind
Konfiguration 1 & 2: Verwendung für Kinder von 61-105 cm
18 Einbau des Kindersitzes
22 Anschnallen des Kindes
26 Checkliste: So ist das Kind richtig gesichert
28 Umbau zu Konfiguration 3 (100 -125 cm)
Konfiguration 3: Verwendung für Kinder von 100-125 cm
32 Anschnallen des Kindes
36 Checkliste: So ist das Kind richtig gesichert
38 Pflege
38 Reinigung
40 Abnehmen des Sitzbezuges
42 Allgemeine Hinweise
44 Maßnahmen nach einem Unfall
46 Produktlebensdauer
46 Entsorgung
48 Garantiebestimmungen

9
DE PLIT ES HUEN FRNL PT RO EL
EN - ENGLISH
INDEX
IT - ITALIANO
INDICE
Quick Guide
3 Configuration 1: Rearward-facing use (61-105 cm)
4 Configuration 2 : Forward-facing use (76-105 cm)
5 Configuration 3 : Forward-facing use (100-125 cm)
6 Product Overview
Features
11 Adjusting the headrest
11 Recline Adjustment
Use in the Vehicle
13 Safety in the Vehicle
17 Safety for the Child
Configuration 1 & 2: Use for children from 61-105 cm
19 Installation of the Car Seat
23 Strapping the child
27 Checklist: Securing the child correctly
29 Conversion to configuration 3 (100 -125 cm)
Configuration 3: Use for children from 100-125 cm
33 Strapping the child
37 Checklist: Securing the child correctly
39 Care
39 Cleaning
41 Removal of the seatcover
43 General notes
45 Measures after an accident
47 Product lifespan
47 Disposal
49 Warranty terms
Guida rapida
3 Configurazione 1: uso nel senso contrario a quello di marcia (61-105 cm)
4 Configurazione 2: uso nel senso di marcia (76-105 cm)
5 Configurazione 3: uso nel senso di marcia (100-125 cm)
6 Panoramica prodotto
Caratteristiche
11 Regolazione del poggiatesta
11 Regolazione della reclinazione
Uso nel veicolo
13 Sicurezza nel veicolo
17 Sicurezza per il bambino
Configurazione 1 e 2: uso per bambini da 61 a 105 cm
19 Installazione del seggiolino auto
23 Assicurare il bambino
27 Lista di controllo: fissare correttamente il bambino
29 Passaggio alla configurazione 3 (100 -125 cm)
Configurazione 3: uso per bambini da 100 a 125 cm
33 Assicurare il bambino
37 Lista di controllo: fissare correttamente il bambino
39 Cura
39 Pulizia
41 Rimozione della fodera del seggiolino auto
43 Note generali
45 Misure in seguito a un incidente
47 Ciclo di vita del prodotto
47 Smaltimento
49 Termini della garanzia

2
3
4
1
10
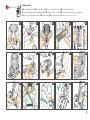
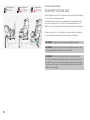
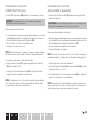
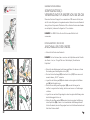
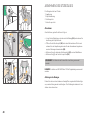
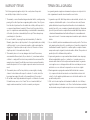
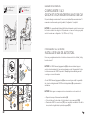
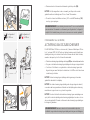
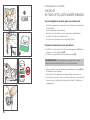
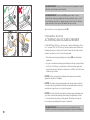
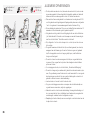
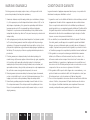
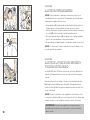
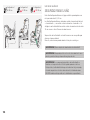
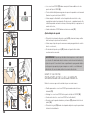
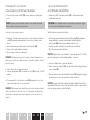
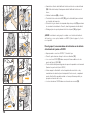
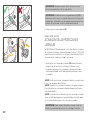
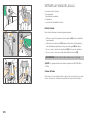
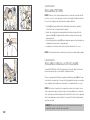
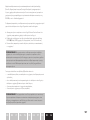
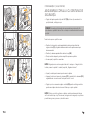
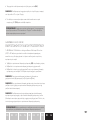
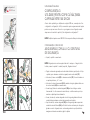
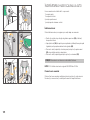
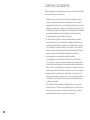
FUNKTIONEN
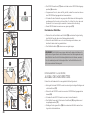
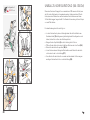
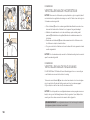
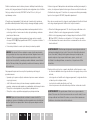
EINSTELLEN DER KOPFSTÜTZE
HINWEIS! Nur eine in optimaler Höhe eingestellte Kopfstütze gewährt Ihrem
Kind bestmöglichen Schutz und Komfort. Die Höhenverstellung kann dazu in
9 Positionen erfolgen.
• Die Kopfstütze (1) muss so eingestellt werden, dass der Abstand zwischen
den Schultern des Kindes und der Kopfstütze 3 cm (ca. 2 Finger) beträgt.
• Lockern Sie die Schultergurte, indem Sie die Verstelltaste am Zentralverstel-
ler (2) betätigen und gleichzeitig beide Schultergurte zu sich ziehen.
• Betätigen Sie den Verstellgriff (3) an der Oberkante der Kopfstütze, um die
Kopfstütze in die passende Position zu bringen.
• Achten Sie darauf, dass die Kopfstütze in der gewünschten Position mit
einem hörbaren Klick einrastet.
HINWEIS! Die Schultergurte sind mit der Kopfstütze fest verbunden und
müssen nicht separat eingestellt werden.
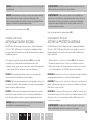
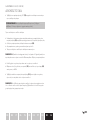
FUNKTIONEN
SITZ UND LIEGEVERSTELLUNG
Der RECARO Salia 125 Kid bietet 4 unterschiedliche Sitz- und Liegepositionen
zum sicheren und komfortablen Transport des Kindes im Fahrzeug.
Um die Sitz- und Liegepositionen einzustellen, ziehen Sie den Verstellgriff (4)
an der Vorderseite des Kindersitzes. Nun kann die Neigung des Kindersitzes
eingestellt werden. Achten Sie immer darauf, dass der Kindersitz hörbar
einrastet.
HINWEIS! Neugeborene und Kleinkinder, die noch nicht selbstständig sitzen
können (unter 1 Jahr), sollten aus orthopädischen und sicherheitstechnischen
Gründen immer in der flachsten Liegeposition rückwärtsgerichtet transportiert
werden.
WARNUNG! Die Verstellung zwischen Sitz- und Liegeposition während der
Fahrt ist aus Sicherheitsgründen ausdrücklich untersagt!

11
DE PLIT ES HUEN FRNL PT RO EL
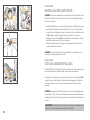
FEATURES
ADJUSTING THE HEADREST
NOTE! Only a headrest set at the optimum height will provide your child with
the best possible protection and comfort. The height can be adjusted in 9
positions for this purpose.
• The headrest (1) must be adjusted in such a way that the distance between
the child‘s shoulders and the headrest is 3 cm (approx. 2 fingers).
• Loosen the shoulder straps by pressing the adjustment button on the central
adjuster (2) and simultaneously pulling both shoulder straps towards you.
• Operate the adjustment handle (3) on the upper edge of the headrest to
move the headrest to the appropriate position.
• Make sure that the headrest locks into the desired position with an
audible click.
NOTE! The shoulder straps are fixed to the headrest and do not need to be
adjusted separately.
CARATTERISTICHE
REGOLAZIONE DEL POGGIATESTA
NOTA! Solo un poggiatesta posizionato all’altezza ottimale garantirà la miglior
protezione e il miglior comfort possibile per il bambino. Per questo motivo,
l’altezza è regolabile in 9 posizioni.
• Il poggiatesta (1) deve essere regolato in modo tale che la distanza tra le
spalle del bambino e il poggiatesta stesso sia di 3 cm (circa 2 dita).
• Allentare gli spallacci premendo il tasto di regolazione del regolatore centra-
le (2) e tirando simultaneamente entrambi gli spallacci verso di sé.
• Azionare la maniglia di regolazione (3) sul bordo superiore del poggiatesta
per spostarlo nella posizione appropriata.
• Assicurarsi che il poggiatesta si blocchi nella posizione desiderata con uno
scatto.
NOTA! Gli spallacci sono fissati sul poggiatesta e non è necessario regolarli
separatamente.
FEATURES
RECLINE ADJUSTMENT
The RECARO Salia 125 Kid offers 4 different reclining positions for safe and
comfortable transport of the child in the vehicle.
To adjust the recline position, pull the adjustment handle (4) on the front of
the car seat. Now the inclination of the car seat can be adjusted.Always make
sure that the car seat clicks audibly into place.
NOTE! For orthopedic and safety reasons, newborns and infants who are
not yet able to sit up on their own (under 1 year of age) should always be
transported rearward-facing in the flattest reclining position.
WARNING! For safety reasons, it is strictly forbidden to adjust the recline
position while driving!
CARATTERISTICHE
REGOLAZIONE DELLA RECLINAZIONE
RECARO Salia 125 Kid offre 4 diverse posizioni di reclinazione per un trasporto
sicuro e confortevole del bambino all’interno del veicolo.
Per regolare la posizione di reclinazione, tirare la maniglia di regolazione (4) sul-
la parte anteriore del seggiolino auto. È adesso possibile regolare l’inclinazione
del seggiolino auto.
Assicurarsi sempre che il seggiolino auto scatti in posizione.
NOTA! Per motivi ortopedici e di sicurezza, i neonati e i bambini che non sono
ancora in grado di stare seduti da soli (meno di 1 anno di età) vanno trasportati
sempre nel senso contrario a quello di marcia e nella posizione di reclinazione
più distesa.
AVVERTENZA! Per motivi di sicurezza, è severamente vietato regolare la
posizione di reclinazione durante la guida!

Volkswagen Golf 7
6
5
12
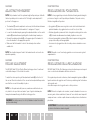
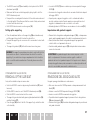
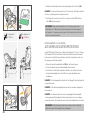
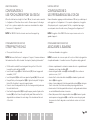
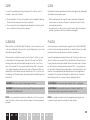
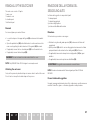
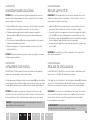
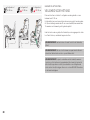
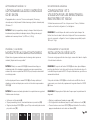
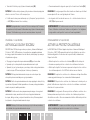
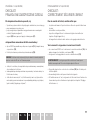
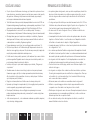
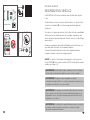
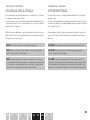
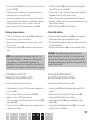
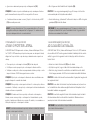
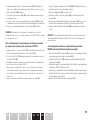
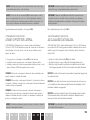
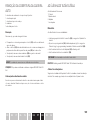
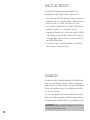
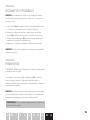
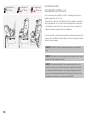
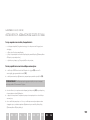
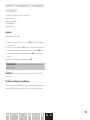
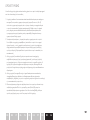
GEBRAUCH IM FAHRZEUG
SICHERHEIT IM FAHRZEUG
Der RECARO Salia 125 Kid ist ein Kinderrückhaltesystem der i-Size Kategorie.
Der Einbau ist auf allen i-Size Fahrzeugsitzen möglich. I-Size Sitzplätze sind
durch das Symbol (5) gekennzeichnet. Zusätzlich können Sie das Fahrzeug-
handbuch zur Hilfe nehmen.
Verfügt Ihr Fahrzeug über keinen i-Size Sitzplatz, prüfen Sie bitte mit der Fahr-
zeugkompatibilitätsliste auf unserer Website, auf welchem Fahrzeugsitz der
Sitz installiert werden darf. Scannen Sie dazu den nebenstehenden QR Code.
Wir empfehlen den Kindersitz auf der Rückbank und wenn möglich hinter
dem Beifahrersitz zu installieren. Wenn Sie den Kindersitz auf dem Beifahrer-
sitz verwenden möchten, beachten Sie bitte unbedingt die Punkte auf der
nächsten Seite.
HINWEIS! I-Size Sitzplätze sind immer auch mit zwei ISOFIX Befestigungs-
punkten (6) ausgestattet. Ohne diese ISOFIX Metalllaschen kann der Kinder-
sitz in Konfiguration 1 und 2 nicht installiert werden.
WARNUNG! Der Kindersitz darf nicht mit anderen Systemen kombiniert
werden. Die Zulassung erlischt sobald Veränderungen vorgenommen
werden.
WARNUNG! Achten Sie darauf, dass Gepäckstücke und sonstige
Gegenstände, welche die Insassen bei einem Unfall verletzen könnten,
sicher verstaut sind.
WARNUNG! Befestigen Sie den Kindersitz immer korrekt im Fahrzeug,
auch wenn er nicht benutzt wird. Bereits bei einer Notbremsung oder
einem geringen Aufprall können unbefestigte Teile andere Mitfahrer und Sie
selbst verletzten.
WARNUNG! Auf rückwärtsgerichteten Fahrzeugsitzen oder auf solchen
die quer zur Fahrtrichtung angeordnet sind, ist die Verwendung des
Kindersitzes nicht zulässig!

13
DE PLIT ES HUEN FRNL PT RO EL
USE IN THE VEHICLE
SAFETY IN THE VEHICLE
The RECARO Salia 125 Kid is a child restraint system of the i-Size category.
Installation is possible on all i-Size vehicle seats. I-Size seats are marked with
the symbol (5). In addition, you can refer to the vehicle manual for assistance.
If your vehicle does not have an i-Size seat, please use the vehicle compati-
bility list on our website to check on which vehicle seat the car seat may be
installed. To do so, scan the adjacent QR code.
We recommend installing the car seat on the back seat and, if possible,
behind the front passenger seat. If you want to use the car seat on the front
passenger seat, please be sure to follow the instructions on the next page.
NOTE! I-Size vehicle seats are always also equipped with two ISOFIX attach-
ment points (6). Without these ISOFIX attachment points, the car seat cannot
be installed in Configuration 1 and 2.
WARNING! The car seat must not be combined with other systems. The
approval expires as soon as changes are made.
WARNING! Make sure that luggage and other objects which could injure
the occupants in the event of an accident are stowed safely.
WARNING! Always secure the child seat correctly in the vehicle even
when it is not in use. Even in the event of emergency braking or a minor
impact, unsecured parts can injure other passengers and yourself.
WARNING! The use of the car seat is not permitted on rearward-facing
vehicle seats or on seats that are arranged perpendicular to the direction
of travel!
USO NEL VEICOLO
SICUREZZA NEL VEICOLO
RECARO Salia 125 Kid è un sistema di ritenuta dei bambini appartenente alla
categoria i-Size.
È consentita l’installazione su tutti i sedili di tipo i-Size. I sedili i-Size sono
contrassegnati dal simbolo (5). Per ulteriore assistenza, consultare il manuale
del veicolo.
Se il veicolo non dispone di un sedile i-Size, consultare l’elenco di compatibilità
del veicolo sul nostro sito web per verificare su quale sedile è possibile instal-
lare il seggiolino auto. Per farlo, scansionare il codice QR adiacente.
Consigliamo di installare il seggiolino auto sul sedile posteriore e, se possibile,
dietro il sedile anteriore lato passeggero. Se si desidera usare il seggiolino
auto sul sedile anteriore lato passeggero, assicurarsi di seguire le istruzioni
riportate nella pagina seguente.
NOTA! I sedili i-Size sono inoltre dotati sempre di due punti di fissaggio
ISOFIX (6). In assenza dei punti di fissaggio ISOFIX, non è possibile installare il
seggiolino auto in Configurazione 1 e 2.
AVVERTENZA! Il seggiolino auto non deve essere usato in combinazione
con altri sistemi. L’approvazione scade non appena vengono applicate
modifiche.
AVVERTENZA! Assicurarsi che bagagli e altri oggetti che potrebbero ferire
gli occupanti in caso di incidente siano fissati in sicurezza.
AVVERTENZA! Fissare sempre correttamente il seggiolino auto nel
veicolo, anche quando non è in uso. Anche in caso di frenata di emergenza
o di un impatto lieve, le parti non fissate potrebbero ferire sé stessi e gli
altri passeggeri.
AVVERTENZA! L’uso del seggiolino auto non è consentito su sedili rivolti
all’indietro o su sedili posizionati perpendicolarmente al senso di marcia!

6
14
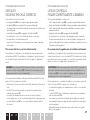
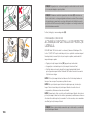
An einigen Autositzen aus empfindlichem Material (z.B. Velours, Leder) kön-
nen durch die Benutzung von Kindersitzen möglicherweise Gebrauchsspuren
oder Abfärbungen auftreten. Um dem vorzubeugen, können Sie z.B. den
separat erhältlichen RECARO Car Seat Protector verwenden.
In Ausnahmefällen kann der Kindersitz auch vorne auf dem Beifahrersitz ver-
wendet werden. Beachten Sie dabei bitte die folgenden Punkte:
• Deaktivieren Sie den Beifahrerairbag! Sollte dies in Ihrem Fahrzeug nicht
möglich sein, ist eine Verwendung auf der Beifahrerseite untersagt.
• Überprüfen Sie, ob der Beifahrersitz mit ISOFIX Befestigungspunkten (6)
ausgestattet ist. Ohne ISOFIX ist eine Verwendung in Konfiguration 1 und
2 nicht möglich.
• Die Empfehlungen des Fahrzeugherstellers sind unbedingt zu befolgen!
WARNUNG! Verwenden Sie den Kindersitz nicht auf einem Sitz, auf dem
ein Frontairbag aktiviert ist. Dieser muss erst deaktiviert werden. Bei einem
Unfall kann sich der großvolumige Frontairbag explosionsartig entfalten
und dadurch das Kind schwer verletzen oder sogar töten. Seitenairbags
hingegen müssen nicht deaktiviert werden.
Achten Sie zum Schutz aller Fahrzeuginsassen stets darauf, dass
- die umklappbaren Rückenlehnen der Fahrzeugsitze eingerastet sind und
sich in einer aufrechten Position befinden
- bei einem Einbau des Kindersitzes auf dem Beifahrersitz, dieser in der
hintersten Position steht
- im Fahrzeug alle beweglichen Gegenstände gesichert sind
- alle Personen im Fahrzeug angeschnallt sind
WARNUNG! Halten Sie das Kind im Auto nie auf dem Schoß! Durch
die enormen Kräfte, die bei einem Unfall frei werden, können Sie das
Kind unmöglich festhalten. Schnallen Sie sich und ein Kind auch niemals
zusammen mit einem Fahrzeuggurt an.

15
DE PLIT ES HUEN FRNL PT RO EL
Some car seats made of sensitive materials (e.g. velour, leather) may show
signs of wear or discoloration due to the use of car seats. To prevent this,
you can use, for example, the RECARO Car Seat Protector, which is available
separately.
In exceptional cases, the car seat can also be used in the front on the front
passenger seat. Please note the following points:
• Deactivate the front passenger airbag! If this is not possible in your vehicle,
the use on the front passenger seat is prohibited.
• Check whether the front passenger seat is equipped with ISOFIX
attachment points (6). Without ISOFIX, use in configuration 1 and 2 is not
possible.
• It is absolutely necessary to follow the recommendations of the vehicle
manufacturer!
WARNING! Do not use the car seat on a vehicle seat on which a front
airbag is activated. This must first be deactivated. In an accident, the large-
volume front airbag may deploy explosively, causing serious injury or even
death to the child. Side airbags, on the other hand, do not need to be
deactivated.
For the protection of all vehicle occupants, always ensure that
- the folding backrests of the vehicle seats are engaged and in an upright
position
- if the car seat is installed on the front passenger seat, the vehicle seat is in
its rearmost position
- all movable objects in the vehicle are secured
- all persons in the vehicle are wearing seat belts
WARNING! Never keep the child on your lap in the car! Due to the
enormous forces exerted in the event of an accident, it is impossible for you
to hold onto the child. Also, never buckle yourself and the child together
with a vehicle seat belt.
Alcuni sedili auto realizzati in materiali sensibili (ad es. velluto, pelle) potreb-
bero mostrare segni di usura o decolorazione dovuti all’utilizzo del seggiolino.
Per evitarlo, è possibile usare, ad esempio, il coprisedile RECARO, disponibile
separatamente.
In casi eccezionali, il seggiolino auto può essere usato anche nella parte ante-
riore, sul sedile anteriore lato passeggero. Tenere presente i seguenti punti:
• Disattivare l’airbag anteriore lato passeggero! Se il proprio veicolo non
consente questa azione, l’uso sul sedile anteriore lato passeggero è vietato.
• Controllare se il sedile anteriore lato passeggero è dotato dei punti di
fissaggio ISOFIX (6). In assenza di ISOFIX, l’uso in configurazione 1 e 2
non è possibile.
• È assolutamente necessario seguire le raccomandazioni del produttore
del veicolo!
AVVERTENZA! Non usare il seggiolino auto sul sedile di un veicolo in cui
è attivato l’airbag frontale. Questo deve prima essere disattivato. In un
incidente, il voluminoso airbag frontale potrebbe dispiegarsi in maniera
esplosiva e causare lesioni gravi o persino la morte del bambino. Non è
necessario, invece, disattivare gli airbag laterali.
Per la protezione di tutti gli occupanti del veicolo, assicurarsi sempre che
- gli schienali ribaltabili del sedile siano fissati e in posizione verticale;
- se il seggiolino auto è installato sul sedile anteriore lato passeggero, il sedile
del veicolo sia arretrato il più possibile;
- tutti gli oggetti mobili del veicolo siano fissati;
- tutte le persone all’interno dell’abitacolo indossino la cintura di sicurezza.
AVVERTENZA! Non tenere mai il bambino in braccio in macchina! A causa
delle enormi forze esercitate in caso di incidente, è impossibile tenere
aggrappato a sé il bambino. Inoltre, non allacciarsi insieme al bambino con
la stessa cintura di sicurezza.

Configuration 1
61 -105 cm
Configuration 2
76 -105 cm
Configuration 3
100 -125 cm
16
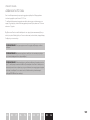
GEBRAUCH IM FAHRZEUG
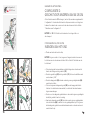
SICHERHEIT FÜR DAS KIND
Dieser Kindersitz kann durch 3 Konfigurationen insgesamt für eine Kindesgrö-
ße von 61-125 cm verwendet werden.
Der Kindersitz kann rückwärts- und vorwärtsgerichtet verwendet werden.
Unter einer Kindesgröße von 76 cm bzw. unter einem Kindesalter von 15
Monaten ist die rückwärtsgerichtete Verwendung zwingend vorgeschrieben.
Nehmen Sie das Kind so oft wie möglich aus dem Kindersitz und entlasten
Sie seine Wirbelsäule. Unterbrechen Sie dazu längere Autofahrten.
WARNUNG! Lassen Sie Ihr Kind nie unbeaufsichtigt im Kindersitz!
WARNUNG! Auch wenn Sie das Kind nur wenige Minuten allein im Auto
lassen besteht bereits die Gefahr eines Hitzeschlags!
WARNUNG! Die Kunststoffteile des Kindersitzes erhitzen sich in der
Sonne. Das Kind kann sich daran verbrennen. Schützen Sie das Kind und
den Kindersitz vor intensiver Sonneneinstrahlung z.B. indem Sie ein helles
Tuch über den Sitz legen. Im Fachhandel ist dazu außerdem ein RECARO
Summer Cover verfügbar.

17
DE PLIT ES HUEN FRNL PT RO EL
USE IN THE VEHICLE
SAFETY FOR THE CHILD
This car seat can be used through 3 configurations in total for a child size from
61-125 cm.
The child seat can be used rearward-facing and forward-facing. Under a child
height of 76 cm and under a child age of 15 months, the rearward-facing use
is mandatory.
Take the child out of the child seat as often as possible and relieve the strain
on its spine. To do this, interrupt longer car journeys.
USO NEL VEICOLO
SICUREZZA PER IL BAMBINO
Questo seggiolino auto può essere usato in un totale di 3 configurazioni per
bambini di dimensioni comprese tra 61 e 125 cm.
Il seggiolino auto può essere usato nel senso di marcia e nel senso contrario a
quello di marcia. Per bambini con un’altezza inferiore a 76 cm e un’età inferiore
a 15 mesi, è obbligatorio l’uso nel senso contrario a quello di marcia.
Togliere il bambino dal seggiolino quanto più frequentemente possibile per
alleviare la tensione sulla colonna vertebrale. Per farlo, fare delle soste in
viaggi in auto prolungati.
WARNING! Never leave your child unattended in the child seat!
WARNING! Even if you leave the child alone in the car for only a few
minutes, there is already a risk of heat stroke!
WARNING! The plastic parts of the child seat heat up in the sun. The child
can burn itself on them. Protect the child and the car seat from intense
sunlight, e.g. by placing a light-colored cloth over the seat. A RECARO
Summer Cover is also available from retailers for this purpose.
AVVERTENZA! Non lasciare mai il bambino incustodito sul seggiolino!
AVVERTENZA! Anche se il bambino viene lasciato da solo in auto per
pochi minuti, esiste già un rischio di colpo di calore!
AVVERTENZA! Le parti in plastica del seggiolino auto si riscaldano al sole.
Il bambino potrebbe bruciarsi entrandovi a contatto. Proteggere il bambino
e il seggiolino dalla luce solare intensa, ad esempio posizionandovi sopra
un panno chiaro. Per questo scopo, è inoltre disponibile una fodera estiva
RECARO presso i rivenditori.

Configuration 1
61 -105 cm
Configuration 2
76 -105 cm
6
10
9
8
12 11
18
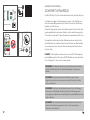
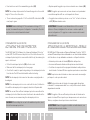
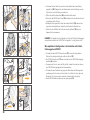
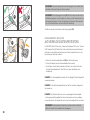
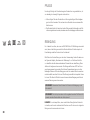
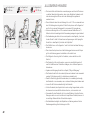
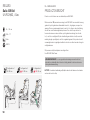
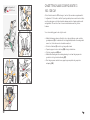
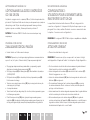
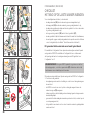
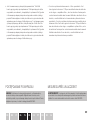
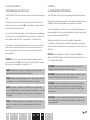
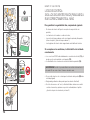
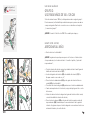
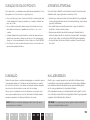
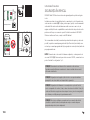
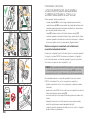
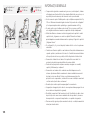
GEBRAUCH IM FAHRZEUG
KONFIGURATION 1 & 2:
VERWENDUNG FÜR KINDER VON 61-105 CM
Unter einer Kindesgröße von 76 cm bzw. unter einem Kindesalter von 15
Monaten ist die rückwärtsgerichtete Verwendung (Konfiguration 1) zwingend
vorgeschrieben.
HINWEIS! Unfallstatistiken belegen, dass ein rückwärtsgerichteter Transport
des Kindes im Fahrzeug am sichersten ist. Deshalb empfehlen wir die Konfi-
guration 1 so lange wie möglich beizubehalten (bis 105 cm / ≤ 18 kg).
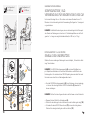
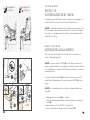
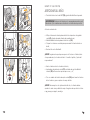
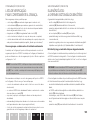
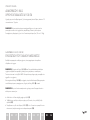
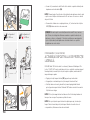
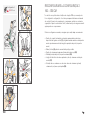
KONFIGURATION 1 & 2 (61-105 CM)
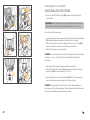
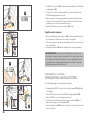
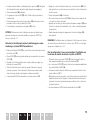
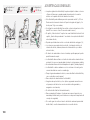
EINBAU DES KINDERSITZES
Wählen Sie einen zulässigen Fahrzeugsitz wie im Kapitel „Sicherheit im Fahr-
zeug“ beschrieben.
HINWEIS! Die ISOFIX Befestigungspunkte (6) sind zwei Metalllaschen
pro Sitzplatz und befinden sich zwischen Rückenlehne und Sitzfläche des
Fahrzeugsitzes. Sie sind durch das ISOFIX-Symbol gekennzeichnet.Für mehr
Informationen sehen Sie im Fahrzeughandbuch nach.
• Sind die ISOFIX Befestigungspunkte (6) Ihres Fahrzeugs schwer zugängig,
so können Sie die mitgelieferten ISOFIX Einführhilfen (8) dauerhaft in
diesen einhängen.
HINWEIS! Stellen Sie keine Gegenstände in den Fußraum vor den Kindersitz.
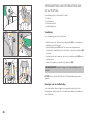
• Klappen Sie den Stützfuß vollständig aus (9).
• Ziehen Sie den Ausleger horizontal heraus, bis der Indikator grün zeigt (10).
• Schieben Sie beide ISOFIX Konnektoren (11) bis zum Anschlag heraus.
Drücken Sie dazu gleichzeitig die seitlichen Tasten (12).

19
DE PLIT ES HUEN FRNL PT RO EL
USE IN THE VEHICLE
CONFIGURATION 1 & 2:
USE FOR CHILDREN FROM 61-105 CM
Under a child height of 76 cm and under a child age of 15 months, the
rearward-facing use (Configuration 1) is mandatory.
NOTE! Accident statistics show that rearward-facing transport of the child in
the vehicle is the safest. We therefore recommend retaining configuration 1
for as long as possible (up to 105 cm / ≤ 18 kg).
USO NEL VEICOLO
CONFIGURAZIONE 1 E 2:
USO PER BAMBINI DA 61 A 105 CM
Per bambini con un’altezza inferiore a 76 cm e un’età inferiore a 15 mesi, è
obbligatorio l’uso nel senso contrario a quello di marcia (configurazione 1).
NOTA! Le statistiche sugli incidenti dimostrano che è più sicuro trasportare
il bambino nel senso contrario a quello di marcia. Consigliamo pertanto di
mantenere la configurazione 1 il più a lungo possibile (fino a 105 cm / ≤ 18 kg).
CONFIGURATION 1 & 2 (61-105 CM)
INSTALLATION OF THE CAR SEAT
Select an approved vehicle seat as described in the chapter „Safety in the
vehicle“.
NOTE! The ISOFIX attachment points (6) are two metal clips per vehicle seat
and are located between the backrest and the seat surface. They are identified
by the ISOFIX symbol. For more information, refer to the vehicle manual.
If the ISOFIX attachment points (6) of your vehicle are difficult to access, you
can permanently hook the supplied ISOFIX insert guides (8) into them.
NOTE! Do not place any objects in the footwell in front of the car seat.
• Fold the support leg all the way out (9).
• Pull out the slide-out horizontally until the indicator shows green (10).
• Push both ISOFIX connectors (11) out as far as they will go. To do this,
simultaneously press the side buttons (12).
CONFIGURAZIONE 1 E 2 (61-105 CM)
INSTALLAZIONE DEL SEGGIOLINO AUTO
Selezionare un sedile auto approvato secondo quanto descritto nella sezione
“Sicurezza nel veicolo”.
NOTA! I punti di fissaggio ISOFIX (6) sono due clip di metallo per sedile e si
trovano tra lo schienale e la superficie del sedile. Sono identificati dal simbolo
ISOFIX. Per maggiori informazioni, consultare il manuale del veicolo.
Se i punti di fissaggio ISOFIX (6) del proprio veicolo sono di difficile accesso,
è possibile agganciarvi permanentemente le guide di inserimento ISOFIX (8)
in dotazione.
NOTA! Non posizionare alcun oggetto sotto il sedile davanti al seggiolino auto.
• Estrarre completamente la gamba di supporto (9).
• Estrarre orizzontalmente la guida fino a quando l’indicatore diventa di colore
verde (10).
• Estrarre al massimo entrambi i connettori ISOFIX (11). Per farlo, premere
simultaneamente i tasti laterali (12).

90°
11
6
13
14
15
16
12
14
17
18
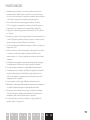
20
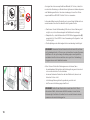
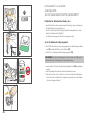
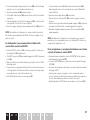
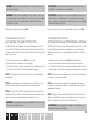
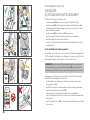
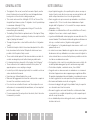
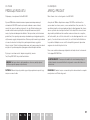
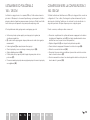
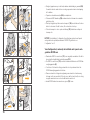
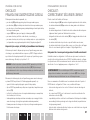
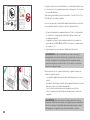
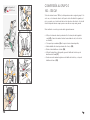
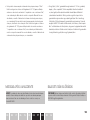
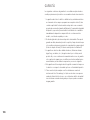
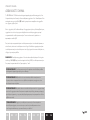
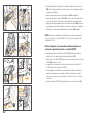
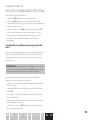
• Die ISOFIX Konnektoren (11) müssen hörbar an den ISOFIX Befestigungs-
punkten (6) einrasten.
• Vergewissern Sie sich, dass der Sitz gut hält, indem Sie versuchen ihn aus
den ISOFIX Befestigungspunkten herauszuziehen.
• Schieben Sie den Kindersitz nun gegen die Rücklehne des Fahrzeugsitzes
und bewegen Sie ihn nach rechts und links. So stellen Sie sicher, dass der
Kindersitz so fest wie möglich verankert ist und am Autositz anliegt.
• Beide ISOFIX Indikatoren müssen nun grün zeigen (13).
Einstellen des Stützfußes
• Drücken Sie die Verstelltaste am Stützfuß (14) und ziehen Sie gleichzeitig
den Stützfuß aus bis dieser den Fahrzeugboden berührt.
• Ziehen Sie den Stützfuß nun noch eine Verrastung weiter heraus, um
direkten Bodenkontakt zu gewährleisten.
• Der Stützfußindikator (15) unten muss nun grün zeigen.
WARNUNG! Der Stützfuß muss immer direkten Bodenkontakt haben. Es
dürfen keine Gegenstände oder Hohlräume zwischen Fahrzeugboden und
dem Stützfuß sein. Besitzt Ihr Fahrzeug Staufächer im Fußraum, wenden
Sie sich unbedingt an den Fahrzeughersteller. Im Zweifelsfall nutzen Sie
bitte einen anderen Fahrzeugsitz.
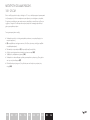
KONFIGURATION 1 & 2 (61-105 CM)
AUSBAU DES KINDERSITZES
Führen Sie die Einbauschritte in umgekehrter Reihenfolge durch:
• Entriegeln Sie beide ISOFIX Konnektoren durch gleichzeitiges Betätigen der
seitlichen Tasten (12).
• Ziehen Sie die ISOFIX Konnektoren aus den ISOFIX Befestigungspunkten
heraus (16).
• Schieben Sie die ISOFIX Konnektoren zurück in den Kindersitz.
• Der Stützfuß kann durch Drücken der Verstelltaste (14) eingefahren und
eingeklappt werden (17).
• Betätigen Sie die graue Taste (18) links neben dem Stützfuß um den Aus-
leger horizontal einzufahren.
A página está carregando...
A página está carregando...
A página está carregando...
A página está carregando...
A página está carregando...
A página está carregando...
A página está carregando...
A página está carregando...
A página está carregando...
A página está carregando...
A página está carregando...
A página está carregando...
A página está carregando...
A página está carregando...
A página está carregando...
A página está carregando...
A página está carregando...
A página está carregando...
A página está carregando...
A página está carregando...
A página está carregando...
A página está carregando...
A página está carregando...
A página está carregando...
A página está carregando...
A página está carregando...
A página está carregando...
A página está carregando...
A página está carregando...
A página está carregando...
A página está carregando...
A página está carregando...
A página está carregando...
A página está carregando...
A página está carregando...
A página está carregando...
A página está carregando...
A página está carregando...
A página está carregando...
A página está carregando...
A página está carregando...
A página está carregando...
A página está carregando...
A página está carregando...
A página está carregando...
A página está carregando...
A página está carregando...
A página está carregando...
A página está carregando...
A página está carregando...
A página está carregando...
A página está carregando...
A página está carregando...
A página está carregando...
A página está carregando...
A página está carregando...
A página está carregando...
A página está carregando...
A página está carregando...
A página está carregando...
A página está carregando...
A página está carregando...
A página está carregando...
A página está carregando...
A página está carregando...
A página está carregando...
A página está carregando...
A página está carregando...
A página está carregando...
A página está carregando...
A página está carregando...
A página está carregando...
A página está carregando...
A página está carregando...
A página está carregando...
A página está carregando...
A página está carregando...
A página está carregando...
A página está carregando...
A página está carregando...
A página está carregando...
A página está carregando...
A página está carregando...
A página está carregando...
A página está carregando...
A página está carregando...
A página está carregando...
A página está carregando...
A página está carregando...
A página está carregando...
A página está carregando...
A página está carregando...
A página está carregando...
A página está carregando...
A página está carregando...
A página está carregando...
A página está carregando...
A página está carregando...
A página está carregando...
A página está carregando...
A página está carregando...
A página está carregando...
A página está carregando...
A página está carregando...
A página está carregando...
A página está carregando...
A página está carregando...
A página está carregando...
A página está carregando...
A página está carregando...
A página está carregando...
A página está carregando...
A página está carregando...
A página está carregando...
A página está carregando...
A página está carregando...
A página está carregando...
A página está carregando...
A página está carregando...
A página está carregando...
A página está carregando...
A página está carregando...
A página está carregando...
A página está carregando...
A página está carregando...
A página está carregando...
A página está carregando...
A página está carregando...
A página está carregando...
A página está carregando...
A página está carregando...
A página está carregando...
A página está carregando...
A página está carregando...
A página está carregando...
A página está carregando...
A página está carregando...
A página está carregando...
A página está carregando...
A página está carregando...
A página está carregando...
A página está carregando...
A página está carregando...
A página está carregando...
A página está carregando...
A página está carregando...
A página está carregando...
A página está carregando...
A página está carregando...
A página está carregando...
A página está carregando...
A página está carregando...
A página está carregando...
A página está carregando...
A página está carregando...
A página está carregando...
A página está carregando...
A página está carregando...
A página está carregando...
A página está carregando...
A página está carregando...
A página está carregando...
A página está carregando...
A página está carregando...
-
 1
1
-
 2
2
-
 3
3
-
 4
4
-
 5
5
-
 6
6
-
 7
7
-
 8
8
-
 9
9
-
 10
10
-
 11
11
-
 12
12
-
 13
13
-
 14
14
-
 15
15
-
 16
16
-
 17
17
-
 18
18
-
 19
19
-
 20
20
-
 21
21
-
 22
22
-
 23
23
-
 24
24
-
 25
25
-
 26
26
-
 27
27
-
 28
28
-
 29
29
-
 30
30
-
 31
31
-
 32
32
-
 33
33
-
 34
34
-
 35
35
-
 36
36
-
 37
37
-
 38
38
-
 39
39
-
 40
40
-
 41
41
-
 42
42
-
 43
43
-
 44
44
-
 45
45
-
 46
46
-
 47
47
-
 48
48
-
 49
49
-
 50
50
-
 51
51
-
 52
52
-
 53
53
-
 54
54
-
 55
55
-
 56
56
-
 57
57
-
 58
58
-
 59
59
-
 60
60
-
 61
61
-
 62
62
-
 63
63
-
 64
64
-
 65
65
-
 66
66
-
 67
67
-
 68
68
-
 69
69
-
 70
70
-
 71
71
-
 72
72
-
 73
73
-
 74
74
-
 75
75
-
 76
76
-
 77
77
-
 78
78
-
 79
79
-
 80
80
-
 81
81
-
 82
82
-
 83
83
-
 84
84
-
 85
85
-
 86
86
-
 87
87
-
 88
88
-
 89
89
-
 90
90
-
 91
91
-
 92
92
-
 93
93
-
 94
94
-
 95
95
-
 96
96
-
 97
97
-
 98
98
-
 99
99
-
 100
100
-
 101
101
-
 102
102
-
 103
103
-
 104
104
-
 105
105
-
 106
106
-
 107
107
-
 108
108
-
 109
109
-
 110
110
-
 111
111
-
 112
112
-
 113
113
-
 114
114
-
 115
115
-
 116
116
-
 117
117
-
 118
118
-
 119
119
-
 120
120
-
 121
121
-
 122
122
-
 123
123
-
 124
124
-
 125
125
-
 126
126
-
 127
127
-
 128
128
-
 129
129
-
 130
130
-
 131
131
-
 132
132
-
 133
133
-
 134
134
-
 135
135
-
 136
136
-
 137
137
-
 138
138
-
 139
139
-
 140
140
-
 141
141
-
 142
142
-
 143
143
-
 144
144
-
 145
145
-
 146
146
-
 147
147
-
 148
148
-
 149
149
-
 150
150
-
 151
151
-
 152
152
-
 153
153
-
 154
154
-
 155
155
-
 156
156
-
 157
157
-
 158
158
-
 159
159
-
 160
160
-
 161
161
-
 162
162
-
 163
163
-
 164
164
-
 165
165
-
 166
166
-
 167
167
-
 168
168
-
 169
169
-
 170
170
-
 171
171
-
 172
172
-
 173
173
-
 174
174
-
 175
175
-
 176
176
-
 177
177
-
 178
178
-
 179
179
-
 180
180
-
 181
181
-
 182
182
-
 183
183
-
 184
184


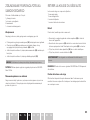
RecPro SALIA 125 KID Child Car Seat Guia de usuario
- Categoria
- Assentos de carro
- Tipo
- Guia de usuario
em outras línguas
- español: RecPro SALIA 125 KID Child Car Seat Guía del usuario
- français: RecPro SALIA 125 KID Child Car Seat Mode d'emploi
- italiano: RecPro SALIA 125 KID Child Car Seat Guida utente
- English: RecPro SALIA 125 KID Child Car Seat User guide
- Nederlands: RecPro SALIA 125 KID Child Car Seat Gebruikershandleiding
- Deutsch: RecPro SALIA 125 KID Child Car Seat Benutzerhandbuch
- polski: RecPro SALIA 125 KID Child Car Seat instrukcja
- română: RecPro SALIA 125 KID Child Car Seat Manualul utilizatorului