Philips HP6403/30 Manual do usuário
- Categoria
- Depiladoras
- Tipo
- Manual do usuário

ENGLISH
Introduction
Congratulations on your purchase and welcome to
Philips! To fully benefit from the support that Philips
offers, register your product at www.philips.com/
welcome.
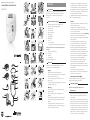
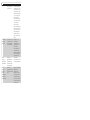
General description (Fig. 1)
1 Hair-lifting attachment with massage element
2 Opti-start cap with massage element
3 Trimming comb
4 Trimming head
5 Sensitive area cap
6 Epilating discs
7 Epilating head
8 On/off slide
- O = off
- I = normal speed
- II = high speed (only to be used for epilating head)
Note: Speed II does not work when the trimming head is
attached.
9 Socket for appliance plug
10 Small plug
11 Adapter
12 Cleaning brush
Storage pouch (not shown)
Important
Read this user manual carefully before you use the
appliance and save it for future reference.
Danger
- Keep the appliance and the adapter dry.
- Do not use the appliance near or over a washbasin
or bath filled with water (Fig. 2).
- Do not use the appliance in the bath or in the
shower (Fig. 3).
- If you use the appliance in the bathroom, do not use
an extension cord (Fig. 4).
Warning
- Only use the appliance in combination with the
adapter supplied.
- Do not use the appliance or the adapter if it is
damaged.
- If the adapter is damaged, always have it replaced
with one of the original type in order to avoid a
hazard.
- The adapter contains a transformer. Do not cut
off the adapter to replace it with another plug, as
this causes a hazardous situation.
- This appliance is not intended for use by persons
(including children) with reduced physical, sensory
or mental capabilities, or lack of experience and
knowledge, unless they have been given supervision
or instruction concerning use of the appliance by a
person responsible for their safety.
- Children should be supervised to ensure that they
do not play with the appliance.
Caution
- Only epilate the underarms and bikini line with the
sensitive area cap attached.
- This appliance is only intended for removing
women’s body hair on areas below the neck. Do not
use it for any other purpose.
- To prevent damage and injuries, keep the operating
appliance (with or without attachment) away
from scalp hair, eyebrows, eyelashes, clothes, threads,
cords, brushes etc.
- Do not use the appliance on irritated skin or skin
with varicose veins, rashes, spots, moles (with hairs)
or wounds without consulting your doctor first.
People with a reduced immune response or people
who suffer from diabetes mellitus, haemophilia or
immunodeficiency should also consult their doctor first.
- Your skin may become a little red and irritated the
first few times you use the epilator. This phenomenon
is absolutely normal and quickly disappears. As
you use the appliance more often, your skin gets
used to epilation, skin irritation decreases and
regrowth becomes thinner and softer. If the irritation
has not disappeared within three days, we advise you to
consult a doctor.
- Do not use the epilating head, trimming
head, attachments or comb if they are damaged or
broken, as this may cause injury.
Electromagnetic elds (EMF)
This Philips appliance complies with all standards
regarding electromagnetic fields (EMF).
Using the appliance
Note: Clean the epilating head before rst use.
Epilation tips
- Epilation is easier just after taking a bath or shower.
Make sure your skin is completely dry when you
start epilating.
- Make sure your skin is clean, entirely dry and free from
grease. Do not use any cream before you start epilating.
- Epilation is easier and more comfortable when the
hair has the optimum length of 3–4 mm. If the hairs
are longer, we recommend that you either shave first
and epilate the shorter regrowing hairs after 1 or 2
weeks, or that you use the trimming head with the
comb to pre-cut hairs to this ideal length.
1
Register your product and get support at
www.philips.com/welcome
4203.000.7197.1
HP6403/30
2 3 4
5
6
7
8
9
10
11
12
13
14
15 16
17 18 19
20 21 22
23 24 25

- When you epilate for the first time, we advise you to
epilate in the evening, so that any reddening that
develops can disappear overnight.
- On some areas, e.g. the underarms, hair may grow in
different directions. In this case, it may be helpful to
move the appliance in different directions to achieve
optimal results.
Connecting the appliance
1 Insert the appliance plug into the appliance (Fig. 5).
2 Insert the adapter into the wall socket.
Epilating the legs
We advise you to start epilating with the opti-start cap
with massage element. This cap ensures maximum skin
contact and allows you to epilate your legs more quickly
and efficiently. The hair-lifting attachment with massage
element ensures optimal hair lifting, relaxes the skin and
minimises the pulling sensation of epilation.
Only use the opti-start cap and hair-lifting attachment
on your legs.
1 Put the opti-start cap or hair-lifting attachment on
the epilating head (Fig. 6).
The procedure for placing the attachments onto the
appliance is the same for all attachments.
2 Select the desired speed to switch on the
appliance (Fig. 7).
Preferably use speed II. Switch to speed I for areas with
little hair growth, for hard-to-reach areas and for areas
where bones are located directly beneath the skin, such
as knees and ankles.
3 Stretch the skin with your free hand to make the
hairs stand upright. Then place the epilator on the
skin at an angle of 90° with the on/off slide pointing
in the direction in which you are going to move the
appliance (Fig. 8).
4 Move the appliance slowly over the skin, against the
direction of hair growth.
Press the appliance lightly onto the skin.
Epilating the underarms and bikini line
Your epilator comes with a sensitive area cap that
reduces the number of active epilating discs.
Note: You get the best results in the most comfortable
way when the hairs are not too long (approx. 4mm). If the
hairs are longer, you can trim them to this length with the
trimming head and comb (see section ‘Trimming sensitive
areas with the trimming head and comb’ in this chapter).
1 Thoroughly clean the area to be epilated to remove
any residues of deodorant, cream etc. Then dab the
area dry.
2 Put the sensitive area cap on the epilating head (Fig. 9).
3 Switch on the appliance.
4 Stretch the skin with your free hand to make the
hairs stand upright. Then place the epilator on the
skin at an angle of 90° with the on/off slide pointing
in the direction in which you are going to move the
appliance.
5 Move the appliance slowly over the skin, against the
direction of the hair growth.
- Epilate your bikini line as shown in the figure (Fig. 10).
- Epilate your underarms as shown in the figure. Move
the appliance in different directions (Fig. 11).
Trimming sensitive areas with the trimming
head and comb
Use the trimming head to trim the hair on your
underarms and bikini line to a length of 4mm.
Note: The trimming head can only be used at speed setting I.
1 Push the epilating head in the direction of the
arrows on the back of the appliance (1) and
remove it from the appliance (2) (Fig. 12).
2 Put the trimming head on the appliance (1) and
push it against the direction of the arrows on the
back of the appliance (2) to x it (Fig. 13).
3 Put the comb on the trimming head.
4 Switch on the appliance (Fig. 14).
Note: Speed II does not work when the trimming head is
attached.
5 Stretch the skin with your free hand.
6 Move the appliance against the direction of hair
growth. Make sure the surface of the comb always
stays in contact with the skin (Fig. 15).
Styling with the trimming head.
To style your bikini line, use the trimming head without
the comb. Styling without the comb results in a hair
length of approx. 0.5-1mm. You can be as creative as you
like when you style your bikini line.
Note: The trimming head can only be used at speed setting I.
1 Push the epilating head in the direction of the
arrows on the back of the appliance (1) and
remove it from the appliance (2) (Fig. 12).
2 Put the trimming head on the appliance (1) and
push it against the direction of the arrows on the
back of the appliance (2) to x it (Fig. 13).
3 Switch on the appliance.
Note: Speed II does not work when the trimming head is
attached.
4 Move the appliance towards the desired contour
of your bikini line, against the direction of hair
growth. Touch the skin lightly with the trimming
head (Fig. 16).
Cleaning and maintenance
Note: Make sure the appliance is switched off and
unplugged before you start to clean it.
Never use scouring pads, abrasive cleaning agents or
aggressive liquids such as petrol or acetone to clean the
appliance.
- Never rinse the appliance or the adapter under the
tap (Fig. 17).
- Keep the appliance and the adapter dry (Fig. 18).
Cleaning the attachments
1 Remove any attachment from the epilating
head (Fig. 19).
- Remove the trimming comb by pulling it off the
trimming head (Fig. 20).
2 Remove loose hairs from the attachment with the
cleaning brush.
3 Rinse the attachment under the tap while turning it.
4 Dry the attachment before you use or store it.
Cleaning the epilating head/trimming head
1 Push the epilating head/trimming head in the
direction of the arrows on the back of the
appliance (1) and remove it (2) (Fig. 12).
2 Remove loose hairs with the cleaning
brush (Fig. 21).
3 Rinse the epilating head/trimming head under the
tap while turning it (Fig. 22).
- Pull the front cover off the trimming head to remove
any hair that has accumulated inside the trimming
head (Fig. 23).
4 Shake the epilating head/trimming
head rmly (Fig. 24).
Dry the epilating/trimming head thoroughly with a tea towel.
Note: Make sure the epilating head/trimming head is
completely dry before you place it back onto the appliance.
Ordering accessories
To purchase accessories for this appliance, please visit
our online shop at www.shop.philips.com/service.
If the online shop is not available in your country, go to
your Philips dealer or a Philips service centre. If you have
any difficulties obtaining accessories for your appliance,
please contact the Philips Consumer Care Centre in
your country. You find its contact details in the worldwide
guarantee leaflet.
Environment
- Do not throw away the appliance with the normal
household waste at the end of its life, but hand it in
at an official collection point for recycling. By doing
this, you help to preserve the environment (Fig. 25).
Guarantee and service
Guarantee
- Philips Consumer Lifestyle guarantees its products for
a period of two years after the date of purchase. If
any defect due to faulty materials and workmanship
occurs within this two-year guarantee period, Philips
Consumer Lifestyle will repair or replace the product at
its expense.
- Philips Consumer Lifestyle will only pay for repair
or replacement if convincing proof is provided, for
instance by means of a receipt, that the day on which
service is claimed is within the guarantee period.
- The guarantee does not cover products and/or
product parts that are subject to wear, that can be
considered as consumable parts by their nature or
that are made of glass.
- The guarantee is not valid if a defect is due to
damage caused by incorrect use, poor maintenance
(e.g. parts blocked by scale) or if alterations or
repairs have been carried out by persons not
authorised by Philips Consumer Lifestyle.
- For the appliance to be used correctly, the user
should strictly adhere to all instructions included in
this user manual and should abstain from any actions
or uses that are described as undesired or which are
warned against in this user manual.
- For some products, the guarantee may be subject
to certain restrictions, for instance as a result of the
type of material used.
- These guarantee restrictions do not affect your
statutory rights.
Service
Service during and after the guarantee period can be
obtained in all countries where the product is officially
distributed by Philips. In countries where the product is not
distributed by Philips, service is provided by the national
Philips organisation. In this case there may be some delay if
the required spare parts are not readily available.
If you need service or information or if you have a problem,
please visit the Philips website at www.philips.com/
support or contact the Philips Consumer Care Centre in
your country. You find its contact details below. If there is no
Consumer Care Centre in your country, go to your local
Philips dealer or contact an authorised Philips service centre.
Addresses and phone numbers of these service centres can
be found in the separate repair-shop leaflet.

Dicas de depilação
- A depilação é mais fácil depois do banho. Antes de
começá-la, verifique se sua pele está completamente
seca.
- Verifique se sua pele está limpa, completamente seca
e sem substâncias oleosas. Não use cremes antes da
depilação.
- É mais fácil e confortável se depilar quando os pelos
estiverem com a altura ideal: 3 a 4 mm. Se estiverem
maiores, recomendamos raspá-los primeiro e depilar
os pelos mais curtos que nascerem após uma ou
duas semanas. Você também pode usar a cabeça
aparadora com o pente para pré-cortar os pelos,
deixando-os na altura ideal.
- Ao se depilar pela primeira vez, recomendamos fazê-
lo à noite, para que a eventual vermelhidão possa
desaparecer durante a noite.
- Em algumas áreas, por exemplo, axilas, os pelos
podem crescer em diferentes direções. Nesse
caso, pode ser útil passar o aparelho em diferentes
direções para obter os melhores resultados.
Conexão do aparelho
1 Insira o plugue no aparelho (g. 5).
2 Insira o adaptador na tomada da parede.
Depilação de pernas
Comece a depilar com a tampa massageadora opti-start.
Essa tampa garante total contato com a pele e permite
depilar as pernas com mais rapidez e eficiência. Com o
acessório massageador para levantar pelos, é possível
levantar todos os pelos, relaxar a pele e minimizar a
sensação de desconforto durante a depilação.
A tampa opti-start e o acessório para levantar pelos
devem ser usados somente nas pernas.
1 Coloque a tampa opti-start ou o acessório para
levantar pelos na cabeça depiladora (g. 6).
O procedimento de encaixe dos acessórios no aparelho
é o mesmo para todos os acessórios.
2 Selecione a velocidade desejada para ligar o
aparelho (g. 7).
De preferência, use a velocidade II. Alterne para a
velocidade I nas áreas com poucos pelos, difíceis de
alcançar e próximas dos ossos, como joelhos e tornozelos.
3 Estique a pele com a mão que está livre para que
os pelos quem retos. Coloque o depilador em
um ângulo de 90° sobre a pele, com o botão liga/
desliga voltado para o sentido de deslocamento do
aparelho (g. 8).
4 Passe o aparelho lentamente sobre a pele na
direção contrária ao crescimento dos pelos.
Pressione suavemente o aparelho sobre a pele.
Aviso
- Só use o aparelho com o adaptador fornecido.
- Não use o barbeador nem o adaptador se estiverem
danificados.
- Se o adaptador estiver danificado, ele deverá ser
trocado (por um modelo original) para evitar
situações de risco.
- O adaptador contém um transformador. Não retire
o adaptador para substituí-lo por outro plugue, pois
isso pode causar uma situação de risco.
- Este aparelho não deve ser usado por pessoas
(inclusive crianças) com capacidades físicas, mentais
ou sensoriais reduzidas ou pouca experiência e
conhecimento, a menos que sejam supervisionadas
ou instruídas sobre o uso do aparelho por uma
pessoa responsável por sua segurança.
- Crianças devem ser supervisionadas para que não
brinquem com o aparelho.
Atenção
- Só depile as axilas e a virilha usando a capa redutora
para áreas sensíveis.
- Este aparelho destina-se apenas à remoção de pelos
do corpo feminino, nas áreas abaixo do pescoço.
Não use-o para outros propósitos.
- Para evitar danos e ferimentos, não use o aparelho
(com ou sem acessórios) no couro cabeludo,
sobrancelhas, cílios, roupas, tecidos, cordas, escovas etc.
- Não use o aparelho em peles irritadas ou com
varizes, arranhões, espinhas, pelos encravados,
verrugas (com pelos) ou feridas sem consultar
um médico. Pessoas com baixa imunidade ou que
sofrem de diabetes mielitus, doença de Raynaud ou
imunodeficiência devem consultar um médico antes
de usar o aparelho.
- Sua pele pode ficar um pouco vermelha e irritada
nas primeiras vezes em que usar o depilador. Isso é
absolutamente normal e desaparece rapidamente.
Quando começar a usar o aparelho com mais
frequência, sua pele se acostumará à depilação, a
irritação desaparecerá e os pelos ficarão mais finos e
macios. Se a irritação não desaparecer em três dias,
recomendamos consultar um médico.
- Não use a cabeça depiladora, a cabeça
aparadora, acessórios ou o pente se estiverem
danificados o quebrados, pois isso pode causar
ferimentos.
Campos eletromagnéticos (EMF)
Este aparelho Philips está em conformidade com todos
os padrões relativos a campos eletromagnéticos (EMF).
Utilização do aparelho
Nota: Limpe a cabeça depiladora antes de usá-la pela
primeira vez.
Problem Cause Solution
I cannot
re-
move the
trimming
head/
epilat-
ing head
from the
appliance.
You try to pull
it straight off.
Push the epilating head/
trimming head in the
direction of the arrows
on the back of the ap-
pliance before you pull
it off the appliance (see
chapter ‘Cleaning and
maintenance’).
PORTUGUÊS DO BRASIL
Introdução
Parabéns pela sua compra e bem-vindo à Philips! Para
aproveitar ao máximo o suporte oferecido pela Philips,
registre o produto em www.welcome.philips.com/br_pt/.
Descrição geral (fig. 1)
1 Acessório para levantar pelos com massageador
2 Capa Opti-start com massageador
3 Pente para aparar
4 Cabeça aparadora
5 Capa redutora para áreas sensíveis
6 Discos de depilação
7 Cabeça depiladora
8 Controle deslizante liga/desliga
- O = desligado
- I = velocidade normal
- II = alta velocidade (usada somente para a cabeça
depiladora)
Nota: A velocidade II não funciona quando a cabeça
aparadora está encaixada.
9 Orifício para encaixe do plugue
10 Pequeno plugue
11 Adaptador
12 Escova de limpeza
Nécessaire (não ilustrado)
Importante
Leia atentamente este manual do usuário antes de usar o
aparelho e guarde-o para consultas futuras.
Perigo
- Mantenha o aparelho e o adaptador secos.
- Não use o aparelho próximo ou sobre bacias ou
banheiras com água (fig. 2).
- Não use o aparelho na banheira ou no
chuveiro (fig. 3).
- Se usar o aparelho no banheiro, não use uma
extensão (fig. 4).
Contact details Philips Consumer Care
Centre
- 0800 701 0203 (Demais localidades)
- (11) 2121 0203 (Grande Sao Paulo)
Troubleshooting
This chapter summarises the most common problems
you could encounter with the appliance. If you are unable
to solve the problem with the information below, contact
the Consumer Care Centre in your country.
Problem Cause Solution
Poor
epilating
results.
You move the
appliance in
the wrong
direction.
Move the appliance
against the direction of
hair growth, with the on/
off slide pointing in the
direction in which you
move the appliance.
You place
the epilating
head on the
skin at the
wrong angle.
Make sure that you place
the appliance on the
skin at an angle of 90°
(see chapter ‘Using the
appliance’).
The hairs are
too short.
Sometimes hairs are too
short to be caught. The
optimal length for easy
removal of the hairs is
3-4mm. The hairs that
are not caught during
this session will be long
enough to be removed
when you epilate the
next time. You can also
try to catch the hairs by
moving the appliance
across the skin a few
more times.
The
appliance
does not
work.
The socket
to which the
appliance is
connected is
not live.
Make sure the socket
is live. If you have con-
nected the epilator to
the socket in a bathroom
cabinet, you may need to
switch on the bathroom
light to activate the
socket.
I cannot
select
speed
setting II.
The trimming
head is at-
tached. The
trimming head
can only be
used at speed
setting I.
Select speed setting I
when you use the trim-
ming head.

Serviço
A assistência durante ou após o período de garantia
pode ser obtida em todos os países onde o produto
é oficialmente distribuído pela Philips. No caso de
países onde o produto não é distribuído pela Philips,
a assistência é oferecida pela organização nacional da
Philips. Nesse caso, poderá haver atraso se as peças
avulsas solicitadas não estiverem prontamente disponíveis.
Caso você precise de assistência técnica, informações ou
tenha algum problema, acesse o site da Philips:
www.philips.com/support ou entre em contato
com a Central de Atendimento ao Cliente Philips do
seu país (veja as informações de contato abaixo). Caso
não exista uma Central de Atendimento ao Cliente no
seu país, dirija-se a um representante local da Philips ou
entre em contato com uma assistência técnica autorizada
da Philips. Os endereços e números de telefone das
assistências técnicas autorizadas encontram-se no folheto
de assistência técnica à parte.
Informações de contato da Central de
Atendimento ao Cliente Philips
- 0800 701 0203 (Demais localidades)
- (11) 2121 0203 (Grande São Paulo)
Solução de problemas
Este capítulo resume os problemas mais comuns
que você pode encontrar ao usar o aparelho. Se não
conseguir resolver o problema com as informações
abaixo, entre em contato com a Assistência Técnica
Autorizada Philips mais próxima.
Problema Causa Solução
A depilação
não ficou
bem feita.
Você não está
movendo o
aparelho na
direção correta.
Mova o aparelho na
direção contrária
ao crescimento
dos pelos, com o
controle deslizante
liga/desliga voltado
para a direção em
que você moverá o
depilador.
Você colocou
a cabeça
depiladora sobre
a pele no ângulo
errado.
Certifique-se
de colocar o
aparelho sobre a
pele a um ângulo
de 90° (consulte o
capítulo ‘Utilização
do aparelho’).
- Retire a tampa frontal da cabeça aparadora para
remover pelos acumulados em seu interior (fig. 23).
4 Sacuda a cabeça depiladora/aparadora com
rmeza (g. 24).
Seque a cabeça depiladora/aparadora com um pano sem
fiapos.
Nota: Verique se a cabeça depiladora/aparadora está seca
antes de encaixá-la novamente no aparelho.
Encomenda de acessórios
Para adquirir acessórios para este aparelho, acesse a nossa
loja on-line: www.shop.philips.com/service. Caso a
loja on-line não esteja disponível para seu país, vá até um
revendedor ou uma Central de Atendimento ao Cliente
Philips. Caso você tenha dificuldade em adquirir acessórios
para o seu aparelho, entre em contato com a Central de
Atendimento ao Cliente Philips do seu país. O número de
telefone se encontra no folheto da garantia mundial.
Meio ambiente
- Não descarte o aparelho com o lixo doméstico no
final de sua vida útil. Leve-o a um posto de coleta
oficial para que possa ser reciclado. Com esse ato,
você ajuda a preservar o meio ambiente (fig. 25).
Garantia e assistência técnica
Garantia
- A Philips Consumer Lifestyle oferece produtos
com garantia válida por dois anos a partir da data
da compra. A Philips Consumer Lifestyle reparará
e trocará os produtos que apresentarem defeito
dentro desses dois anos de garantia.
- A Philips Consumer Lifestyle só pagará pelo
reparo ou substituição se for apresentada prova
convincente, por exemplo, um recibo, indicando que
no dia em que a manutenção foi solicitada, o serviço
estava dentro da garantia.
- A garantia não cobre produtos e/ou peças que estão
sujeitas a desgaste, que são itens de consumo ou que
são feitas de vidro.
- A garantia não cobre defeitos causados por mau
uso, manutenção inapropriada (por exemplo, peças
obstruídas por sujeiras) ou modificações/reparos
realizados por pessoas não autorizadas pela Philips
Consumer Lifestyle.
- Para usar o aparelho corretamente, o usuário deve
seguir todas as instruções inclusas no manual do
usuário e evitar uso e ações não recomendadas.
- Dependendo do produto, a garantia pode estar
sujeita a restrições (por exemplo, decorrentes do
tipo de material usado).
- Essas restrições da garantia não interferem em seus
direitos estatutários.
Modelagem com a cabeça aparadora.
Para modelar a virilha, use a cabeça aparadora sem o
pente. A modelagem sem o pente resulta em pelos com
o comprimento de 0,5 a 1mm. Você também pode usar
sua criatividade para modelar a virilha.
Nota: A cabeça aparadora só pode ser usada na velocidade I.
1 Empurre a cabeça depiladora na direção das setas
na parte posterior do aparelho (1) e retire-a
(2) (g. 12).
2 Coloque a cabeça aparadora no aparelho (1) e
empurre-a na direção contrária às setas na parte
posterior do aparelho (2) para xá-la (g. 13).
3 Ligue o aparelho.
Nota: A velocidade II não funciona quando a cabeça
aparadora está encaixada.
4 Mova o aparelho na direção do contorno que
deseja dar aos pelos da virilha, na direção contrária
ao crescimento dos pelos. Toque a pele suavemente
com a cabeça aparadora (g. 16).
Limpeza e manutenção
Nota: Verique se o aparelho está desligado e desconecte-o
da tomada elétrica antes de limpá-lo.
Nunca use palhas de aço, agentes de limpeza abrasivos
ou líquidos agressivos, como querosene ou acetona,
para limpar o aparelho.
- Nunca lave o aparelho ou o adaptador na
torneira (fig. 17).
- Mantenha o aparelho e o adaptador secos (fig. 18).
Limpeza dos acessórios
1 Remova todos os acessórios da cabeça
depiladora (g. 19).
- Retire o pente para aparar puxando-o da cabeça
aparadora (fig. 20).
2 Remova do acessório pelos soltos usando a escova
de limpeza.
3 Lave o acessório na torneira, girando-o.
4 Seque o acessório antes de usá-lo ou guardá-lo.
Limpeza da cabeça depiladora/aparadora
1 Empurre a cabeça depiladora/aparadora na direção
das setas na parte posterior do aparelho (1) e
retire-a (2) (g. 12).
2 Remova pelos soltos com a escova de
limpeza (g. 21).
3 Lave bem a cabeça depiladora/aparadora em água
corrente (g. 22).
Depilando axilas e virilha
O depilador vem com uma tampa para regiões sensíveis
que reduz o número de discos de depilação ativos.
Nota: Você obterá os melhores resultados da maneira mais
confortável quando os pelos não estiverem muito compridos
(cerca de 4 mm). Se estiverem maiores, você poderá apará-
los até essa altura com a cabeça aparadora e o pente para
aparar (consulte a seção ‘Aparar áreas sensíveis com a
cabeça aparadora e o pente para aparar’ neste capítulo).
1 Limpe totalmente a área que será depilada para
remover resíduos de desodorante, creme etc. Em
seguida, dê tapinhas na área seca.
2 Coloque a capa redutora para áreas sensíveis na
cabeça depiladora (g. 9).
3 Ligue o aparelho.
4 Estique a pele com a mão que está livre para que
os pelos quem retos. Coloque o depilador em
um ângulo de 90° sobre a pele, com o botão liga/
desliga voltado para o sentido de deslocamento do
aparelho.
5 Passe o aparelho lentamente sobre a pele na
direção contrária ao crescimento dos pelos.
- Depile as áreas íntimas como mostra a
figura (fig. 10).
- Depile as axilas como mostra a figura. Mova o
aparelho em direções diferentes (fig. 11).
Aparar áreas sensíveis com a cabeça
aparadora e o pente para aparar
Use a cabeça aparadora para aparar os pelos das axilas e
da virilha a uma altura de 4 mm.
Nota: A cabeça aparadora só pode ser usada na velocidade I.
1 Empurre a cabeça depiladora na direção das setas
na parte posterior do aparelho (1) e retire-a
(2) (g. 12).
2 Coloque a cabeça aparadora no aparelho (1) e
empurre-a na direção contrária às setas na parte
posterior do aparelho (2) para xá-la (g. 13).
3 Coloque o pente na cabeça aparadora.
4 Ligue o aparelho (g. 14).
Nota: A velocidade II não funciona quando a cabeça
aparadora está encaixada.
5 Estique a pele com uma das mãos.
6 Mova o aparelho na direção contrária ao
crescimento dos pelos. Certique-se de que
o pente sempre esteja em contato com a
pele (g. 15).

Problema Causa Solução
Os pelos estão
muito curtos.
Às vezes, os pêlos
podem estar muito
curtos para sempre
removidos. A altura
ideal dos pêlos é de
3 a 4mm. Os pêlos
que não forem
removidos durante
uma sessão estarão
com tamanho
suficiente para
serem depilados na
próxima. Você pode
tentar remover os
pêlos passando o
aparelho sobre a
pele mais algumas
vezes.
O aparelho
parou de
funcionar.
A tomada à qual
o aparelho está
conectado não
está alimentada.
Verifique se a
tomada está
alimentada. Se o
depilador estiver
conectado a
uma tomada em
um armário de
banheiro, talvez seja
preciso acender a
luz para ativá-la.
Não
consigo
selecionar a
velocidade II.
A cabeça
aparadora está
encaixada e só
pode ser usada
na velocidade I.
Selecione a
velocidade I ao usar
a cabeça aparadora.
Não
consigo
retirar a
cabeça
aparadora/
depiladora
do aparelho.
Você está
tentando puxá-la
diretamente para
fora.
Empurre a cabeça
depiladora/
aparadora na
direção das setas
na parte posterior
do aparelho para
retirá-la (consulte o
capítulo ‘Limpeza e
manutenção’).
-
 1
1
-
 2
2
-
 3
3
-
 4
4
-
 5
5


Philips HP6403/30 Manual do usuário
- Categoria
- Depiladoras
- Tipo
- Manual do usuário
em outras línguas
- English: Philips HP6403/30 User manual
Artigos relacionados
-
Philips HP6401/30 Manual do usuário
-
Philips HP6400/30 Manual do usuário
-
-
Philips HP6375 Manual do usuário
-
-
Philips HP6523/03 Manual do usuário
-
Philips BRE640/00 Manual do usuário
-
Philips HP6578 Manual do usuário
-
-
Philips BRE640/00 Manual do usuário