Pepperl+Fuchs Lite-Ex PL 10e Instruções de operação
- Categoria
- Lanternas
- Tipo
- Instruções de operação
1
Operating Instructions | Bedienungsanleitung
Notice d‘utilisation | Istruzioni per l‘uso
Instrucciones de uso | Manual de instruçoes
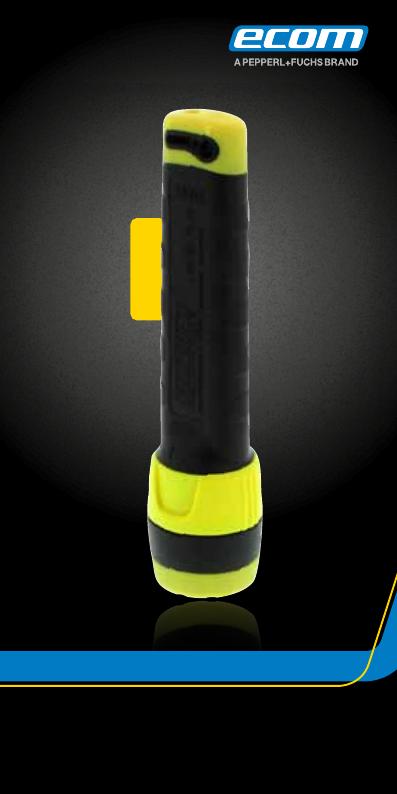
Intrinsically Safe LED Flashlight Lite-Ex® PL 10e
Zone 0 / 20

2
English .....................................................Page ...............3
Deutsch ...................................................Seite ............. 11
Français ...................................................Page ............. 20
Italiano .....................................................Page ............29
Español ....................................................Página .........37
Português ................................................Sida .............. 46

3
Note:
The current operating instructions, the EU Declaration of
Conformity can be downloaded from the relevant product
page at www.ecom-ex.com, www.pepperl-fuchs.com
or alternatively they can be requested directly from the
manufacturer.
Content
1. Safety instructions .........................................................4
2. Technical specifications .................................................4
3. Functional description / operating instructions ...............4
3.1 Assembly of the Lite-Ex PL 10e ...................................5
3.2 Getting started.............................................................5
3.3 Battery replacement ....................................................5
3.4 Cleaning the ring switch ...............................................6
3.5 LED replacement .........................................................6
3.6 Replacing the protective disc .......................................7
3.7 Assembling the belt clip ...............................................8
4. Repairs ..........................................................................8
5. Cleaning, maintenance and storage ...............................8
6. Disposal ........................................................................9
7. Warranty and liability ....................................................10
8. EU Declaration of Conformity .......................................10
9. EU-type examination certificate ....................................10

4
1. Safety instructions
Caution! Strong light may blind other people.
• Do not look directly into the light.
•
Do not shine the light directly into the eyes of other people.
2. Technical specifications
Ambient temperature Ta: -20 °C ... +50 °C
Storage temperature: -30 °C ... +60 °C
Batteries / power supply: 3 x LR03 (see Ex-Safety
Manual, table with approved
batteries)
Lamp: High performance LED:
3000 lx
Luminosity: 3000 lx (at a distance of 1 m)
Luminous flux: 64 lumens
Operating time: approx. 55 hours
Dimensions: 147 x 36 x 36 mm
Weight: approx. 120g
(with batteries)
IP protection class: IP 65/67
(according to IEC 60529)
ESD protection: Anti-static housing
CE-designation:
‡
0102
3. Functional description / operating instructions
Please read these operating instructions carefully so
that you are familiar with, and are able to use, all of the
functions of your Lite-Ex PL 10e. For your own safety and
information please read the instructions on the following
pages carefully!

5
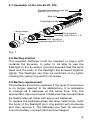
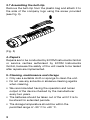
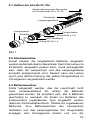
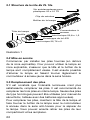
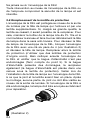
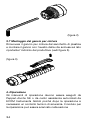
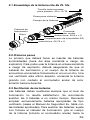
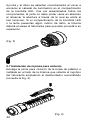
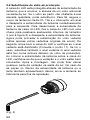
3.1 Assembly of the Lite-Ex PL 10e
Thread-forming screw for
plastic 20 x 10 T6
Belt clip
Flashlight body
Ring switch
Sealing ring 22.8 x 1.5
LED housing
Sealing ring 22.76 x 2
Disc
Lamp head
Fig. 1
3.2 Getting started
The supplied batteries must be inserted to begin with
(outside the Ex-area). In order to be able to use the
flashlight in the Ex-area it must be ensured that the lamp
head and the body of the flashlight are screwed together
tightly. The flashlight can then be switched on by lightly
rotating the yellow ring switch clockwise.
3.3 Battery replacement
The batteries should be replaced if the level of luminance
is no longer deemed to be satisfactory. It is advisable
to change all 3 batteries at the same time. Only the
appropriate, approved types of batteries may be used (see
Ex-Safety Manual, table with approved batteries).
To replace the batteries grasp the lamp head firmly, twist
the body of the flashlight (incl. ring switch) anti-clockwise
and then remove it. The batteries can then be removed
from the battery compartment and exchanged.

6
After inserting the new batteries (observe the correct
polarity) the body of the flashlight can be screwed back
on. Please make sure the flashlight has been screwed
together completely before switching it on again.
Battery replacement
• Only use type-tested batteries
(see Ex-Safety Manual, table in section 6)
• Always replace all batteries simultaneously.
• Pay attention to the correct polarity.
• Dispose of depleted batteries in an appropriate and
environmentally friendly manner!
• When changing the batteries examine the threads and
seals for cleanliness and signs of damage.
3.4 Cleaning the ring switch
A non-contacting ring switch is used to switch on the
Lite-Ex PL 10e (see description above). Dirt and moisture
do not impair the switching function. The ring switch
is easy to clean if excessive amounts of dirt and grime
have made it dicult to turn. Start by unscrewing the
lamp head. (See point 3.3 Battery replacement). The ring
switch can now be removed and cleaned. When it has
been cleaned replace the ring switch and rotate it until it
engages firmly in place (magnet must be positioned on
the shaft - P+F address side). The lamp head can then be
screwed back onto the flashlight.
3.5 LED replacement
The Lite-Ex PL 10e is equipped with a long-life LED bulb.
Under normal conditions it is not necessary to change the
LED. If, however, the torch is defective or the brightness
of the torch has diminished, it should be sent to ecom
instruments for inspection or repair. The LED housing
should not be opened!

7
Manipulating the torch head or LED on your own poses
a risk to the safety of the flashlight and is not permitted.
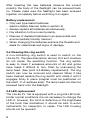
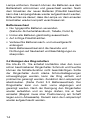
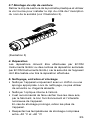
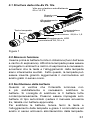
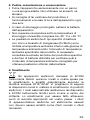
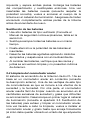
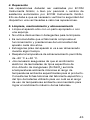
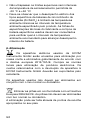
3.6 Replacing the protective disc
The LED housing is protected by the surrounding housing
head and an additional protective disc, which is located
over the opening where the beam is emitted. The disc is
made of high-quality material. Should, however, the disc
break, it is possible to replace it. To do this grasp the body
of the Lite-Ex PL 10e and the ring switch and then carefully
unscrew the lamp head by turning it anti-clockwise. To
unscrew the lamp head from the LED housing use an Allen
key (AF4) to secure the LED housing in place (see Fig. 2)
and unscrew the lamp head. The protective disc can now
be replaced (only use original ecom protective disc). The
LED housing should then be cleaned thoroughly (Please
observe point 5) and the sealing ring checked for signs of
damage. If the sealing ring exhibits any damage, it should
also be replaced (the sealing ring is set in a groove under
the protective disc). When replacing the lamp head on
the LED housing make sure the seal and disc are seated
properly. After assembly no part of the seal should be
visible through the opening where the beam is emitted. If
the LED housing or lens has been damaged, the flashlight
should be sent to the manufacturer for repair.
(Fig. 2)

8
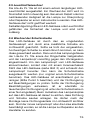
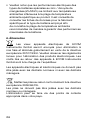
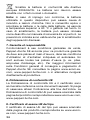
3.7 Assembling the belt clip
Remove the belt clip from the plastic bag and attach it to
the side of the company logo using the screw provided
(see Fig. 3).
(Fig. 3)
4. Repairs
Repairs are to be conducted by ECOM Instruments GmbH
or service centres authorised by ECOM Instruments
GmbH, because the safety of the unit needs to be tested
after repairs are implemented.
5. Cleaning, maintenance and storage
• Only use a suitable cloth or sponge to clean the unit.
• Do not use any solvents or abrasive cleaning agents
when cleaning.
• We recommended having the operation and lumen
output of the device checked by the manufacturer
every two years.
• The batteries should be taken out of the unit if it is to
be stored for extended periods.
• The storage temperature should be within the
permitted range of -30 °C to +60 °C.

9
• It should be observed that the electrical performance
of specific types of Zinc-Manganese Dioxide (Zn/
MnO2) batteries are limited to ambient temperatures
below the product specified ambient temperature
range. The datasheets for the specific manufacturer
and type of battery used should be consulted to see
what the recommended ambient temperature range of
use is to achieve maximum battery performance.
6. Disposal
Old electrical devices by ECOM Instruments GmbH
will be directed to disposal at our expense and disposed
of free of charge in accordance with European Directive
2012/19/EC. Please follow local regulations for the
disposal of electronic products. The costs associated with
returning devices to ECOM Instruments GmbH are to be
borne by the sender.
Old electrical devices should not be disposed of along
with normal or household waste.
Dispose of batteries in accordance with European
Directive 2006/66/EC. Batteries should not be disposed of
with normal or household waste. Disposal can be done via
appropriate collection points in your country.
Note: The battery used in this unit poses a fire hazard and
can cause chemical injuries if it is used improperly. Neither
the batteries nor the battery cells should be opened or
disassembled and they should not be burned or exposed
to temperatures exceeding 60 °C. In case of disposal,
the battery can be removed as described in the Ex safety
manual under point 6. The disposal regulations specified
above are also applicable for old devices.

10
7. Warranty and liability
Under the general terms and conditions of business,
Pepperl+Fuchs SE oers a two-year warranty for
function and materials on this product when used under
the specified operating and maintenance conditions.
Batteries, LED/Lamps and working parts are considered
consumable parts and are not covered under the
warranty. More detailed information regarding the
General Conditions of Delivery and Payment of
ECOM Instruments GmbH are available at www.ecom-ex.
com or can alternatively be requested directly from the
manufacturer.
8. EU Declaration of Conformity
The EU Declaration of Conformity is enclosed with the
sales packaging as a separate document. The current
EU Declaration of Conformity can be downloaded from
the relevant product page at www.ecom-ex.com, www.
pepperl-fuchs.com or alternatively be requested directly
from the manufacturer.
9. EU-type examination certificate
The current EU-type examination certificate can be
downloaded from the relevant product page at
www.ecom-ex.com, www.pepperl-fuchs.com or
alternatively be requested directly from the manufacturer.

11
Hinweis:
Die jeweils aktuelle Bedienungsanleitung, die EU-
Konformitätserklärung und das Ex-Zertifikat können auf
der jeweiligen Produktseite unter www.ecom-ex.com,
www-pepperl-fuchs.com heruntergeladen werden, oder
direkt beim Hersteller angefordert werden.
Inhalt
1. Sicherheitshinweise Blendgefahr! .................................12
2. Technische Daten ........................................................12
3. Funktionsbeschreibung / Bedienungshinweise .............12
3.1 Aufbau der Lite-Ex PL 10e .........................................13
3.2 Inbetriebnahme..........................................................13
3.3 Batteriewechsel .........................................................13
3.4 Reinigen des Ringschalters ........................................14
3.5 Leuchtmittelwechsel ..................................................15
3.6 Wechsel der Schutzscheibe .......................................15
3.7 Montage des Gürtelclips ............................................16
4. Reparatur ....................................................................17
5. Reinigung, Wartung und Lagerung ..............................17
6. Entsorgung ..................................................................18
7. Garantie und Haftung ..................................................19
8. EU-Konformitätserklärung ............................................19
9. EU-Baumusterprüfbescheinigung ................................19

12
1. Sicherheitshinweise Blendgefahr!
• Nicht direkt in den Lichtstrahl blicken
• Lichtkegel nicht direkt auf die Augen einer anderen
Person richten
2. Technische Daten
Umgebungstemperatur Ta: -20 °C ... +50 °C
Lagertemperatur: -30 °C ... +60 °C
Batterien / Stromversorgung: 3 x LR03 (siehe Ex-
Sicherheitshandbuch,
Tabelle mit zugelassenen
Batterien)
Leuchtmittel: Hochleistungs-LED
(3000 lx)
Leuchtkraft: 3000 lx (in 1 m Abstand)
Lichtstrom: 64 Lumen
Betriebsdauer: ca. 55 h
Abmessungen: 147 x 36 x 36 mm
Gewicht: ca. 120g (mit Batterien)
IP-Schutzart: IP 65/67
ESD-Schutz: antistatisches Gehäuse
CE-Kennzeichnung:
0
0102
3. Funktionsbeschreibung / Bedienungshinweise
Bitte lesen Sie diese Bedienungsanleitung sorgfältig
durch, damit Sie alle Funktionen Ihrer Lite-Ex PL 10e
kennen und nutzen können. Lesen Sie zu Ihrer Sicherheit
und Information die Hinweise auf den folgenden Seiten!

13
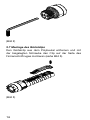
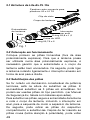
3.1 Aufbau der Lite-Ex PL 10e
Gewindeformende Schraube
für Kunststoffe 20 x 10 T6
Gürtelclip
Lampengehäuse
Ringschalter
O-Ring 22,8 x 1,5
LED-Gehäuse
O-Ring 22,76 x 2
Scheibe
Lampenkopf
Bild 1
3.2 Inbetriebnahme
Zuerst müssen die mitgelieferten Batterien eingesetzt
werden (außerhalb des Ex-Bereiches). Damit die Lampe im
Ex-Bereich eingesetzt werden kann, muss sichergestellt
sein, dass der Lampenkopf und das Lampengehäuse
komplett aufgeschraubt sind. Danach kann die Lampe
durch eine leichte Drehung des gelben Ringschalters im
Uhrzeigersinn eingeschaltet werden.
3.3 Batteriewechsel
Sollte festgestellt werden, das die Leuchtkraft nicht
mehr zufriedenstellend ist, sollten die Batterien
gewechselt werden. Es empfiehlt sich, alle 3 Batterien
gleichzeitig zu wechseln. Es dürfen nur Batterien des
entsprechend zugelassenen Typs eingesetzt werden
(siehe Ex-Sicherheitshandbuch, Tabelle mit zugelassenen
Batterien). Zum Batteriewechsel den Lampenkopf
festhalten und das Lampengehäuse inkl. Ringschalter
entgegen dem Uhrzeigersinn drehen und von der

14
Lampe entfernen. Danach können die Batterien aus dem
Batteriefach entnommen und gewechselt werden. Nach
dem Einsetzen der neuen Batterien (Polarität beachten)
kann das Lampengehäuse wieder aufgeschraubt werden.
Bitte achten sie darauf, dass die Lampe vor dem erneuten
Einschalten wieder komplett verschlossen ist.
Batteriewechsel
• Nur typgeprüfte Batterien verwenden
(Siehe Ex-Sicherheitshandbuch, Tabelle, Punkt 6).
• Immer alle Batterien gleichzeitig auswechseln.
• Auf richtige Polarität achten.
• Verbrauchte Batterien sach- und umweltgerecht
entsorgen!
• Beim Batteriewechsel sind die Gewinde und
Dichtungen auf Sauberkeit und Beschädigungen zu
überprüfen.
3.4 Reinigen des Ringschalters
Die Lite-Ex PL 10e schaltet kontaktlos über den zuvor
schon beschriebenen Ringschalter. Schmutz und Feuchte
können die Schalterfunktion nicht beeinträchtigen. Sollte
der Ringschalter durch starke Schmutzablagerungen
schwergängiger werden, kann der Ring einfach und
problemlos gereinigt werden. Zunächst den Lampenkopf
abschrauben. (Siehe Punkt 3.3 Batteriewechsel). Der
Ringschalter kann nun nach vorne abgezogen und
gereinigt werden. Nach der Reinigung den Ringschalter
wieder aufsetzten und so lange drehen, bis er fest
einrastet (Magnet muss über Positionierung am Schaft
liegen-ecom Adressseite). Danach kann der Lampenkopf
wieder aufgeschraubt werden.

15
3.5 Leuchtmittelwechsel
Die Lite-Ex PL 10e ist mit einem extrem langlebigen LED-
Leuchtmittel ausgestattet. Ein Wechsel der LED wird im
Normalfall nicht notwendig sein. Bei einem Defekt oder bei
nachlassender Helligkeit ist die Lampe zur Überprüfung
oder Reparatur an ecom instruments zu senden. Das LED-
Gehäuse darf nicht geönet werden!
Selbständige Eingrie am LED-Gehäuse oder Leuchtmittel
gefährden die Sicherheit der Lampe und sind nicht
zulässig.
3.6 Wechsel der Schutzscheibe
Das LED-Gehäuse ist durch den es umgebenden
Gehäusekopf und durch eine zusätzliche Scheibe am
Lichtaustritt geschützt. Sollte es trotz der eingesetzten,
hochwertigen Scheibe zu einem Bruch kommen, so kann
diese gewechselt werden. Dazu wird das Lampengehäuse
der Lite-Ex PL 10e sowie der Ringschalter festgehalten
und der Lampenkopf vorsichtig gegen den Uhrzeigersinn
abgeschraubt. Um den Lampenkopf vom LED-Gehäuse
abzuschrauben, kontert man mit einem Innensechskant
SW4 das LED-Gehäuse (siehe Bild 2) und schraubt den
Lampenkopf herunter. Nun kann die Schutzscheibe
ausgetauscht werden (nur original ecom-Schutzscheibe
benutzen). Das LED-Gehäuse ist anschließend gut zu
reinigen (Bitte Punkt 5 beachten) und der Dichtungsring
auf Beschädigungen zu prüfen. Sollte der Dichtungsring
Beschädigungen aufweisen, ist er ebenfalls zu
tauschen(der Dichtungsring ist unter der Schutzscheibe in
einer Nut eingefasst). Beim Aufsetzen des Lampenkopfes
auf das LED-Gehäuse ist darauf zu achten, dass Dichtung
und Scheibe sauber anliegen. Es dürfen nach der
Montage keine Dichtungsanteile im Lichtaustritt sichtbar
sein. Sind der innere Lampenkopf oder die Linse ebenfalls
beschädigt worden, so ist die Lampe zur Reparatur an den
Hersteller zu senden.

16
(Bild 2)
3.7 Montage des Gürtelclips
Den Gürtelclip aus dem Polybeutel entfernen und mit
der beigelegten Schraube den Clip auf der Seite des
Firmenschriftzuges montieren (siehe Bild 3).
(Bild 3)

17
4. Reparatur
Reparaturen dürfen nur von der ECOM Instruments GmbH
oder Servicecenter, die von der ECOM Instruments GmbH
autorisiert wurden, durchgefürt werden, da die Sicherheit
des Gerätes nach der Reparatur überprüft werden muss.
5. Reinigung, Wartung und Lagerung
• Gerät nur mit einem geeigneten Tuch oder Schwamm
reinigen.
• Verwenden Sie zur Reinigung keine Lösungs- oder
Scheuermittel.
• Es wird empfohlen, Funktion und Lichtleistung des
Geräts alle zwei Jahre
vom Hersteller überprüfen zu lassen.
• Bei längerer Lagerung sind die Batterien aus dem
Gerät zu entnehmen.
• Zulässige Lagertemperaturen –30 °C bis
+60 °C nicht unter- bzw. überschreiten!
• Beachten Sie, dass die Leistungsfähigkeit bestimmter
Zink-Mangandioxid (Zn/MnO2)-Batterien bei
Umgebungstemperaturen bereits unterhalb der für das
Produkt angegebenen Umgebungstemperaturbereiche
nachlässt. Lesen Sie die Informationen des
entsprechenden Batterieherstellers, um den
empfohlenen Umgebungstemperaturbereich der
Batterie zum Erzielen einer maximalen Batterieleistung
zu ermitteln.

18
6. Entsorgung
Elektro- und Elektronik-Altgeräte von der
Firma ECOM Instruments GmbH werden zu
unseren Lasten der Entsorgung zugeführt und
nach der europäischen Richtlinie 2002/96/EG
kostenfrei entsorgt. Bitte befolgen sie die lokalen
Bestimmungen zur Entsorgung von Elektronik-Produkten.
Der Versand der Geräte zu ECOM Instruments GmbH geht
auf Kosten des Versenders.
Elektro- und Elektronik-Altgeräte dürfen nicht in den
normalen Müll oder Hausmüll.
Entsorgen sie Batterien gemäß der Europäische
Richtlinie 2006/66/EG. Batterien sollten nicht mit dem
normalen Müll oder Hausmüll entsorgt werden.
Die Entsorgung kann über entsprechende Sammelstellen
in Ihrem Land erfolgen.
Achtung: Die im Gerät eingesetzte Batterie birgt eine
Feuergefahr und die Gefahr von chemischen Verletzungen
bei nicht ordnungsgemäßem Einsatz. Weder die
Batterie noch die Batteriezellen dürfen geönet oder
demontiert, nicht über 60 °C erhitzt oder verbrannt
werden. Im Entsorgungsfall kann die Batterie wie im
Ex-Sicherheitshandbuch unter Punkt 6. beschrieben
entnommen werden. Im Übrigen gelten die oben
genannten Entsorgungsvorschriften für Altgeräte.

19
7. Garantie und Haftung
Für dieses Produkt gewährt die Pepperl+Fuchs SE
laut den allgemeinen Geschäftsbedingungen eine
Garantie von zwei Jahren auf Funktion und Material
unter den angegebenen und zulässigen Betriebs- und
Wartungsbedingungen. Ausgenommen hiervon sind
alle Verschleißteile (z.B. Batterien, Leuchtmittel, etc).
Weitere Informationen zu den Allgemeinen Liefer- und
Zahlungsbedingungen der ECOM Instruments GmbH
finden Sie unter www.ecom-ex.com, www.pepperl-fuchs.
com oder können Sie direkt beim Hersteller anfordern.
8. EU-Konformitätserklärung
Die EU-Konformitätserklärung liegt der
Verkaufsverpackung als separates Dokument bei. Bitte
beachten Sie auch die unter dem Inhaltsverzeichnis
angegebenen Informationen. Die aktuelle EU-
Konformitätserklärung steht auf der entsprechenden
Produktseite unter www.ecom-ex.com, www.pepperl-
fuchs.com zum Download zur Verfügung.
9. EU-Baumusterprüfbescheinigung
Die aktuelle EU-Baumusterprüfbescheinigung steht auf
der entsprechenden Produktseite unter www. ecom-
ex.com, www.pepperl-fuchs.com zum Download zur
Verfügung.

20
Remarque:
Le mode d‘emploi à jour, la déclaration UE de conformité
et le certificat de conformité Ex peuvent être téléchargés
sur la page produit correspondante, à l‘adresse suivante:
www.ecom-ex.com, www.pepperl+fuchs.com ou
demandés directement au fabricant.
Sommaire
1. Consigne de sécurité ...................................................21
2. Caractéristiques techniques .........................................21
3. Description fonctionnelle / consignes d‘utilisation ........21
3.1 Structure de la Lite-Ex PL 10e ...................................22
3.2 Mise en service ..........................................................22
3.4 Nettoyage du commutateur à anneau ........................23
3.5 Remplacement de l‘ampoule .....................................23
3.6 Remplacement de la lentille de protection ..................24
3.7 Montage du clip de ceinture ......................................25
4. Réparation ...................................................................25
5. Nettoyage, entretien et stockage .................................25
6. Élimination ...................................................................26
7. Garantie et responsabilité ............................................27
8. Déclaration UE de conformité ......................................27
9. Certificat d‘examen de type UE ...................................28
A página está carregando ...
A página está carregando ...
A página está carregando ...
A página está carregando ...
A página está carregando ...
A página está carregando ...
A página está carregando ...
A página está carregando ...
A página está carregando ...
A página está carregando ...
A página está carregando ...
A página está carregando ...
A página está carregando ...
A página está carregando ...
A página está carregando ...
A página está carregando ...
A página está carregando ...
A página está carregando ...
A página está carregando ...
A página está carregando ...
A página está carregando ...
A página está carregando ...
A página está carregando ...
A página está carregando ...
A página está carregando ...
A página está carregando ...
A página está carregando ...
A página está carregando ...
A página está carregando ...
A página está carregando ...
A página está carregando ...
A página está carregando ...
A página está carregando ...
A página está carregando ...
A página está carregando ...
A página está carregando ...
-
 1
1
-
 2
2
-
 3
3
-
 4
4
-
 5
5
-
 6
6
-
 7
7
-
 8
8
-
 9
9
-
 10
10
-
 11
11
-
 12
12
-
 13
13
-
 14
14
-
 15
15
-
 16
16
-
 17
17
-
 18
18
-
 19
19
-
 20
20
-
 21
21
-
 22
22
-
 23
23
-
 24
24
-
 25
25
-
 26
26
-
 27
27
-
 28
28
-
 29
29
-
 30
30
-
 31
31
-
 32
32
-
 33
33
-
 34
34
-
 35
35
-
 36
36
-
 37
37
-
 38
38
-
 39
39
-
 40
40
-
 41
41
-
 42
42
-
 43
43
-
 44
44
-
 45
45
-
 46
46
-
 47
47
-
 48
48
-
 49
49
-
 50
50
-
 51
51
-
 52
52
-
 53
53
-
 54
54
-
 55
55
-
 56
56


Pepperl+Fuchs Lite-Ex PL 10e Instruções de operação
- Categoria
- Lanternas
- Tipo
- Instruções de operação
em outros idiomas
Artigos relacionados
-
Pepperl+Fuchs Lite-Ex PL 10e H 6° Instruções de operação
-
-
Pepperl+Fuchs LHCR-51 Manual do usuário
-
-
-
-
-
Outros documentos
-
Ecom Smart Ex 02 Safety Manual
-
Sagola Equipo de iluminación ALTAIR LED Manual do proprietário
-
ANSMANN WL280B Manual do usuário
-
Bushnell 100400 Manual do usuário
-
-
Edision ML25LT-J201G MAGLITE ML25LT LED Flashlight Manual do usuário
-
Bushnell 10-0200 Manual do usuário
-
Aastra-Ericsson 4100 Series Manual do proprietário
-
Endres+Hauser BA Field Xpert SMT70 Instruções de operação