
FP 200
Windscreen blackout system
Installation and Operating Manual. . . . . . . . 8
Frontscheiben Plissee
Montage- und Bedienungsanleitung . . . . . 12
Système d'occultation de
pare-brise
Instructions de montage
et de service . . . . . . . . . . . . . . . . . . . . . . . . . 16
Sistema para oscurecer el
parabrisas
Instrucciones de montaje y de uso . . . . . . .20
Sistema de escurecimento do
pára-brisas
Instruções de montagem e manual de
instruções . . . . . . . . . . . . . . . . . . . . . . . . . . .24
Sistema di oscuramento del
parabrezza
Istruzioni di montaggio e d’uso . . . . . . . . .28
Voorruitverduisteringssysteem
Montagehandleiding en
gebruiksaanwijzing. . . . . . . . . . . . . . . . . . . 32
System til mørklægning af forrude
Monterings- og betjeningsvejledning. . . . 36
Mörkläggningssystem för framruta
Monterings- och bruksanvisning . . . . . . . . 39
Blendingssystem for frontrute
Monterings- og bruksanvisning. . . . . . . . . 43
Tuulilasin tummennusjärjestelmä
Asennus- ja käyttöohje . . . . . . . . . . . . . . . . 46
Система затемнения лобового
стекла
Инструкция по монтажу и эксплуатации . 50
System zasłaniania przedniej szyby
Instrukcja montażu i obsługi. . . . . . . . . . . . 54
Systém zatienenia čelného skla
Návod na montáž a uvedenie
do prevádzky. . . . . . . . . . . . . . . . . . . . . . . . 58
Systém stínění pro čelní sklo
Návod k montáži a obsluze . . . . . . . . . . . . 62
Első szélvédő sötétítő-rendszer
Szerelési és használati útmutató . . . . . . . . 66
EN
DE
FR
ES
PT
IT
NL
DA
SV
NO
FI
RU
PL
SK
CS
HU
WINDOWS & DOORS
BLINDS
FP200-IO-16s.book Seite 1 Donnerstag, 13. Februar 2020 9:20 09

© 2020 Dometic Group. The visual appearance of the contents of this manual is
protected by copyright and design law. The underlying technical design and the
products contained herein may be protected by design, patent or be patent
pending. The trademarks mentioned in this manual belong to Dometic Sweden AB.
All rights are reserved.
FP200-IO-16s.book Seite 2 Donnerstag, 13. Februar 2020 9:20 09

FP200
3
1
2345687
A
B
C
D
2x
E
6x 4x 4x 14x
1
2.
1.
2
FP200-IO-16s.book Seite 3 Donnerstag, 13. Februar 2020 9:20 09

FP200
4
1.
2.
C
C
E E
E E
DD
3
1.
2.
D
E
E
C
C
E
E
D
4
2.
1.
3.
D
E
E
C
C
E
E
D
5
FP200-IO-16s.book Seite 4 Donnerstag, 13. Februar 2020 9:20 09

FP200
5
2.
1.
2,5 mm
6
1.
2.
4
B
7
1.
2.
2,5 mm
8
FP200-IO-16s.book Seite 5 Donnerstag, 13. Februar 2020 9:20 09

FP200
6
A
9
3
2 1
0
FP200-IO-16s.book Seite 6 Donnerstag, 13. Februar 2020 9:20 09

FP200
7
a
FP200-IO-16s.book Seite 7 Donnerstag, 13. Februar 2020 9:20 09

EN
Safety and installation instructions FP200
8
Please read this instruction manual carefully before installation and first
use, and store it in a safe place. If you pass on the product to another
person, hand over this instruction manual along with it.
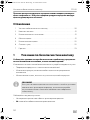
Table of contents
1 Safety and installation instructions . . . . . . . . . . . . . . . . . . . . . . . . . . . . . . . . . .8
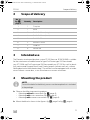
2 Scope of delivery . . . . . . . . . . . . . . . . . . . . . . . . . . . . . . . . . . . . . . . . . . . . . . .9
3 Intended use . . . . . . . . . . . . . . . . . . . . . . . . . . . . . . . . . . . . . . . . . . . . . . . . . . .9
4 Mounting the product . . . . . . . . . . . . . . . . . . . . . . . . . . . . . . . . . . . . . . . . . . .9
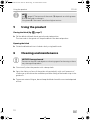
5 Using the product . . . . . . . . . . . . . . . . . . . . . . . . . . . . . . . . . . . . . . . . . . . . . .10
6 Cleaning and maintenance. . . . . . . . . . . . . . . . . . . . . . . . . . . . . . . . . . . . . . .10
7 Warranty . . . . . . . . . . . . . . . . . . . . . . . . . . . . . . . . . . . . . . . . . . . . . . . . . . . . . 11
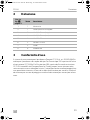
1 Safety and installation instructions
Please observe the prescribed safety instructions and stipulations from the
vehicle manufacturer and service workshops.
The manufacturer accepts no liability for damage in the following cases:
•
Damage to the product resulting from mechanical influences
•
Alterations to the product without express permission from the manufacturer
•
Use for purposes other than those described in the operating manual
I
Please note the following:
•
During installation, do not damage any cables in the vehicle.
•
Do not obscure the windscreen while driving.
NOTE
If you do not have sufficient technical knowledge for installing the
components in vehicles, you should have a specialist install the wind-
screen blackout system in your vehicle.
FP200-IO-16s.book Seite 8 Donnerstag, 13. Februar 2020 9:20 09

EN
FP200 Scope of delivery
9
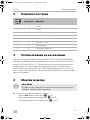
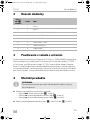
2Scope of delivery
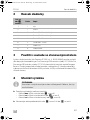
3 Intended use
The Dometic windscreen blackout system FP200 (item no. 9104116564) is suitable
for the windscreen of mobile homes of type Fiat Ducato type 250 from model
year 07/2006 and Fiat Ducato type 290 from model year 07/2014 as well as identi-
cally constructed Peugeot Boxers and Citroën Jumpers (without roof rack, without
folding bed and without head airbag). The vehicles can be equipped with an inside
mirror without a sensor box, a rain sensor box or a camera sensor box.
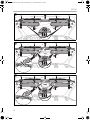
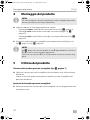
4 Mounting the product
I
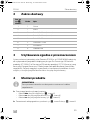
➤ Observe the following mounting options:
–Mounting without a sensor box (fig. 3, page 4)
–Mounting with a rain sensor box (fig. 4, page 4)
–Mounting with a camera sensor box (fig. 5, page 4)
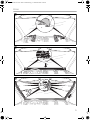
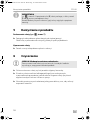
➤ Mount the blind as shown in the figures: fig. 6, page 5 to fig. 0, page 6.
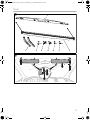
No. in
fig. 1,
page 3
Quantity Description
1 1 Trim plate
2 1 Blind
3 12 Bolt 3.5 x 13 mm (beige)
4 4 Bolt 3.5 x 13 mm (black)
5 4 Bolt M6 x 50 mm
6 2 Bolt M6 x 70 mm
7 2 Guide rail
8 6 Washer M6
NOTE
To mark the holes for the blind, you can use the template that is included
in the package.
FP200-IO-16s.book Seite 9 Donnerstag, 13. Februar 2020 9:20 09

EN
Using the product FP200
10
I
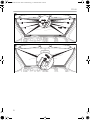
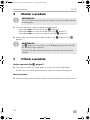
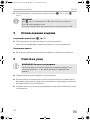
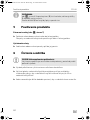
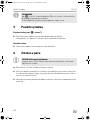
5 Using the product
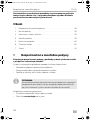
Closing the blind (fig. a, page 7)
➤ Pull the blind with both hands up to the desired position.
The two cords in the guide rails keep the blind in the desired position.
Opening the blind
➤ Guide the blind back into its holder slowly using both hands.
6 Cleaning and maintenance
A
➤ Occasionally clean the product with a damp cloth.
➤ Spray the sliding surfaces of the guide rails periodically with small amounts of
silicone spray to achieve the smoothest possible sliding of the handle strips in the
guide rails.
➤ To prevent material fatigue, do not keep the blind closed for an extended period
of time.
NOTE
fig. 0, page 6: The tension of the cords (3) depends on which groove
(1 or 2) the cords are hung in.
Use groove 2 if the cords are to have higher tension.
NOTICE! Damage hazard
Do not use sharp or hard objects or cleaning agents for cleaning as these
may damage the product.
FP200-IO-16s.book Seite 10 Donnerstag, 13. Februar 2020 9:20 09

EN
FP200 Warranty
11
7Warranty
The statutory warranty period applies. If the product is defective, please contact your
retailer or the manufacturer's branch in your country (see dometic.com/dealer).
For repair and warranty processing, please include the following documents when
you send in the device:
•
A copy of the receipt with purchasing date
•
A reason for the claim or description of the fault
FP200-IO-16s.book Seite 11 Donnerstag, 13. Februar 2020 9:20 09

DE
Sicherheits- und Einbauhinweise FP200
12
Bitte lesen Sie diese Anleitung vor Einbau und Inbetriebnahme sorgfältig
durch und bewahren Sie sie auf. Geben Sie sie im Falle einer Weitergabe
des Produktes an den Nutzer weiter.
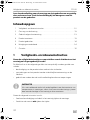
Inhaltsverzeichnis
1 Sicherheits- und Einbauhinweise . . . . . . . . . . . . . . . . . . . . . . . . . . . . . . . . . .12
2 Lieferumfang . . . . . . . . . . . . . . . . . . . . . . . . . . . . . . . . . . . . . . . . . . . . . . . . . .13
3 Bestimmungsgemäßer Gebrauch . . . . . . . . . . . . . . . . . . . . . . . . . . . . . . . . .13
4 Produkt montieren . . . . . . . . . . . . . . . . . . . . . . . . . . . . . . . . . . . . . . . . . . . . .13
5 Produkt benutzen . . . . . . . . . . . . . . . . . . . . . . . . . . . . . . . . . . . . . . . . . . . . . .14
6 Reinigung und Pflege . . . . . . . . . . . . . . . . . . . . . . . . . . . . . . . . . . . . . . . . . . .14
7 Gewährleistung. . . . . . . . . . . . . . . . . . . . . . . . . . . . . . . . . . . . . . . . . . . . . . . .15
1 Sicherheits- und Einbauhinweise
Beachten Sie die vom Fahrzeughersteller und vom Kfz-Handwerk vorge-
schriebenen Sicherheitshinweise und Auflagen!
Der Hersteller übernimmt in folgenden Fällen keine Haftung für Schäden:
•
Beschädigungen am Produkt durch mechanische Einflüsse
•
Veränderungen am Produkt ohne ausdrückliche Genehmigung vom Hersteller
•
Verwendung für andere als die in der Anleitung beschriebenen Zwecke
I
Beachten Sie folgende Hinweise:
•
Beschädigen Sie bei der Montage keine Kabel im Fahrzeug.
•
Verdunkeln Sie die Frontscheibe nicht während der Fahrt.
HINWEIS
Wenn Sie nicht über ausreichende technische Kenntnisse zum Einbauen
von Komponenten in Fahrzeugen verfügen, sollten Sie sich das Front-
scheibenverdunklungssystem von einem Fachmann ins Fahrzeug ein-
bauen lassen.
FP200-IO-16s.book Seite 12 Donnerstag, 13. Februar 2020 9:20 09

DE
FP200 Lieferumfang
13
2 Lieferumfang
3 Bestimmungsgemäßer Gebrauch
Das Dometic Frontscheibenverdunklungssystem FP200 (Art.-Nr. 9104116564) ist
geeignet für die Frontscheibe von Wohnmobilen des Typs Fiat Ducato Typ 250 ab
Baujahr 07/2006 und Fiat Ducato Typ 290 ab Baujahr 07/2014 und baugleiche
Peugeot Boxer und Citroën Jumper (ohne Dachablage, ohne Hubbett und ohne
Kopfairbag). Dabei können die Fahrzeuge mit einem Innenspiegel ohne Sensorbox,
einer Regensensorbox oder einer Kamerasensorbox ausgestattet sein.
4 Produkt montieren
I
➤ Beachten Sie die folgenden Befestigungsmöglichkeiten:
–Befestigung ohne Sensorbox (Abb. 3, Seite 4)
–Befestigung mit Regensensorbox (Abb. 4, Seite 4)
–Befestigung mit Kamerasensorbox (Abb. 5, Seite 4)
➤ Montieren Sie das Rollo wie in den Abbildungen dargestellt: Abb. 6, Seite 5
bis Abb. 0, Seite 6.
Pos. in
Abb. 1,
Seite 3
Anzahl Beschreibung
11Blende
2 1 Rollo
3 12 Schraube 3,5 x 13 mm (beige)
4 4 Schraube 3,5 x 13 mm (schwarz)
5 4 Schraube M6 x 50 mm
6 2 Schraube M6 x 70 mm
7 2 Führungsschiene
8 6 Unterlegscheibe M6
HINWEIS
Zum Anzeichnen der Bohrungen für das Rollo können Sie die Schablone
verwenden, die in der Verpackung enthalten ist.
FP200-IO-16s.book Seite 13 Donnerstag, 13. Februar 2020 9:20 09

DE
Produkt benutzen FP200
14
I
5 Produkt benutzen
Rollo schließen (Abb. a, Seite 7)
➤ Ziehen Sie das Rollo mit beiden Händen nach oben in die gewünschte Stellung.
Die beiden Bänder in den Führungsschienen halten das Rollo in der gewünschte
Stellung.
Rollo öffnen
➤ Führen Sie das Rollo mit beiden Händen langsam in seine Aufnahme zurück.
6 Reinigung und Pflege
A
➤ Reinigen Sie das Produkt gelegentlich mit einem feuchten Tuch.
➤ Sprühen Sie die Führungsschienen an den Gleitflächen in regelmäßigen
Abständen mit Silikonspray in geringer Dosis ein, um ein möglichst leichtes
Gleiten der Griffleisten in den Führungsschienen zu erreichen.
➤ Halten Sie das Rollo nicht über einen längeren Zeitraum geschlossen, um eine
Materialermüdung zu vermeiden.
HINWEIS
Abb. 0, Seite 6: Die Spannung der Bänder (3) hängt davon ab, in
welche Nut (1 oder 2) die Bänder eingehängt werden.
Verwenden Sie die Nut 2, wenn die Bänder eine höhere Spannung
haben sollen.
ACHTUNG! Beschädigungsgefahr
Keine scharfen oder harten Gegenstände oder Reinigungsmittel zur
Reinigung verwenden, da dies zu einer Beschädigung des Produktes
führen kann.
FP200-IO-16s.book Seite 14 Donnerstag, 13. Februar 2020 9:20 09

DE
FP200 Gewährleistung
15
7Gewährleistung
Es gilt die gesetzliche Gewährleistungsfrist. Sollte das Produkt defekt sein, wenden
Sie sich bitte an Ihren Fachhändler oder an die Niederlassung des Herstellers in
Ihrem Land (siehe dometic.com/dealer).
Zur Reparatur- bzw. Gewährleistungsbearbeitung müssen Sie folgende Unterlagen
mitschicken:
•
eine Kopie der Rechnung mit Kaufdatum,
•
einen Reklamationsgrund oder eine Fehlerbeschreibung.
FP200-IO-16s.book Seite 15 Donnerstag, 13. Februar 2020 9:20 09

FR
Consignes de sécurité et instructions de montage FP200
16
Veuillez lire attentivement cette notice avant le montage et la mise en
service. Veuillez ensuite la conserver. En cas de passer le produit, veuillez
le transmettre au nouvel acquéreur.
Table des matières
1 Consignes de sécurité et instructions de montage . . . . . . . . . . . . . . . . . . . .16
2 Pièces fournies . . . . . . . . . . . . . . . . . . . . . . . . . . . . . . . . . . . . . . . . . . . . . . . .17
3 Usage conforme . . . . . . . . . . . . . . . . . . . . . . . . . . . . . . . . . . . . . . . . . . . . . . .17
4 Montage du produit . . . . . . . . . . . . . . . . . . . . . . . . . . . . . . . . . . . . . . . . . . . .18
5 Utilisation du produit . . . . . . . . . . . . . . . . . . . . . . . . . . . . . . . . . . . . . . . . . . .18
6 Entretien et nettoyage . . . . . . . . . . . . . . . . . . . . . . . . . . . . . . . . . . . . . . . . . .19
7 Garantie. . . . . . . . . . . . . . . . . . . . . . . . . . . . . . . . . . . . . . . . . . . . . . . . . . . . . .19
1 Consignes de sécurité et instructions de
montage
Respectez les consignes de sécurité et autres prescriptions imposées par
le fabricant du véhicule et par les professionnels de l’automobile !
Le fabricant décline toute responsabilité pour des dommages dans les cas suivants :
•
des sollicitations mécaniques ayant endommagé le matériel
•
des modifications apportées au produit sans autorisation explicite de la part du
fabricant
•
une utilisation différente de celle décrite dans la notice
I
Tenez compte des remarques suivantes :
•
Attention de ne pas endommager de câble au montage.
•
N'occultez pas le pare-brise pendant le trajet.
REMARQUE
Si vos connaissances techniques en matière d’installation d’éléments
dans un véhicule sont insuffisantes, nous vous recommandons de faire
installer le système d’occultation de pare-brise avant par un spécialiste.
FP200-IO-16s.book Seite 16 Donnerstag, 13. Februar 2020 9:20 09

FR
FP200 Pièces fournies
17
2Pièces fournies
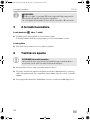
3Usage conforme
Le système d'occultation de pare-brise Dometic FP200 (réf. 9104116564)
convient aux pare-brises : Fiat Ducato de type 250, à partir de l'année de
fabrication 07/2006 ; Fiat Ducato de type 290, à partir de l'année de fabrication
07/2014 ; Peugeot Boxer et Citroën Jumper de construction identique (sans
compartiment de rangement dans le toit, ni lit escamotable, ni airbag rideau).Les
véhicules peuvent être équipés d’un rétroviseur intérieur sans boîtier de capteur,
d’un boîtier de capteur de pluie ou d’un boîtier de capteur de caméra.
Pos. dans
fig. 1,
page 3
Nombre Description
11Cache
21Store
3 12 Vis 3,5 x 13 mm (beige)
4 4 Vis 3,5 x 13 mm (noire)
54Vis M6x50mm
62Vis M6x70mm
7 2 Rail de guidage
8 6 Rondelle M6
FP200-IO-16s.book Seite 17 Donnerstag, 13. Februar 2020 9:20 09

FR
Montage du produit FP200
18
4 Montage du produit
I
➤ Respectez les options de montage suivantes :
–Montage sans boîtier de capteurs (fig. 3, page 4)
–Montage avec boîtier de capteur de pluie (fig. 4, page 4)
–Montage avec boîtier de caméra (fig. 5, page 4)
➤ Montez le store comme sur les schémas : fig. 6, page 5 à fig. 0, page 6.
I
5 Utilisation du produit
Fermeture du store (fig. a, page 7)
➤ Tirez le store vers le haut et mettez-le dans la position souhaitée.
Les deux bandes dans les rails de guidage maintiennent le store dans la position
souhaitée.
Ouverture du store
➤ Faites remonter lentement le store à deux mains dans son logement.
REMARQUE
Le gabarit de l'emballage permet de marquer les alésages pour le store.
REMARQUE
fig. 0, page 6 : La tension des bandes (3) dépendra des rainures (1 ou
2) par lesquelles elles seront accrochées.
La rainure 2 permet d'obtenir une tension supérieure.
FP200-IO-16s.book Seite 18 Donnerstag, 13. Februar 2020 9:20 09

FR
FP200 Entretien et nettoyage
19
6 Entretien et nettoyage
A
➤ Nettoyez le produit avec un tissu humide.
➤ Vaporisez à intervalles réguliers une faible dose de spray au silicone sur les
surfaces de glissement des glissières latérales afin que les poignées glissent aussi
facilement que possible dans les glissières latérales.
➤ Ne laissez pas le store fermé pendant une période prolongée pour éviter que le
matériau ne s’use.
7 Garantie
Le délai légal de garantie s'applique. Si le produit s'avérait défectueux, veuillez vous
adresser à la filiale du fabricant située dans votre pays (voir dometic.com/dealer) ou
à votre revendeur spécialisé.
Veuillez y joindre les documents suivants pour la gestion des réparations et de la
garantie :
•
une copie de la facture avec la date d'achat,
•
le motif de la réclamation ou une description du dysfonctionnement.
AVIS ! Risque d'endommagement
N’utilisez aucun objet coupant ou dur, ni de détergents pour le
nettoyage. Cela pourrait endommager le produit.
FP200-IO-16s.book Seite 19 Donnerstag, 13. Februar 2020 9:20 09

ES
Indicaciones de seguridad y montaje FP200
20
Lea detenidamente estas instrucciones antes de llevar a cabo la instalación
y puesta en funcionamiento, y consérvelas en un lugar seguro. En caso de
vender o entregar el producto a otra persona, entregue también estas
instrucciones.
Índice
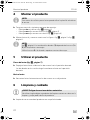
1 Indicaciones de seguridad y montaje . . . . . . . . . . . . . . . . . . . . . . . . . . . . . 20
2 Volumen de entrega . . . . . . . . . . . . . . . . . . . . . . . . . . . . . . . . . . . . . . . . . . . .21
3 Uso adecuado. . . . . . . . . . . . . . . . . . . . . . . . . . . . . . . . . . . . . . . . . . . . . . . . .21
4 Montar el producto. . . . . . . . . . . . . . . . . . . . . . . . . . . . . . . . . . . . . . . . . . . . 22
5 Utilizar el producto . . . . . . . . . . . . . . . . . . . . . . . . . . . . . . . . . . . . . . . . . . . . 22
6 Limpieza y cuidado . . . . . . . . . . . . . . . . . . . . . . . . . . . . . . . . . . . . . . . . . . . . 22
7 Garantía legal . . . . . . . . . . . . . . . . . . . . . . . . . . . . . . . . . . . . . . . . . . . . . . . . 23
1 Indicaciones de seguridad y montaje
Tenga en cuenta las indicaciones de seguridad y la documentación
suministrada por el fabricante del vehículo y por el taller.
El fabricante declina toda responsabilidad ante daños ocurridos en los siguientes
casos:
•
desperfectos en el producto debidos a influencias mecánicas
•
modificaciones realizadas en el producto sin el expreso consentimiento del
fabricante
•
utilización del aparato para fines distintos a los descritos en las instrucciones
I
Tenga en cuenta las siguientes indicaciones:
•
No dañe ningún cable del vehículo durante el montaje.
•
No oscurezca el parabrisas durante la conducción.
NOTA
Si no dispone de conocimientos técnicos suficientes para llevar a cabo
el montaje de componentes en el vehículo, encargue el montaje del sis-
tema para oscurecer el parabrisas a personal técnico cualificado.
FP200-IO-16s.book Seite 20 Donnerstag, 13. Februar 2020 9:20 09
A página está carregando ...
A página está carregando ...
A página está carregando ...
A página está carregando ...
A página está carregando ...
A página está carregando ...
A página está carregando ...
A página está carregando ...
A página está carregando ...
A página está carregando ...
A página está carregando ...
A página está carregando ...
A página está carregando ...
A página está carregando ...
A página está carregando ...
A página está carregando ...
A página está carregando ...
A página está carregando ...
A página está carregando ...
A página está carregando ...
A página está carregando ...
A página está carregando ...
A página está carregando ...
A página está carregando ...
A página está carregando ...
A página está carregando ...
A página está carregando ...
A página está carregando ...
A página está carregando ...
A página está carregando ...
A página está carregando ...
A página está carregando ...
A página está carregando ...
A página está carregando ...
A página está carregando ...
A página está carregando ...
A página está carregando ...
A página está carregando ...
A página está carregando ...
A página está carregando ...
A página está carregando ...
A página está carregando ...
A página está carregando ...
A página está carregando ...
A página está carregando ...
A página está carregando ...
A página está carregando ...
A página está carregando ...
A página está carregando ...
A página está carregando ...
A página está carregando ...
A página está carregando ...
-
 1
1
-
 2
2
-
 3
3
-
 4
4
-
 5
5
-
 6
6
-
 7
7
-
 8
8
-
 9
9
-
 10
10
-
 11
11
-
 12
12
-
 13
13
-
 14
14
-
 15
15
-
 16
16
-
 17
17
-
 18
18
-
 19
19
-
 20
20
-
 21
21
-
 22
22
-
 23
23
-
 24
24
-
 25
25
-
 26
26
-
 27
27
-
 28
28
-
 29
29
-
 30
30
-
 31
31
-
 32
32
-
 33
33
-
 34
34
-
 35
35
-
 36
36
-
 37
37
-
 38
38
-
 39
39
-
 40
40
-
 41
41
-
 42
42
-
 43
43
-
 44
44
-
 45
45
-
 46
46
-
 47
47
-
 48
48
-
 49
49
-
 50
50
-
 51
51
-
 52
52
-
 53
53
-
 54
54
-
 55
55
-
 56
56
-
 57
57
-
 58
58
-
 59
59
-
 60
60
-
 61
61
-
 62
62
-
 63
63
-
 64
64
-
 65
65
-
 66
66
-
 67
67
-
 68
68
-
 69
69
-
 70
70
-
 71
71
-
 72
72


em outros idiomas
- français: Dometic FP200 Guide d'installation
- italiano: Dometic FP200 Guida d'installazione
- slovenčina: Dometic FP200 Návod na inštaláciu
- dansk: Dometic FP200 Installationsvejledning
Artigos relacionados
-
Dometic Softroll Guia de instalação
-
-
-
-
-
-
-
-
-