Avent SCF330/40 Manual do usuário
- Categoria
- Bombas de mama
- Tipo
- Manual do usuário

SCF330
SCF330


2
1
3 4 5
6
7
8
9
1


Introduction
Congratulations on your purchase and welcome to Philips Avent! To fully benet from the
support that Philips Avent oers, register your product at www.philips.com/welcome.
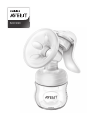
The Philips Avent manual breast pump has a unique design that enables you to sit in a more
comfortable position while expressing. The soft massage cushion* is designed to feel soft and
warm and imitates your baby’s sucking action to provide fast milk ow - quietly, comfortably
and gently. The pump is compact, easy to assemble and all parts are dishwasher-safe and
BPA-free. Healthcare professionals say that breast milk is the best nutrition for babies during the
rst year, combined with solid food after the rst 6 months. Your breast milk is specially adapted
to your baby’s needs and contains antibodies which help protect your baby against infection
and allergies. A breast pump can help you to breastfeed longer. You can express and store your
milk so that your baby can still enjoy the benets of it, even if you cannot be there to provide
it yourself. As the pump is compact and discrete to use, you can take it with you anywhere,
allowing you to express milk at your own convenience and maintain your milk supply.
*The massage cushion included with this pump was designed to comfortably t the majority
of mothers. However, should you need it, you can buy a massage cushion for larger nipples
separately.
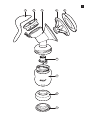
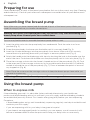
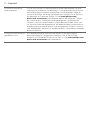
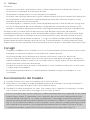
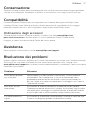
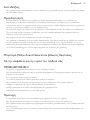
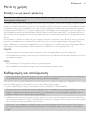
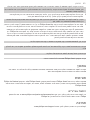
General description (Fig. 1)
1 Handle
2 Silicone diaphragm with stem
3 Pump body
4 Massage cushion
5 Cover
6 White valve
7 Philips Avent Natural bottle
8 Screw ring
9 Sealing disc
Intended use
The Philips Avent manual breast pump is intended to express and to collect milk from the breast
of a lactating woman. The device is intended for a single user.
Important safety information
Read this user manual carefully before you use the breast pump and save it for future reference.
Contraindication
- Never use the breast pump while you are pregnant, as pumping can induce labor.
6 English

Warning
- This breast pump is not intended for use by persons (including children) with reduced
physical, sensory or mental capabilities, or lack of experience and knowledge, unless they
have been given supervision or instruction concerning use of the product by a person
responsible for their safety.
- Children should be supervised to ensure that they do not play with the breast pump.
- Inspect the breast pump for signs of damage before each use. Do not use the breast pump if
it does not work properly.
- Never use the breast pump while you are sleepy or drowsy.
- Do not expose the breast pump to extreme heat and do not place it in direct sunlight.
- If you are a mother who is infected with Hepatitis B, Hepatitis C or Human Immunodeciency
Virus (HIV), expressing breast milk will not reduce or remove the risk of transmitting the virus
to your baby through your breast milk.
Philips Avent Natural bottle and screw ring
For your child‘s safety and health
WARNING!
- Always use this product with adult supervision.
- Do not allow children to play with small parts or walk/run while using bottles or cups.
- The bottle may break if dropped.
- For glass bottles: glass bottles may break.
- Do not place the bottle in a hot oven or on any other hot surface.
- Throw away at the rst signs of damage or weakness.
- Keep all components not in use out of the reach of children.
- Clean and disinfect before each use.
Caution
- The breast pump is only intended for repeated use by a single user.
- Never drop or insert any foreign object into any opening.
- Never use any accessories or parts from other manufacturers or that Philips Avent does not
specically recommend.
- Wash, rinse and disinfect all pump parts before each use.
- Do not use antibacterial or abrasive cleaning agents when you clean breast pump parts.
- Do not continue pumping for more than ve minutes at a time if you do not succeed in
expressing any milk.
- If the pressure generated is uncomfortable or causes pain, break the seal between the breast
and the pump body with your nger and remove the pump from your breast.
7English

Preparing for use
Clean and disinfect all parts of the breast pump before rst use in the correct way (see ‘Cleaning
and disinfection’). Clean all parts after each subsequent use and disinfect all parts before each
subsequent use.
Assembling the breast pump
Note: Make sure you have cleaned and disinfected all parts of the breast pump. Wash your
hands thoroughly before you handle cleaned parts.
Warning: Be careful, the cleaned parts may still be hot. Only start assembling the
breast pump when cleaned parts have cooled down.
Tip: You may nd it easier to assemble the breast pump while it is wet.
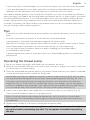
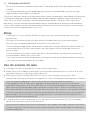
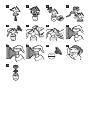
1 Insert the white valve into the pump body from underneath. Push the valve in as far as
possible (Fig. 2).
2 Screw the pump body clockwise onto the bottle until it is securely xed (Fig. 3).
3 Insert the silicone diaphragm into the pump body from above. Make sure it ts securely
around the rim by pressing down with your ngers to ensure a perfect seal (Fig. 4).
4 Attach the handle onto the diaphragm with stem by hooking the hole in the handle over the
end of the stem. Push down the handle onto the pump body until it clicks into place (Fig. 5).
5 Place the massage cushion into the funnel-shaped section of the pump body (Fig. 6). Push
in the inner part of the massage cushion as far as possible and make sure that it is perfectly
sealed all around the rim of the pump body (Fig. 7). Press in between the petals to remove
any trapped air (Fig. 8).
Note: Place the cover over the massage cushion to keep the breast pump clean while you
prepare for expressing.
Warning: Always use the breast pump with a massage cushion.
Using the breast pump
When to express milk
If breastfeeding goes well, it is advisable (unless advised otherwise by your healthcare
professional/breastfeeding advisor) to wait until your milk supply and breastfeeding schedule
are established (normally at least 2 to 4 weeks after giving birth) before you start expressing.
Exceptions:
- If breastfeeding does not go well immediately, expressing regularly can help to establish and
maintain your milk supply.
- If you are expressing milk for your baby to be given in hospital.
- If your breasts are engorged (painful or swollen), you can express a small amount of milk
before or between feeds to ease the pain and to help your baby latch on more easily.
8 English

- If you have sore or cracked nipples, you may wish to express your milk until they are healed.
- If you are separated from your baby and wish to continue to breastfeed when you are
reunited, you should express your milk regularly to stimulate your milk supply.
You need to nd the optimum times of the day to express your milk, for example just before or
after your baby’s rst feed in the morning when your breasts are full, or after a feed if your baby
has not emptied both breasts. If you have returned to work, you may need to express during
a break. Using a breast pump requires practice and it may take several attempts before you
succeed. Fortunately, the Philips Avent manual breast pump is easy to assemble and use so
you will soon get used to expressing with it.
Tips
- Familiarize yourself with the breast pump and how to operate it before you use it for the rst
time.
- Choose a time when you are not in a rush and will not be interrupted.
- A photograph of your baby can help encourage the ‘let-down’ reex.
- Warmth can also help: try to express after a bath or shower, or place a warm cloth or Philips
Avent Thermopad on the breast for a few minutes before you start expressing.
- You may nd it easier to express while your baby is feeding from the other breast,
or immediately after a feed.
- If expressing becomes painful, stop and consult your breastfeeding advisor or healthcare
professional.
Operating the breast pump
1 Wash your hands thoroughly and make sure your breasts are clean.
2 Relax in a comfortable chair (you may wish to use cushions to support your back). Make sure
you have a glass of water nearby.
3 Press the assembled pump body against your breast. Make sure that your nipple is centered,
so that the massage cushion creates an airtight seal.
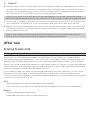
Note: Make sure that your nipple ts correctly in the massage cushion (Fig. 9). Not too tight,
it is important that the nipple can move freely, while expressing breast milk (Fig. 10). The
massage cushion should not be too large, because this can cause pain or less eective
expression (Fig. 11). If the cushion is not the right size for your nipples, you can purchase a
cushion of a dierent size separately. Two cushion sizes are available: 19.5 mm and 25 mm.
You can nd the size of the cushion (19.5 or 25 mm) on the cushion itself (Fig. 12).
4 Gently start to press down the handle until you feel the suction on your breast (Fig. 13).
Then allow the handle to return to its resting position.
Note: You do not have to press down the handle fully, only as much as is comfortable.
Your milk will soon start owing, even though you are not using all the suction the pump
can generate.
5 Repeat step 4 rapidly 5 or 6 times to initiate the ‘let-down’ reex.
Warning: Do not continue pumping for more than ve minutes at a time if you
do not succeed in expressing any milk. Try to express at another time during
the day.
9
English

6 Adopt a slower rhythm by pressing down the handle and keeping it pressed down for up to 3
seconds before you let it return to its resting position. Continue in this way while your milk is
owing. If your hand becomes tired, try to use the other hand to operate the breast pump or
rest your arm across your body to pump from the opposite breast.
Note: Do not worry if your milk does not ow immediately. Relax and continue pumping.
Repositioning the breast pump on your breast from time to time can help stimulate milk ow.
7 On average, you need to pump for 10 minutes to express 60-125 ml (2-4 oz) of breast milk
from one breast. However, this is just an indication and varies from woman to woman.
8 When you have nished expressing, carefully remove the breast pump from your breast and
unscrew the bottle from the pump body, ready for feeding or storage. Clean the other used
parts of the breast pump.
Note: If you regularly express more than 125 ml per session, you can purchase and use a
260 ml (9 oz) Philips Avent bottle to prevent overlling and spillage.
After use
Storing breast milk
Warning: Only store breast milk collected with a clean and disinfected pump.
Breast milk can be stored in the fridge (not in the door) for up to 48 hours. Expressed milk
should be refrigerated immediately. If you store milk in the fridge to add to during the day, only
add milk that has been expressed into a clean and disinfected bottle or breast milk container.
Breast milk can be stored in the freezer for up to three months as long as it is kept in disinfected
bottles tted with a disinfected screw ring and sealing disc. Clearly label the bottle with the date
and time of expression and use older breast milk rst.
If you intend to feed your baby with the expressed breast milk within 48 hours, you can store
the breast milk in the fridge in an assembled Philips Avent bottle. Unscrew the bottle and
remove it from the pump body. Insert a disinfected sealing disc into a disinfected screw ring and
screw this onto the bottle (Fig. 14).
Do’s
- Always refrigerate or freeze expressed milk immediately.
- Only store milk collected with a cleaned and disinfected breast pump in cleaned bottles.
Don’ts
- Never refreeze thawed breast milk.
- Never add fresh breast milk to frozen breast milk.
10 English

Cleaning and disinfection
Caution: Wash your hands thoroughly before you touch disinfected items and make sure the
surfaces on which you place disinfected items are clean.
Clean and disinfect all parts of the breast pump before rst use. Clean all parts after each use
and disinfect all parts before each subsequent use.
1 Disassemble the breast pump completely. Also remove the white valve.
Caution: Be careful when you remove the white valve and when you clean it. If it gets
damaged, your breast pump does not function properly. To remove the white valve, gently
pull at the ribbed tab on the side of the valve.
2 Clean all parts in hot water with some mild washing-up liquid and then rinse them
thoroughly. You can also clean the parts in the dishwasher (on the top rack only). Do not put
any other objects on top of them.
Note: To clean the valve, rub it gently between your ngers in warm water with some
washing-up liquid. Do not insert objects into the valve, as this may cause damage.
3
Disinfect all parts in a Philips Avent steam steriliser or by boiling them for 5 minutes. For
boiling, ll a household pot with enough water to cover all parts. Bring the water to the boil.
Place the parts in the household pot and boil them for 5 minutes. During disinfection with
boiling water, prevent the bottle or other parts from touching the side of the pan. This can
cause irreversible product deformation or damage that Philips cannot be held liable for. Allow
water to cool and gently remove the parts from the water. Place the parts neatly on a clean
paper towel or in a clean drying rack and allow them to air-dry. Avoid using cloth towels to
dry the parts because they can carry germs and bacteria that are harmful to your baby.
Note: Do not use abrasive or antibacterial cleaning agents.
Note: Excessive concentration of detergents may eventually cause plastic components to crack.
Should this occur, replace immediately.
Note: Food colorings may discolor parts.
Note: Philips Avent bottles are suitable for all methods of disinfection.
Storage
Keep the breast pump out of direct sunlight as prolonged exposure may cause discoloration.
Store the breast pump and its accessories in a safe and dry place.
Compatibility
The Philips Avent manual breast pump is compatible with Philips Avent bottles in our range.
The high-quality plastic Philips Avent Natural bottle is compatible with most Philips Avent
breast pumps, spouts, sealing discs and cup tops.
11English

Ordering accessories
To buy accessories or spare parts, visit www.philips.com/parts-and-accessories or go to your
Philips dealer. You can also contact the Philips Consumer Care Center in your country.
Support
If you need information or support, please visit www.philips.com/support.
Troubleshooting
This chapter summarizes the most common problems you could encounter with the
manual breast pump. If you are unable to solve the problem with the information below,
visit www.philips.com/support for a list of frequently asked questions or contact the
Consumer Care Center in your country.
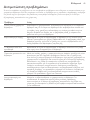
Problem Solution
I experience pain when I
use the breast pump.
Stop using the breast pump and consult your breastfeeding advisor.
If the pump does not come away easily from the breast, it may be
necessary to break the vacuum by placing a nger between the
breast and the massage cushion or between the breast and the
pump funnel.
I do not feel any suction. Make sure you have assembled the breast pump in the right way
(see 'Preparing for use'). Make sure the massage cushion is sealed
around the rim of the funnel and make sure the white valve is rmly
in place.
The breast pump makes
a squeaking noise.
Make sure that you assemble the breast pump correctly and that
the handle is wet when you assemble the breast pump.
The breast pump is
scratched.
In case of regular use, some light scratching is normal and does not
cause problems. However, if a part of the breast pump becomes
badly scratched or cracks, stop using the breast pump and contact
the Philips Consumer Care Center or visit www.philips.com/
parts-and-accessories to obtain a replacement part. Be aware
that combinations of detergents, cleaning products, sterilizing
solution, softened water and temperature uctuations may, under
certain circumstances, cause the plastic to crack. Avoid contact
with abrasive or antibacterial detergents as these can damage the
plastic.
The breast pump is
discolored.
You can still use the breast pump. For replacement parts, please
contact the Philips Consumer Care Center in your country or visit
www.philips.com/parts-and-accessories for spare parts.
12 English

Introducción
Enhorabuena por la adquisición de este producto y bienvenido a Philips Avent.
Para sacar el mayor partido a la asistencia que Philips Avent le ofrece, registre el producto
en www.philips.com/welcome.
El extractor de leche manual Philips Avent tiene un diseño único para que pueda sentarse en
una posición más cómoda durante la extracción. El suave cojín masajeador* se ha diseñado
para ofrecer un tacto suave y cálido e imita el patrón de succión del bebé para proporcionar
un ujo rápido de la leche, de forma silenciosa, cómoda y suave. El extractor es compacto
y fácil de montar y todas las piezas son aptas para lavavajillas y sin BPA. Los profesionales
de la salud arman que la leche materna es la mejor alimentación para los bebés durante el
primer año de vida, combinada con alimento sólido a partir de los 6 meses. La leche materna
se adapta especícamente a las necesidades infantiles y contiene anticuerpos que ayudan a
proteger a los bebés de infecciones y alergias. Un extractor de leche materna ayuda a prolongar
la lactancia. Puede extraer y guardar la leche para que el bebé obtenga todos sus benecios
aunque usted no pueda proporcionarla. Como el extractor es compacto y de uso discreto,
puede llevarlo a cualquier parte, extraer la leche cuando más le convenga y mantener el
suministro de leche.
*El cojín masajeador incluido con el extractor se ha diseñado para adaptarse cómodamente a
la mayoría de las madres. Sin embargo, si lo necesita, puede comprar un cojín masajeador para
pezones más grandes por separado.
Descripción general (Fig. 1)
1 Mango
2 Diafragma de silicona con base
3 Cuerpo del extractor
4 Cojín masajeador
5 Cubierta
6 Válvula blanca
7 Biberón Natural de Philips Avent
8 Rosca
9 Disco sellador
Uso indicado
El extractor de leche manual Philips Avent permite extraer y guardar la leche de una mujer
lactante. Este dispositivo está diseñado para un solo usuario.
Información de seguridad importante
Antes de usar el extractor de leche materna, lea atentamente este manual de usuario
y consérvelo por si necesitara consultarlo en el futuro.
Contraindicación
- Nunca utilice el extractor de leche si está embarazada, ya que la extracción puede inducir
el parto.
13Español

14 Español
Advertencia
- Este extractor de leche materna no debe ser usado por personas (adultos o niños) con
discapacidad física, psíquica o sensorial, ni por quienes no tengan los conocimientos y la
experiencia necesarios, a menos que sean supervisados o instruidos acerca del uso del
producto por una persona responsable de su seguridad.
- Asegúrese de que los niños no jueguen con el extractor de leche materna.
- Inspeccione si el extractor de leche muestra signos de daños antes de cada uso. No utilice el
extractor de leche si no funciona correctamente.
- Nunca utilice el extractor de leche si se siente somnolencia.
- No exponga el extractor de leche al calor extremo ni a la luz solar directa.
- Si es madre y tiene hepatitis B, hepatitis C o el virus de inmunodeciencia humana (VIH),
la extracción de la leche materna no reducirá ni eliminará el riesgo de contagiar el virus al
bebé a través de la leche materna.
Biberón Natural Philips Avent y rosca
Para la salud y seguridad de su bebé
ADVERTENCIA
- Utilice siempre este producto bajo la supervisión de un adulto.
- No permita a los niños jugar con piezas pequeñas ni andar o correr mientras utilizan
biberones o vasos.
- El biberón puede romperse si se cae.
- Para biberones de cristal: los biberones de cristal se pueden romper.
- No ponga el biberón en un horno caliente ni en ninguna otra supercie caliente.
- Tirarlo al primer indicio de deterioro o de desperfecto.
- Mantenga todos los componentes que no estén en uso fuera del alcance de los niños.
- Límpielo y desinféctelo antes de cada uso.
Precaución
- El extractor de leche se ha diseñado para el uso repetido por parte de un solo usuario.
- No deje caer ni introduzca ningún objeto extraño en ninguna abertura.
- Nunca utilice accesorios ni piezas de otros fabricantes o que Philips Avent no recomiende
especícamente.
- Lave, enjuague y desinfecte todas las piezas del extractor antes de cada uso.
- No utilice agentes de limpieza abrasivos o antibacterias para limpiar las piezas del extractor.
- No siga extrayendo durante más de cinco minutos de una sola vez si no consigue extraer
nada de leche.
- Si la presión generada le resulta incómoda o dolorosa, elimine el vacío que hay entre el
pecho y el cuerpo del extractor con el dedo y retire el extractor del pecho.

15Español
Preparación para su uso
Antes del primer uso, limpie y desinfecte todas las piezas del extractor de leche de forma
correcta (consulte ‚Limpieza y desinfección‘). Limpie todas las piezas después de cada uso
siguiente y desinféctelas antes de volver a utilizarlas.
Montaje del extractor de leche
Nota: Asegúrese de que ha limpiado y desinfectado todas las piezas del extractor de leche.
Lávese bien las manos antes de manipular las piezas limpias.
Advertencia: Tenga cuidado, las piezas limpias aún pueden estar calientes.
Comience a montar el extractor de leche solo cuando las partes limpias se hayan
enfriado.
Consejo: Puede que le resulte más fácil montar el extractor de leche mientras está húmedo.
1 Inserte la válvula blanca en el cuerpo del extractor desde la parte inferior. Empuje la válvula
lo máximo posible (Fig. 2).
2 Enrosque el cuerpo del extractor en el sentido de las agujas del reloj en el biberón hasta que
esté bien sujeto (Fig. 3).
3 Inserte el diafragma de silicona en el cuerpo del extractor desde arriba. Asegúrese de
que está bien sujeto alrededor del borde presionándolo hacia abajo con los dedos para
garantizar un sellado perfecto (Fig. 4).
4 Coloque el mango sobre el diafragma con base enganchando el oricio del mango sobre el
extremo de la base. Empuje el mango hacia abajo sobre el cuerpo del extractor hasta que
encaje en su lugar con un clic (Fig. 5).
5 Coloque el cojín masajeador en la sección con forma de embudo del cuerpo del extractor
(Fig. 6). Empuje la parte interior del cojín masajeador el máximo posible y asegúrese de que
queda perfectamente sellado en torno al borde del cuerpo del extractor (Fig. 7). Presione
entre los pétalos para eliminar el aire que pueda haber quedado atrapado (Fig. 8).
Nota: Coloque la cubierta sobre el cojín masajeador para mantener el extractor de leche
limpio mientras se prepara para la extracción.
Advertencia: Utilice siempre el extractor de leche materna con un cojín
masajeador.
Uso del extractor de leche
Cuándo extraer la leche
Si la lactancia materna va bien en su caso, es conveniente (a menos que un profesional de la
salud o asesor de lactancia se lo recomiende) esperar hasta que se haya establecido un horario
de producción de leche y lactancia (normalmente, al menos entre 2 y 4 semanas después del
nacimiento) para comenzar a extraer leche.

Excepciones:
- Si la lactancia materna no va bien de forma inmediata, la extracción regular puede ayudar a
establecer y mantener el suministro de leche.
- Si extrae leche para su bebé para dársela en el hospital.
- Si tiene los pechos hinchados (doloridos o inamados), puede extraer una pequeña cantidad
de leche antes de cada toma o entre las mismas para aliviar el dolor o para ayudar a que el
bebé se enganche al pecho más fácilmente.
- Si tiene los pezones irritados o agrietados, puede que preera extraer la leche hasta que se
hayan curado.
- Si tiene que separarse del bebé y desea continuar con la lactancia cuando vuelva con él,
debería extraer la leche con regularidad para estimular su producción.
Debe encontrar los momentos del día óptimos para extraer la leche, por ejemplo justo antes o
después de la primera toma del bebé por la mañana cuando los pechos están llenos o después
de una toma si el bebé no ha vaciado ambos pechos. Si ha vuelto al trabajo, puede hacerlo
durante un descanso. El uso de extractor de leche requiere práctica y es posible que tenga
que hacer varios intentos para hacerlo bien. Por suerte, el extractor de leche manual de Philips
Avent es fácil de montar y utilizar, por lo que pronto se acostumbrará a extraer la leche.
Consejos
- Familiarícese con el extractor de leche y cómo manejarlo antes de utilizarlo por primera vez.
- Elija un momento en el que no tenga prisa y no vayan a interrumpirle.
- Una fotografía del bebé puede ayudar a fomentar el „reejo de bajada“.
- El calor también ayuda: pruebe a extraer la leche después de un baño o una ducha, o
coloque un paño caliente o una almohadilla térmica de Philips Avent en el pecho durante
unos minutos antes de iniciar la extracción.
- Puede que le resulte más fácil extraer la leche mientras el bebé está tomando del otro pecho
o inmediatamente después de la toma.
- Si la extracción le resulta dolorosa, pare y consulte a su asesor de lactancia o profesional de
la salud.
Funcionamiento del extractor de leche
1 Lávese bien las manos y asegúrese de que los pechos están limpios.
2 Relájese en una silla cómoda (puede utilizar cojines para apoyar la espalda). Asegúrese de
que tiene un vaso de agua cerca.
3 Presione el cuerpo del extractor montado contra el pecho. Asegúrese de que el pezón está
centrado para que el cojín masajeador cree un sellado estanco.
Nota: Asegúrese de que el pezón se ajusta adecuadamente en el cojín masajeador (Fig. 9).
No demasiado apretado, es importante que el pezón pueda moverse libremente cuando
se extrae la leche del pecho (Fig. 10). El cojín masajeador no debe ser demasiado grande,
porque puede hacer daño o que la extracción sea menos ecaz (Fig. 11). En caso de que el
cojín no sea del tamaño adecuado para los pezones, puede comprar uno de otro tamaño
diferente por separado. Hay dos tamaños diferentes disponibles: 19,5 mm y 25 mm. El
tamaño está indicado en el mismo (Fig. 12) cojín (19,5 o 25 mm).
16 Español

4 Comience a presionar suavemente el mango hacia abajo hasta que sienta la succión en el
pecho (Fig. 13). A continuación, deje que el mango vuelva a su posición de reposo.
Nota: No es necesario presionar el mango completamente, solo en la medida que se sienta
confortable. La leche empezará a uir pronto, incluso si no utiliza la succión máxima que
puede generar el extractor.
5 Repita el paso 4 rápidamente 5 o 6 veces para iniciar el „efecto de bajada“.
Advertencia: No siga extrayendo durante más de cinco minutos de una sola vez
si no consigue extraer nada de leche. Inténtelo en algún otro momento del día.
6 Reduzca el ritmo presionando hacia abajo el mango y manteniéndolo así durante un
máximo de 3 segundos antes de dejar que vuelva a la posición de reposo. Continúe así
mientras que la leche uya. Si se le cansa la mano, intente utilizar la otra para manejar el
extractor de leche o apoye el brazo sobre el cuerpo para extraer del pecho contrario.
Nota: No se preocupe si la leche no uye inmediatamente. Relájese y continúe bombeando.
Volver a colocar el extractor de leche en el pecho de vez en cuando ayudará a estimular el
ujo de leche.
7 Como media, es necesario bombear durante 10 minutos para extraer 60-125 ml de leche de
un pecho. No obstante, esto solo es indicativo y varía de mujer a mujer.
8 Cuando termine de extraer la leche, retire con cuidado el extractor del pecho y desenrosque
el biberón del cuerpo del extractor, listo para dar al bebé o para guardarlo. Limpie las otras
piezas utilizadas del extractor de leche.
Nota: Si normalmente extrae más de 125 ml por sesión, puede comprar y usar un biberón de
Philips Avent de 260 ml para evitar que se llene en exceso o se derrame.
Después del uso
Almacenamiento de la leche materna
Advertencia: Almacene solo leche materna que se haya extraído con un extractor
de leche limpio y desinfectado.
La leche materna se mantiene en el frigoríco hasta 48 horas (no en la puerta). La leche extraída
se debe refrigerar o congelar inmediatamente. Si guarda leche en el frigoríco para agregar más
durante el día, añada leche que se haya extraído en un biberón o vaso de almacenamiento
limpio y desinfectado únicamente. La leche materna se puede guardar en el congelador
durante un máximo de tres meses, siempre que se conserve en biberones desinfectados que
dispongan de una rosca y un disco sellador desinfectados. Etiquete con claridad el biberón con
la fecha y la hora de la extracción, y consuma primero la leche más antigua.
Si va a alimentar al bebé con la leche materna extraída en un plazo de 48 horas, puede
guardarla en el frigoríco en un biberón Philips Avent montado. Desenrosque el biberón
y retírelo del cuerpo del extractor. Inserte un disco sellador desinfectado en una rosca
desinfectada y enrósquelo en el biberón (Fig. 14).
17Español

Recomendaciones
- Refrigere o congele siempre la leche extraída inmediatamente.
- Guarde solo la leche extraída con un extractor de leche limpio y desinfectado en
biberones limpios.
Prohibiciones
- Nunca vuelva a congelar leche materna ya descongelada.
- Nunca añada leche materna fresca a leche materna congelada.
Limpieza y desinfección
Precaución: Lávese bien las manos antes de tocar objetos desinfectados y asegúrese de
que las supercies en las que coloca dichos objetos estén limpias.
Antes del primer uso, limpie y desinfecte todas las piezas del extractor de leche. Limpie todas
las piezas después de cada uso y desinféctelas antes de volver a utilizarlas.
1 Desmonte completamente el extractor de leche. Quite también la válvula blanca.
Precaución: Tenga cuidado cuando quite la válvula blanca y cuando la limpie. Si se
estropea, el extractor de leche no funciona correctamente. Para quitar la válvula blanca,
tire suavemente de la pestaña estriada del lateral de la válvula.
2 Limpie todas las piezas con agua caliente con un poco de detergente líquido y enjuáguelas
a fondo. También puede limpiar todas las piezas en el lavavajillas, solo en la bandeja
superior. No coloque ningún otro objeto encima de ellas.
Nota: Para limpiar la válvula, frótela suavemente con los dedos en agua tibia con un poco de
detergente líquido. No inserte objetos en la válvula, ya que podrían deteriorarla.
3 Desinfecte todas las piezas en un esterilizador a vapor de Philips Avent o hirviéndolas
durante 5 minutos. Para hervirlas, llene un recipiente con agua suciente para cubrir todas
las piezas. Hierva el agua. Coloque las piezas en el recipiente y hierva durante 5 minutos.
Durante la desinfección con agua hirviendo, evite que la botella o alguna otra pieza roce las
paredes del recipiente, ya que podría producirse una deformación o daño del producto del
que Philips no puede considerarse responsable. Espere hasta que el agua se enfríe y saque
con cuidado las partes del agua. Con cuidado, coloque las piezas sobre un papel absorbente
limpio o en una rejilla de secado limpia, y espere hasta que se sequen. No utilice toallas para
secar las piezas porque pueden albergar gérmenes y bacterias perjudiciales para el bebé.
Nota: No utilice agentes de limpieza abrasivos o antibacterias.
Nota: Una excesiva concentración de detergentes puede provocar que los componentes de
plástico se agrieten. Si ocurriera, sustitúyalos de inmediato.
Nota: Los colorantes alimentarios pueden decolorar las piezas.
Nota: Los biberones Philips Avent son adecuados para todos los métodos de desinfección.
18 Español

Almacenamiento
Mantenga el extractor de leche lejos de la luz del sol directa ya que la exposición
prolongada puede causar decoloración. Guarde el extractor de leche y sus accesorios en
un lugar seguro y seco.
Compatibilidad
El extractor de leche manual Philips Avent es compatible con los biberones Philips Avent de
nuestra gama. El biberón de plástico de alta calidad Philips Avent Natural es compatible con
la mayoría de los extractores de leche, las boquillas, los discos selladores y los tapones Philips
Avent.
Solicitud de accesorios
Para comprar accesorios o piezas de repuesto, visite www.philips.com/parts-and-accessories
o acuda a su distribuidor de Philips. También puede ponerse en contacto con el Servicio de
Atención al Cliente de Philips en su país.
Soporte
Si necesita información o asistencia, visite www.philips.com/support.
Resolución de problemas
Este capítulo resume los problemas más comunes que pueden surgir al usar el extractor de
leche manual. Si no puede resolver el problema con la siguiente información, visite
www.philips.com/support para consultar una lista de preguntas frecuentes o comuníquese con
el servicio de atención al cliente en su país.
Problema Solución
Siento dolor al utilizar el
extractor de leche.
Deje de utilizar el extractor de leche y consulte a su asesor de
lactancia. Si el extractor no se separa fácilmente del pecho, puede
que tenga que interrumpir la succión colocando un dedo entre el
pecho y el cojín masajeador o bien entre el pecho y el embudo.
No siento ninguna
succión.
Asegúrese de que ha montado el extractor de leche de la forma
(consulte 'Preparación para su uso') correcta. Asegúrese de que el
cojín masajeador esté sellado alrededor del borde del embudo y
compruebe que la válvula blanca esté bien colocada en su lugar.
El extractor de leche
rechina.
Compruebe que haya montado el extractor de leche correctamente
y que el mango esté húmedo al montarlo.
19Español

El extractor de leche
tiene arañazos.
Con el uso normal, es normal que se arañe ligeramente sin que
suponga un problema. Sin embargo, si una pieza del extractor de
leche tiene algún arañazo importante o está agrietada, deje
de
utilizar el extractor de leche y póngase en contacto con el Servicio
de Atención al Cliente de Philips o visite www.philips.com/
parts-and-accessories para obtener piezas de repuesto. Tenga
en cuenta que la combinación de detergentes, productos de
limpieza, solución esterilizadora y agua descalcicada, junto con
las uctuaciones de temperatura, en determinadas circunstancias,
pueden provocar que el plástico se resquebraje. Evite el contacto
con detergentes abrasivos o antibacterianos, ya que éstos pueden
dañar el plástico.
El extractor de leche ha
perdido el color.
Aún puede utilizar el extractor de leche. Si necesita alguna
pieza de repuesto, póngase en contacto con el Servicio de
Atención al Cliente de Philips en su país o visite www.philips.com/
parts-and-accessories para obtenerlas.
20 Español
A página está carregando...
A página está carregando...
A página está carregando...
A página está carregando...
A página está carregando...
A página está carregando...
A página está carregando...
A página está carregando...
A página está carregando...
A página está carregando...
A página está carregando...
A página está carregando...
A página está carregando...
A página está carregando...
A página está carregando...
A página está carregando...
A página está carregando...
A página está carregando...
A página está carregando...
A página está carregando...
A página está carregando...
A página está carregando...
A página está carregando...
A página está carregando...
A página está carregando...
A página está carregando...
A página está carregando...
A página está carregando...
A página está carregando...
A página está carregando...
A página está carregando...
A página está carregando...
A página está carregando...
A página está carregando...
A página está carregando...
A página está carregando...
-
 1
1
-
 2
2
-
 3
3
-
 4
4
-
 5
5
-
 6
6
-
 7
7
-
 8
8
-
 9
9
-
 10
10
-
 11
11
-
 12
12
-
 13
13
-
 14
14
-
 15
15
-
 16
16
-
 17
17
-
 18
18
-
 19
19
-
 20
20
-
 21
21
-
 22
22
-
 23
23
-
 24
24
-
 25
25
-
 26
26
-
 27
27
-
 28
28
-
 29
29
-
 30
30
-
 31
31
-
 32
32
-
 33
33
-
 34
34
-
 35
35
-
 36
36
-
 37
37
-
 38
38
-
 39
39
-
 40
40
-
 41
41
-
 42
42
-
 43
43
-
 44
44
-
 45
45
-
 46
46
-
 47
47
-
 48
48
-
 49
49
-
 50
50
-
 51
51
-
 52
52
-
 53
53
-
 54
54
-
 55
55
-
 56
56


Avent SCF330/40 Manual do usuário
- Categoria
- Bombas de mama
- Tipo
- Manual do usuário
em outras línguas
- español: Avent SCF330/40 Manual de usuario
- italiano: Avent SCF330/40 Manuale utente
- English: Avent SCF330/40 User manual
Artigos relacionados
-
Avent Avent Manual do usuário
-
mothercare SCF330/11 Manual do usuário
-
Avent Comfort Double Electric Breast Pump Manual do usuário
-
Avent SCF330/13 Manual do usuário
-
Avent SCF395/11 Manual do usuário
-
 Avent SCF300/12 Manual do usuário
-
-
Avent SCF290/20 Manual do usuário
-
-
 Avent SCF158/02 Product Datasheet


