
www.logitech.com
© 2009 Logitech. All rights reserved. Logitech, the Logitech logo, and other
Logitech marks are owned by Logitech and may be registered. All other
trademarks are the property of their respective owners. Logitech assumes
no responsibility for any errors that may appear in this manual. Information
contained herein is subject to change without notice.
620-002193-003
2
1
3
Quick-start
Guide
Logitech
®
Harmony
®
300 Remote
Simple to Set Up. Easy to Use.
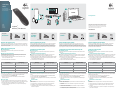
Thank you for choosing the Harmony 300 – your answer to effortless home entertainment.
After installing batteries and gathering device information, we’ll guide you through a step-
by-step onine setup of the Harmony 300. After this simple setup, you’re just a button press
away from hours of enjoyment.
Setting Up Your Harmony 300
n
Install the batteries
Insert the two AA batteries into the battery compartment located in the back of
the Harmony 300.
o
Gather your device information
In order for the Harmony 300 to control your entertainment system, we’ll need to know
the manufacturer and model number of each of the devices you own (such as your TV,
cable or satelite receiver, DVD player, or VCR).
A. Find the manufacturer and model number on the front, back or bottom of each
device in your entertainment system.
B. Write down the information in the table below.
Manufacturer
(for example, Sony® or Pioneer®)
Model Number
(for example, DV-414 or Explorer 3100)
p
Complete the online setup
Before you can use your Harmony 300, you’ll need to set it up through our easy online software.
A. Connect your Harmony 300 to your computer using the supplied USB cable.
B. Open a Web browser and go to myharmony.com.
C. Follow the on-screen instructions to create a Harmony account and install the
My Harmony software.
q
Try your remote
Once you’ve completed the online setup and synced your Harmony 300, please try it out.
A. Unplug your Harmony 300 from your computer and take it to your entertainment system.
B. Point your Harmony 300 at your television and try it to confirm that it works.
C. If you want to make changes, plug it back into your computer and use My Harmony
to modify your settings.
English
Box Contents
2 AA batteriesRemote USB cable
English
Español
Français
Português
Guia de inicio rápido
Guide de démarrage rapide
Guia de inicio rápido
Español
Contenido
de la caja
Dos pilas AAMando a distancia Cable USB
Fácil de configurar. Fácil de usar.
Gracias por haber elegido el mando a distancia Harmony 300, la solución para simplificar
el uso del sistema multimedia doméstico. Después de colocar las pilas y de recopilar
la información de los dispositivos, le acompañaremos a través de la configuración guiada
en línea del mando Harmony 300. Cuando haya concluido esta senclla configuración,
sólo tendrá que pulsar un botón para empezar a disfrutar de horas y horas de diversión.
Configuración de Harmony 300
n
Coloque las pilas
Coloque las dos pilas AA en el compartimento de las pilas situado en la parte inferior
de Harmony 300.
o
Recopile la información de dispositivos
Para que Harmony 300 pueda controlar el sistema multimedia, es necesario conocer
el fabricante y número de modelo de cada uno de los dispositivos que posea
(como televisor, sintonizador por cable o satélite, reproductor de DVD o grabador de vídeo).
A. Encontrará el fabricante y el número de modelo en la parte frontal, posterior o inferior
de cada dispositivo del sistema multimedia.
B. Anote esa información en la tabla siguiente.
Fabricante
(por ejemplo, Sony® o Pioneer®)
Número de modelo
(por ejemplo, DV-414 o Explorer 3100)
p
Complete la configuración en línea
Antes de usar Harmony 300, deberá configurarlo mediante nuestro fac lísimo software
en línea.
A. Conecte el mando Harmony 300 al ordenador mediante el cable USB suministrado.
B. Abra un navegador Web y vaya a myharmony.com.
C. Siga las instrucciones en pantalla para crear una cuenta Harmony e instalar el software
My Harmony.
q
Pruebe el mando
Cuando haya completado la configuración en línea y haya sincronizado Harmony 300,
pruebe el mando.
A. Desconecte Harmony 300 del ordenador y llévelo cerca del sistema multimedia.
B. Dirija Harmony 300 hacia el televisor y trate de confirmar que funciona.
C. Si desea realizar cambios, vuelva a conectarlo al ordenador y use My Harmony para
modificar la configuración.
Français
Contenu
Deux piles AATélécommande Câble USB
Facile à installer. Facile à utiliser.
Merci d'avoir choisi la télécommande Harmony 300 pour contrôler en tout confort
l'ensemble de vos dispositifs multimédia. Une fois les piles insérées et après avoir pris
connaissance des informations relatives à votre nouveau dispositif, laissez-vous guider lors des
étapes de configuration en ligne de la télécommande Harmony 300. Ensuite, vous n'aurez
plus qu'à appuyer sur un bouton pour profiter des heures durant de vos activités multimédia.
Configuration de la télécommande Harmony 300
n
Installation des piles
Insérez les deux piles AA dans le compartiment à piles situé au dos de la télécommande
Harmony 300.
o
Collecte des informations sur le dispositif
Pour permettre à la télécommande Harmony 300 de contrôler votre système multimédia,
nous devons connaître le fabricant et le numéro de modèle de chacun de vos dispositifs
(téléviseur, décodeur, lecteur de DVD ou magnétoscope).
A. Vous trouverez le nom du fabricant et le numéro de modèle à l'avant, à l'arrière ou sous
chaque composant du système mu timédia.
B. Reportez les informations dans le tableau ci-dessous.
Fabricant
(Sony® ou Pioneer®, par exemple)
Numéro de modèle
(DV-414 ou Explorer 3100, par exemple)
p
Configuration en ligne
Avant d'utiiser la télécommande Harmony 300, vous devez la configurer en suivant les étapes
simples de notre logiciel en ligne.
R. Reliez votre télécommande Harmony 300 à l'ordinateur à l'aide du câble USB fourni.
B. Ouvrez un navigateur Web et accédez à la page myharmony.com.
C. Suivez les instructions à l’écran pour créer un compte Harmony et installer le logiciel
My Harmony.
q
Test de la télécommande
Une fois la configuration en ligne et la synchronisation de la télécommande Harmony 300
terminées, testez votre dispositif.
A. Déconnectez la télécommande de l'ordinateur et rapprochez-la de votre système
multimédia.
B. Pointez la télécommande Harmony 300 vers le téléviseur et essayez de l'utiliser afin
d'en vérifier le bon fonctionnement.
C. Si vous souhaitez effectuer des modifications, branchez-la de nouveau sur l'ordinateur
et utilisez My Harmony afin de modifier les paramètres.
Português
Conteúdo
da caixa
2 pilhas AAControlo remoto Cabo USB
Fácil de configurar. Fácil de utilizar.
Obrigado por ter escolhido o Harmony 300 – a solução para facilitar o entretenimento
em casa. Depois de as pilhas serem introduzidas e de ser recolhida a informação
sobre os aparelhos, será guiado passo a passo, para efectuar uma configuração online
do Harmony 300. Após esta simples configuração, bastará um mero toque no botão
para desfrutar de horas de entretenimento.
Configurar o Harmony 300
n
Introduzir as pilhas
Introduza as duas pilhas AA no respectivo compartimento, localizado na parte de trás
do Harmony 300.
o
Recolher a informação sobre os aparelhos
Para que o Harmony 300 possa controlar o seu sistema de entretenimento, é necessário saber
qual o fabricante e o número do modelo de cada um dos aparelhos que possui (como, por
exemplo, do televisor, do receptor de cabo ou de satélite, do leitor de DVD ou do VCR).
A. Procure o fabricante e o número do modelo na parte frontal, posterior ou inferior de cada
apareho do sistema de entretenimento.
B. Anote a informação no quadro abaixo.
Fabricante
(por exemplo, Sony® ou Pioneer®)
Número do Modelo
(por exemplo, DV-414 ou Explorer 3100)
p
Concluir a configuração online
Para poder funcionar com o Harmony 300, é necessário proceder a uma configuração simples,
através do nosso software online.
A. Ligue o Harmony 300 ao seu computador com o cabo USB fornecido.
B. Abra um browser de Internet e aceda a myharmony.com.
C. Siga as instruções na tela para criar uma conta do Harmony e instalar o software
My Harmony.
q
Experimentar o controlo remoto
Quando tiver concluído a configuração online e o Harmony 300 estiver sincronizado,
experimente-o.
A. Desligue o Harmony 300 do computador e leve-o até ao sistema de entretenimento.
B. Aponte o Harmony 300 para o televisor e experimente-o para confirmar que está
a funcionar.
C. Se quiser fazer alterações, ligue-o novamente ao computador e uti ize o My Harmony
para modificar as definições.

English
–
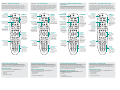
Using Your Harmony 300
The Harmony 300 makes it easy to sit back and enjoy better control of your
entertainment devices. Controls are intuitive and grouped in ways that make sense.
Power and device buttons give quick access to all important device functions.
Whatever you watch, you’re just a button press away from hours of enjoyment.
Watch TV
with one click:
Turn your TV and cable/
satelite box on with
a single button press.
Control devices
with ease:
To operate a device
just click the device
you want to operate
and you’re in control.
To turn a device on
or off, click the device
you want to operate
and then press the
power button.
Control where
you want it:
The channel area
puts the most popular
buttons at your
fingertips. You can
control the volume
or change channels
from one location.
Enjoy direct
channel selection:
A few clicks of the
number pad is all it
takes to access your
channel of choice.
Do More with Your Harmony 300
Use My Harmony to customize your Harmony 300 settings. What you choose
to do is up to you. With a number of programmable buttons, you can customize
your Harmony 300 to jump right to your favorite channels or perform other functions
ike switching screen sizes or accessing your DVR recordings with a single click.
We’re Here to Help
Find more about your Harmony 300 at myharmony.com, including:
• Answers to Frequently Asked Questions
• How-To topics
• User forums
• Additional support information
Change your input:
Easily cycle through
inputs to find the one
you need.
Personalize
buttons:
Jump to your favorite
channels. Easily change
Picture-in-Picture or
change screen sizes.
Get better access:
The play area puts
your play, pause,
skip and other
buttons in one area
for quick access.
Español
–
Uso de Harmony 300
Harmony 300 permite relajarse y controlar a la perfección los componentes del sistema
mu timedia. Los controles son intuitivos y se agrupan de forma sensata. Los botones
de encendido y de dispositivo ofrecen acceso rápido a todas las funciones importantes
de los dispositivos. Cuando quiera ver algo, sólo tendrá que pulsar un botón para
empezar a disfrutar de horas y horas de diversión.
Ver TV con una sola
pulsación:
Encienda el televisor
y el sintonizador por
cable/satélite con sólo
pulsar un botón.
Controlar
dispositivos
fácilmente:
Para manejar
un dispositivo,
púlselo y podrá
controlarlo al instante.
Para encender
o apagar un dispositivo,
pulse el dispositivo que
desea controlar y pulse
el botón de encendido.
Control donde
se requiere:
La sección de canales
pone los botones más
populares al alcance
de la mano. Puede
controlar el volumen
o cambiar de canal
desde una ubicación.
Selección directa
de canales:
Bastan unas cuantas
pulsaciones en
la sección de números
para acceder al canal
de su elección.
Consiga más con Harmony 300
Use My Harmony para personalizar la configuración de Harmony 300. Usted el je lo
que desea hacer. Con varios botones programables, puede personalizar Harmony 300
para ir directamente a sus canales favoritos o para realizar otras funciones como cambiar
de tamaño de panta la o acceder con una sola pulsación a lo que tenga grabado en
el grabador de DVD (DVR).
Estamos aquí para ayudarle
Obtenga más información sobre Harmony 300 en myharmony.com, como:
• Respuestas a preguntas frecuentes (FAQ)
• Información sobre uso
• Foros de usuario
• Información sobre asistencia adicional
Cambio de entrada:
Recorra fácilmente
las diversas entradas
para encontrar la
que necesita.
Botones
personalizables:
Vaya directamente
a sus canales favoritos.
Cambie fác lmente de
imagen en imagen o de
tamaño de pantalla.
Acceso mejorado:
La sección de
reproducción
agrupa los botones
de reproducción,
pausa, salto y otros
relacionados.
Français
–
Utilisation de la télécommande
Harmony 300
La télécommande Harmony 300 offre un confort de contrôle amélioré des dispositifs
mu timédia. Les boutons de marche/arrêt et de dispositif vous donnent un accès
rapide à toutes les fonctions importantes des dispositifs. Quel que soit le support,
il suffit d'appuyer sur un bouton pour bénéficier de longues heures de détente.
Activation
du téléviseur à l'aide
d'un bouton unique:
Mettez votre téléviseur
et votre décodeur sous
tension en appuyant
simplement sur
un bouton.
Contrôle simplifié
des dispositifs:
Pour activer
un dispositif,
appuyez simplement
sur le bouton
correspondant de
la télécommande.
Pour mettre un
dispositif sous ou hors
tension, appuyez sur le
bouton correspondant
sur la télécommande,
puis sur le bouton
d'a imentation.
Disposition
optimale
des boutons:
La zone de
chaînes fournit
un accès rapide
aux commandes
courantes.
Elle permet de régler
le volume ou de
changer de chaîne
à partir du même
emplacement.
Sélection directe
des chaînes:
Quelques pressions
sur le pavé numérique
suffisent pour accéder
à la chaîne souha tée.
Une télécommande multifonctions
Utilisez My Harmony pour personnaliser les paramètres de la télécommande
Harmony 300. Libre à vous de configurer votre dispositif selon vos besoins. Les nombreux
boutons programmables vous permettent de personnaliser la télécommande afin
d'accéder directement à vos chaînes favorites ou d'utiliser d'autres fonctions, telles que
le changement de taille d'écran ou l'accès aux enregistrements de votre magnétoscope
numérique, en appuyant simplement sur un bouton.
Nous sommes là pour vous aider.
Pour en savoir plus sur la télécommande Harmony 300, rendez-vous sur la page
myharmony.com, où vous trouverez les informations suivantes:
• réponses aux questions fréquentes;
• didacticiels;
• forums utilisateurs;
• conseils techniques supplémentaires.
Sélection d'entrée:
Passez facilement
en revue les différentes
entrées afin de trouver
celle qui vous convient.
Personnalisation
des boutons:
Accédez directement à
vos chaînes préférées.
Passez facilement
au mode Image dans
l’image ou changez
de taille d’écran.
Accès amélioré:
La zone de lecture
regroupe tous
les boutons de lecture,
de mise en pause,
etc. dans un même
emplacement facile
d'accès.
Português
–
Como utilizar o Harmony 300
Com o Harmony 300, é fácil recostar-se e apreciar um melhor controlo dos seus
aparelhos de entretenimento. Os controlos são intuitivos e agrupados de uma forma
que faz sentido. Botões de energia e dispositivo oferecem rápido acesso a todas as
funções de dispositivo importantes. Seja o que for a que assista, basta premir um botão
para ter horas de entretenimento.
Veja TV com
um clique:
Ligue o seu televisor e o
receptor de cabo/satélite
apenas com um único
toque num botão.
Controle
os aparelhos
com facilidade:
Para funcionar
com um aparelho,
basta clicar no aparelho
pretendido e este fica
sob controlo.
Para ligar ou desligar
um aparelho, clique no
aparelho que pretende
operar e depois
no botão de ligar
e desligar.
Controle
onde quiser:
A área de canais
disponibiliza
os botões
mais utilizados.
Pode controlar
o volume ou
alterar os canais,
num só local.
Seleccione
os canais
directamente:
Bastam apenas alguns
cliques no teclado
numérico para aceder
aocanal escolhido.
Faça mais com o seu Harmony 300
Utilize o My Harmony para personalizar as definições do Harmony 300. A escolha
é sua do que quiser fazer. Com um conjunto de botões programáveis, pode personalizar
o Harmony 300 para aceder imediatamente aos seus canais preferidos ou executar
outras funções como alternar o tamanho do ecrã ou aceder às gravações do DVR com
um único clique.
Estamos cá para o ajudar
Obtenha mais informações sobre o Harmony 300 em myharmony.com, incluindo:
• Respostas a perguntas frequentes
• Tópicos "Como fazer"
• Fóruns de utilizadores
• Informação de suporte adicional
Altere
a sua entrada:
Percorra facilmente
as entradas até encontrar
a que necessita.
Personalize
os botões:
Aceda aos seus
canais favoritos.
Altere facilmente figura-
em-figura ou altere
tamanhos de tela.
Obtenha
melhor acesso:
A área de reprodução
inclui os botões
reproduzir, pausa,
saltar e outros botões
numa única área para
um rápido acesso.

Log
itech,
What
do
you
think?
lCual
es
su
opinion?
Qu'en
pensez-vous?
oque
voce
acha?
Please
take a minute
to
tell
us.
Thank you for purchasing our product.
Nos
gustarfa conocerla,
si
puede dedicarnos un minuto.
Le
agradecemos
la
adquisici6n de nuestro producto.
Prenez quelques minutes pour nous faire part de
vos
commentaires.
Vous
venez d'acheter ce produit
et
nous vous
en
remercions.
Reserve
um
minuto
para nos dizer. Obrigado par adquirir nasso produta.

Logitech0
Important Information
For
Harmony®
Remotes
•

,
English
Care and Maintenance.
Do
not
open
the
remote.
There
are
no
user-serviceable
parts
inside.
Do
not
allow
moisture
to
enter the unit.
Moisture
will
corrode
the
inner
electronics.
Any
changes
or
modifications not
expressly
approved
by
Logitech"
Inc.
void
the
user's
authority
to
operate
the
equipment
and
could
void
the
warranty.
BATTERY
WARNING
AND
CAUTION:
Risk
of
explosion
and
personal
injury
if
batteries
are
replaced
by
incorrect type.
The
non-rechargeable
alkaline
batteries
used
in
this
device
may
present
a
risk
of
fire
or
chemical
burn
if
mistreated.
Do
not
disassemble,
expose
to
heat
above
54
0
C
(1300
F),
recharge,
incinerate,
or
immerse
in
water
or
liquid of
any
kind.
Do
not
use
the
batteries
if
they
appear
to
be
leaking,
discolored,
deformed, or
in
any
way
abnormal.
When
replacing,
remove
all
spent
batteries,
and
do
not
mix
old
batteries
with
new.
Do
not
leave
your
batteries
unused
for
extended
periods
of time.
When
batteries
are
misused,
they
may
explode
or
leak,
causing
burns
and
personal
injury.
If
the
batteries
leak,
use
normal
precaution
and
discard
them immediately
following
the
laws
and
regulations
governing
battery
disposal
in
your
area.
If
there
are
no
local
regulations
concerning battery
disposal,
please
dispose
of the
dead
batteries
in
a
waste
bin
for
electronic
devices.
Keep
all
batteries
out of the
reach
of
children.
logitech Compliance.
Your
product
is
FCC
compliant.
For
more
information,
refer
to the
software
help
system
or
online
at
www.logitech.com/compliance.
FCC
Compliance and Advisory Statement.
This
equipment
has
been
tested
and
found
to
comply with the limits for a
Class
Bdigital
devices,
pursuant
to
Part
15
of the
FCC
Rules.
These
limits
are
designed
to
provide
reasonable
protection
against
harmful
interference
in
a
residential
installation.
This
equipment
generates,
uses,
and
can
radiate
radio
frequency
energy
and,
if not
installed
and
used
in
accordance
with the instruction
manual,
may
cause
harmful interference
to
radio
communications.
However,
there
is
no
guarantee
that
interference
will
not occur
in
aparticular installation.
If
this
equipment
does
cause
harmful
interference to
radio
or
television
reception,
which
can
be
determined
by
turning the
equipment off
and
on,
the
user
is
encouraged
to try to correct
the
interference
by
one
of
more
of the following
measures:
•
Reorient
or
relocate
the
receiving
antenna
•
Increase
the
separation
between
the equipment
and
receiver
•
Connect
the equipment into
an
outlet
on
acircuit different from that to
which
the
receiver
is
connected.
•
Consult
the
dealer
or
an
experienced
radio/TV
technician
for
help.
Warning:
Changes
or
modifications not
expressly
approved
by
Logitech
could
void
the
user's
authority
to
operate the equipment.
Where
shielded
interface
cables
have
been
provided
with the product or
specified
additional components or
accessories
elsewhere
defined
to
be
used
with the installation of
the
product,
they
must
be
used
in
order
to
ensure
compliance
with
FCC
regulations.
This
device
complies
with
Part
15
of the
FCC
Rules.
Operation
is
subject
to
the following two conditions:
(1)
this
device
may
not
cause
harmful
interference
and
(2)
this
device
must
accept
any
interference
received,
including interference that
may
cause
undesired
operation.

Canadian DOC Statement:
This
digital
device
does
not
exceed
the
Class
B
limits
for
radio
noise
emissions
from digital
apparatus
specified
in
the
interference-causing
equipment
standard
entitled "Digital
Apparatus,"
ICES-003
of
the
Department of
Communications.
logitech Hardware Product
limited
Warranty.
Logitech
warrants
that
your
Logitech
hardware
product
shall
be
free
from
defects
in
material
and
workmanship
for
one
(1)
year,
beginning
from
the
date
of
purchase.
Except
where
prohibited
by
applicable
law,
this
warranty
is
nontransferable
and
is
limited to
the
original
purchaser.
This
warranty
gives
you
specific
legal
rights,
and
you
may
also
have
other
rights
that
vary
under
local
laws.
Remedies.
Logitech's
entire liability
and
your
exclusive
remedy
for
any
breach
of
warranty
shall
be,
at
Logitech's
option,
(1)
to
repair
or
replace
the
hardware,
or
(2)
to
refund
the
price
paid,
provided
that the
hardware
is
returned
to
the
point of
purchase
or
such
other
place
as
Logitech
rnay
direct with a
copy
of
the
sales
receipt
or
dated
itemized
receipt.
Shipping
and
handling
charges
rnay
apply
except
where
prohibited
by
applicable
law.
Logitech
may,
at
its
option,
use
new
or
refurbished
or
used
parts
in
good
working
condition to
repair
or
replace
any
hardware
product.
Any
replacement
hardware
product
will
be
warranted
for
the
remainder
of
the
original
warranty
period
or
thirty
(30)
days,
whichever
is
longer
or
for
any
additional
period
of tirne that
may
be
applicable
in
your
jurisdiction.
This
warranty
does
not
cover
problems
or
damage
resulting
from
(1)
accident,
abuse,
misapplication,
or
any
unauthorized
repair,
modification
or
disassembly;
(2)
improper operation
or
maintenance,
usage
not
in
accordance
with product
instructions
or
connection to improper
voltage
supply;
or
(3)
use
of
consumables,
such
as
replacement
batteries,
not
supplied
by
Logitech
except
where
such
restriction
is
prohibited
by
applicable
law.
How to Obtain Warranty Support.
Before
submitting a
warranty
claim,
we
recommend
you
visit
the
support
section
at
www.logitech.com
for
technical
assistance.
Valid
warranty
claims
are
generally
processed
through
the
point of
purchase
during
the
first
thirty
(30)
days
after
purchase;
however,
this
period
of
time
may
vary
depending
on
where
you
purchased
your
product -
please
check
with
Logitech
or
the
retailer
where
you
purchased
your
product
for
details.
Warranty
claims
that
cannot
be
processed
through the point of
purchase
and
any
other product
related
questions
should
be
addressed
directly to
Logitech.
The
addresses
and
customer
service
contact information for
Logitech
can
be
found
in
the
documentation
accompanying
your
product
and
on
the
web
at
www.logitech.com{contactus.
limitation
of liability.
LOGITECH
SHALL
NOT
BE
LIABLE
FOR
ANY
SPECIAL,
INDIRECT,
INCIDENTAL
OR
CONSEQUENTIAL
DAMAGES
WHATSOEVER,
INCLUDING
BUT
NOT
LIMITED
TO
LOSS
OF
PROFITS,
REVENUE
OR
DATA
(WHETHER
DIRECT
OR
INDIRECT)
OR
COMMERCIAL
LOSS
FOR
BREACH
OF
ANY
EXPRESS
OR
IMPLIED
WARRANTY
ON
YOUR
PRODUCT
EVEN
IF
LOGITECH
HAS
BEEN
ADVISED
OF
THE
POSSIBILITY
OF
SUCH
DAMAGES.
Some
jurisdictions
do
not
allow
the
exclusion
or
limitation of
special,
indirect,
incidental
or
consequential
damages,
so
the
above
limitation
or
exclusion
may
not
apply
to
you.
Duration of Implied Warranties.
EXCEPT
TO
THE
EXTENT
PROHIBITED
BY
APPLICABLE
LAW,
ANY
IMPLIED
WARRANTY
OR
CONDITION
OF
MERCHANTABILITY
OR
FITNESS
FOR
A
PARTICULAR
PURPOSE
ON
THIS
HARDWARE
PRODUCT
IS
LIMITED
IN
DURATION
TO
THE
DURATION
OF
THE
APPLICABLE
LIMITED
WARRANTY
PERIOD
FOR
YOUR
PRODUCT.
Some
jurisdictions
do
not
allow
limitations
on
how
long
an
implied
warranty
lasts,
so
the
above
limitation
may
not
apply
to
you.
National Statutory Rights.
Consumers
have
legal
rights
under
applicable
national
legislation
governing
the
sale
of
consumer
goods.
Such
rights
are
not a
ected
by
the
warranties
in
this
Limited
Warranty.
No Other Warranties.
No
Logitech
dealer,
agent,
or
employee
is
authorized to
make
any
modification,
extension,
or
addition to
this
warranty.
logitech
Address:
Logitech,
Inc.
6505
Kaiser
Drive,
Fremont,
California
94555
U.S.A.
© 2009
Logitech.
All
rights
reserved.
Logitech,
the
Logitech
logo,
and
other
Logitech
marks
are
owned
by
Logitech
and
may
be
registered.
All
other
trademarks
are
the property
of their
respective
owners.
Logitech
assumes
no
responsibility
for
any
errors
that
may
appear
in
any
manual
or
on
this
website.
Information
contained
herein
is
subject
to
change
without notice.
-
 1
1
-
 2
2
-
 3
3
-
 4
4
-
 5
5
-
 6
6


Logitech Harmony 300 Remote Manual do proprietário
- Tipo
- Manual do proprietário
- Este manual também é adequado para
em outras línguas
Artigos relacionados
-
Logitech Harmony 300 Remote Guia rápido
-
Logitech Harmony Touch Guia de instalação
-
Logitech 600 Manual do usuário
-
Logitech H1000 Manual do proprietário
-
-
Logitech Harmony 700 Advanced Universal Remote Manual do proprietário
-
-
Logitech Harmony RF System Manual do usuário