Stanley STDC18LHBK Manual do usuário
- Categoria
- Martelos rotativos
- Tipo
- Manual do usuário

Português Page 04
English Page 10
STDC18LHBK
MANUAL DE INSTRUÇÕES
INSTRUCTIONS MANUAL
ADVERTÊNCIA: LEIA ESTAS INSTRUÇÕES ANTES DE USAR O PRODUTO.
WARNING: READ INSTRUCTION MANUAL BEFORE USING PRODUCT.
STDC18LHBK
Español Page 0
Português Page 00
English Page 01
MANUAL DE INSTRUCCIONES
MANUAL DE INSTRUÇÕES
INSTRUCTIONS MANUAL
ADVERTENCIA: LEASE ESTE INSTRUCTIVO ANTES DE USAR EL PRODUCTO.
ADVERTÊNCIA: LEIA ESTAS INSTRUÇÕES ANTES DE USAR O PRODUTO.
WARNING: READ INSTRUCTION MANUAL BEFORE USING PRODUCT.

ENGLISH (Original instructions)
2
A

ENGLISH
(Original instructions)
2
A
C
B
D
E
G
F
(Original instructions) ENGLISH
3

PORTUGUÊS
4
USO PREVISTO
Sua furadeira martelete/parafusadeira STDC18LHBK da
STANLEY foi projetada para aparafusar e fazer perfurações
em madeira, metal, plástico e alvenaria. Esta ferramenta foi
prevista para uso profissional.
INSTRUÇÕES DE SEGURANÇA
Advertências gerais de segurança para
ferramentas elétricas
ADVERTÊNCIA! Leia todas as advertências
de segurança, instruções, ilustrações e
especificações fornecidas com esta ferramenta
elétrica. A não observação de todas as instruções listadas
abaixo pode resultar em choque elétrico, incêndio e/ou
lesões graves.
Guarde todas as advertências e instruções para
futura referência.
O termo “ferramenta elétrica” em todas as advertências
listadas abaixo se refere a ferramentas acionadas por
eletricidade (com fio) ou por baterias (sem fio).
1. Segurança na área de trabalho
a. Mantenha a área de trabalho limpa, organizada
e bem iluminada. Áreas desorganizadas ou escuras
são um convite a acidentes.
b. Não utilize ferramentas elétricas em ambientes
com risco de explosão, como na presença de
líquidos, gases ou pós inflamáveis. As ferramentas
elétricas podem gerar faíscas que podem provocar a
ignição de pós ou vapores.
c. Mantenha crianças e observadores afastados ao
utilizar uma ferramenta elétrica. Distrações podem
provocar uma falta de controle.
2. Segurança com a eletricidade
a. Os plugues da ferramenta devem ser compatíveis
com as tomadas. Nunca altere o plugue. Não use
adaptadores com ferramentas elétricas aterradas
(com fio terra). Plugues inalterados e tomadas
compatíveis reduzirão o risco de choque elétrico.
b. Evite o contato com superfícies aterradas, como
canos, aquecedores, fogões e geladeiras. Há
maior risco de choque elétrico quando o corpo está
aterrado.
c. Não exponha ferramentas elétricas à chuva nem
a condições de umidade. A entrada de água a uma
ferramenta elétrica aumenta o risco de choque elétrico.
d. Não force o fio. Nunca use o fio para transportar
ou puxar a ferramenta nem para desconectar o
plugue da tomada. Mantenha o fio afastado de
fontes de calor, óleo, bordas afiadas ou peças
móveis. Fios danificados ou emaranhados aumentam
o risco de choque elétrico.
e. Ao utilizar uma ferramenta elétrica ao ar livre, use
extensões próprias para uso externo. O uso de
extensões próprias para uso externo diminui o risco de
choque elétrico.
f. Se for necessário utilizar uma ferramenta elétrica
em um local úmido, use uma rede elétrica
protegida por um disjuntor diferencial residual
(RCD, do inglês). O uso de um RCD reduz o risco de
choque elétrico.
3. Segurança pessoal
a. Fique alerta, preste atenção no que está fazendo
e use o bom senso ao utilizar uma ferramenta
elétrica. Não use a ferramenta se estiver
cansado ou sob a influência de drogas, álcool ou
medicamentos. Um momento de distração durante o
uso de ferramentas elétricas pode resultar em lesões
corporais graves.
b. Use equipamento de proteção individual. Use
sempre proteção ocular. Equipamentos de proteção,
como máscara contra pós, calçados de segurança
antiderrapantes, capacete ou proteção auditiva,
usados para as condições apropriadas reduzirão as
lesões pessoais.
c. Evite o acionamento acidental. Certifique-se de
que o botão esteja na posição “desligado” antes
de introduzir o plugue na tomada e/ou colocar
as baterias e antes de levantar a ferramenta ou
transportá-la. Transportar ferramentas elétricas com
o dedo no gatilho ou conectar ferramentas elétricas
na rede elétrica quando o interruptor está na posição
“ligado” é um convite a acidentes.
d. Retire qualquer chave de ajuste ou ferramenta
antes de ligar uma ferramenta elétrica. Uma
ferramenta ou chave encaixada em uma peça giratória
da ferramenta elétrica pode resultar em lesões
pessoais.
e. Não tente realizar trabalhos fora do seu alcance.
Mantenha sempre os pés bem apoiados e o
equilíbrio. Isto lhe permite ter maior controle da
ferramenta elétrica em situações inesperadas.
f. Use roupa adequada. Não use roupas frouxas
nem joias. Mantenha o cabelo e a roupa afastados
de peças móveis. Roupas frouxas, joias e cabelos
compridos podem ser puxados por peças móveis.
g. Se forem incluídos dispositivos de extração
e coleta de pó, certifique-se de que sejam
conectados e devidamente usados. O uso da coleta
pode reduzir os riscos associados à geração de pó.
h. Não permita que a familiaridade com o uso
frequente de uma ferramenta faça com que você
se torne complacente e ignore os princípios de
segurança da mesma. Uma ação descuidada pode
causar lesões graves numa fração de segundo.
4. Uso e cuidado da ferramenta elétrica
a. Não force a ferramenta elétrica. Use a ferramenta
elétrica adequada para o trabalho a fazer. A
ferramenta elétrica correta vai fazer um trabalho melhor
e mais seguro na velocidade para a qual foi projetada.
b. Não use a ferramenta elétrica se o botão não
liga ou desliga. Qualquer ferramenta elétrica que
não possa ser controlada com o botão liga/desliga é
perigosa e deverá ser consertada.

5
PORTUGUÊS
c. Tire o plugue da tomada e/ou retire a bateria, se
for o caso, antes de fazer qualquer ajuste, trocar
acessórios ou guardar ferramentas elétricas.
Estas medidas preventivas de segurança reduzem o
risco de acionamento acidental.
d. Guarde as ferramentas elétricas que não
estiverem em uso longe do alcance das crianças
e não permita que sejam utilizadas por pessoas
não familiarizadas com a ferramenta elétrica ou
com estas instruções. As ferramentas elétricas são
perigosas nas mãos de usuários não treinados.
e. Faça a manutenção das ferramentas elétricas
e os respectivos acessórios. Verifique se
estão desalinhadas ou se peças móveis estão
enganchadas, se há peças quebradas ou qualquer
outro problema que possa afetar o funcionamento
da ferramenta. Se estiver danificada, leve-a
ao serviço técnico antes de usá-la. Muitos
acidentes são causados por ferramentas elétricas
malconservadas.
f. Mantenha as ferramentas de corte afiadas e
limpas. Ferramentas de corte bem conservadas com
lâminas afiadas têm menos probabilidade de ficar
cegas e são mais fáceis de controlar.
g. Utilize a ferramenta elétrica, seus acessórios,
brocas etc. seguindo estas instruções, levando
em conta as condições de trabalho e o trabalho
a fazer. O uso da ferramenta elétrica para trabalhos
diferentes dos previstos pode resultar em situações
perigosas.
h. Mantenha cabos e superfícies de contato secos,
limpos e livres de óleo e graxa. Cabos e superfícies
de contato escorregadios não permitem um manuseio
seguro e o controle da ferramenta em situações
inesperadas.
5. Uso e cuidado de ferramentas a bateria
a. Recarregue apenas com o carregador
especificado pelo fabricante. Um carregador
adequado para um tipo de bateria pode gerar risco de
incêndio se usado com outro tipo de bateria.
b. Use as ferramentas elétricas apenas com as
baterias especificamente designadas. O uso de
qualquer outra bateria pode gerar risco de lesão e
incêndio.
c. Quando a bateria não estiver sendo usada,
mantenha-a longe de outros objetos metálicos,
como clips, moedas, chaves, pregos, parafusos
ou outros objetos pequenos de metal que possam
fazer a conexão de um terminal com o outro. A
conexão entre os terminais da bateria pode causar
queimaduras ou incêndio.
d. Em condições inadequadas, pode haver
vazamento de líquido da bateria; evite o contato.
Se houver contato acidental, lave com água
corrente. Se houver contato acidental com os
olhos, procure também atendimento médico. O
líquido que vaza da bateria pode causar irritação ou
queimaduras.
6. Serviço de manutenção
a. Leve sua ferramenta elétrica para serviços de
manutenção com qualquer serviço qualificado
para consertos que use apenas peças de
reposição idênticas. Isto vai garantir que a segurança
da ferramenta elétrica seja mantida.
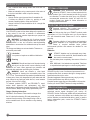
ADVERTÊNCIAS DE SEGURANÇA ADICIONAIS
PARA FERRAMENTAS ELÉTRICAS
ADVERTÊNCIA! Advertências de segurança
adicionais para furadeiras/parafusadeiras
Use proteções auditivas ao fazer perfurações
com impacto. A exposição ao ruído pode causar perda da
audição.
♦ Use os cabos ou alças auxiliares fornecidos com a
ferramenta. A perda de controle pode causar lesões
pessoais.
♦ Segure a ferramenta elétrica nas superfícies de contato
isoladas ao realizar trabalhos nos quais o acessório de
corte possa entrar em contato com fiação escondida. O
contato do acessório de corte com um fio eletrificado
pode eletrificar peças de metal expostas da ferramenta
elétrica e provocar um choque elétrico no usuário.
♦ Segure a ferramenta elétrica nas superfícies de contato
isoladas ao realizar trabalhos nos quais um parafuso
ou outra peça de metal possa entrar em contato com
fiação escondida. O contato dessas peças com um fio
eletrificado pode eletrificar peças de metal expostas da
ferramenta elétrica e provocar um choque elétrico no
usuário.
♦ Use uma prensa ou outra forma prática para segurar e
apoiar o material que está sendo trabalhado em uma
plataforma estável. Segurá-lo com a mão ou contra o
corpo o torna instável e pode haver perda de controle.
♦ Antes de perfurar paredes, pisos ou tetos, verifique a
localização da fiação e do encanamento.
♦ Evite tocar a ponta da broca logo após ser usada
porque pode estar quente.
♦ O uso previsto é descrito neste manual de instruções. O
uso de qualquer acessório ou peça extra ou a realização
de qualquer trabalho com esta ferramenta diferentes
dos recomendados neste manual pode representar um
risco de lesão pessoal e/ou dano material.
SEGURANÇA DE OUTRAS PESSOAS
Esta ferramenta não deve ser utilizada por pessoas
(inclusive crianças) com deficiências físicas, sensoriais ou
mentais, nem com falta de experiência e conhecimentos, a
menos que sejam supervisionadas ou recebam instruções
para o uso da ferramenta de uma pessoa responsável por
sua segurança.
♦ Crianças devem ser supervisionadas para garantir que
não brinquem com a ferramenta.
Riscos Residuais
Podem surgir outros riscos residuais ao usar a ferramenta
que não tenham sido incluídos nas advertências de
segurança. Estes riscos podem surgir pelo uso incorreto,
prolongado etc.

PORTUGUÊS
6
Mesmo seguindo as normas de segurança relevantes e
implementando dispositivos de segurança, certos riscos
residuais não podem ser evitados. Eles incluem:
♦ Lesões causadas por tocar peças giratórias ou móveis;
♦ Lesões causadas ao trocar peças, lâminas ou
acessórios;
♦ Lesões causadas pelo uso prolongado de uma
ferramenta. Ao utilizar qualquer ferramenta por
períodos prolongados, faça intervalos de descanso
regulares;
♦ Deterioro auditivo;
♦ Riscos de saúde causados pela inspiração de pós
gerados ao utilizar a ferramenta (por exemplo: ao
trabalhar com madeira, especialmente carvalho, faia
e MDF).
SEGURANÇA COM A ELETRICIDADE
O carregador tem isolamento duplo, portanto,
não requer aterramento. Verifique sempre que
a voltagem da rede elétrica seja compatível com
a voltagem da placa de dados do carregador. Não tente
nunca substituir a caixa do carregador por um plugue
normal.
♦ Se o fio fornecido sofrer qualquer dano, deve ser
substituído pelo fabricante ou por um Centro de Serviço
autorizado STANLEY, para evitar situações perigosas.
INSTRUÇÕES DE SEGURANÇA ADICIONAIS
PARA CARREGADORES E BATERIAS
Baterias
♦ Não tente nunca abrir as baterias.
♦ Não exponha a bateria à água.
♦ Não guarde em locais cuja temperatura possa exceder
40 °C.
♦ Carregue apenas a temperaturas ambientes entre 10
°C e 40 °C.
♦ Carregue apenas com o carregador fornecido com a
ferramenta.
♦ Para descartar as baterias, siga as instruções
fornecidas na seção “Proteção do meio ambiente”.
♦
Não tente carregar baterias danificadas.
Carregadores
♦ Só use o seu carregador para carregar a bateria da
ferramenta com a qual ele foi fornecido. Outras baterias
podem estourar, causando lesões pessoais e danos
materiais.
♦ Não tente nunca carregar baterias não recarregáveis.
♦ Mande substituir imediatamente fios defeituosos.
♦ Não exponha à água.
♦ Não abra o carregador.
♦ Não introduza uma sonda no carregador.
O carregador foi projetado apenas para uso interno.
Leia o manual de instruções antes de usar.
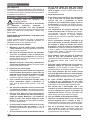
ETIQUETAS DA FERRAMENTA
Os pictogramas a seguir são mostrados na ferramenta
junto com o código da data.
ADVERTÊNCIA! Para reduzir o risco de lesões,
o usuário deve ler o manual de instruções.
Use sempre óculos de proteção.
Use sempre proteção auditiva.
Posição do código da data
O código da data, que também inclui o ano de fabricação,
vai impresso dentro da carcaça.
Exemplo:
2016 XX JN
Ano de fabricação
CONTEÚDO DA EMBALAGEM
A embalagem contém:
1 furadeira martelete
1 carregador
2 baterias (C2/S2/D2) ou 1 bateria (C1/S1/D1)
1 manual de instruções
♦ Verifique que a ferramenta, peças extras ou acessórios
não tenham danos que possam ter ocorrido durante o
transporte.
♦ Leia cuidadosamente e compreenda as instruções
antes de utilizar a ferramenta.
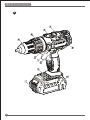
CARACTERÍSTICAS (FIG. A)
Esta ferramenta inclui algumas ou todas as características
a seguir:
1. Gatilho de velocidade variável
2. Deslizador para a frente/para trás e trava
de brocas
3. Seletor de modo / colarinho de ajuste de
torque
4. Mandril
5. Seletor de velocidade
6. Suporte para brocas/pontas
7. Bateria
8. Luz indicadora de funcionamento
9. Indicador do estado da carga
10. Clip de cinto
FIG. B
11. Carregador
12. Indicador de carga
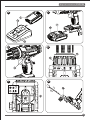
MONTAGEM

7
PORTUGUÊS
ADVERTÊNCIA! Antes de armar, retire a bateria da
ferramenta.
Colocação e remoção da bateria (Fig. C)
♦ Para colocar a bateria (7), alinhe-a com o receptáculo
da ferramenta. Deslize a bateria no receptáculo e
empurre até ela travar no lugar correto.
♦ Para retirar a bateria, aperte o botão de liberação (13),
puxando a bateria para fora ao mesmo tempo.
Colocação e remoção de brocas ou pontas de
chaves de fenda
Esta ferramenta está equipada com um mandril sem chave
que permite trocar facilmente as brocas ou pontas.
♦ Trave a ferramenta colocando o deslizador (2) na
posição central.
♦ Abra o mandril (4), girando-o com uma mão enquanto
segura a ferramenta com a outra.
♦ Introduza a broca ou ponta no mandril.
♦ Aperte firmemente o mandril (4), girando-o com uma
mão enquanto segura a ferramenta com a outra.
♦ Introduza a broca ou ponta no mandril.
♦ Aperte firmemente o mandril (4), girando-o com uma
mão enquanto segura a ferramenta com a outra.
Esta ferramenta vem com uma ponta de chave de fenda
dupla no suporte para brocas/pontas (6).
♦ Para retirar a ponta do suporte, levante a ponta do lugar
de apoio.
♦ Para guardar a ponta, empurre-a firmemente no
suporte.
USO
ADVERTÊNCIA! Deixe que a ferramenta trabalhe no
próprio ritmo. Não tente forçá-la.
ADVERTÊNCIA! Antes de perfurar paredes, pisos ou
tetos, verifique a localização da fiação e do encanamento.
CARGA DA BATERIA (FIG. B)
A bateria deve ser carregada antes do primeiro uso e
sempre que não tenha energia suficiente para trabalhos
que eram facilmente realizados. A bateria pode esquentar
um pouco enquanto está sendo carregada; isso é normal e
não indica um problema.
ADVERTÊNCIA! Não carregue a bateria em ambientes
cuja temperatura seja menor que 10 °C ou maior que 40 °C.
A temperatura ideal para carregá-la é de aproximadamente
24 °C.
OBS.: O carregador não será capaz de carregar uma
bateria se a temperatura da célula for menor que
aproximadamente 0 °C ou maior que 40 °C. Deve-se
deixar a bateria no carregador para que ele comece a
carregar automaticamente quando a temperatura da
célula tiver esquentado ou esfriado o suficiente.
♦ Para carregar a bateria (7), coloque-a no carregador
(11). A bateria só cabe no carregador em uma posição.
Não force. Verifique que esteja bem colocada no
carregador.
♦ Ligue o carregador na tomada.
O indicador de carga (12) vai piscar (lentamente) com uma
luz verde.
A carga estará completa quando o indicador (12) ficar aceso
com uma luz verde contínua. O carregador e a bateria
podem ficar ligados indefinidamente com o LED aceso. O
LED vai tornar a piscar com uma luz verde (carregando)
porque o carregador ocasionalmente vai voltar a carregar
totalmente a bateria. O indicador de carga ficará aceso
enquanto a bateria estiver no carregador ligado na tomada.
♦ Carregue baterias descarregadas em menos de uma
semana. A vida útil da bateria diminuirá muito se ela for
guardada descarregada.
Deixar a bateria no carregador
O carregador e a bateria podem ficar ligados na tomada
com o LED aceso indefinidamente. O carregador mantém a
bateria totalmente carregada.
Diagnóstico do carregador
Se o carregador detectar uma bateria fraca ou danificada,
o indicador de carga (12) vai piscar rapidamente com uma
cor vermelha. Proceda da seguinte forma:
♦ Coloque novamente a bateria no carregador (7).
♦ Se o indicador continuar piscando rapidamente na
cor vermelha, use outra bateria para determinar se o
processo de carga está funcionando corretamente.
♦ Se a segunda bateria for carregada corretamente, a
primeira deve ter algum defeito e deve ser devolvida a
um centro de serviço para ser reciclada.
♦ Se a segunda bateria apresentar a mesma indicação
que a primeira, leve o carregador a um centro de
serviço autorizado para ser testado.
OBS.: Pode demorar até 60 minutos para determinar
se a bateria tem algum defeito. Se a bateria estiver
muito quente ou muito fria, o LED vai piscar na cor
vermelha, alternando entre rápida e lentamente,
piscando cada vez com uma velocidade e repetindo
o processo.
Seleção do sentido da rotação (Fig. D)
Para fazer perfurações e apertar parafusos, use a rotação
para a frente (sentido horário). Para afrouxar parafusos
ou retirar uma broca enganchada, use a rotação para trás
(sentido anti-horário).
♦ Para selecionar a rotação para a frente, empurre o
deslizador (2) para a esquerda.
♦ Para selecionar a rotação para trás, empurre o
deslizador para a direita.
♦ Para travar a ferramenta, coloque o deslizador na
posição central.
Selecionar o modo de funcionamento ou o torque
(Fig. E)
Esta ferramenta está equipada com um colarinho para
selecionar o modo de funcionamento e estabelecer o
torque para apertar parafusos. Parafusos compridos
e materiais duros requerem um torque maior que o de
parafusos pequenos e materiais mais brandos. O colarinho
tem uma ampla gama de configurações para se adequar ao
tipo de trabalho que você precisar.
♦ Para fazer perfurações em madeira, metal e plástico,

PORTUGUÊS
8
coloque o colarinho (3) na posição de furadeira,
alinhando o símbolo com a marca (14).
♦ Para aparafusar, coloque o colarinho na configuração
desejada. Se você ainda não sabe bem a configuração
adequada, proceda da seguinte forma:
- Coloque o colarinho (3) na configuração do torque
mais baixo.
- Aperte o primeiro parafuso.
- Se o mandril emperrar antes do resultado
desejado, aumente a configuração do colarinho e
continue apertando o parafuso. Repita até atingir a
configuração adequada. Use essa configuração para
os parafusos restantes.
Perfurações em alvenaria (Figs. E e F)
♦ Para fazer perfurações em alvenaria, coloque o
colarinho (3) na posição de furadeira martelete
alinhando o símbolo com a marca (14).
♦ Deslize o seletor de velocidade (5) para a frente da
ferramenta (2º engrenagem).
Seletor de velocidade (Fig. F)
♦ Para perfurar aço e para trabalhos de parafusadeira,
deslize o seletor de velocidade (5) para a parte traseira
da ferramenta (1ª engrenagem).
♦ Para perfurar materiais diferentes do aço, deslize o
seletor (5) para a frente da ferramenta (2ª engrenagem).
Perfurar/aparafusar
♦ Escolha a rotação para a frente ou para trás usando o
deslizador (2).
♦ Para ligar a ferramenta, aperte o gatilho (1). A
velocidade da ferramenta dependerá da força que você
aplicar no gatilho.
♦ Para desligar a ferramenta, solte o gatilho.
Luz de trabalho LED
A luz de trabalho LED (8) se ativa automaticamente quando
o gatilho for apertado. A luz de trabalho acenderá quando o
gatilho for parcialmente apertado, antes de que a unidade
seja acionada.
Indicador do estado da carga
Esta ferramenta está equipada com um indicador do estado
da carga. Ele pode ser usado para mostrar o nível atual da
carga na bateria durante o uso
♦ Aperte o botão do indicador do estado da carga (9).
♦ Conselhos para um uso ideal
♦ Furadeira
♦ Aplique sempre uma pressão leve em linha reta com
a broca.
♦ Imediatamente antes de que a broca passe pelo outro
lado do material de trabalho, diminua a pressão na
ferramenta.
♦ Use um bloco de madeira para apoiar peças de trabalho
que possam rachar.
♦ Use brocas pá para fazer perfurações de grande
diâmetro em madeira.
♦ Use brocas HSS para perfurar metal.
♦ Use brocas de alvenaria para perfurar em alvenaria.
♦ Use um lubrificante para perfurar metais diferentes do
ferro fundido e latão.
♦ Faça uma covinha com um perfurador central no centro
do local onde vai perfurar para ter maior precisão.
Parafusadeira
♦ Use sempre o tipo e tamanho adequado de ponta.
♦ Se estiver sendo difícil de apertar um parafuso,
experimente aplicar um pouco de detergente ou sabão
como lubrificante.
♦ Segure sempre a ferramenta e a ponta em linha reta
com o parafuso.
MANUTENÇÃO
Sua ferramenta elétrica STANLEY foi projetada para estar
em funcionamento por muito tempo com uma manutenção
mínima. O funcionamento contínuo satisfatório vai
depender do cuidado adequado e limpeza regular da
ferramenta.
ADVERTÊNCIA! Para reduzir o risco de lesões
pessoais graves, coloque o deslizador na posição
de trava ou desligue a ferramenta da tomada
antes de retirar/instalar peças ou acessórios. Um
acionamento acidental pode causar lesões.
O carregador e a bateria não podem ser consertados. Não
há peças que possam ser substituídas dentro deles.
Lubrificação
A ferramenta não requer lubrificação adicional.
Limpeza
ADVERTÊNCIA! Sopre a sujeira e o pó da
carcaça com ar seco sempre que começar a se
acumular ao redor das aberturas de ventilação.
Use óculos de proteção e máscara contra pó aprovados ao
fazer esse trabalho.
ADVERTÊNCIA! Nunca use solventes nem
outros químicos abrasivos para limpar peças não
metálicas da ferramenta. Esses químicos podem
debilitar o material usado nessas peças. Use um
pano úmido com água e um pouco de sabão. Nunca
permita que entre líquido na ferramenta. Nunca submerja
nenhuma peça da ferramenta em nenhum líquido.
Para manter a SEGURANÇA e CONFIABILIDADE dos
produtos, consertos, inspeções e substituições da escova
de carvão, e qualquer outro serviço de manutenção
ou ajuste devem ser efetuados por Centros de Serviço
STANLEY, sempre utilizando peças de reposição STANLEY.
Instruções de limpeza do carregador
ADVERTÊNCIA: perigo de choque elétrico. Desligue
o carregador da tomada antes de limpá-lo. Pode limpar
sujeira e gordura do exterior do carregador com um pano
ou uma escovinha suave não metálica. Não use água nem
produtos de limpeza.
ACESSÓRIOS OPCIONAIS
ADVERTÊNCIA: como outros acessórios,

9
PORTUGUÊS
diferentes dos oferecidos pela STANLEY, não foram
testados com este produto, o uso desses acessórios com
esta ferramenta pode ser perigoso. Para reduzir o risco de
lesões, com este produto só devem ser usados os
acessórios recomendados pela STANLEY. Consulte o seu
distribuidor para mais informações sobre os acessórios
apropriados.
PROTEÇÃO DO MEIO AMBIENTE
Coleta separada. Este produto não deve ser
descartado no lixo caseiro normal.
Se você chegar à conclusão de que seu produto
STANLEY precisa ser substituído, ou se ele já não for útil
para você, não o descarte no lixo caseiro. Leve-o a um local
de reciclagem.
A coleta separada desses produtos e embalagens
permite que os materiais sejam reciclados e usados
novamente. Materiais reutilizados ou reciclados
ajudam a prevenir a poluição ambiental e reduzem a
demanda de matérias primas novas.
Baterias
As baterias STANLEY podem ser recarregadas
muitas vezes. No final da vida útil, descarte as
baterias com o devido cuidado para o meio ambiente:
♦ Use toda a carga da bateria e, então, retire-a da
ferramenta;
♦ As baterias de NiCd, NiMH e de íons de lítio são
recicláveis. Leve-as a um centro de serviços autorizado
ou a uma estação de reciclagem local.
OBSERVAÇÕES
A política da STANLEY é de melhora contínua dos nossos
produtos; portanto, se reserva o direito de alterar as
especificações do produto sem aviso prévio.
Os equipamentos e acessórios padrão podem variar de
um país a outro. As especificações dos produtos também
podem variar de um país a outro.
É possível que não esteja disponível a gama completa
de produtos em todos os países. Entre em contato
com os distribuidores STANLEY locais para conhecer a
disponibilidade de produtos de uma gama.
INFORMAÇÕES DE SERVIÇO
A STANLEY oferece uma ampla rede de centros de serviço
próprios da companhia e/ou autorizados em todo o país.
Todos os Centros de Serviço STANLEY possuem pessoal
treinado para oferecer aos clientes um serviço eficiente e
confiável para as ferramentas elétricas. Se você precisar
de conselhos técnicos, consertos ou peças de reparação
genuínas do fabricante, entre em contato com o centro
STANLEY mais próximo.
DADOS TÉCNICOS
STDC18LHBK
Tensão VDC 20 V
MAX
Velocidade sem
carga
…/min
(rpm)
0 - 400 / 0 - 1600
Torque máx. pés-lbs (Nm) 37,9 (51,4)
Capacidade do
mandril
pol. (mm) 1/2 (13)
Capacidade
máx. furadeira
Madeira pol. (mm) 1-1/2 (38)
Metal pol. (mm) 1/2 (13)
Alvenaria pol. (mm) 1/2 (13)
Peso lbs (kg) 2,95 (1,34)
Carregador SC201 SC202
TIPO TIPO BR AR B2C B3 B2 BR
Tensão de
entrada
V
127/
220
220 220 120 220 127
Frequência Hz 60 50 50 60
50-
60
60
Tensão de
saída
20 V
MAX
Corrente mA 1000 2000
Tempo
de carga
aproximado
min 80 - 240 40 - 120
Bateria
SB20C SB20S SB20D SB20M
Tensão VAC 20 V MAX
Capacidade Ah 1,3 1,5 2,0 4,0
Tipo Íons de Litio

ENGLISH (Original instructions)
10
INTENDED USE
Your STANLEY STDC18LHBK hammer drill/screwdriver has
been designed for screwdriving applications and for drilling in
wood, metal, plastics and soft masonry. This tool is intended
for professional use.
SAFETY INSTRUCTIONS
General power tool safety warnings
WARNING! Read all safety warnings,
instructions, illustrations and specifications
provided with this power tool. Failure to follow all
instructions listed below may result in electric shock,
fire and/or serious injury.
Save all warnings and instructions for future reference.
The term "power tool" in all of the warnings listed below refers
to your mains operated (corded) power tool or battery operated
(cordless) power tool.
1. Work area safety
a. Keep work area clean and well lit. Cluttered or dark areas
invite accidents.
b. Do not operate power tools in explosive atmospheres,
such as in the presence of flammable liquids, gases or
dust. Power tools create sparks which may ignite the dust
or fumes.
c. Keep children and bystanders away while operating a
power tool. Distractions can cause you to lose control.
2. Electrical safety
a. Power tool plugs must match the outlet. Never modify
the plug in any way. Do not use any adapter plugs with
earthed (grounded) power tools. Unmodified plugs and
matching outlets will reduce risk of electric shock.
b. Avoid body contact with earthed or grounded surfaces
such as pipes, radiators, ranges and refrigerators.
There is an increased risk of electric shock if your body is
earthed or grounded.
c. Do not expose power tools to rain or wet conditions.
Water entering a power tool will increase the risk of electric
shock.
d. Do not abuse the cord. Never use the cord for carrying,
pulling or unplugging the power tool. Keep cord away
from heat, oil, sharp edges or moving parts. Damaged
or entangled cords increase the risk of electric shock.
e. When operating a power tool outdoors, use an
extension cord suitable for outdoor use. Use of a cord
suitable for outdoor use reduces the risk of electric shock.
f. If operating a power tool in a damp location is unavoida-
ble, use a residual current device (RCD) protected
supply. Use of an RCD reduces the risk of electric shock.
3. Personal safety
a. Stay alert, watch what you are doing and use common
sense when operating a power tool. Do not use a
power tool while you are tired or under the influence of
drugs, alcohol or medication. A moment of inattention
while operating power tools may result in serious personal
injury.
b. Use personal protective equipment. Always wear eye
protection. Protective equipment such as a dust mask,
non-skid safety shoes, hard hat, or hearing protection used
for appropriate conditions will reduce personal injuries.
c. Prevent unintentional starting. Ensure the switch is in
the off-position before connecting to power source
and/or battery pack, picking up or carrying the tool.
Carrying power tools with your finger on the switch or
energising power tools that have the switch on invites
accidents.
d. Remove any adjusting key or wrench before turning
the power tool on. A wrench or a key left attached to a
rotating part of the power tool may result in personal injury.
e. Do not overreach. Keep proper footing and balance at
all times. This enables better control of the power tool in
unexpected situations.
f. Dress properly. Do not wear loose clothing or
jewellery. Keep your hair and clothing away from
moving parts. Loose clothes, jewellery or long hair can be
caught in moving parts.
g. If devices are provided for the connection of dust
extraction and collection facilities, ensure these are
connected and properly used. Use of dust collection can
reduce dust-related hazards.
h. Do not let familiarity gained from frequent use of tools
allow you to become complacent and ignore tool
safety principles. A careless action can cause severe
injury within a fraction of a second.
4. Power tool use and care
a. Do not force the power tool. Use the correct power tool
for your application. The correct power tool will do the job
better and safer at the rate for which it was designed.
b. Do not use the power tool if the switch does not turn it
on and off. Any power tool that cannot be controlled with
the switch is dangerous and must be repaired.
c. Disconnect the plug from the power source and/or
remove the battery pack, if detachable from the power
tool before making any adjustments, changing
accessories, or storing power tools. Such preventive
safety measures reduce the risk of starting the power tool
accidentally.
d. Store idle power tools out of the reach of children and
do not allow persons unfamiliar with the power tool or
these instructions to operate the power tool. Power
tools are dangerous in the hands of untrained users.
e. Maintain power tools and accessories. Check for
misalignment or binding of moving parts, breakage of
parts and any other condition that may affect the
power tools operation. If damaged, have the power tool
repaired before use. Many accidents are caused by
poorly maintained power tools.
f. Keep cutting tools sharp and clean. Properly maintained
cutting tools with sharp cutting edges are less likely to bind
and are easier to control.
g. Use the power tool, accessories and tool bits etc. in
accordance with these instructions, taking into
account the working conditions and the work to be
performed. Use of the power tool for operations different
from those intended could result in a hazardous situation.
(Original instructions) ENGLISH
11
h. Keep handles and grasping surfaces dry, clean and
free from oil and grease. Slippery handles and grasping
surfaces do not allow for safe handling and control of the
tool in unexpected situations.
5. Battery tool use and care
a. Recharge only with the charger specified by the
manufacturer. A charger that is suitable for one type of
battery pack may create a risk of fire when used with
another battery pack.
b. Use Power tools only with specifically designated
battery packs. Use of any other battery packs may
create a risk of injury and fire.
c. When battery pack is not in use, keep it away from
other metal objects, like paper clips, coins, keys, nails,
screws, or other small metal objects, that can make a
connection from one terminal to another. Shorting the
battery terminals together may cause burns or a fire.
d. Under abusive conditions, liquid may be ejected from
the battery; avoid contact. If contact accidentally
occurs, flush with water. If liquid contacts eyes,
additionally seek medical help. Liquid ejected from the
battery may cause irritation or burns.
6. Service
a. Have your power tool serviced by a qualified repair
person using only identical replacement parts. This will
ensure that the safety of the power tool is maintained.
ADDITIONAL POWER TOOL SAFETY WARNINGS
WARNING! Additional safety warnings for
drills/screwdrivers
• Wear ear protectors when impact drilling. Exposure to
noise can cause hearing loss.
• Use auxiliary handles supplied with the tool. Loss of
control can cause personal injury.
• Hold power tool b–y insulated gripping surfaces when
performing an operation where the cutting accessory
may contact hidden wiring. Cutting accessory contacting a
"live" wire may make exposed metal parts of
the power tool "live" and could give the operator an
electric shock.
• Hold power tool by insulated gripping surfaces, when
performing an operation where the fastener may contact
hidden wiring. Fasteners contacting a "live" wire may
make exposed metal parts of the power tool "live" and
could give the operator an electric shock.
• Use clamps or another practical way to secure and
support the workpiece to a stable platform. Holding the
work by hand or against your body leaves it unstable and
may lead to loss of control.
• Before drilling into walls, floors or ceilings, check for the
location of wiring and pipes.
• Avoid touching the tip of a drill bit just after drilling, as it
may be hot.
• The intended use is described in this instruction manual.
The use of any accessory or attachment or performance
of any operation with this tool other than those
recommended in this instruction manual may present a
risk of personal injury and/or damage to property.
Residual risks
Additional residual risks may arise when using the tool which
may not be included in the enclosed safety warnings. These
risks can arise from misuse, prolonged use etc.
Even with the application of the relevant safety regulations
and the implementation of safety devices, certain residual
risks can not be avoided. These include:
• Injuries caused by touching any rotating/moving parts.
• Injuries caused when changing any parts, blades or
accessories.
• Injuries caused by prolonged use of a tool. When using
any tool for prolonged periods ensure you take regular
breaks.
• Impairment of hearing.
• Health hazards caused by breathing dust developed when
using your tool (example:- working with wood, especially
oak, beech and MDF.)
ELECTRICAL SAFETY
Your charger is double insulated; therefore no earth
wire is required. Always check that the mains voltage
corresponds to the voltage on the rating plate. Never
attempt to replace the charger unit with a regular
mains plug.
• If the supply cord is damaged, it must be replaced by the
manufacturer or an authorised STANLEY Service Centre in
order to avoid a hazard.
ADDITIONAL SAFETY INSTRUCTIONS FOR
BATTERIES AND CHARGERS
Batteries
• Never attempt to open for any reason.
• Do not expose the battery to water.
• Do not store in locations where the temperature may
exceed 40 °C.
• Charge only at ambient temperatures between 10 °C and
40 °C.
SAFETY OF OTHERS
This tool is not intended for use by persons (including
children) with reduced physical, sensory or mental
capabilities, or lack of experience and knowledge, unless they
have been given supervision or instruction concerning use of
the tool by a person responsible for their safety.
• Children should be supervised to ensure that they do not
play with the appliance.

ENGLISH (Original instructions)
12
• Charge only using the charger provided with the tool.
• When disposing of batteries, follow the instructions given
in the section “Protecting the environment”.
Do not attempt to charge damaged batteries.
Chargers
• Use your charger only to charge the battery in the tool with
which it was supplied. Other batteries could burst, causing
personal injury and damage.
• Never attempt to charge non-rechargeable batteries.
• Have defective cords replaced immediately.
• Do not expose the charger to water.
• Do not open the charger.
• Do not probe the charger.
The charger is intended for indoor use only.
Read the instruction manual before use.
LABELS ON TOOL
The following pictograms are shown on the tool along with the
date code:
WARNING! To reduce the risk of injury, the user
must read the instruction manual.
Always wear safety goggles
Always wear safety hearing protection
Position of date code
The Date Code, which also includes the year of manufacture,
is printed into the housing.
Example:
2015 XX JN
Year of manufacturing
PACKAGE CONTENTS
The package contains:
1 Hammer drill
1 Charger
2 Batteries (C2/S2/D2) or 1 Battery (C1/S1/D1)
1 Instruction manual
• Check for damage to the tool, parts or accessories which
may have occurred during transport.
• Take the time to thoroughly read and understand this
manual prior to operation.
FEATURES (Fig A)
This tool includes some or all of the following features.
1. Variable speed switch
2. Forward/reverse slider
3. Mode selector / torque adjustment collar
4. Chuck
5. Speed selector
6. Bit holder
7. Battery
8. LED work light
9. State of charge indicator
10. Belt clip
FIG.B
11. Charger
12. Charge indicator
ASSEMBLY
WARNING! Before assembly, remove the battery from the tool.
Fitting and removing the battery (Fig C)
• To fit the battery (7), line it up with the receptacle on the
tool. Slide the battery into the receptacle and push until the
battery snaps into place.
• To remove the battery, push the release button (13) while
at the same time pulling the battery out of the receptacle.
Fitting and removing a drill bit or screwdriver bit
This tool is fitted with a keyless chuck to allow for an easy
exchange of bits.
• Lock the tool by setting the forward/reverse slider (2) to the
centre position.
• Open the chuck by turning it (4) with one hand while
holding the tool with the other.
• Insert the bit shaft into the chuck.
• Firmly tighten the chuck by turning it (4) with one hand
while holding the tool with the other.
• Insert the bit shaft into the chuck.
• Firmly tighten the chuck by turning it (4) with one hand
while holding the tool with the other.
This tool is supplied with a double-ended screwdriver bit in the
bit holder (6).
• To remove the screwdriver bit from the bit holder, lift the bit
from the recess.
• To store the screwdriver bit, firmly push it into the holder.
USE
WARNING! Let the tool work at its own pace. Do not overload.
WARNING! Before drilling into walls, floors or ceilings, check
for the location of wiring and pipes.
CHARGING THE BATTERY (Fig B)
The battery needs to be charged before first use and whenever
it fails to produce sufficient power on jobs that were easily
done before. The battery may become warm while charging;
this is normal and does not indicate a problem.
WARNING! Do not charge the battery at ambient temperatures
below 10 °C or above 40 °C. Recommended charging
temperature: approx. 24 °C.
NOTE: The charger will not charge a battery if the cell
temperature is below approximately 0 °C or above 40 °C.
The battery should be left in the charger and the charger
will begin to charge automatically when the cell tempera-
ture warms up or cools down.
(Original instructions) ENGLISH
13
• To charge the battery (7), insert it into the charger (11).
The battery will only fit into the charger in one way. Do not
force. Be sure that the battery is fully seated in the
charger.
• Plug in the charger and switch on at the mains.
The charging indicator (12) will flash green (slowly).
The charge is complete when the charging indicator (12) lights
green continuously. The charger and the battery can be left
connected indefinitely with the LED illuminated. The LED will
change to flashing green (charging) state as the charger
occasionally tops up the battery charge. The charging
indicator (12) will be lit as long as the battery is connected to
the plugged-in charger.
• Charge discharged batteries within 1 week. Battery life will
be greatly diminished if stored in a discharged state.
Leaving the battery in the charger
The charger and battery pack can be left connected with the
LED glowing indefinitely. The charger will keep the battery
pack fresh and fully charged.
Charger diagnostics
If the charger detects a weak or damaged battery, the
charging indicator (12) will flash red at a fast rate. Proceed as
follows:
• Re-insert the battery (7).
• If the charging indicators continues flashing red at a fast
rate, use a different battery to determine if the charging
process works properly.
• If the replaced battery charges correctly, the original
battery is defective and should be returned to a service
centre for recycling.
• If the new battery gives the same indication as the original
battery, take the charger to be tested at an authorised
services centre.
NOTE: It may take as long as 60 minutes to determine that
the battery is defective. If the battery is too hot or too
cold, the LED will alternately blink red, fast and slow, one
flash at each speed and repeat.
Selecting the direction of rotation (Fig D)
For drilling and for tightening screws, use forward (clockwise)
rotation. For loosening screws or removing a jammed drill bit,
use reverse (counterclockwise) rotation.
• To select forward rotation, push the forward/reverse slider
(2) to the left.
• To select reverse rotation, push the forward/reverse slider
to the right.
• To lock the tool, set the forward/reverse slider into the
centre position.
Selecting the operating mode or torque (Fig E)
This tool is fitted with a collar to select the operating mode and
to set the torque for tightening screws. Large screws and hard
workpiece materials require a higher torque setting than small
screws and soft workpiece materials. The collar has a wide
range of settings to suit your application.
• For drilling in wood, metal and plastics, set the collar (3) to
the drilling position by aligning the symbol with the
marking (14).
• For screwdriving, set the collar to the desired setting. If
you do not yet know the appropriate setting, proceed as
follows:
- Set the collar (3) to the lowest torque setting.
- Tighten the first screw.
- If the clutch ratchets before the desired result is
achieved, increase the collar setting and continue
tightening the screw. Repeat until you reach the correct
setting. Use this setting for the remaining screws.
Drilling in masonry (Fig E & F)
• For drilling in masonry, set the collar (3) to the hammer
drilling position by aligning the symbol with the marking
(14).
• Slide the speed selector (5) towards the front of the tool
(2nd gear).
Speed selector (Fig F)
• For drilling in steel and for screwdriving applications, slide
the speed selector (5) towards the rear of the tool (1st
gear).
• For drilling in materials other than steel, slide the speed
selector (5) towards the front of the tool (2nd gear).
Drilling/screwdriving
• Select forward or reverse rotation using the forward/re-
verse slider (2).
• To switch the tool on, press the switch (1). The tool speed
depends on how far you press the switch.
• To switch the tool off, release the switch.
LED work light
The LED work light (8) is activated automatically when the
trigger is depressed. The LED work light will illuminate when
the trigger is partially depressed, before the unit begins
running.
State of charge indicator
The tool is fitted with a state of charge indicator. This can be
used to display the current level of charge in the battery during
use.
• Press the state of charge indicator button (9).
Hints for optimum use
Drilling
• Always apply a light pressure in a straight line with the drill
bit.
• Just before the drill tip breaks through the other side of the
workpiece, decrease pressure on the tool.
• Use a block of wood to back up workpieces that may
splinter.
• Use spade bits when drilling large diameter holes in wood.
• Use HSS drill bits when drilling in metal.
• Use masonry bits when drilling in soft masonry.

OPTIONAL ACCESSORIES
WARNING: Since accessories, other than those
offered by STANLEY, have not been tested with this
product, use of such accessories with this tool could
be hazardous. To reduce the risk of injury, only STANLEY,
recommended accessories should be used with this
product. Consult your dealer for further information on
theappropriate accessories.
PROTECTING THE ENVIRONMENT
Separate collection. This product must not be
disposed of with normal household waste.
Should you find one day that your STANLEY product needs
replacement, or if it is of no further use to you, do not dispose
of it with household waste. Please sort it out for separate
recycling.
Separate collection of used products and packaging
allows materials to be recycled and used again.
Reuse of recycled materials helps prevent
environmental pollution and reduces the demand for raw
materials.
Batteries
STANLEY batteries can be recharged many times.
At the end of their useful life, discard batteries with
due care for our environment:
• Run the battery down completely, then remove it from the
tool.
• NiCd, NiMH and Li-Ion batteries are recyclable. Take them
to any authorized repair agent or a local recycling station.
NOTES
STANLEY’s policy is one of continuous improvement to our
products and as such, we reserve the right to change product
specifications without prior notice.
Standard equipment and accessories may vary by country.
Product specifications may differ by country.
Complete product range may not be available in all countries.
Contact your local STANLEY dealers for range availability.
SERVICE INFORMATION
STANLEY offers a full network of company-owned and or
authorized service agents throughout your country. All
STANLEY Service Centers are staffed with trained personnel
to provide customers with efficient and reliable power tool
service. Whether you need technical advice, repair, or genuine
factory replacement parts, contact the STANLEY location
nearest to you.
• Use a lubricant when drilling metals other than cast iron
and brass.
• Make an indentation using a centre punch at the centre of
the hole to be drilled in order to improve accuracy.
Screwdriving
• Always use the correct type and size of screwdriver bit.
• If screws are difficult to tighten, try applying a small
amount of washing liquid or soap as a lubricant.
• Always hold the tool and screwdriver bit in a straght line
with the screw.
MAINTENANCE
Your STANLEY power tool has been designed to operate over
a long period of time with a minimum of maintenance.
Continuous satisfactory operation depends upon proper tool
care and regular cleaning.
WARNING! To reduce the risk of serious personal
injury, place the forward/reverse button in the lockoff
position or turn tool off before removing/installing
attachments or accessories. An accidental start-up can cause
injury.
The charger and battery are not serviceable. There are no
serviceable parts inside.
Lubrication
Your power tool requires no additional lubrication.
Cleaning
WARNING: Blow dirt and dust out of the main housing
with dry air as often as dirt is seen collecting in and
around the air vents. Wear approved eye protection and
approved dust mask when performing this procedure.
WARNING: Never use solvents or other harsh
chemicals for cleaning the non-metallic parts of the
tool. These chemicals may weaken the materials used
in these parts. Use a cloth dampened only with water and mild
soap. Never let any liquid get inside the tool; never immerse
any part of the tool into a liquid.
To maintain products SAFETY and RELIABILITY, repair,
carbon brush inspection and replacement, any other
maintenance or adjustment should be performed by STANLEY
Service Centers, always using Stanley replacement parts.
Charger Cleaning Instructions
WARNING: Shock hazard. Disconnect the charger from
the AC outlet before cleaning. Dirt and grease may be
removed from the exterior of the charger using a cloth or
soft non-metallic brush. Do not use water or any cleaning
solutions.
ENGLISH (Original instructions)
14

STDC18LHBK
Voltage V
DC
20 V MAX
No-load speed
.../min
0 - 400 / 0 - 1600
(rpm)
Max. torque ft-lbs (Nm) 37.9 (51.4)
Chuck capacity in (mm) 1/2 (13)
Max drilling capacity
Wood in (mm) 1-1/2 (38)
Metal in (mm) 1/2 (13)
Masonry in (mm) 1/2 (13)
Weight lbs (kg) 2.95 (1.34)
Charger SC201 SC202
TYPE BR AR B2C B3 B2 BR
Input voltage V 127/220 220 220 120 220 127
Frequency Hz 60 50 50 60 50-60 60
Output voltage 20 V
Current mA 1000 2000
Approx.
min 80 - 240 40 - 120
charge time
(Original instructions) ENGLISH
15
Battery SB20C SB20S SB20D SB20M
Voltage V
AC
20 V MAX
Capacity Ah 1.3 1.5 2.0 4.0
Type Li-Ion
TECHNICAL DATA

Solamente para propósito de Argentina:
Importa y Distribuye: Black & Decker
Argentina S.A.
Pacheco Trade Center Colectora de Ruta Panamericana
Km. 32.0 El Talar de Pacheco Partido de Tigre
Buenos Aires (B1618FBQ) República de Argentina
CUIT: 33-65861596-9 Tel.: (011) 4726-4400
Importado por:
Black & Decker do Brasil Ltda.
Rod. BR 050, s/n° - Km 167
Dist. Industrial II Uberaba - MG - Cep: 38064-750
CNPJ: 53.296.273/0001-91
Insc. Est.: 701.948.711.00-98
S.A.C.: 0800.703.4644
Solamente para propósito de Chile:
Importado por: Black & Decker de Chile,
S.A.
Av. Andrés Bello 2457, Oficina 1603
Providencia - Santiago de Chile
Tel.: (56-2) 2687.1700
Solamente para propósito de Colombia:
Importado por: Black & Decker de Colom
-
bia S.A.S.
Av. Cra 72 # 80-94, Oficina 902.
Torre Titan Plaza Centro Comercial y Empresarial.
Bogotá, Colombia (111021)
Tel.: (571) 508 9100
Solamente para propósito de México:
Importado por: Black and Decker S.A
de C.V.
Antonio Dovali Jaime #70 Torre B Piso 9
Col. Santa Fé, Alvaro Obregón
Ciudad de México, México.
C.P 01210 Tel: (52) 55 53267100
R.F.C.BDE8106261W7
Importado por: Black & Decker del Perú
S.A.
Av. Circunvalación del Club Golf
Los Incas N° 152 - 154, Oficinas 601 – 602
Urb. Club Golf Los Incas - Santiago de Surco
Lima – Perú Tel.: (511) 614-4242
RUC 20266596805
Fabricado na China
Made in China
P/N: N761484
07/16/2019
-
 1
1
-
 2
2
-
 3
3
-
 4
4
-
 5
5
-
 6
6
-
 7
7
-
 8
8
-
 9
9
-
 10
10
-
 11
11
-
 12
12
-
 13
13
-
 14
14
-
 15
15
-
 16
16


Stanley STDC18LHBK Manual do usuário
- Categoria
- Martelos rotativos
- Tipo
- Manual do usuário
em outras línguas
- English: Stanley STDC18LHBK User manual
Artigos relacionados
-
Stanley FMC021 Manual do proprietário
-
-
Stanley SFMCD720 Manual do usuário
-
-
-
-
-
-
-
Outros documentos
-
Black & Decker KFBCD701 Manual do usuário
-
-
BLACK DECKER HP9048 Manual do proprietário
-
Black & Decker ASL148 Manual do usuário
-
BLACK DECKER CL12K Manual do proprietário
-
-
BLACK+DECKER BDCDD12SC1A Manual do usuário
-
-
Black & Decker XTC243BK Manual do proprietário
-
Black & Decker HP148F4LBK Manual do usuário