Hamilton Beach 37516 Guia de usuario

Categoria
Panelas de arroz
Tipo
Guia de usuario

Este manual também é adequado para

READ BEFORE USE
LIRE AVANT UTILISATION
LEA ANTES DE USAR
Visit www.hamiltonbeach.com for our
complete line of products and Use and
Care Guides – as well as delicious recipes,
tips, and to register your product online!
Rendez-vous sur www.hamiltonbeach.ca
pour notre liste complète de produits et de
nos manuels utilisateur – ainsi que nos
délicieuses recettes et nos conseils !
¡Visite www.hamiltonbeach.com (
EE. UU.)
o
www.hamiltonbeach.com.mx (México)
para ver otros productos de Hamilton Beach
o para contactarnos!
Questions?
Please call us – our friendly
associates are ready to help.
USA: 1.800.851.8900
¿Preguntas?
Por favor llámenos – nuestros
amables representantes están
listos para ayudar.
EE. UU.: 1.800.851.8900
MEX: 01 800 71 16 100
Le invitamos a leer cuidadosamente este
instructivo antes de usar su aparato.
Questions ?
N’hésitez pas à nous appeler –
nos associés s’empresseront
de vous aider.
CAN : 1.800.267.2826
English ....................... 2
Français .................... 18
Español .................... 34
16-Cup Rice Cooker
& Steamer
Cuiseur de riz et
cuit-vapeur de
nourriture
Arrocera y Vaporera
2
IMPORTANT SAFEGUARDS
1. Read all instructions.
2. This appliance is not intended for use by persons (including
children) with reduced physical, sensory, or mental capabilities,
or lack of experience and knowledge, unless they are closely
supervised and instructed concerning use of the appliance by a
person responsible for their safety.
3. Close supervision is necessary when any appliance is used by or
near children. Children should be supervised to ensure that they
do not play with the appliance.
4. Do not touch hot surfaces. Use handles or knobs. Use pot
holders when removing hot containers.
5. To protect against a risk of electrical shock, do not immerse cord,
plug, or base in water or other liquid.
6. Unplug from outlet when not in use and before cleaning. Allow
to cool before putting on or taking off parts and before cleaning.
7. Do not operate any appliance with a damaged supply cord or
plug, or after the appliance malfunctions or has been dropped
or damaged in any manner. Supply cord replacement and
repairs must be conducted by the manufacturer, its service
agent, or similarly qualified persons in order to avoid a hazard.
Call the provided customer service number for information on
examination, repair, or adjustment.
8. The use of accessory attachments not recommended by the
appliance manufacturer may cause injuries.
9. Do not use outdoors.
10. Do not let cord hang over edge of table or counter or touch hot
surfaces, including the stove.
11. Do not place on or near a hot gas or an electric burner, or in a
heated oven.
12. Extreme caution must be used when moving an appliance
containing hot food, water, or other hot liquids.
13. To disconnect, push up the switch and then remove plug from
wall outlet.
14. Do not use appliance for other than intended use.
15. Lift and open cover carefully to avoid scalding, and allow water
to drip into the cooking pot.
16. CAUTION: Risk of electric shock. Cook only in removable
cooking pot.
17. Do not place the unit directly under cabinets when operating as
this product produces large amounts of steam. Avoid reaching
over the product when operating.
When using electrical appliances, basic safety precautions should always be followed to reduce the risk of fire, electric shock, and/or injury to
persons, including the following:
SAVE THESE INSTRUCTIONS
Other Consumer Safety Information
This appliance is intended for household use only.
w WARNING
Electrical Shock Hazard: This appliance is provided
with a polarized plug (one wide blade) to reduce the risk of electric
shock. The plug fits only one way into a polarized outlet. Do not defeat
the safety purpose of the plug by modifying the plug in any way or by
using an adapter. If the plug does not fit fully into the outlet, reverse
the plug. If it still does not fit, have an electrician replace the outlet.
The length of the cord used on this appliance was selected to reduce
the hazards of becoming tangled in or tripping over a longer cord. If a
longer cord is necessary, an approved extension cord may be used.
The electrical rating of the extension cord must be equal to or greater
than the rating of the appliance. Care must be taken to arrange the
extension cord so that it will not drape over the countertop or tabletop
where it can be pulled on by children or accidentally tripped over.
3
Parts and Features
Rice Paddle*
Lid*
Cooking Pot*
Base
Rice Measuring Cup
6-Ounce (177 ml)*
Rinsing/Steamer
Basket*
*To order parts:
US: 1.800.851.8900
www.hamiltonbeach.com
Canada: 1.800.267.2826
Mexico:
01 800 71 16 100
Cook Switch
COOK and WARM
Indicator Lights
4
How to Cook Rice,
Grain, and Cereal
3
2
4
Place cooking pot securely into
the base. NOTE: Make sure
bottom of cooking pot is not bent
or warped, or it will not conduct
heat correctly.
65
Plug into outlet. The WARM light
will illuminate BUT UNIT IS NOT
COOKING.
Press cook switch down to begin
cooking.
w WARNING
Electrical Shock Hazard. Cook only in removable
cooking pot. Never place water or food directly into the base.
w CAUTION
Burn Hazard. Steam from steam vent can cause injury.
BEFORE FIRST USE: Wash all removable parts before using. See
Care and Cleaning for details.
Follow charts on pages 6 and
7 for cooking amounts, times,
and yields. Fill with water to
corresponding water line.
Example: If you add 3 level rice
cups of rice to the cooking pot,
add water to the “3” line of the
cooking pot.
1
Measure rice with rice measuring
cup. Add the desired amount
of measured uncooked rice
to steamer basket. Do not fill
above side vents to prevent
rice from falling through while
rinsing. Place basket under a
slow-flowing faucet and rinse.
Add drained rice to cooking
pot. Repeat rinsing with any
remaining rice.
Add lid to cooking pot.
5
7 8
9
When finished cooking, cooker
will switch automatically to
WARM and light will illuminate.
Unplug.COOK light will illuminate.
How to Cook Rice, Grain, and Cereal (cont.)
6
Rice Cooking Chart
Chart is based on measuring rice and water with the rice measuring cup provided.
There are many different types of rice. Rice packaging directions may call for different amounts of rice and water from the chart; following
package directions may vary results.
Do not exceed MAX fill line to prevent overflow while rice is cooking.
TYPE OF RICE
MAXIMUM AMOUNT
OF RICE*
MAXIMUM AMOUNT
OF WATER
APPROX.
COOKING TIME YIELD**
Long Grain White 8 cups (1.42 L) fill to 8 line 34–36 min 16+ cups
Long Grain Brown 8 cups (1.42 L) fill to 8 line 52–54 min 16+ cups
Arborio 8 cups (1.42 L) fill to 8 line 38–40 min 16+ cups
Basmati*** 8 cups (1.42 L) fill to 8 line 35–37 min 16+ cups
Jasmine*** 8 cups (1.42 L) fill to 8 line 33–35 min 16+ cups
Sushi Rice 8 cups (1.42 L) fill to 8 line 27–29 min 16+ cups
*Measured in rice measuring cup
**Measured in 1-cup U.S. measure
***Rinse before cooking
7
TYPE OF GRAIN
OR CEREAL
MAXIMUM AMOUNT
OF GRAIN OR CEREAL*
MAXIMUM AMOUNT
OF WATER*
APPROX.
COOKING TIME
YIELD**
Barley 1 cup (177 ml) 3 cups (532 ml)
36–38 min
2 3/4 cups
Buckwheat 4 cups (710 ml) 10 cups (1.77 L)
31–33 min
9 cups
Farro 8 cups (1.42 L) fill to 8 line
53–55 min
15 cups
Millet 5 cups (887 ml) 10 cups (1.77 L)
41–43 min
11 1/2 cups
Quinoa*** 8 cups (1.42 L) fill to 8 line 35
37 min 17 1/2 cups
Wheatberries 8 cups (1.42 L) fill to 8 line 86
88 min 15 cups
Cream of Wheat****
1 cup (177 ml) 5 cups (887 ml) 19–21 min 3 3/4 cups
Grits 1 cup (177 ml) 4 cups (710 ml) 13–15 min 3 cups
Old-Fashioned Oatmeal 6 cups (1.06 L) 10 cups (1.77 L) 23–25 min 10 cups
*Measured in rice measuring cup
**Measured in 1-cup U.S. measure
***Rinse before cooking
****Stir once or twice during cooking
Follow directions to cook rice, adding water as indicated.
Chart is based on measuring grain or cereal and water with the rice measuring cup provided. Teff, amaranth, and other very small grains
are not recommended.
Grain and Cereal Cooking Chart
Cream of Wheat is a trademark of B&G Foods North America, Inc. Use of the trademark does not imply any affiliation with or endorsement by B&G North America, Inc.
8
How to Steam Food
2
4
1
3
Place cooking pot securely into
the base. NOTE: Make sure
bottom of cooking pot is not bent
or warped, or it will not conduct
heat correctly.
w WARNING
Electrical Shock Hazard. Cook only in removable cooking
pot and steamer basket. Never place water or food directly into the base.
w CAUTION
Burn Hazard. Steam from steam vent can cause injury.
Fill cooking pot with 2 rice
measuring cups of water.
6
5
Plug into outlet. Press cook switch down to begin
cooking.
8
7
Add food to steamer basket
according to the Steam Cooking
Chart on page 10.
Place steamer basket into
cooking pot.
Add lid to cooking pot. The WARM light will illuminate
BUT UNIT IS NOT COOKING.
9
How to Steam Food (cont.)
9 10 11
COOK light will illuminate. Steam
food to desired doneness. See
approximate cooking times
on chart. Unit automatically
switches to WARM when all
water is evaporated. NOTE: If
unit switches to WARM and food
needs more steaming, add water
to cooking pot and push down
switch to cook.
Using an oven mitt, remove food
from steamer basket.
Unplug.
10
Steam Cooking Chart
TYPE OF FOOD
MAXIMUM AMOUNT
OF FOOD*
MAXIMUM AMOUNT
OF WATER*
APPROX.
COOKING TIME
DONENESS TEST
FOR FOOD
Vegetables:
Asparagus, cut in 3-inch pieces 4 cups (946 ml) 2 cups (473 ml) 12–14 min Crisp-tender
Broccoli, florets 4 cups (946 ml) 2 cups (473 ml) 10–12 min Crisp-tender
Carrots, sliced 1/4-inch thick 4 cups (946 ml) 2 cups (473 ml) 17–19 min Crisp-tender
Corn-on-the-Cob 2–3 ears 2 cups (473 ml) 19–21 min Crisp-tender
Potatoes, cut in 1/2–3/4 inch
chunks
4 cups (946 ml) 2 cups (473 ml) 19–21 min Tender
Zucchini, sliced 1/4-inch thick 4 cups (946 ml) 2 cups (473 ml) 13–15 min Crisp-tender
Poultry/Seafood:
Chicken, tenders 20 oz. (567 g) 2 cups (473 ml) 18–20 min Internal temperature
160°–165°F (71°–74°C)
Salmon, fillet 20 oz. (567 g) 2 cups (473 ml) 18–20 min Internal temperature
145°F (63°C)
Shrimp, peeled and deveined
31–40 count
24 oz. (680 g) 2 cups (473 ml) 13–15 min Pink and opaque
*Measured in 1-cup U.S. measure
The more food added to the steamer basket, the longer the steam
time should be.
Smaller pieces of food will steam faster than larger pieces.
11
2
1
Place cooking pot securely into
the base. NOTE: Make sure
bottom of cooking pot is not bent
or warped, or it will not conduct
heat correctly.
How to Steam Food
While Cooking Rice
Plug into outlet. The WARM light
will illuminate BUT UNIT IS NOT
COOKING.
6
4
3 5
Follow charts on pages 13
and 14 for cooking amounts,
times, and yields. Fill with water
to corresponding water line.
Example: If you add 3 level
cups of rice to the cooking pot,
add water to the “3” line of the
cooking pot.
NOTE: Some foods should be
added to the steamer basket
at the start of cooking rice and
others need to be added when
steaming starts heavily from the
lid vent.
Add food to steamer basket. Add lid to cooking pot.Place steamer basket into
cooking pot.
w WARNING
Electrical Shock Hazard. Cook only in removable
cooking pot and steamer basket. Never place water or food
directly into the base.
w CAUTION
Burn Hazard. Steam from steam vent can cause
injury.
12
7
Press cook switch down to begin
cooking.
8
12
When finished cooking rice,
cooker will automatically switch
to WARM mode and light will
illuminate.
How to Steam Food While Cooking Rice (cont.)
10
13
9
11
COOK light will illuminate. Remove lid to check doneness of
food in steamer basket.
NOTE: To check steamed food
during rice cooking time, use
caution and an oven mitt while
lifting lid. If food is done, remove
food with spatula from steamer
basket to serving bowl/platter.
Using an oven mitt, remove
steamer basket.
Add lid to cooking pot. Unplug.
13
Steaming Food With Rice Chart
Chart is based on measuring rice and water with the rice measuring cup provided. If you lose the rice measuring cup, one rice measuring
cup equals 6 oz. (177 ml) or approximately 3/4 cup U.S. measure, or follow the recommended two parts water to one part rice.
TYPE OF FOOD
MAXIMUM
AMOUNT
OF FOOD*
MAXIMUM
AMOUNT
OF RICE**
MAXIMUM
AMOUNT
OF WATER
APPROX.
COOKING
TIME***
YIELD OF
RICE*
DONENESS TEST
FOR FOOD
Asparagus, cut in 3-inch pieces 4 cups
(946 ml)
4 cups
(710 ml)
Fill to 4 line 21–23 min 8 cups Crisp-Tender: add
vegetables when steaming
heavily from vent
Broccoli, florets 4 cups
(946 ml)
4 cups
(710 ml)
Fill to 4 line 22–24 min 9 cups Crisp-Tender: add
vegetables when steaming
heavily from vent
Corn-on-the-Cob 2–3 ears 4 cups
(710 ml)
Fill to 4 line 25–27 min 9 cups Crisp-Tender
Potatoes, cut in 1/2–3/4 inch
chunks
4 cups
(946 ml)
4 cups
(710 ml)
Fill to 4 line 23–25 min 9 cups Tender: add potatoes
from the start. Let stand
10 minutes on WARM.
*Measured in 1-cup U.S. measure
**Measured in rice measuring cup
***All times are for long grain white rice
The more food added to the steamer basket, the longer the steam
time should be.
Smaller pieces of food will steam faster than larger pieces.
Give rice a flavor boost by substituting an equal amount of chicken/
beef/vegetable broth for water.
14
TYPE OF FOOD
MAXIMUM
AMOUNT
OF FOOD*
MAXIMUM
AMOUNT
OF RICE**
MAXIMUM
AMOUNT
OF WATER
APPROX.
COOKING
TIME***
YIELD OF
RICE*
DONENESS TEST
FOR FOOD
Yellow Squash and Red Bell
Peppers, sliced 1/4-inch thick
and 1-inch cubes
4 cups
(946 ml)
4 cups
(710 ml)
Fill to 4 line 23–25 min 8 1/2 cups Crisp-Tender: add
vegetables when steaming
heavily from vent
Chicken, tenders 18 oz.
(510 g)
4 cups
(710 ml)
Fill to 4 line 23–25 min 8 1/4 cups Internal temp 160°–165°F
(71°–74°C). Let stand on
WARM up to 10 minutes
if needed.
Salmon fillet 18 oz.
(510 g)
4 cups
(710 ml)
Fill to 4 line 23–25 min 9 cups Internal temperature
145°F (63°C). Let stand on
WARM up to 10 minutes if
needed.
Shrimp, peeled and deveined
31–40 count
18 oz.
(510 g)
4 cups
(710 ml)
Fill to 4 line 23–25 min 9 cups Pink and opaque
*Measured in 1-cup U.S. measure
**Measured in rice measuring cup
***All times are for long grain white rice
Steaming Food With Rice Chart (cont.)
15
Care and Cleaning
1 2
w WARNING
Electrical Shock Hazard.
Do not immerse base, cord, or plug in water or
other liquid.
Visit www.hamiltonbeach.com for our complete
line of products and Use and Care Guides –
as well as delicious recipes, tips, and
to register your product online!
DISHWASHER-SAFE
Cooking pot and lid are
dishwasher-safe. Steamer basket,
rice measuring cup, and rice
paddle are dishwasher-safe for top
rack only.
DO NOT use the “SANI” setting
when washing in the dishwasher.
“SANI” cycle temperatures could
damage your product.
Wipe cooking pot with a damp
cloth or sponge. To remove
stubborn spots, use a mild
nonabrasive cleanser.
Unplug.
16
Troubleshooting
PROBLEM PROBABLE CAUSE/SOLUTION
Cooker doesn’t
turn on.
Cooker is not plugged in. Make sure rice cooker is plugged into a properly operating electrical
outlet.
Rice is not cooked. Not enough water/cooking liquid. Follow package directions or see Rice Cooking Chart for more
information.
Place cooking pot securely into the base. NOTE: If cooking pot is bent or warped, it will not seat
properly in base and, therefore, will not conduct heat correctly. To replace cooking pot, call the toll-
free Customer Assistance number listed on the cover of this guide.
Let rice rest for 10 to 15 minutes after cooking is complete and rice cooker has switched to WARM.
Rice is mushy. Too much liquid added to cooking pot. Reduce liquid.
17
This warranty applies to products purchased and used in the U.S. and Canada. This is the only express warranty for this product and
is in lieu of any other warranty or condition.
This product is warranted to be free from defects in material and workmanship for a period of five (5) years from the date of original
purchase in Canada and one (1) year from the date of original purchase in the U.S. During this period, your exclusive remedy is repair
or replacement of this product or any component found to be defective, at our option; however, you are responsible for all costs
associated with returning the product to us and our returning a product or component under this warranty to you. If the product or
component is no longer available, we will replace with a similar one of equal or greater value.
This warranty does not cover glass, filters, wear from normal use, use not in conformity with the printed directions, or damage to
the product resulting from accident, alteration, abuse, or misuse. This warranty extends only to the original consumer purchaser or
gift recipient. Keep the original sales receipt, as proof of purchase is required to make a warranty claim. This warranty is void if the
product is used for other than single-family household use or subjected to any voltage and waveform other than as specified on the
rating label (e.g., 120V ~ 60 Hz).
We exclude all claims for special, incidental, and consequential damages caused by breach of express or implied warranty. All
liability is limited to the amount of the purchase price. Every implied warranty, including any statutory warranty or condition
of merchantability or fitness for a particular purpose, is disclaimed except to the extent prohibited by law, in which case such
warranty or condition is limited to the duration of this written warranty. This warranty gives you specific legal rights. You may have
other legal rights that vary depending on where you live. Some states or provinces do not allow limitations on implied warranties or
special, incidental, or consequential damages, so the foregoing limitations may not apply to you.
To make a warranty claim, do not return this appliance to the store. Please call 1.800.851.8900 in the U.S. or 1.800.267.2826 in Canada
or visit hamiltonbeach.com in the U.S. or hamiltonbeach.ca in Canada. For faster service, locate the model, type, and series numbers
on your appliance.
Limited Warranty
18
1. Lire toutes les instructions.
2. Cet appareil n’est pas destiné à être utilisé par des personnes (y compris
les enfants) dont les capacités physiques, sensorielles ou mentales sont
réduites, ou manquant d’expérience et de connaissance, sauf si elles sont
étroitement surveillées et instruites sur l’utilisation de l’appareil par une
personne responsable de leur sécurité.
3. Une surveillance étroite est requise pour tout appareil utilisé par ou près
des enfants. Surveiller que les enfants ne jouent pas avec l’appareil.
4. Ne pas toucher les surfaces chaudes. Utiliser les poignées ou les boutons.
Utiliser des sous-plats pour déposer les récipients chauds.
5. Pour éviter les risques d’électrocution, ne pas immerger le cordon, la prise
ou la base dans l’eau ou tout autre liquide.
6. Débrancher l’appareil lorsqu’il n’est pas utilisé ou avant le nettoyage.
Laisser refroidir l’appareil avant d’installer ou de retirer des pièces et avant
de le nettoyer.
7. Ne pas faire fonctionner un appareil électroménager avec un cordon
ou une fiche endommagée, ou lorsque l’appareil ne fonctionne pas
bien ou a été échappé ou endommagé d’une manière quelconque. Le
remplacement et la réparation du cordon d’alimentation doivent être faits
par le fabricant, son agent de service ou toute personne qualifiée de façon
à éviter tout danger. Appeler le numéro de service à la clientèle fourni pour
des renseignements concernant l’examen, la réparation ou l’ajustement.
8. L’utilisation d’accessoires non recommandés par le fabricant
d’électroménagers peut causer des blessures.
9. Ne pas utiliser à l’extérieur.
10. Ne pas laisser pendre le cordon de la table ou du comptoir et éviter tout
contact entre le cordon et les surfaces chaudes, y compris la cuisinière.
11. Ne pas placer sur ou près de surfaces chaudes comme un brûleur
électrique ou à gaz ou un four chaud.
12. Exercer une très grande prudence lors du déplacement d’un appareil
contenant des aliments, de l’eau ou tout autre liquide chaud.
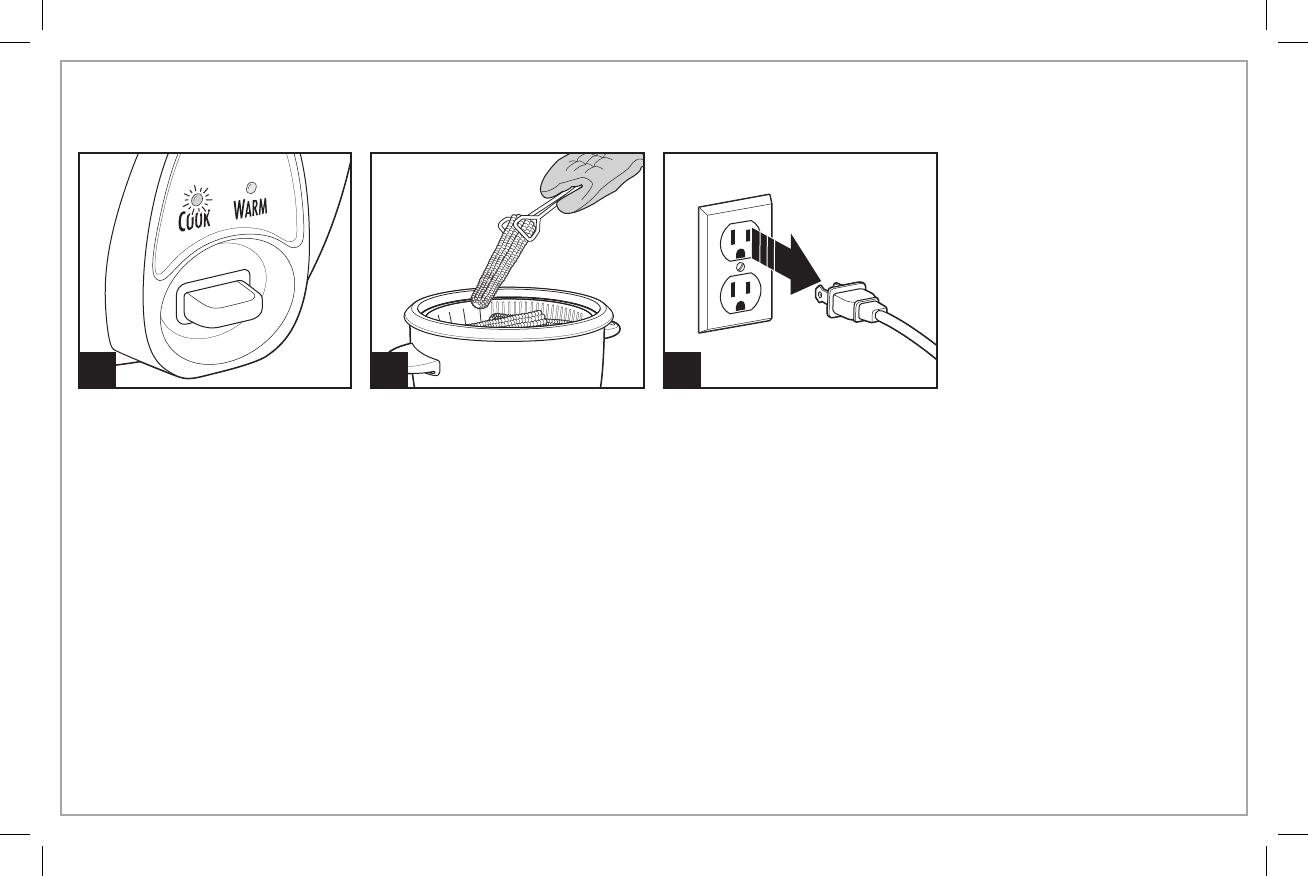
13. Pour débrancher, soulever l’interrupteur puis débrancher la fiche de la
prise murale.
14. N’utiliser cet appareil que pour les fonctions auxquelles il est destiné.
15. Soulever et ouvrir le couvercle avec précaution pour éviter l’échaudage et
permettre l’égouttement de l’eau dans le pot de cuisson.
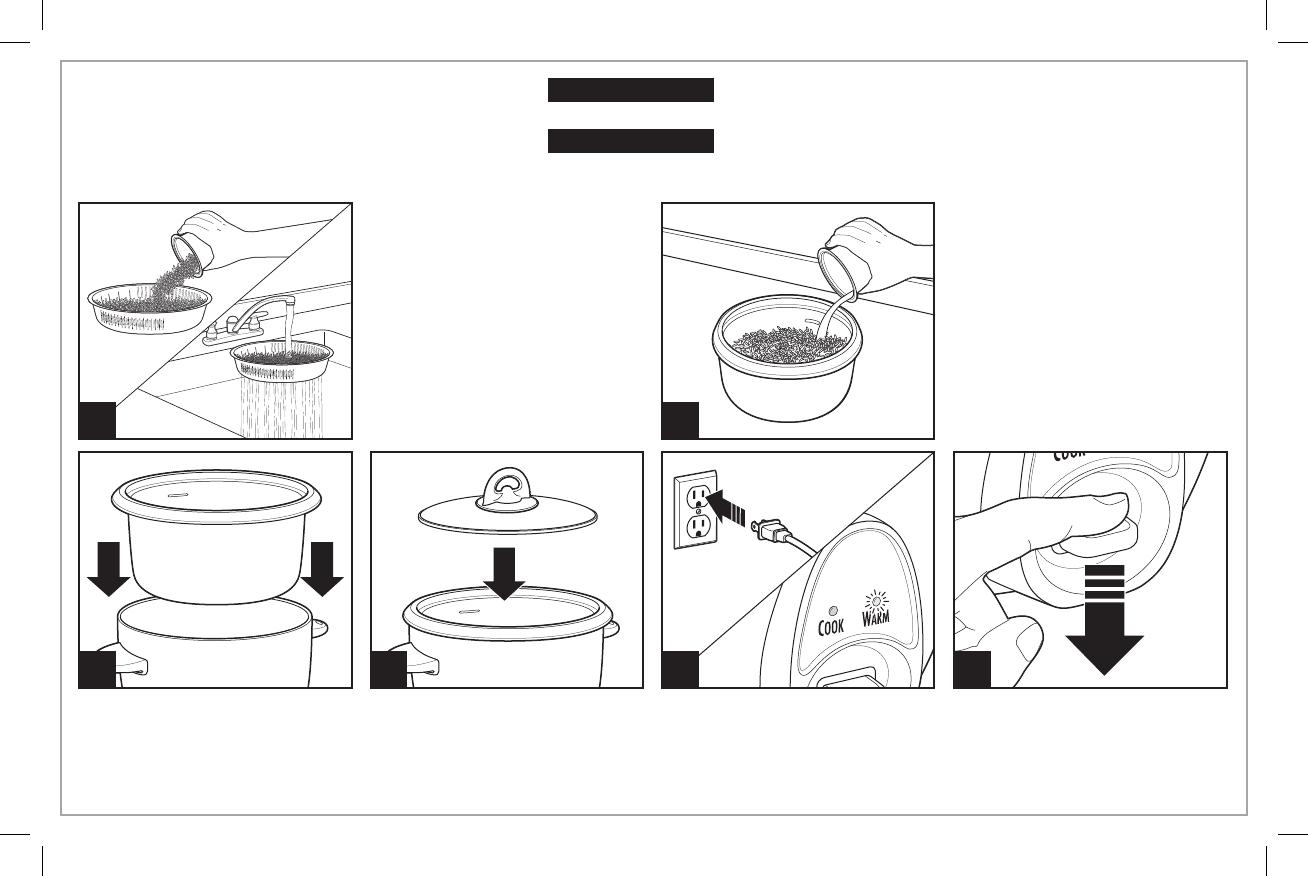
16. MISE EN GARDE : Risque d’électrocution. Cuire uniquement dans le pot
de cuisson amovible.
17. Ne pas placer l’appareil directement sous les armoires pendant le
fonctionnement, car cet appareil dégage une grande quantité de
vapeur. Éviter de tendre la main pour atteindre l’appareil pendant le
fonctionnement.
Pour utiliser un appareil électroménager, vous devez toujours prendre des mesures élémentaires de sécurité pour réduire le risque d’incendie,
d’électrocution et/ou de blessure corporelle, en particulier les mesures suivantes :
PRÉCAUTIONS IMPORTANTES
CONSERVEZ CES INSTRUCTIONS
Autre consigne de sécurité pour le consommateur
Cet appareil est destiné à un usage domestique uniquement.
w AVERTISSEMENT
Risque de choc électrique : Cet appareil est
fourni avec une fiche polarisée (une broche large) pour réduire le risque
d’électrocution. Cette fiche n’entre que dans un seul sens dans une prise
polarisée. Ne contrecarrez pas l’objectif sécuritaire de cette fiche en la modifiant
de quelque manière que ce soit ou en utilisant un adaptateur. Si vous ne
pouvez pas insérer complètement la fiche dans la prise, inversez la fiche. Si elle
refuse toujours de s’insérer, faire remplacer la prise par un électricien.
La longueur du cordon installé sur cet appareil a été sélectionnée afin de
réduire les risques d’enchevêtrement ou de faux pas causés par un fil trop long.
L’utilisation d’une rallonge approuvée est permise si le cordon est trop court.
Les caractéristiques électriques de la rallonge doivent être équivalentes ou
supérieures aux caractéristiques de l’appareil. Prendre toutes les précautions
nécessaires pour installer la rallonge de manière à ne pas la faire courir sur
le comptoir ou sur une table pour éviter qu’un enfant ne tire sur le cordon ou
trébuche accidentellement.
19
Pièces et caractéristiques
Spatule à riz*
Couvercle*
Pot de cuisson*
Base
Mesure pour le riz
6 oz (177 ml)*
Panier cuit-
vapeur/rinçage*
*Pour commander des pièces :
Canada : 1.800.267.2826
Interrupteur de cuisson
Témoins lumineux de COOK
(cuisson) et WARM (réchaud)
20
Cuisson du riz, des
grains et céréales
3
2
4
65
w AVERTISSEMENT
Risque de choc électrique. Cuire les aliments uniquement dans le pot de cuisson
amovible. Ne jamais verser d’eau ou déposer des aliments directement dans la base.
w MISE EN GARDE
Risque de brûlures. La vapeur s’échappant de l’évent peut provoquer des blessures.
AVANT LA PREMIÈRE UTILISATION : Laver toutes les pièces amovibles avant d’utiliser. Voir le chapitre
Entretien et nettoyage pour les détails.
Suivre les tableaux aux pages
22 et 23 pour connaître les
quantités, durées de cuisson et
portions. Remplir d’eau jusqu’à
la ligne de remplissage d’eau
correspondante. Exemple : Pour
trois mesures de riz dans le
pot de cuisson, ajouter de l’eau
jusqu’à la ligne « 3 » du pot de
cuisson.
Appuyer sur l’interrupteur de
cuisson pour commencer la
cuisson.
1
Mesurer la quantité de riz avec
la mesure pour le riz. Ajouter la
quantité désiré de riz mesuré non
cuit dans le panier cuit-vapeur. Ne
pas remplir au-delà des évents
pour éviter que le riz ne tombe
pendant le rinçage. Placer le
panier sous un jet d’eau faible
du robinet et rincer. Ajouter le
riz rincé dans le pot de cuisson.
Répéter le rinçage avec le reste
du riz.
Placer le pot de cuisson solidement
dans la base. NOTE : S’assurer que
le fond du pot de cuisson n’est pas
croche ou tordu, autrement le transfert
de chaleur ne sera pas uniforme.
Brancher dans la prise de
courant. Le témoin WARM (garde
au chaud) s’illuminera, MAIS
L’APPAREIL N’EST PAS EN MODE
DE CUISSON.
Mettre le couvercle sur le pot de
cuisson.
  • Page 1 1
  • Page 2 2
  • Page 3 3
  • Page 4 4
  • Page 5 5
  • Page 6 6
  • Page 7 7
  • Page 8 8
  • Page 9 9
  • Page 10 10
  • Page 11 11
  • Page 12 12
  • Page 13 13
  • Page 14 14
  • Page 15 15
  • Page 16 16
  • Page 17 17
  • Page 18 18
  • Page 19 19
  • Page 20 20
  • Page 21 21
  • Page 22 22
  • Page 23 23
  • Page 24 24
  • Page 25 25
  • Page 26 26
  • Page 27 27
  • Page 28 28
  • Page 29 29
  • Page 30 30
  • Page 31 31
  • Page 32 32
  • Page 33 33
  • Page 34 34
  • Page 35 35
  • Page 36 36
  • Page 37 37
  • Page 38 38
  • Page 39 39
  • Page 40 40
  • Page 41 41
  • Page 42 42
  • Page 43 43
  • Page 44 44
  • Page 45 45
  • Page 46 46
  • Page 47 47
  • Page 48 48
  • Page 49 49
  • Page 50 50
  • Page 51 51
  • Page 52 52

Hamilton Beach 37516 Guia de usuario

Categoria
Panelas de arroz
Tipo
Guia de usuario
Este manual também é adequado para