
Four
Backofen
Oven
Oven
Forno
FR GUIDE D’UTILISATION
DE BETRIEBSANLEITUNG
EN GUIDE TO INSTALLATION
NL GEBRUIKSAANWIJZING
PT GUIA DE UTILIZAÇÃO
99638333_A_ML.qxp 16/01/2007 14:57 Page 1
A página está carregando ...
A página está carregando ...
A página está carregando ...
A página está carregando ...
A página está carregando ...
A página está carregando ...
A página está carregando ...
A página está carregando ...
A página está carregando ...
A página está carregando ...
A página está carregando ...
A página está carregando ...
A página está carregando ...
A página está carregando ...
A página está carregando ...
A página está carregando ...
A página está carregando ...
A página está carregando ...
A página está carregando ...
A página está carregando ...
A página está carregando ...

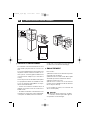
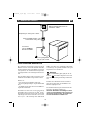
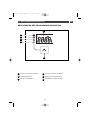
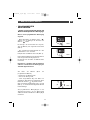
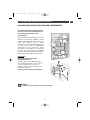
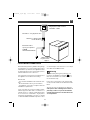
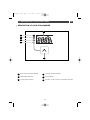
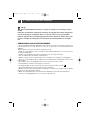
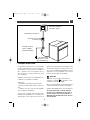
Les éventuelles interventions sur votre appa-
reil doivent être effectuées par un profession-
nel qualifié dépositaire de la marque. Lors de
votre appel, mentionnez la référence complète
de votre appareil (modèle, type, numéro de
série). Ces renseignements figurent sur la pla-
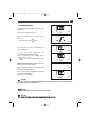
que signalétique
(Fig.1).
PIÈCES D’ORIGINE
Lors d’une intervention d’entretien, deman-
dez l'utilisation exclusive de
pièces déta-
chées certifiées d’origine.
•INTERVENTIONS
•RELATIONS CONSOMMATEURS
**
Service fourni par Brandt Customer Services, société par actions simplifiée au capital de 2.5000.000 euros,
5/7 avenue des Béthunes, 95310 Saint Ouen l’Aumône - RCS Pontoise 440 303 303
BBrraannddtt AApppplliiaanncceess
- société par actions simplifiée au capital de 10.000.000 euros RCS Nanterre 440 302 347.
BRANDT APPLIANCES SAS
7 rue Henri Becquerel
92500 RUEIL MALMAISON
230V ~ 50 Hz
MADE IN FRANCE
•Pour en savoir plus sur tous les produits de
la marque :
informations, conseils, les points de vente, les
spécialistes après-vente.
•Pour communiquer :
nous sommes à l'écoute de toutes vos remar-
ques, suggestions, propositions auxquelles
nous vous répondrons personnellement.
> Vous pouvez nous écrire :
Service Consommateurs BRANDT
BP 9526
95069 CERGY PONTOISE CEDEX
> ou nous téléphoner au :
Tarif en vigueur au 1er avril 2004
fig.1
23
8 / SERVICE APRES-VENTE
FR
99638333_A_ML.qxp 16/01/2007 14:58 Page 23
A página está carregando ...
A página está carregando ...
A página está carregando ...
A página está carregando ...
A página está carregando ...
A página está carregando ...
A página está carregando ...
A página está carregando ...
A página está carregando ...
A página está carregando ...
A página está carregando ...
A página está carregando ...
A página está carregando ...
A página está carregando ...
A página está carregando ...
A página está carregando ...
A página está carregando ...
A página está carregando ...
A página está carregando ...
A página está carregando ...
A página está carregando ...

45
66 //
KUNDENDIENST
DE
Any maintenance on your equipment should be undertaken by:
- either your dealer,
- or another qualified mechanic who is an authorized agent for the brand appliances.
When making an appointment, state the full reference of your equipment (model, type and serial
number). This information appears on the manufacturer's nameplate attached to your equipment.
Eingriffe an Ihrem Gerät dürfen nur:
- von Ihrem Händler oder
- von einem sonstigen Fachmann und Vertragshändler der Marke durchgeführt werden.
Geben Sie bei der Meldung einer Störung die vollständige Typenbezeichnung Ihres Gerätes an
(Modell, Typ, Seriennummer). Diese Angaben finden Sie auf einem an Ihrem Gerät angebrach-
ten Schild.
66 //
AFTER-SALES SERVICE
EN
66 //
SERVICIO TÉCNICO
ES
Qualquer intervenção no seu aparelho deve ser realizada:
- quer pelo seu revendedor,
- quer por outro profissional qualificado autorizado pela marca.
Ao chamá-los, indique a referência completa do seu aparelho (modelo, tipo e número de série).
Estas informações figuram na placa de identificação fixada no aparelho.
Las intervenciones que requiera la máquina deberán ser efectuadas:
- por el revendedor,
- o por cualquier profesional cualificado depositario de la marca.
Al llamar, mencione la referencia completa de la máquina (modelo, tipo y número de serie).
Estos datos figuran en la placa de identificación situada en la máquina.
66 //
SERVIZIO POST-VENDITA E RELAZIONI CON I CONSUMATORI
IT
66 //
SERVICEDIENST
NL
Qualquer intervenção no seu aparelho deve ser realizada:
- quer pelo seu revendedor,
- quer por outro profissional qualificado autorizado pela marca.
Ao chamá-los, indique a referência completa do seu aparelho (modelo, tipo e número de série).
Estas informações figuram na placa de identificação fixada no aparelho.
De eventuele ingrepen in de machine moeten worden uitgevoerd :
- of door uw vakhandelaar,
- of door een andere gekwalificeerd technicus van dit merk.
Tijdens het telefoneren, dient u de complete referentie op te geven van uw machine (model,
type, serienummer). Deze informatie staat op het typeplaatje op de machine.
66 //
SERVIÇO PÓS-VENDA
PT
99638333_A_ML.qxp 16/01/2007 14:59 Page 45

As part of our commitment to constantly improving our products, we reserve the right to make
changes to them based on technical advances to their technical and functional features and
appearance.
Warning:
Before installing and using your appliance, please carefully read this Guide to
Installation and Use, which will allow you to quickly familiarise yourself with its operation.
Dear Customer,
You have just acquired a
BBRRAANNDDTT
oven and we would like to thank
you.
We have invested all our dedication and know-how in this appliance
so that it would best meet your needs. With innovation and perfor-
mance, we designed it to be always easy to use.
In the
BBRRAANNDDTT
product range, you will also find a wide choice of
microwaves, cooking hobs, ventilation hoods, cookers, dishwashers,
washing machines, driers, fridges and freezers, that you can coordi-
nate with your new
BBRRAANNDDTT
oven.
Visit our website
wwwwww..bbrraannddtt..ccoomm
where you will find all of our pro-
ducts, as well as useful and complementary information.
BBRRAANNDDTT
FR
02
DE
24
NL
46
PT
68
90
EN
46
99638333_A_ML.qxp 16/01/2007 14:59 Page 46

TABLE OF CONTENTS
EN
47
1 / INFORMATION FOR THE USER
• Safety instructions
_________________________________________
48
• Environment
______________________________________________
49
2 / INSTALLING YOUR APPLIANCE
• Choice of location
__________________________________________
50
• Fitting
___________________________________________________
50
• Electrical connection
_______________________________________
51
• Changing the power cable
___________________________________
52
3 / DESCRIPTION OF YOUR APPLIANCE
• Introduction to your oven
____________________________________
53
• Accessories
_______________________________________________
54
• Introduction to the programmer ______________________________ 55
4 / USING YOUR APPLIANCE
• Using the programmer
______________________________________
56
º
How to set the time_____________________________________ 56
º
How to adjust the time __________________________________ 56
º
Instant cooking ________________________________________ 57
º
Programmed cooking ___________________________________ 58
º
Using the timer function _________________________________ 60
º
Display brightness______________________________________ 60
5 / OVEN COOKING MODES_______________________________________ 61
6 / CARING FOR AND CLEANING YOUR APPLIANCE
• Cleaning the outer surfaces
__________________________________
62
• Cleaning the door
__________________________________________
62
• Cleaning the catalytic oven __________________________________ 63
• Changing the catalytic walls _________________________________ 64
7 / TROUBLESHOOTING __________________________________________ 65
• Changing the bulb
_________________________________________
66
8 / AFTER-SALES SERVICE________________________________________ 67
99638333_A_ML.qxp 16/01/2007 14:59 Page 47
A página está carregando ...
A página está carregando ...
A página está carregando ...
A página está carregando ...
A página está carregando ...
A página está carregando ...

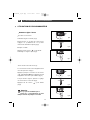
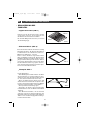
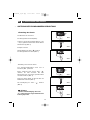
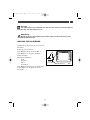
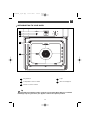
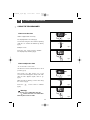
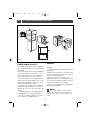
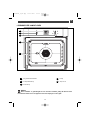
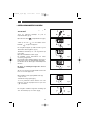
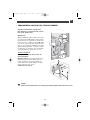
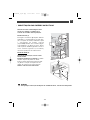
54
Rear
Front
•
Anti-rocking safety grid (fig.1)
The grid can be used to hold all dishes and
moulds containing foodstuffs to be cooked or
browned.
It can be used for barbecues (to be placed di-
rectly on the grid).
DESCRIPTION OF THE ACCESSORIES
•
fig.1
fig.2
•
Multi-purpose dish (fig.2)
It serves as a cake dish and has a sloped
edge. It is used for cooking pastries such as
cream puffs, meringues, cup cakes, puff pas-
try, etc.
Inserted under the grid, it catches barbecue
juices and grease. It can also be used half-full
of water for double-boiler cooking methods.
Avoid placing roasts or meats directly in the
dish because this is certain to cause signifi-
cant spattering on the oven walls.
•
Rotisserie (fig.3)
In order to use it:
• place the hollow dish on the grid on shelf
support number 1 to catch the cooking juices
or on the bottom heating element if the item
being roasted is too big.
• slide one of the forks onto the spit; skewer
the piece of meat to be roasted; slide on the
second fork; centre and tighten by screwing
the two forks.
• place the spit in its cradle.
• push slightly to insert the point of the spit in
the guide slot located at the back of the oven.
• remove the handle by unscrewing, in order
to be able to close the door. After cooking,
screw on the spit handle once again in order
to remove the roast without burning yourself.
fig.3
3 / DESCRIPTION OF YOUR APPLIANCEEN
99638333_A_ML.qxp 16/01/2007 14:59 Page 54
A página está carregando ...

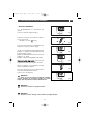
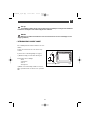
56
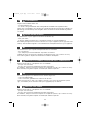
4 / USING YOUR APPLIANCEEN
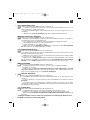
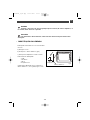
USING THE PROGRAMMER
••
•
How to set the time
--
When supplied with electricity
The display flashes at 12:00 (fig.1)
Set the time using the + and - buttons (holding
down the + or - makes the numbers go faster)
(fig.2).
Example: 12:30
Press the “ ” touch control to validate.
The display stops flashing (fig.3).
•
How to adjust the time
- To set the time on the clock
The function selector switch must be in the 0
position (fig.1).
Hold down the “ ” button for a few
seconds until 0.00 appears. Keep held down
until the time appears again, then let go
(fig.2).
While the time is flashing, set the time using
the selector (fig.3).
Press the “ ” touch control to validate
(fig.4).
fig.1
fig.3
fig.2
Warning
If there is no confirmation from the
“ ” button, the time is recorded auto-
matically after a few seconds.
fig.2
fig.3
fig.4
99638333_A_ML.qxp 16/01/2007 14:59 Page 56

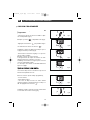
57
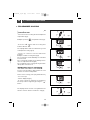
4 / USING YOUR APPLIANCE
EN
Warning
All types of cooking are done with the door closed.
Warning
After a cooking cycle, the cooling fan continues to operate for a period of time in order
to guarantee optimal oven reliability.
Warning
Do not hang a towel or cloth on the oven handle.
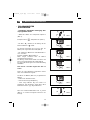
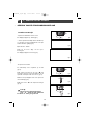
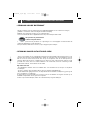
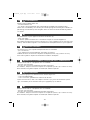
•Instant cooking
— The programmer should display only
the time.
It should not be flashing (fig.1).
Turn the function selector to the position of
your choice.
Example: position (fig.2).
Your oven recommends the ideal temperature
for the chosen cooking mode (fig.3).
It is, however, possible to adjust the tempera-
ture. The temperature symbol flashes (fig.4).
Set the temperature using the + or - selector
(fig.5).
Example: temperature set to 210°C (fig.6).
PPllaaccee yyoouurr ddiisshh iinn tthhee oovveenn
based on the re-
commendations provided by the cook book.
After these steps, the oven heats up and the tempe-
rature indicator flashes.
A series of beeps will be emitted when the oven rea-
ches the selected temperature.
The temperature stops flashing.
fig.2
fig.6
fig.5
fig.1
fig.3
fig.4
99638333_A_ML.qxp 16/01/2007 14:59 Page 57
A página está carregando ...
A página está carregando ...
A página está carregando ...
A página está carregando ...
A página está carregando ...
A página está carregando ...
A página está carregando ...
A página está carregando ...
A página está carregando ...

67
66 //
KUNDENDIENST
DE
Any maintenance on your equipment should be undertaken by:
- either your dealer,
- or another qualified mechanic who is an authorized agent for the brand appliances.
When making an appointment, state the full reference of your equipment (model, type and serial
number). This information appears on the manufacturer's nameplate attached to your equipment.
Eingriffe an Ihrem Gerät dürfen nur:
- von Ihrem Händler oder
- von einem sonstigen Fachmann und Vertragshändler der Marke durchgeführt werden.
Geben Sie bei der Meldung einer Störung die vollständige Typenbezeichnung Ihres Gerätes an
(Modell, Typ, Seriennummer). Diese Angaben finden Sie auf einem an Ihrem Gerät angebrach-
ten Schild.
66 //
AFTER-SALES SERVICE
EN
66 //
SERVICIO TÉCNICO
ES
Qualquer intervenção no seu aparelho deve ser realizada:
- quer pelo seu revendedor,
- quer por outro profissional qualificado autorizado pela marca.
Ao chamá-los, indique a referência completa do seu aparelho (modelo, tipo e número de série).
Estas informações figuram na placa de identificação fixada no aparelho.
Las intervenciones que requiera la máquina deberán ser efectuadas:
- por el revendedor,
- o por cualquier profesional cualificado depositario de la marca.
Al llamar, mencione la referencia completa de la máquina (modelo, tipo y número de serie).
Estos datos figuran en la placa de identificación situada en la máquina.
66 //
SERVIZIO POST-VENDITA E RELAZIONI CON I CONSUMATORI
IT
66 //
SERVICEDIENST
NL
Qualquer intervenção no seu aparelho deve ser realizada:
- quer pelo seu revendedor,
- quer por outro profissional qualificado autorizado pela marca.
Ao chamá-los, indique a referência completa do seu aparelho (modelo, tipo e número de série).
Estas informações figuram na placa de identificação fixada no aparelho.
De eventuele ingrepen in de machine moeten worden uitgevoerd :
- of door uw vakhandelaar,
- of door een andere gekwalificeerd technicus van dit merk.
Tijdens het telefoneren, dient u de complete referentie op te geven van uw machine (model,
type, serienummer). Deze informatie staat op het typeplaatje op de machine.
66 //
SERVIÇO PÓS-VENDA
PT
99638333_A_ML.qxp 16/01/2007 15:00 Page 67

68
Uit een voortdurend streven naar het verbeteren van onze producten, behouden we ons het recht
voor om wijzigingen aan te brengen aan de technische, functionele of esthetische eigenschap-
pen ervan, om de technische evolutie op de voet te volgen.
Belangrijk:
Alvorens het apparaat in gebruik te nemen vragen wij u eerst deze installatie- en
gebruikshandleiding aandachtig te lezen om u snel met de werking vertrouwd te maken.
Geachte Klant,
U hebt net een oven van BRANDT aangekocht. Wij willen u hier graag
voor bedanken.
Wij hebben al onze knowhow en ons enthousiasme in dit apparaat
gestopt, opdat het zo goed mogelijk aan uw behoeften zal beantwoor-
den. Deze innoverende en uitstekend presterende oven is speciaal
ontworpen voor uw gebruiksgemak.
BRANDT biedt tevens een ruime keuze aan fornuizen, magnetrons,
kookplaten, afzuigkappen, vaatwassers, droogtrommels, koelkasten
en diepvriezers die allemaal met uw oven van
BBRRAANNDDTT
kunnen wor-
den gecombineerd.
U kunt ook onze website
wwwwww..bbrraannddtt..ccoomm ,,
bezoeken voor al onze
producten en nuttige en aanvullende informatie.
BBRRAANNDDTT
FR
02
DE
24
NL
46
PT
68
90
EN
99638333_A_ML.qxp 16/01/2007 15:00 Page 68

69
1 / BESTEMD VOOR DE GEBRUIKER
• Veiligheidsaanwijzingen
_____________________________________
70
• Omgeving
________________________________________________
71
2 / INSTALLATIE VAN HET APPARAAT
• Keuze van de plaats
________________________________________
72
• Inbouw
___________________________________________________
72
• Elektrische aansluiting
______________________________________
73
• Vervanging van de voedingskabel
_____________________________
74
3 / BESCHRIJVING VAN HET APPARAAT
• Voorstelling van de oven
____________________________________
75
• Beschrijving van de accessoires
______________________________
76
• Beschrijving van de programmaschakelaar _____________________ 77
4 / GEBRUIK VAN HET APPARAAT
• Gebruik van de programmaschakelaar
_________________________
78
º
Instellen van de tijd _____________________________________ 78
º
Wijzigen van de tijd_____________________________________ 78
º
Onmiddellijk bakken ____________________________________ 79
º
Geprogrammeerd bakken _______________________________ 80
º
Gebruik van de functie schakelklok _______________________ 82
º
Helderheid van de display _______________________________ 82
5 / BAKWIJZEN VAN DE OVEN _____________________________________ 83
6 / ONDERHOUD EN REINIGING VAN HET APPARAAT
• Reiniging van de buitenkant
__________________________________
84
• Reiniging van de deur
_______________________________________
84
• Reiniging van de katalytische oven ____________________________ 85
• Verandering van de katalytische wanden _______________________ 86
7 / PROBLEMEN EN OPLOSSINGEN________________________________ 87
• Vervanging van de ovenlamp ________________________________ 88
8 / SERVICEDIENST ______________________________________________ 89
INHOUD
NL
99638333_A_ML.qxp 16/01/2007 15:00 Page 69

70
VEILIGHEIDSAANWIJZINGEN
— Dit apparaat is bestemd voor huishoudelijk
gebruik. Deze oven is uitsluitend ontworpen
voor het bakken van voedingsmiddelen. Deze
oven bevat geen enkel bestanddeel op basis
van asbest
— Dit apparaat dient door volwassenen te wor-
den gebruikt. Waak ervoor dat kinderen het
niet aanraken of als speelgoed gebruiken.
Zorg ervoor dat zij de bedieningen van het
apparaat niet gebruiken.
— Pak het apparaat onmiddellijk bij ontvangst
uit of laat het uitpakken. Controleer de alge-
mene staat. Schrijf eventueel voorbehoud op
de leveringsbon waarvan u een exemplaar
behoudt.
— Het apparaat is bestemd voor normaal huis-
houdelijk gebruik. Niet gebruiken voor com-
merciële of industriële doelen of andere doel-
einden waarvoor het niet is ontworpen.
— De technische gegevens van het apparaat
niet wijzigen of proberen te wijzigen. Dit kan
gevaarlijk zijn.
— Houd kinderen uit de buurt van het apparaat
wanneer het in werking is. Zo kunnen ze zich
niet verbranden aan een omvallende kookpot.
Bovendien is de voorzijde van het apparaat tij-
dens de werking en de reiniging warm (pyro-
lyse).
— Gebruik nooit het handvat van de deur om
het apparaat naar u toe te trekken.
— Vooraleer de oven voor de eerste keer te
gebruiken, moet hij ongeveer 15 minuten leeg
opwarmen. Zorg ervoor dat de ruimte vol-
doende verlucht is. U kunt hierbij een bijzon-
der geurtje of wat rook gewaarworden. Dit is
normaal.
— Let erop dat de ovendeur altijd goed geslo-
ten is. Alleen dan sluit de afdichting de oven
volledig af.
— Tijdens het gebruik wordt het apparaat
warm. Raak nooit de verwarmingselementen
binnen in de oven aan. U kunt zo ernstige
brandwonden oplopen.
— Wanneer u de gerechten in de oven plaatst
of eruit neemt, moet u de handen uit de buurt
van de bovenste verwarmende elementen hou-
den. Gebruik een ovenwant.
— Na het bakken mogen de pannen (rooster,
draaispit) nooit met de blote handen vastgeno-
men worden.
— Plaats nooit aluminiumfolie rechtstreeks in
contact met de ovenbodem (zie beschrijving
van de oven), omdat de geaccumuleerde
warmte het email kan beschadigen.
— Plaats op de open ovendeur geen zware
voorwerpen en zorg ervoor dat een kind niet
op de deur kan klauteren of erop gaat zitten.
— Om de bedieningen van uw apparaat niet te
beschadigen, de deur niet openlaten wanneer
de oven in werking is of nog warm is.
— Zet de oven altijd uit alvorens een reiniging
aan de binnenzijde van de oven uit te voeren.
— Een intensief en langdurig gebruik van het
apparaat kan een bijkomende verluchting van
de ruimte vergen. Open hiervoor het raam of
verhoog het vermogen van de mechanische
ventilatie.
— Naast de accessoires geleverd met de oven,
gebruikt u alleen schotels die bestand zijn
tegen hoge temperaturen (volg de instructies
van de fabrikant).
— Na gebruik van de oven, controleer of alle
bedieningen uit staan.
— Gebruik nooit stoom- of hoge druk appara-
ten voor het reinigen van de oven (eisen met
betrekking tot de elektrische veiligheid).
Uw oven is voorzien van een AUTOMATISCHE
STOPZETTING voor uw veiligheid, als u per
ongeluk vergeet uw oven af te zetten. Na 10
uur gebruik wordt de functie AS
(Automatische Stop) actief en zal uw oven
vanzelf uitgaan. AS wordt vertoond in plaats
van het uur en een serie van 2 opeenvolgende
pieptonen zal een korte tijd weerklinken.
•
Belangrijk
Bewaar deze gebruiksaanwijzing in de
nabijheid van het apparaat. Indien het appa-
raat aan een ander persoon wordt verkocht
of gegeven, dient u de gebruiksaanwijzing
hierbij niet te vergeten. Wij vragen u kennis
te nemen van de aanwijzingen alvorens het
apparaat te installeren en te gebruiken. Zij
zijn voor uw veiligheid en die van anderen
opgesteld.
1 / BESTEMD VOOR DE GEBRUIKERNL
99638333_A_ML.qxp 16/01/2007 15:00 Page 70
A página está carregando ...
A página está carregando ...
A página está carregando ...
A página está carregando ...
A página está carregando ...

76
3 / BESCHRIJVING VAN HET APPARAATNL
Achterzijde
Voorzijde
•
Rooster met kantelbeveiliging
(fig.1)
Het rooster kan worden gebruikt voor alle
schalen en vormen met gerechten die gebak-
ken of gegratineerd moeten worden.
Dit rooster wordt gebruikt voor grillgerechten
(plaats het gerecht op het rooster).
BESCHRIJVING VAN DE ACCESSOIRES
•
fig.1
fig.2
•
Multifunctionele ovenschaal (fig.2)
Het dient als gebaksplaat en heeft een schuin
aflopende rand. Wordt gebruikt voor het bak-
ken van roomsoezen, schuimgebak, madelei-
nes, gebak van bladerdeeg...
Dit vangt, als u het in de richel onder de grill
plaatst, het braadnat en het braadvet op bij het
roosteren. Kan ook half met water gevuld ge-
bruikt worden om au bain-marie te koken.
Plaats vlees niet rechtstreeks op deze plaat,
omdat dan vocht en vet tegen de wanden van
de oven zal opspatten.
•
Draaispit fig.3
Hoe gebruik ik het draaispit:
• plaats de multifunctionele ovenschaal op de
richel nr.1 om het braadnat op te vangen of op
de bodem als het te braden stuk te groot is.
• schuif een eerste braadvork op het spit ;
plaats vervolgens het te braden vlees tegen de
vork op het spit ; schuif de tweede braadvork
op het spit ; schuif het vlees met de twee vor-
ken tot in het midden van het braadspit en
draai de twee vorken vast.
• plaats het braadspit op het draagkader.
• druk de punt van het braadspit voorzichtig
in de opening achterin de oven om het spit
vast te zetten.
• verwijder het handvat door het los te
schroeven, om de ovendeur te kunnen sluiten.
Na de bereiding kunt u dit handvat opnieuw op
het spit vastschroeven om het braadstuk uit
de oven te halen zonder zich te verbranden.
fig.3
99638333_A_ML.qxp 16/01/2007 15:00 Page 76
A página está carregando ...
A página está carregando ...
A página está carregando ...
A página está carregando ...

81
4 / GEBRUIK VAN HET APPARAAT
NL
-
Uitgesteld bakken (instelling van
eindtijd)
Ga te werk als bij een geprogrammeerde
bakcyclus
- Na instelling van de bakduur, drukt u op de
toets “ ” tot de indicator van het einde van de
bakduur knippert “ ”
De weergave knippert op 0u00 om aan te geven
dat instellen dan mogelijk is. (fig.
1).
- Druk op de toets + of - om de gewenste
eindtijd in te stellen.
Bijvoorbeeld: einde bakduur om 13u (fig.
2).
Na enkele seconden registreert de oven
automatisch de instelling.
De weergave van het einde van de bakduur
knippert niet meer.
Na deze 3 instellingen is het starten van de
oven uitgesteld zodat het bakken klaar is om
13u00.
Na het bakken (einde geprogrammeerde tijd),
- stopt de oven,
- verschijnt 0:00
,
- u hoort gedurende enkele minuten een reeks
pieptonen. U stopt de pieptonen door op de
toets “ ” te drukken.
De weergave schakelt terug naar de huidige tijd
door de keuzeknop op 0 te zetten (fig.3
),
Voor de uitgestelde bakcycli, wordt de
binnenkant van de oven verlicht bij de start van
de bakcyclus en ook erna.
fig.2
fig.3
GEPROGRAMMEERD BAKKEN
•
fig.1
99638333_A_ML.qxp 16/01/2007 15:00 Page 81
A página está carregando ...
A página está carregando ...
A página está carregando ...
A página está carregando ...
A página está carregando ...
A página está carregando ...
A página está carregando ...

89
66 //
KUNDENDIENST
DE
Any maintenance on your equipment should be undertaken by:
- either your dealer,
- or another qualified mechanic who is an authorized agent for the brand appliances.
When making an appointment, state the full reference of your equipment (model, type and serial
number). This information appears on the manufacturer's nameplate attached to your equipment.
Eingriffe an Ihrem Gerät dürfen nur:
- von Ihrem Händler oder
- von einem sonstigen Fachmann und Vertragshändler der Marke durchgeführt werden.
Geben Sie bei der Meldung einer Störung die vollständige Typenbezeichnung Ihres Gerätes an
(Modell, Typ, Seriennummer). Diese Angaben finden Sie auf einem an Ihrem Gerät angebrach-
ten Schild.
66 //
AFTER-SALES SERVICE
EN
66 //
SERVICIO TÉCNICO
ES
Qualquer intervenção no seu aparelho deve ser realizada:
- quer pelo seu revendedor,
- quer por outro profissional qualificado autorizado pela marca.
Ao chamá-los, indique a referência completa do seu aparelho (modelo, tipo e número de série).
Estas informações figuram na placa de identificação fixada no aparelho.
Las intervenciones que requiera la máquina deberán ser efectuadas:
- por el revendedor,
- o por cualquier profesional cualificado depositario de la marca.
Al llamar, mencione la referencia completa de la máquina (modelo, tipo y número de serie).
Estos datos figuran en la placa de identificación situada en la máquina.
66 //
SERVIZIO POST-VENDITA E RELAZIONI CON I CONSUMATORI
IT
66 //
SERVICEDIENST
NL
Qualquer intervenção no seu aparelho deve ser realizada:
- quer pelo seu revendedor,
- quer por outro profissional qualificado autorizado pela marca.
Ao chamá-los, indique a referência completa do seu aparelho (modelo, tipo e número de série).
Estas informações figuram na placa de identificação fixada no aparelho.
De eventuele ingrepen in de machine moeten worden uitgevoerd :
- of door uw vakhandelaar,
- of door een andere gekwalificeerd technicus van dit merk.
Tijdens het telefoneren, dient u de complete referentie op te geven van uw machine (model,
type, serienummer). Deze informatie staat op het typeplaatje op de machine.
66 //
SERVIÇO PÓS-VENDA
PT
99638333_A_ML.qxp 16/01/2007 15:00 Page 89

Estimado(a) Cliente,
Acabou de adquirir um forno
BBRRAANNDDTT
, e estamos lhe gratos por isso.
Toda a nossa paixão e o nosso saber-fazer foram dedicados a este
aparelho, de maneira a que ele possa satisfazer o melhor possível as
suas necessidades. Inovador e eficiente, concebemo-lo a pensar na
sua permanente facilidade de utilização.
Na gama de produtos
BBRRAANNDDTT
, encontrará também uma vasta selec-
ção de fogões, microondas, placas de cozinha, exaustores, máquinas
de lavar louça, máquinas de lavar roupa, máquinas de secar roupa, fri-
goríficos e congeladores, que poderá combinar com o seu forno
BBRRAANNDDTT
.
No intuito permanente de satisfazer o melhor possível as suas exigên-
cias em relação aos nossos produtos, o nosso serviço de Apoio ao
Consumidor encontra-se, naturalmente, à sua disposição e à sua
escuta para responder a todas as suas perguntas ou sugestões
(morada e n.º de telefone no fim deste manual).
E visite o nosso sítio
wwwwww..BBRRAANNDDTT..ccoomm
onde poderá encontrar
todos os nossos produtos, bem como informações úteis e comple-
mentares.
BBRRAANNDDTT
Com a preocupação de melhorar constantemente os nossos produtos, reservamo-nos o direito
de modificar as respectivas características técnicas, funcionais ou estéticas por motivos liga-
dos à sua evolução.
Importante:
Antes de pôr o aparelho a funcionar, leia este guia de instalação e de utilização com
atenção para se familiarizar mais rapidamente com o seu funcionamento.
90
FR
02
DE
24
NL
46
PT
68
90
EN
99638333_A_ML.qxp 16/01/2007 15:00 Page 90

91
ÍNDICE
PT
1 / INFORMAÇÕES DESTINADAS AO UTILIZADOR
• Instruções de segurança
___________________________________
92
• Meio Ambiente
____________________________________________
93
2 / INSTALAÇÃO DO SEU APARELHO
• Escolha do local de instalação
_______________________________
94
• Encastramento
____________________________________________
94
• Ligação eléctrica
___________________________________________
95
• Substituição do cabo de alimentação
__________________________
96
3 / DESCRIÇÃO DO SEU APARELHO
• Apresentação do seu forno
__________________________________
97
• Descrição dos acessórios
___________________________________
98
• Descrição do programador __________________________________ 99
4/ UTILIZAÇÃO DO APARELHO
• Utilização do programador
__________________________________
100
• Como acertar a hora _______________________________________ 100
º
Como alterar a hora ____________________________________ 100
º
Cozedura imediata _____________________________________ 101
º
Cozedura programada __________________________________ 102
º
Utilização da função temporizador ________________________ 104
º
Luminosidade do visor __________________________________ 104
5 / OS MODOS DE COZEDURA DO FORNO _________________________ 105
6 / MANUTENÇÃO E LIMPEZA DO SEU APARELHO
• Limpeza da superfície exterior
_______________________________
106
• Limpeza da porta
__________________________________________
106
• Limpeza do forno catalítico __________________________________ 107
• Substituição das paredes catalíticas __________________________ 108
7 / ANOMALIAS DE FUNCIONAMENTO _____________________________ 109
• Substituição da lâmpada
____________________________________
110
8 / SERVIÇO PÓS-VENDA _________________________________________ 111
99638333_A_ML.qxp 16/01/2007 15:00 Page 91

92
INSTRUÇÕES DE SEGURANÇA
— Este exaustor foi concebido para uma utili-
zação por particulares na sua habitação.
Destina-se exclusivamente à cozedura dos
géneros alimentícios. Este forno não contém
qualquer componente a base de amianto.
— A sua utilização deve ser efectuada por
adultos. Assegure-se de que as crianças não
mexem no aparelho e não o utilizam como
brinquedo. Assegure-se de que as crianças
não manipulam os comandos do exaustor.
— Quando receber o aparelho, desembale-o
ou mande-o desembalar imediatamente.
Verifique o seu aspecto geral. Aponte as
eventuais reservas por escrito na guia de
remessa e guarde um exemplar da mesma.
— Este aparelho destina-se a uma utilização
doméstica normal. Não o utilize para fins
comerciais ou industriais, nem para fins dife-
rentes daqueles para os quais ele foi conce-
bido.
— Não modifique nem tente modificar as
características deste aparelho. pois isso
poderá representar um perigo para si.
— Mantenha as crianças afastadas do apa-
relho enquanto estiver em utilização. Desta
forma, evita que se queimem se entornar um
recipiente de cozedura. Além disso, a frente
do seu aparelho fica quente durante a utiliza-
ção.
— Nunca puxe o seu aparelho através da pega
da porta.
— Antes de utilizar o seu forno pela primeira
vez, aqueça-o vazio durante cerca de
15 minutos. Certifique-se de que a peça está
suficientemente ventilada. Poderá constatar
um cheiro particular ou uma pequena liberta-
ção de fumo. Estes fenómenos são absoluta-
mente normais.
— Durante a cozedura, certifique-se de que a
porta do forno está devidamente fechada, de
modo a que a junta de vedação cumpra cor-
rectamente a sua função.
— Durante a utilização, o aparelho fica quente.
Não toque nos elementos que aquecem situa-
dos no interior do forno. Poderia sofrer quei-
maduras graves.
— Quando colocar ou retirar os pratos do
forno, não aproxime as mãos dos elementos
que aquecem superiores, utilize luvas térmi-
cas de cozinha.
— Após uma cozedura, não pegue nos acessó-
rios (grelha, espeto rotativo,..) com as mãos
sem protecção.
— Nunca coloque papel de alumínio directa-
mente em contacto com a base (ver capítulo
descrição do forno), o calor acumulado pode-
ria provocar uma deterioração do esmalte.
— Na porta de abertura do forno, não pouse
cargas pesadas e verifique que nenhuma
criança possa subir nem sentar-se.
— Para evitar danificar os comandos do apa-
relho, não deixe a porta aberta enquanto esti-
ver em funcionamento ou ainda quente.
— Para qualquer intervenção de limpeza na
cavidade do forno, este deverá estar parado.
— No caso de uma utilização intensiva e pro-
longada do aparelho pode ser necessária uma
ventilação suplementar como abrindo a janela
ou aumentando a potência da ventilação
mecânica.
— Além dos acessórios fornecidos com o
forno, utilize apenas pratos resistentes a tem-
peraturas elevadas (respeite as instruções dos
fabricantes).
— Após a utilização do forno, verifique que
todos os comandos estão na posição de para-
gem.
— Nunca utilize aparelhos a vapor ou de alta
pressão para limpar o aparelho (requisitos
relativos à segurança eléctrica).
— Para sua segurança, o seu forno vem
equipado com PARAGEM AUTOMÁTICA, para
caso se esqueça de o desligar. Após 10 horas
de funcionamento, a função AS (Paragem
automática) activa-se e o seu forno deixa de
criar calor. AS aparece no lugar da hora e é
emitida uma série de 2 sons sucessivos
durante um certo tempo.
•
Importante
Guarde este guia de utilização junta-
mente com o aparelho. Se o aparelho for
vendido ou cedido a outra pessoa, tenha o
cuidado de remeter igualmente o guia de
utilização. Antes de instalar e de utilizar o
exaustor, tome conhecimento dos presen-
tes conselhos, pois estes foram elaborados
para a sua segurança e a das outras pes-
soas.
1 / INFORMAÇÕES DESTINADAS AO UTILIZADORPT
99638333_A_ML.qxp 16/01/2007 15:00 Page 92

93
Atenção
A instalação é reservada aos instaladores e técnicos habilitados.
Este aparelho está em conformidade com as seguintes directivas europeias:
- Directiva Baixa Tensão 73/23/CEE alterada pela directiva 93/68/CEE para a colocação da
marca CE.
- Directiva Compatibilidade Electromagnética 89/336/CEE alterada pela directiva 93/68/CEE
para a colocação da marca CE.
- Regulamento CE n° 1935/2004 relativos aos materiais e objectos destinados a entrar em
contacto com os géneros alimentares.
MEIO AMBIENTE
•
— Os materiais que constituem esta embalagem são recicláveis. Por isso, participe à sua recicla-
gem e coloque-os nos contentores municipais previstos para o efeito.
— Este aparelho também contém vários materiais recicláveis. A presença deste símbolo indica-lhe
que os aparelhos usados não devem ser misturados com os outros resíduos. A reciclagem dos
aparelhos organizada pelo seu fabricante realizar-se-á assim nas melhores condições, em confor-
midade com a directiva europeia 2002/96/CE relativa aos resíduos de equipamentos
eléctricos e electrónicos. Dirija-se junto da sua junta de freguesia ou do seu revende-
dor para conhecer os pontos de recolha dos aparelhos usados mais próximos do seu
domicílio.
— Obrigado pela sua colaboração na protecção do meio ambiente.
1 / INFORMAÇÕES DESTINADAS AO UTILIZADOR
PT
99638333_A_ML.qxp 16/01/2007 15:00 Page 93

94
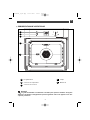
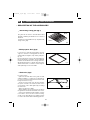
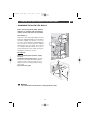
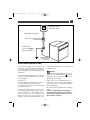
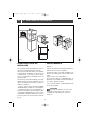
ENCASTRAMENTO
Para tal:
1) Retire as tampas de borracha dos parafusos
para aceder aos orifícios de fixação.
2) Faça um orifício com 3 mm de diâmetro na
parede do armário para evitar estalar a ma-
deira.
3) Fixe o forno com os 2 parafusos.
4) Coloque novamente os tapa-parafusos de
borracha (estes também servem para amorte-
cer o fecho da porta do forno).
(*) se o móvel for aberto, a sua abertura deverá
ser de 70 mm (máx).
Conselho
De modo a certificar-se de que a sua
instalação está conforme, não hesite em
contactar um especialista em electrodo-
mésticos.
•
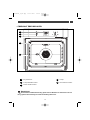
ESCOLHA DO LOCAL DE
INSTALAÇÃO
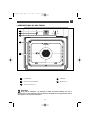
Os esquemas acima determinam as cotas de
um móvel que permitirá receber um forno.
O forno pode indiferentemente ser instalado
sob uma mesa de trabalho ou num móvel de
coluna (aberto* ou fechado) com as dimen-
sões de encastramento adaptadas (ver es-
quema ao lado).
O seu forno possui uma circulação de ar opti-
mizada que permite obter resultados de coze-
dura e de limpeza excepcionais, seguindo os
elementos seguintes:
• Centre o forno no móvel, de modo a garantir
uma distância mín. de 5 mm com o móvel vizinho.
• O material do móvel de encastramento e o
respectivo revestimento devem resistir ao calor.
• Para maior estabilidade, fixe o forno no mó-
vel utilizando 2 parafusos através dos buracos
previstos para esse fim nos pilares laterais
(fig. 1)
•
585
560
550
70
550
Fig. 01
2 / INSTALAÇÃO DO SEU APARELHOPT
99638333_A_ML.qxp 16/01/2007 15:00 Page 94
A página está carregando ...
A página está carregando ...
A página está carregando ...
A página está carregando ...
A página está carregando ...
A página está carregando ...
A página está carregando ...
A página está carregando ...
A página está carregando ...
A página está carregando ...
A página está carregando ...
A página está carregando ...
A página está carregando ...
A página está carregando ...
A página está carregando ...
A página está carregando ...
A página está carregando ...
A página está carregando ...
-
 1
1
-
 2
2
-
 3
3
-
 4
4
-
 5
5
-
 6
6
-
 7
7
-
 8
8
-
 9
9
-
 10
10
-
 11
11
-
 12
12
-
 13
13
-
 14
14
-
 15
15
-
 16
16
-
 17
17
-
 18
18
-
 19
19
-
 20
20
-
 21
21
-
 22
22
-
 23
23
-
 24
24
-
 25
25
-
 26
26
-
 27
27
-
 28
28
-
 29
29
-
 30
30
-
 31
31
-
 32
32
-
 33
33
-
 34
34
-
 35
35
-
 36
36
-
 37
37
-
 38
38
-
 39
39
-
 40
40
-
 41
41
-
 42
42
-
 43
43
-
 44
44
-
 45
45
-
 46
46
-
 47
47
-
 48
48
-
 49
49
-
 50
50
-
 51
51
-
 52
52
-
 53
53
-
 54
54
-
 55
55
-
 56
56
-
 57
57
-
 58
58
-
 59
59
-
 60
60
-
 61
61
-
 62
62
-
 63
63
-
 64
64
-
 65
65
-
 66
66
-
 67
67
-
 68
68
-
 69
69
-
 70
70
-
 71
71
-
 72
72
-
 73
73
-
 74
74
-
 75
75
-
 76
76
-
 77
77
-
 78
78
-
 79
79
-
 80
80
-
 81
81
-
 82
82
-
 83
83
-
 84
84
-
 85
85
-
 86
86
-
 87
87
-
 88
88
-
 89
89
-
 90
90
-
 91
91
-
 92
92
-
 93
93
-
 94
94
-
 95
95
-
 96
96
-
 97
97
-
 98
98
-
 99
99
-
 100
100
-
 101
101
-
 102
102
-
 103
103
-
 104
104
-
 105
105
-
 106
106
-
 107
107
-
 108
108
-
 109
109
-
 110
110
-
 111
111
-
 112
112


Brandt FC641BF1 Manual do proprietário
- Categoria
- Fornos
- Tipo
- Manual do proprietário
em outros idiomas
- français: Brandt FC641BF1 Le manuel du propriétaire
- English: Brandt FC641BF1 Owner's manual
- Nederlands: Brandt FC641BF1 de handleiding
- Deutsch: Brandt FC641BF1 Bedienungsanleitung