Philips HX 7351 Manual do usuário
- Categoria
- Escovas de dente eletricas
- Tipo
- Manual do usuário

e7000
e9000
elite
the sonic toothbrush
4235.020.1985.2.indd 1 05-05-2006 07:49:05

2
B
J
F
D
E
H
G
I
A
C
1
4235.020.1985.2.indd 2 05-05-2006 07:49:06

Sonicare elite e7000/e9000
ENGLISH 4
DANSK
14
ESPAÑOL 25
SUOMI 36
NORSK
47
PORTUGUÊS
58
69
SVENSKA
80
4235.020.1985.2.indd 3 05-05-2006 07:49:06

4
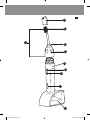
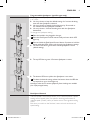
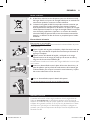
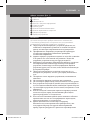
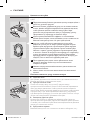
General description (Fig. 1)
A Travel cap
B Bristles
C Brush head
D Colour code ring
E Removable nut
F Handle with soft grip
G Power on/off button
H Dual Speed Control button
I LED charging lights
J Charger
Important
Read these instructions for use carefully before you use the appliance and
save them for future reference.
Check if the voltage that is indicated on the bottom or back of the
charger corresponds to the local mains voltage before you connect
the charger.
Voltage converters and plug adapters DO NOT guarantee voltage
compatibility. Always check for voltage compatibility.
Keep the charger away from water. Do not place or store it over or
near water that is contained in a bathtub, washbasin, sink etc. Do not
immerse the charger in water or any other liquid.
Never use the charger if it is damaged or if the cord or plug is
damaged. If the charger, the cord or the plug is damaged, always have
the charger replaced by one of the original type in order to avoid a
hazard.
Unplug the charger before you clean it and make sure that it is dry
before you put the plug in the wall socket.
Only use the charger supplied.
Do not use the charger outdoors.
Do not use the toothbrush in the bath or shower.
Close supervision is necessary when this product is used by or on
children under the age of 10 or the disabled.
Stop using the appliance if you are unable to handle it properly.
If you have had oral or gum surgery in the previous 2 months,
consult your dentist before you use the toothbrush.
Consult your dentist if excessive bleeding occurs after using this
toothbrush or if bleeding continues to occur after 1 week of use.
The Sonicare toothbrush complies with the safety standards for
electromagnetic devices. If you have a pacemaker or other implanted
device, consult your doctor or the manufacturer of the implanted
device if you have any questions about using the Sonicare.
Do not use other brush heads than the ones that the manufacturer
recommends.
Replace the brush head every 6 months or sooner if signs of wear
appear, such as crushed or bent bristles.
This appliance has only been designed for cleaning teeth, gums and
tongue. Do not use it for any other purpose.
The Sonicare toothbrush is a personal care device and is not
intended for use on multiple patients in a dental practice or
institution.
,
,
,
,
,
,
,
,
,
,
,
,
,
,
,
,
,
ENGLISH
4235.020.1985.2.indd 4 05-05-2006 07:49:06

Supervise children when they are brushing until they have established
good brushing habits.
If your toothpaste contains peroxide, baking soda or bicarbonate
(common in whitening toothpastes), thoroughly clean the brush head
with soap and water after each use.
The mains cord of the charger cannot be replaced. If the mains cord
is damaged, you must discard the charger.
Preparing for use
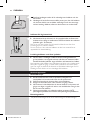
1
Store excess cord by winding it round the cord storage hooks in the
bottom of the charger.
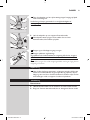
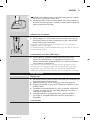
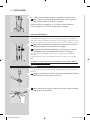
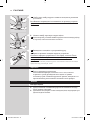
Attaching the brush head
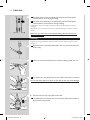
1 Align the front of the brush head with the front of the toothbrush
handle. Match the bars on the brush head with the notches inside
the top of the handle and slide the brush head onto the handle.
2 Screwthebrushheadnutclockwiseuntilitisrmlytightened.Ifthe
brush head rattles during use, tighten the nut further.
3 Remove the travel cap from the brush head before you start
to brush.
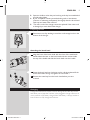
Charging
Charge the Sonicare for at least 24 hours during the rst few days of use.
We advise you to keep the Sonicare in the plugged-in charger when not in
use to maintain a full battery charge. When the battery is empty, it takes at
least 24 hours to fully charge the Sonicare.
,
,
,
ENGLISH 5
4235.020.1985.2.indd 5 05-05-2006 07:49:08

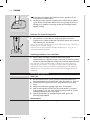
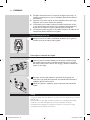
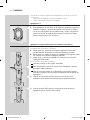
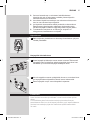
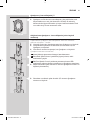
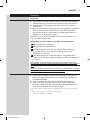
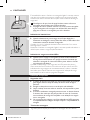
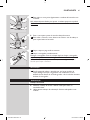
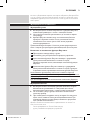
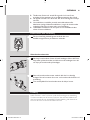
1 Make sure the bottom of the handle sits back securely in the charger
so that it makes complete contact.
ThehandlesofotherSonicaremodelsdonottinthischarger
and will therefore not charge effectively. Do not attempt to force a
handle into this charger, as this will cause damage.
Battery-low indicator
When the battery is running low, you hear 3 beeps after the
Smartimer has switched off the toothbrush. In addition, the bottom
LED blinks yellow for 30 seconds.
When you see and hear the battery-low indication, 3 or fewer 2-minute
brushings remain.
Keep the Sonicare in the plugged-in charger when not in use to maintain a
full battery charge.
Multiple-LED charge indicator
When you place the handle in the charger, the green charge indicator
LEDs blink in a rising pattern as the battery charges. The number
of blinking LEDs indicates the level to which the battery has been
charged.
When the battery is fully charged, the LEDs stop blinking and start burning
continuously. About once a minute, the charge indicator LEDs go out
briey and then go on again. This indicates that the battery is maintained
at full charge. The full-charge indication persists until you remove the
handle from the charger.
Using the appliance
Useful tips
The brush head comes with a convenient travel cap. Remove the
travel cap from the brush head before you switch on the Sonicare.
Rinse the brush head and bristles after each use.
Clean the brush head weekly, including under the nut.
A fully charged Sonicare allows you to brush your teeth for 2
minutes twice a day for approximately 2 weeks without charging. This
makes it easy to travel without the charger.
Voltage converters and plug adapters DO NOT guarantee voltage
compatibility. Always check for voltage compatibility.
Brushing technique
Follow these simple steps to maximise your brushing experience.
,
,
,
,
,
,
,
,
ENGLISH6
4235.020.1985.2.indd 6 05-05-2006 07:49:09

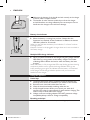
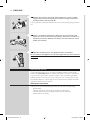
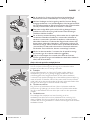
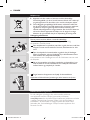
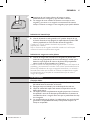
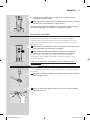
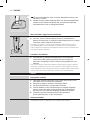
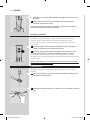
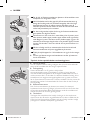
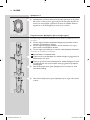
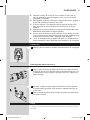
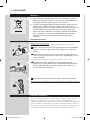
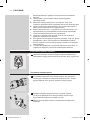
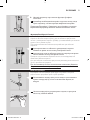
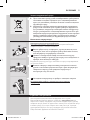
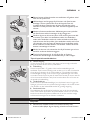
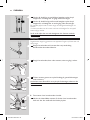
1 Before you switch on the Sonicare, place the bristles of the brush
head on your gumline at a 45-degree angle.
2 Hold the handle with a light grip and switch on the Sonicare. Gently
move the bristles in a small circular motion so that the longer
bristles reach between your teeth. After a few seconds, pass the
bristles to the next section. Continue this routine throughout the
2-minute brushing cycle.
3 To maximise the effectiveness of the Sonicare toothbrush, use light
pressure and let the Sonicare do the brushing for you. Do not scrub.
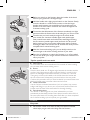
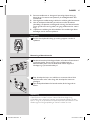
4 To make sure you brush evenly throughout the mouth, divide
your mouth into 4 sections: outside upper teeth, inside upper
teeth, outside lower teeth and inside lower teeth. Begin brushing
therstsection(outsideupperteeth)andbrushfor30seconds
before moving to the next section (inside upper teeth). Continue
brushing the other two sections for 30 seconds each until you have
completed the 2-minute brushing cycle.
5 Afterthe2-minutebrushingcycle,youcanbrieyswitchonthe
Sonicare again to brush the chewing surfaces of your teeth.
6 Press the on/off button to switch the Sonicare on or off as needed.
You can also brush your tongue with the toothbrush switched on or
off, as you prefer.
Stain removal
For even better stain removal, dedicate a few seconds of extra brushing
time to areas where excess staining occurs.
Braces
Place the brush head at a 45-degree angle between the brackets and the
gumline. Using light pressure, gently move the bristles in a small circular
motion so the longer bristles reach between your teeth for 2 seconds.
Then gently roll the brush handle so the bristles clean the bracket and
the rest of the tooth. Subsequently pass the bristles to the next tooth.
Continue this procedure until you have brushed all your teeth. Please note
that brush heads wear out sooner when used on braces.
Dental restorations
Use the Sonicare on dental restorations (such as implants, caps, crowns,
bridges and llings) as you do on your normal tooth surfaces. Work the
bristles round all areas of the restoration for thorough cleaning.
Periodontal pockets
Your dentist or dental hygienist may have indicated that you have
periodontal pockets, deep pockets where plaque bacteria collect. If this is
the case, spend extra time brushing these areas after you have completed
the 2-minute brushing cycle to improve your gum health.
Features
Easy-start
All Sonicare models come with the Easy-start feature activated,
which helps you get used to brushing with the Sonicare.
,
,
,
,
,
,
4
5
º
4
5
º
1
2
4
3
1
2
4
3
ENGLISH 7
4235.020.1985.2.indd 7 05-05-2006 07:49:11

Thebrushingpowergentlyincreasestofullpowerovertherst14
brushings.
The Easy-start feature is active if you hear 2 beeps immediately after
you switch on the Sonicare. Once the Sonicare has reached optimal
brushing power (after the 14th brushing), you no longer hear the 2
beeps at the beginning of each brushing cycle.
Note:Each of the rst 14 brushings must be at least 1 minute long to move
properly through the Easy-start ramp-up cycle.
To deactivate or activate the Easy-start feature:
1 Attach the brush head to the handle.
2 Place the handle in the plugged-in charger.
3 To deactivate the Easy-start feature, press and hold the on/off button
for 5 seconds. You hear 1 beep to indicate that the Easy-start feature
has been deactivated.
4 To activate the Easy-start feature, press and hold the on/off button
for 5 seconds. You hear 2 beeps to indicate that the Easy-start
feature has been activated.
Use of the Easy-start feature beyond the initial ramp-up period is not
recommended and reduces the effectiveness of the Sonicare toothbrush
in removing plaque.
Make sure the Easy-start feature is deactivated and the handle fully
charged when the Sonicare is used in clinical trials.
Smartimer
All Sonicare models come with the Smartimer feature, which
automatically sets the brushing time to the 2 minutes that dentists
and dental hygienists recommend.
After 2 minutes, the Smartimer automatically switches off the
toothbrush.
Ifyouwanttostopbrushingbrieyduringa2-minutebrushingcycle,
press the on/off button. When you press the on/off button again,
the Smartimer resumes the brushing cycle at the point where you
stopped.
The Smartimer automatically resets to the beginning of a 2-minute cycle if:
you stop brushing for 30 seconds or longer;
you put the handle in the charger.
Quadpacer \
The Quadpacer 30-second interval timer ensures that you brush
all sections of your mouth evenly and thoroughly. At 30, 60 and 90
seconds, you hear a short beep and notice a pause in brushing action.
These signals tell you to continue with the next section of your
mouth.
,
,
,
,
,
-
-
,
1
3
1
3
ENGLISH8
4235.020.1985.2.indd 8 05-05-2006 07:49:12

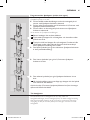
The Programmable Quadpacer allows you to customise the Quadpacer in
1 of 3 ways:
You may choose to keep the default setting of a 2-minute brushing
time with the Quadpacer activated.
You may choose to extend the brushing time by 30 seconds to
2.5 minutes with the Quadpacer activated.
You may choose a 2-minute brushing time with the Quadpacer
deactivated.
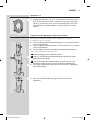
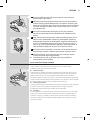
To change the Quadpacer setting:
1 Place the handle in the plugged-in charger.
2 PresstheDualSpeedControlbuttonbrieyandnotewhichLED
lights up.
3 Press and hold the Dual Speed Control button. Continue to hold the
button while the LEDs slowly cycle through the Quadpacer settings:
The fourth LED burns green: the 2-minute Quadpacer is active
(default setting).
The top LED burns green: 2.5-minute Quadpacer is active.
The bottom LED burns yellow: the Quadpacer is not active.
4 To select the desired setting, release the button when the LED that
corresponds to your choice lights up.
Note:If you select the 2.5-minute Quadpacer, fewer brushings are available
from a fully charged battery.
Dual Speed Control
The Dual Speed Control feature allows you to choose between 2 speed
settings: normal speed (‘Max’) for optimum brushing performance or
reduced speed (‘Gentle’) when you desire an even more gentle brushing
action.
Each time you switch on the Sonicare, it starts to brush at the normal
speed setting.
,
,
,
,
,
,
ENGLISH 9
4235.020.1985.2.indd 9 05-05-2006 07:49:14

1 To switch from normal to reduced speed, press the Dual Speed
Control button once during brushing.
2 To switch from reduced to normal speed, press the Dual Speed
Control button a second time during brushing.
A distinctive two-tone beep indicates that the speed setting has been
changed.
We advise you to brush at the normal speed setting to maintain optimal
results.
Make sure you select the normal speed setting when the Sonicare is
used in clinical trials.
Cleaning
Regular cleaning guarantees the best performance and a long life for the
appliance.
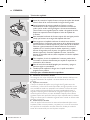
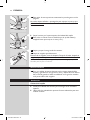
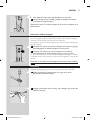
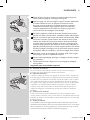
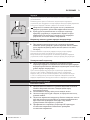
1 Rinse the brush head and bristles after each use. Let the brush head
air-dry only.
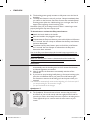
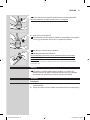
2 Clean the brush head at least once a week, including under the nut.
3 To remove the nut, gently press on the rubber seal with your thumbs.
Do not use sharp objects to press on the seal, as this may cause damage.
Pull the nut over the top of the brush head.
4 To reattach the nut, slip the nut over the brush head shaft and pull it
down until it snaps home.
,
ENGLISH10
4235.020.1985.2.indd 10 05-05-2006 07:49:17

5 Clean and dry the handle weekly.
6 Clean the charger periodically.
Unplug the charger before you clean it. After you have cleaned the
charger, dry it completely before you put the plug back into the wall
socket.
We advise you to use a mild cleaning agent, water and a moist cloth to
clean the Sonicare.
Storage
1
If you do not intend to use the appliance for a long time, unplug it,
clean it and store it in a cool and dry place away from direct sunlight.
You can store the cord by winding it round the cord storage hooks
in the bottom of the charger.
Replacement
Brush head
Replace the brush head every 6 months to achieve optimal results.
Only use Sonicare replacement brush heads that are suitable for this
Sonicare model.
Environment
Do not throw away the appliance with the normal household waste
attheendofitslife,buthanditinatanofcialcollectionpointfor
recycling. By doing this, you help to preserve the environment.
The built-in rechargeable NiCd battery contains substances that
may pollute the environment. Always remove the battery before
youdiscardandhandintheapplianceatanofcialcollection
point.Disposeofthebatteryatanofcialcollectionpointfor
batteries. If you have trouble removing the battery, you can also
take the appliance to a Philips service centre. The staff of this
centre will remove the battery for you and will dispose of it in an
environmentally safe way.
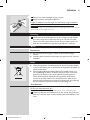
Removing the battery
This process is not reversible.
To remove the batteries yourself, you need a at-head (standard)
screwdriver.
1 Remove the toothbrush from the charger, switch it on and let it run
until it stops. Continue to switch on the Sonicare until the battery is
completely empty.
,
,
,
,
ENGLISH 11
4235.020.1985.2.indd 11 05-05-2006 07:49:19

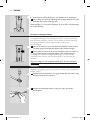
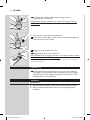
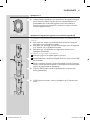
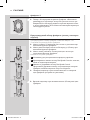
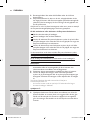
2 Remove the nut from the brush head and place it onto the handle.
Tighten the nut onto the handle (A) until the housing comes loose
and then pull the nut forward (B).
The components inside the handle come out of the housing along with the
nut.
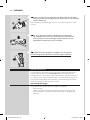
3 Insert a screwdriver between the electronic circuit board and the
plastic part close to each end of the battery. Twist the screwdriver to
break the connection between the battery and the electronic circuit
board in 2 locations.
4 Separate the battery from the appliance with a screwdriver.
Do not connect the appliance to the mains again after you have removed
the battery.
Guarantee & service
If you need information or if you have a problem, please visit the Philips
website at
www.philips.com or contact the Philips Customer Care Centre
in your country (you nd its phone number in the worldwide guarantee
leaet). If there is no Customer Care Centre in your country, turn to your
local Philips dealer or contact the Service Department of Philips Domestic
Appliances and Personal Care BV.
Guarantee restrictions
The terms of the international guarantee do not cover the following:
Brush heads
Damage caused by misuse, abuse, neglect or alterations.
Normal wear and tear, including chips, scratches, abrasions,
discolouration or fading.
-
-
-
B
A
B
A
ENGLISH12
4235.020.1985.2.indd 12 05-05-2006 07:49:20

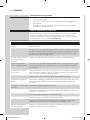
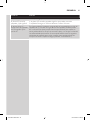
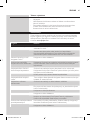
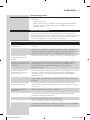
Troubleshooting
This chapter summarises the most common problems you could encounter
with the Sonicare. If you are unable to solve the problem, contact the
Philips Customer Care Centre in your country (see chapter ‘Guarantee &
service’) or visit www.philips.com.
Problem Solution
The Sonicare toothbrush
does not work
You may need to recharge the Sonicare. Charge the Sonicare for at least
24 hours.
Make sure the socket is live when you recharge the appliance. The
electricity supply to sockets in mirror cabinets over washbasins or shaver
sockets in bathrooms may be cut off when the light is switched off.
The motor runs but the
brush head does not
operate.
You may need to reattach or replace the brush head.
I feel a tickling sensation
when I use the Sonicare.
You may experience a slight tickling/tingling sensation when you use the
Sonicare for the rst time. As you become accustomed to brushing with
the Sonicare, this sensation diminishes.
The brush head rattles when
I use the Sonicare.
The Sonicare should produce a gentle hum during operation. Tighten
the brush head nut to eliminate excessive rattling. If the rattling does not
stop, you may need to replace the brush head.
Make sure you remove the travel cap before you switch on the
appliance.
The brush head chatters
against my teeth.
You can avoid this by keeping the brush head properly oriented, with the
brush head placed on the gumline at an angle of 45 degrees.
Brushing seems less
powerful.
You may need to recharge the Sonicare.
The Easy-start feature may be active and needs to be deactivated (see
chapter ‘Features’).
You may need to clean the brush head.
You may need to replace the brush head.
The Dual Speed Control button may be set to reduced speed. Set the
button to normal speed.
The Sonicare gives off an
unpleasant smell.
You may need to clean the appliance. Clean the handle, brush head and
charger thoroughly (see chapter ‘Cleaning’).
You may need to replace the brush head.
The yellow LED blinks. What
does this mean?
The blinking yellow LED indicates that fewer than 3 brushings remain.
Recharge the Sonicare for at least 24 hours.
The appliance has an extra
30 seconds of brushing time.
What is this for?
The Programmable Quadpacer has been set to a 2.5-minute brushing
cycle instead of the default 2-minute brushing cycle. This setting provides
additional time for brushing troublesome areas where plaque collects
and gum disease starts. We advise you to use the extra 30 seconds of
brushing time to rebrush troublesome areas, massage your gums or
brush your tongue (see chapter ‘Features’).
ENGLISH 13
4235.020.1985.2.indd 13 05-05-2006 07:49:20

14
A Beskyttelseshætte
B Børstehår
C Børstehoved
D Farvekodet ring
E Aftagelig skruekapsel
F Håndtag med blødt greb
G On/off-knap
H Dual Speed-hastighedsknap
I LED-opladeindikator med lys
J Oplader
Vigtigt
Læs brugsvejledningen omhyggeligt igennem, inden apparatet tages i brug,
og gem den til eventuel senere brug.
Kontrollér, om den indikerede netspænding i bunden eller på
bagsiden af opladeren, svarer til den lokale netspænding, før du
tilslutter opladeren.
Spændingsomskiftere og stikadaptere giver IKKE garanti for
spændingskompatibilitet.
Hold opladeren væk fra vand. Undlad at anbringe eller opbevare
opladeren over eller i nærheden af vand i badekar, håndvaske el. lign.
Opladeren må aldrig kommes ned i vand eller andre væsker.
Brug aldrig opladeren, hvis den er beskadiget, eller hvis dens ledning
eller stik er beskadiget. Hvis oplader, ledning eller stik er beskadiget,
skal opladeren udskiftes med en original type for at undgå enhver
risiko.
Tag stikket ud af opladeren, før du rengør den og sørg for, at den er
tør, før du sætter stikket i stikkontakten.
Brug kun den medfølgende oplader.
Brug ikke opladeren udendørs.
Brug ikke tandbørsten i kar- eller brusebad.
Vær ekstra opmærksom, når apparatet bruges af eller på børn under
10 år eller af handicappede.
Brug ikke apparatet, hvis du har svært ved at håndtere det.
Hvis du er blevet opereret i mund eller tandkød inden for de seneste
2 måneder, skal du spørge din tandlæge til råds, før du bruger
tandbørsten.
Kontakt din tandlæge, hvis tandkødet bløder voldsomt efter brug af
tandbørsten, eller hvis der stadig forekommer blødninger efter
1 uges brug.
Sonicare-tandbørsten overholder de gældende sikkerhedsregler
for elektromagnetisk udstyr. Hvis du har pacemaker eller andre
implantater, skal du rådføre dig med din læge eller producenten af
implantatet, hvis du er i tvivl om, hvorvidt du må bruge Sonicare.
Brug ikke andre børstehoveder end dem, producenten anbefaler.
Udskift børstehovedet hvert halve år, eller så snart de første tegn på
slitage viser sig, f.eks. slidte eller ødelagte børstehår.
Apparatet er kun beregnet til renholdelse af tænder, tandkød og
tunge. Brug ikke apparatet til andre formål.
,
,
,
,
,
,
,
,
,
,
,
,
,
,
,
,
DANSK
4235.020.1985.2.indd 14 05-05-2006 07:49:21

Sonicare-tandbørsten er beregnet til personligt hjemmebrug og
ikke til brug af et større antal patienter på tandlægeklinikker eller
institutioner.
Overvåg børns tandbørstning, indtil de har udviklet gode børstevaner.
Hvis din tandpasta indeholder peroxid, natron eller bikarbonat
(almindelig i tandpastaer med blegende virkning), skal børstehovedet
renses grundt med vand og sæbe, hver gang tandbørsten har været i
brug.
Opladerens netledning kan ikke udskiftes. Hvis netledningen bliver
beskadiget, skal du kassere opladeren.
Klargøring
1
Rul den overskydende ledning op omkring tappene i bunden af
opladeren.
Montering af børstehovedet
1 Sæt børstehovedet på håndtaget således, at forsiden af børstehoved
og håndtag vender samme vej. Sørg for, at udskæringerne i
børstehovedet passer ned i de tilsvarende indhak i toppen af
håndtaget, og tryk børstehovedet på.
2 Drej skruekapslen højre om, indtil den er strammet helt til. Hvis
børstehovedet rasler under brug, skal skruekapslen strammes
yderligere.
3 Fjern beskyttelseshætten fra børstehovedet, før du begynder at
børste.
Opladning
Oplad Sonicare i mindst 24 timer i løbet af de første dages brug.
Vi anbefaler, at du opbevarer Sonicare i den tilsluttede oplader, når den
ikke er i brug for at opretholde fuld batterikapacitet. Når batteriet er helt
aadet, tager en fuld genopladning af Sonicare mindst 24 timer.
,
,
,
,
DANSK 15
4235.020.1985.2.indd 15 05-05-2006 07:49:21

1 Kontrollér, at håndtagets bund sidder korrekt i opladeren, så der
er fuld kontakt mellem delene.
Håndtag fra andre Sonicare-modeller passer ikke til denne oplader
og kan derfor ikke oplades effektivt heri. Forsøg aldrig at presse et
håndtag ned i opladeren med magt, da det kan beskadige oplader
og/eller håndtag.
Indikator for lav batterikapacitet
Når batteriet er ved at løbe tør, høres 3 bip, efter Smartimer-
funktionen har slukket tandbørsten. Derudover blinker den nederste
LED-lysdiode gult i 30 sekunder.
Når du ser og hører indikationen for lavt batteriniveau, er der 3 eller færre
børstninger à 2 minutter tilbage.
Lad Sonicare stå i den tilsluttede oplader, når den ikke er i brug, for at
opretholde batterikapaciteten.
Opladningsindikator med multi-LED
Når du sætter håndtaget i opladeren, blinker de grønne
opladeindikatorer i stigende mønster i takt med, at batteriet oplades.
Antallet af blinkende lysdioder indikerer den aktuelle batterikapacitet.
Når batteriet er fuldt opladet, holder lysdioderne op med at blinke og
begynder at lyse konstant. Ca. en gang i minuttet, slukker lysdioderne et
kort øjeblik. Dette indikerer, at batteriet vedligeholdes på fuld opladning.
Indikationen for fuld opladning vises konstant, indtil håndtaget fjernes fra
opladeren.
Sådan bruges apparatet
Gode råd
Børstehovedet leveres med en praktisk beskyttelseshætte. Fjern
beskyttelseshætten fra børstehovedet, inden du tænder for Sonicare.
Skyl børstehoved og børstehår, hver gang tandbørsten har været
brugt.
Rengør børstehovedet ugentligt, også under skruekapslen.
Med en fuldt opladet Sonicare kan du børste tænder i 2 minutter
2 gange dagligt i ca. 2 uger uden opladning. Derfor behøver du ikke
medbringe opladeren på kortere rejser.
Spændingsomskiftere og stikadaptere giver IKKE garanti for
spændingskompatibilitet.
Børsteteknik
Følg disse enkle trin for at blive fortrolig med tandbørsten.
,
,
,
,
,
,
,
,
DANSK16
4235.020.1985.2.indd 16 05-05-2006 07:49:22

1 Før du tænder for Sonicare, skal du placere børstehovedet, så
børstehårene berører tandkødslinjen i en vinkel på 45 grader.
2 Hold om håndtaget med et let greb og tænd for Sonicare. Bevæg
forsigtigt tandbørsten i små cirkelbevægelser, så de længste børstehår
når ind mellem tænderne. Skift til næste sektion efter nogle sekunder.
Fortsæt på denne måde, indtil du har børstet i 2 minutter.
3 Den størst mulige effekt opnås ved at holde og bevæge Sonicare
tandbørsten med et let tryk og lade Sonicare klare børstningen.
Tænderne skal ikke skrubbes.
4 For at sikre en ensartet børstning i hele munden kan du opdele den
i 4 sektioner: Ydersiden af tænderne i overmunden, indersiden af
tænderne i overmunden, ydersiden af tænderne i undermunden og
indersiden af tænderne i undermunden. Begynd med at børste den
første sektion (ydersiden af tænderne i overmunden), og børst i 30
sekunder, før du går videre til næste sektion (indersiden af tænderne
i overmunden). Fortsæt med at børste de to resterende sektioner i
30 sekunder hver, indtil du har børstet i sammenlagt 2 minutter.
5 Når du har børstet tænder i 2 minutter, kan du tænde kortvarigt
forSonicareigenforatbørstetændernestyggeader.
6 Tryk på on/off-knappen for at tænde eller slukke for Sonicare.
Du kan også børste tungen med tandbørsten tændt eller slukket alt
efter, hvad du foretrækker.
Gode råd ved specielle tandplejebehov
Fjernelse af misfarvning
Hvis du vil fjerne misfarvning, kan du bruge et par sekunders ekstra
børstetid på områder, som er særligt misfarvede.
Tandbøjler
Anbring børstehovedet i en vinkel på 45 grader mellem bøjlen og
tandlinjen. Brug et let tryk, og bevæg forsigtigt tandbørsten i lette
cirkelbevægelser, så de længste børstehår når ind mellem tænderne, i
2 sekunder. Drej derefter håndtaget let, så børstehårene børster bøjlen og
resten af tanden. Gå derefter videre til den næste tand. Fortsæt på denne
måde, indtil du har børstet alle tænderne. Bemærk, at børstehovedet slides
hurtigere, når det bruges til at børste tænder med bøjle.
Tandrekonstruktioner
Brug Sonicare på tandrekonstruktioner (såsom implantater, tandhalse,
kroner, broer og fyldninger) på samme måde som på dine andre tænder.
Sørg for, at børstehårene kommer hele vejen rundt om det reparerede
område.
Tandkødslommer
Din tandlæge eller tandplejer kan have fortalt dig, at du har
tandkødslommer, dybe lommer, hvor plakbakterier kan samle sig. Hvis
dette er tilfældet, skal du bruge ekstra tid på nænsom børstning af disse
områder, efter at have gennemført 2-minutters børstningen, for at forbedre
tandkødets tilstand.
,
,
,
,
,
4
5
º
4
5
º
1
2
4
3
1
2
4
3
DANSK 17
4235.020.1985.2.indd 17 05-05-2006 07:49:23

Funktioner
Easy-start
Alle Sonicare-modeller leveres med Easy-start-funktionen aktiveret,
så du kan vænne dig til at børste tænder med Sonicare.
Børstestyrken vil i løbet af de første 14 børstninger gradvist og blidt
tiltage til fuld styrke.
Hvis du hører 2 bip umiddelbart efter, at du har tændt for Sonicare,
er Easy-start-funktionen aktiveret. Når Sonicare når op på fuld
børstestyrke (efter 14 børstninger), ophører det dobbelte lydsignal.
Bemærk:Hver af de første 14 børstninger skal være af mindst 1 minuts
varighed, for at børstestyrken tiltager ved næste børstning.
Aktivering og deaktivering af Easy-start-funktionen:
1 Sæt børstehovedet på håndtaget.
2 Anbring håndtaget i den tilsluttede oplader.
3 Easy-start-funktionen deaktiveres ved at trykke på on/off-knappen og
holde den inde i 5 sekunder. Når du hører 1 bip, betyder det, at
Easy-start-funktionen er deaktiveret.
4 Easy-start-funktionen aktiveres ved at trykke på on/off-knappen og
holde den inde i 5 sekunder. Når du hører 2 bip, betyder det, at
Easy-start-funktionen er aktiveret.
Brug af Easy-start-funktionen efter opstartsperioden kan ikke anbefales,
da det medfører en mindre effektiv plakfjernelse.
Sørg for, at Easy-start-funktionen er slået fra, og at håndtaget er fuldt
opladet, når Sonicare bruges i kliniske forsøg.
Smartimer
Alle Sonicare-modeller leveres med Smartimer-funktion, som
automatisk indstiller børstetiden til de 2 minutter, der anbefales af
tandlæger og tandplejere.
Efter 2 minutter slukker Smartimer-funktionen automatisk for
tandbørsten.
Hvis du vil holde pause eller afbryde børstningen, inden de
2 minutter er gået, skal du trykke på on/off-knappen. Når du trykker
på on/off-knappen igen, starter Smartimer -funktionen der, hvor du
slap.
Smartimer -funktionen nulstiller automatisk 2-minuttersintervallet, hvis:
Du holder op med at børste i mere end 30 sekunder
Du stiller håndtaget i opladeren
,
,
,
,
,
,
-
-
DANSK18
4235.020.1985.2.indd 18 05-05-2006 07:49:23

Quadpacer \
Quadpacer-funktionen, som er en 30-sekunders intervaltimer, sikrer,
at du får børstet alle områder i munden ensartet og grundigt. Efter
30, 60 og 90 sekunder høres et kort bip efterfulgt af en kort pause
i børstefunktionen. Dette indikerer, at du skal gå videre til næste
sektion.
Programmérbar Quadpacer (ikke alle modeller)
Den programmérbare Quadpacer giver mulighed for at tilpasse
Quadpaceren på 1 af 3 måder:
Du kan vælge beholde standardindstillingen på 2-minutters børstetid
med aktiv Quadpacer.
Du kan vælge at udvide børstetiden med 30 sekunder til 2,5 minutter
med aktiv Quadpacer.
Du kan vælge 2-minutters børstetid med deaktiveret Quadpacer.
Sådan ændres Quadpacer-indstillingerne:
1 Anbring håndtaget i den tilsluttede oplader.
2 Tryk kort på Dual Speed-hastighedsknappen, og bemærk, hvilken
LED-lysdiode, der tændes.
3 Tryk på Dual Speed-hastighedsknappen, og hold den inde, mens
lysdioderne langsomt kører gennem Quadpacer-indstillingerne:
Den fjerde LED-lysdiode lyser grønt: Aktiv 2-minutters Quadpacer
(standardindstilling).
Den øverste LED-lysdiode lyser grønt: Aktiv 2,5-minutters
Quadpacer.
,
,
,
,
,
,
1
3
1
3
DANSK 19
4235.020.1985.2.indd 19 05-05-2006 07:49:24

Den nederste LED-lysdiode lyser gult: Quadpacer er deaktiveret.
4 For at vælge den ønskede indstilling, skal du slippe knappen, når LED-
lysdioden, der svarer til dit valg, lyser.
Bemærk:Vælger du 2,5 minutters Quadpacer, er der et færre antal børstninger
på en fuld opladning.
Dual Speed-hastighedsknap
Med Dual Speed-hastighedsknappen kan du vælge mellem
2 hastighedsindstillinger: Normalhastighed (“Max”) for optimal børstning
eller reduceret hastighed (“Gentle”) hvis du ønsker en blidere børstning.
Hver gang du tænder Sonicare, begynder den at børste ved
normalhastighed.
1 Hvis du vil skifte fra normal til reduceret hastighed, trykker du blot
en enkelt gang på Dual Speed-knappen under tandbørstningen.
2 Vil du skifte fra reduceret til normal hastighed, trykker du endnu en
gang på Dual Speed-hastighedsknappen under tandbørstningen.
To tydelige bip indikerer, at hastighedsindstillingen er blevet ændret.
Vi anbefaler, at du børster ved normalhastighed for at opnå optimale
resultater.
Sørg for at vælge normal hastighedsindstilling, når Sonicare benyttes i
kliniske tests.
Rengøring
Regelmæssig rengøring giver dig et optimalt resultat og sikrer apparatet en
længere levetid.
1 Skyl børstehoved og børster, hver gang tandbørsten har været i brug.
Børstehovedet bør kun lufttørre.
2 Rengør børstehovedet mindst én gang om ugen, også under
skruekapslen.
,
DANSK20
4235.020.1985.2.indd 20 05-05-2006 07:49:25
A página está carregando...
A página está carregando...
A página está carregando...
A página está carregando...
A página está carregando...
A página está carregando...
A página está carregando...
A página está carregando...
A página está carregando...
A página está carregando...
A página está carregando...
A página está carregando...
A página está carregando...
A página está carregando...
A página está carregando...
A página está carregando...
A página está carregando...
A página está carregando...
A página está carregando...
A página está carregando...
A página está carregando...
A página está carregando...
A página está carregando...
A página está carregando...
A página está carregando...
A página está carregando...
A página está carregando...
A página está carregando...
A página está carregando...
A página está carregando...
A página está carregando...
A página está carregando...
A página está carregando...
A página está carregando...
A página está carregando...
A página está carregando...
A página está carregando...
A página está carregando...
A página está carregando...
A página está carregando...
A página está carregando...
A página está carregando...
A página está carregando...
A página está carregando...
A página está carregando...
A página está carregando...
A página está carregando...
A página está carregando...
A página está carregando...
A página está carregando...
A página está carregando...
A página está carregando...
A página está carregando...
A página está carregando...
A página está carregando...
A página está carregando...
A página está carregando...
A página está carregando...
A página está carregando...
A página está carregando...
A página está carregando...
A página está carregando...
A página está carregando...
A página está carregando...
A página está carregando...
A página está carregando...
A página está carregando...
A página está carregando...
A página está carregando...
A página está carregando...
A página está carregando...
A página está carregando...
-
 1
1
-
 2
2
-
 3
3
-
 4
4
-
 5
5
-
 6
6
-
 7
7
-
 8
8
-
 9
9
-
 10
10
-
 11
11
-
 12
12
-
 13
13
-
 14
14
-
 15
15
-
 16
16
-
 17
17
-
 18
18
-
 19
19
-
 20
20
-
 21
21
-
 22
22
-
 23
23
-
 24
24
-
 25
25
-
 26
26
-
 27
27
-
 28
28
-
 29
29
-
 30
30
-
 31
31
-
 32
32
-
 33
33
-
 34
34
-
 35
35
-
 36
36
-
 37
37
-
 38
38
-
 39
39
-
 40
40
-
 41
41
-
 42
42
-
 43
43
-
 44
44
-
 45
45
-
 46
46
-
 47
47
-
 48
48
-
 49
49
-
 50
50
-
 51
51
-
 52
52
-
 53
53
-
 54
54
-
 55
55
-
 56
56
-
 57
57
-
 58
58
-
 59
59
-
 60
60
-
 61
61
-
 62
62
-
 63
63
-
 64
64
-
 65
65
-
 66
66
-
 67
67
-
 68
68
-
 69
69
-
 70
70
-
 71
71
-
 72
72
-
 73
73
-
 74
74
-
 75
75
-
 76
76
-
 77
77
-
 78
78
-
 79
79
-
 80
80
-
 81
81
-
 82
82
-
 83
83
-
 84
84
-
 85
85
-
 86
86
-
 87
87
-
 88
88
-
 89
89
-
 90
90
-
 91
91
-
 92
92


Philips HX 7351 Manual do usuário
- Categoria
- Escovas de dente eletricas
- Tipo
- Manual do usuário
em outras línguas
- español: Philips HX 7351 Manual de usuario
- dansk: Philips HX 7351 Brugermanual
Artigos relacionados
Outros documentos
-
Sonicare HX6932/10 Manual do usuário
-
Sonicare HX6972/10 Manual do usuário
-
Sonicare HX6711/50 Manual do usuário
-
Sonicare HX6911/02 Manual do usuário
-
-
-
-
 Askle Sante WINNCARE VTAC410/CIC Manual do usuário
