
ISTRUZIONI PER L’INSTALLAZIONE DEL CANNOCCHIALE EZSIGHT
™
MONTAGGIO
Attenzione: verificate che l’arma sia scarica.
1. Allentate le viti di fissaggio e inserite la guida di montaggio su uno degli attacchi scanalati da 0,95 cm
(3/8”).
2. Regolate la posizione dell’oculare in avanti o indietro fino a trovare quella più comoda per l’occhio. Serrate
le viti di fissaggio.
INSTALLAZIONE DELLE PILE
Attenzione: verificate che l’arma sia scarica prima di installare le pile.
Il cannocchiale EZSight
™
è alimentato da una pila al litio da 3V
tipo bottone. Se la luminosità del punto rosso si affievolisce o il
cannocchiale non si illumina, sostituite la pila.
1. Per estrarre la pila scarica, inserite un cacciavite o un attrezzo
simile nel lato con la tacca del vano per spingere la pila in fuori dal
lato opposto.
2. Inserite la pila nuova con il lato + verso il basso.
PUNTAMENTO
Nota: questa procedura va eseguita a una distanza approvata
o in un’altra area sicura. Si suggerisce di usare protezioni per
gli occhi e l’udito.
1. Attivate il punto rosso illuminato spingendo in
avanti il pulsante On/Off.
2. Sparate tre colpi di prova su un bersaglio. Osservate il
punto di impatto per regolare la derivazione e l’elevazione
in modo da colpire con la serie successiva di tre colpi il
centro del bersaglio.
Nota: per regolare la derivazione girate l’apposita vite micrometrica in senso orario per spostare il punto di
impatto a sinistra o in senso antiorario per spostarlo a destra. Analogamente, girate la vite micrometrica di
regolazione dell’elevazione in senso orario per alzare il punto di impatto o in senso antiorario per abbassarlo.
TABELLA DI RIFERIMENTO DELLA PILA AL LITIO
Duracell® Sunrise®/Radio Shack® Tipo NEDA (dimensioni)
DL2032 CR2032 5004L
GARANZIA/RIPARAZIONI
Per prodotti acquistati fuori degli Stati Uniti o del Canada, rivolgersi al rivenditore per le clausole pertinenti
della garanzia.
© 2004 B.P.O. • Tasco,®, tm denotes trademarks of B.P.O.
INSTRUÇÕES PARA A INSTALAÇÃO DO EZSIGHT
™
MONTAGEM
Cuidado: Assegure-se de que a arma de fogo não está carregada.
1.
Afrouxe os parafusos prendedores e deslize o trilho de montagem sobre qualquer receptor com ranhuras de 3/8”
2. Ajuste para a frente ou para trás até que a posição do ocular esteja na posição que lhe seja mais confor tável.
Aperte os parafusos prendedores.
INSTALAÇÃO DAS BATERIAS
Cuidado: Assegure-se de que a arma de fogo não está carregada ao
instalar as baterias.
Seu EZSight
™
é acionado por uma bateria de lítio 3V “estilo moeda”.
Troque a bateria caso o ponto vermelho iluminado perca a intensidade
ou seu EZSight nem sequer se ilumine.
1. Para retirar a bateria velha, utilize uma chave de parafuso ou uma
ferramenta similar inserindo-a no lado com ranhuras do
compartimento para empurrar a bateria e retirá-la do outro lado.
2. Coloque a nova bateria com o sinal + para baixo.
AJUSTAR A PONTARIA
Nota: Faça o seguinte num campo de tiro aprovado ou em
outro local seguro. Recomenda-se proteção para os olhos
e os ouvidos.
1. Ativar o ponto vermelho iluminado empurrando o
interruptor on/off para a frente..
2. Dê 3 tiros de prova a um alvo determinado. Verifique o
impacto da bala ou das pastilhas de pólvora para efetuar
os ajustes necessários do ponto de desvio
devido ao vento e
da elevação e para fazer com que o próximo grupo de 3 tiros atinja o centro do alvo.
Note: Para ajustar o desvio devido ao vento e para mover o ponto de impacto para a esquerda, gire o botão de
ajuste de desvio devido ao vento (windage) em sentido horário e para mover o ponto de impacto para a direita
gire o botão em sentido anti-horário. Ajuste a elevação da mesma maneira, girando o botão de elevação em
sentido horário para elevar o ponto de impacto (e em sentido anti-horário para baixar o ponto de impacto).
TABELA DE REFERÊNCIA DA BATERIA DE LÍTIO
Duracell® Sunrise®/Radio Shack® Tipo NEDA (tamanho)
DL2032 CR2032 5004L
GARANTIA/CONSERTO
Para produtos adquiridos fora dos Estados Unidos ou do Canadá favor contatar seu revendedor local quanto a
informações aplicáveis referentes a sua garantia.
© 2004 B.P.O. • Tasco,®, tm denotes trademarks of B.P.O.
INSTRUCTIONS FOR EZSIGHT
™
INSTALLATION
MOUNTING
Caution: Be sure firearm is not loaded.
1. Loosen locking screws and slide mounting rail onto any 3/8” grooved receiver.
2. Adjust forward or backward until eyepiece position is most comfortable for you.
Tighten locking screws.
INSTALLING BATTERIES
Caution: Be sure firearm is not loaded when installing batteries.
Y
our EZSight
™
is powered by one 3V “coin-style” lithium battery. Should the illuminated
red dot grow dim or your EZSight not light at all, replace the battery.
1. To remove the old battery, use a screwdriver or similar implement inserted on the
notched side of the compartment to push battery out the other side.
2. Insert new battery + side down.
ZEROING
Note: The following should be done at an approved range or other safe
area. Eye and ear protection is recommended.
1.
Activate the illuminated red dot by pushing the on/off switch forward.
2.
Test fire 3 shots at a target. Observe the bullet or pellet strike to adjust the windage
and elevation as needed to bring the next text group of 3 shots into the
center of the target.
Note: For windage adjustment, turn the windage adjustment knob
clockwise to move the point of impact left and counterclockwise to
move the point of impact right. In the same manner, adjust the elevation
by turning the elevation knob clockwise to raise the point of impact
(counterclockwise to lower the point of impact).
LITHIUM BATTERY REFERENCE CHART
Duracell
®
Sunrise
®
/Radio Shack
®
NEDA Type (size)
DL2032 CR2032 5004L
ONE YEAR LIMITED WARRANTY
Congratulations on the purchase of your new Tasco product. You have chosen one of the finest values available today. This product
carries Tasco’s ONE YEAR LIMITED WARRANTY. This product is warranted against original defects in material and/or workmanship for
the length of time specified by this warranty, provided, however, that the unit has not been abused, taken apart or tampered with in
any way whatsoever. This warranty is limited to the original purchaser and is not transferable. This warranty applies only to products
purchased in the United States of America. Any return made under this warranty must be accompanied by the items listed below:
1) A check/money order in the amount of $10.00 to cover the cost of postage and handling
2) Name and address for product return
3) An explanation of the defect
4) Proof of Date Purchased
5) Product should be well packed in a sturdy shipping carton to prevent damage in transit, with return postage prepaid to the
address listed below:
TASCO
Attn.: Repairs
8500 Marshall Drive
Lenexa, Kansas 66214
Tasco shall not be liable for any consequential, incidental or contingent damages whatsoever. Some states do not allow the exclusion
of incidental or consequential damages, so the above limitation or exclusion may not apply to you. This warranty gives you specific
legal rights, and you may have other rights which vary from state to state.
Non-warranty repairs or refurbishing of your Tasco product are always provided at a reasonable cost.
For products purchased outside the United States please contact your local dealer for applicable warranty information.
© 2004 B.P.O. • Tasco,®, tm denotes trademarks of B.P.O.
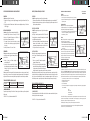
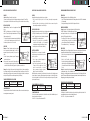
Battery Compartment
On/Off Switch
Windage
Adjustment Knob
Elevation
Adjustment Knob
LIT. #: 9303611104
MODEL #: EZ01D
Vano portapile
Compartimento para pilha
Interruptor On/Off
Botão de ajuste
do desvio lateral
Botão
de ajuste
da elevação
Interruttore On/Off
Manopola di
regolazione
derivazione
Manopola
di regolazione elevazione
EZ01 6LIM.indd 1 11/4/04 2:44:08 PM
A página está carregando...
-
 1
1
-
 2
2


em outras línguas
- español: Tasco EZSight EZ01D Manual de usuario
- français: Tasco EZSight EZ01D Manuel utilisateur
- italiano: Tasco EZSight EZ01D Manuale utente
- English: Tasco EZSight EZ01D User manual
- Deutsch: Tasco EZSight EZ01D Benutzerhandbuch
Artigos relacionados
-
Tasco REDDOT Scope Manual do usuário
-
-
Tasco ProPoint Red Dot Scopes Manual do usuário
-
-
-
Tasco General Manual do usuário
-