Jole every stage™ Manual do usuário
- Categoria
- Assentos de carro
- Tipo
- Manual do usuário

0+/1 /2/3(0–36kg)
every stage
child restraint
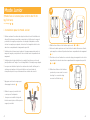
This child restraint is approved to
UN ECE regulation 44, 04 series
of amendments.
Please read all the instructions
in this manual before installing
and using the product.
Instruction Manual

2
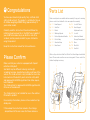
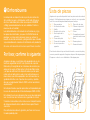
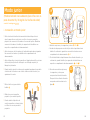
Parts List
Make sure all parts are available before assembly. If any part is missing,
please contact local retailer. No tools are required for assembly.
Fig. 1.1 Head Support Fig. 1.9 Lock-off Device
Fig. 1.2 Seat Pad Fig. 1.10 Head Support
Fig. 1.3 Buckle Adjustment Lever
Fig. 1.4 Webbing Adjuster Fig. 1.11 Lock-off
Fig. 1.5 Recline Adjustment Handle Fig. 1.12 Instruction Manual
Fig. 1.6 Crotch Strap Storage Compartment
Fig. 1.7 Shoulder Strap Fig. 1.13 Base
Fig. 1.8 Infant Insert Fig. 1.14 Back Slot
Fig. 1.15 Seat Slot
Outer soft goods include Seat Pad, Crotch Pad, Head Support and Infant
Insert. Please make sure there are no missing parts. Please contact the
retailer if anything is missing.
GB Congratulations
You have purchased a high quality﹐ fully certified child
safety child restraint. This product is suitable for the use
of children weighing UNDER 36kg (approximately 12
years old or under).
Carefully read this Instruction Manual and follow the
installing steps because this is the ONLY way to protect
your child from serious injury or death in case of an
accident﹐ and to provide comfort to your child while
using this product.
Keep this instruction manual for future reference.
Please Confirm
Make sure that your vehicle is equipped with 3-point
retractor safety-belt.
Seat belts may be different in design and length
according to maker﹐ manufacturing date﹐ and type of the
vehicle. This child restraint is only suitable for use in the
listed vehicles fitted with 3-point retractor safety-belts
and approved to UN ECE regulation 16 or other equiva-
lent standards.
This child restraint is approved to UN ECE regulation 44﹐
04 series of amendments.
This child restraint is not suitable for use in the vehicles
fitted with Lap Belts.
For warranty information﹐ please visit our website at joi-
ebaby.com
! Please keep the instruction manual in the storage
compartment of the rear cover for future reference.
13
14
15
9
10
11
12
1
2
3
456
7
8

12
WARNING
! NO child restraint can guarantee full protection from injury in an acci-
dent. However﹐ proper use of this child restraint will reduce the risk of
serious injury or death to your child.
! This child restraint is designed ONLY for child weighing under 36kg
(approximately 12 years old or under).
!
DO NOT use forward facing mode before the child’s weight exceeds 9kg.
! Any straps of child restraint and vehicle seat should be tightened and
not twisted.
! DO NOT use or install this child restraint until you read and understand
the instructions in this manual and in your vehicle owner's manual.
! DO NOT install or use this child restraint without following the
instructions and warnings in this manual or you may put your child in
serious risk of injury or death.
! DO NOT make any modification to this child restraint or use it along
with component parts from other manufacturers.
! DO NOT use this child restraint if it has damaged or missing parts.
! DO NOT have your child in unfitted clothes when use this child restraint
in baby or toddler mode﹐ because this may prevent your child from
being properly and securely fastened by the shoulder harnesses and
the harnesses between thighs.
! When use this child restraint in baby or toddler mode﹐ the safety belt must
be used correctly﹐ and ensure that any lap strap is worn low down﹐ so that
the pelvis is firmly engaged.
! DO NOT leave this child restraint unbelted or unsecured in your vehicle
because unsecured child restraint can be thrown around and may
injure occupants in a sharp turn﹐ sudden stop﹐ or collision. Remove it if
not in regular use.
! NEVER leave your child unattended with this child restraint at all times.
! Don’t use it on front seat with active airbag when installed in rearfacing
mode.
! NEVER use a second-hand child restraint or a child restraint whose
history you do not know because they may have structural damage
that endangers your child's safety.
! Please keep this child restraint away from sunlight﹐ otherwise it may be
too hot for the child's skin.
! NEVER use ropes or any other substitutes in place of seat belts in case
of injuries from restraint.
! DO NOT use this child restraint as a regular chair as it tends to fall
down and injure the child.
! DO NOT use this child restraint without the soft goods.
! The soft goods should not be replaced with any besides the ones
recommended by the manufacturer﹐ because the soft goods
constitute an integral part of the child restraint performance.
! DO NOT put anything other than the recommended inner cushions in
this child restraint.
! DO NOT carry this child restraint with a child in it.
! DO NOT put unsecured items in the vehicle because they can be
thrown around and may injure occupants in a sharp turn﹐ sudden
stop﹐ or collision.
! Do not allow the child restraint harness or buckles to become trapped
or caught in the vehicle seat or door.
! DO NOT continue to use this child restraint after it has suffered any
violent crash. Replace immediately as there may be invisible
structural damage from the crash.
! Remove this child restraint from the vehicle seat when it is not in use
for a long period of time.
! To avoid suffocation﹐ remove plastic bag and packaging materials
before using this product. The plastic bag and packaging materials
should then be kept away from babies and children.
! Consult the distributor for issues concerning maintenance﹐ repair
and part replacement.
! DO NOT use any load bearing contact points other than those
described in the instructions and marked in the child restraint.
! DO NOT install this child restraint under the following conditions:
1. Vehicle seats with 2-point safety belts.
2. Vehicle seats facing sideward or rearward with respect to the
running direction of the vehicle.
3. Vehicle seats unstable during installation.
! Please do not use this child restraint if the child restraint has dropped
from a significant height﹐ hit the ground at a considerable speed﹐ or
has visible signs of damage. We are not responsible to replace if the
child restraint has been damaged under these abnormal conditions.
A new child restraint will need to be purchased when any of the
aforementioned conditions occurs.

34
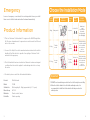
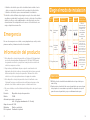
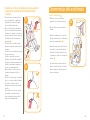
Choose the Installation Mode
Emergency
In case of emergency or accidents﹐ it is most important to have your child
taken care of with first aids and medical treatment immediately.
Product Information
1. This is a ‘Universal’ child restraint. It is approved to UN ECE regulation
44, 04 series of amendments, for general use in vehicles and it will fit most,
but not all, car seats.
2. A correct fit is likely if the vehicle manufacturer has declared in the vehicle
handbook that the vehicle is capable of accepting a ‘Universal’ child
restraint for this age group.
3. This child restraint has been classified as ‘Universal’ under more stringent
conditions than those which applied to earlier designs which do not carry
this notice.
4. If in doubt, please consult the child restraint distributor.
Product Child Restraint
Model C1209
Suitable for
Child weighing 0 - 36kg (approximately 0 – 12 years)
Mass Group 0+/1/2/3
Materials Plastics, metal, fabrics
Patent No. Patents pending
When installing
the child restraint
In the toddler
mode, do not
use the
infant insert.
When installing
the child restraint
In the booster
mode, do not
use the
infant insert.
Child's
Weig ht
Installation
Mode
Figure for
Installation
Reference
Age
Seat Seat pad
Position Instructions
<18kg
9 - 18 kg
15 - 36 kg
Baby mode
Toddler
mode
booster
mode
<4 years
1 year
to
4 years
3 years
to
12 years
3
Position 1 -4
Position 1 -4
Position 5-6
5
2
1
Infant insert
must
be used from
0-9 months
to help restrain
the child tightly
4
3
2
1
4
6
Important
1. DO NOT use forward facing mode before the child's weight exceeds 9kg.
2. When the child is suitable for both toddler and baby modes﹐ it is
recommended to install this child restraint in the baby mode as it is
relatively safer.

56
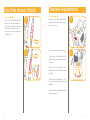
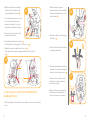
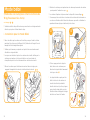
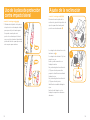
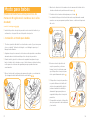
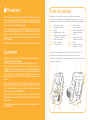
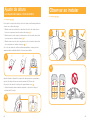
Recline Adjustment
see images 3 - 4
Press the recline adjustment handle,
and adjust the child restraint to the
proper position. 3
The recline angles are shown as 4
There are two recline angles 5-6 for
baby mode, they are marked as blue
triangles.
There are four recline angles 1-4 for
toddler mode, they are marked as red
triangles.
There are four recline angles 1-4 for
booster mode, they are marked as red
triangles.
Angle indication: with top and bottom
triangles aligned.
Use Side Impact Shield
see images 1 - 2
! Must open the side impact shield
plastic to protect the child more
safely. The side impact shield not
on the same side of the vehicle
door can be closed to allow more
seating space.
1
2
1
2
3
2
1
4
33
22
11
66
44
55

78
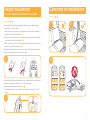
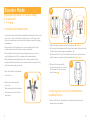
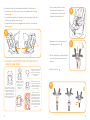
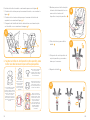
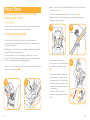
Height Adjustment
for Head Support and Shoulder Harnesses
see images 5 - 6
Please adjust the head support and shoulder harnesses to proper height
according to the child's height.
! When used in baby mode, the shoulder harness slots must be even with or
just below the child’s shoulders. 5 -1
! When used in toddler mode, the shoulder harness slots must be even with
or just above the child’s shoulders. 5 -2
! When used in booster mode, the shoulder belt guides must be even with or
just above the child’s shoulders. 5 -3
If the shoulder harnesses are not at proper height, the child may be thrown
from the child restraint when there is an accident.
Squeeze the head support adjustment lever, meanwhile pull up or push down
the head support until it snaps into one of the 10 positions.
The head support positions are shown as 6
! Side wings are able to open while the head support is adjusted to the 6th
position.
5
123
61
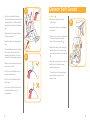
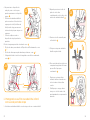
Concerns on Installation
see images 7 - 9
7 8
2
3
1
2
31
1
24
3
57
6
1
24
3
57
6
A
I
R
B
A
G
9

910
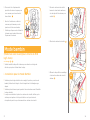
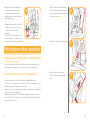
2. Fasten the shoulder belt in the two shoulder-belt slots at the back of the
body. 12
! Shoulder belt must pass through the Lock-off. 13
! Ensure the belt lock off cover is completely closed when not in use to
prevent injury, or damage to vehicle upholstery.
3. While pressing the child restraint,
pull the belts to fasten the child
restraint tightly and securely. 14
! The child restraint can not be used
if the vehicle safety belt buckle
(female buckle end) is too long to
anchor the child restraint securely.
! Please check by moving the child
restraint back and forth.
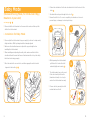
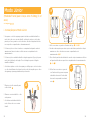
Baby Mode
(Rearward Facing Mode/for Child under 18kg /
Newborn–4 years old)
see images 10 - 19
! Please install the child restraint on the rear vehicle seat, and then put the
child in the child restraint.
i. Installation for Baby Mode
! Please adjust the child restraint to proper angle (2 positions for baby mode).
Angle indication: With top triangle and blue triangle aligned.
! Make sure the shoulder harness is adjusted to proper height before
installing this child restraint.
! When installing and adjusting the safety belts, make sure that both the
shoulder belt and the waist belt are not twisted and will not stop the safety
belts from functioning properly.
1. Pass the waist belt over seat slots, and then engage the vehicle buckle
tongue into the buckle. 10 11
11
10
12 13
22
11
14
33
44

11 12
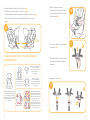
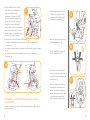
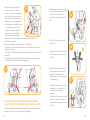
1. While pressing the harness
adjustment button, pull completely
the two shoulder harnesses of the
child restraint. 16
2. Press the red button to disengage
the buckle. 17
3. Place the child in the child restraint
and pass both arms through the
harnesses.
4. Engage the buckle. 18
Correctly assembled vehicle belt is shown as 15
! Waist belt passes through the seat slots , as 15 -1
! Shoulder belt must passes through the shoulder-belt slots, as 15 -2
! The vehicle buckle tongue is engaged with the buckle correctly,
as
15 -3
ii. Securing your Child in the Child Restraint
Use Infant Insert
33
22
11
15
We recommend using the full
infant insert while the baby
is 0-9 months or until they
outgrow the insert. The infant
insert increases side impact
protection.
Detach the snaps on
the head support to
remove the head
portion of the insert.
Remove the head support
portion of the infant
insert when the child’s
head no longer fits
comfortably.
Remove the body
portion of the infant
insert when the infant’s
shoulders no longer fit
comfortably.
Remove the infant insert
cushion by detaching the
snaps to allow more space
when the infant does not
fit comfortably. The
cushion can be used
separately without being
attached to the insert to
bolster the infant's back
for more comfort.
1
2
16
17
18

13 14
1. Thread the safety belt through
two back slots at the back of the
child restraint. 20
2. Buckle the safety belt. 21
3. Open the lock-off device and insert
the safety belt through it. 22
5. Pull down the adjustment webbing
and adjust it to the proper length to
make sure your child is snugly
secured. 19
! After the child is seated, recheck
whether the shoulder harnesses are
at the proper height.
! Make sure the space between the
child and the shoulder harness is
about the thickness of one hand.
Toddler Mode
(Forward Facing Mode/ for Child between
9-18kg / 1–4 years old)
see images 20 - 27
! Please install the child restraint on the vehicle seat, and then put the child in
the child restraint.
i. Installation for Toddler Mode
! Please adjust the child restraint to proper angle (4 positions for toddler
mode). Angle indication: With top triangle and red triangle aligned.
! Please adjust the shoulder harnesses to proper height before installing the
child restraint.
! When installing and adjusting the safety belts, make sure that both the
shoulder belt and the waist belt are not twisted and will not keep the safety
belts from being properly positioned.
19 20
22
21

15 16
1. While pressing the harness
adjustment button, pull completely
the two shoulder harnesses of the
child restraint. 25
2. Press the red button to disengage
the buckle. 26
3. Place the child in the child restraint
and engage the buckle.
4. Pull down the adjustment webbing
and adjust it to the proper length so
that your child is snugly secured. 27
! After the child is seated, recheck
whether the shoulder harnesses
are at proper height.
! Make sure the space between the
child and the shoulder harness is
about the thickness of one hand.
4. While pressing the child restraint,
pull the belts to fasten the child
restraint tightly and securely. 23
! The child restraint can not be used
if the vehicle safety belt buckle
(female buckle end) is too long to
anchor the child restraint securely.
! Please check by moving the child
restraint back and forth.
The assembled safety belt is shown as 24
! Shoulder belt passes through Lock-off Device, as 24 -1
! Waist belt passes through the back slots, as 24 -2
! The vehicle buckle tongue is engaged with the buckle correctly,
as 24 -3
ii. Securing your Child in the Child Restraint
Use Body Portion
! When installing the child restraint in the toddler mode, do not use the infant
insert.
23
24
11
22
33
27
25
26

17 18
Booster Mode
(Forward Facing Mode / for Child 15–36kg /
3–12 years old)
see images 28 - 32
i. Installation for Booster Mode
! Just use the vehicle seat belt when installing the child restraint in the booster
mode, do not use the infant insert, shoulder straps or crotch strap, please
store the shoulder straps, buckle and buckle tongues in respective storage
compartments.
! Please adjust the shoulder harnesses to proper length before store the
shoulder straps and buckle in their storage compartments.
! Please adjust the child restraint to proper angle (4 positions for booster
mode). Angle indication: With top triangle and red triangle aligned.
! When installing and adjusting the safety belts, make sure that both the
shoulder belt and the waist belt are not twisted and will not keep the safety
belts from being properly positioned.
1. Press the red button to disengage
the buckle. 28
2. Remove the infant insert and
crotch pad.
! When installing the child restraint in
the booster mode, do not use the
infant insert.
28
3. Detach the snaps and the hook and loop fasteners. 29 -1 & 29 -2
4. Lift the upper flap upward and pull the lower flap forward, and then store the
shoulder straps in their storage compartments. 29 -3
5. Pull the buckle to the back of the seat pad, and then store the buckle and
buckle tongues in respective storage compartments. 29 -4 & 29 -5
6. Do reattach the snaps and the
hook and loop fasteners to recover
the seat pad. The recovered seat
pad is shown as 30
ii. Securing your Child in the Child Restraint
Use Body Portion
1. Let the child sit in the child restraint, check whether the shoulder belt
guides are at proper height.
29
45
1
2
3
30

19 20
2. Position shoulder belt through
shoulder belt guide, pass waist belt
through seat slots. Fasten buckle
and pull the vehicle belt to tighten.
31
! Shoulder belt must pass through
shoulder belt guide.
! Waist belt must pass through seat
slots.
! The child restraint can not be used
if the vehicle safety belt buckle
(female buckle end) is too long to
anchor the child restraint securely.
! Never use a vehicle waist-only belt
across front of child.
! Do not use shoulder belt loose or
positioned under arm.
! Do not use shoulder belt behind
child’s back.
! Do not allow child to slide down in
the child restraint in case of
strangulation.
32
1
2
Detach Soft Goods
see images 33
1. Remove the infant insert and
crotch strap.
2. Press the red button to disengage
the buckle.
3. Detach the hook and loop fasteners
on the head support, and then
remove the head support. 33 -1
4. Detach the snaps on the seat pad,
pull the buckle to the back of seat
pad, and then remove the seat pad.
33
! Please do not remove any connector
which fixed to the plastic when
removing soft goods.
! To re-attach the soft goods please
repeat the above steps in the
reverse order.
33 1
31

21
Maintenance
! After removing the foam of infant insert, please store it somewhere that the
child can not access it.
! Please wash the soft goods with cold water under 30°C.
! Do not iron the soft goods.
! Do not bleach or dry clean the soft goods.
! Do not use undiluted neutral detergent, gasoline or other organic solvent to
wash the child restraint. It may cause damage to the child restraint.
! Do not twist the soft goods to dry with great force. It may leave the soft
goods with wrinkles.
! Please hang dry the soft goods in the shade.
! Please remove the child restraint from the vehicle seat if not in use for a
long period of time. Put the child restraint in the shade and somewhere your
child can not access it.
NOTE

23
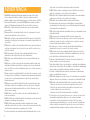
Liste des pièces
Assurez-vous que toutes les pièces sont disponibles avant le montage. Si
une pièce est manquante, veuillez contacter votre revendeur local. Le
montage ne nécessite aucun outil.
Fig. 1.1 Support de tête
Fig. 1.2 Coussin du siège
Fig. 1.3 Boucle
Fig. 1.4 Ajustateur de la toile
Fig. 1.5 Poignée de mémorisation
d'ajustement de l'inclinaison
Fig. 1.6 Sangle pour jambes
Fig. 1.7 Sangle pour épaules
Fig. 1.8 Support pour bébé
Les pièces souples extérieures comprennent le coussin de siège, le
coussin pour l'entrejambe, le support pour tête et le support pour bébé.
Veuillez vous assurer qu'aucune pièce ne manque. Veuillez contacter le
revendeur en cas de pièces manquantes.
FR Félicitations
Vous avez acheté un dispositif de retenue pour enfants﹐
de haute qualité﹐ sûr et pleinement certifié. Ce produit
est adapté aux enfants pesant MOINS de 36 kg (environ
12 ans ou moins).
Lisez attentivement ce manuel d’instructions et suivez les
étapes d’installation﹐ car il s’agit de l’UNIQUE façon de
protéger vos enfants contre des blessures sérieuses ou la
mort en cas d’accident﹐ et de proposer du confort à votre
enfant lors de l’utilisation de ce produit.
Conservez ce manuel d’instructions pour toute référence
future.
Points à confirmer
Vérifiez que votre véhicule est équipé de ceintures de
sécurité rétractables à 3 points.
Les ceintures peuvent être différentes en conception et
longueur en fonction du fabricant﹐ de la date de fabrica-
tion et du type de véhicule. Ce dispositif de retenue pour
enfants convient uniquement pour les véhicules réperto-
riés dotés de ceintures de sécurité rétractables à 3 points
et conformes à la réglementation UN ECE 16 ou d’autres
normes équivalentes.
Ce dispositif de retenue pour enfants est approuvé par la
série d’amendements 44﹐ 04 de la réglementation UN ECE.
Ce dispositif de retenue pour enfants ne convient pas
pour les véhicules dotés de ceintures ventrales.
! Veuillez conserver le manuel d’instructions dans le com-
partiment de stockage du couvercle arrière pour toute
consultation ultérieure.
Pour plus d’informations sur le service de garantie﹐
veuillez consulter notre site Web à l’adresse suivante :
www.joiebaby.com
Fig. 1.9 Système de pince d'arrêt
Fig. 1.10 Levier d'ajustement du
support pour tête
Fig. 1.11 Pince d'arrêt
Fig. 1.12 Compartiment du manuel
d'instructions
Fig. 1.13 Base
Fig. 1.14 Fente arrière
Fig. 1.15 Fente du siège
13
14
15
9
10
11
12
1
2
3
456
7
8

25 26
AVERTISSEMENT
! AUCUN dispositif de retenue pour enfants ne peut garantir une
protection complète contre les blessures en cas d'accident.
Cependant﹐ une bonne utilisation de ce dispositif de retenue pour enfants
réduira les risques de blessures sérieuses ou de mort pour votre enfant.
! Ce dispositif de retenue pour enfants est conçu UNIQUEMENT pour
les enfants de moins de 36 kg (environ 12 ans ou moins).
! N'utilisez PAS le mode face à la route si le poids de l'enfant ne
dépasse pas 9 kg.
! Les sangles du siège de bébé et du siège de véhicule doivent être
serrées﹐ sans torsion.
! N'utilisez PAS et N'installez PAS ce dispositif de retenue pour enfants
avant d'avoir lu et compris les instructions de ce manuel et du manuel
du propriétaire de votre véhicule.
! N'installez PAS et N'utilisez PAS ce dispositif de retenue pour enfants
sans suivre les instructions et avertissements de ce manuel au risque
de mettre votre enfant en danger de blessure ou de mort.
! Ne faites AUCUNE modification sur ce dispositif de retenue pour
enfants et ne l'utilisez pas avec des pièces d'autres fabricants.
! N'utilisez PAS ce dispositif de retenue pour enfants si des pièces sont
endommagées ou manquantes.
!
Ne mettez PAS de vêtements mal adaptés à votre enfant lors de
l'utilisation de ce dispositif de retenue pour enfants en mode bébé ou
bambin﹐ car cela pourrait empêcher votre enfant d'être correctement
attaché par le harnais pour épaules et le harnais au niveau des cuisses.
! En cas d'utilisation de ce dispositif de retenue pour enfants en mode
bébé ou bambin﹐ la ceinture de sécurité doit être utilisée correctement﹐
en vérifiant que les lanières à la taille sont bien placées en bas﹐ afin
que le bassin soit bien engagé.
! Ne laissez PAS ce siège de bébé détaché ou non fixé dans votre
véhicule﹐ car un siège de bébé non attaché peut basculer et blesser
les passagers lors de virages serrés﹐ d'arrêts soudains ou de
collisions. Enlevez-le si vous ne l'utilisez pas.
!
Ne laissez JAMAIS votre enfant sans surveillance dans ce siège de bébé.
! N'installez JAMAIS ce dispositif de retenue pour enfants sur un siège
de véhicule équipé d'airbags de sécurité.
!
N'utilisez JAMAIS un dispositif de retenue pour enfants d'occasion ou
dont vous ne connaissez pas l'historique﹐ car ils pourraient présenter
des dommages structurels mettant la sécurité de votre enfant en péril.
! Veuillez conserver ce siège de bébé à l'écart de la lumière du soleil﹐
car il pourrait devenir trop chaud pour la peau de l'enfant.
! N'utilisez JAMAIS de cordes ou autres substituts au lieu des ceintures
au risque de provoquer des blessures lors de la retenue.
! N'utilisez PAS ce siège de bébé comme chaise ordinaire﹐ car il
pourrait tomber et blesser l'enfant.
! N'utilisez PAS ce siège de bébé sans les parties souples.
! Les parties souples ne doivent pas être remplacées par d'autres que
celles recommandées par le fabricant﹐ car les parties souples font
entièrement partie des performances du siège de bébé.
! NE placez RIEN d'autre que les coussins internes recommandés sur
ce siège de bébé.
! Ne transportez PAS ce dispositif de retenue pour enfants avec un
enfant dedans.
! Ne placez PAS d'objets non attachés dans le véhicule﹐ car ils
pourraient basculer et blesser les passagers lors de virages serrés﹐
d'arrêts soudains ou de collisions.
! Ne laissez pas le harnais ou les boucles du dispositif de retenue pour
enfant être coincés ou bloqués dans le siège ou la porte du véhicule.
!
Ne continuez PAS à utiliser ce dispositif de retenue pour enfants après
un accident violent. Remplacez-le immédiatement﹐ car des dommages
structurels invisibles pourraient avoir été causés par l'accident.
! Retirez ce siège de bébé du siège du véhicule si vous ne prévoyez
pas de l'utiliser pendant une longue période.
! Pour éviter les risques de suffocation﹐ enlevez le sac plastique et les
matériaux d'emballage avant d'utiliser ce produit. Le sac plastique et
les matériaux d'emballage doivent être conservés à l'écart des bébés
et des enfants.
! Consultez le distributeur pour tout problème concernant l'entretien﹐ la
réparation et le remplacement de pièces.
!
N'utilisez PAS de points de contact porteurs autres que ceux décrits
dans les instructions et indiqués sur le dispositif de retenue pour enfants.
! N'installez PAS ce siège de bébé dans les conditions suivantes :
1. Sièges de véhicule avec ceintures de sécurité à 2 points.
2. Les sièges de véhicule tournés sur le côté ou vers l'arrière en
fonction de la direction de déplacement du véhicule.
3. Sièges de véhicule instables lors de l'installation.

27 28
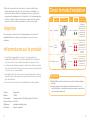
Choisir le mode d'installation
! Merci de ne pas utiliser ce siège auto si ce dernier a chuté d’une
hauteur importante﹐ a heurté le sol à une vitesse considérable﹐ ou
présente des signes visibles de dommages. Nous ne sommes pas
responsable du remplacement si le siège auto a été endommagé dans
de telles conditions. Un nouveau siège de voiture devra être acheté
lorsque l'une des conditions mentionnées ci-dessus se produit.
Urgence
En cas d'urgence ou d'accident﹐ il est primordial que votre enfant soit
immédiatement pris en charge par les premiers secours et des soins
médicaux.
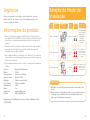
Informations sur le produit
1. Il s'agit d'un siège de bébé « universel ». Il est approuvé par la
réglementation UN ECE 44, série d'amendements 04, pour utilisation
dans un véhicule et il sera adapté à la plupart des sièges de voiture.
2. Le siège sera probablement adapté si le fabricant du véhicule a indiqué
dans le manuel du véhicule que celui-ci peut accepter un siège de bébé
« universel » pour ce groupe d'âge.
3. Ce siège de bébé a été classé comme universel d'après des conditions
plus strictes que celles appliquées à de précédents modèles ne portant
pas cette indication.
4. En cas de doute, veuillez consulter le distributeur du siège de bébé.
Produit Siège bébé
Modèle C1209
Convient aux enfants pesant de 0 à 36 kg (environ 0 à 12 ans)
Groupe de masse 0+/1/2/3
Matériaux : plastiques, métaux, tissus
No. Brevet Brevets en attente
Poids de
l'enfant
Mode
d'installation
Illustration
pour l'installation
Âge
référence
Position
du siège
Instructions
du coussin de siège
<18kg
9 - 18 kg
15 - 36 kg
Mode bébé
Mode
bambin
Mode Junior
<4 ans
1 à 4 ans
3 à 12 ans
3
Position 1 -4
Position 1 -4
Position 5-6
2
1
4
3
2
1
4
Le support
pour bébé doit
être utilisé de 0
à 9 mois pour
permettre de
retenir ferme-
ment l'enfant
Cuando instale el
dispositivo de
sujeción para niños
en el modo para
niños pequeños, no
utilice el accesorio
para niños
pequeños.
En cas d’installation
du dispositif de
retenue pour enfant
en mode junior,
n’utilisez pas le
support pour bébé
56
Important
1. N'utilisez PAS le mode face à la route si le poids de l'enfant ne dépasse
pas 9 kg.
2. Lorsque l'enfant peut être installé en modes bambin et bébé﹐ il est
conseillé d'installer ce dispositif de retenue pour enfants en mode bébé﹐
car il est relativement plus sûr.

29 30
Ajustement de 'inclinaison
voir images 3 - 4
Appuyez sur la poignée
d'ajustement de l'inclinaison et
ajustez le siège de bébé dans la
bonne position 3
Les angles d'inclinaison sont
illustrés en 4
Il y a deux angles d'inclinaison (5
- 6) en utilisation Groupe 0 (dos à la
route) qui sont indiqués par des
triangles bleus
Il y a quatre angles d'inclinaison, 1 à
4 pour le mode bambin, ils sont
marqués par les triangles rouges.
Il y a quatre angles d'inclinaison, 1 à
4 pour le mode junior, ils sont
marqués par les triangles rouges.
Indication de l'angle : avec les
triangles haut et bas alignés.
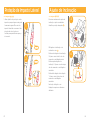
Utiliser la protection contre
les impacts latéraux
voir images 1 - 2
! Il faut ouvrir le plastique de la
protection contre les impacts
latéraux pour protéger correctement
l'enfant. La protection contre les
impacts latéraux ne doit pas être sur
le même côté que la porte du
véhicule qui peut être fermée, pour
avoir plus d'espace.
1
2
1
2
3
2
1
4
33
22
11
66
44
55

31 32
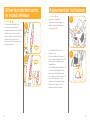
Ajuster la hauteur
pour le repose-tête et le harnais pour épaules
voir images 5 - 6
Veuillez ajuster le support pour tête et le harnais pour épaules à la bonne
hauteur selon la taille de votre enfant.
!
En cas d'utilisation en mode bébé, les fentes pour le harnais d'épaules
doivent être à niveau avec ou juste en dessous des épaules de l'enfant.
5
-1
! En cas d'utilisation en mode bambin, les fentes pour le harnais d'épaules
doivent être à niveau avec ou juste au-dessus des épaules de l'enfant. 5 -2
! En cas d'utilisation en mode junior, les guides de la ceinture pour épaules
doivent être à niveau avec ou juste au-dessus des épaules de l'enfant. 5 -3
Si le harnais pour épaules n'est pas à la bonne hauteur, l'enfant pourrait être
éjecté du siège en cas d'accident.
Appuyez sur le levier d’ajustement du support pour la tête tout en tirant sur le
support vers le haut ou le bas pour le placer sur l’une des 10 positions.
Les positions du support pour la tête sont illustrées en 6
! Les ailes latérales peuvent s'ouvrir quand le support pour tête est ajusté sur
la 6e position.
61
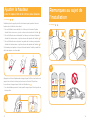
Remarques au sujet de
l'installation
voir images 7 - 9
7 8
A
I
R
B
A
G
9
5
123
2
3
1
2
31
1
24
3
57
6
1
24
3
57
6

33 34
2. Attachez la ceinture pour épaules dans les deux emplacements de ceinture
pour épaules à l'arrière du corps. 12
! La ceinture d'épaules doit passer dans le dispositif de verrouillage. 13
! S’assurer que la boucle bleue de retenue de la ceinture est bien fermée en
cas de non-utilisation afin d’éviter toute blessure corporelle ou d’abîmer la
garniture intérieure (siège ou habitacle) de la voiture
3. Tout en appuyant sur le siège de
bébé, tirez sur les ceintures pour
attacher le siège de bébé fermement
et de façon sûre. 14
! Le siège de bébé ne peut pas être
utilisé si la boucle de ceinture de
sécurité du véhicule (extrémité
femelle de la boucle) est trop longue
pour retenir le siège de façon sûre.
! Veuillez vérifier en déplaçant le siège
de bébé vers l'avant et l'arrière.
Mode bébé(Rearward Facing Mode/
(Mode dos à la route/pour enfants de moins de
18 kg/nouveaux nés–4 ans)
voir images 10 - 19
! Veuillez installer le dispositif de retenue pour enfants sur le siège arrière du
véhicule, puis placez l'enfant dans le siège.
i. Installation pour le mode Bébé
! Merci de vérifier que la ceinture est bien fixée pour que l'enfant soit bien
maintenu (2 positions pour le Groupe 0+ & I) Indication de l'angle : Avec le
triangle haut et le triangle bleu alignés.
! Vérifiez que le harnais pour épaules est ajusté à la bonne hauteur avant
d'installer ce siège de bébé.
! Lorsque vous installez et ajustez les ceintures de sécurité, vérifiez que la
ceinture pour épaules et celle pour la taille ne sont pas tordues et
n'empêchent pas le bon fonctionnement des ceintures de sécurité.
1. Passez la ceinture pour la taille au-dessus des fentes du siège, puis
engagez la languette de la boucle du véhicule dans la boucle. 10 11
12
11
10
13
22
11
14
33
44

35 36
1. Tout en appuyant sur le bouton
d'ajustement du harnais, tirez
complètement les deux harnais
d'épaules du siège bébé. 16
2. Appuyez sur le bouton rouge pour
désengager la boucle. 17
3. Placez l'enfant dans le siège de bébé
et passez les deux bras à travers le
harnais.
4. Fermez la boucle. 18
La ceinture de véhicule correctement assemblée est illustrée en 15
! La ceinture pour la taille passe à travers les emplacements du siège,
comme en 15 -1
! La ceinture pour épaules doit passer à travers les emplacements de la
ceinture pour épaules, comme en 15 -2
! La languette de la boucle est engagée dans la boucle correctement,
comme en 15 -3
ii. Attacher votre enfant dans le siège avec le
support pour bébé
33
22
11
15
Nous conseillons d'utiliser le
support pour enfant intégral
lorsque le bébé fait moins de
60cm ou jusqu'à ce qu'il
dépasse du support. Le
support pour nourrisson
augmente la protection contre
les impacts latéraux.
Détachez les attaches
du support pour tête
afin d'enlever la
portion haute du
support pour
nourrisson.
Retirez la portion de tête du
support pour nourrisson
lorsque la tête de l'enfant ne
se place plus de façon
confortable.
Retirez la portion du corps
du support pour nourrisson
lorsque les épaules de
l'enfant ne se placent plus de
façon confortable.
Enlevez le coussin de
support pour nourrissons
en débloquant les fermoirs
pour faire plus de place
quand l'enfant grandit. Le
coussin peut être utilisé
séparément sans être fixé
au support afin de soutenir
le dos de l'enfant pour plus
de confort.
1
2
16
17
18
A página está carregando...
A página está carregando...
A página está carregando...
A página está carregando...
A página está carregando...
A página está carregando...
A página está carregando...
A página está carregando...
A página está carregando...
A página está carregando...
A página está carregando...
A página está carregando...
A página está carregando...
A página está carregando...
A página está carregando...
A página está carregando...
A página está carregando...
A página está carregando...
A página está carregando...
A página está carregando...
A página está carregando...
A página está carregando...
A página está carregando...
A página está carregando...
A página está carregando...
A página está carregando...
A página está carregando...
A página está carregando...
A página está carregando...
A página está carregando...
A página está carregando...
A página está carregando...
A página está carregando...
-
 1
1
-
 2
2
-
 3
3
-
 4
4
-
 5
5
-
 6
6
-
 7
7
-
 8
8
-
 9
9
-
 10
10
-
 11
11
-
 12
12
-
 13
13
-
 14
14
-
 15
15
-
 16
16
-
 17
17
-
 18
18
-
 19
19
-
 20
20
-
 21
21
-
 22
22
-
 23
23
-
 24
24
-
 25
25
-
 26
26
-
 27
27
-
 28
28
-
 29
29
-
 30
30
-
 31
31
-
 32
32
-
 33
33
-
 34
34
-
 35
35
-
 36
36
-
 37
37
-
 38
38
-
 39
39
-
 40
40
-
 41
41
-
 42
42
-
 43
43
-
 44
44
-
 45
45
-
 46
46
-
 47
47
-
 48
48
-
 49
49
-
 50
50
-
 51
51
-
 52
52
-
 53
53


Jole every stage™ Manual do usuário
- Categoria
- Assentos de carro
- Tipo
- Manual do usuário
em outras línguas
- español: Jole every stage™ Manual de usuario
- français: Jole every stage™ Manuel utilisateur
Artigos relacionados
-
 Jole steadi™ Manual do usuário
-
 Jole litetrax™ 4 Manual do usuário
-
 Jole VERSO Manual do usuário
-
 Jole stages™ Manual do usuário
-
Joie every stage™ FX Manual do proprietário
-
 Jole stages™ FX Manual do usuário
-
-
 Jole i-Juva™ Manual do usuário
-
 Jole muze™ lx Manual do usuário


Outros documentos
-
Graco EXTEND Manual do proprietário
-
Joie EVERYSTAGE FX Manual do usuário
-
Joie i-Venture Group 0+/1 Car Seat Manual do usuário
-
mothercare Joie Juva group 0+ 0720185 Guia de usuario
-
-
Graco GC2117ABIRO000 Manual do usuário
-