
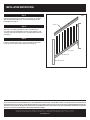
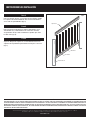
Measure the distance between posts and, if necessary, cut the
2x4 rails to size by trimming the unnotched end. The baluster
and rails have been set to 34 degrees, so if you need to cut
the rails and cap rail, cut them to the 34 degree angle (fig. 2).
Cut the cap rail at the same end as the rails.
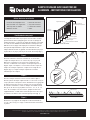
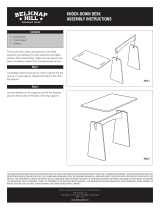
Place the moulded cap rail upside down on a flat surface.
Next, place the top 2x4 rail with the notch on the same side
as the baluster holes into the moulded cap rail channel so that
the holes are facing up. Starting from either end, fasten the
rails together using the (7) 4" screws through holes 1, 2, 5, 8,
11, 14 and 15. If rails are trimmed, predrill any additional holes
with a 1/8" drill bit and insert the screw into the next nearest
hole (fig. 3).
Attach the (4) 2x4 DeckoRail railing brackets according to the
included instructions.
Items you will need
• Drill/power screwdriver
• Miter or circular saw
with carbide-tipped blade
• Tape measure
• Carpenter’s level
• Carpenter’s pencil
• Safety glasses/goggles
• Gloves
Planning your project
Step 1
©2016 Universal Forest Products, Inc. All rights reserved. DeckoRail is a registered trademark of Universal Forest Products, Inc. in the U.S.
Assembled in the USA with balusters from Mexico. UFP Windsor, LLC 15 East Walnut St., West Building, Windsor, CO 80550 7734_1/16
DeckoRail.com
Railing Brackets (4)
Baluster
Outside Edge of Stairs
Post
Cap
Less than 6"
Less than 4"
Support Block
34" < Tread Nose to
Top of Rail < 38"
Top and
Bottom Rail
•
•
•
•
•
•
•
•
•
•
StairsOutline3a1.ai
fig. 1
Cut This End
Do NOT Cut This End
Notch
StairRail1.ai
34°
fig. 2
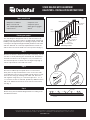
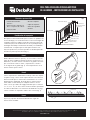
The stair railing was designed to work on stairs that have a 10"
run and 6-3/4" rise, which creates a 34-degree angle. Check local
building code requirements prior to starting your project. A 6" ball
cannot pass through the triangle formed by the bottom rail, tread
and riser. Stair rails are commonly required to be more than 34"
and less than 38" from the tread nose to the top of the rail (fig. 1).
Step 2
Cap
123 456789101112131415
StairRail2.ai
Insert Rail
•
•
Step 3
fig. 3
STAIR RAILING WITH ALUMINUM
BALUSTERS - INSTALLATION INSTRUCTIONS

INSTALLATION INSTRUCTIONS
Step 5
Step 6
Bottom Rail
Railing Brackets
Balusters
Cap Rail
•
•
•
•
StairRail3.ai
fig. 4
Step 4
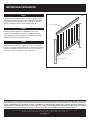
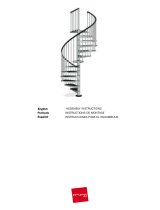
Attach the bottom 2x4 rail, with the holes facing up, using the
2x4 DeckoRail railing brackets. Insert the balusters into the
pre-drilled holes (fig. 4).
Attach the cap rail by aligning the holes to the baluster at
one end of the rail and working your way to the opposite end,
ensuring that all of the balusters are secured between the two
rails (fig. 4).
Fasten a support block at the center of the bottom rail to the
tread surface for spans greater than three feet (fig. 1).
©2016 Universal Forest Products, Inc. All rights reserved. DeckoRail is a registered trademark of Universal Forest Products, Inc. in the U.S.
Assembled in the USA with balusters from Mexico. UFP Windsor, LLC 15 East Walnut St., West Building, Windsor, CO 80550 7734_1/16
DeckoRail.com
THE DIAGRAMS AND INSTRUCTIONS IN THIS BROCHURE ARE FOR ILLUSTRATION PURPOSES ONLY AND ARE NOT MEANT TO REPLACE A LICENSED PROFESSIONAL. ANY CONSTRUCTION OR
USE OF THE PRODUCT MUST BE IN ACCORDANCE WITH ALL LOCAL ZONING AND/OR BUILDING CODES. THE CONSUMER ASSUMES ALL RISKS AND LIABILITY ASSOCIATED WITH THE
CONSTRUCTION OR USE OF THIS PRODUCT. THE CONSUMER OR CONTRACTOR SHOULD TAKE ALL NECESSARY STEPS TO ENSURE THE SAFETY OF EVERYONE INVOLVED IN THE PROJECT,
INCLUDING, BUT NOT LIMITED TO, WEARING THE APPROPRIATE SAFETY EQUIPMENT. UNIVERSAL FOREST PRODUCTS, INC., MAKES NO WARRANTY, EITHER EXPRESS OR IMPLIED,
AND SHALL NOT BE LIABLE FOR ANY DAMAGES, INCLUDING CONSEQUENTIAL DAMAGES.

Mesurez la distance entre les montants et, si nécessaire,
coupez les rampes de 5,1 cm x 10,2 cm (2 po x 4 po) à la
dimension souhaitée en raccourcissant l’extrémité sans
encoche. Le balustre et les rampes ont été précoupés à 34
degrés et par conséquent si vous avez besoin de couper les
rampes et la rampe supérieure, coupez-les à l’angle de 34
degrés (fig. 2). Coupez la rampe supérieure à la même
extrémité que les rampes.
Placez la rampe moulée à l’envers sur une surface plane.
Ensuite, placez la rampe supérieure de 5,1 cm x 10,2 cm (2 po
x 4 po) du même côté que les trous du balustre sur la gorge de
la rampe moulée avec les trous tournés vers le haut. À partir
de l’une des extrémités, serrez les rampes ensemble à l’aide
des (7) vis de 10,2 cm (4 po) dans les trous 1, 2, 5, 8, 11, 14
et 15. Si les rampes sont raccourcies, prépercez des trous
supplémentaires à l’aide d’une mèche de perceuse de 1/8 po
et insérez la vis dans le trou suivant le plus proche (fig. 3).
Attachez les (4) supports de rampe d’escalier DeckoRail de
5,1 cm x 10,2 cm (2 po x 4 po) conformément aux instructions
ci-jointes.
Articles dont vous aurez besoin
• Tournevis électrique/perceuse
• Scie circulaire ou à onglet avec
lame à pointe au carbure
• Ruban à mesurer
• Niveau de menuisier
• Crayon de menuisie
• Lunettes de sécurité
• Gants
Planification de votre projet
Étape 1
©2016 Universal Forest Products, Inc. Tous droits réservés. DeckoRail est une marque commerciale déposée d’Universal Forest Products, Inc., aux É.-U.
Assemblé aux États-Unis avec balustres du Mexique. 2895 Progress Way, Woodburn, OR 97071 7734_1/16
DeckoRail.com
supports de rampe (4)
balustre
Bord extérieur de l'escalier
capuchon
de poteau
moins de 6 pouces
moins de 4 pouces
bloc de support
34 pouces < du pas au
haut de la rampe < 38 pouces
Rampe supérieure et inférieure
•
•
•
•
•
•
•
•
•
•
StairsOutline3a1.ai
fig. 1
coupez cette extrémité
ne coupez pas
cette extrémité
encoche
StairRail1FRENCH.ai
34°
fig. 2
La rampe d’escalier a été conçue pour convenir à des escaliers
qui mesurent 25,40 cm (10 po) de giron et 17,15 cm (6¾ po) de
hauteur de marche, ce qui crée un angle de 34 degrés. Consultez
les codes locaux du bâtiment avant d’entamer votre projet. Une
balle de 15,24 cm (6 po) ne doit pas passer à travers le triangle
formé par la rampe inférieure, le pas et la contremarche. Les
rampes doivent mesurer, en général, au moins 86,36 cm (34 po) et
au plus 96,52 cm (38 po) entre le pas et le haut de la rampe (fig. 1).
Étape 2
rampe supérieure
1 2 3 4 5 6 7 8 9 10 11 12 13 14 15
StairRail2FRENCH.ai
insérez la rampe
•
•
Étape 3
fig. 3
RAMPE D’ESCALIER AVEC BALUSTRES EN
ALUMINIUM - INSTRUCTIONS D’INSTALLATION

INSTRUCTIONS D’INSTALLATION
Étape 5
Étape 6
Rampe inférieure
Supports de rampe
Balustres
Rampe supérieure
•
•
•
•
StairRail3FRENCH.ai
fig. 4
Étape 4
Attachez la rampe inférieure de 5,1 cm x 10,2 cm (2 po x 4 po)
avec les trous faisant face vers le haut, à l’aide des supports de
rampe d’escalier DeckoRail de 5,1 cm x 10,2 cm (2 po x 4 po).
Insérez les balustres dans les trous prépercés (fig. 4).
Attachez la rampe supérieure en alignant les trous sur le
balustre à une extrémité de la rampe et en progressant vers
l’autre extrémité en vous assurant que les balustres sont fixés
solidement entre les deux rampes (fig. 4).
Serrez fermement le bloc de support au centre de la rampe in-
férieure sur la surface de platelage pour les travées plus grandes
que 91,5 cm (3 pi) (fig. 1).and cut off the tops of the posts. Finish
off your posts with an optional decorative finial tops.
©2016 Universal Forest Products, Inc. Tous droits réservés. DeckoRail est une marque commerciale déposée d’Universal Forest Products, Inc., aux É.-U.
Assemblé aux États-Unis avec balustres du Mexique. 2895 Progress Way, Woodburn, OR 97071 7734_1/16
DeckoRail.com
LES DIAGRAMMES ET INSTRUCTIONS DE CETTE BROCHURE SONT À DES FINS D’ILLUSTRATION SEULEMENT ET NON PAS POUR REMPLACER UN PROFESSIONNEL AGRÉÉ. TOUTE CONSTRUC-
TION OU UTILISATION DE CE PRODUIT DOIT ÊTRE CONFORME AUX CODES LOCAUX DE CONSTRUCTION ET/OU DE ZONAGE. LE CLIENT ASSUME TOUS LES RISQUES ET RESPONSABILITÉS
ASSOCIÉS À LA CONSTRUCTION OU À L’UTILISATION DE CE PRODUIT. LE CONSOMMATEUR OU L’ENTREPRENEUR DOIT PRENDRE TOUTES LES MESURES NÉCESSAIRES POUR ASSURER LA
SÉCURITÉ DE TOUTE PERSONNE IMPLIQUÉE DANS LE PROJET, INCLUANT, MAIS SANS S’Y LIMITER, PORTER UN ÉQUIPEMENT DE SÉCURITÉ APPROPRIÉ. UNIVERSAL FOREST PRODUCTS, INC
N’OFFRE AUCUNE GARANTIE, QU’ELLE SOIT EXPRESSE OU IMPLICITE, ET NE SERA PAS RESPONSABLE DE TOUS DOMMAGES, INCLUANT DES DOMMAGES CONSÉCUTIFS.

Mide la distancia entre los postes y, si es necesario, corta los
rieles de 2x4 a medida recortando el extremo sin muesca. Los
balaústres y los rieles fueron colocados a 34 grados, de modo
que si necesitas cortar los rieles y el pasamanos, córtalos
en un ángulo de 34 grados (fig. 2). Corta el pasamanos en el
mismo extremo que los rieles.
Coloca el pasamanos moldeado boca abajo sobre una superfi-
cie plana. Luego, coloca el riel superior de 2x4 con la muesca
del mismo lado que los orificios de los balaústres en el canal
del pasamanos moldeado, de modo que los orificios miren
hacia arriba. Comenzando por cualquier extremo, une los
rieles con los (7) tornillos de 4 plg pasándolos por los orificios
1, 2, 5, 8, 11, 14 y 15. Si los rieles están recortados, pretaladra
los orificios adicionales con una broca de taladro de 1/8 plg y
coloca el tornillo en el próximo orificio más cercano (fig. 3).
Fija los (4) soportes del riel DeckoRail de 2x4 según las
instrucciones incluidas.
Elementos que necesitará
• Taladro/destornillador
eléctrico
• Sierra circular o angular con
disco con puntas de carburo
• Cinta de medir
• Nivel de carpintero
• Lápiz de carpintero
• Gafas de seguridad
• Guantes
Planificación de tu proyecto
Paso 1
©2016 Universal Forest Products, Inc. Todos los derechos reservados. DeckoRail es una marca registrada de Universal Forest Products, Inc. en EE.UU.
Ensamblado en E.E. U.U. con balaustres de México. 2895 Progress Way, Woodburn, OR 97071 7734_1/16
DeckoRail.com
Soportes de rieles (4)
balaustre
Borde exterior de la escalera
Tapa de poste
menos de 15.2 cm
menos de 10.2 cm
bloque de soporte
86.4 cm <punta de la
huella a la parte superior
del riel> 96.5 cm
riel superior e inferior
•
•
•
•
•
•
•
•
•
•
StairsOutline3a1.ai
fig. 1
cortar este extremo
no cortar este extremo
muesca
StairRail1SPANISH.ai
34°
fig. 2
El riel para escalera fue diseñado para escaleras con peldaños de
25.4 cm de largo y 17.1 cm de elevación, lo cual crea un ángulo de
34 grados. Revisa los códigos locales de construcción antes de
comenzar tu proyecto. Una bola de 15.2 cm no puede pasar por
el triángulo formado por el riel inferior, la huella y la contrahuella.
Comúnmente, se requiere que los rieles para escaleras sean
mayores que 86.4 cm y menores que 96.5 cm desde la punta de
la huella a la parte superior del riel (fig. 1).
Paso 2
tapa
1 2 3 4 5 6 7 8 9 10 11 12 13 14 15
StairRail2SPANISH.ai
insertar el riel
•
•
Paso 3
fig. 3
RIEL PARA ESCALERA CON BALAÚSTRES
DE ALUMINIO - INSTRUCCIONES DE INSTALACIÓN

INSTRUCCIONES DE INSTALACIÓN
Paso 5
Paso 6
Riel inferior
Soportes de riel
Balaústres
Tapa de riel
•
•
•
•
StairRail3SPANISH.ai
fig. 4
Paso 4
Fija el riel inferior de 2x4, con los orificios hacia arriba, usando
los soportes del riel DeckoRail de 2x4. Inserta los balaústres
en los orificios pretaladrados (fig. 4).
Fija el pasamanos alineando los orificios al balaústre en un
extremo del riel y continuando hacia el extremo contrario,
asegurándote de que todos los balaústres queden fijos entre
los dos rieles (fig. 4).
Sujeta un bloque de soporte en el centro del riel inferior a la
superficie de la plataforma para distancias mayores a 91.4 cm
(fig. 1).
©2016 Universal Forest Products, Inc. Todos los derechos reservados. DeckoRail es una marca registrada de Universal Forest Products, Inc. en EE.UU.
Ensamblado en E.E. U.U. con balaustres de México. 2895 Progress Way, Woodburn, OR 97071 7734_1/16
DeckoRail.com
LOS DIAGRAMAS E INSTRUCCIONES DE ESTE FOLLETO SON PARA FINES ILUSTRATIVOS SOLAMENTE Y NO ESTÁN DESTINADOS A REEMPLAZAR A UN PROFESIONAL CERTIFICADO. CUAL-
QUIER CONSTRUCCIÓN O USO DEL PRODUCTO DEBEN ESTAR DE ACUERDO CON TODOS LOS CÓDIGOS LOCALES DE CONSTRUCCIÓN O DE ZONIFICACIÓN. EL CONSUMIDOR ASUME TODA
LA RESPONSABILIDAD, ASÍ COMO LOS RIESGOS RELACIONADOS CON LA CONSTRUCCIÓN O EL USO DE ESTE PRODUCTO. EL CONSUMIDOR O EL CONTRATISTA DEBEN TOMAR TODAS LAS
MEDIDAS NECESARIAS PARA GARANTIZAR LA SEGURIDAD DE TODAS LAS PERSONAS QUE PARTICIPAN EN EL PROYECTO, INCLUYENDO, ENTRE OTROS, EL USO DE LOS EQUIPOS DE SEGURI-
DAD ADECUADOS. UNIVERSAL FOREST PRODUCTS, INC., NO OTORGA GARANTÍAS NI ASUME RESPONSABILIDAD ALGUNA, EN FORMA EXPRESA O IMPLÍCITA, POR DAÑOS Y PERJUICIOS DE
CUALQUIER TIPO, INCLUIDOS DAÑOS CONSECUENTES.
-
 1
1
-
 2
2
-
 3
3
-
 4
4
-
 5
5
-
 6
6


DeckoRail 287872 Instruções de operação
- Tipo
- Instruções de operação
- Este manual também é adequado para
em outras línguas
- español: DeckoRail 287872 Instrucciones de operación
- français: DeckoRail 287872 Mode d'emploi
- English: DeckoRail 287872 Operating instructions
Outros documentos
-
Deckorators Railing Connector Guia de instalação
-
Freedom 73021949 Guia de instalação
-
 Belknap Hill Trading Post 188399 Instruções de operação
-
 Fontanot K03002 Guia de instalação
-
none 201570 Guia de instalação
-
Arke K03041 Guia de instalação
-
-
-
 Fontanot CUBE LINE Assembly Instructions Manual
-


