Philips GC8615/02 Manual do usuário
- Categoria
- Estações de engomar a vapor
- Tipo
- Manual do usuário

GC8600 series
User Manual
Mode d’emploi
사용
설명서
使用手冊
用户手册
Manual pengguna
Petunjuk Pengguna
Hướng dẫn sử dụng
Manual do utilizador
4239.001.0634.1

IMPORTANT:
Perform descaling regularly for great steam and prolonged life.
IMPORTANT :
Effectuez régulièrement un détartrage pour une vapeur de qualité et
une durée de vie prolongée.
ขอสำ�คัญ:
중요 사항:
뛰어난 스팀 성능과 수명 연장을 위해 정기적으로 석회질을
제거하십시오.
重要事項:
定期除垢,以達到良好蒸氣效果和延長壽命。
注意事项:
定期执行除垢程序,以获得优异的蒸汽性能并延长产品使用寿命。
PENTING:
Tanggalkan kerak secara berkala untuk mendapatkan stim yang hebat
dan hayat lebih panjang.
PENTING:
Lakukan pembersihan kerak secara berkala agar uap yang dihasilkan
optimal dan masa pakai menjadi lebih lama.
LƯU Ý QUAN TRỌNG:
Thường xuyên khử sạch cặn bám sẽ cho hơi nước tối ưu và kéo dài tuổi
thọ của thiết bị.
IMPORTANTE:
Execute a descalcicação regularmente para um óptimo vapor e uma
duração prolongada.
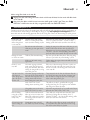
1
2 3 4
5 6 7
8 9


6
Important
Congratulations on your purchase and welcome to Philips! To fully benet from the support that
Philips offers, register your product at www.philips.com/welcome.
Read this user manual, the important information leaet, and the quick start guide on the packaging
carefully before you use the appliance. Save them for future reference.
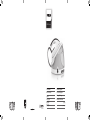
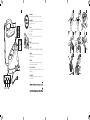
Product overview (Fig. 1)
1 ECO button with light
2 On/off button with power-on light
3 EASY DE-CALC light
4 EASY DE-CALC knob
5 Steam hose storage compartment
6 Carry lock release button (specic types only)
7 Steam trigger/Steam boost (specic types only)
8 Iron ready light/Water tank empty light
OptimalTEMP technology
No temperature and steam setting needed.
The OptimalTEMP technology enables you to iron all types of ironable fabrics, in any order, without
adjusting the iron temperature or steam setting.
Fabrics with these symbols are ironable, for example linen, cotton, polyester, silk, wool, viscose and
rayon (Fig. 2).
Fabrics with this symbol are not ironable. These fabrics include synthetic fabrics such as Spandex or
elastane, Spandex-mixed fabrics and polyolens (e.g. polypropylene), but also prints on
garments (Fig. 3).
Type of water to use
This appliance has been designed to be used with tap water. If you live in an area with very hard
water, fast scale build-up may occur. Therefore, it is recommended to use distilled or de-mineralized
water to prolong the lifetime of the appliance.
Do not put perfume, vinegar, starch, descaling agents, ironing aids or other chemicals in the water
tank of the appliance, as your appliance is not designed to work with these chemicals.
Ironing
Please read the quick start guide on the packaging carefully to start using your
appliance.
Note: Keep the steam trigger pressed continuously when you move the iron over the fabric while you iron.
Steam boost function (specic types only)
Press the steam trigger twice quickly and release it for a high continuous steam output during
13 minutes. Hence you do not have to press the steam trigger continuously, which gives a more
comfortable ironing experience.
Energy saving - ECO mode
By using the ECO mode (reduced amount of steam), you can save energy without compromising
on the ironing result..
Note: For the shortest ironing time, we advise you to use the ‘OptimalTEMP’ mode.
ENGLISH

1 Press the ECO button when the appliance is switched on (Fig. 4).
2 To go back to the ‘OptimalTEMP’ mode, press the ECO button again.
For more powerful steam, you can use the turbo steam mode.
1 Press and hold the on/off button for 5 seconds until the light turns white.
2 The appliance returns to normal steam mode automatically after 15 minutes to save energy.
3 Otherwise, to switch back to normal steam mode at any time, press and hold the on/off
button for 2 seconds until the light turns blue again.
Safety auto-off mode (specic types only)
To save energy, the steam generator switches off automatically when it has not been used for
10 minutes. The light in the on/off button ashes.
To reactivate the steam generator, press the on/off button.
IMPORTANT - cleaning and maintenance
Descaling the appliance
When DE-CALC light is ashing, perform the descaling procedure.This helps to prolong the lifetime
of the appliance and optimise the ironing performance.
If your water is very hard, increase the descaling frequency.
To avoid the risk of burns, unplug the appliance and let it cool down for at least two hours
before you perform the descaling procedure.
Tip: When you perform the descaling procedure, place the appliance on the edge of the table top or near
the sink. Water may ow out of the appliance when the EASY DE-CALC knob is opened.
1 Hold a cup (with a capacity of at least 350 ml) under the EASY DE-CALC knob and turn
the knob anti-clockwise. (Fig. 5)
2 RemovetheEASYDE-CALCknobandletthewaterwithscaleparticlesowintothecup(Fig.6).
3 When no more water comes out of the appliance, reinsert the EASY DE-CALC knob and
tighten it. (Fig. 7)
Descaling the soleplate
If you do not descale your appliance regularly, you may see brown stains coming out of the soleplate
due to scale particles. Descale the soleplate by following the procedure below. We advise you to
repeat the procedure twice for better results.
1 Make sure the appliance is cool and clean the soleplate with a damp cloth.
2 Emptythewatertankthroughthellingdoor.TilttheapplianceandremovetheEASY
DE-CALC knob. Pour 500ml distilled water into the DE-CALC opening and tighten the
EASY DE-CALC knob. (Fig. 8)
3 Switch on the appliance and wait for 5 minutes.
4 Keep the steam trigger pressed continuously while you iron a piece of thick cloth in a
back-and-forth motion for 3 minutes. (Fig. 9)
Hot, dirty water comes out of the soleplate.
5 Stop cleaning when no more water comes out of the soleplate or when steam starts coming
out of the soleplate.
6 Unplug the steam generator and let it cool down for at least 2 hours. Remove the EASY
DE-CALCknobandlettheremainingwaterowout.TightentheEASYDE-CALCknob.
ENGLISH 7

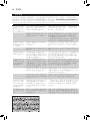
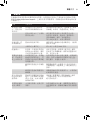
Troubleshooting
This chapter summarises the most common problems you could encounter with the appliance. If
you are unable to solve the problem with the information below, visit www.philips.com/support
for a list of frequently asked questions or contact the Consumer Care Centre in your country.
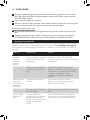
Problem Possible cause Solution
Dirty water,
brown stains or
white akes
come out of the
soleplate.
Scale has built up inside the
appliance because it has not
been descaled regularly.
Descale the appliance (see chapter
‘IMPORTANT - cleaning and maintenance’,
section ‘Descaling the appliance’).
You have put chemicals or
additives in the water tank.
Never use chemical or additives with the
appliance. If you have already done so, follow
the procedure in chapter ‘IMPORTANT-
cleaning and maintenance’, section ‘Descaling
the soleplate’ to remove the chemicals.
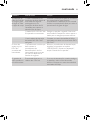
There is no or
little steam.
The appliance has not heated
up sufciently.
Wait until the iron ready light stays on
continuously. This takes approx. 2 minutes.
There is not enough water in
the water tank.
Fill the water tank up to the MAX indication.
Water leaks from
the soleplate.
Steam condenses into water in
the hose when you use steam
for the rst time or have not
used it for a long time.
This is normal. Hold the iron away from
the garment and press the steam trigger.
Wait until steam instead of water comes out
of the soleplate.
The ironing
board cover
becomes wet, or
there are water
droplets on the
oor/garment.
Steam has condensed on the
ironing board cover after a
long ironing session, or your
board cover is not designed to
cope with the high steam rate.
Replace the ironing board cover if the foam
material has worn out. We also advise you to
use a layer of felt material in the board cover
to prevent water droplets.
The EASY DE-CALC knob is
not tightened properly.
Switch off the appliance and wait 2 hours for
it to cool down. Unscrew and reattach the
knob to make sure it is tightened.
The rubber sealing ring of
the EASY DE-CALC knob is
worn.
Contact an authorised Philips service centre
for a new EASY DE-CALC knob.
The iron does
not heat up and
the red DE-
CALC light
ashes.
The appliance reminds you
to perform the descaling
procedure. The light ashes
about after every one month
or after every 10 ironing
sessions.
Perform the descaling procedure, following
the instructions in chapter ‘IMPORTANT-
cleaning and maintenance’, section ‘Descaling
the appliance’.
The steam
generator
produces a
pumping sound.
Water is pumped into the
boiler. This is normal.
If the pumping sound continues non-stop,
switch off the appliance and unplug it. Contact
an authorised Philips service centre.
ENGLISH8

99FRANÇAIS
Important
Félicitations pour votre achat et bienvenue dans l’univers Philips ! Pour proter pleinement de
l’assistance Philips, enregistrez votre produit sur le site Web suivant : www.philips.com/welcome.
Lisez attentivement ce mode d’emploi, la brochure « Informations importantes » et le guide de démarrage
rapide sur l’emballage avant d’utiliser l’appareil et conservez-le pour une consultation ultérieure.
Présentation du produit (g. 1)
1 Bouton ECO avec voyant
2 Bouton marche/arrêt avec voyant
3 Voyant EASY DE-CALC
4 Bouton EASY DE-CALC
5 Compartiment de rangement du cordon de vapeur
6 Bouton de déverrouillage du fer (certains modèles uniquement)
7 Gâchette vapeur/effet pressing (certains modèles uniquement)
8 Voyant « Fer prêt »/Voyant « Réservoir d’eau vide »
Technologie OptimalTEMP
Aucun réglage de température et de vapeur nécessaire.
La technologie OptimalTEMP vous permet de repasser tous les types de tissus repassables,
dans l’ordre que vous souhaitez, sans avoir à régler la température du fer ou la vapeur.
Les tissus avec les symboles suivants sont repassables. Par exemple, le lin, le coton, le polyester,
la soie, la laine, la viscose et la rayonne (soie articielle) (g. 2).
Les tissus avec les symboles suivants ne sont pas repassables. Parmi ces tissus : les tissus synthétiques
tels que l’élasthanne, les tissus comprenant de l’élasthanne et des polyolénes (par exemple du
polypropylène), mais également les impressions sur les vêtements (g. 3).
Type d’eau à utiliser
Cet appareil a été conçu pour être utilisé avec l’eau du robinet. Si vous habitez dans une région où
l’eau est très calcaire, des dépôts peuvent se former rapidement. Il est dès lors recommandé
d’utiliser de l’eau distillée ou déminéralisée an de prolonger la durée de vie de l’appareil.
Ne mettez pas de parfum, de vinaigre, d’amidon, de détartrants, de produits d’aide au repassage
ou autres agents chimiques dans le réservoir d’eau de l’appareil car votre appareil n’est pas
conçu pour fonctionner avec ces produits chimiques.
Repassage
Veuillez lire attentivement le guide de mise en route sur l’emballage avant d’utiliser
votre appareil.
Remarque : Maintenez la gâchette vapeur enfoncée de manière continue lorsque vous déplacez le fer
sur le tissu lors du repassage.
Fonction Effet pressing (certains modèles uniquement)
Appuyez rapidement sur la gâchette vapeur à deux reprises, puis relâchez-la pour un débit de
vapeur élevé et continu pendant 13 minutes. Vous ne devez donc pas appuyer sur la gâchette
vapeur en continu, ce qui est plus confortable pour repasser.

Économie d’énergie - mode ECO
En utilisant le mode ECO (quantité réduite de vapeur), vous pouvez économiser l’énergie sans
compromettre le résultat de repassage.
Remarque : Pour réduire le temps de repassage, nous vous conseillons d’utiliser le mode
« OptimalTEMP ».
1 AppuyezsurleboutonECOlorsquel’appareilestallumé(g.4).
2 Pour retourner au mode « OptimalTEMP », appuyez à nouveau sur le bouton ECO.
Pour obtenir un ux de vapeur plus puissant, vous pouvez utiliser le mode vapeur turbo.
1 Maintenez le bouton marche/arrêt enfoncé pendant 5 secondes jusqu’à ce que le voyant
devienne blanc.
2 L’appareilrevientautomatiquementaumodevapeurnormalauboutde15minutesan
d’économiser de l’énergie.
3 Sinon, pour revenir au mode vapeur normal à tout moment, maintenez enfoncé le bouton
marche/arrêt pendant 2 secondes jusqu’à ce que le voyant s’allume à nouveau en bleu.
Mode d’arrêt automatique de sécurité (certains modèles uniquement)
Pour économiser l’énergie, la chaudière s’éteint automatiquement lorsqu’elle n’a pas été utilisée
pendant 10 minutes. Le voyant dans le bouton marche/arrêt clignote.
Pour réactiver la chaudière, appuyez sur le bouton marche/arrêt.
IMPORTANT - nettoyage et entretien
Détartrage de l’appareil
Lorsque le voyant DE-CALC clignote, effectuez la procédure de détartrage. Ceci permet de
prolonger la durée de vie de l’appareil et d’optimiser les performances de repassage.
Si votre eau est très calcaire, augmentez la fréquence de détartrage.
Pour éviter tout risque de brûlure, débranchez l’appareil et laissez-le refroidir pendant au moins
deux heures avant d’effectuer la procédure de détartrage.
Conseil : Lorsque vous effectuez la procédure de détartrage, placez l’appareil au bord du plan de travail
ou près de l’évier. De l’eau peut s’écouler de l’appareil lorsque le bouton EASY DE-CALC est ouvert.
1 Placez une tasse (d’une contenance d’au moins 350 ml) sous le bouton EASY DE-CALC et
tournez-ledanslesensinversedesaiguillesd’unemontre.(g.5)
2 Enlevez le bouton EASY DE-CALC et laissez l’eau avec des dépôts de calcaire s’écouler dans
latasse(g.6).
3 Lorsque toute l’eau est sortie de l’appareil, réinsérez le bouton EASY DE-CALC et serrez-le.
(g.7)
Détartrage de la semelle
Si vous ne détartrez pas votre appareil régulièrement, la semelle peut provoquer des taches marron
en raison de particules de calcaire. Détartrez la semelle en suivant la procédure ci-dessous. Nous
vous conseillons de répéter la procédure 2 fois pour obtenir les meilleurs résultats.
FRANÇAIS10

1 Assurez-vous que l’appareil est froid et nettoyez la semelle à l’aide d’un chiffon humide.
2 Videz le réservoir d’eau par l’ouverture de remplissage. Inclinez l’appareil et retirez le bouton
EASY DE-CALC. Versez 500 ml d’eau distillée dans l’ouverture DE-CALC et serrez le bouton
EASYDE-CALC.(g.8)
3 Allumez l’appareil et patientez pendant 5 minutes.
4 Maintenez la gâchette vapeur enfoncée de manière continue pendant que vous repassez un
morceaudetissuépaisavecunmouvementdeva-et-vientpendant3minutes.(g.9)
L’eau chaude qui s’écoule de la semelle est sale.
5 Arrêtez le nettoyage lorsque toute l’eau est sortie de la semelle ou lorsque la vapeur
commence à s’échapper de la semelle.
6 Débranchez la chaudière et laissez-la refroidir pendant au moins 2 heures. Retirez le bouton
EASY DE-CALC et laissez l’eau restante s’écouler. Serrez le bouton EASY DE-CALC.
Dépannage
Cette rubrique présente les problèmes les plus courants que vous pouvez rencontrer avec votre
appareil. Si vous ne parvenez pas à résoudre le problème à l’aide des informations ci-dessous,
rendez-vous sur www.philips.com/support pour consulter les questions fréquemment posées,
ou contactez le Service Consommateurs de votre pays.
Problème Cause possible Solution
De l’eau sale, des
taches marron ou
des particules de
calcaire
s’échappent de la
semelle.
Du calcaire s’est accumulé dans
l’appareil car il n’a pas été
détartré régulièrement.
Détartrez l’appareil (voir le chapitre
« IMPORTANT - nettoyage et entretien »,
section « Détartrage de l’appareil »).
Vous avez mis des produits
chimiques ou des additifs dans
le réservoir d’eau.
N’utilisez jamais de produits chimiques ni
d’additifs avec l’appareil. Si vous l’avez fait,
suivez la procédure du chapitre
« IMPORTANT - nettoyage et entretien »,
section « Détartrage de la semelle » pour
éliminer les produits chimiques.
Il n’y a pas de
vapeur ou peu
de vapeur.
L’appareil n’a pas sufsamment
chauffé.
Patientez environ 2 minutes jusqu’à ce que
le voyant « Fer prêt » reste allumé en
continu.
Il n’y a pas assez d’eau dans le
réservoir d’eau.
Remplissez le réservoir d’eau jusqu’au
niveau MAX.
De l’eau s’écoule
de la semelle.
La vapeur se condense en eau
dans le cordon lorsque vous
utilisez la vapeur pour la
première fois ou lorsque vous
ne l’avez pas utilisée pendant
longtemps.
Ce phénomène est normal. Éloignez le fer
du vêtement et appuyez sur la gâchette
vapeur. Patientez jusqu’à ce que de la
vapeur, et non de l’eau, s’échappe de la
semelle.
FRANÇAIS 11

FRANÇAIS12
Problème Cause possible Solution
La housse de la
planche à
repasser devient
humide ou des
gouttes d’eau
apparaissent sur
le sol/le
vêtement.
La vapeur s’est condensée sur
la housse de la planche à
repasser après une longue
séance de repassage ou votre
housse n’est pas conçue pour
résister à un débit élevé de
vapeur.
Remplacez la housse de la planche à
repasser si sa mousse est usée. Nous vous
conseillons également d’utiliser une couche
de feutre dans la housse pour empêcher la
formation de gouttes d’eau.
Le bouton EASY DE-CALC n’a
pas été correctement vissé.
Éteignez l’appareil et attendez 2 heures qu’il
refroidisse. Dévissez et revissez
correctement le bouton.
La bague d’étanchéité en
caoutchouc du bouton EASY
DE-CALC est usée.
Contactez un Centre Service Agréé Philips
pour vous procurer un nouveau bouton
EASY DE-CALC.
Le fer ne chauffe
pas et le voyant
rouge DE-CALC
clignote.
L’appareil vous rappelle
d’exécuter la procédure de
détartrage. Le voyant clignote
après un mois environ ou après
10 séances de repassage.
Effectuez la procédure de détartrage, suivez
les instructions du chapitre « IMPORTANT
- nettoyage et entretien », section
« Détartrage de l’appareil ».
La chaudière
produit un bruit
de pompe.
L’eau est aspirée dans le
réservoir de la centrale. Ce
phénomène est normal.
Si le bruit provoqué persiste, éteignez
l’appareil et débranchez-le. Contactez un
Centre Service Agréé Philips.

13ภ�ษ�ไทย
ขอสำ�คัญ
Philips! Philips
www.philips.com/welcome
ภ�พรวมของผลิตภัณฑ (รูปที่ 1)
1 ECO
2 /
3 EASY DE-CALC
4 EASY DE-CALC
5
6 ()
7 / ()
8 /
เทคโนโลยี OptimalTEMP
ไมตองตั้งค�อุณหภูมิและไอน
OptimalTEMP
( 2)
(
) ( 3)
ชนิดของนที่ใชง�น
, , , ,
เต�รีด
โปรดอ�นคมือก�รใชง�นอย�งยอในบรรจุภัณฑอย�งถี่ถวนเพื่อเริ่มใชง�นเครื่อง
:
ฟงกชันเพิ่มพลังไอน (เฉพ�ะบ�งรนเท�นั้น)
13
ก�รประหยัดพลังง�น - โหมด ECO
ECO () ...
: ‘OptimalTEMP’
1 ECO ( 4)
2 ‘OptimalTEMP’ ECO
1 / 5

14
2 15
3 / 2
โหมดก�รตัดไฟโดยอัตโนมัติ (เฉพ�ะบ�งรนเท�นั้น)
10 /
/
ขอสำ�คัญ - ก�รทำ�คว�มสะอ�ดและบำ�รุงรักษ�
ก�รขจัดคร�บตะกรันตัวเครื่อง
DE-CALC
: EASY
DE-CALC
1 ( 350 .) EASY DE-CALC ( 5)
2 EASY DE-CALC ( 6)
3 EASY DE-CALC ( 7)
ก�รขจัดคร�บตะกรันแผนคว�มรอน
2
1
2 EASY DE-CALC 500 . DE-CALC EASY DE-
CALC ( 8)
3 5
4 - 3 ( 9)
5
6 2 EASY DE-CALC
EASY DE-CALC
ภ�ษ�ไทย

15ภ�ษ�ไทย 15
ก�รแกปญห�
www.philips.com/
support
( ‘ -
’ ‘’)
‘ - ’ ‘
’
‘’ 2
(MAX)
/
EASY DE-CALC 2
EASY DE-CALC
Philips EASY
DE-CALC
DE-CALC
10
‘
- ’ ‘’
Philips

16
중요 사항
필립스 제품을 구입해 주셔서 감사합니다! 필립스가 드리는 지원 혜택을 받으실 수
있도록 www.philips.co.kr에서 제품을 등록하십시오.
본 제품을 사용하기 전에 이 사용자 설명서와 중요 정보 책자, 포장에 있는 요약
설명서를 주의 깊게 읽고 나중에 참조할 수 있도록 잘 보관하십시오.
제품 개요 (그림 1)
1 표시등이 있는 ECO 버튼
2 전원 표시등이 있는 전원 스위치
3 EASY DE-CALC 표시등
4 EASY DE-CALC 조절기
5 스팀 호스 보관함
6 이동용 고정장치 해제 버튼(특정 모델만 해당)
7 스팀 버튼/순간 스팀(특정 모델만 해당)
8 다림질 준비 표시등/물 부족 표시등
자동 온도 설정 기술
온도와 스팀 설정을 조절할 필요가 없습니다.
자동 온도 설정 기술로 다리미 온도나 스팀 설정을 조절하지 않고 다림질이 가능한 모든
종류의 옷감을 다림질할 수 있습니다.
이런 기호가 있는 마, 면, 폴리에스테르, 실크, 모, 인견, 레이온 같은 섬유는 다림질이
가능합니다 (그림 2).
이런 기호가 있는 섬유는 다림질을 할 수 없습니다. 이 섬유는 스판덱스나 엘라스테인,
스판덱스 혼합 섬유, 폴리올레핀(예: 폴리프로필렌)과 같은 합성 섬유 뿐만 아니라
옷감에 새겨진 인쇄를 포함합니다 (그림 3).
사용할 물의 종류
이 다리미는 수돗물을 사용할 수 있도록 설계되었습니다. 사용 지역의 수돗물이 심한
경수일 경우 석회질이 더 빨리 생성될 수 있습니다. 이럴 경우 증류수 또는 탈염수를
사용하면 제품의 수명이 연장됩니다.
제품의 정해진 용도에 맞지 않는 향수, 식초, 풀, 석회질 제거제, 다림질 보조제, 기타
화학 약품을 제품의 물탱크에 넣지 마십시오.
다림질
제품을 사용하기 전에 포장에 있는 요약 설명서를 주의 깊게 읽어 보십시오.
참고: 다림질을 하는 동안 옷감 위로 다리미를 문지르면서 스팀 버튼을 계속 누르고
계십시오.
순간 스팀 기능(특정 모델만 해당)
13분간의 강력한 연속 스팀 분사를 위해 스팀 버튼을 2회 빠르게 눌렀다 뗍니다. 이렇게
하면 스팀 버튼을 계속 누를 필요가 없어 다림질이 더 쉽습니다.
절전 - ECO 모드
ECO모드(스팀 발생량 감소)를 사용하면 다림질 효과에는 영향을 미치지 않으면서
에너지를 절약할 수 있습니다.
참고: 다림질 시간을 최대한 줄이려면 ‘자동 온도 설정’ 모드를 사용하는 것이 좋습니다.
1 제품 전원을 켜고 ECO 버튼을 누릅니다 (그림 4).
한국어

2 ’자동 온도’ 모드로 돌아가려면 ECO 버튼을 다시 누릅니다. 터보 스팀 모드를
사용하여 더 강력한 스팀을 사용할 수 있습니다.
1 흰색 불이 켜질 때까지 전원 버튼을 5초 동안 길게 누르십시오.
2 에너지 절약을 위해 15분 후에 일반 스팀 모드로 자동으로 전환됩니다.
3 언제든지 일반 스팀 모드로 다시 전환하려면 표시등이 다시 파란색으로 켜질 때까지
전원 버튼을 2초 간 길게 누르십시오.
안전한 자동 전원 차단 모드(특정 모델만 해당)
에너지 절약을 위해 약 10분 동안 다리미를 사용하지 않는 경우 전원이 자동으로 꺼지고
전원 버튼에 있는 표시등이 깜박입니다.
다시 다리미를 켜려면 전원 버튼을 누릅니다.
주의 사항 - 세척 및 유지관리
제품의 석회질 제거
DE-CALC 표시등이 깜박일 때 석회질 제거 절차를 수행하셔야 제품의 수명이 연장되고
다림질 성능을 최적화할 수 있습니다.
심한 경수일 경우 석회질 제거 빈도를 늘리십시오.
화상의 위험을 방지하려면 석회질 제거 절차를 수행하기 전에 제품의 전원 플러그를
뽑고 최소 2시간 동안 식히십시오.
도움말: 석회질 제거 절차를 수행할 때에는 제품을 테이블 상단 가장자리 또는 싱크대
위에 올려 놓으십시오. EASY DE-CALC 조절기가 열려 있으면 제품에서 물이 흘러나올
수 있습니다.
1 EASY DE-CALC 조절기 컵(최소 350ml 이상의 용량)을 받치고 조절기를 시계 반대
방향 으로 돌립니다 (그림 5)
2 EASY DE-CALC 조절기를 열어 물과 석회질 입자를 컵으로 배출하십시오 (그림 6).
3 더 이상 제품에서 물이 배출되지 않으면 EASY DE-CALC 조절기를 다시 끼워
고정시키십시오. (그림 7)
열판의 석회질 제거
정기적으로 석회질을 제거하지 않으면 열판에서 석회질 입자에 의해 생성되는 갈색
얼룩이 새어 나오는 것을 볼 수 있습니다. 다음 절차에 따라 열판에서 석회질을
제거합니다. 더 좋은 결과를 위해 제거 절차를 2번 반복하는 것이 좋습니다.
1 제품이 식었는지 확인한 후 젖은 천을 사용하여 열판을 닦습니다.
2 주입 도어를 통해 물탱크를 비웁니다. 제품을 기울이고 EASY DE-CALC 조절기를
제거합니다. 500ml 증류수를 DE-CALC 주입구에 붓고 EASY DE-CALC 조절기를
조입니다. (그림 8)
3 제품의 전원을 켜고 5분간 기다립니다.
4 스팀 버튼을 계속 누른 채로 3분간 두꺼운 천을 앞뒤 방향으로 다림질합니다.
(그림 9)
열판에서 뜨겁고 더러운 물이 떨어집니다.
5 열판에서 더 이상 물이 떨어지지 않거나 열판에서 스팀이 나오기 시작하면 청소를
끝냅니다.
6 스팀시스템 다리미의 전원 플러그를 뽑고 최소 2시간 동안 식힙니다. EASY DE-CALC
조절기를 제거하고 남은 물을 배출시킵니다. EASY DE-CALC 조절기를 조입니다.
한국어 17

문제 해결
이 란은 본 제품을 사용하면서 가장 일반적으로 경험하게 되는 문제와 그 해결 방법을
제시합니다. 아래의 정보로도 문제를 해결할 수 없는 경우 www.philips.com/support를
방문하여 자주 묻는 질문(FAQ) 목록을 참조하거나 필립스 고객 상담실로 문의하십시오.
문제점 가능한 원인 해결책
열판에서 더러
운 물, 갈색 얼
룩 또는 흰 가
루가 나옵니다.
정기적으로 석회질을 제거
하지 않아 제품 내부에 석
회질이 축적되었습니다.
석회질을 제거하십시오(‘주의 사항 -
세척 및 유지관리’란의 ‘제품의 석회
질 제거’섹션 참조).
물탱크에 화학물질 또는 첨
가물을 넣었을 수 있습니
다.
제품에 화학물질 또는 첨가물을 절대로
사용하지 마십시오. 이미 사용한 경우
화학물질을 제거하려면 ‘주의 사항
- 세척 및 유지관리’란의 ‘열판의 석
회질 제거’섹션을 참조하십시오.
스팀이 아예 나
오지 않거나 너
무 적습니다.
제품이 충분히 뜨거워지지
않았습니다.
다림질 준비 표시등이 계속 켜져 있을
때까지 기다리십시오. 약 2분이 걸립니
다.
물탱크의 물이 충분하지 않
습니다.
물탱크의 MAX 눈금까지 물을 채우십시
오.
열판에서 물이
새어 나옵니다.
스팀을 처음 사용할 경우
또는 오랫동안 사용하지 않
은 경우 스팀이 호스 안에
서 물로 응축됩니다.
이는 일반적인 현상입니다. 다리미를 옷
감으로부터 멀리 들고 스팀 버튼을 누
른 다음 열판에서 물 대신 스팀이 나올
때까지 기다리십시오.
다림판 덮개가
젖거나 바닥/옷
감에 물방울이
떨어집니다.
장시간 다림질을 할 경우
다림판 덮개 위에서 스팀이
응축되었거나, 가지고 있는
다림판 덮개가 높은 스팀량
을 견디지 못합니다.
폼 소재가 낡은 경우에는 다림판 덮개
를 교체하십시오. 또한 물방울이 떨어지
지 않도록 다림판 덮개에 펠트 소재를
한 겹 추가하는 것이 좋습니다.
EASY DE-CALC 조절기를
제대로 닫지 않았습니다.
제품 전원을 끄고 2시간을 기다려 다리
미를 식힙니다. 조절기를 풀었다가 다시
부착해 꽉 조이십시오.
EASY DE-CALC 조절기의
고무 봉합 링이 마모되었습
니다.
필립스 서비스 센터로 연락하여 EASY
DE-CALC 조절기를 교체하십시오.
다리미가 예열
되지 않고, DE
CALC 표시등
이 빨간색으로
깜박입니다.
석회질을 제거해야 할 시기
임을 알려주는 신호입니다.
표시등은 한 달마다 또는
10회 다림질한 후에 깜박
입니다.
’주의 사항 - 세척 및 유지관리’란의
‘제품의 석회질 제거’섹션에 있는 지
침에 따라 석회질 제거 절차를 수행하
십시오.
다리미에서 펌
프 소리가 납니
다.
물이 스팀 탱크로 공급되면
서 나는 소리로, 일반적인
현상입니다.
펌프 소리가 멈추지 않을 경우, 제품의 전
원을 끄고 전원 코드를 뽑으십시오. 그런
다음 필립스 서비스 센터로 문의하십시오.
한국어18

19
重要事項
恭喜您購買本產品並歡迎加入飛利浦!請於 www.philips.com/welcome 註冊您的產品,
以善用飛利浦提供的支援。
使用本產品前,請先詳閱本使用手冊、重要資訊手冊及包裝上的快速入門指南。
請妥善保存這些手冊,以便日後參考。
產品概要 (圖 1)
1 ECO 指示燈按鈕
2 開啟/關閉 (On/off) 按鈕附電源指示燈
3 簡易除鈣指示燈
4 簡易除鈣旋鈕
5 蒸氣膠管收藏槽
6 安全鎖釋放鈕 (限特定機型)
7 蒸汽觸動器/強力蒸氣 (限特定機型)
8 熨斗就緒指示燈/水箱已空指示燈
OptimalTEMP 技術
無需設定溫度和蒸氣。
此 OptimalTEMP 技術讓您無需調整熨斗溫度或蒸氣設定,便能熨燙各種可熨燙衣料。
有亞麻、棉、聚酯纖維、絲、羊毛、人造絲、嫘縈等標誌的衣料皆可熨燙。 (圖 2)
有 Spandex 彈性纖維或 Spandex 彈性纖維混紡衣料和聚烯烴 (如聚丙烯) 等標誌的衣料還
有印花衣物,皆不可熨燙。 (圖 3)
使用的水質
此產品乃專為搭配自來水使用而設計。如果您居住的地區水質硬度很高,產品可能會快速
累積水垢。因此,我們建議您使用蒸餾水或軟水,以延長產品的使用壽命。
請勿將香水、醋、澱粉、除水垢劑、熨燙添加劑或其他化學物質加入本產品的水箱內,
因為本產品的設計無法與這些化學物質一起使用。
熨燙
使用本產品前,請先詳閱包裝上的快速入門指南。
注意:熨燙時,在衣物上移動熨斗的同時,持續按住蒸氣觸動器。
強力噴射蒸汽功能 (限特定機型)
快速按兩次蒸氣觸動器並鬆開,可在 13 分鐘內使用高速連續蒸氣輸出。如此您就不必持
續按住蒸氣觸動器,給您更舒適的熨燙體驗。
省電 - ECO 模式
使用 ECO 模式 (蒸氣量會減少) 可以節省能源,但仍然可獲得相近的熨燙效果。
注意:如要在最短時間內完成熨燙,我們建議您使用「OptimalTEMP」模式。
1 開啟產品電源時,按下 ECO 按鈕。 (圖 4)
2 若要回到「OptimalTEMP」模式,請再按一次 ECO 按鈕。
繁體中文

如需更強大的蒸氣量,請使用渦輪蒸氣模式。
1 按住開關按鈕 5 秒鐘,直到指示燈轉為白色。
2 本產品會在 15 分鐘後回復一般蒸氣模式,以節省能源。
3 若要在任何時候切換回「一般蒸氣」模式,請按住開關按鈕 2 秒鐘,直到指示燈再次
轉成藍色。
安全自動斷電模式 (限特定機型)
為了節省能源,蒸氣製造器閒置 10 分鐘時會自動關閉。開啟/關閉 (On/off) 按鈕上的指示
燈會開始閃爍。
若要重新啟動蒸氣製造器,請按下開啟/關閉 (On/off) 按鈕。
重要事項 - 清潔與維護
為產品除垢
除鈣指示燈開始閃爍時,請執行除垢程序。這有助於延長產品的使用壽命,並獲得最佳熨
燙效能。
如果您的水質硬度很高,請提高除垢頻率。
為避免燙傷,請確認本產品插頭已拔離電源插座,並冷卻至少 2 小時後,再進行除垢程序。
提示:執行除垢程序時,請將產品放在桌面邊緣或靠近水槽的地方。打開簡易除鈣旋鈕
時,水可能會從產品內部流出。
1 拿一個杯子 (容量至少 350 毫升) 接在 EASY DE-CALC 簡易除鈣旋鈕下方,
然後以逆時針方向 轉動 旋鈕。 (圖 5)
2 取下簡易除鈣旋鈕,讓含有水垢雜質的水流入杯中。 (圖 6)
3 水都流光之後,請重新裝回簡易除鈣旋鈕並旋緊。 (圖 7)
為底盤除垢
如果未定期幫產品除垢,您可能會看到底盤流出棕色污垢,這是因為水垢雜質的緣故。
此時請依照下列程序為底盤除垢。我們建議您重複此程序兩次,以達到最佳效果。
1 確定產品已經冷卻,然後以濕布清潔底盤。
2 經由注水口門將水箱清空。傾斜本產品,並取下簡易除鈣旋鈕。從除鈣開口倒入
500 毫升蒸餾水,並旋緊簡易除鈣旋鈕。 (圖 8)
3 開啟產品電源,然後靜候 5 分鐘。
4 持續按住蒸氣觸動器,同時在一塊較厚的布料上前後來回熨燙 3 分鐘。 (圖 9)
髒污的熱水會從底盤流出。
5 當底盤不再流出水,或底盤開始冒蒸氣時,便可以停止清潔。
6 拔除蒸氣製造器的插頭,讓其冷卻至少 2 小時。取下簡易除鈣旋鈕,並讓剩餘的水流
出。旋緊簡易除鈣旋鈕。
繁體中文20

疑難排解
本章概述您使用本產品時最常遇到的問題。如果您無法利用以下資訊解決您遇到的問題,
請造訪 www.philips.com/support,上面列有常見問題清單,或聯絡您所在國家/地區的客
戶服務中心。
問題 可能原因 解決方法
從底盤流出髒
水、棕色汙垢
或白屑。
因為產品沒有定期除垢,
所以內部逐漸累積水垢。
請為產品除垢 (請參閱「重要事項 - 清潔
與維護」章節的「為產品除垢」單元)。
您在水箱中加入了化學物
質或添加物。
請勿讓本產品使用化學物質或添加物。
如果您已經使用,請依照「重要事項 -
清潔與維護」章節「為底盤除垢」
單元所述的程序,去除化學物質。
沒有蒸氣,或
蒸氣量微弱。
產品加熱溫度不夠。 請等到熨斗就緒指示燈持續亮起。可能需
要約 2 分鐘。
水箱中的水量不足。 將水倒入水箱至 MAX 刻度。
底盤漏水。 在您第一次使用蒸氣或長
時間未加以使用時,膠管
中的蒸氣會凝結成水滴。
這是正常現象。請將熨斗從衣物上拿開,
然後按下蒸氣觸動器。請等到底盤冒出蒸
氣,而不是水滴。
熨燙板布套潮
濕,或地板/衣
物上出現水滴。
長時間熨燙之後,蒸氣會
凝結在熨燙板布套上,或
熨燙板布套的設計無法處
理高壓蒸氣。
如果熨燙板布套的泡棉已破損,請更換熨
燙板。我們也建議您在熨燙板布套上墊一
層毛氈布,以避免水滴滲入。
簡易除鈣旋鈕並未正確旋
緊。
關閉產品電源,並靜候 2 小時待其冷卻。
先轉開旋鈕,再重新裝上,藉此確定其已
旋緊。
簡易除鈣旋鈕的橡膠密封
圈磨損。
請聯絡授權的飛利浦服務中心,以取得新
的簡易除鈣旋鈕。
熨斗沒有加熱,
紅色除鈣指示
燈閃爍。
產品是在提醒您進行除垢
程序。大約每個月或每熨
燙 10 次後,此指示燈便
會開始閃爍。
請依照「重要事項 - 清潔與維護」章節
「為產品除垢」單元中所述的指示,
進行除垢程序。
蒸氣製造器發
出汲水聲音。
水打進蒸氣箱。這是正常
現象。
如果持續發出汲水聲,請關閉產品電源並
且將插頭拔掉。請聯絡授權的飛利浦服務
中心。
繁體中文 21

22
注意事项
感谢您的惠顾,欢迎光临飞利浦!为了您能充分享受飞利浦提供的支持,请在
www.philips.com/welcome 上注册您的产品。
使用产品之前,请阅读重要信息手册和包装上的快速入门指南。妥善保管以供日后参考。
产品概述 (图 1)
1 ECO 环保节能按钮(带指示灯)
2 带有通电指示灯的开/关按钮
3 EASY DE-CALC 指示灯
4 EASY DE-CALC 旋钮
5 蒸汽管储藏格
6 搬运锁释放按钮(仅限于特定型号)
7 蒸汽开关/蒸汽束喷射(仅限于特定型号)
8 熨斗就绪指示灯/水箱无水指示灯
OptimalTEMP 智能温控科技
无需温度和蒸汽设定。
OptimalTEMP 技术可让您熨烫各种类型的可熨烫面料,而无需调节熨斗温度或蒸汽设定。
带有这些标志的面料为可熨烫面料,如亚麻、棉质、聚酯纤维、丝质、羊毛、粘胶纤维、
人造丝。(图 2)
带有此标志的面料为不可熨烫面料,此类面料包括合成纤维,如氨纶或弹性纤维、氨纶混
合纤维和聚烯烃(如聚丙烯)以及衣物上的印花布。 (图 3)
所用水质类型
根据设计,本产品适合使用自来水。如果您所居住的区域水质非常硬,水垢积聚会非常
快。因此,建议向水箱中注入蒸馏水或软化水,以延长产品的使用寿命。
切勿将香水、醋、淀粉、除垢剂、烫衣剂或其它化学品注入产品的水箱,因为您的产品不
适合使用这些化学品。
电熨斗和挂烫机
请先仔细阅读包装上的快速入门指南,,然后再开始使用产品。
注意:在织物上移动熨斗时,持续按下蒸汽开关。
蒸汽束喷射功能(仅限于特定型号)
快速按两次蒸汽开关,然后松开即可获得长达 13 分钟的持久强力蒸汽喷射。因此,您不
必持续按蒸汽开关,熨烫体验更舒适。
节能 - ECO 环保节能模式
使用 ECO 环保节能模式(减少蒸汽量),可以节省能源而不影响熨烫效果。
注意:对于最短熨烫时间,建议您使用“OptimalTEMP 技术”模式。
1 启动产品后按 ECO 环保节能按钮。 (图 4)
2 要返回“OptimalTEMP 技术”模式,请再次按 ECO 环保节能按钮。
简体中文
A página está carregando...
A página está carregando...
A página está carregando...
A página está carregando...
A página está carregando...
A página está carregando...
A página está carregando...
A página está carregando...
A página está carregando...
A página está carregando...
A página está carregando...
A página está carregando...
A página está carregando...
A página está carregando...
A página está carregando...
A página está carregando...
A página está carregando...
A página está carregando...
A página está carregando...
A página está carregando...
A página está carregando...
A página está carregando...
A página está carregando...
A página está carregando...
A página está carregando...
A página está carregando...
-
 1
1
-
 2
2
-
 3
3
-
 4
4
-
 5
5
-
 6
6
-
 7
7
-
 8
8
-
 9
9
-
 10
10
-
 11
11
-
 12
12
-
 13
13
-
 14
14
-
 15
15
-
 16
16
-
 17
17
-
 18
18
-
 19
19
-
 20
20
-
 21
21
-
 22
22
-
 23
23
-
 24
24
-
 25
25
-
 26
26
-
 27
27
-
 28
28
-
 29
29
-
 30
30
-
 31
31
-
 32
32
-
 33
33
-
 34
34
-
 35
35
-
 36
36
-
 37
37
-
 38
38
-
 39
39
-
 40
40
-
 41
41
-
 42
42
-
 43
43
-
 44
44
-
 45
45
-
 46
46


Philips GC8615/02 Manual do usuário
- Categoria
- Estações de engomar a vapor
- Tipo
- Manual do usuário
em outras línguas
- français: Philips GC8615/02 Manuel utilisateur
Artigos relacionados
-
Philips GC8640/02 Manual do usuário
-
Philips GC9650/80 Manual do usuário
-
-
Philips GC9630/20 Manual do usuário
-
Philips GC7600 series Manual do usuário
-
-
Philips GC660/05 Manual do usuário
-
-
Philips GC9642/60 Informação importante
-
Philips GC504/38 Manual do usuário