Dell PowerEdge C2100 Manual do proprietário
- Tipo
- Manual do proprietário

Dell™ PowerEdge™ C2100
Getting Started
With Your System
Mise en route de votre système
Introdução ao uso do sistema
Introducción al sistema


Dell PowerEdge C2100
Getting Started
With Your System
Regulatory Model FS12-TY

Notes, Cautions, and Warnings
NOTE:
A NOTE indicates important information that helps you make better use of
your computer.
CAUTION:
A CAUTION indicates potential damage to hardware or loss of data
if instructions are not followed.
WARNING:
A WARNING indicates a potential for property damage, personal
injury, or death.
____________________
© 2013 Dell Inc. All rights reserved.
Trademarks used in this text: Dell, the DELL logo, and PowerEdge, are trademarks of Dell Inc.;
Citrix and XenServer are trademarks of Citrix Systems, Inc. and/or more of its subsidiaries, and may
be registered in the United States Patent and Trademark Office and in other countries; Intel and Xeon
are registered trademarks of Intel Corporation in the U.S. and other countries; VMware is a registered
trademark of VMware, Inc. in the United States and/or other jurisdictions; Red Hat and Red Hat
Enterprise Linux are registered trademarks of Red Hat, Inc. in the United States and other countries;
SUSE is a registered trademark of Novell, Inc. in the United States and other countries.
Regulatory Model FS12-TY
2013 - 11 P/N P5KND Rev. A02

Getting Started With Your System
3
Installation and Configuration
WARNING:
Before performing the following procedure, review the safety
instructions that came with the system.
Unpacking the System
Unpack your system and identify each item.
Installing the Rails and System in a Rack
WARNING:
Whenever you need to lift the system, get others to assist you.
To avoid injury, do not attempt to lift the system by yourself.
WARNING:
The system is not fixed to the rack or mounted on the rails. To avoid
personal injury or damage to the system, you must adequately support the system
rack during installation and removal.
CAUTION:
Before installing systems in a rack, install front and side stabilizers
on stand-alone (single) racks or the front stabilizer on racks joined to other racks.
Failure to install stabilizers accordingly before installing systems in a rack could
cause the rack to tip over, potentially resulting in bodily injury under certain
circumstances. Therefore, always install the stabilizer(s) before installing
components in the rack.
CAUTION:
Many repairs may only be done by a certified service technician.
You should only perform troubleshooting and simple repairs as authorized in
your product documentation, or as directed by the online or telephone service
and support team. Damage due to servicing that is not authorized by Dell is not
covered by your warranty. Read and follow the safety instructions that came
with the product.

4
Getting Started With Your System
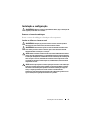
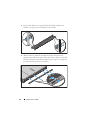
1
Secure the rails to the front of the rack using two screws and to the back of
the rack using four screws.
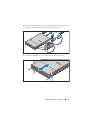
2
Align the keyhole slot on the chassis rails with the corresponding pin
on either side of the system and slide the chassis rails towards the front
of the system until it locks into place. Secure the chassis rails to the
system using screws.

Getting Started With Your System
5
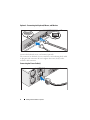
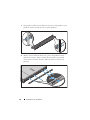
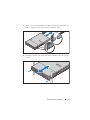
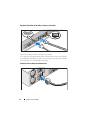
3
Align and insert the ends of the chassis rails into the ends of the rails and
push the system inward until the chassis rails lock into place.
4
Tighten the thumbscrews to secure the ears of system to the rack.

6
Getting Started With Your System
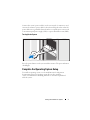
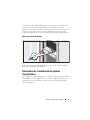
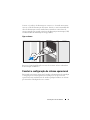
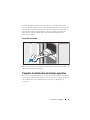
Optional – Connecting the Keyboard, Mouse, and Monitor
Connect the keyboard, mouse, and monitor (optional).
The connectors on the back of your system have icons indicating which cable
to plug into each connector. Be sure to tighten the screws (if any) on the
monitor's cable connector.
Connecting the Power Cable(s)

Getting Started With Your System
7
Connect the system’s power cable(s) to the system and, if a monitor is used,
connect the monitor’s power cable to the monitor. Plug the other end of the
power cables into a grounded electrical outlet or a separate power source such
as an uninterrupted power supply (UPS) or a power distribution unit (PDU).
Turning On the System
Press the power button on the system and the monitor. The power indicators
should light.
Complete the Operating System Setup
To install an operating system, see the installation and configuration
documentation for your operating system. Be sure the operating
system is installed before installing hardware or software not purchased
with the system.

8
Getting Started With Your System
Supported Operating Systems
•Red Hat
®
Enterprise Linux
®
5.4 Standard edition (x64)
• Red Hat Enterprise Linux 5.4 Standard edition (x86)
•SUSE
®
Linux Enterprise Server 11 (x86_64)
• Citrix
®
XenServer™ Enterprise edition 5.
x
• VMware
®
ESX Server Version 4.0, Update 1
NOTE:
For the latest information on supported operating systems,
see dell.com/ossupport.
Other Information You May Need
WARNING:
See the safety and regulatory information that shipped with
your system. Warranty information may be included within this document or
as a separate document.
•The
Hardware Owner’s Manual
provides information about system
features and describes how to troubleshoot the system and install or
replace system components. This document is available online at
dell.com/support/manuals
.
• Dell systems management application documentation provides
information about installing and using the systems management software.
This document is available online at
dell.com/support/manuals
.
NOTE:
Always check for updates on dell.com/support/manuals and read
the updates first because they often supersede information in other documents.

Getting Started With Your System
9
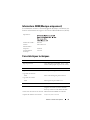
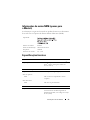
NOM Information (Mexico Only)
The following information is provided on the device described in this
document in compliance with the requirements of the official Mexican
standards (NOM):
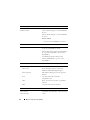
Technical Specifications
Importer:
Model number: FS12-TY
Supply voltage: 100–240 V CA
Frequency: 50/60 Hz
Current consumption: 9.0–5.0 A
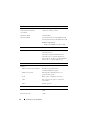
Processor
Processor type One or two Intel
®
Xeon
®
5500 or 5600 series
processors (up to six core processors)
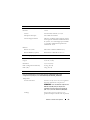
Expansion Bus
Bus type PCI Express Generation 2
Expansion slots
PCIe
Two x8 half-length, full height
Mezzanine slots
PCIe
Two x4 custom slots
Memory
Architecture 800/1066/1333 MHz DDR-3
unbuffered/registered memory modules with
Error Correcting Code (ECC)
Memory module sockets Eighteen 240-pin DIMMs
Memory module capacities 2 GB, 4 GB, 8 GB, or 16 GB

10
Getting Started With Your System
Minimum RAM 12 GB RAM
Maximum RAM 144 GB (dual rank) using 8 GB DIMM
288 GB (quad rank) using 16 GB DIMM
S3 Sleep State
48 GB using 2 GB or 4 GB DIMM
Drive
Hard drives Up to twelve 3.5", hot-swappable SAS/SATA
hard drives
Up to twenty four 2.5", hot-swappable
SAS/SATA hard drives (when available)
(Optional) up to two 2.5", internal SATA/SSD
hard drives (when available)
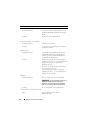
Connectors
Back
NIC
Two RJ-45 (for integrated 10/100/1000 Mbps
Ethernet)
KVM over IP port
Dedicated Ethernet port for remote
management access
Serial
9-pin, DTE, 16550-compatible
USB
Two 4-pin, USB 2.0-compliant
Video
15-pin VGA
Video
Video type AST2050 video controller; VGA connector
Video memory 8 MB
Memory (continued)

Getting Started With Your System
11
Power
AC power supply (redundant)
Wattage 750 W
Voltage
100–240 VAC, 50/60 Hz, 9.5–5.0 A
Heat dissipation
2217.8 BTU/hr maximum
Maximum inrush current
Under typical line conditions and over
the entire system ambient operating range,
the inrush current may reach 55 A per power
supply for 10 ms or less.
Batteries
System battery
CR 2032 3.0-V Lithium coin cell
ROMB battery (optional)
3.7-V Lithium ion battery pack
Physical
Height 87.5 cm (3.44")
Width 43.74 cm (17.22")
Depth 72.2 cm (28.42")
Weight (maximum configuration) 28.5 kg (62.8 lb)
Weight (empty) 12 kg (26.5 lb)
Environmental
For additional information about environmental measurements for specific system
configurations, see www.dell.com/environmental_datasheets.
Temperature
Operating
10° to 35°C (50° to 95°F) with a maximum
temperature gradation of 10°C per hour
NOTE:
For altitudes above 2950 ft,
the maximum operating temperature
is derated 1ºF/550 ft.
Storage
–40° to 65°C (–40° to 149°F) with
a maximum temperature gradation
of 20°C per hour

12
Getting Started With Your System
Relative humidity
Operating
8% to 85% (noncondensing) with a maximum
humidity gradation of 10% per hour
Storage
5% to 95% (noncondensing)
Maximum vibration
Operating
0.26 Grms at 5–350 Hz
Storage
1.54 Grms at 10–250 Hz for 15 mins
Maximum shock
Operating
One shock pulse in the positive z axis
(one pulse on each side of the system)
of 31 G for 2.6 ms in the operational
orientation
Storage
Six consecutively executed shock pulses
in the positive and negative x, y, and z axes
(one pulse on each side of the system)
of 71 G for up to 2 ms
Six consecutively executed shock pulses
in the positive and negative x, y, and z axes
(one pulse on each side of the system) of
27 G fair squared wave pulse with velocity
at 596.9 cm/sec
Altitude
Operating
–16 to 3048 m (–50 to 10,000 ft)
NOTE:
For altitudes above 2950 ft,
the maximum operating temperature
is derated 1ºF/550 ft.
Storage
–16 to 12,000 m (–50 to 35,000 ft)
Airborne Contaminant Level
Class
G2 or lower as defined by ISA-S71.04-1985
Environmental (continued)

Dell PowerEdge C2100
Mise en route
de votre système
Modèle réglementaire FS12-TY

Remarques, précautions et avertissements
REMARQUE :
une REMARQUE indique des informations importantes qui peuvent
vous aider à mieux utiliser votre ordinateur.
PRÉCAUTION :
une PRÉCAUTION vous avertit d'un risque d'endommagement du
matériel ou de perte de données en cas de non-respect des instructions.
AVERTISSEMENT :
un AVERTISSEMENT vous avertit d’un risque
d'endommagement du matériel, de blessure corporelle ou même de mort.
____________________
© 2013 Dell Inc. Tous droits réservés.
Marques mentionnées dans ce document : Dell, le logo DELL et PowerEdge sont des marques de
Dell Inc.; Citrix et XenServer sont des marques de Citrix Systems, Inc. et/ou d'une ou de plusieurs de
ses filiales, et peuvent être déposées auprès du Patent and Trademark Office aux États-Unis et
d'organismes similaires dans d'autres pays ; Intel et Xeon sont des marques déposées d'Intel
Corporation aux États-Unis et dans d'autres pays ; VMware est une marque déposée de VMware, Inc.
aux États-Unis et/ou dans d'autres juridictions ; Red Hat et Red Hat Enterprise Linux sont des marques
déposées de Red Hat, Inc. aux États-Unis et dans d'autres pays ; SUSE est une marque déposée de
Novell, Inc. aux États-Unis et dans d'autres pays.
Modèle réglementaire FS12-TY
2013 - 11 N/P P5KND Rév. A02

Mise en route de votre système
15
Installation et configuration
AVERTISSEMENT :
avant d'exécuter la procédure ci-dessous, lisez les
consignes de sécurité fournies avec le système.
Déballage du système
Sortez le système de son emballage et identifiez chaque élément.
Installation des rails et du système dans un rack
AVERTISSEMENT :
demandez toujours de l'aide avant de soulever le système.
N'essayez pas de le soulever seul, car vous risqueriez de vous blesser.
AVERTISSEMENT :
le système n'est fixé ni au rack ni aux rails. Pour éviter tout
risque d'accident et d'endommagement du système, vous devez soutenir le rack
au cours de l'installation et du retrait du système.
PRÉCAUTION :
avant d'installer des systèmes dans un rack, installez d'abord les
stabilisateurs avant et latéraux. Pour plusieurs racks associés, installez d'abord
le stabilisateur avant. Si les stabilisateurs ne sont pas installés selon la
procédure recommandée avant de placer des systèmes dans un rack, ce dernier
risque de basculer et d'occasionner des blessures corporelles. Installez toujours
le(s) stabilisateur(s) avant d'ajouter des composants.
PRÉCAUTION :
la plupart des réparations ne peuvent être effectuées que par un
technicien de maintenance agréé. N'effectuez que les opérations de dépannage
et les petites réparations autorisées par la documentation de votre produit et
suivez les instructions fournies en ligne ou par téléphone par l'équipe de
maintenance et d'assistance technique. Tout dommage causé par une réparation
non autorisée par Dell est exclu de votre garantie. Consultez et respectez les
consignes de sécurité fournies avec votre produit.

16
Mise en route de votre système
1
Fixez les rails à l'avant du rack à l'aide de deux vis et à l'arrière du rack à
l'aide de quatre vis.
2
Alignez les encoches en trou de serrure sur les rails du châssis avec les
broches correspondantes de chaque côté du système et faites glisser les
rails du châssis vers l'avant du système jusqu'à ce qu'ils soient bloqués.
Fixez les rails du châssis au système à l'aide de vis.

Mise en route de votre système
17
3
Insérez les extrémités des rails du châssis dans celles des rails du rack,
puis poussez le système dans le rack jusqu'à ce que les rails du châssis
s'enclenchent.
4
Serrez les vis moletées afin de fixer les pattes du système au rack.

18
Mise en route de votre système
Facultatif – Connexion du clavier, de la souris et du moniteur
Connectez le clavier, la souris et le moniteur (en option).
Aidez-vous des icônes des connecteurs situés à l'arrière du système pour savoir
où insérer chaque câble. N'oubliez pas de serrer les vis situées sur le
connecteur du câble du moniteur, s'il en est équipé.
Branchement du ou des câbles d'alimentation
A página está carregando...
A página está carregando...
A página está carregando...
A página está carregando...
A página está carregando...
A página está carregando...
A página está carregando...
A página está carregando...
A página está carregando...
A página está carregando...
A página está carregando...
A página está carregando...
A página está carregando...
A página está carregando...
A página está carregando...
A página está carregando...
A página está carregando...
A página está carregando...
A página está carregando...
A página está carregando...
A página está carregando...
A página está carregando...
A página está carregando...
A página está carregando...
A página está carregando...
A página está carregando...
A página está carregando...
A página está carregando...
A página está carregando...
A página está carregando...
A página está carregando...
A página está carregando...
A página está carregando...
A página está carregando...
-
 1
1
-
 2
2
-
 3
3
-
 4
4
-
 5
5
-
 6
6
-
 7
7
-
 8
8
-
 9
9
-
 10
10
-
 11
11
-
 12
12
-
 13
13
-
 14
14
-
 15
15
-
 16
16
-
 17
17
-
 18
18
-
 19
19
-
 20
20
-
 21
21
-
 22
22
-
 23
23
-
 24
24
-
 25
25
-
 26
26
-
 27
27
-
 28
28
-
 29
29
-
 30
30
-
 31
31
-
 32
32
-
 33
33
-
 34
34
-
 35
35
-
 36
36
-
 37
37
-
 38
38
-
 39
39
-
 40
40
-
 41
41
-
 42
42
-
 43
43
-
 44
44
-
 45
45
-
 46
46
-
 47
47
-
 48
48
-
 49
49
-
 50
50
-
 51
51
-
 52
52
-
 53
53
-
 54
54


Dell PowerEdge C2100 Manual do proprietário
- Tipo
- Manual do proprietário
em outras línguas
Artigos relacionados
-
Dell Server C2100 Manual do usuário
-
-
Dell PowerEdge R210 II Guia rápido
-
Dell PowerEdge M820 Manual do proprietário
-
-
-
-
-
-