Creative Zen Vision M Manual do usuário
- Categoria
- Leitores de MP3 / MP4
- Tipo
- Manual do usuário
Este manual também é adequado para

i
English . . . . . . . . . . . . . . . . . . . . . . . . . . . . . . . 1
Français . . . . . . . . . . . . . . . . . . . . . . . . . . . . . 31
Nederlands . . . . . . . . . . . . . . . . . . . . . . . . . . 61
Español . . . . . . . . . . . . . . . . . . . . . . . . . . . . . 91
Italiano . . . . . . . . . . . . . . . . . . . . . . . . . . . . . 121
Ellinika . . . . . . . . . . . . . . . . . . . . . . . . . . . . . 151
Português . . . . . . . . . . . . . . . . . . . . . . . . . . 183
Zen Vision Mini PM3.book Page i Friday, October 21, 2005 11:39 AM

ii
Zen Vision Mini PM3.book Page ii Friday, October 21, 2005 11:39 AM
1
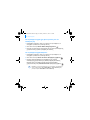
Congratulations
Zen Vision:M™ is the new digital player from Creative. Read on to learn how to
get started with your new player!
Contents
About Your Player ................................................................................... 2
Using the Navigation Controls ............................................................... 3
Getting Started ....................................................................................... 4
Managing Music and Data...................................................................... 10
Understanding your Player.................................................................... 11
Managing Your Player .......................................................................... 12
Personalizing Your Player .................................................................... 21
Connecting Your Player to a TV (Optional) ........................................... 24
FAQ ....................................................................................................... 25
Information Diagrams .......................................................................... 26
General Specifications ........................................................................ 28
Copyright and License .......................................................................... 30
Zen Vision Mini PM3.book Page 1 Friday, October 21, 2005 11:39 AM

2 About Your Player
About Your Player
Unfold the last page of this booklet, and reference the image there against the
names and descriptions below.
1Power switch
2 Screensaver LED
3Lock
Push toward the Lock icon to
lock the player and prevent
functions from being accidentally
activated.
4Headphone jack
5Vertical Touch Pad
See “Using the Navigation
Controls” on page 3.
6 Microphone
7Play/Pause button
8 Next/Fast Forward button
Press to go to the next track or
menu option.
Press and hold to move forward
within a track.
9 Options button
Press to display more options.
10 Dock connector
Connect the USB synchronization
adapter to this connector.
11 Reset hole
See “How do I reset Zen
Vision:M?” on page 25.
12 Menu/Back button
Press to return to the previous
screen or menu.
Press and hold to return to the
main menu.
13 Previous/Rewind button
Press to go to the previous track
or menu option.
Press and hold to move back
within a track.
14 My Shortcut button
See “To assign a menu shortcut
to My Shortcut button” on
page 21.
15 Liquid Crystal Display (LCD)
Zen Vision Mini PM3.book Page 2 Friday, October 21, 2005 11:39 AM

Using the Navigation Controls 3
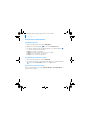
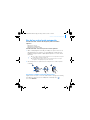
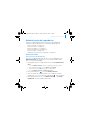
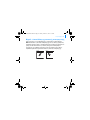
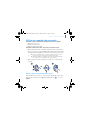
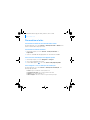
Using the Navigation Controls
We use the term “Navigation controls” to mean the following:
Vertical Touch Pad
Previous/Rewind button
Next/Fast Forward button.
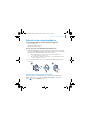
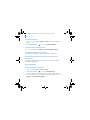
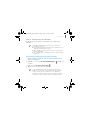
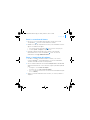
We use the term “Select” to mean the following actions:
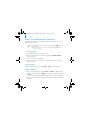
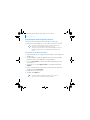
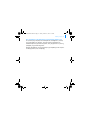
1 Move your thumb up and down the Vertical Touch Pad to move vertically in a
menu OR press the Previous/Rewind or Next/Fast Forward button to move
horizontally in a menu.
2 Firmly tap the Vertical Touch Pad to select the highlighted option.
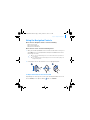
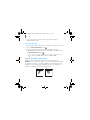
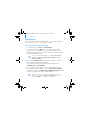
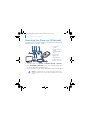
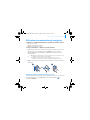
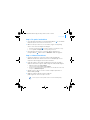
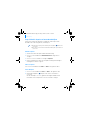
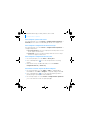
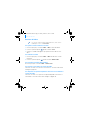
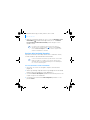
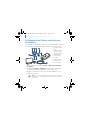
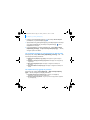
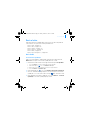
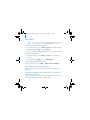
To adjust volume with the Vertical Touch Pad
Depending on the menu you are in, move your thumb up and down the Vertical
Touch Pad OR press the Options button and select Volume.
Press the top or bottom edge of the Vertical Touch Pad to move up or down one
menu option.
Press and hold the top or bottom edge of the Vertical Touch Pad to rapidly scroll
through menu options.
2
1
OR
Zen Vision Mini PM3.book Page 3 Friday, October 21, 2005 11:39 AM

4 Getting Started
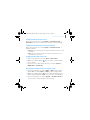
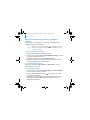
Getting Started
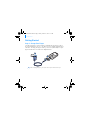
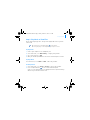
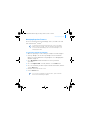
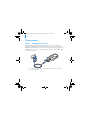
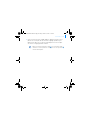
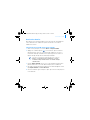
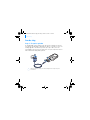
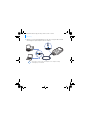
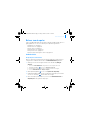
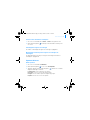
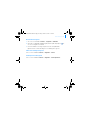
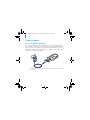
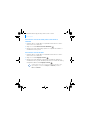
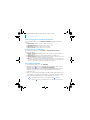
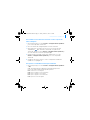
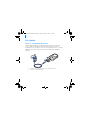
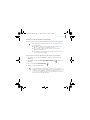
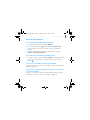
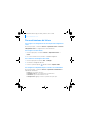
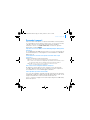
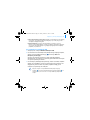
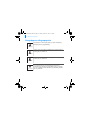
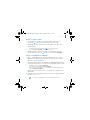
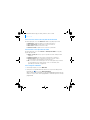
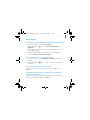
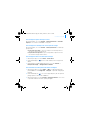
Step 1: Charge Your Player
The high performance Lithium Ion battery supplied with your player needs to
be fully charged before you use it. The battery is fully charged in approximately
two hours. To charge your player's battery, connect the power adapter to your
player and wall outlet as shown in the diagram below.
While charging your player, you can proceed to "Step 2: Turn On Your Player".
3
2
1
Zen Vision Mini PM3.book Page 4 Friday, October 21, 2005 11:39 AM

Getting Started 5
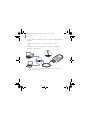
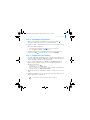
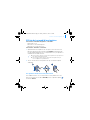
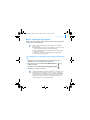
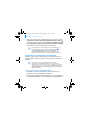
Step 2: Turn On Your Player
1 Slide the Power switch towards the Power icon and hold it there until the
LCD lights up.
2 When you turn on your player for the first time, the menu is in English. To
change the language:
i. Press and hold the Menu/Back button . The main menu appears.
ii. Select System
→ Language → language that you want.
3 After you have finished using your player, slide the Power switch towards
the Power icon until the Shutting down message appears.
Step 3: Set Up Software
1 Turn on your computer. You must log in as an administrator in Windows
®
before you can set up the software. For more information, refer to your
operating system’s online Help.
2 Insert the Installation CD into your CD-ROM/DVD-ROM drive. Your CD
should start automatically. If it does not, follow the steps below:
i. Double-click the My Computer icon.
Alternatively, click Start → My Computer.
ii. Right-click the CD-ROM/DVD-ROM drive icon, and then click Autoplay.
3 Follow the instructions on the screen and when prompted, restart your
computer.
4 When your computer restarts, follow the product registration instructions
on the screen.
You will require an Internet connection to register your product.
Zen Vision Mini PM3.book Page 5 Friday, October 21, 2005 11:39 AM

6 Getting Started
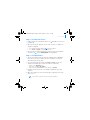
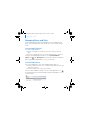
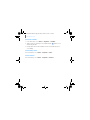
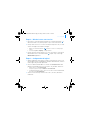
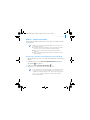
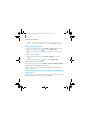
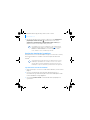
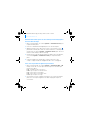
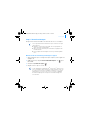
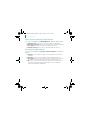
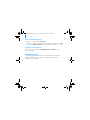
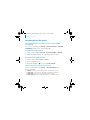
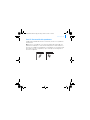
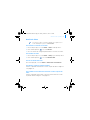
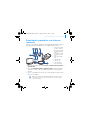
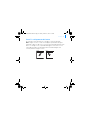
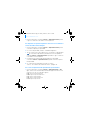
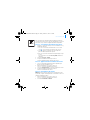
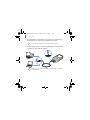
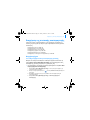
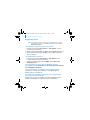
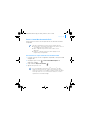
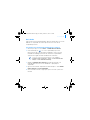
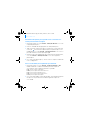
5 When prompted, connect your player to your computer’s USB port as
shown.
Connect to a computer USB port only; avoid connecting to a USB hub.
Zen Vision Mini PM3.book Page 6 Friday, October 21, 2005 11:39 AM

Getting Started 7
Step 4: Transfer Content
Transfer music and other files from your CD collection or computer. For more
details, see “Managing Music and Data” on page 10
To transfer or ‘rip’ music from your CD collection
1 Make sure your player is connected to your computer as shown on page 6.
2 Double-click the Zen Vision:M Media Explorer icon on the desktop.
3 Click the Rip Audio CDs button .
4 Follow the instructions on the screen.
To transfer audio files, videos or pictures from your computer
1 Repeat steps 1 and 2 in "To transfer or ‘rip’ music from your CD collection".
2 Click the Browse Media button .
You can acquire content from many legal sources. Here are some suggestions:
Audio tracks - ripped from personal audio CDs, home studio recordings or
purchased from online music stores.
Videos - purchased from online movie stores or digitized home video
footage.
Photos - encoded from your personal digital camera or scanned from
printed photos.
Creative Media Explorer uses MusicID
SM
from Gracenote
®
to get artist, title,
track, credits, and other information about the CDs you play. This service is
FREE and automatic. You must be connected to the Internet when using this
service. For more information, refer to the Creative Audio CD Ripper online
Help.
Zen Vision Mini PM3.book Page 7 Friday, October 21, 2005 11:39 AM

8 Getting Started
3 Locate your media files and copy them to your player using the
drag-and-drop method.
To transfer data files
1 Repeat steps 1 and 2 in "To transfer or ‘rip’ music from your CD collection".
2 Click the Browse Documents button .
3 Locate your data files and transfer them to your player using the
drag-and-drop method. You can also transfer audio files and photos using
the Browse Documents button .
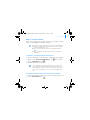
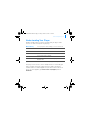
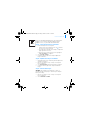
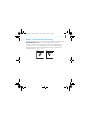
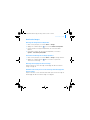
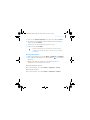
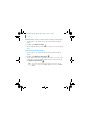
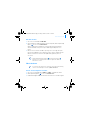
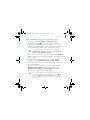
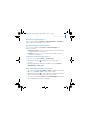
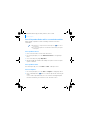
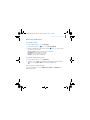
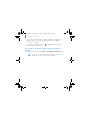
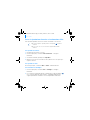
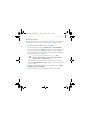
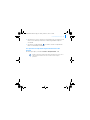
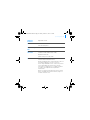
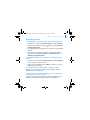
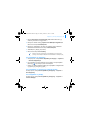
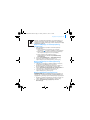
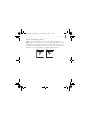
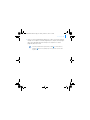
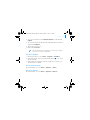
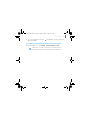
Step 5: Disconnect Your Player
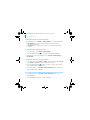
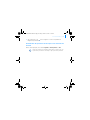
When you have finished transferring files, disconnect Zen Vision:M.
DO NOT disconnect your player if you see the left picture below on the display.
Track or data file transfer is in progress and disconnecting your player may
damage the content being transferred. Wait until you see the right picture
below on the display before disconnecting your player.
Make sure files are transferred to the correct folder, for example pictures are
transferred to Media → Pictures and music to Media → Music.
Docked
Docked
Zen Vision Mini PM3.book Page 8 Friday, October 21, 2005 11:39 AM

Getting Started 9
Step 6: Play Music or View Files
You are now ready to play music that you have ripped, and view files you have
transferred!
To play music
1 Connect your earphones to the Headphone jack.
2 In the main menu, select Music Library → category that you want.
3 Select a track and select Play.
4 Move your thumb up and down the Vertical Touch Pad to adjust the volume.
To play videos
In the main menu, select Videos → Video → video that you want.
To view pictures
1 In the main menu, select Photos → Pictures → picture that you want.
2 Press the Options button
to select rotate and zoom options.
If you select the zoom option, use the Navigation controls to pan horizontally
and vertically in four different directions.
At any time, press the Options button for more options.
Files in your player are sorted alphabetically for quicker searches.
Zen Vision Mini PM3.book Page 9 Friday, October 21, 2005 11:39 AM

10 Managing Music and Data
Managing Music and Data
Creative Media Explorer and Creative MediaSource™ are included with your
player. Try out both applications to decide which one is more suitable for your
needs.
Creative Media Explorer
Use Creative Media Explorer if:
you are new to digital music and want to transfer music from your CDs to your
player
you prefer to manage your player in the familiar “Windows Explorer” environment.
To start Creative Media Explorer, double-click the Zen Vision:M Media
Explorer icon under My Computer or on the desktop. For more information
about using Creative Media Explorer, refer to its online Help.
Creative MediaSource
Use Creative MediaSource, a full-featured media organizer/player, if:
you require additional features such as recording, automatic playlist generation and
audio format conversion
you want to manage a music library on your computer.
To start Creative MediaSource, double-click the Creative MediaSource icon
on your desktop. For more information about using Creative MediaSource, refer
to its online Help.
Zen Vision Mini PM3.book Page 10 Friday, October 21, 2005 11:39 AM

Understanding Your Player 11
Understanding Your Player
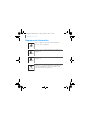
Navigate through the different menus to find out what your player can do!
These are the main menu options on your player:
Your player’s menu interface, features and operations are controlled by your
player’s firmware. Sometimes, improvements are made to your player’s
firmware and these firmware upgrades are placed on Creative’s web site for
you. To check for upgrades, go to www.creative.com/support/ and click
Downloads.
Music Library
select to play music and recordings, or to use the DJ function
Photos
select to view pictures
Videos
select to play videos
FM Radio
select to scan for and listen to FM radio stations
Microphone
select to make instant recordings
Extras
select to use additional features including Organizer and
Removable Disk
System
select to view and customize your player’s settings
Zen Vision Mini PM3.book Page 11 Friday, October 21, 2005 11:39 AM

12 Managing Your Player
Managing Your Player
You are now equipped to use your player’s more advanced features! Read on to
get the most out of your player.
“Managing Audio” on page 12
“Managing Videos” on page 15
“Managing Pictures” on page 16
“Managing Recordings” on page 17
“Managing Data” on page 18
“Managing Organizer Features” on page 19.
Managing Audio
To create playlists
You can select any combination of tracks you want from your player’s Music
Library to create playlists for convenient playback.
1 To add a track or category of tracks to the Now Playing folder:
i. Select Music Library → track or category of tracks that you want.
ii. Press the Options button , and select Add to Selected.
iii. Repeat steps i) and ii) to add another track or category of tracks.
iv. Select Music Library → Now Playing.
2 Press the Options button , and select Save As Playlist.
3 Use the Navigation controls to create a name for your playlist and select the
check mark to confirm the name.
4 To play a playlist, select Music Library → Playlists → playlist that you want.
Zen Vision Mini PM3.book Page 12 Friday, October 21, 2005 11:39 AM

Managing Your Player 13
To select tracks with Zen Vision:M’s DJ
In the main menu, select Music Library → DJ → option that you want:
Album of the Day: plays a randomly selected album
Random Play All: plays all tracks randomly
Most Popular: plays the most played tracks
Rarely Heard: plays rarely played tracks.
To enhance your audio experience
In the main menu, select System → Audio Settings → option/s that you want:
Play Mode: shuffles, repeats or plays your audio tracks in sequential order
Bass Boost: enhances the bass in your track during playback
Smart Volume: sets playback at a constant volume. You no longer need to adjust the
volume when you play different tracks.
EQ: enhances your music depending on its genre or style. You can also customize
your own EQ setting. See “To create a customized equalizer setting” on page 23.
To set up FM Radio
1 In the main menu, select FM Radio.
2 To automatically scan and save radio stations, press the Options button
,
and select Autoscan.
At the end of the autoscan, Zen Vision:M automatically saves all stations as
preset channels and tunes in to the first preset.
Zen Vision Mini PM3.book Page 13 Friday, October 21, 2005 11:39 AM

14 Managing Your Player
3 To select a different preset, firmly tap the Vertical Touch Pad to display the
list of presets, and then move your thumb up and down the Vertical Touch
Pad to select the preset that you want.
Hold down the Next/Fast Forward button or Previous/Rewind button for
one second to scan for the next available radio station.
Zen Vision Mini PM3.book Page 14 Friday, October 21, 2005 11:39 AM

Managing Your Player 15
Managing Videos
To go forward or backward in a video
1 In the main menu, select Videos → Video → video that you want.
2 Press the Options button , and select Seek To.
3 Use the Navigation controls to go forward or backward in a video.
To delete a video
1 In the main menu, select Videos → Video, and highlight the video that you
want.
2 Press the Options button , and select Delete Video.
To display the last viewed video
In the main menu, select Videos → Recently browsed videos.
To display or hide video folders
See “To display or hide video or picture folders” on page 22.
To set a password when displaying or hiding video folders
See “To set a password when displaying or hiding video or picture folders” on
page 22.
To convert your videos to a format supported by your player, launch Creative
Media Explorer and click Convert Video. For information about Creative Media
Explorer, see “Managing Music and Data” on page 10.
Zen Vision Mini PM3.book Page 15 Friday, October 21, 2005 11:39 AM

16 Managing Your Player
Managing Pictures
To view your pictures in a slideshow
1 In the main menu, select Photos → Pictures.
2 Press the Options button , and select Start Slideshow.
3 To customize your own slideshows, launch Creative Media Explorer.
4 To change the slideshow interval duration, select System → Photo/Video
Settings.
To rate and view your favorite pictures
1 In the main menu, select Photos → Pictures → picture that you want.
2 Press the Options button to select rating and viewing options.
To display or hide picture folders
See “To display or hide video or picture folders” on page 22.
To set a password when displaying or hiding picture folders
See “To set a password when displaying or hiding video or picture folders” on
page 22.
Zen Vision Mini PM3.book Page 16 Friday, October 21, 2005 11:39 AM

Managing Your Player 17
Managing Recordings
To record audio
1 In the main menu, select Microphone.
2 Press the Options button , and select Start Recording.
3 While recording, you can press the Options button
to do one of the
following:
Pause: pauses the recording
Resume: resumes the paused recording
Stop: stops and saves the recording
Split: starts a new recording.
To record radio broadcasts
1 In the main menu, select FM Radio.
2 While listening to a radio broadcast, press the Options button , and
select Record Radio to start recording.
To listen to recorded audio
In the main menu, select Music Library → Recordings → recording that you
want.
Zen Vision Mini PM3.book Page 17 Friday, October 21, 2005 11:39 AM

18 Managing Your Player
Managing Data
You can use Zen Vision:M to store backup copies of your computer’s data files,
or use it to transfer files from one computer to another.
To use Zen Vision:M as a Removable Disk
1 In the main menu, select Extras → Removable Disk.
2 Press the Options button
, and select the capacity that you want.
Alternatively, connect Zen Vision:M to your computer and use Creative
Removable Disk Manager to increase or decrease the amount of hard disk
space in Removable Disk mode.
3 When you see Removable Disk on Zen Vision:M’s LCD, you are ready to
transfer data files to and from any computer.
4 Connect Zen Vision:M to your computer. Zen Vision:M appears as a
Removable Disk under My Computer.
5 Use the drag-and-drop method to copy files to and from Zen Vision:M.
6 When you have finished copying files, click the Safely Remove Hardware
icon on the Taskbar, click Safely remove USB Mass Storage Device, and
disconnect your player when you are prompted to do so.
To start Creative Removable Disk Manager, click Start → Programs or All
Programs → Creative → Creative Removable Disk Manager → Creative
Removable Disk Manager.
To delete all the data files in the Removable Disk hard disk space, press the
Options button , and select Format. Go to My Computer if you want to
delete individual data files stored in Removable Disk mode.
Zen Vision Mini PM3.book Page 18 Friday, October 21, 2005 11:39 AM
A página está carregando...
A página está carregando...
A página está carregando...
A página está carregando...
A página está carregando...
A página está carregando...
A página está carregando...
A página está carregando...
A página está carregando...
A página está carregando...
A página está carregando...
A página está carregando...
A página está carregando...
A página está carregando...
A página está carregando...
A página está carregando...
A página está carregando...
A página está carregando...
A página está carregando...
A página está carregando...
A página está carregando...
A página está carregando...
A página está carregando...
A página está carregando...
A página está carregando...
A página está carregando...
A página está carregando...
A página está carregando...
A página está carregando...
A página está carregando...
A página está carregando...
A página está carregando...
A página está carregando...
A página está carregando...
A página está carregando...
A página está carregando...
A página está carregando...
A página está carregando...
A página está carregando...
A página está carregando...
A página está carregando...
A página está carregando...
A página está carregando...
A página está carregando...
A página está carregando...
A página está carregando...
A página está carregando...
A página está carregando...
A página está carregando...
A página está carregando...
A página está carregando...
A página está carregando...
A página está carregando...
A página está carregando...
A página está carregando...
A página está carregando...
A página está carregando...
A página está carregando...
A página está carregando...
A página está carregando...
A página está carregando...
A página está carregando...
A página está carregando...
A página está carregando...
A página está carregando...
A página está carregando...
A página está carregando...
A página está carregando...
A página está carregando...
A página está carregando...
A página está carregando...
A página está carregando...
A página está carregando...
A página está carregando...
A página está carregando...
A página está carregando...
A página está carregando...
A página está carregando...
A página está carregando...
A página está carregando...
A página está carregando...
A página está carregando...
A página está carregando...
A página está carregando...
A página está carregando...
A página está carregando...
A página está carregando...
A página está carregando...
A página está carregando...
A página está carregando...
A página está carregando...
A página está carregando...
A página está carregando...
A página está carregando...
A página está carregando...
A página está carregando...
A página está carregando...
A página está carregando...
A página está carregando...
A página está carregando...
A página está carregando...
A página está carregando...
A página está carregando...
A página está carregando...
A página está carregando...
A página está carregando...
A página está carregando...
A página está carregando...
A página está carregando...
A página está carregando...
A página está carregando...
A página está carregando...
A página está carregando...
A página está carregando...
A página está carregando...
A página está carregando...
A página está carregando...
A página está carregando...
A página está carregando...
A página está carregando...
A página está carregando...
A página está carregando...
A página está carregando...
A página está carregando...
A página está carregando...
A página está carregando...
A página está carregando...
A página está carregando...
A página está carregando...
A página está carregando...
A página está carregando...
A página está carregando...
A página está carregando...
A página está carregando...
A página está carregando...
A página está carregando...
A página está carregando...
A página está carregando...
A página está carregando...
A página está carregando...
A página está carregando...
A página está carregando...
A página está carregando...
A página está carregando...
A página está carregando...
A página está carregando...
A página está carregando...
A página está carregando...
A página está carregando...
A página está carregando...
A página está carregando...
A página está carregando...
A página está carregando...
A página está carregando...
A página está carregando...
A página está carregando...
A página está carregando...
A página está carregando...
A página está carregando...
A página está carregando...
A página está carregando...
A página está carregando...
A página está carregando...
A página está carregando...
A página está carregando...
A página está carregando...
A página está carregando...
A página está carregando...
A página está carregando...
A página está carregando...
A página está carregando...
A página está carregando...
A página está carregando...
A página está carregando...
A página está carregando...
A página está carregando...
A página está carregando...
A página está carregando...
A página está carregando...
A página está carregando...
A página está carregando...
A página está carregando...
A página está carregando...
A página está carregando...
A página está carregando...
A página está carregando...
A página está carregando...
A página está carregando...
A página está carregando...
A página está carregando...
A página está carregando...
A página está carregando...
A página está carregando...
A página está carregando...
A página está carregando...
A página está carregando...
A página está carregando...
A página está carregando...
-
 1
1
-
 2
2
-
 3
3
-
 4
4
-
 5
5
-
 6
6
-
 7
7
-
 8
8
-
 9
9
-
 10
10
-
 11
11
-
 12
12
-
 13
13
-
 14
14
-
 15
15
-
 16
16
-
 17
17
-
 18
18
-
 19
19
-
 20
20
-
 21
21
-
 22
22
-
 23
23
-
 24
24
-
 25
25
-
 26
26
-
 27
27
-
 28
28
-
 29
29
-
 30
30
-
 31
31
-
 32
32
-
 33
33
-
 34
34
-
 35
35
-
 36
36
-
 37
37
-
 38
38
-
 39
39
-
 40
40
-
 41
41
-
 42
42
-
 43
43
-
 44
44
-
 45
45
-
 46
46
-
 47
47
-
 48
48
-
 49
49
-
 50
50
-
 51
51
-
 52
52
-
 53
53
-
 54
54
-
 55
55
-
 56
56
-
 57
57
-
 58
58
-
 59
59
-
 60
60
-
 61
61
-
 62
62
-
 63
63
-
 64
64
-
 65
65
-
 66
66
-
 67
67
-
 68
68
-
 69
69
-
 70
70
-
 71
71
-
 72
72
-
 73
73
-
 74
74
-
 75
75
-
 76
76
-
 77
77
-
 78
78
-
 79
79
-
 80
80
-
 81
81
-
 82
82
-
 83
83
-
 84
84
-
 85
85
-
 86
86
-
 87
87
-
 88
88
-
 89
89
-
 90
90
-
 91
91
-
 92
92
-
 93
93
-
 94
94
-
 95
95
-
 96
96
-
 97
97
-
 98
98
-
 99
99
-
 100
100
-
 101
101
-
 102
102
-
 103
103
-
 104
104
-
 105
105
-
 106
106
-
 107
107
-
 108
108
-
 109
109
-
 110
110
-
 111
111
-
 112
112
-
 113
113
-
 114
114
-
 115
115
-
 116
116
-
 117
117
-
 118
118
-
 119
119
-
 120
120
-
 121
121
-
 122
122
-
 123
123
-
 124
124
-
 125
125
-
 126
126
-
 127
127
-
 128
128
-
 129
129
-
 130
130
-
 131
131
-
 132
132
-
 133
133
-
 134
134
-
 135
135
-
 136
136
-
 137
137
-
 138
138
-
 139
139
-
 140
140
-
 141
141
-
 142
142
-
 143
143
-
 144
144
-
 145
145
-
 146
146
-
 147
147
-
 148
148
-
 149
149
-
 150
150
-
 151
151
-
 152
152
-
 153
153
-
 154
154
-
 155
155
-
 156
156
-
 157
157
-
 158
158
-
 159
159
-
 160
160
-
 161
161
-
 162
162
-
 163
163
-
 164
164
-
 165
165
-
 166
166
-
 167
167
-
 168
168
-
 169
169
-
 170
170
-
 171
171
-
 172
172
-
 173
173
-
 174
174
-
 175
175
-
 176
176
-
 177
177
-
 178
178
-
 179
179
-
 180
180
-
 181
181
-
 182
182
-
 183
183
-
 184
184
-
 185
185
-
 186
186
-
 187
187
-
 188
188
-
 189
189
-
 190
190
-
 191
191
-
 192
192
-
 193
193
-
 194
194
-
 195
195
-
 196
196
-
 197
197
-
 198
198
-
 199
199
-
 200
200
-
 201
201
-
 202
202
-
 203
203
-
 204
204
-
 205
205
-
 206
206
-
 207
207
-
 208
208
-
 209
209
-
 210
210
-
 211
211
-
 212
212
-
 213
213
-
 214
214
-
 215
215
-
 216
216
-
 217
217
-
 218
218


Creative Zen Vision M Manual do usuário
- Categoria
- Leitores de MP3 / MP4
- Tipo
- Manual do usuário
- Este manual também é adequado para
em outras línguas
- español: Creative Zen Vision M Manual de usuario
- français: Creative Zen Vision M Manuel utilisateur
- italiano: Creative Zen Vision M Manuale utente
- English: Creative Zen Vision M User manual
- Nederlands: Creative Zen Vision M Handleiding
Artigos relacionados
-
Creative ZEN Vision Guia rápido
-
Creative zen sleek photo 20gb Manual do proprietário
-
-
Creative Zen V Manual do proprietário
-
-
-
-
Creative Zen Micro Manual do proprietário
-
-
 Creative Zen Zen Vision V Manual do usuário
