Hamilton KHaki X-Wind Manual do proprietário
- Categoria
- Relógios
- Tipo
- Manual do proprietário

KHaKi X-Wind
InstructIon manual

8
9
2
C
A
6
1
B
5
7
0
E
D
4
3

English 2
Français 6
Deutsch 10
Italiano 14
Español 18
Português 22
Nederlands 26
Türkçe 30
Ελληνικά 34
Русский 38
日本語 42
한국어 46
简体中文 50
繁體中文 54
61

2 © HAMILTON 19/07/2013
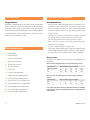
Introduction Care and maintenance
Congratulations.
Hamilton is delighted that you have chosen a timepiece
from its collection. You have acquired a small technolog-
ical marvel that will serve you faithfully for many years.
The most advanced technologies were used throughout
its manufacture and it underwent stringent controls
before it was released for sale.
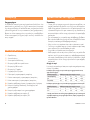
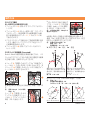
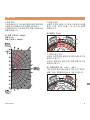
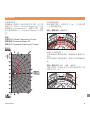
Illustration keys
1 Hour hand
2 Minute hand
3 Small seconds hand
4 -second counter
5 -minute counter
6 -hour counter
7 Date / Day
8 Exterior rotating bezel
9 Upper interior rotating bezel
0 Lower interior rotating bezel
A Time / Date / Day setting crown
B Chronograph start / stop button
C Chronograph resetting button
D Crown for adjusting bezel 9
E Crown for adjusting bezel 0
Recommendations
• Like all micro-mechanical precision instruments, your
Hamilton watch should be checked at least once
every two years. Entrust your watch to an authorized
Hamilton repair center or to any other professional
watch service.
• To keep your watch water-resistant, make sure that
its sealing features are tested at every check-up.
• Do not move the crown when you are in water.
• Rinse off your watch with fresh water after any
immersion in seawater.
• Dry your watch whenever it gets wet.
• Have your watch checked for water-resistance by an
authorized Hamilton retailer or by any other profes-
sional watch service each time the case is opened.
Water-resistance
The water-resistance of your watch is indicated on the
case back.
Water resistance and equivalent pressure used in Anglo-Saxon countries:
Unit of measure Water resistance categories available
atm (overpressure) 3 5 10 20 100
psi 44 72,5 145 290 1450
ft * 100 165 330 660 3300
Water resistance and equivalent pressure used in countries using metric
systems:
Unit of measure Water resistance categories available
bar 3 5 10 20 100
m * 30 50 100 200 1000
* The values given in feet or meters of immersion in water are equivalent
to the degree of overpressure applied during the tests according to the ISO
22810 standard.

INSTRUCTION MANUAL 3
Leather straps
Hamilton recommends that you follow the steps below
in order to preserve the condition of your leather strap
for as long as possible:
• Avoid contact with water and dampness to prevent
discoloration and deformation.
• Avoid prolonged exposure to sunlight to prevent the
color from fading.
• Do not forget that leather is permeable ! Therefore
avoid contact with greasy substances and cosmetic
products.
• If you have a problem with your leather strap, please
contact your nearest Hamilton retailer.
Magnetic elds
To prevent malfunctions of your watch avoid coming
into contact with magnetic elds such as those of mag-
nets, loudspeakers, cell phones, refrigerators, etc.
Operating instructions
Movement
Your watch is tted with an automatic movement. The
mechanism of the watch includes an oscillating rotor
that winds the mainspring via the motion of your wrist.
The power reserve is up to hours.
If necessary, the movement may be rewound manually
by turning the crown clockwise times in position (I).
With most of our models, the beauty of the inner work-
ing of the watch movement can be admired through
the transparent case back.
The Hamilton Khaki Automatic X-Wind has three screw-down
crowns and two push-buttons.
Important: to keep your watch water-resistant, always
screw the crowns A, D, and E back to position () after
all the settings.
Setting the time
. Unscrew setting crown A.
. Pull out the crown completely to position (III).
. Adjust the time by turning the crown in the desired
direction.
. Push back the crown completely then screw it down
again.
Setting the date / day
. Unscrew setting crown A.
. Pull out the crown to the intermediate position (II).
. Turn the crown anticlockwise until the desired date
appears, or clockwise for the desired day. Do not
perform this operation between : and :
(p.m. and a.m.).
. Push back the crown completely then screw it down
again.
Chronograph functions
Simple or added timing
. Press button B to start the chronograph.
. Press button
B
again to stop the chronograph. The
elapsed time or the rst partial time is indicated by
the hands of the counters 4, 5 and 6.
. Repeat these two steps for each additional timing.
At the end of the last timing, the chronograph will
indicate the cumulative time of all the partial timings
added together.
. Push button C to reset the counters to zero.

4 © HAMILTON 19/07/2013
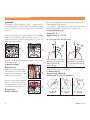
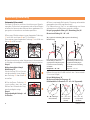
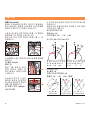
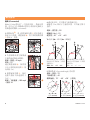
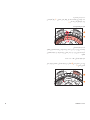
Operating instructions
Crosswind
The Khaki X-Wind integrates a drift – angle calcula-
tor, enabling pilots to accurately calculate and record
the crosswinds they will encounter on their planned
journey.
. Position the red arrow of the upper interior rotating
bezel 9 at o’clock by adjusting with crown D.
Adjust the lower interior rotating bezel 0 to ° by
adjusting with crown E.
. Obtain wind speed and direction from control tower
or weather chart.
Ex. Wind speed: mph
Wind direction: °
Indicate wind direction () in
the window with the upper
interior rotating bezel 9 by
adjusting with crown D.
. Adjust the exterior rotating
bezel
8
so that one tenth of
the speed of the aircraft is indi-
cated opposite the red arrow.
Ex. Aircraft speed:
mph – indicate .
. From the geographical bearing, calculate the mag-
netic bearing of the aircraft:
The variation (Var) depends on the current location,
which can be determined from an aviation chart.
Ex. Geographical bearing: °
Variation (Var): °
Magnetic bearing: ° + ° = °
Tn: True North | Mn: Magnetic North | Var: Variation
If the variation (Var) is to the West, it is
added to the geographical bearing to
obtain the magnetic bearing.
Ex. 30° + 10° = 40°
If the variation (Var) is to the East, it is
subtracted from the geographical bear-
ing to obtain the magnetic bearing. Ex.
30° – 15° = 15°
. Calculation of crosswind angle.
Ex. Wind direction: °
Magnetic bearing of aircraft: °
Crosswind angle: ° – ° = ° (headwind)
70° – 40° = 30°
(Headwind)
180° – (330° - 220°) =
70° (Tailwind)
360° – (330° - 40°) =
70° (Headwind)

INSTRUCTION MANUAL 5
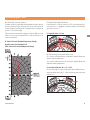
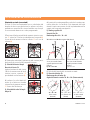
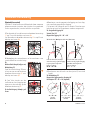
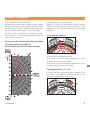
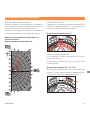
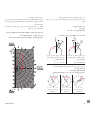
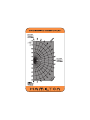
. Calculation of crosswind:
Using the graph (plastic card) determine the point of
intersection of the wind speed (head/tailwind compo-
nent) and the crosswind angle.
Going from the point of intersection, read the value
of the crosswind component on the horizontal axis.
Ex. Headwind component: mph
Crosswind angle: °
Crosswind component: mph
. Calculate the angle of drift:
Locate the crosswind component () on the exterior
rotating bezel 8 and read the value indicated on the
interior bezel 9.
Ex. Angle of drift: approx. .°
. Calculation of corrected bearing:
If the wind is blowing from the right, add the angle of
drift to the magnetic bearing.
If the wind is blowing from the left, subtract the angle
of drift from the magnetic bearing.
Ex. Corrected bearing: ° + .° = .°
For memorization, use the crown E to indicate the cor-
rected bearing (t) on the lower interior rotating bezel 0.
Operating instructions

6 © HAMILTON 19/07/2013
Introduction Soins et entretien
Félicitations
Hamilton vous remercie d’avoir porté votre choix sur
un modèle de sa collection. Vous avez acquis une
petite merveille technique qui vous servira dèlement
pendant de longues années. Les techniques les plus
avancées ont été appliquées tout au long de sa fabri-
cation et des contrôles très stricts ont précédé sa mise
en vente.
Légende des illustrations
1 Aiguille des heures
2 Aiguille des minutes
3 Petite seconde
4 Compteur secondes
5 Compteur minutes
6 Compteur heures
7 Date / Jour
8 Lunette rotative extérieure
9 Lunette rotative intérieure supérieure
0 Lunette rotative intérieure inférieure
A Couronne de réglage: heure / date / jour
B Poussoir départ/arrêt du chronographe
C Poussoir de remise à zéro du chronographe
D Couronne de réglage: lunette 9
E Couronne de réglage: lunette 0
Recommandations
• Votre montre Hamilton, comme toute microméca-
nique de précision, doit être contrôlée au moins une
fois tous les deux ans. Veillez à ne coner votre montre
qu’à votre concessionnaire Hamilton ou à tout autre
revendeur professionnel.
• Pour préserver l’étanchéité de votre montre, assu-
rez-vous que ses dispositifs d’étanchéité sont vériés
lors de chaque contrôle.
• Ne touchez pas à la couronne lorsque vous êtes dans
l’eau.
• Rincez votre montre avec de l’eau douce après chaque
immersion dans de l’eau de mer.
• Séchez votre montre chaque fois qu’elle présente des
traces d’humidité.
• Demandez à votre concessionnaire Hamilton ou à tout
autre revendeur professionnel de vérier l’étanchéité
de votre montre après toute ouverture du boîtier.
Étanchéité
L’étanchéité de votre montre est indiquée au dos du
boîtier.
Équivalences d’étanchéité et de pression utilisées dans les pays
anglo-saxons:
Unité de mesure Catégories d’étanchéité disponibles
atm (surpression) 3 5 10 20 100
psi 44 72,5 145 290 1450
ft * (pieds) 100 165 330 660 3300
Équivalences d’étanchéité et de pression utilisées dans les pays utilisant le
système métrique:
Unité de mesure Catégories d’étanchéité disponibles
bar 3 5 10 20 100
m * 30 50 100 200 1000
* Les valeurs données en pieds ou en mètres d’immersion dans l’eau sont
équivalentes à la mesure de la pression appliquée lors des essais selon la
norme ISO 22810.

INSTRUCTION MANUAL 7
Bracelets en cuir
Hamilton vous recommande de prendre les mesures
suivantes pour garder votre bracelet en cuir en bon
état aussi longtemps que possible:
• Évitez tout contact avec l’eau et l’humidité pour
prévenir toute décoloration et déformation.
• Évitez une exposition prolongée au soleil pour
prévenir la perte d’éclat de la couleur.
• N’oubliez pas que le cuir est perméable! Évitez
donc tout contact avec des matières grasses et des
cosmétiques.
• En cas de problème avec votre bracelet en cuir, veuil-
lez prendre contact avec votre détaillant Hamilton le
plus proche.
Champs magnétiques
An d’éviter les dysfonctionnements de votre montre,
évitez d’entrer en contact avec des champs magné-
tiques tels que ceux d’aimants, d’enceintes acoustiques,
de téléphones mobiles, de réfrigérateurs, etc.
Mode d’emploi
Mouvement
Votre montre est équipée d’un mouvement automa-
tique. Le mécanisme de la montre contient une masse
oscillante qui remonte le ressort par le mouve ment de
votre poignet.
La réserve de marche est d’environ heures.
En cas de besoin, le mouvement peut être remontée
manuellement en tournant fois la couronne en posi-
tion (I) dans le sens des aiguilles d’une montre.
La beauté du mécanisme peut être admirée grâce au
fond transparent du boîtier.
La montre Hamilton Khaki Automatic X-Wind est dotée de trois
couronnes vissées et de deux poussoirs.
Important: An de préserver l’étanchéité de votre montre
et après toute correction, revissez toujours les cou-
ronnes A, D, et E en position ().
Réglage de l’heure
. Dévissez la couronne A.
. Tirez entièrement la couronne en position (III).
. Réglez l’heure en tournant la couronne dans le sens
souhaité.
. Repoussez entièrement la couronne puis la revisser.
Réglage date / jour
. Dévissez la couronne A.
. Tirez la couronne en position intermédiaire (II).
. Tournez la couronne dans le sens contraire des
aiguilles d’une montre pour que la date souhaitée
apparaisse et dans le sens des aiguilles d’une montre
pour que le jour souhaité apparaisse; évitez d’eectuer
cette opération entre heures et heures.
. Repoussez entièrement la couronne puis la revisser.
Fonctions du chronographe
Chronométrage simple ou cumulé
. Appuyez sur le poussoir B: le chronographe démarre.
. Appuyez de nouveau sur le poussoir B: le chrono-
graphe s’arrête, le temps écoulé ou le premier temps
partiel est indiqué par les aiguilles des compteurs
4
,
5 et 6.
. Répétez ces deux étapes pour chaque temps partiel.
A la n de la dernière étape, le chronographe indique
le temps cumulé de toutes les étapes.
. Appuyez sur le poussoir C pour remettre les comp-
teurs à zéro.

8 © HAMILTON 19/07/2013
Mode d’emploi
Vent de travers (Crosswind)
La Khaki X-Wind est équipée d’une calculatrice d’angle
de dérive qui permet aux pilotes de calculer et d’enregis-
trer exactement les vents latéraux qu’ils rencontreront
lors de leur vol programmé.
. Positionner la èche rouge de la lunette rotative
intérieure supérieure
9
sur heures. (Réglage par la
couronne D).
Régler la lunette rotative intérieure inférieure 0 sur °
(Réglage par la couronne E).
. Connaître la vitesse du vent (force du vent) et la direc-
tion du vent (d’où vient le vent). Information connue
par la tour de contrôle ou sur
la carte météo.
Ex. Vitesse du vent: mph
Direction du vent: °
Indiquer la direction du vent
() dans la fenêtre avec la
lunette rotative intérieure
supérieure 9 (Réglage par la couronne D).
. Indiquer la vitesse de l’avion
au dixième sur la lunette rota-
tive extérieure 8 en face de la
èche rouge.
Ex. Vitesse de l’avion:
mph – indiquer .
. A partir du cap géographique, calculer le cap magné-
tique de l’avion: La variation (Var) dépend de l’endroit où
l’on se trouve, elle peut être lue sur une carte d’aviation.
Ex. Cap géographique: °
Variation (Var): °
Cap magnétique: ° + ° = °
Tn: Vrai Nord | Mn: Nord Magnétique | Var: Variation
Quand la variation (Var) est à l’ouest,
elle est ajoutée au cap géographique
pour trouver le cap magnétique.
Ex. 30° + 10° = 40°
Quand la variation (Var) est à l’est, elle
est soustraite au cap géographique
pour trouver le cap magnétique.
Ex. 30° – 15° = 15°
. Calculer l’angle au vent de l’avion (Crosswind Angle).
C’est-à-dire l’angle aigu entre l’axe du vent et l’axe de
l’avion.
Ex. Direction du vent: °
Cap magnétique de l’avion: °
Angle au vent: ° – ° = ° (vent d’avant droite)
70° – 40° = 30°
Vent avant droite
(Headwind)
180° – (330° - 220°) =
70° Vent arrière droite
(Tailwind)
360° – (330° - 40°) =
70° Vent avant gauche
(Headwind)

INSTRUCTION MANUAL 9
. Calcul du vent de travers:
A l’aide de l’abaque (carte plastique), reporter la vitesse
du vent (Head/Tailwind Component) et l’angle au vent
(Crosswind Angle).
Depuis l’intersection, lire la valeur du vent de travers
(Crosswind Component) sur l’abscisse (axe horizontal).
Ex. Vitesse du vent (Headwind Component): mph
Angle au vent (Crosswind Angle): °
Vent de travers (Crosswind Component): mph
. Calculer l’angle de dérive:
Repérer la valeur du vent de travers () sur la lunette
rotative extérieure
8
et relever la valeur indiquée sur
la lunette intérieure 9.
Ex. Angle de dérive: env. ,°
. Calculer le cap corrigé:
Si le vent vient de droite, additionner l’angle de dérive
au cap magnétique.
Si le vent vient de gauche, soustraire l’angle de dérive
au cap magnétique.
Ex. Cap corrigé: ° + ,° = ,°
A l’aide de la couronne E, indiquer pour mémoire
le cap corrigé (,°) sur la lunette rotative intérieure
inférieure 0.
Mode d’emploi

10 © HAMILTON 19/07/2013
Einleitung Pege und Wartung
Herzlichen Glückwunsch !
Wir freuen uns sehr, dass Sie sich für eine Uhr aus der
Hamilton-Kollektion entschieden haben. Sie haben
damit ein kleines Wunderwerk der Technik erworben,
das Ihnen viele Jahre lang treue Dienste leisten wird.
Diese Uhr wurde unter Einsatz modernster Technologien
hergestellt und strengsten Kontrollen unterzogen, bevor
sie für den Verkauf freigegeben wurde.
Zeichenerklärung
1 Stundenzeiger
2 Minutenzeiger
3 Kleine Sekunde
4 -Sekundenzähler
5 -Minutenzähler
6 -Stundenzähler
7 Datum / Wochentag
8 Außendrehring
9 Oberer Innendrehring
0 Unterer Innendrehring
A Einstellkrone: Uhrzeit / Datum / Wochentag
B Start-/Stopp-Drücker des Chronographen
C Reset-Drücker des Chronographen
D Einstellkrone: Lünette 9
E Einstellkrone: Lünette 0
Empfehlungen
• Wie alle mikromechanischen Präzisionsinstrumente
sollte auch Ihre Hamilton Uhr mindestens alle zwei
Jahre überprüft werden. Überlassen Sie Ihre Uhr
einem autorisierten Hamilton Reparaturzentrum oder
einem professionellen Uhrenservice.
• Sorgen Sie dafür, dass die Wasserdichtigkeit Ihrer Uhr
bei jeder Überprüfung der Uhr mitgetestet wird.
• Betätigen Sie die Krone nicht, wenn Sie im Wasser
sind.
• Spülen Sie Ihre Uhr mit klarem Wasser ab, wenn sie
mit Salzwasser in Kontakt gekommen ist.
• Trocknen Sie Ihre Uhr stets ab, wenn sie nass gewor-
den ist.
• Lassen Sie immer die Wasserdichtigkeit Ihrer Uhr von
einem autorisierten Hamilton Händler oder einem
professionellen Uhrenservice überprüfen, wenn das
Gehäuse geönet worden ist.
Wasserdichtigkeit
Die Wasserdichtigkeit Ihrer Uhr ist auf dem Gehäuse-
boden angegeben.
Wasserdichtigkeit und entsprechende Wasserdruckangaben in angelsäch-
sischen Ländern:
Maßeinheit Verfügbare Kategorien für die Wasserdichtigkeit
atm (Überdruck) 3 5 10 20 100
psi 44 72,5 145 290 1450
ft * (Fuß) 100 165 330 660 3300
Wasserdichtigkeit und entsprechende Wasserdruckangaben in Ländern mit
metrischen Systemen:
Maßeinheit Verfügbare Kategorien für die Wasserdichtigkeit
bar 3 5 10 20 100
m * 30 50 100 200 1000
* Die angegebene Tiefe unter Wasser in Fuß oder Metern entspricht dem
Überdruck, der bei den Standardtests nach ISO 22810 angewendet wird.

INSTRUCTION MANUAL 11
Lederarmbänder
Damit Ihr Lederarmband so lange wie möglich in gutem
Zustand bleibt, empehlt Hamilton, folgende Hinweise
zu beachten:
• Vermeiden Sie Kontakt mit Wasser und Feuchtigkeit,
um Verfärbungen und Formveränderungen zu
verhindern.
• Setzen Sie das Armband nicht über längere Zeit dem
Sonnenlicht aus, damit die Farbe nicht verblasst.
• Vergessen Sie nicht, dass Leder durchlässig ist ! Ver-
meiden Sie deshalb Kontakt mit fettigen Substanzen
und Kosmetikprodukten.
• Wenn Sie mit Ihrem Lederarmband ein Problem
haben, setzen Sie sich bitte mit Ihrem nächstgelege-
nen Hamilton-Händler in Verbindung.
Magnetfelder
Um Funktionsstörungen bei Ihrer Uhr zu vermeiden,
halten Sie diese bitte von Magnetfeldern fern, wie sie
etwa von Magneten, Lautsprechern, Mobiltelefonen,
Kühlschränken etc. ausgehen.
Bedienungsanleitung
Uhrwerk
Ihre Uhr verfügt über ein automatisches Uhrwerk.
Eine Schwungmasse im Uhrenmechanismus zieht die
Zugfeder bei Bewegungen des Handgelenks auf.
Die Gangreserve der Uhr beträgt dann etwa Stunden.
Bei Bedarf kann das Uhrwerk von Hand durch unge-
fähr Umdrehungen der Krone in der Position (I) im
Uhrzeigersinn aufgezogen werden.
Der transparente Gehäuseboden bietet Sicht auf das
schöne Innenleben der Uhr.
Die Hamilton Khaki Automatic X-Wind verfügt über drei fest-
stellbare Kronen und zwei Knöpfe.
Wichtig: Verschrauben Sie die Kronen
A
,
D
und
E
nach
jeder Korrektur wieder in die Position (), damit die
Wasserdichtheit Ihrer Uhr gewährleistet ist.
Einstellung der Uhrzeit
. Krone A lösen.
. Krone vollständig in Position (III) herausziehen.
. Zeit durch Drehen der Krone in die gewünschte
Richtung einstellen.
. Krone wieder ganz eindrücken und festschrauben.
Einstellung von Datum/Wochentag
. Krone A lösen.
. Krone in Zwischenstellung (II) herausziehen.
. Krone gegen den Uhrzeigersinn drehen, bis das
gewünschte Datum, oder mit dem Uhrzeigersinn
drehen, bis der gewünschte Wochentag erscheint.
Dieser Vorgang sollte nicht zwischen . und .
Uhr erfolgen.
. Krone wieder ganz eindrücken und festschrauben.
Chronographenfunktionen
Einfache Zeitmessung und Addieren von Zeiten
. Betätigen Sie den Drücker B. Die Zeitmessung wird
gestartet.
. Betätigen Sie erneut den Drücker B. Die Zeitmessung
wird gestoppt. Die verstrichene Zeit bzw. die erste
Teilzeit kann über die Zeiger in den Zählern
4
,
5
und 6 abgelesen werden.
. Wiederholen Sie diese beiden Schritte für jede
Teilzeit. Nach der letzten Teilzeitmessung zeigt der
Chronograph die Gesamtzeit sämtlicher Etappen an.
. Betätigen Sie den Drücker C, um die Zähler auf null
zu stellen.

12 © HAMILTON 19/07/2013
Bedienungsanleitung
Seitenwind (Crosswind)
Die Khaki X-Wind ist mit einer Vorrichtung zur Berech-
nung des Driftwinkels ausgestattet, die es dem Piloten
erlaubt, die Seitenwinde während eines geplanten Flu-
ges genau zu berechnen und abzuspeichern.
. Den roten Pfeil des oberen innen liegenden Drehrings
9 mit Hilfe von Krone D auf Uhr drehen.
Den unteren innen liegenden Drehring
0
mit Hilfe von
Krone E auf ° bringen.
. Über Kontrollturm oder Wetterkarte Informationen
zu Windgeschwindigkeit und Windrichtung einholen.
Beispiel:
Windgeschwindigkeit: mph
Windrichtung: °
Windrichtung () im Fenster
mit dem oberen innen liegen-
den Drehring
9
über Krone
D
einstellen.
. Den äußeren Drehring 8
so einstellen, dass der rote
Pfeil auf ein Zehntel der Flug-
geschwindigkeit zeigt.
Beispiel:
Fluggeschwindigkeit mph – auf
einstellen.
. Die missweisende Peilung des Flugzeugs anhand der
geographischen Peilung berechnen:
Die Abweichung (Var) ist ortsabhängig und kann
anhand einer Luftfahrtkarte ermittelt werden.
Beispiel: geographische Peilung: ° / Abweichung (Var): °
Missweisende Peilung: ° + ° = °
Tn: geographische Nordrichtung | Mn: magnetische Nordrichtung |
Var: Abweichung
Liegt eine Abweichung (Var) in west-
licher Richtung vor, wird sie zur
geographischen Peilung hinzu gerech-
net, um die missweisende Peilung
zu ermitteln.
Beispiel: 30° + 10° = 40°
Liegt eine Abweichung (Var) in öst-
licher Richtung vor, wird sie von der
geographischen Peilung abgezo-
gen, um die missweisende Peilung
zu ermitteln.
Beispiel: ° – ° = °
. Berechnung des Einfallswinkels des Seitenwindes
(Crosswind Angle)
Beispiel: Windrichtung: °
Missweisende Peilung des Flugzeugs: °
Einfallswinkel des Seitenwindes: ° - ° = ° (Gegenwind)
° – ° = ° Gegen-
wind (Headwind)
° – (° - °)
= ° Rückenwind
(Tailwind)
° – (° - °)
= ° Gegenwind
(Headwind)

INSTRUCTION MANUAL 13
. Berechnung des Seitenwindes: Mit Hilfe des Graphen
(Plastikkarte) den Schnittpunkt der Windgeschwindig-
keit (Gegenwind/Rückenwind Komponente) (Head/
Tailwind Component) und des Einfallswinkels des
Seiten windes (Crosswind Angle) ermitteln.
Ausgehend vom Schnittpunkt den Wert der Seiten-
windkomponente (Crosswind Component) von der
horizontal verlaufenden Achse ablesen.
Beispiel: Gegenwindkomponente (Headwind Component): mph
Einfallswinkel des Seitenwindes (Crosswind Angle): °
Seitenwindkomponente (Crosswind Component): mph
. Berechnung des Abdriftwinkels:
Unter der auf dem äußeren Drehring 8 angegebenen
Seitenwindkomponente () den angegebenen Wert
von dem innen liegenden Drehring 9 ablesen.
Beispiel: Abdriftwinkel: etwa ,°
. Berechnung der korrigierten Richtung:
Kommt der Wind von rechts, Abdriftwinkel und mis-
sweisende Peilung addieren.
Kommt der Wind von links, Abdriftwinkel von misswei-
sender Peilung abziehen.
Beispiel: Korrigierte Richtung: ° + ,° = ,°
Die korrigierte Richtung (,°) kann über die Krone E
auf dem unteren innen liegenden Drehring 0 festge-
halten werden.
Bedienungsanleitung

14 © HAMILTON 19/07/2013
Introduzione Cura e manutenzione
Congratulazioni.
Hamilton vi ringrazia per aver scelto un orologio della
sua collezione. Avete acquistato una piccola meraviglia
tecnologica sulla quale potrete fare adamento per
molti anni. Nel corso della sua realizzazione sono state
applicate le tecnologie più avanzate ed è stato sotto-
posto a rigorosi controlli prima che ne fosse autorizzata
la vendita.
Legenda illustrazioni
1 Lancetta delle ore
2 Lancetta dei minuti
3 Piccoli secondi
4 Contatore dei secondi
5 Contatore dei minuti
6 Contatore delle ore
7 Data / Giorno
8 Lunetta girevole esterna
9 Lunetta girevole interna superiore
0 Lunetta girevole interna inferiore
A Corona di regolazione: ora / data / giorno
B Pulsante di avvio/arresto del cronografo
C Pulsante di azzeramento del cronografo
D Corona di regolazione: lunetta 9
E Corona di regolazione: lunetta 0
Raccomandazioni
• Come tutti gli strumenti meccanici di precisione, l’oro-
logio Hamilton dovrebbe essere revisionato almeno
ogni due anni. Si raccomanda di far revisionare l’oro-
logio soltanto ad un centro di riparazione Hamilton
autorizzato o ad altro servizio professionale. Per
mantenere l’impermeabilità dell’orologio, assicurarsi
che ad ogni revisione siano controllate le guarnizioni
di tenuta.
• Non muovere la corona quando si è in acqua.
• Sciacquare l’orologio con acqua dolce dopo le
immersioni in mare.
• Asciugarlo quando si bagna.
• Ogni volta che si apre la cassa, far controllare l’imper-
meabilità dell’orologio da un distributore autorizzato
Hamilton o altro servizio professionale.
Impermeabilità
L’impermeabilità dell’orologio è indicata sul fondello.
Impermeabilità e pressione equivalente utilizzate nei paesi anglosassoni:
Unità di misura Categorie di impermeabilità disponibili
atm (sovrapressione) 3 5 10 20 100
psi 44 72,5 145 290 1450
ft * (piedi) 100 165 330 660 3300
Impermeabilità e pressione equivalente utilizzate nei paesi in cui vige il
sistema metrico decimale:
Unità di misura Categorie di impermeabilità disponibili
bar 3 5 10 20 100
m * 30 50 100 200 1000
* I valori indicati in piedi o metri di immersione in acqua sono equivalenti
al grado di sovrapressione applicato durante le prove conformemente alla
norma ISO 22810.

INSTRUCTION MANUAL 15
Cinturini in pelle
Per mantenere a lungo in buone condizioni il vostro
cinturino in pelle, Hamilton raccomanda di attenersi
alle seguenti indicazioni:
• Evitate il contatto con acqua e umidità per prevenire
scolorimenti e deformazioni.
• Evitate l’esposizione prolungata alla luce del sole per
evitare che il colore sbiadisca.
• Non dimenticatevi che la pelle è permeabile! Quindi
evitate il contatto con sostanze oleose e prodotti
cosmetici.
• In caso di problemi al vostro cinturino in pelle, per
favore contattate il rivenditore Hamilton più vicino.
Campi magnetici
Per evitare il malfunzionamento del vostro orologio
evitate che venga a contatto con campi magnetici
tipo quelli di calamite, altoparlanti, telefoni cellulari,
frigoriferi, ecc.
Istruzioni per l’uso
Movimento
Questo orologio è dotato di movimento automatico. Il
meccanismo dell’orologio contiene una massa oscillante
che carica l’orologio grazie al movimento del polso.
La riserva di carica è di circa ore.
All’occorrenza, il movimento può essere caricato
manualmente ruotando volte in senso orario la
corona in posizione (I).
La bellezza del meccanismo può essere ammirata grazie
al fondello trasparente della cassa.
Il modello Khaki Automatic X-Wind della Hamilton è dotato di
tre corone a vite e due pulsanti.
Importante: per preservare l’impermeabilità dell’orolo-
gio, dopo ogni regolazione occorre sempre riportare
le corone A, D, e E in posizione ().
Regolazione dell’ora
. Svitare la corona di regolazione A.
. Estrarla completamente no a raggiungere la posi-
zione (III).
. Regolare l’ora girando la corona nella direzione
desiderata.
. Spingere a fondo la corona e poi riavvitarla.
Regolazione della data / del giorno
. Svitare la corona di regolazione A.
. Estrarre la corona no a raggiungere la posizione
intermedia (II).
. Ruotare la corona in senso antiorario no a quando
appare la data desiderata, in senso orario per il giorno
desiderato. Si raccomanda di non eseguire questa
operazione tra le : e le : ( di sera, del
mattino).
. Spingere a fondo la corona e poi riavvitarla.
Funzioni del cronografo
Cronometraggio semplice o cumulativo
. Premere il pulsante B: il cronometro si avvia.
. Premere nuovamente il pulsante B: il cronografo si
arresta, il tempo trascorso, o il primo tempo parziale,
viene indicato dalle lancette dei contatori
4
,
5
e
6
.
. Ripetere queste due fasi per ogni tempo parziale. Al
termine dell’ultima fase, il cronografo indica il tempo
cumulativo di tutte le fasi.
. Premere il pulsante C per azzerare i contatori.

16 © HAMILTON 19/07/2013
Istruzioni per l’uso
Vento al traverso (Crosswind)
Il Khaki X-Wind è dotato di una calcolatrice dell’angolo
di deriva che consente ai piloti di calcolare e registrare
esattamente i venti laterali che incontreranno durante
il volo programmato.
. Girando la corona D posizionare la freccia rossa della
lunetta girevole interna superiore 9 sulle ore .
Girando la corona E posizionare la lunetta girevole
interna inferiore 0 su °.
. Ricavare la velocità e la direzione del vento dalla torre
di controllo o dalla carta del tempo.
Es. Velocità del vento: mph
Direzione del vento: °
Girando la corona
D
indicare
la direzione del vento ()
nella nestrella della lunetta
girevole interna superiore 9.
. Regolare la lunetta gire-
vole esterna 8 in modo
che davanti alla freccia rossa
appaia un decimo della velo-
cità del velivolo.
Es. Velocità del velivolo: mph –
indicare .
. Dal polo nord geograco calcolare il polo nord
magnetico del velivolo. La declinazione magnetica
(Var) dipende dalla località in cui ci si trova e può essere
determinata dalla carta aeronautica.
Es. Polo nord geograco: °
Declinazione magnetica (Var): °
Polo nord magnetico: ° + ° = °
Tn: Nord vero | Mn: Nord magnetico | Var: Declinazione magnetica
Se la declinazione magnetica (Var) è
verso ovest, si aggiunge al polo nord
geograco per ottenere il polo nord
magnetico.
Es. 30° + 10° = 40°
Se la declinazione magnetica (Var) è
verso est, viene sottratta dal polo nord
geograco per ottenere il polo nord
magnetico.
Es. 30°-15° = 15°
. Calcolo dell’angolo del vento al traverso (Crosswind
Angle)
Es. Direzione del vento: °
Polo nord magnetico del velivolo: °
Angolo del vento al traverso: ° – ° = ° vento di fronte
70° – 40° = 30°
vento di fronte
(Headwind)
180° – (330° - 220°)
= 70° vento di coda
(Tailwind)
360° – (330° - 40°)
= 70° vento di fronte
(Headwind)

INSTRUCTION MANUAL 17
. Calcolo del vento al traverso
Usando il graco (carta plasticata) determinare il punto
di intersezione fra la velocità del vento (di fronte/di
coda) (Headwind/Tailwind Component) e l’angolo al
vento (Crosswind Angle).
Dal punto di intersezione, leggere il valore del vento al
traverso (Crosswind Component) sull’asse delle ascisse
(asse orizzontale).
Es. Velocità del vento (Headwind Component): mph
Angolo al vento (Crosswind Angle): °
Vento al traverso (Crosswind Component): mph
. Calcolo dell’angolo di deriva:
Individuare il vento al traverso () sulla lunetta gire-
vole esterna 8 e leggere il valore indicato sulla lunetta
girevole interna 9.
Es. Angolo di deriva: ,° circa
. Calcolo della correzione della rotta:
Se il vento soa da destra, sommare l’angolo di deriva
al polo nord magnetico.
Se il vento soa da sinistra, sottrarre l’angolo di deriva
dal polo nord magnetico.
Es. Correzione della rotta: ° + ,° = ,°
Per memorizzare, usare la corona E per indicare la cor-
rezione della rotta (,°) sulla lunetta girevole interna
inferiore 0.
Istruzioni per l’uso

18 © HAMILTON 19/07/2013
Introducción Cuidado y Mantenimiento
Enhorabuena.
Nos llena de alegría que haya elegido un aparato de
relojería de la colección Hamilton. Ha comprado una
pequeña maravilla tecnológica que le acompañará
elmente durante muchos años. En su fabricación se
han aplicado las tecnologías más avanzadas y ha sido
sometida a estrictos controles antes de salir al mercado.
Leyenda de las ilustraciones
1 Aguja de las horas
2 Aguja de los minutos
3 Segundero pequeño
4 Contador de segundos
5 Contador de minutos
6 Contador de horas
7 Fecha / Día
8 Bisel giratorio exterior
9 Bisel giratorio interior superior
0 Bisel giratorio interior inferior
A Corona de ajuste: hora / fecha / día
B Pulsador de inicio/parada del cronógrafo
C Pulsador de puesta a cero del cronógrafo
D Corona de ajuste: bisel 9
E Corona de ajuste: bisel 0
Recomendaciones
• Como cualquier instrumento de precisión micro-
mecánica, su reloj Hamilton debe ser revisado al
menos una vez cada dos años. Confíe su reloj a un
centro de reparación autorizado de Hamilton o a otro
servicio de relojería profesional.
• Para preservar la estanqueidad de su reloj, asegúrese
de que sus dispositivos de estanqueidad sean
revisados en cada control.
• No mueva la corona cuando esté en el agua.
• Enjuague su reloj con agua corriente después de
bañarse en el mar.
• Seque su reloj cada vez que se humedezca.
• Verique la estanqueidad de su reloj en un distribuidor
Hamilton autorizado o cualquier otro servicio técnico
de relojería profesional cada vez que se abra la caja.
Estanqueidad
La estanqueidad de su reloj se indica en la parte pos-
terior de la caja.
Equivalente para estanqueidad y presión utilizado en los países
anglosajones:
Unidad de medición Categorías de estanqueidad disponibles
atm (sobrepresión) 3 5 10 20 100
psi 44 72,5 145 290 1450
ft * (pies) 100 165 330 660 3300
Equivalente para estanqueidad y presión utilizado en los países con sistemas
métricos:
Unidad de medición Categorías de estanqueidad disponibles
bar 3 5 10 20 100
m * 30 50 100 200 1000
* Los valores de inmersión en agua en pies o metros son equivalentes al grado
de sobrepresión aplicado durante las pruebas según la norma ISO 22810.
A página está carregando...
A página está carregando...
A página está carregando...
A página está carregando...
A página está carregando...
A página está carregando...
A página está carregando...
A página está carregando...
A página está carregando...
A página está carregando...
A página está carregando...
A página está carregando...
A página está carregando...
A página está carregando...
A página está carregando...
A página está carregando...
A página está carregando...
A página está carregando...
A página está carregando...
A página está carregando...
A página está carregando...
A página está carregando...
A página está carregando...
A página está carregando...
A página está carregando...
A página está carregando...
A página está carregando...
A página está carregando...
A página está carregando...
A página está carregando...
A página está carregando...
A página está carregando...
A página está carregando...
A página está carregando...
A página está carregando...
A página está carregando...
A página está carregando...
A página está carregando...
A página está carregando...
A página está carregando...
A página está carregando...
A página está carregando...
A página está carregando...
A página está carregando...
A página está carregando...
-
 1
1
-
 2
2
-
 3
3
-
 4
4
-
 5
5
-
 6
6
-
 7
7
-
 8
8
-
 9
9
-
 10
10
-
 11
11
-
 12
12
-
 13
13
-
 14
14
-
 15
15
-
 16
16
-
 17
17
-
 18
18
-
 19
19
-
 20
20
-
 21
21
-
 22
22
-
 23
23
-
 24
24
-
 25
25
-
 26
26
-
 27
27
-
 28
28
-
 29
29
-
 30
30
-
 31
31
-
 32
32
-
 33
33
-
 34
34
-
 35
35
-
 36
36
-
 37
37
-
 38
38
-
 39
39
-
 40
40
-
 41
41
-
 42
42
-
 43
43
-
 44
44
-
 45
45
-
 46
46
-
 47
47
-
 48
48
-
 49
49
-
 50
50
-
 51
51
-
 52
52
-
 53
53
-
 54
54
-
 55
55
-
 56
56
-
 57
57
-
 58
58
-
 59
59
-
 60
60
-
 61
61
-
 62
62
-
 63
63
-
 64
64
-
 65
65


Hamilton KHaki X-Wind Manual do proprietário
- Categoria
- Relógios
- Tipo
- Manual do proprietário
em outras línguas
- español: Hamilton KHaki X-Wind El manual del propietario
- français: Hamilton KHaki X-Wind Le manuel du propriétaire
- italiano: Hamilton KHaki X-Wind Manuale del proprietario
- English: Hamilton KHaki X-Wind Owner's manual
- русский: Hamilton KHaki X-Wind Инструкция по применению
- Nederlands: Hamilton KHaki X-Wind de handleiding
- Deutsch: Hamilton KHaki X-Wind Bedienungsanleitung
- 日本語: Hamilton KHaki X-Wind 取扱説明書
- Türkçe: Hamilton KHaki X-Wind El kitabı
Artigos relacionados
-
Hamilton PULSOMATIC Manual do usuário
-
Hamilton KHAKI E.T.O. Manual do proprietário
-
Hamilton Sub Manual do usuário
-
-
Hamilton caliber 251.471 Manual do usuário
-
-
-
Hamilton 980.163 Manual do usuário
-
-