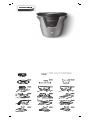
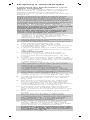
Philips S1070/04 Manual do usuário
- Categoria
- Barbeadores masculinos
- Tipo
- Manual do usuário

2
3
4
5
6
7
8
9
10
11
12
13
14
15
16
>75% recycled paper
>75% papel reciclado
S1070, S1030

1
8
9
10
11
7
13
12
5 6
2
3
4
S1070
S1030
1
2
1
17
18
19
20
21
1
2
22
23
24
25
26
27
28
English
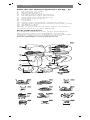
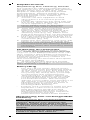
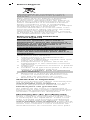
General description (Fig. 1)
1 Protection cap
2 Shaving unit
3 On/off button
4 Charging light (S1070)
5 Charging light (S1030)
6 Socket for small plug
7 Retaining frame
8 Cutter
9 Guard
10 Pop-up trimmer (S1070 only)
11 Trimmer release slide (S1070 only)
12 Supply unit
13 Small plug
Note: You can find the type number
on the back of the shaver.
Introduction
Congratulations on your purchase
and welcome to Philips! To fully
benefit from the support that Philips
offers, register your product at
www.philips.com/welcome.

Please read this user manual, as it
contains information about the
features of this shaver as well as
some tips to make shaving easier and
more enjoyable.
Important safety
information
Read this important information
carefully before you use the
appliance and its accessories and
save it for future reference. The
accessories supplied may vary for
different products.
Danger
- Keep the supply unit dry (Fig. 2).
Warning
- To charge the battery, only use
the detachable supply unit
(A00390) provided with the
appliance.
- The supply unit contains a
transformer. Do not cut off the
supply unit to replace it with
another plug, as this causes a
hazardous situation.
- This appliance can be used by
children aged from 8 years and
above and persons with reduced
physical, sensory or mental
capabilities or lack of experience
and knowledge if they have been
given supervision or instruction
concerning use of the appliance in
a safe way and understand the
hazards involved. Children shall
not play with the appliance.
Cleaning and user maintenance
shall not be made by children
without supervision.
- Always unplug the shaver before
you clean it under the tap.
- Always check the appliance
before you use it. Do not use the
appliance if it is damaged, as this
may cause injury. Always replace
a damaged part with one of the
original type.
- Do not open the appliance to
replace the rechargeable battery.
Caution
- Never immerse the cleaning
system or the charging stand in
water and do not rinse it under
the tap (Fig. 2).
- Never use water hotter than 60°C
to rinse the shaver.
- Only use this appliance for its
intended purpose as shown in the
user manual.
- For hygienic reasons, the
appliance should only be used by
one person.
- Never use compressed air,
scouring pads, abrasive cleaning
agents or aggressive liquids such
as petrol or acetone to clean the
appliance.
- If your shaver comes with a
cleaning system, always use the
original Philips cleaning fluid
(cartridge or bottle, depending on
the type of cleaning system).
- Always place the cleaning system
on a stable, level and horizontal
surface to prevent leakage.
- If your cleaning system uses a
cleaning cartridge, always make
sure the cartridge compartment is
closed before you use the
cleaning system to clean or
charge the shaver.
- When the cleaning system is
ready for use, do not move it to
prevent leakage of cleaning fluid.
- Water may drip from the socket at
the bottom of the shaver when
you rinse it. This is normal and not
dangerous because all electronics
are enclosed in a sealed power
unit inside the shaver.

- Do not use the supply unit in or
near wall sockets that contain an
electric air freshener to prevent
irreparable damage to the supply
unit.
Electromagnetic fields (EMF)
- This Philips appliance complies
with all applicable standards and
regulations regarding exposure to
electromagnetic fields.
General
- This shaver is waterproof (Fig. 3). It
is suitable for use in the bath or
shower and for cleaning under the
tap. For safety reasons, the shaver
can therefore only be used
without cord.
- The supply unit is suitable for
mains voltages ranging from 100
to 240 volts.
- The supply unit transforms
100-240 volts to a safe low
voltage of less than 24 volts.
Charging
Note: This appliance can only be
used without cord.
When you charge the appliance for
the first time or after a long period of
disuse, let it charge for at least 10
hours.
A fully charged appliance provides up
to 45 minutes of shaving time.
The shaving time may be less as a
result of your shaving behavior, your
cleaning habits or your beard type.
Charging with the supply unit
1 Make sure the shaver is switched
off.
2 Put the small plug in the shaver
and put the supply unit in the wall
socket.
The display of the shaver
indicates that the shaver is
charging.
3 After charging, remove the supply
unit from the wall socket and pull
the small plug out of the
appliance.
Charge indications
Battery low
When the battery is almost empty,
the appliance starts working more
slowly.
Charging
When the appliance is charging, the
charging light lights up white
continuously (Fig. 4).
- The charging light will keep
lighting up white when the
appliance is fully charged.
Note: After charging, remove the
supply unit from the wall socket and
pull the small plug out of the
appliance.
Using the appliance
Note: This appliance can only be
used without cord.
Switching the appliance on
and off
1 To switch the appliance on or off,
press the on/off button once (Fig.
5).
Shaving tips
- Use the shaver with shaving gel or
foam for extra skin comfort, or use
the shaver dry for extra
convenience.
-
We advise you to use the
shaver with shaving gel or
foam when you use it for a wet
shave. Do not use thick
shaving cream or shaving oil
with this shaver.

-
When you use the shaver for
dry shaving, we advise you to
make sure your skin is fully dry
so that the shaver glides
smoothly over your skin.
- For best results on skin comfort,
pre-trim your beard if you have
not shaved for 3 days or longer.
- For optimal shaving results, make
circular movements during use.
- The shaver is waterproof and can
be used in the bath or shower.
- Your skin may need 2 or 3 weeks
to get accustomed to the Philips
shaving system.
Wet shaving
For a more comfortable shave, you
can also use this appliance on a wet
face with shaving foam or shaving
gel.
To shave with shaving foam or
shaving gel, follow the steps below:
1 Apply some water to your skin
(Fig. 6).
2 Apply shaving foam or shaving gel
to your skin (Fig. 7).
3 Rinse the shaving unit under the
tap to ensure that the shaving unit
glides smoothly over your skin
(Fig. 8).
4 Switch on the appliance.
5 Move the shaving heads over your
skin in circular movements to
catch all hairs growing in different
directions (Fig. 9). Exert gentle
pressure for a close, comfortable
shave.
Note: Rinse the shaving unit
regularly to ensure that it
continues to glide smoothly over
your skin (Fig. 8).
6 Dry your face.
7 Clean the appliance after use (see
'Cleaning and maintenance').
Note: Make sure you rinse all
foam or shaving gel off the
appliance.
Dry shaving
1 Switch on the appliance.
2 Move the shaving heads over your
skin in circular movements to
catch all hairs growing in different
directions (Fig. 9). Exert gentle
pressure for a close, comfortable
shave.
Note: Do not press too hard, this
can cause skin irritation.
3 Clean the appliance after use (see
'Cleaning and maintenance').
Trimming
You can use the trimmer to groom
your sideburns and moustache.
1 Push the trimmer release slide
downwards to open the trimmer
(Fig. 10).
2 Switch on the appliance.
3 Hold the trimmer perpendicular to
the skin and move the appliance
downwards while you exert gentle
pressure (Fig. 11).
4 After trimming, switch off the
appliance.
5 Clean the trimmer.
6 Close the trimmer (‘click’) (Fig. 12).
Cleaning and maintenance
Cleaning the shaver under the
tap
Clean the shaver after every shave
for optimal performance.
Always unplug and switch off the
appliance before you clean it.
Note: Water may leak from the socket
at the bottom of the shaver when
you rinse it. This is normal and not
dangerous because all electronics
are enclosed in a sealed power unit
inside the shaver.

Be careful with hot water. Always
check if the water is not too hot, to
prevent burning your hands.
Never dry the shaving unit with a
towel or tissue, as this may damage
the shaving heads.
1 Hold the shaving unit and first lift
the front, then the back upwards
of the appliance (Fig. 13).
Note: Make sure to hold the
shaving unit while doing so.
2 Rinse the hair chamber under the
tap (Fig. 14).
3 Rinse the inside of the shaving
unit under a warm tap (Fig. 15).
4 Rinse the outside of the shaving
unit under a warm tap (Fig. 16).
Thorough cleaning
5 Turn the lock anticlockwise and
remove the retaining frame from
the shaving unit (Fig. 17).
6 Remove and clean one shaving
head at a time (Fig. 18). Each
shaving head consists of a cutter
and a guard.
Do not clean more than one
cutter and guard at a time, since
they are all matching sets. If you
accidentally mix up the cutters
and guards, it may take several
weeks before optimal shaving
performance is restored.
7 Remove the cutter from the
shaving guard and rinse it with
water (Fig. 19).
8 Rinse the inside and outside of
the shaving guard with water (Fig.
20).
9 Put the shaving heads back into
the shaving unit (Fig. 21). Make
sure that the projections of the
shaving heads fit exactly into the
recesses.
10 Put the retaining frame back into
the shaving unit and turn the lock
clockwise (Fig. 22).
11 Reattach the shaving unit (Fig. 23).
Note: If you cannot reattach the
shaving unit properly, check if you
have inserted the shaving heads
properly and if the retaining frame
is locked.
12 Carefully shake off excess water,
open the shaving unit again and
leave it open to let the shaving
unit air dry completely.
Caution: Be careful not to hit the
shaving unit against anything
while you shake off excess water.
Cleaning the trimmer
Clean the trimmer every time you
have used it.
1 Switch off the appliance and
disconnect it from the wall socket.
2 Push the trimmer release slide
downwards to open the trimmer
(Fig. 10).
3 Rinse the trimmer under the tap
(Fig. 24).
4 Carefully shake off excess water
and let the trimmer dry.
5 Close the trimmer (‘click’) (Fig. 12).
Tip: For optimal trimming
performance, lubricate the trimmer
teeth with a drop of sewing machine
oil regularly.
Storage
We advise you to let the appliance
dry before you put the protection cap
on it.
1 Switch off the appliance.
2 Put the protection cap on the
shaving unit after use to prevent
damage and to avoid dirt
accumulation in the shaving
heads (Fig. 26).

Replacement
Replacing the shaving heads
For maximum shaving performance,
we advise you to replace the shaving
heads every two years (Fig. 25).
Replace damaged shaving heads
immediately. Always replace the
shaving heads with original Philips
shaving heads' (see 'Ordering
accessories').
1 Switch off the appliance and
disconnect it from the power
outlet.
2 Hold the shaving unit and first lift
the front, then the back upwards
of the appliance (Fig. 13).
Note: Make sure to hold the
shaving unit while doing so.
3 Turn the lock anticlockwise and
remove the retaining frame.
4 Remove the shaving heads (Fig.
18) and place new ones in the
shaving unit (Fig. 21). Make sure
that the projections of the shaving
heads fit exactly into the recesses.
5 Put the retaining frame back into
the shaving unit and turn the lock
clockwise (Fig. 22).
6 Reattach the shaving unit (Fig. 23).
Note: If you cannot reattach the
shaving unit properly, check if you
have inserted the shaving heads
properly and if the retaining frame
is locked
Ordering accessories
To buy accessories or spare parts,
visit www.shop.philips.com/service
or go to your Philips dealer. You can
also contact the Philips Consumer
Care Center in your country (see the
international warranty leaflet for
contact details).
The following accessories and spare
parts are available:
- SH30/51 Philips shaving heads
Note: Availability of the accessories
may differ by country.
Recycling
- Do not throw away the product
with the normal household waste
at the end of its life, but hand it in
at an official collection point for
recycling. By doing this, you help
to preserve the environment.
- This product contains a built-in
rechargeable battery which shall
not be disposed of with normal
household waste. We strongly
advise you to take your product to
an official collection point or a
Philips service centre to have a
professional remove the
rechargeable battery.
- Follow your country’s rules for the
separate collection of electrical
and electronic products and
rechargeable batteries. Correct
disposal helps prevent negative
consequences for the
environment and human health.
Removing the rechargeable
battery
Only remove the rechargeable
battery when you discard the
shaver. Before you remove the
battery, make sure that the shaver
is disconnected from the mains
and that the battery is completely
empty.
Take any necessary safety
precautions when you handle
tools to open the shaver.

Be careful, the battery strips are
sharp.
1 Disconnect the shaver from the
mains.
2 Let the shaver operate until it
stops.
3 Undo the screws in the back of
the shaver and in the hair
chamber.
4 Remove the front panel and the
back panel.
5 Bend the 8 hooks aside and take
out the power unit.
Be careful, the hooks are sharp.
6 Take out the battery holder and
cut the battery tags with a pair of
cutting pliers.
7 Remove the rechargeable battery.
Warranty and support
If you need information or support,
please visit
www.philips.com/support or read
the international warranty leaflet.
Warranty restrictions
The shaving heads (cutters and
guards) are not covered by the terms
of the international warranty because
they are subject to wear.
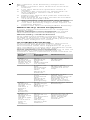
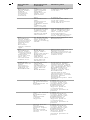
Troubleshooting
This chapter summarizes the most
common problems you could
encounter with the appliance. If you
are unable to solve the problem with
the information below, visit
www.philips.com/support for a list of
frequently asked questions or
contact the Consumer Care Center in
your country.
Prob
lem
Possible
cause
Solution
The
shaver
does not
shave as
well as it
used to.
The
shaving
heads
are
damaged
or worn.
Replace the
shaving
heads.
Foam or
gel
residues
clog up
the
shaving
heads.
Rinse the
shaving unit
under a hot
tap.
You have
not
inserted
the
shaving
heads
properly.
Make sure
that the
projections of
the shaving
heads fit
exactly into
the recesses.
The
shaver
does not
work
when I
press
the
on/off
button.
The
recharge
able
battery is
empty.
Recharge the
battery.
The
shaver
does not
work,
although
it is
connect
ed to
the
mains.
This
shaver is
not
designed
to be
used
directly
from the
mains.
Recharge the
battery and
disconnect
the shaver
from the
mains.

Prob
lem
Possible
cause
Solution
My skin
is slighty
irritated
after
shaving.
Your skin
has not
yet
adapted
to the
new
shaving
system.
Wait at least
three weeks
to allow your
skin to adapt
to the shaver.
Do not use
different
shaving
methods
during this
period, it will
be easier for
your skin to
adapt.
Your skin
is
sensitive
to dry
shaving.
Use the
shaver with
shaving gel or
shaving foam
and with
plenty of
water for
extra skin
comfort.
You are
only
shaving
with
water.
Use the
shaver with
shaving gel or
shaving foam
and with
plenty of
water for
extra skin
comfort.
Your skin
is
irritated
by the
type of
foam you
use.
Use the
shaver with
shaving gel or
shaving foam
and with
plenty of
water for
extra skin
comfort
Português do Brasil
Descrição geral (Fig. 1)
1 Tampa de proteção
2 Unidade de corte
3 Botão Liga/Desliga
4 Luz piloto de recarga (S1070)
5 Luz piloto de recarga (S1030)
6 Entrada para o plugue pequeno
7 Moldura de retenção
8 Cortador
9 Protetor
10 Aparador removível (somente
S1070)
11 Controle deslizante de liberação
do aparador (somente para
S1070)
12 Fonte de alimentação
13 Plugue pequeno
Nota: É possível localizar o número
do modelo na parte de trás do
aparelho.
Introdução
Parabéns pela sua compra e seja
bem-vindo à Philips! Para aproveitar
todos os benefícios oferecidos pelo
suporte da Philips, registre seu
produto na página
www.philips.com/welcome.
Leia este manual do usuário, pois ele
contém informações sobre os
recursos deste barbeador e algumas
dicas para facilitar o barbear etorná-
lo mais agradável.
Informações importantes
de segurança
Leia atentamente estas informações
importantes antes de usar o aparelho
e seus acessórios. Guarde-as para
futuras consultas. Os acessórios
fornecidos podem variar para
produtos diferentes.

Perigo
- Mantenha a fonte de alimentação
seca (fig. 2).
Aviso
- Para carregar a bateria, use
apenas a fonte de alimentação
removível (A00390) fornecida
com o aparelho.
- A fonte de alimentação contém
um transformador. Não desligue a
fonte de alimentação para trocá-
la por outro conector, pois isso
causará uma situação perigosa.
- Este aparelho pode ser utilizado
por crianças de oito anos ou mais
e por pessoas com capacidade
física, sensorial ou mental
reduzida ou com pouca
experiência e conhecimento,
desde que sejam supervisionadas
ou instruídas sobre o uso do
aparelho de forma segura e
estejam cientes dos riscos
envolvidos. Não deixe o aparelho
ao alcance de crianças. Crianças
não devem realizar a limpeza ou a
manutenção sem a supervisão de
um adulto.
- Sempre desconecte o barbeador
da tomada antes de lavá-lo com
água corrente.
- Sempre verifique o aparelho
antes de usá-lo. Não use o
aparelho se ele estiver danificado,
pois isso pode causar ferimentos.
Sempre substitua uma peça
danificada por outra do tipo
original.
- Não abra o aparelho para trocar a
bateria recarregável.
Atenção
- Nunca mergulhe o sistema de
limpeza ou o suporte para
carregamento na água nem lave-
o sob água corrente (fig. 2).
- Nunca lave o barbeador usando
água com temperatura superior a
60°C.
- Só use este aparelho para o
propósito ao qual ele se destina,
conforme mostrado no manual do
usuário.
- Por questões de higiene, o
aparelho só deve ser utilizado por
uma pessoa.
- Nunca use ar comprimido, palhas
de aço, agentes de limpeza
abrasivos ou líquidos agressivos
como gasolina ou acetona para
limpar o aparelho.
- Se o seu barbeador vier com um
sistema de limpeza, sempre use o
fluido de limpeza original da
Philips (cartucho ou garrafa,
dependendo do tipo de sistema
de limpeza).
- Sempre apoie o sistema de
limpeza em uma superfície
estável, nivelada e horizontal para
evitar vazamento.
- Se o seu sistema de limpeza usar
um cartucho de limpeza, verifique
sempre se o compartimento do
cartucho está fechado antes de
usar o sistema de limpeza para
limpar ou carregar o barbeador.
- Quando o sistema de limpeza
estiver pronto para uso, não o
mova para evitar vazamento do
fluido de limpeza.
- É possível que pingue água pela
tomada na parte inferior do
barbeador quando você for lavá-
lo. Isso é normal e não há riscos
porque os componentes
eletrônicos estão protegidos em
uma unidade elétrica vedada
dentro do barbeador.
- Não use a fonte de alimentação

em tomadas que contenham um
purificador de ar elétrico, nem
perto delas, para evitar danos
irreparáveis à fonte de
alimentação.
Campos eletromagnéticos
- Este aparelho Philips está em
conformidade com todos os
padrões e regulamentos
aplicáveis relacionados à
exposição a campos
eletromagnéticos.
Informações gerais
- Este barbeador é à prova d'água
(fig. 3). Ele é adequado para uso
na banheira ou no chuveiro e para
limpeza em água corrente. Por
questões de segurança, o
barbeador só pode ser usado sem
fio.
- A fonte de alimentação é
adequada para voltagens de 100
a 240 volts.
- A fonte de alimentação
transforma a tensão de 100-240
volts em uma tensão segura,
inferior a 24 volts.
Carregamento
Nota: Este aparelho só pode ser
utilizado sem fios.
Quando você carregar o aparelho
pela primeira vez ou após um longo
período sem usá-lo, deixe-o
carregando por, pelo menos, 10
horas.
Um aparelho totalmente carregado
fornece até 45 minutos de barbear.
O tempo de barbear pode ser menor
do que o esperado em razão de sua
rotina de barbear, de seus hábitos de
limpeza ou de seu tipo de barba.
Carregamento com a fonte de
alimentação
1 Verifique se o barbeador está
desligado.
2 Coloque o plugue pequeno no
barbeador e ligue a fonte de
alimentação na tomada elétrica.
O display do barbeador indica
que ele está carregando.
3 Após o carregamento, remova a
fonte de alimentação da tomada
elétrica e desconecte o conector
pequeno do aparelho.
Indicadores de carga
Bateria fraca
Quando a
bateriaestiverpraticamentedescarre
gada, o aparelho funciona mais
devagar.
Carregamento
Quando o aparelho estiver
carregando, a luz indicadora de
recarga ficará acesa continuamente
(fig. 4) na cor branca.
- A luz indicadora de carregamento
piscará na cor branca quando o
aparelho estiver totalmente
carregado.
Nota: Após o carregamento, remova
a fonte de alimentação da tomada
elétrica e desconecte o conector
pequeno do aparelho.
Utilização do aparelho
Nota: Este aparelho só pode ser
utilizado sem fios.
Como ligar e desligar o
aparelho
1 Para ligar ou desligar o aparelho,
pressione o botão Liga/desliga
uma vez (fig. 5).
Dicas de barbear
- Use o barbeador com gel ou

espuma de barbear para um
conforto extra ou use o barbeador
seco para o máximo conforto.
-
Recomendamos que você use
o barbeador com gel ou
espuma de barbear quando
usá-lo com a pele molhada.
Não use creme de barbear
espesso ou óleo de barbear
com este barbeador.
-
Se usar o barbeador com a
pele seca, recomendamos que
esteja com a pele totalmente
seca para que o barbeador
deslize suavemente por ela.
- Para garantir os melhores
resultados e conforto para a pele,
apare previamente a barba se não
se barbeou nos últimos 3 dias ou
mais.
- Para obter os melhores
resultados, faça movimentos
circulares durante o uso.
- O barbeador é à prova d'água e
pode ser usado na banheira ou
no chuveiro.
- Talvez sua pele precise de duas a
três semanas para se acostumar
ao sistema de barbear da Philips.
Barbear com a pele molhada
Para obter um barbear mais
confortável, use este aparelho com a
pele molhada usando espuma ou gel
de barbear.
Para se barbear com espuma ou gel
de barbear, siga as etapas abaixo:
1 Aplique um pouco de água sobre
a pele (fig. 6).
2 Aplique a espuma ou o gel de
barbear sobre a pele (fig. 7).
3 Use água corrente para lavar a
unidade de corte e garantir que
ela deslize suavemente pela pele
(fig. 8).
4 Ligue o aparelho.
5 Mova as cabeças de corte em
movimentos circulares para
alcançar todos os pelos que
nascem em direções (fig. 9)
diferentes. Pressione levemente
para obter um barbear mais
confortável.
Nota: Lave a unidade de corte
regularmente para garantir que
ela continue deslizando
suavemente pela pele (fig. 8).
6 Seque o rosto.
7 Limpe o aparelho após o uso.
Nota: Verifique se você retirou
toda a espuma e gel de barbear
do aparelho.
Barbear a seco
1 Ligue o aparelho.
2 Mova as cabeças de corte em
movimentos circulares para
alcançar todos os pelos que
nascem em direções (fig. 9)
diferentes. Pressione levemente
para obter um barbear mais
confortável.
Nota: Não pressione muito o
aparelho, pois pode causar
irritação na pele.
3 Limpe o aparelho após o uso.
Aparando os pelos
Você poderá usar o aparador nas
costeletas e no bigode.
1 Pressione o controle deslizante
do aparador para baixo para abri-
lo (fig. 10).
2 Ligue o aparelho.
3 Segure o aparador perpendicular
à pele e mova o aparelho para
baixo pressionando (fig. 11)
suavemente.
4 Após aparar, desligue o aparelho.
5 Limpe o aparador.
6 Feche o aparador (você ouvirá um
'clique') (fig. 12).

Limpeza e manutenção
Limpeza do barbeador com
água corrente
Limpe o barbeador após cada uso
para obter o melhor desempenho.
Sempre desligue o aparelho e
desconecte-o da tomada antes de
limpá-lo.
Nota: É possível que pingue água
pela tomada na parte inferior do
barbeador quando você for lavá-lo.
Isso é normal e não há riscos porque
os componentes eletrônicos estão
protegidos em uma unidade elétrica
vedada dentro do barbeador.
Cuidado: Cuidado com água quente.
Sempre verifique se a água não está
quente demais para evitar
queimaduras nas mãos.
para não danificar as cabeças de
corte, nunca seque a unidade de
corte com toalha ou pano.
1 Segure a unidade de corte e
levante a parte frontal primeiro,
depois, a parte traseira do
aparelho (fig. 13).
Nota: Segure a unidade de corte
enquanto faz isso.
2 Lave acâmaracoletora de pelos
em água corrente (fig. 14).
3 Lave a parte de dentro da
unidade de corte em água morna
corrente (fig. 15).
4 Lave a parte de fora da unidade
de corte em água morna corrente
(fig. 16).
Limpeza total
5 Gire a trava no sentido anti-
horário e retire a estrutura de
retenção da unidade (fig. 17) de
corte.
6 Remova e limpe uma cabeça de
corte por vez (fig. 18). Cada cabeça
de corte consiste em um cortador
e um protetor.
Não limpe mais de um cortador e
um protetor por vez, pois todos
eles são conjuntos
correspondentes. Se você
acidentalmente misturar os
cortadores e protetores, talvez
sejam necessárias várias semanas
até que o desempenho ideal no
barbear seja restaurado.
7 Remova o cortador do protetor de
corte e lave-o com água (fig. 19).
8 Lave as partes interna e externa
do protetor de corte com água
(fig. 20).
9 Encaixe novamente as cabeças
de corte na unidade (fig. 21) de
corte. Verifique se as saliências
das cabeças de corte se encaixam
corretamente nos espaços.
10 Coloque a moldura de retenção
de volta na unidade de corte e
gire a trava no sentido horário (fig.
22).
11 Recoloque a unidade (fig. 23) de
corte.
Nota: Se você não conseguir
recolocar a unidade de corte
corretamente, verifique se inseriu
as cabeças de corte de forma
adequada e se a moldura de
retenção está travada.
12 Tire com cuidado o excesso de
água, abra a unidade de corte
novamente e deixe-a aberta para
que seque completamente.
Cuidado: Tome cuidado para não
bater a unidade de corte em algo
ao agitar o aparelho para retirar o
excesso de água.

Limpeza do aparador
Limpe o aparador toda vez que usá-
lo.
1 Desligue o aparelho e
desconecte-o da tomada.
2 Pressione o controle deslizante
do aparador para baixo para abri-
lo (fig. 10).
3 Lave o aparador em água
corrente (fig. 24).
4 Tire com cuidado oexcesso de
água e deixe o aparador secar.
5 Feche o aparador (você ouvirá um
'clique') (fig. 12).
Dica: Para obter o melhor
desempenho, lubrifique os dentes do
aparador pingando uma gota de óleo
lubrificante regularmente.
Para guardar o aparelho
Recomendamos que você deixe o
aparelho secar antes de colocar a
tampa de proteção.
1 Desligue o aparelho.
2 Coloque a tampa de proteção na
unidade de corte depois de usá-
la a fim de evitar danos e acúmulo
de sujeira nas cabeças (fig. 26) de
corte.
Substituição
Substituição das cabeças de
corte
Para obter o melhor desempenho do
barbeador, recomendamos substituir
as cabeças de corte a cada dois anos
(fig. 25). Substitua as cabeças de
corte danificadas imediatamente.
Sempre troque as cabeças de corte
por cabeças (consulte 'Encomenda
de acessórios') de corte originais da
Philips.
1 Desligue o aparelho e
desconecte-o da tomada elétrica.
2 Segure a unidade de corte e
levante a parte frontal primeiro,
depois, a parte traseira do
aparelho (fig. 13).
Nota: Segure a unidade de corte
enquanto faz isso.
3 Gire a trava no sentido anti-
horário e retire a moldura de
retenção.
4 Remova as cabeças (fig. 18) de
corte e coloque as novas na
unidade (fig. 21) de corte. Verifique
se as saliências das cabeças de
corte se encaixam corretamente
nos espaços.
5 Coloque a moldura de retenção
de volta na unidade de corte e
gire a trava no sentido horário (fig.
22).
6 Recoloque a unidade (fig. 23) de
corte.
Nota: Se você não conseguir
recolocar a unidade de corte
corretamente, verifique se inseriu
as cabeças de corte de forma
adequada e se a moldura de
retenção está travada
Encomenda de acessórios
Para comprar acessórios ou peças de
substituição, acesse
www.shop.philips.com/service ou
dirija-se até um revendedor Philips.
Você também pode entrar em
contato com a Central de
Atendimento ao Cliente Philips do
seu país (consulte o folheto de
garantia mundial para ver as
informações de contato).
As seguintes peças de substituição e
acessórios estão disponíveis:
- Cabeças de corte SH30/51 Philips
Nota: A disponibilidade dos
acessórios pode diferir de acordo
com o país.

Reciclagem
ADVERTÊNCIA: Cuidados com a
utilização e descarte de pilhas e
baterias.
Não descarte as pilhas e baterias
juntamente ao lixo doméstico.
O descarte inadequado de pilhas e
baterias pode representar riscos ao
meio ambiente e à saúde humana.
Para contribuir com a qualidade
ambiental e com sua saúde, a Philips
receberá pilhas e baterias
comercializadas ou fornecidas com
seus produtos após seu fim de vida,
que serão encaminhadas à
destinação ambientalmente correta.
A Philips dispõe de pontos de coleta
em Assistências Técnicas.
Remoção da bateria
recarregável
Remova a bateria recarregável
somente quando descartar o
barbeador. Antes de remover a
bateria, é necessário desconectar
o barbeador da tomada e a
bateria deve estar
completamente descarregada.
Tome todas as precauções de
segurança necessárias ao lidar
com as ferramentas para abrir o
barbeador.
tenha cuidado, pois os fios de metal
da bateria são afiados.
1 Desconecte o barbeador do
sistema elétrico.
2 Deixe o barbeador ligado até que
pare de funcionar.
3 Desparafuse a parte de trás do
barbeador e da câmara coletora
de pelos.
4 Remova o painel frontal e o painel
traseiro.
5 Dobre os 8 ganchos para o lado e
retire a unidade elétrica.
Tenha cuidado, pois os ganchos
são afiados.
6 Remova o suporte da bateria e
corte os rótulos da bateria com
um par de alicates de corte.
7 Remova a bateria recarregável.
Garantia e suporte
Caso você precise obter informações
ou suporte, visite o site
www.philips.com/support ou leia o
folheto de garantia internacional.
Restrições da garantia
As cabeças de corte (cortadores e
protetores) não estão cobertas pelos
termos da garantia internacional por
estarem sujeitas ao desgaste.
Resolução de problemas
Este capítulo resume os problemas
mais comuns que podem surgir com
a utilização do aparelho. Caso você
não consiga solucionar o problema
com as informações abaixo, acesse
www.philips.com/support para obter
uma lista de perguntas frequentes ou
entre em contato com a Central de
Atendimento ao Cliente do seu país.

Proble
ma
Possível
causa
Solução
O
barbea
dor não
está
funcio
nando
como
antes.
As
cabeças
de corte
estão
danifica
das ou
gastas.
Substitua as
cabeças de
corte.
Os
resíduos
de
espuma
ou gel
obstruem
as
cabeças
de corte.
Lave a
unidade de
corte em
água quente
corrente.
Você não
inseriu as
cabeças
de corte
adequad
amente.
Verifique se
as saliências
das cabeças
de corte se
encaixam
corretamente
nos espaços.
O
barbea
dor não
funciona
quando
pressio
no o
botão
liga/desl
iga.
A bateria
recarregá
vel está
descarreg
ada.
Recarregue a
bateria.
O
barbea
dor não
funciona
, embora
esteja
conecta
do ao
sistema
elétrico.
Este
barbea
dor não
foi
projetado
para ser
usado
direta
mente do
sistema
elétrico.
Recarregue a
bateria e
desconecte o
barbeador da
tomada
elétrica.
Minha
pele fica
um
pouco
irritada
após o
barbear.
Sua pele
ainda
não se
adaptou
ao novo
sistema
de
barbear.
Espere pelo
menos três
semanas até
que sua pele
se adapte ao
barbeador.
Não utilize
métodos de
barbear
diferentes
durante este
período; será
mais fácil
para a
adaptação da
pele.
Sua pele
é sensível
ao
barbear a
seco.
Use o
barbeador
com gel ou
espuma de
barbear e
bastante
água para
conforto
extra para a
pele.
Você está
se
barbean
do
apenas
com
água.
Use o
barbeador
com gel ou
espuma de
barbear e
bastante
água para
conforto
extra para a
pele.
Sua pele
fica
irritada
pelo tipo
de
espuma
que você
usa.
Use o
barbeador
com gel ou
espuma de
barbear e
bastante
água para
conforto
extra para a
pele
-
 1
1
-
 2
2
-
 3
3
-
 4
4
-
 5
5
-
 6
6
-
 7
7
-
 8
8
-
 9
9
-
 10
10
-
 11
11
-
 12
12
-
 13
13
-
 14
14
-
 15
15
-
 16
16


Philips S1070/04 Manual do usuário
- Categoria
- Barbeadores masculinos
- Tipo
- Manual do usuário
em outros idiomas
- English: Philips S1070/04 User manual
Artigos relacionados
-
Philips S9511/31 Manual do proprietário
-
Philips S9151/42 Manual do usuário
-
Philips HQ6970/16 Manual do usuário
-
-
Philips HQ6940 Manual do usuário
-
Philips YS521/17 Manual do usuário
-
-
Philips PQ226/18 Manual do usuário
-
-