MO-EL CRONOTERMOSTATO 9006ED Manual do proprietário
- Categoria
- Termostatos
- Tipo
- Manual do proprietário

MO-EL S.p.a.
Via Galvani, 18
42027 Montecchio Emilia (RE)
ITALY
tel +39 (0522) 868011
fax +39 (0522) 864223
www.mo-el.com - [email protected]
Termostato da installazione a muroTermostato da installazione a muro
Wall-Mount ThermostatWall-Mount Thermostat
Thermostat muralThermostat mural
Thermostat für WandmontageThermostat für Wandmontage
Termostato de paredTermostato de pared
Termóstato de instalação na paredeTermóstato de instalação na parede
90069006
MANUALE D’USOMANUALE D’USO
USER MANUALUSER MANUAL
MANUEL D’UTILISATIONMANUEL D’UTILISATION
BEDIENUNGSANLEITUNGBEDIENUNGSANLEITUNG
MANUAL DE USOMANUAL DE USO
MANUAL DO UTILIZADORMANUAL DO UTILIZADOR

2
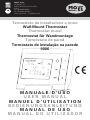
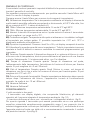
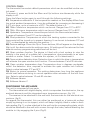
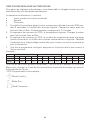
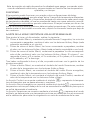
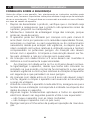
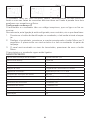
Giorno/Weekday/Jour
Tag/Dia
Orologio/Clock/Horloge
Uhr/ Reloj/ Relógio
Temperatura ambiente/Room temperature
Température ambiante/Raumtemperatur
Temperatura ambiente
On/Off
Programmazione/Program/Programmation
Programmierung/Programación/Programação
Indietro/Return/Retour
Zurück/Atrás/Retroceder
LED
Identicazione/ID button/Identication
Identikationstaste/Identicación/Identicação
Termostato
Thermostat
Ricevitore
Receiver

3
IT TERMOSTATO PROGRAMMABILE
AVVERTENZE RIGUARDANTI LA SICUREZZA
Prima di utilizzare l’apparecchio, leggere attentamente le istruzioni contenute
in questo manuale, poiché esso contiene importanti informazioni riguardo alla
sicurezza dell’installazione, l’uso e la manutenzione. Il manuale deve essere
conservato e trasmesso al nuovo utente in caso di cessione dell’apparecchio.
1. Dopo aver disimballato il prodotto vericarne la completezza e
assicurarsi che non presenti segni di rotture, danneggiamenti
o manomissioni.
2. Tenere il materiale d’imballaggio lontano dai bambini, perché
può essere fonte di pericolo.
3. L’apparecchio può essere utilizzato da bambini di almeno
8 anni (come pure da persone con ridotte capacità siche,
sensoriali o mentali, o prive di esperienza o della necessaria
conoscenza) purché essi siano sotto sorveglianza, oppure
dopo che abbiano ricevuto istruzioni relative all’uso sicuro e
abbiano compreso i potenziali pericoli. I bambini non devono
giocare con l’apparecchio. La pulizia e la manutenzione
devono essere fatte dall’utilizzatore e non da bambini privi di
sorveglianza.
4. I bambini di età inferiore ai 3 anni dovrebbero essere tenuti a
distanza se non continuamente sorvegliati.
5. I bambini di età compresa tra i 3 e gli 8 anni devono solamente
accendere/spegnere l’apparecchio purchè sia stato posto
o installato nella sua normale posizione di funzionamento e
che essi ricevano sorveglianza o istruzioni riguardanti l’utilizzo
dell’apparecchio in sicurezza e ne capiscano i pericoli.
6. I bambini di età compresa tra i 3 e gli 8 anni non devono
inserire la spina, regolare o pulire l’apparecchio né eseguire la
manutenzione a cura dell’utilizzatore.
7. Prima di effettuare il collegamento alla rete elettrica, assicurarsi
che la tensione dell’impianto corrisponda a quella indicata
nell’etichetta dati targa posta sull’apparecchio.
8. Quando si utilizza l’apparecchio, è necessario seguire alcune
regole fondamentali (applicabili a tutti gli apparecchi elettrici):
• Non toccare l’apparecchio con le mani bagnate.
• Non maneggiare l’apparecchio con i piedi nudi.
9. Disconnettere sempre l’apparecchio prima di ogni operazione
di manutenzione.

4
Questo termostato radio montato a parete è stato sviluppato per essere in grado
di spegnere ed accendere sistemi di riscaldamento elettrici e covenzionali in base
ad una temperatura impostabile ed un tempo.
FUNZIONI
Il termostato è in grado di lavorare secondo due diverse impostazioni:
1) Impostazione manuale: vengono selezionate 3 diverse fasce di temperatura,
Comfort, Risparmio energia, Vacanza, e di volta in volta basterà selezionare la
fascia di temperatura desiderata che verrà mantenuta no ad una nuova selezione
manuale.
2) Impostazione automatica: vengono selezionate 4 fasce orarie per giorno nelle
quali il termostato dovrà gestire determinate temperature. In questo modo si può
settare il termostato una sola volta e lasciarlo operare n quando non ce ne sarà
più bisogno.
REGOLAZIONE ORARIO E GESTIONE IMPOSTAZIONI MANUALI
Per impostare l’ora ed il giorno attuali seguire i seguenti punti:
1. Premere il pulsante Menu e tenere premuto per 3 secondi, la cifra dei minuti
inizierà a lampeggiare, cambiare il valore con i pulsanti Su e Giù (ogni pressione
varrà un minuto).
2. Premere ancora il pulsante Menu, la cifra delle ore inizierà a lampeggiare,
cambiare il valore con i pulsanti Su e Giù (ogni pressione varrà un’ora).
3. Premere ancora il pulsante Menu, la cifra del giorno inizierà a lampeggiare,
cambiare il valore con i pulsanti Su e Giù. Il numero 1 corrisponde a Lunedì, il
2 a martedì, il 3 a Mercoledì, il 4 a Giovedì, il 5 a Venerdì, il 6 a Sabato ed il 7
a Domenica.
Dopo aver sistemato ora e giorno, si può continuare con la gestione delle
impostazioni manuali:
1. Premere il pulsante Menu, verrà visualizzato il simbolo della modalità Vacanze;
cambiare il valore della temperatura con i pulsanti Su e Giù.
2. Premere il pulsante Menu, verrà visualizzato il simbolo della modalità Risparmio
di energia; cambiare il valore della temperatura con i pulsanti Su e Giù.
3. Premere il pulsante Menu, verrà visualizzato il simbolo della modalità Comfort;
cambiare il valore della temperatura con i pulsanti Su e Giù.
La funzione Comfort è rappresentata dal simbolo e rappresenta la temperatura
di benessere che si vuole raggiungere e mantenere.
La funzione Risparmio di energia è rappresentata dal simbolo e rappresenta la
temperatura minima sotto la quale inizia ad accendersi il riscaldamento per non far
raffreddare troppo l’ambiente.
La funzione Vacanze è rappresentata dal simbolo e rappresenta la modalità
antigelo, impostando una temperatura minima sotto la quale si accenderà il
riscaldamento per evitare il congelamento in caso di assenza da casa.

5
GESTIONE IMPOSTAZIONI AUTOMATICHE
Per gestire le impostazioni automatiche si dovranno settare 4 fasce orarie giornaliere
ad ognuna delle quali verrà abbinata una temperatura desiderata.
La settimana è divisa in 3 settori:
• Giorni feriali (da lunedì a venerdì)
• Sabato
• Domenica
4. Per impostare la prima fascia oraria tenere premuto il tasto PRG per 3 secondi,
inizierà a lampeggiare la cifra dei minuti. Cambiare il valore con i pulsanti Su e
Giù. Ogni pressione del tasto varrà 15minuti.
5. Premendo ancora PRG, la temperatura inizierà a lampeggiare. Cambiare il
valore con i pulsanti Su e Giù.
6. Premendo ancora PRG, il numero del programma avanzerà alla fascia oraria
successiva ed inizierà a lampeggiare di nuovo la cifra dei minuti. Ripetere
l’operazione per ogni fascia oraria dei giorni feriali, poi per il sabato e poi per la
domenica.
7. Una volta impostato il programma, premere il tasto indietro no alla schermata
iniziale.
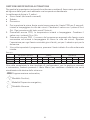
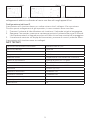
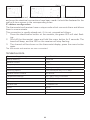
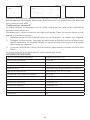
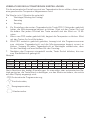
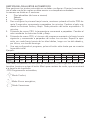
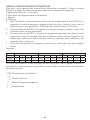
Esempio:
Da lunedì a venerdì Sabato Domenica
PRG 1 2 3 4 1 2 3 4 1 2 3 4
Ore 6.30 8.00 18.00 22.30 8.00 10.00 18.00 23.00 9.00 12.00 19.00 0.00
Temp. 21°C 18°C 21°C 16°C 21°C 21°C 21°C 16°C 23°C 21°C 16°C 21°C
Una volta completate le due tipologie di congurazioni, per la gestione manuale
o automatica, basterà premere il tasto Menu per cambiare modalità che verrà
visualizzata sulla destra dello schermo:
- PRG Programmazione automatica;
- Modalità Comfort;
- Modalità Risparmio energetico;
- Modalità Vacanze.

6
PANNELLO DI CONTROLLO
Il termostato ha alcuni parametri impostati di default che possono essere modicati
tramite il pannello di controllo.
Per accedervi premere simultaneamente per qualche secondo il tasto Menu ed il
tasto Su mentre il display è spento.
Premere ancora il tasto Menu per scorrere tra le seguenti impostazioni:
01) Calibrazione temperatura: Se la temperatura ambiente sul display è diversa da
quella reale è possibile calibrarla aumentando o diminuendo, di 0.5°C alla volta, no
ad un massimo di 8°C. Il valore di default è 0.
02) T.Max: Massima temperatura selezionabile. Si va dai 5°C agli 80°C.
03) T.Min: Minima temperatura selezionabile. Si va dai 5°C agli 80°C.
04) Isteresi: Intervallo di temperatura entro il quale entrerà in azione il termostato.
Si può scegliere i un range tra 0 e 3°C.
05) Protezione antigelo: Temperatura alla quale si attiveranno i riscaldatori collegati
al termostato per evitare gelate. E’ possibile impostarla tra i 5°C ed i 15°C o
disattivarlo andando sulla posizione - -.
06) Ripristino impostazioni: Premere i tasti Su o Giù, sul display comparirà la scritta
88. Attendere n quando esce dal menu impostazioni. Tutte le impostazioni saranno
riportate ai livelli di default e saranno cancellate le eventuali programmazioni già
impostate.
07) Funzione Finestra aperta: Il dispositivo dispone di un sistema di blocco in caso
di brusco calo di temperatura, dovuto presumibilmente all’apertura di una nestra
o simile. Selezionando 1 il sistema sarà attivo, con 0 si disattiva.
08) Tempo di rilevazione Finestra aperta: Tempo di rilevazione nel quale,
l’abbassamento della temperatura, farà attivare la funzione di blocco per nestra
aperta. Si può scegliere tra i 2 ed i 30minuti.
09) Calo di temperatura Finestra aperta: Gradi Celsius in meno, nel tempo di
rilevazione, per far si che si attivi la funzione di blocco per nestra aperta. Si può
scegliere tra i 2°C ed i 4°C.
10) Ritorno alla normale funzionalità: Questa impostazione determina dopo quanto
tempo dopo l’attivazione del blocco, l’apparecchio tornerà al funzionamento
normale. La scelta è tra i 10 ed i 60minuti.
11) Versione Software
12) Versione Software2
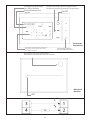
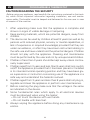
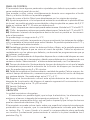
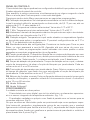
POSIZIONAMENTO
L’unità consiste in due parti:
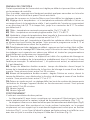
- Il termostato con display digitale, che comprende l’elettronica, gli elementi
operativi ed il sensore integrato di temperatura ambiente. (g.1-2)
- Il ricevitore da ssare al muro con i morsetti per i collegamenti elettrici. (g.3)
Per quanto riguarda il termostato può essere posizionato sia su una qualunque
superce orizzontale semplicemente poggiandolo sopra il suo supporto che lo
manterrà leggermente inclinato per facilitarne la lettura(Fig.1), sia ssando al muro
l’apposita piastrina forata con delle viti e successivamente incastrando il modulo
alla piastrina tramite i 4 pin(Fig.2).

7
Il ricevitore va invece aperto sbloccando i due pin sul fondo ed una volta fatti i
collegamenti elettrici va ssato al muro con due viti negli appositi fori.
Congurazione indirizzo IP
Il termostato ed il ricevitore hanno un codice univoco che li collega e li fa comunicare.
Di solito questo collegamento è già impostato, in caso contrario ecco cosa fare:
1. Premere il pulsante di identicazione sul ricevitore; il led verde inizierà a lampeggiare.
2. Spegnere il termostato, premere e mantenere premuto il pulsante Menu per 3 secondi.
La scheda emetterà un segnale acustico ed il led sul ricevitore smetterà di lampeggiare.
3. Il canale sarà mostrato sul display del termostato, premere di nuovo il pulsante Menu.
Il termostato ed il ricevitore sono ora collegati.
DATI TECNICI
Tensione di alimentazione termostato 2 batterie AAA da 1,5V
Memoria di Backup EEPROM
Corrente ricevitore 16 A
Frequenza 868MHz
Selezione canale Programmando il termostato ed il ricevitore
Opzioni di comutazione 4 periodi al giorno, 5+1+1 giorni
Contatti dell’interruttore del ricevitore NA e NC
Impostazioni di temperatura 5°C - 30°C, incrementi di 0.5°C
Precisione +/- 0.5°C (+/- 1°F)
Dimensioni termostato 135x88x22 mm
Dimensioni ricevitore 114x86x30 mm
Colore Bianco
Grado di protezione IP 20
Certicazione CE
Fig.1 Fig.2 Fig.3

8
EN PROGRAMMABLE THERMOSTAT
CAUTION REGARDING THE SECURITY
Before using your appliance, read carefully the instructions contained in this book-
let, which furnish important information regarding installation, use and mainte-
nance safety. The booklet must be keeped and delivered to the new user in case
of cession of the machine.
1. After unpacking make sure that the appliance is complete and
shows no signs of visible damage or tampering.
2. Keep packing materials, which are potential dangers, away from
children.
3. The device can be used by children at least 8 years (as well as by
persons with reduced physical, sensory or mental capabilities, or
lack of experience or required knowledge) provided that they are
under surveillance, or after they have been instructed relating to
the safe use and have understood the potential dangers. Children
should not play with the appliance. Cleaning and maintenance
must be performed by the user and not by unsupervised children.
4. Children of less than 3 years should be kept away unless continu-
ously supervised.
5. Children aged from 3 years and less than 8 years shall only switch
on/off the appliance provided that it has been placed or installed
in its intended normal operating position and they have been giv-
en supervision or instruction concerning use of the appliance in a
safe way and understand the hazards involved.
6. Children aged from 3 years and less than 8 years shall not plug in,
regulate and clean the appliance or perform user maintenance.
7. Before inserting the plug make sure that the voltage is the same
as indicated on the device.
8. Some fundamental rules which apply to all electrical devices
must be observed when using the heater:
• Do not touch the device with wet hands.
• Do not handle with bare feet.
9. Always unplug the appliance before doing any maintenance op-
eration.

9
This wall-mounted remote thermostat is designed to switch electric and boiler-
based heating systems on and off on the basis of a set temperature and time.
FUNCTIONS
The thermostat can work in two different modes:
1) Manual setting: three different temperature bands are selected: Comfort, Ener-
gy Saving and Holiday; simply select the desired temperature band when required;
this will then be maintained until a new manual selection is made.
2) Automatic setting: four time bands per day are selected, during which the ther-
mostat must manage set temperatures. This allows the thermostat to be set only
once, and to leave it running until it is no longer required.
SETTING THE TIME AND ADJUSTING THE MANUAL SETTINGS
To set the time and day, proceed as follows:
1. Press and hold the Menu button for 3 seconds: the minutes will start ashing;
adjust the value using the Up and Down buttons (each press changes the set-
ting by one minute).
2. Press the Menu button again: the hours will now start ashing; adjust the value
using the Up and Down buttons (each press changes the setting by one hour).
3. Press the Menu button again: the number representing the day will now start
ashing; adjust the value using the Up and Down buttons. The number 1 corre-
sponds to Monday, 2 to Tuesday, 3 to Wednesday, 4 to Thursday, 5 to Friday,
6 to Saturday and 7 to Sunday.
After setting the time and day, you can continue entering the manual settings:
1. Press the Menu button, and the Holiday mode symbol will be displayed;
change the temperature value using the Up and Down buttons.
2. Press the Menu button, and the Energy Saving mode symbol will be displayed;
change the temperature value using the Up and Down buttons.
3. Press the Menu button, and the Comfort mode symbol will be displayed;
change the temperature value using the Up and Down buttons.
The Comfort function is represented by the symbol, and represents the com-
fortable room temperature you wish to reach and maintain.
The Energy Saving function is represented by the symbol and represents the
minimum temperature below which the heating should be turned on in order to
prevent the environment becoming too cold.
The Holiday function is represented by the symbol and is an anti-frost feature –
the temperature is set to the minimum below which the heating should be turned
on to prevent freezing when away from home.

10
ADJUSTING THE AUTOMATIC SETTINGS
Adjusting the automatic settings requires four daily time bands to be set, with a
temperature linked to each of them.
The week is divided into three sectors:
• Weekdays (Monday to Friday)
• Saturday
• Sunday
4. To set the rst time band, press and hold the PRG button for 3 seconds; the
minutes will start ashing. Adjust the value using the Up and Down buttons.
Each press of the button will change the value by 15 minutes.
5. Press PRG again; the temperature will start to ash. Adjust the value using the
Up and Down buttons.
6. Press PRG again and the program number will advance to the next time band,
and the minutes will start ashing again. Repeat the operation for each time
band for the weekdays, then for Saturday and for Sunday.
7. Once the program has been set, press the back button until you reach the
main screen.
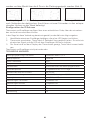
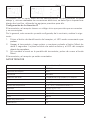
Example:
Monday to Friday Saturday Sunday
PRG 1 2 3 4 1 2 3 4 1 2 3 4
Time 6.30 8.00 18.00 22.30 8.00 10.00 18.00 23.00 9.00 12.00 19.00 0.00
Temp. 21°C 18°C 21°C 16°C 21°C 21°C 21°C 16°C 23°C 21°C 16°C 21°C
Once the two conguration types have been completed, for manual or automatic
management simply press the Menu button to change mode; this will be displayed
on the right-hand side of the screen:
- PRG Automatic Programming
- Comfort mode
- Energy Saving mode
- Holiday mode

11
CONTROL PANEL
The thermostat has certain default parameters which can be modied via the con-
trol panel.
To access it, press and hold the Menu and Up buttons simultaneously while the
display is off.
Press the Menu button again to scroll through the following settings:
01) Temperature calibration: If the temperature readout on the display differs from
the actual ambient temperature, it can be calibrated by increasing or decreasing it
0.5°C at a time, up to a maximum of 8°C. The default value is 0.
02) T.Max: Maximum temperature which can be set. Ranges from 5°C to 80°C.
03) T.Min: Minimum temperature which can be set. Ranges from 5°C to 80°C.
04) Hysteresis: Temperature interval beyond which the thermostat activates.
A range of between 0 and 3°C can be selected.
05) Frost protection: Temperature at which the heating system connected to the
thermostat will be turned on to prevent freezing. It can be set to between 5°C and
15°C, or deactivated by selecting the position - -.
06) Restore settings: Press the Up or Down buttons; 88 will appear on the display.
Wait until the device exits the settings menu. All settings will be returned to their
defaults and any programming performed will be lost.
07) Open window function: The device is tted with a lock system to stop the
heating in the event of a sudden fall in temperature, due presumably to an open
window or similar. Select 1 to activate this system, or 0 to deactivate it.
08) Open window detection time: Detection time in which the drop in temperature
will activate the open window lock function. Choose between 2 and 30 minutes.
09) Open window temperature drop: Temperature drop in degrees centigrade,
within the detection time, required to activate the open window lock function.
Select a value between 2°C and 4°C.
10) Return to normal operation: This setting determines how long the appliance
should wait before returning to normal operation after activation of the lock func-
tion. Select a value between 10 and 60 minutes.
11) Software Version
12) Software Version 2
POSITIONING THE APPLIANCE
The unit is composed of two parts:
- The thermostat with digital display, which incorporates the electronics, the op-
erational elements and the integrated room temperature sensor. (g.1-2)
- The receiver to be attached to the wall with the terminals for the electrical con-
nections. (g.3)
As regards the thermostat, this can either be positioned on a horizontal surface
simply by placing it on its support, which will keep it slightly tilted in order to facili-
tate reading (Fig.1), or else attached to the wall via the corresponding plate, which
should be attached to the wall with screws through the holes, before attaching the
module to it by engaging the 4 pins (Fig.2).

12
The receiver is opened, on the other hand, by releasing the two pins on the base,
and once the electrical connections have been made it should be fastened to the
wall with two screws in the corresponding holes.
IP address conguration
The thermostat and receiver have a unique code which connects them and allows
them to communicate.
This connection is usually already set; if it is not, proceed as follows:
1. Press the identication button on the receiver; the green LED will start ash-
ing.
2. Shut off the thermostat, press and hold the menu button for 3 seconds. The
board will beep, and the LED on the receiver will stop ashing.
3. The channel will be shown on the thermostat display; press the menu button
again.
The thermostat and receiver are now connected.
TECHNICAL DATA
Thermostat Supply Voltage 2 x 1.5V AAA batteries
Backup Memory EEPROM
Receiver current 16 A
Frequency 868MHz
Channel selection By programming the thermostat and the receiver
Switching options Four periods per day, 5+1+1 days
Receiver switch contacts NO and NC
Temperature settings 5°C - 30°C, 0.5°C increments
Accuracy +/- 0.5°C (+/- 1°F)
Thermostat size 135x88x22 mm
Receiver size 114x86x30 mm
Colour White
IP protection rating 20
Certication CE
Fig.1 Fig.2 Fig.3

13
FR THERMOSTAT PROGRAMMABLE
NOTICES CONCERNANTES LA SÛRETÉ
Avant d’utiliser votre appareil suivez les recommandations contenues dans cette
notice car elles donnent des informations importantes en ce qui concerne l’instal-
lation, l’utilisation et la sécurité de maintenance. Le manuel doit être conservé et
transmis au nouvel usager en cas de cession de l’appareil.
1. Après avoir déballer le produit vériez la perfection du contenu et
assurez-vous que le produit ne présente pas de signes de ruptures,
d’endommagements ou d’effractions.
2. Garder le matériel d’emballage loin des enfants, car il peut être
source de danger.
3. L’appareil peut être utilisé par des enfants d’au moins 8 ans, ainsi
que par des personnes dont les capacités physiques, sensorielles
ou mentales seraient réduites, voire qui ne posséderaient pas
l’expérience ni les connaissances nécessaires, à condition qu’ils
soient surveillés ou qu’ils aient reçu les instructions d’utilisation
nécessaires et qu’ils soient conscients des risques potentiels. Les
enfants ne doivent pas jouer avec l’appareil. Le nettoyage et l’en-
tretien doivent être effectués par l’utilisateur et ne doivent pas être
conés à des enfants sans surveillance.Ne laisser en aucun cas
des enfants jouer avec l’appareil.
4. Les enfants de moins de 3 ans doivent être tenus à bonne distance
à moins d’être constamment surveillés.
5. Les enfants d’âge compris entre 3 et 8 ans ne peuvent qu’allumer/
éteindre l’appareil à condition que celui-ci ait été placé ou installé
dans sa position normale de fonctionnement et à condition qu’ils
soient surveillés ou qu’ils aient reçu des instructions relatives à
l’utilisation de l’appareil en conditions de sécurité et qu’ils en aient
compris les dangers.
6. Les enfants d’âge compris entre 3 et 8 ans ne doivent en aucun
cas brancher la che d’alimentation, régler l’appareil, le nettoyer ni
en effectuer l’entretien qui incombe à l’utilisateur.
7. lation corresponde à celle indiquée dans la plaque des données sur
l’appareil.
8. Certaines règles fondamentales applicables à tous les appareils
électriques sont à suivre quand vous utilisez votre réchauffeur:
• Ne pas toucher l’appareil avec les mains mouillées.
• Ne pas manier l’appareil avec les pieds nus.
9. Débrancher systématiquement la che en cas d’opérations d’en-
tretien.

14
Ce thermostat radio installé sur le mur a été développé pour éteindre et allumer
des systèmes de chauffage électriques et conventionnels à une température et
pendant une durée programmables.
FONCTIONS
Le thermostat peut fonctionner selon deux congurations :
1) Conguration manuelle : 3 plages de température sont sélectionnées (Confort,
Éco et Vacances), il sufra de programmer à chaque fois la plage de température
qui sera maintenue jusqu’à ce qu’un nouveau réglage manuel soit effectué.
2) Conguration automatique : sont sélectionnées 4 plages horaires par jour du-
rant lesquelles le thermostat gérera des températures programmées. Vous pouvez
ainsi régler le thermostat une seule fois et le laisser fonctionner jusqu’à ce que cela
ne soit plus nécessaire.
RÉGLAGE DE L’HEURE ET GESTION DES RÉGLAGES MANUELS
Pour régler l’heure et le jour, suivez la procédure décrite ci-après :
10. Appuyez et maintenez enfoncée pendant 3 secondes la touche Menu. Le chif-
fre des minutes clignote. Changez la valeur à l’aide des touches Haut et Bas
(une pression correspond à une minute).
11. Appuyez de nouveau sur la touche Menu. Le chiffre des heures clignote.
Changez la valeur à l’aide des touches Haut et Bas (une pression correspond
à une heure).
12. Appuyez de nouveau sur la touche Menu. Le chiffre du jour de la semaine
clignote. Changez le jour à l’aide des touches Haut et Bas. Le chiffre 1 cor-
respond à lundi, le 2 à mardi, le 3 à mercredi, le 4 à jeudi, le 5 à vendredi, le 6
à samedi et le 7 à dimanche.
Après avoir réglé l’heure et le jour de la semaine, procédez à la gestion des ré-
glages manuels :
1. Appuyez sur la touche Menu. L’écran afche le symbole du mode Vacances ;
réglez la température à l’aide des touches Haut et Bas.
2. Appuyez sur la touche Menu. L’écran afche le symbole du mode Éco ; réglez
la température à l’aide des touches Haut et Bas.
3. Appuyez sur la touche Menu. L’écran afche le symbole du mode Confort ;
réglez la température à l’aide des touches Haut et Bas.
La fonction Confort est représentée par le symbole et correspond à la tempé-
rature de confort que vous souhaitez atteindre et maintenir.
La fonction Éco est représentée par le symbole et correspond à la tempéra-
ture minimale en-dessous de laquelle le chauffage se déclenche pour chauffer les
pièces.
La fonction Vacances est représentée par le symbole et correspond au mode
hors gel, programmant une température minimale en-dessous de laquelle le
chauffage se déclenche pour empêcher le gel des canalisations en cas d’absence.

15
GESTION DES RÉGLAGES AUTOMATIQUES
Pour gérer les réglages automatiques, vous devez dénir 4 plages horaires journal-
ières associées aux températures désirées.
La semaine est divisée en 3 sections :
• Jours ouvrés (du lundi au vendredi)
• Samedi
• Dimanche
4. Pour dénir la première plage horaire, maintenez enfoncée la touche PRG pen-
dant 3 secondes. Le chiffre des minutes clignote. Changez la valeur avec les
touches Haut et Bas. Chaque pression correspond à 15 minutes.
5. En appuyant de nouveau sur PRG, la température clignote. Changez la valeur
avec les touches Haut et Bas.
6. En appuyant de nouveau sur PRG, le numéro du programme passe à la plage
horaire suivante et le chiffre des minutes recommence à clignoter. Répétez
l’opération pour chaque plage horaire des jours ouvrés, puis pour le samedi et
pour le dimanche.
7. Une fois le programme conguré, appuyez sur la touche retour pour revenir à
l’écran principal.
Exemple :
Du lundi au vendredi Samedi Dimanche
PRG 1 2 3 4 1 2 3 4 1 2 3 4
Heures 6.30 8.00 18.00 22.30 8.00 10.00 18.00 23.00 9.00 12.00 19.00 0.00
Temp. 21°C 18°C 21°C 16°C 21°C 21°C 21°C 16°C 23°C 21°C 16°C 21°C
Une fois les deux congurations effectuées, il vous sufra d’appuyer sur la touche
Menu pour changer le mode de fonctionnement manuel/automatique qui sera af-
ché à droite de l’écran :
- PRG Programmation automatique ;
- Mode Confort ;
- Mode Éco ;
- Mode Vacances.

16
PANNEAU DE CONTRÔLE
Certains paramètres du thermostat sont réglés par défaut et peuvent être modiés
via le panneau de contrôle.
Pour y accéder, appuyez simultanément pendant quelques secondes sur la touche
Menu et sur la touche Haut quand l’écran est éteint.
Appuyez de nouveau sur la touche Menu pour faire déler les réglages ci-après :
01) Réglage de la température : si la température ambiante afchée à l’écran ne
correspond pas à la température réelle, il est possible de l’ajuster en augmentant
ou en diminuant de 0,5 °C à chaque fois, jusqu’à un maximum de 8 °C. La valeur
par défaut est 0.
02) T.Max : température maximale programmable. De 5 °C à 80 °C.
03) T.Min : température minimale programmable. De 5 °C à 80 °C.
04) Hystérésis : plage de température dans laquelle le thermostat se déclenche.
Vous pouvez choisir une plage comprise entre 0 et 3 °C.
05) Protection hors gel : température à laquelle les radiateurs reliés au thermostat
se déclenchent pour éviter les gelées. Vous pouvez la programmer entre 5 °C et
15 °C ou la désactiver en allant sur la position - -.
06) Rétablissement des réglages par défaut : appuyez sur les touches Haut ou Bas.
L’écran afche le message 88. Patientez jusqu’à la sortie du menu Réglages. Tous
les réglages sont ramenés aux valeurs par défaut et toutes les programmations
éventuellement congurées sont supprimées.
07) Fonction fenêtre ouverte : le dispositif est doté d’un système de blocage en
cas de chute soudaine de la température probablement due à l’ouverture d’une
fenêtre par exemple. En sélectionnant 1, le système est activé, en sélectionnant
0, il est désactivé.
08) Temps de détection fenêtre ouverte : temps de détection durant lequel la
baisse de la température déclenche la fonction de blocage à cause d’une fenêtre
ouverte. Vous pouvez choisir entre 2 et 30 minutes.
09) Baisse de température fenêtre ouverte : degrés Celsius en moins, durant le
temps de détection, pour déclencher la fonction de blocage à cause d’une fenêtre
ouverte. Vous pouvez choisir entre 2 °C et 4 °C.
10) Retour au mode normal : ce réglage dénit au bout de combien de temps après
l’activation du blocage l’appareil revient au fonctionnement normal. Vous pouvez
choisir entre 10 et 60 minutes.
11) Version logiciel
12) Version logiciel2
POSITIONNEMENT
L’unité est constituée de deux parties :
- Le thermostat l avec écran numérique qui comprend l’électronique, les élé-
ments opérationnels et le capteur intégré de température ambiante. (Fig. 1-2)
- Le récepteur à xer au mur avec les bornes pour les raccordements électriques. (Fig.3)
Le thermostat peut être positionné sur toute surface horizontale, en le posant
simplement sur son support qui le maintiendra légèrement incliné pour en faciliter
la lecture (Fig.1), ou en xant d’abord la plaque perforée prévue à cet effet au mur
avec des vis puis le module à la plaque à l’aide des 4 broches (Fig. 2).

17
Fig.1 Fig.2 Fig.3
Ouvrez le récepteur en déverrouillant les deux broches situées à la base. Une fois
les connexions électriques effectuées, xez-le au mur en serrant deux vis dans les
trous prévus à cet effet.
Conguration adresse IP
Le thermostat et le récepteur ont un code unique qui les relie et leur permet de
communiquer entre eux.
Généralement, cette connexion est déjà congurée. Dans le cas contraire, procé-
dez de la manière suivante :
1. Appuyez sur la touche d’identication sur le récepteur ; le voyant vert clignote.
2. Éteignez le thermostat. Appuyez et maintenez enfoncée la touche Menu pen-
dant 3 secondes. Le dispositif émet un signal sonore et le voyant sur le récep-
teur cesse de clignoter.
3. Le canal s’afche sur l’écran du thermostat. Appuyez de nouveau sur la touche
Menu.
Le thermostat et le module sans l sont maintenant reliés.
DONNÉES TECHNIQUES
Tension d’alimentation thermostat 2 batteries AAA de 1,5 V
Mémoire de sauvegarde EEPROM
Courant récepteur 16 A
Fréquence 868 MHz
Sélection canal En programmant le thermostat et le récepteur
Options de commutation 4 périodes par jour, 5+1+1 jours
Contacts de l’interrupteur du récepteur NO et NF
Réglages de la température 5 °C - 30 °C, paliers de 0,5 °C
Précision +/- 0,5 °C (+/- 1 °F)
Dimensions thermostat 135x88x22 mm
Dimensions récepteur 114x86x30 mm
Couleur Blanc
Degré de protection IP 20
Certication CE

18
DE EINSTELLBARER THERMOSTAT
SICHERHEITSHINWEISE
Die nachfolgenden Hinweise aufmerksam lesen, da sie wichtige Angaben über die
Sicherheit im Hinblick auf Installation, Gebrauch und Wartung des Gerätes enthal-
ten. Dieses Handbuch ist aufzubewahren und bei Abgabe des Geräts an den neuen
Anwender zu übergeben.
1. Vergewissern Sie sich nach dem Auspacken des Produkts über
die Vollständigkeit des Inhalts, und überprüfen Sie, dass das Pro-
dukt keine Zeichen von Defekten, Beschädigungen oder unsach-
gemässer Behandlung aufweist.
2. Das Verpackungsmaterial ausserhalb der Reichweite von Kindern
aufbewahren, da es eine potentielle Gefahrenquelle darstellt.
3. Das Gerät kann von Kindern von mindestens 8 Jahren (wie auch
von Menschen mit eingeschränkten körperlichen und geistigen
Fähigkeiten oder eingeschränkter Sinneswahrnehmung oder ohne
Erfahrung oder notwendiger Kenntnis) verwendet werden, sofern
diese unter Aufsicht sind oder nachdem sie Anweisungen zum si-
cheren Gebrauch erhalten und die möglichen Gefahren verstanden
haben. Kinder dürfen nicht mit dem Gerät spielen. Die Reinigung
und Wartung muss durch den Benutzer durchgeführt werden und
nicht durch unbeaufsichtigte Kinder.
4. Kinder unter 3 Jahren dürfen sich nicht in der Nähe des Geräts
aufhalten, es sei denn, sie stehen unter ständiger Beaufsichtigung.
5. Kinder im Alter zwischen 3 und 8 Jahren dürfen das Gerät nur
unter der Voraussetzung ein- und ausschalten, dass dieses in der
normalen Betriebsposition aufgestellt oder installiert wurde und
dass sie beaufsichtigt werden oder Anweisungen zum sicheren
Gebrauch des Geräts erhalten haben und in der Lage sind, die
vom Gerät ausgehenden Gefahren zu verstehen.
6. Kinder im Alter zwischen 3 und 8 Jahren dürfen nicht den Netzste-
cker in die Steckdose stecken und das Gerät nicht einstellen oder
reinigen. Ebenso dürfen sie nicht die Instandhaltungsarbeiten aus-
führen, für die der Anwender zuständig ist.
7. Versichern Sie sich vor dem Anschliessen des Geräts an das
Stromnetz darüber, dass die Spannung Ihres Geräts mit der auf
dem Typenschild-Etikett des Geräts angegebenen übereinstimmt.
8. Es gilt, einige grundlegende Regeln für alle elektrischen Geräte zu
befolgen, wenn Sie Ihren Heizer verwenden:
• Das Gerät nicht mit nassen Händen anfassen.
• Das Gerät nicht mit blossen Füssen bedienen.
9. Vor jeglicher Wartung ist es nötig das Gerät vom elektrischen
Stromnetz abzuschalten.

19
Dieser Funkthermostat für den Einbau in die Wand wurde für das Ein- und Aus-
schalten von elektrischen und herkömmlichen Heizsystemen auf Grundlage einer
einstellbaren Temperatur und Zeit entwickelt.
FUNKTIONEN
Der Thermostat kann in zwei verschiedenen Einstellungen in Betrieb genommen
werden:
1) Manuelle Einstellung: es werden die 3 verschiedenen Temperaturbereiche
Komfort, Energiesparen, Urlaub ausgewählt und ein einmal gewählter Tempera-
turbereich wird bis zu einer erneuten manuellen Auswahl aufrecht erhalten.
2) Automatische Einstellung: es werden 4 Tageszeiten ausgewählt, an denen der
Thermostat eine bestimmte Temperatur einstellt. So kann der Thermostat nur ein-
mal eingestellt werden und läuft dann selbsttätig, bis er nicht mehr benötigt wird.
EINSTELLUNG DER UHRZEIT UND VERWALTUNG DER MANUELLEN EIN-
STELLUNGEN
Für die Einstellung von Uhrzeit und Tag folgen Sie den folgenden Punkten:
10. Taste Menü 3 Sekunden lang gedrückt halten, die Minutenanzeige fängt an zu
blinken. Wert mit den Tasten Auf und Ab ändern (einmal drücken entspricht
einer Minute).
11. Taste Menü weiterhin gedrückt halten, die Stundenanzeige fängt an zu
blinken. Wert mit den Tasten Auf und Ab ändern (einmal drücken entspricht
einer Stunde).
12. Taste Menü weiterhin gedrückt halten, die Tagesanzeige fängt an zu blinken.
Wert mit den Tasten Auf und Ab ändern. Die Ziffer 1 steht für Montag, 2 für
Dienstag, 3 für Mittwoch, 4 für Donnerstag, 5 für Freitag, 6 für Samstag und
7 für Sonntag.
Nach der Einstellung von Tag und Uhrzeit können die manuellen Einstellungen
vorgenommen werden:
1. Taste Menü betätigen, das Symbol für den Urlaubsmodus wird angezeigt;
Temperaturwert mit den Auf-/Ab-Tasten ändern.
2. Taste Menü betätigen, das Symbol für den Energiesparmodus wird angezeigt;
Temperaturwert mit den Auf-/Ab-Tasten ändern.
3. Taste Menü betätigen, das Symbol für den Komfortmodus wird angezeigt;
Temperaturwert mit den Auf-/Ab-Tasten ändern.
Die Komfortfunktion wird durch das Symbol dargestellt und steht für die
Wohlfühltemperatur, die man erreichen und halten möchte.
Die Energiesparfunktion wird durch das Symbol dargestellt und steht für die
Mindesttemperatur, bei der sich die Heizung einstellt, damit der Raum nicht zu
sehr auskühlt.
Die Urlaubsfunktion wird durch das Symbol dargestellt und steht für den Frost-
schutzmodus unter Einstellung einer Mindesttemperatur, bei der sich die Heizung
einstellt, damit es bei längerer Abwesenheit nicht zu Frostbildung kommt.

20
VERWALTUNG DER AUTOMATISCHEN EINSTELLUNGEN
Für die automatische Einstellung sind vier Tagesabschnitte zu wählen, denen jeder
eine gewünschte Temperatur beigemessen wird.
Die Woche ist in 3 Abschnitte unterteilt:
• Werktage (Montag bis Freitag)
• Samstag
• Sonntag
4. Zur Einstellung des ersten Tagesabschnitts Taste PRG 3 Sekunden gedrückt
halten, die Minutenanzeige beginnt zu blinken. Wert mit den Tasten Auf und
Ab ändern. Bei jedem Drücken der Taste verstellt sich der Wert um 15 Mi-
nuten.
5. Wenn man PRG weiter gedrückt hält, beginnt die Temperatur zu blinken. Wert
mit den Tasten Auf und Ab ändern.
6. Wird PRG weiterhin gedrückt gehalten, bewegt sich die Programmnummer
zum nächsten Tagesabschnitt und die Minutenanzeige beginnt erneut zu
blinken. Vorgang für jeden Tagesabschnitt an Werktagen wiederholen, dann
für den Samstag und anschließend für den Sonntag.
7. Nachdem das Programm eingestellt wurde, Taste Zurück drücken, bis man
zum Startbildschirm gelangt ist.
Beispiel:
Von Montag bis Freitag Samstag Sonntag
PRG 1 2 3 4 1 2 3 4 1 2 3 4
Uhrzeit 6.30 8.00 18.00 22.30 8.00 10.00 18.00 23.00 9.00 12.00 19.00 0.00
Temp. 21°C 18°C 21°C 16°C 21°C 21°C 21°C 16°C 23°C 21°C 16°C 21°C
Nach Abschluss der beiden Einstellungen für manuellen oder automatischen Be-
trieb genügt es, die Taste Menü zu betätigen, um den Modus zu ändern, der rechts
auf dem Display angezeigt wird:
- PRG Automatische Programmierung;
- Komfortmodus;
- Energiesparmodus;
- Urlaubsmodus.
A página está carregando...
A página está carregando...
A página está carregando...
A página está carregando...
A página está carregando...
A página está carregando...
A página está carregando...
A página está carregando...
A página está carregando...
A página está carregando...
A página está carregando...
A página está carregando...
A página está carregando...
A página está carregando...
A página está carregando...
A página está carregando...
-
 1
1
-
 2
2
-
 3
3
-
 4
4
-
 5
5
-
 6
6
-
 7
7
-
 8
8
-
 9
9
-
 10
10
-
 11
11
-
 12
12
-
 13
13
-
 14
14
-
 15
15
-
 16
16
-
 17
17
-
 18
18
-
 19
19
-
 20
20
-
 21
21
-
 22
22
-
 23
23
-
 24
24
-
 25
25
-
 26
26
-
 27
27
-
 28
28
-
 29
29
-
 30
30
-
 31
31
-
 32
32
-
 33
33
-
 34
34
-
 35
35
-
 36
36


MO-EL CRONOTERMOSTATO 9006ED Manual do proprietário
- Categoria
- Termostatos
- Tipo
- Manual do proprietário
em outras línguas
Artigos relacionados


Outros documentos
-
Argoclima Mythiko Instruções de operação
-
Argoclima Magico 9.2 Instruções de operação
-
TECHNIBEL MTF 94 Instruções de operação
-
 Bronpi Mila Instruções de operação
-
 Bronpi NOA HORNO Instruções de operação
-
Saunier Duval SDH 12-035 MCNHWI Manual do proprietário
-
Johnson Controls York DPC-1 Operating And Maintenance Instructions Manual
-
 Airzone Cloud Manual do usuário
-
Daikin EABH16DF6V Manual do usuário


