
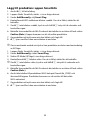
ned.is/wipo20ewt
ned.is/wipo20fwt
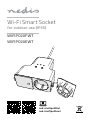
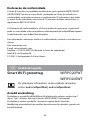
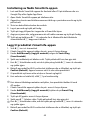
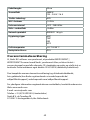
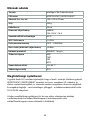
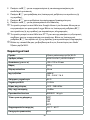
Wi-Fi Smart Socket
for outdoor use (IP55)
WIFIPO20FWT
WIFIPO20EWT

a
Quick start guide 4
c
Kurzanleitung 8
b
Guide de démarrage rapide 12
d
Verkorte handleiding 17
j
Guida rapida all’avvio 21
h
Guía de inicio rápido 25
i
Guia de iniciação rápida 29
e
Snabbstartsguide 33
g
Pika-aloitusopas 38
f
Hurtigguide 42
2
Vejledning til hurtig start 46
k
Gyors beüzemelési útmutató 50
n
Przewodnik Szybki start 54
x
Οδηγό γρήγορη εκκίνηση 58
1
Rýchly návod 62
l
Rychlý návod 66
y
Ghid rapid de iniiere 70

2
4
5
3
1
6
4
1
2
4
5
3
A
B

4
a
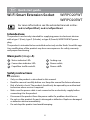
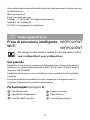
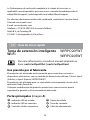
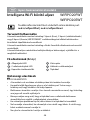
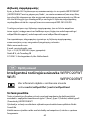
Quick start guide
Wi-Fi Smart Extension Socket WIFIPO20FWT
WIFIPO20EWT
For more information see the extended manual online:
ned.is/wipo20fwt | ned.is/wipo20ewt
Intended use
The product is exclusively intended for supplying power to electronic devices
with a type C (Euro), type F (Schuko), or type E (French) WIFIPO20EWT power
plug.
The product is intended to be controlled exclusively via the Nedis SmartLife app.
Any modication of the product may have consequences for safety, warranty
and proper functioning.
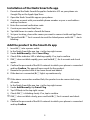
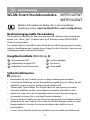
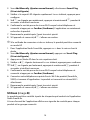
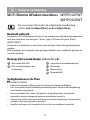
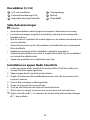
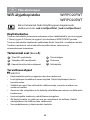
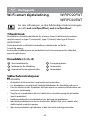
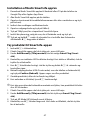
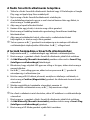
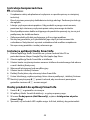
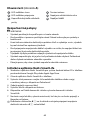
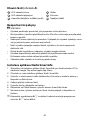
Main parts (image A)
Status indicator LED
Connection indicator LED
Capacitive touch controls
Sealing cap
Power outlet
Power cable
Safety instructions
-
WARNING
• Only use the product as described in this manual.
• Read the manual carefully before use. Keep the manual for future reference.
• Risk of electric shock. The product should only be opened by an authorized
technician when service is required.
• Make sure the power cable is not connected to an electricity supply before
connecting it to the product.
• Disconnect the product from the power cable if a problem should occur.
• Do not use the product if a part is damaged or defective. Replace a damaged
or defective device immediately.
• Do not drop the product and avoid bumping.

5
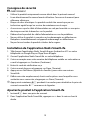
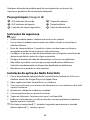
Installation of the Nedis SmartLife app
1. Download the Nedis SmartLife app for Android or iOS on your phone via
Google Play or the Apple App Store.
2. Open the Nedis SmartLife app on your phone.
3. Create an account with your mobile phone number or your e-mail address
and tap Continue.
4. Enter the received verication code.
5. Create a password and tap Done.
6. Tap Add Home to create a SmartLife Home.
7. Set your location, choose the rooms you want to connect with and tap Done.
4
Tap and hold A
3
for 6 seconds to reset the linked power outlet. A
2
starts
blinking.
Add the product to the SmartLife app
1. Insert A
6
into a power outlet.
2. In the Nedis SmartLife app, tap + in the top right corner.
3. Under Add Manually, select Smart Plug.
4. Check if the indicator LED is blinking rapidly. If so, tap to conrm.
5. If A
2
does not blink rapidly, press and hold A
3
for 6 seconds and check
again.
6. Conrm the password of the Wi-Fi network to which your phone is connected
and tap Conrm. The app will now search for the product.
7. Rename the product after it has been found and added.
8. If the device is connected, A
2
lights up continuously.
4
If the above connection method fails, the product can be connected using
AP mode.
1. In the Nedis SmartLife app, tap + in the top right corner.
2. Under Add Manually, tap Smart Plug.
3. Tap AP Mode in the top right corner.
4. Check if A
2
is blinking slowly. If so, tap to conrm.
4
If A
2
does not blink slowly, press and hold A
3
for 6 seconds and check
again.
5. Conrm the password of the Wi-Fi network to which your phone is connected
and tap Conrm.

6
6. Connect your phone to the product's Wi-Fi hotspot (SmartLife_XXXX)
and return to the app. The product will now connect to the selected Wi-Fi
network.
7. Rename the product after it has been found and added.
8. If the device is connected, A
2
lights up continuously.
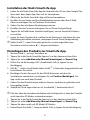
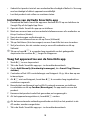
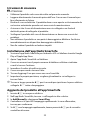
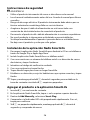
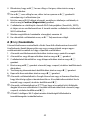
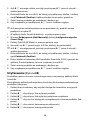
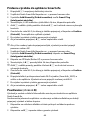
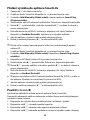
Use (image B)
The product can be controlled from any location via the Nedis SmartLife app.
The home screen of the app shows a control tile for each connected product
and/or group.
1. Tap the control tile to access the controls of the product.
2. Tap B
1
to switch the product on or o.
3. Tap B
2
to switch a connected device on or o.
4. Tap B
3
to access the detailed settings of the product (or group).
5. Tap B
4
to set an activity schedule.
6. Tap B
5
to rename a switch.
4
The product can be connected to Google Home or Amazon Alexa to enable
speech control. See the detailed settings B
3
of the product (or group) for
more information.
4
The product can be connected to IFTTT to enable external conditions to
trigger the product. See the detailed settings B
3
of the product (or group)
for more information.
4
See our support webpage to discover all possibilities of the Nedis
®
Wi-Fi
Smart Socket.
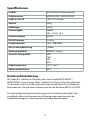
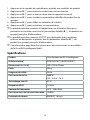
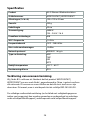
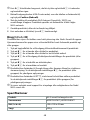
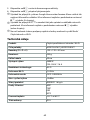
Specications
Product Wi-Fi Smart Extension Socket
Article number WIFIPO20FWT | WIFIPO20EWT
Dimensions (l x w x h) 120 x 120 x 43 mm
Weight 335 g
Cable length 40 cm
Power output 3680 W
220 – 240 V / 16 A
Wireless technology Wi-Fi

7
Wi-Fi frequency 2.4 GHz
Frequency range 2412 - 2484 MHz
Max. radio transmit power 14 dBm
Network protocol IEEE802.11 b/g/n
Encryption types WEP
TKIP
AES
WPS
Working temperature -30 °C – 60 °C
Protection class IP55
Declaration of Conformity
We, Nedis B.V. declare as manufacturer that the product WIFIPO20FWT |
WIFIPO20EWT from our brand Nedis
®
, produced in China, has been tested
according to all relevant CE standards and regulations and that all tests have
been passed successfully. This includes, but is not limited to the RED 2014/53/
EU regulation.
The complete Declaration of Conformity (and the safety datasheet if applicable)
can be found and downloaded via webshop.nedis.com/wipo20fwt#support |
webshop.nedis.com/wipo20ewt#support
For additional information regarding the compliance, contact the customer
service:
Web: www.nedis.com
E-mail: [email protected]
Phone: +31 (0)73-5991055 (during oce hours)
Nedis B.V., de Tweeling 28
5215 MC ’s-Hertogenbosch, the Netherlands

8
c
Kurzanleitung
WLAN-Smart-Steckdosenleiste WIFIPO20FWT
WIFIPO20EWT
Weitere Informationen nden Sie in der erweiterten
Anleitung online: ned.is/wipo20fwt | ned.is/wipo20ewt
Bestimmungsgemäße Verwendung
Das Produkt ist allein für die Stromversorgung von elektronischen Geräten mit
einem Typ C (Euro), Typ F (Schuko) oder Typ E (Französischen) WIFIPO20EWT
Stromstecker gedacht.
Das Produkt darf ausschließlich über die Nedis SmartLife-App gesteuert werden.
Jegliche Modikation des Produkts kann Folgen für die Sicherheit, Garantie und
ordnungsgemäße Funktionalität haben.
Hauptbestandteile (Abbildung A)
Statusanzeige-LED
Verbindungsanzeige-LED
Kapazitive Touch-Steuerung
Dichtungskappe
Steckdose
Stromkabel
Sicherheitshinweise
-
WARNUNG
• Verwenden Sie das Produkt nur wie in dieser Anleitung beschrieben.
• Lesen Sie die Anleitung vor der Verwendung sorgfältig durch. Heben Sie die
Gebrauchsanweisung zum späteren Nachschlagen auf.
• Gefahr eines Stromschlags. Das Produkt darf nur von einem geschulten
Techniker geönet werden, wenn Reparaturarbeiten erforderlich sind.
• Stellen Sie sicher, dass das Stromkabel nicht mit einer Stromversorgung
verbunden ist, bevor Sie es mit dem Produkt verbinden.
• Trennen Sie das Produkt von der Stromversorgung, falls ein Problem auftritt.
• Verwenden Sie das Produkt nicht, wenn ein Teil beschädigt ist oder es einen
Mangel aufweist. Ersetzen Sie ein beschädigtes oder defektes Gerät
unverzüglich.
• Lassen Sie das Produkt nicht herunterfallen und vermeiden Sie Kollisionen.

9
Installation der Nedis SmartLife-App
1. Laden Sie die Nedis SmartLife-App für Android oder iOS aus dem Google Play
Store oder dem Apple App Store auf Ihr Smartphone.
2. Önen Sie die Nedis SmartLife-App auf Ihrem Smartphone.
3. Erstellen Sie ein Konto mit Ihrer Mobiltelefonnummer oder Ihrer E-Mail-
Adresse und tippen Sie auf Continue (Fortsetzen).
4. Geben Sie den erhaltenen Bestätigungscode ein.
5. Erstellen Sie ein Passwort und tippen Sie auf Done (Fertigstellung).
6. Tippen Sie auf Add Home (Familie hinzufügen), um ein SmartLife-Zuhause
zu erstellen.
7. Legen Sie Ihren Standort fest, wählen Sie die Räume aus mit denen Sie eine
Verbindung herstellen möchten, und tippen Sie auf Done (Fertigstellung).
4
Halten Sie A
3
etwa 6 Sekunden gedrückt, um die angeschlossene
Steckdose zurückzusetzen. A
2
beginnt zu blinken.
Hinzufügen des Produkts zur SmartLife-App.
1. Stecken Sie A
6
an einer Steckdose an.
2. Tippen Sie in der Nedis SmartLife-App auf + in der oberen rechten Ecke.
3. Tippen Sie unter Add Manually (Manuell hinzufügen) auf Smart Plug.
4. Prüfen Sie, ob die Anzeige-LED schnell blinkt. Falls ja, tippen Sie zur
Bestätigung.
5. Falls A
2
nicht schnell blinkt, halten Sie A
3
6 Sekunden lang gedrückt und
kontrollieren Sie erneut.
6. Bestätigen Sie das Passwort für das WLAN-Netzwerk, mit dem Ihr
Smartphone verbunden ist und tippen Sie auf Conrm (Bestätigen). Die
App sucht nun nach dem Produkt.
7. Geben Sie dem Produkt einen anderen Namen, nachdem es gefunden und
hinzugefügt wurde.
8. Sobald das Gerät angeschlossen ist, leuchtet A
2
kontinuierlich auf.
4
Falls das oben beschriebene Verfahren nicht erfolgreich ist, kann das Produkt
auch über den AP-Modus verbunden werden.
1. Tippen Sie in der Nedis SmartLife-App auf + in der oberen rechten Ecke.
2. Tippen Sie unter Add Manually (Manuell hinzufügen) auf Smart Plug.
3. Tippen Sie oben rechts auf AP Mode (AP-Modus).
4. Kontrollieren Sie ob A
2
langsam blinkt. Falls ja, tippen Sie zur Bestätigung.

10
4
Falls A
2
nicht langsam blinkt, halten Sie A
3
6 Sekunden lang gedrückt
und kontrollieren Sie erneut.
5. Bestätigen Sie das Passwort für das WLAN-Netzwerk, mit dem Ihr
Smartphone verbunden ist und tippen Sie auf Conrm (Bestätigen).
6. Verbinden Sie Ihr Smartphone mit dem WLAN-Hotspot des Produkts
(SmartLife_XXXX) und kehren Sie zur App zurück. Das Produkt verbindet sich
nun mit dem ausgewählten WLAN-Netzwerk.
7. Geben Sie dem Produkt einen anderen Namen, nachdem es gefunden und
hinzugefügt wurde.
8. Sobald das Gerät angeschlossen ist, leuchtet A
2
kontinuierlich auf.
Verwendung (Abbildung B)
Das Produkt kann von jedem beliebigen Ort aus über die Nedis SmartLife-App
gesteuert werden.
Die Startseite der App zeigt eine Steuerkachel für jedes verbundene Produkt
und/oder jede Gruppe.
1. Tippen Sie auf die Kachel, um die Steuerung des jeweiligen Produkts
aufzurufen.
2. Tippen Sie auf B
1
, um das Produkt ein- oder auszuschalten.
3. Tippen Sie auf B
2
, um ein angeschlossenes Gerät ein- oder auszuschalten.
4. Tippen Sie auf B
3
, um Zugri auf die ausführlichen Einstellungen des
Produkts (oder der Gruppe) zu erhalten.
5. Tippen Sie auf B
4
, um einen Aktivitätszeitplan festzulegen.
6. Tippen Sie auf B
5
, um einen Schalter umzubenennen.
4
Das Produkt kann mit Google Home oder Amazon Alexa verbunden werden,
um eine Sprachsteuerung zu ermöglichen. Weitere Informationen nden Sie
in den ausführlichen Einstellungen B
3
des Produkts (oder der Gruppe).
4
Das Produkt kann mit IFTTT verbunden werden, um es durch externe
Bedingungen zu schalten. Weitere Informationen nden Sie in den
ausführlichen Einstellungen B
3
des Produkts (oder der Gruppe).
4
Besuchen Sie unsere Support-Webseite, um alle Möglichkeiten der Nedis
®
WLAN-Smart-Steckdose zu entdecken.

11
Spezikationen
Produkt WLAN-Smart-Steckdosenleiste
Artikelnummer WIFIPO20FWT | WIFIPO20EWT
Größe (L x B x H) 120 x 120 x 43 mm
Gewicht 335 g
Kabellänge 40 cm
Stromausgabe 3680 W
220 – 240 V / 16 A
Funktechnologie WLAN
WLAN-Frequenz 2,4 GHz
Frequenzbereich 2412 - 2484 MHz
Max. Funksendeleistung 14 dBm
Netzwerkprotokoll IEEE802.11 b/g/n
Verschlüsselungsarten WEP
TKIP
AES
WPS
Arbeitstemperatur -30 °C – 60 °C
Gehäuseschutzklasse IP55
Konformitätserklärung
Wir, Nedis B.V., erklären als Hersteller, dass das Produkt WIFIPO20FWT |
WIFIPO20EWT unserer Marke Nedis
®
, produziert in China, nach allen geltenden
CE-Standards und Vorschriften getestet wurde und alle diese Tests erfolgreich
bestanden hat. Dies gilt unter anderem auch für die Richtlinie RED 2014/53/EU.
Die vollständige Konformitätserklärung (und das Sicherheitsdatenblatt, falls
zutreend) steht zum Download zur Verfügung unter webshop.nedis.de/
wipo20fwt#support | webshop.nedis.com/wipo20ewt#support

12
Weiterführende Informationen zur Compliance erhalten Sie über den
Kundenservice:
Web: www.nedis.com
E-Mail: [email protected]
Telefon: +31 (0)73-5991055 (zu den Geschäftszeiten)
Nedis B.V., de Tweeling 28
5215 MC ’s-Hertogenbosch, Niederlande
b
Guide de démarrage rapide
Prise d’extension Wi-Fi
intelligente
WIFIPO20FWT
WIFIPO20EWT
Pour plus d'informations, consultez le manuel détaillé en
ligne: ned.is/wipo20fwt | ned.is/wipo20ewt
Utilisation prévue
Le produit est exclusivement destiné à l'alimentation d'appareils électroniques
dotés d'une che d'alimentation de type C (Euro), type F (Schuko) ou type E
(France) WIFIPO20EWT.
Le produit est destiné à être contrôlé exclusivement via l'application Nedis
SmartLife.
Toute modication du produit peut avoir des conséquences sur la sécurité, la
garantie et le bon fonctionnement.
Pièces principales (image A)
Voyant LED d’état
Voyant LED de connexion
Commandes tactiles capacitives
Bouchon d'étanchéité
Prise de courant
Câble d'alimentation

13
Consignes de sécurité
-
AVERTISSEMENT
• Utilisez le produit uniquement comme décrit dans le présent manuel.
• Lisez attentivement le manuel avant utilisation. Conservez le manuel pour
référence ultérieure.
• Risque de choc électrique. Le produit ne doit être ouvert que par un
technicien agréé lorsqu'un service de maintenance est requis.
• Assurez-vous que le câble d’alimentation ne soit pas branché sur une prise
électrique avant de le brancher sur le produit.
• Débranchez le produit du câble d'alimentation en cas de problème.
• Ne pas utiliser le produit si une pièce est endommagée ou défectueuse.
Remplacer immédiatement un appareil endommagé ou défectueux.
• Ne pas laisser tomber le produit et éviter de le cogner.
Installation de l'application Nedis SmartLife
1. Téléchargez l'application Nedis SmartLife pour Android ou iOS sur votre
téléphone via Google Play ou l’App Store d’Apple.
2. Ouvrez l'application Nedis SmartLife sur votre téléphone.
3. Créez un compte avec votre numéro de téléphone mobile ou votre adresse
e-mail et appuyez sur Continue (Continuer).
4. Entrez le code de vérication reçu.
5. Créez un mot de passe et appuyez sur Done (Terminé).
6. Appuyez sur Add Home (Ajouter les familles) pour créer une maison
SmartLife.
7. Dénissez votre emplacement, choisissez les pièces avec lesquelles vous
souhaitez vous connecter et appuyez sur Done (Terminé).
4
Appuyez et maintenez A
3
pendant 6 secondes pour réinitialiser la prise de
courant connectée. A
2
commence à clignoter.
Ajoutez le produit à l’application SmartLife
1. Insérez A
6
dans une prise de courant.
2. Dans l’application Nedis SmartLife, appuyez sur + dans le coin en haut à
droite.

14
3. Sous Add Manually (Ajouter manuellement), sélectionnez Smart Plug
(Prise intelligente).
4. Vériez si le voyant LED clignote rapidement. Le cas échéant, appuyez pour
conrmer.
5. Si A
2
ne clignote pas rapidement, appuyez et maintenez A
3
pendant 6
secondes et vériez à nouveau.
6. Conrmez le mot de passe du réseau Wi-Fi auquel votre téléphone est
connecté et appuyez sur Conrm (Conrmer). L'application va maintenant
rechercher le produit.
7. Renommez le produit après l'avoir trouvé et ajouté.
8. Si l'appareil est connecté, A
2
s'allume en continu.
4
Si la méthode de connexion ci-dessus échoue, le produit peut être connecté
en mode AP.
1. Dans l’application Nedis SmartLife, appuyez sur + dans le coin en haut à
droite.
2. Sous Add Manually (Ajouter manuellement), appuyez sur Smart Plug
(Prise intelligente).
3. Appuyez sur Mode AP dans le coin supérieur droit.
4. Vériez si A
2
clignote lentement. Le cas échéant, appuyez pour conrmer.
4
Si A
2
ne clignote pas lentement, appuyez et maintenez A
3
pendant 6
secondes et vériez à nouveau.
5. Conrmez le mot de passe du réseau Wi-Fi auquel votre téléphone est
connecté et appuyez sur Conrm (Conrmer).
6. Connectez votre téléphone au point d'accès Wi-Fi du produit (SmartLife_
XXXX) et revenez à l'application. Le produit est connecté au réseau Wi-Fi
sélectionné.
7. Renommez le produit après l'avoir trouvé et ajouté.
8. Si l'appareil est connecté, A
2
s'allume en continu.
Utilisez (image B)
Le produit peut être contrôlé à partir de n’importe quel endroit via l’application
Nedis SmartLife.
L'écran d'accueil de l'application ache une vignette de contrôle pour chaque
produit et/ou groupe connecté.

15
1. Appuyez sur la vignette de contrôle pour accéder aux contrôles du produit.
2. Appuyez sur B
1
pour mettre le produit sous ou hors tension.
3. Appuyez sur B
2
pour activer ou désactiver un appareil connecté.
4. Appuyez sur B
3
pour accéder aux paramètres détaillés du produit (ou du
groupe).
5. Appuyez sur B
4
pour dénir un calendrier d'activités.
6. Appuyez sur B
5
pour renommer un commutateur.
4
Le produit peut être connecté à Google Home ou à Amazon Alexa pour
permettre un contrôle vocal. Voir les paramètres détaillés B
3
du produit (ou
groupe) pour plus d'informations.
4
Le produit peut être connecté à l’IFTTT pour permettre à des conditions
externes de déclencher le produit. Voir les paramètres détaillés B
3
du
produit (ou groupe) pour plus d'informations.
4
Consultez notre page Web d'assistance pour découvrir toutes les possibilités
de la Prise Wi-Fi intelligente Nedis
®
.
Spécications
Produit Prise d’extension Wi-Fi intelligente
Article numéro WIFIPO20FWT | WIFIPO20EWT
Dimensions (L x l x H) 120 x 120 x 43 mm
Poids 335 g
Longueur de câble 40 cm
Puissance de sortie 3680 W
220 – 240 V / 16 A
Technologie sans l Wi-Fi
Fréquence Wi-Fi 2,4 GHz
Gamme de fréquences 2412 - 2484 MHz
Puissance max. de transmission radio 14 dBm
Protocole de réseau IEEE802.11 b/g/n

16
Types de cryptage WEP
TKIP
AES
WPS
Température de fonctionnement -30 °C – 60 °C
Classe de protection IP55
Déclaration de conformité
Nous, Nedis B.V., déclarons en tant que fabricant que le produit WIFIPO20FWT
| WIFIPO20EWT de notre marque Nedis
®
, produit en Chine, a été testé
conformément à toutes les normes et réglementations CE en vigueur et que
tous les tests ont été réussis. Cela inclut, sans toutefois s'y limiter, la directive RED
2014/53/UE.
La Déclaration de conformité complète (et la che de sécurité le cas échéant)
peut être trouvée et téléchargée via webshop.nedis.fr/wipo20fwt#support |
webshop.nedis.com/wipo20ewt#support
Pour plus d'informations sur la conformité, contactez le service client:
Site Web: www.nedis.com
E-mail: [email protected]
Téléphone: +31 (0)73-5991055 (pendant les heures de bureau)
Nedis B.V., de Tweeling 28
5215 MC ’s-Hertogenbosch, Pays-Bas

17
d
Verkorte handleiding
Wi-Fi Slimme Aftakcontactdoos WIFIPO20FWT
WIFIPO20EWT
Zie voor meer informatie de uitgebreide handleiding
online: ned.is/wipo20fwt | ned.is/wipo20ewt
Bedoeld gebruik
Het product is uitsluitend bestemd voor de voeding van elektronische apparaten
met een netstekker van het type C (Euro), type F (Schuko) of type E (Frans)
WIFIPO20EWT.
Het product is bedoeld om uitsluitend met de Nedis SmartLife-app bediend te
worden.
Elke wijziging van het product kan gevolgen hebben voor veiligheid, garantie en
correcte werking.
Belangrijkste onderdelen (afbeelding A)
Statusindicatie LED
LED-controlelampje voor
verbinding
Capacitieve aanraakbediening
Afsluitdop
Stopcontact
Stroomkabel
Veiligheidsvoorschriften
-
WAARSCHUWING
• Gebruik het product alleen zoals beschreven in deze handleiding.
• Lees voor gebruik de handleiding aandachtig door. Bewaar de handleiding
voor toekomstig gebruik.
• Risico op elektrische schok. Het product mag alleen door een erkend
reparateur worden geopend wanneer onderhoud vereist is.
• Zorg ervoor dat het netsnoer niet op een stroomvoorziening is aangesloten
voordat u het op het product aansluit.
• Haal het netsnoer uit het product als er zich een probleem voordoet.

18
• Gebruik het product niet als een onderdeel beschadigd of defect is. Vervang
een beschadigd of defect apparaat onmiddellijk.
• Laat het product niet vallen en voorkom stoten.
Installatie van de Nedis SmartLife-app
1. Download de Nedis SmartLife-app voor Android of iOS op uw telefoon via
Google Play of de Apple App Store.
2. Open de Nedis SmartLife-app op uw telefoon.
3. Maak een account aan met uw mobiele telefoonnummer of e-mailadres en
tik op Continue (Verder).
4. Voer de ontvangen vericatiecode in.
5. Maak een wachtwoord aan en tik op Done (Voltooid).
6. Tik op Add Home (Huis toevoegen) om een SmartLife-huis aan te maken.
7. Stel je locatie in, kies de ruimtes waar je mee wilt verbinden en tik op
Voltooid.
4
Tik op en houd A
3
6 seconden lang ingedrukt om het gekoppelde
stopcontact te resetten. A
2
begint te knipperen.
Voeg het apparaat toe aan de SmartLife app
1. Steek A
6
in een stopcontact.
2. Tik in de Nedis SmartLife app, op + in de rechterbovenhoek.
3. Onder Add Manually (Handmatig toevoegen), kies Smart Plug (Slimme
stekker).
4. Controleer of het LED-controlelampje snel knippert. Zo ja, tik er dan op om
te bevestigen.
5. Als A
2
niet snel knippert, houd dan A
3
6 seconden lang ingedrukt en
controleer nogmaals.
6. Bevestig het wachtwoord van het Wi-Fi-netwerk waarmee uw telefoon
is verbonden en tik op Conrm (Bevestigen). De app zoekt nu naar het
product.
7. Hernoem het product nadat het gevonden en toegevoegd is.
8. Als het apparaat aangesloten is, brandt A
2
continu.
4
Als de bovenstaande verbindingsmethode mislukt, kan het product in de
AP-modus worden aangesloten.
1. Tik in de Nedis SmartLife app, op + in de rechterbovenhoek.

19
2. Onder Add Manually (Handmatig toevoegen), tik op Smart Plug (Slimme
stekker).
3. Tik op AP-modus in de rechterbovenhoek.
4. Controleer of A
2
langzaam knippert. Zo ja, tik er dan op om te bevestigen.
4
Als A
2
niet langzaam knippert, houd dan A
3
6 seconden lang ingedrukt
en controleer nogmaals.
5. Bevestig het wachtwoord van het Wi-Fi-netwerk waarmee uw telefoon is
verbonden en tik op Conrm (Bevestigen).
6. Verbind uw telefoon met de Wi-Fi-hotspot van het product (SmartLife_XXXX)
en ga terug naar de app. Het product maakt nu verbinding met het
geselecteerde Wi-Fi-netwerk.
7. Hernoem het product nadat het gevonden en toegevoegd is.
8. Als het apparaat aangesloten is, brandt A
2
continu.
Gebruik (afbeelding B)
Het product kan vanaf elke locatie m.b.v. de Nedis SmartLife app worden
bediend.
Het startscherm van de app toont een bedieningstegel voor elk aangesloten
product en/of groep.
1. Tik op de bedieningstegel om toegang te krijgen tot de bediening van het
product.
2. Tik op B
1
om het product aan of uit te zetten.
3. Tik op B
2
om een aangesloten apparaat aan of uit te zetten.
4. Tik op B
3
om de gedetailleerde instellingen van het product (of de groep)
te openen.
5. Tik op B
4
om een activiteitenschema in te stellen.
6. Tik op B
5
om de naam van een schakelaar te wijzigen.
4
Het product kan op Google Home of Amazon Alexa worden aangesloten om
spraakbesturing mogelijk te maken. Zie de gedetailleerde instellingen B
3
van het product (of de groep) voor meer informatie.
4
Het product kan op IFTTT worden aangesloten om externe omstandigheden
in staat te stellen het product te activeren. Zie de gedetailleerde instellingen
B
3
van het product (of de groep) voor meer informatie.
4
Zie onze ondersteunings-webpagina om alle mogelijkheden van de Nedis
®
Wi-Fi Slim Stopcontact te ontdekken.

20
Specicaties
Product Wi-Fi Slimme Aftakcontactdoos
Artikelnummer WIFIPO20FWT | WIFIPO20EWT
Afmetingen (l x b x h) 120 x 120 x 43 mm
Gewicht 335 g
Kabellengte 40 cm
Stroomuitgang 3680 W
220 – 240 V / 16 A
Draadloze technologie Wi
Wi-Fi-frequentie 2,4 GHz
Frequentiebereik 2412 - 2484 MHz
Max. radio zendvermogen 14 dBm
Netwerk protocol IEEE802.11 b/g/n
Type versleuteling WEP
TKIP
AES
WPS
Bedrijfstemperatuur -30 °C – 60 °C
Beschermingsklasse IP55
Verklaring van overeenstemming
Wij, Nedis B.V. verklaren als fabrikant dat het product WIFIPO20FWT |
WIFIPO20EWT van ons merk Nedis
®
, geproduceerd in China, is getest conform
alle relevante CE-normen en voorschriften en dat alle tests met succes zijn
doorstaan. Dit omvat, maar is niet beperkt tot de richtlijn RED 2014/53/EU.
De volledige conformiteitsverklaring (en het blad met veiligheidsgegevens
indien van toepassing) kan worden gevonden en gedownload via webshop.
nedis.nl/wipo20fwt#support | webshop.nedis.com/wipo20ewt#support
A página está carregando...
A página está carregando...
A página está carregando...
A página está carregando...
A página está carregando...
A página está carregando...
A página está carregando...
A página está carregando...
A página está carregando...
A página está carregando...
A página está carregando...
A página está carregando...
A página está carregando...
A página está carregando...
A página está carregando...
A página está carregando...
A página está carregando...
A página está carregando...
A página está carregando...
A página está carregando...
A página está carregando...
A página está carregando...
A página está carregando...
A página está carregando...
A página está carregando...
A página está carregando...
A página está carregando...
A página está carregando...
A página está carregando...
A página está carregando...
A página está carregando...
A página está carregando...
A página está carregando...
A página está carregando...
A página está carregando...
A página está carregando...
A página está carregando...
A página está carregando...
A página está carregando...
A página está carregando...
A página está carregando...
A página está carregando...
A página está carregando...
A página está carregando...
A página está carregando...
A página está carregando...
A página está carregando...
A página está carregando...
A página está carregando...
A página está carregando...
A página está carregando...
A página está carregando...
A página está carregando...
A página está carregando...
A página está carregando...
A página está carregando...
-
 1
1
-
 2
2
-
 3
3
-
 4
4
-
 5
5
-
 6
6
-
 7
7
-
 8
8
-
 9
9
-
 10
10
-
 11
11
-
 12
12
-
 13
13
-
 14
14
-
 15
15
-
 16
16
-
 17
17
-
 18
18
-
 19
19
-
 20
20
-
 21
21
-
 22
22
-
 23
23
-
 24
24
-
 25
25
-
 26
26
-
 27
27
-
 28
28
-
 29
29
-
 30
30
-
 31
31
-
 32
32
-
 33
33
-
 34
34
-
 35
35
-
 36
36
-
 37
37
-
 38
38
-
 39
39
-
 40
40
-
 41
41
-
 42
42
-
 43
43
-
 44
44
-
 45
45
-
 46
46
-
 47
47
-
 48
48
-
 49
49
-
 50
50
-
 51
51
-
 52
52
-
 53
53
-
 54
54
-
 55
55
-
 56
56
-
 57
57
-
 58
58
-
 59
59
-
 60
60
-
 61
61
-
 62
62
-
 63
63
-
 64
64
-
 65
65
-
 66
66
-
 67
67
-
 68
68
-
 69
69
-
 70
70
-
 71
71
-
 72
72
-
 73
73
-
 74
74
-
 75
75
-
 76
76


Nedis WIFIPO20FWT Guia rápido
- Tipo
- Guia rápido
- Este manual também é adequado para
em outras línguas
- español: Nedis WIFIPO20FWT Guía de inicio rápido
- français: Nedis WIFIPO20FWT Guide de démarrage rapide
- italiano: Nedis WIFIPO20FWT Guida Rapida
- English: Nedis WIFIPO20FWT Quick start guide
- Nederlands: Nedis WIFIPO20FWT Snelstartgids
- slovenčina: Nedis WIFIPO20FWT Stručná príručka spustenia
- Deutsch: Nedis WIFIPO20FWT Schnellstartanleitung
- dansk: Nedis WIFIPO20FWT Hurtig start guide
- čeština: Nedis WIFIPO20FWT Rychlý návod
- svenska: Nedis WIFIPO20FWT Snabbstartsguide
- polski: Nedis WIFIPO20FWT Skrócona instrukcja obsługi
- suomi: Nedis WIFIPO20FWT Pikaopas
- română: Nedis WIFIPO20FWT Ghid de inițiere rapidă
Artigos relacionados
-
Nedis WIFILT10GDA60 Manual do usuário
-
Nedis SMARTLIFE SMART-STIKKONTAKT MED STRØMMÅLER Manual do usuário
-
Nedis SmartLife Multicolour Lamp Manual do usuário
-
Nedis WIFILS51CRGB Guia de usuario
-
-
-
Nedis WIFICO40CBK Guia de usuario
-
-
-
Nedis WIFILX01C42 Guia de usuario
Outros documentos
-
woox R4294 Smart Universal IR remote Guia de usuario
-
woox R5147 Guia de usuario
-
 QNect QN-WP06 Manual do usuário
-
Bticino 26108N Instruções de operação
-
QNect QN-WP01E Manual do usuário
-
QNect QN-WP01 Manual do usuário
-
woox R5145 Manual do proprietário
-
-
woox R9044 Guia de usuario
-
König SEC-AED10 Especificação
