
Register your product and get support at
www.philips.com/SatinLux
or call 00800-S-A-T-I-N-L-U-X (7-2-8-4-6-5-8-9)
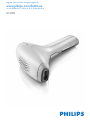
SC2000

2

3
A
M
B
D
C
E
F
G
H
I
J
K
N
L
1

4

SC2000
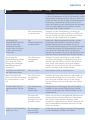
ENGLISH 6
DEUTSCH 22
ESPAÑOL 40
FRANÇAIS
57
ITALIANO 74
NEDERLANDS 92
PORTUGUÊS
110

6
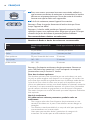
Introduction
Congratulations on your purchase and welcome to Philips! To fully benet
from the support that Philips offers, register your product at www.philips.
com/satinlux.
Hair removal with light is one of the most effective methods to get
rid of unwanted body hair with longer lasting results. It is completely
different from current home hair removal methods and Philips has been
investigating this method together with leading dermatologists for almost
10 years. You can now use this innovative technology comfortably in the
privacy of your own home, whenever you want.
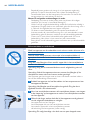
This appliance is intended for removing women’s body hair on areas below
the neck:
underarms
bikini area
legs
The appliance is not intended for:
persons with a too light body hair colour (light blond, red, grey or
white body hair) or a very dark skin. See chapter ‘Preparing for use’,
section ‘Setting the light intensity’.
For more information about the SatinLux, see www.philips.com/satinlux.
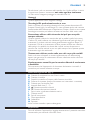
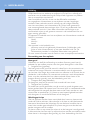
How photo-epilation works
Hair growth
Depending on age, metabolism and other factors, everyone’s hair grows
differently, but hair normally grows in three phases:
1 Anagen phase (growing phase)
The hair grows actively from the root. In this phase the concentration
of melanin is highest. Melanin is responsible for the pigmentation of the
hair. The more melanin there is in the root, the darker the hair is. Melanin
concentration is also the determining factor for the efcacy of this method.
Only hairs in the anagen phase are susceptible to treatment with light.
2 Catagen phase (degradation phase)
The hair growth stops and the root shrinks before the hair sheds.
3 Telogen phase (resting phase)
The old hair separates from the root and the new hair slowly pushes out
the old hair. The root remains at rest until the biological clock tells it to
become active again and grow a new hair (4). Hairs on an area of skin are
usually in different stages of the cycle of hair growth.
Working principle
The appliance removes hair by heating up the hair and root beneath the
skin. The melanin in the hair and hair root absorbs the released light pulses.
The darker the colour of the hair, the more heat can be produced. This
process stimulates the hair to go into the resting phase.
The hair now sheds naturally and the hair growth is inhibited.
Optimal hair removal cannot be obtained with a single session, since only
hairs in the anagen phase are susceptible to treatment with light. During
a treatment, hairs on the treated area are usually in different stages of the
cycle of hair growth.
To treat all hairs successfully and to prevent the hair root from becoming
active again, the treatments have to be repeated once every two weeks.
-
-
-
-
1 2 3 41 2 3 4
ENGLISH

An integrated optical lter makes sure no UV light reaches the skin and
therefore leaves it unharmed.
Benets
This appliance has the following advantages:
Professional IPL technology for home use
SatinLux uses a light-based technology called ‘Intense Pulsed Light’ (IPL). IPL
is also used in the professional beauty market for hair removal. SatinLux
now brings this innovative technology to the comfort of your home.
Effective hair regrowth prevention for everlasting smoothness
This method prevents hair from growing back for a long time and provides
a silky-smooth skin. Our studies have shown a signicant hair reduction
already after 2 treatments. Optimal results were generally achieved after
4 to 5 treatments. A reduction in hair density is visible from treatment to
treatment. How fast the effect becomes visible and how long the results
last varies from person to person. Repeat this treatment every two weeks
to achieve optimal results and to keep your skin smooth for ever.
Gentle treatment, even on sensitive body areas
SatinLux has been developed in close cooperation with leading
dermatologists for an effective and gentle treatment, even on the most
sensitive body areas.
Cordless operation for maximum freedom and exibility
Because the appliance runs on rechargeable batteries, it is portable and can
be used anywhere.
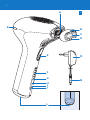
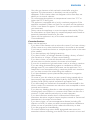
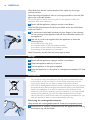
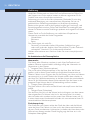
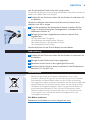
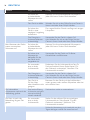
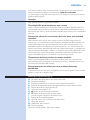
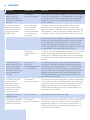
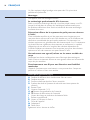
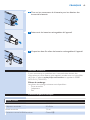
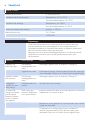
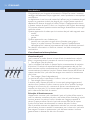
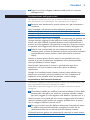
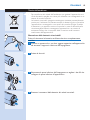
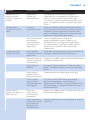
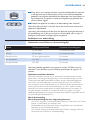
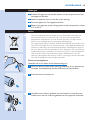
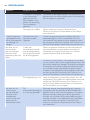
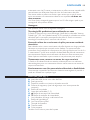
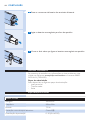
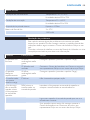
General description (Fig. 1)
A Light exit window with lter glass
B Removable window
C Metallic surface inside the removable window
D Safety system (safety ring with contact switches)
E Flash button
F Intensity lights (1- 5)
G % Intensity increase button
H ^ Intensity decrease button
I Charging light and battery low indication
J On/off button
K ’Ready to ash’ light
L Appliance socket
M Adapter
N Small plug
Also included: pouch and cleaning cloth
Important
Read this user manual carefully before you use the appliance and save it for
future reference.
ENGLISH 7

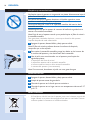
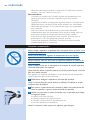
Danger
Water and electricity are a dangerous combination. Do not use
this appliance in wet surroundings (e.g. near a bath, a shower or a
swimming pool).
Keep the appliance and the adapter dry.
Warning
This appliance is not intended for use by persons (including children)
with reduced physical, sensory or mental capabilities, or lack of
experience and knowledge, unless they have been given supervision or
instruction concerning use of the appliance by a person responsible for
their safety.
Children should be supervised to ensure that they do not play with the
appliance.
Only use the appliance in combination with the adapter supplied.
Do not use the appliance if the adapter or the appliance itself is
damaged.
Do not use the appliance if the lter glass is broken.
If the adapter is damaged, always have it replaced with one of the
original type in order to avoid a hazard.
The adapter contains a transformer. Do not cut off the adapter to
replace it with another plug, as this causes a hazardous situation.
To prevent damage:
1 never cover the ventilation slots during use.
2 make sure nothing can obstruct the air ow through the ventilation
slots
3 never subject the appliance to heavy shocks and do not shake or drop
it.
If you take the appliance from a very cold environment to a very warm
environment, wait approximately 3 hours before you use it.
Never use or store the appliance in a dusty environment.
Never leave the appliance unattended when it is switched on. Always
switch off the appliance after use.
Do not expose the appliance to direct sunlight or UV light for a longer
time.
Caution
This appliance is only intended for removing women’s body hair. Do
not use it for any other purpose.
The appliance is only intended for removing human hair from areas
below the neck. Do not use it for any other body part.
This appliance is not designed for commercial or professional use.
If the appliance is used for commercial or professional purposes, if it
is used on other body parts than for which it is explicitly intended
or if it is used by persons explicitly excluded from use, the guarantee
becomes invalid and Philips refuses any liability for damage caused.
-
-
-
-
-
-
-
-
-
-
-
-
-
-
-
-
-
-
ENGLISH8

Your skin may become a little red and irritated after using the
appliance. This phenomenon is absolutely normal and quickly
disappears. If the irritation does not disappear within three days, we
advise you to consult a doctor.
Do not expose the appliance to temperatures lower than 15°C or
higher than 35°C during use.
The appliance is equipped with a built-in overheat protection. If the
appliance overheats, it does not ash. Do not switch off the appliance,
but let it cool down for approx. 15 minutes before you continue with
your treatment.
Always return the appliance to a service centre authorised by Philips
for examination or repair. Repair by unqualied people could cause an
extremely hazardous situation for the user.
Never use the appliance in any of the cases mentioned under
Contraindications.
Contraindications
Never use the appliance:
If you have a skin disease such as active skin cancer, if you have a history
of skin cancer or any other localised cancer in the areas to be treated,
if you have pre-cancerous lesions or multiple atypical moles in the areas
to be treated.
If you have epilepsy with ashlight sensitivity.
If you have a history of collagen disorder, including a history of keloid
scar formation or a history of poor wound healing.
If you have a history of vascular disorder, such as the presence of
varicose veins or vascular ectasia in the areas to be treated.
If your skin is sensitive to light and causes a rash or an allergic reaction.
If you are taking photosensitising agents or medications, check the
package insert of your medicine and never use the appliance if it is
stated that it can cause photo-allergic reactions, photo-toxic reactions
or if you have to avoid sun when taking this medicine.
If you have diabetes, lupus erythematodes, porphyria or congestive
heart disease.
On areas of your skin where you are currently being treated with or
have recently been treated with Alpha-Hydroxy Acids (AHAs), Beta-
Hydroxy Acids (BHAs), topical isotretinoin and azelaic acid.
If you have taken oral isotretinoin Accutane® or Roaccutane® in the
last six months.This treatment can make skin more susceptible to tears,
wounds and irritations.
If you have any bleeding disorder or take anticoagulation medications,
including heavy use of aspirin, in a manner which does not allow for a
minimum 1-week washout period prior to each treatment.
If you have infections, eczema, burns, inammation follicles, open
lacerations, abrasions, surgeries, herpes simplex, wounds or lesions and
haematomas in the areas to be treated.
If you have a history of immunosuppressive disease (including HIV
infection or AIDS) or when you take immunosuppressive medications.
When you are on painkillers, which reduce the sensitivity to heat.
If you are pregnant or breastfeeding.
On moles, freckles, large veins, darker pigmented areas, scars, skin
anomalies without consulting your doctor. This can result in a burn and
-
-
-
-
-
-
-
-
-
-
-
-
-
-
-
-
-
-
-
ENGLISH 9

change of colour, which makes it potentially harder to identify skin-
related diseases (e.g. skin cancer).
On nipples and mucous areas.
After intensive sunbathing and/or on sunburnt skin or if you use suntan
accelerators.
On warts, tattoo or permanent make-up. This can result in a burn and
change of colour.
If you use long-lasting deodorants. This can result in skin reactions.
Over or near anything articial like silicon implants, Implanon
contraceptive implants, pacemakers, subcutaneous injection ports
(insulin dispenser) or piercings.
Electromagnetic elds (EMF)
This Philips appliance complies with all standards regarding electromagnetic
elds (EMF). If handled properly and according to the instructions in this
user manual, the appliance is safe to use based on scientic evidence
available today.
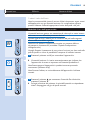
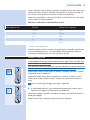
Charging
Fully charge the batteries before you use the appliance for the rst time
and when the batteries are empty. Fully charging the batteries takes up to
4 hours.
Charge the appliance when the charging light lights up orange during use.
When the charging light goes on, the remaining capacity is at least 30
ashes.
Fully charged batteries provide at least 160 ashes at light intensity 5, which
amounts to approx. 15 minutes of cordless operation time. The actual
number of ashes varies, depending on the selected light intensity (see
‘Efcacy at different light intensities’ in chapter ‘Preparing for use’).
Fully charge the appliance every 3 to 4 months, even if you do not use the
appliance for a longer time.
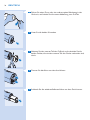
1 Switch off the appliance.
2 Insert the small plug into the appliance and put the adapter in the
wall socket.
The charging light ashes green to indicate that the appliance is
charging.
When the batteries are fully charged, the charging light lights
up green continuously.
Caution: Never cover the appliance and adapter during charging.
Note: During charging, the appliance cannot be used.
Note: The adapter feels warm during charging. This is normal.
3 After charging, remove the adapter from the wall socket and pull the
small plug out of the appliance.
Preparing for use
For optimal results and highest efcacy, prepare the areas on which you
intend to use the appliance in the manner described below.
-
-
-
-
-
,
,
ENGLISH10

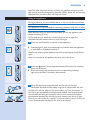
1 Shave the areas you intend to treat as long as you still experience
hair regrowth.
Never remove the hairs by means of wax, epilation, tweezers or
depilation cream. These methods counteract photo-epilation because
they remove hairs by the root. In these cases, the light cannot be
successfully absorbed by the root and the hairs will grow back again.
Note: Shaving is necessary to ensure that the light energy is channelled
to the hair root in the most efcient way. Furthermore, visible hairs in the
treatment area can be burnt by the light and can thus cause an unpleasant
smell. In general this is harmless, but it may be a bit painful when you use the
appliance.
2 Clean your skin and make sure it is entirely dry and free from grease
and oil (e.g. present in cosmetic products like deodorants, lotions,
perfumes, tanning creams and sunscreens).
Note: If shaving causes wounds or lesions, the skin may be more sensitive
as a result. In that case, the light treatment may be more perceptible and
sometimes even uncomfortable.
Note: Once the hairs stop growing back - which usually happens after a few
treatments - you no longer have to shave before you use the appliance.
Tip: If shaving causes skin irritation, you can also use a trimmer to trim the
hair as short as possible. In that case, the light treatment may be more
perceptible and sometimes even slightly uncomfortable.
Setting the light intensity
You have to adjust the light intensity to your skin and body hair colour and
to a level you nd comfortable.
The table with recommended light intensities below helps you to establish
the right light intensity.
1 Consult the table below to determine which light intensities are
most suitable for your skin and body hair colour and to check if this
method is suitable for you at all (if it is not, this is indicated with x in
the table).
Note: Persons with darker skin run a higher risk of skin irritation because
their skin absorbs more light. Therefore lower intensities are recommended for
persons with darker skin.
2 For each body area you want to treat, select a suitable intensity in
the recommended range that is as high as possible but does not
cause any discomfort on the skin.
The light intensity you use can feel warm or hot on the skin, but should
never feel uncomfortable.
Note: Before every treatment, check if the appliance is set to the right intensity.
ENGLISH 11

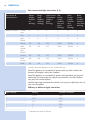
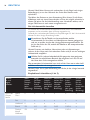
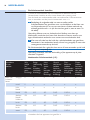
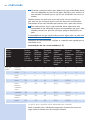
Recommended light intensities (1-5)
Skin colour &
characteristics :
White
(always
sunburn,
no
tanning)
Beige
(easy
sunburn,
minimal
tanning)
Light brown
(sometimes
sunburn,
good
tanning)
Mid
brown
(rarely
sunburn,
fast and
good
tanning)
Dark
brown
(rarely
sunburn,
very
good
tanning)
Black
(rarely
to never
sunburn,
very dark
tanning)
Body hair colour: white/
grey
x x x x x x
red x x x x x x
light
blond
x x x x x x
blond 4/5 4/5 4/5 3/4/5 1/2/3/4 x
dark
blond/
light
brown
4/5 4/5 4/5 3/4/5 1/2/3/4 x
brown 4/5 4/5 4/5 3/4/5 1/2/3/4 x
dark
brown
4/5 4/5 4/5 3/4/5 1/2/3/4 x
black 4/5 4/5 4/5 3/4/5 1/2/3/4 x
x means that the appliance is not suitable for use.
Note: The appliance is not suitable for persons with very dark to black skin
because of the higher risk of skin irritations.
Note: The appliance is not suitable for persons with light blond, red, grey and
white body hair because the low melanin concentration in the hair results in
very poor hair removal efcacy.
Note: At higher light intensities the method is not only more efcacious, but it is
also more perceptible.
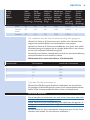
Efcacy at different light intensities
Light intensity Efcacy Number of ashes
5 ***** 160
4 **** 190
3 *** 250
2 ** 350
1 * 520
* indicates the level of efcacy
ENGLISH12

Note: This table shows the number of ashes the appliance can give at each
light intensity and the corresponding expected efcacy. Please use the intensity
appropriate for your skin colour and body hair colour.
Using the appliance
The light intensity you use can feel warm or hot on the skin, but should
never feel uncomfortable.
This appliance is only intended for removing women’s body hair on areas
below the neck: underarms, bikini area and legs.
Note: Shave the area you intend to treat before you use the appliance (see
chapter ‘Preparing for use’).
Tip: The best time for treatment is before you go to bed at night.This
diminishes any skin reaction that may occur overnight.
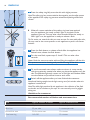
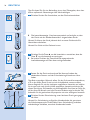
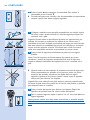
1 Press the on/off button to switch on the appliance.
Intensity light 1 goes on automatically to indicate that the appliance
is switched on at default intensity 1.
Note: You can switch off the appliance any time by pressing the on/off button
again.
Note: It is normal that the appliance becomes warm during use.
2 Press the % button to increase the intensity. To lower the intensity,
press the ^ button.
Every time you press the button, the corresponding intensity
light starts to ash. This takes a few seconds.
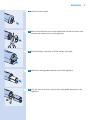
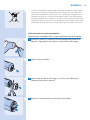
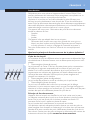
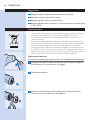
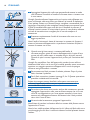
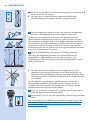
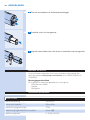
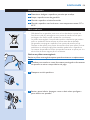
3 Place the appliance perpendicularly on the skin so that the
removable window and the safety ring are in contact with the skin.
Tip: When you use the appliance for the rst time, try it out, for instance on
your hip, to get accustomed to the light-based method. Start with the lowest
recommended intensity and increase it until you have reached the highest
recommended intensity. This test tells you how sensitive your skin is to light.
Check if your skin shows any reactions 20 minutes after the test. If it does, use
a lower recommended intensity for the areas to be treated.
,
,
ENGLISH 13

4 Press the safety ring fully onto the skin with slight pressure.
Note: The safety ring has contact switches that together are the safety system
of the appliance. This safety ring prevents unintentional ashing without skin
contact.
When all contact switches of the safety ring have been pushed
into the appliance, the ‘ready to ash’ light on the back of the
appliance goes on. This may take a few seconds. When the ‘ready to
ash’ light is on, the appliance is ready to release a ash.
Tip: For easier use, stretch the skin you want to treat. On areas with softer skin,
you may need to exert more pressure on the appliance to push in all contact
switches.
5 Press the ash button to release a ash. After the appliance has
ashed once, release the ash button.
6 For the next ash, repeat steps 3, 4 and 5. This can take a few
seconds.
Never ash the same area twice without lifting the appliance off the skin.
This prevents excessive heating and possible burning of the skin.
7 To avoid untreated areas, always make sure there is some overlap
with the previously treated area when you place the appliance on the
skin.The effective light only comes out of the light exit window. Make
sure the ashes are produced close to each other.
8 Switch off the appliance after you have nished the treatment.
Note: Avoid looking straight into the light coming out of the window when the
appliance is switched on.
Note: The visible light produced by the appliance is the reection of the ash
on the skin and is harmless to your eyes. It is not necessary to wear goggles
during use.
Guidelines for treatment
Recommended number of ashes and treatment time
Area Approx. number of ashes Approx. treatment time
Underarms 25 per underarm 3 minutes per underarm
Bikini line 25 per side 3 minutes per side
Entire bikini area 90 for entire area 10 minutes
One lower leg 160-190 15 minutes
,
ENGLISH14

Area Approx. number of ashes Approx. treatment time
One full leg 320-380 30 minutes
Note: Fully charged batteries offer at least 160 ashes at intensity 5, which
amounts to a cordless operating time of approx. 15 minutes.
How to achieve optimal results
Optimal results cannot be obtained with a single session, since only hairs
in the anagen phase are susceptible to treatment with light. During a
treatment, hairs on a treated area are usually in different stages of the cycle
of hair growth. To treat all hairs successfully and to prevent that the hair
root becomes active again, you have to repeat the treatment every 2
weeks. It is recommended to adhere to this frequency. Better results are
not expected if you increase or decrease the treatment frequency. Clinical
trials have shown that this is the optimal frequency of use.
After treatment
After treatment it may happen that:
Your skin shows slight redness and/or prickles, tingles or feels warm.
This reaction is harmless and disappears quickly.
A skin reaction similar to sunburn may occur on the treated area for a
short while.
Your skin may appear to be dry, as the combination of shaving and light
treatment may cause dry skin.
Some hairs grow back although you use the appliance frequently.
This happens because hairs are in different stages of the cycle of hair
growth during treatment. The hairs that grow back tend to be softer
and thinner.
It is recommended to
:
Consult your doctor if skin irritation does not disappear within three
days (see chapter ‘Important’, section ‘Caution’).
Wait with the next treatment until skin irritation has disappeared
completely. Perhaps you have used an intensity that was too high for
you. Use a lower intensity the next time.
Do not take an intensive sunbath or suntan without proper protection
immediately after a treatment. If you want to go sunbathing after a
treatment, apply a sun blocker to the treated areas.
Avoid swimming in chlorinated water for 48 hours after treatment.The
chlorine in the water can cause itchiness.
Avoid applying any cosmetic substances to the treated areas
immediately after treatment.
Cleaning and maintenance
Never clean the appliance or any of its parts under the tap or in the
dishwasher.
Never use scouring pads, abrasive cleaning agents or aggressive liquids
such as petrol or acetone to clean the appliance.
Never scratch the lter glass or the metallic surface inside the
removable window.
-
-
-
-
-
-
-
-
-
ENGLISH 15

Note: Make sure that the contact switches of the safety ring do not get
jammed with dirt.
Note: Stop using the appliance when it is no longer possible to clean the lter
glass or the removable window.
To ensure optimal results and a long life for the appliance, clean the
appliance after each treatment.
1 Switch off the appliance, unplug it and let it cool down.
Note: The lter glass becomes hot during use. Make sure it has cooled down
before you clean it.
2 To remove the removable window, put your ngers in the recesses
on the housing of the appliance and pull the removable window off
the appliance.
3 Use the dry, soft cloth supplied with the appliance to clean the
following parts:
the surface of the lter glass
the outside surface of the removable window
the metallic frame inside the removable window
the housing of the appliance (if necessary)
Note: If necessary, wet the cloth with some drops of water.
Storage
1
Switch off the appliance, unplug it and let it cool down.
2 Clean the appliance before you store it.
3 Put the appliance in the pouch supplied.
4 Store the appliance in a dry place at a temperature between 0°C and
60°C.
Environment
Do not throw away the appliance with the normal household waste
at the end of its life, but hand it in at an ofcial collection point for
recycling. By doing this, you help to preserve the environment.
The built-in rechargeable batteries contain substances that may pollute
the environment. Always remove the batteries before you discard and
hand in the appliance at an ofcial collection point. Dispose of the
batteries at an ofcial collection point for batteries. If you have trouble
removing the batteries, you can also take the appliance to a Philips
service centre. The staff of this centre will remove the batteries for you
and will dispose of them in an environmentally safe way.
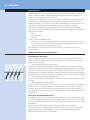
Removing the rechargeable batteries
Only remove the rechargeable batteries if they are completely empty.
1 Insert an awl or another pointed tool into the appliance tool and pry
the bottom cap off the handle.
-
-
-
-
-
-
ENGLISH16

2 Undo the two screws.
3 Remove the bottom part of the handle and cut the two wires that
connect the bottom part to the appliance.
4 Pull the battery connectors off the battery terminals.
5 Shake the rechargeable batteries out of the appliance.
6 Cut the two wires that connect the rechargeable batteries to the
appliance.
ENGLISH 17

Guarantee and service
If you need service or information or if you have a problem, please visit
the Philips website at www.philips.com/satinlux or call 00800-SATINLUX
(72846589).
Replacement parts
The following replacement parts are available:
Removable window
Adapter
Pouch
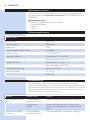
Technical specications
Model SC2000
Rated voltage 100V-240V
Rated frequency 50Hz-60Hz
Rated input 7.5W
Protection against electric shock Class II Q
Protection rating IP 30 (EN 60529)
Operating conditions Temperature: +15° to +35°C
Relative humidity: 25% to 75%
Storage conditions Temperature: 0° to +60°C
Relative humidity: 5% to 95%
Intense pulsed light lamp Spectrum: >570nm
Lithium ion battery 2 x 3.7 Volt
1100 mAh
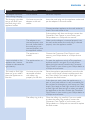
Troubleshooting
This chapter summarises the most common problems you could
encounter with the appliance. If you are unable to solve the problem with
the information below, contact the Consumer Care Centre in your country.
See the telephone number on the back of the user manual or visit www.
philips.com/satinlux for further information.
Problem Possible cause Solution
The appliance does not
work.
The rechargeable
batteries are empty.
Charge the appliance (see chapter ‘Charging’).
The appliance is
broken.
Contact the Consumer Care Centre in your
country, your Philips dealer or a Philips service
centre.
The appliance suddenly
switches off.
The rechargeable
batteries are empty.
Charge the appliance (see chapter ‘Charging’).
-
-
-
ENGLISH18

Problem Possible cause Solution
The adapter becomes
warm during charging.
This is normal. No action required.
The charging light does
not go on when I put
the small plug in the
appliance socket.
You have not put the
adapter in the wall
socket.
Insert the small plug into the appliance socket and
put the adapter in the wall socket.
Connect another appliance to the wall socket to
check if the wall socket is live.
If the appliance still does not charge, contact the
Consumer Care Centre in your country, your
Philips dealer or a Philips service centre.
The adapter is not
inserted properly into
the wall socket and/or
the small plug is not
inserted properly into
the appliance socket.
Make sure the adapter is inserted properly into
the wall socket and/or the small plug is inserted
properly into the appliance socket.
The appliance is
broken.
Contact the Consumer Care Centre in your
country, your Philips dealer or a Philips service
centre.
I have switched on the
appliance but I cannot
increase or decrease the
light intensity.
The appliance has to
be reset.
To reset the appliance, switch off the appliance
and then switch it on again. If you still cannot
adjust the light intensity, contact the Consumer
Care Centre in your country, your Philips dealer or
a Philips service centre.
The ‘ready to ash’ light
does not go on when I
place the appliance on
the skin.
You have not put the
removable window
with safety ring
properly on the skin.
Place the appliance perpendicularly onto the skin
in such a way that all contact switches touch the
skin. Then check if the ‘ready to ash’ light is on
and press the ash button.
If this does not work, place the appliance on a
part of your body where it is easy to establish full
skin contact, for example on your lower arm.Then
check if the ‘ready to ash’ light works. If the ‘ready
to ash’ light still does not go on when you place
the appliance on the skin, contact the Consumer
Care Centre in your country, your Philips dealer or
a Philips service centre.
The safety ring is dirty. Clean the safety ring carefully. If you are unable
to clean the safety ring properly, contact the
Consumer Care Centre in your country, your
Philips dealer or a Philips service centre to replace
the ash screen.
ENGLISH 19

Problem Possible cause Solution
The ‘ready to ash’ light
does not go on when
I place the removable
window on my skin, but
the cooling fan works.
The overheat
protection has been
activated.
When the overheat protection has been activated,
the fan still works. Do not switch off the appliance
and let it cool down for approx. 15 minutes before
you continue to use it. If the ‘ready to ash’ light
still does not go on when you place the appliance
on the skin, contact the Consumer Care Centre
in your country, your Philips dealer or a Philips
service centre.
The ‘ready to ash’
light is green but
the appliance does
not produce a ash
when I press the ash
button.
The appliance needs to
be reset.
To reset the appliance, switch off the appliance
and switch it on again. If the ‘ready to ash’ light
is green but the appliance still does not produce
a ash when you press the ash button, contact
the Consumer Care Centre in your country, your
Philips dealer or a Philips service centre.
The appliance becomes
warm during use.
This is normal. No action required.
The appliance does not
show light intensity 1
when I switch it on.
The appliance needs to
be reset.
To reset the appliance, switch it off and on again.
If the appliance still does not show light intensity
1, contact your Customer Care Centre, your
Philips dealer or a Philips Service Centre.
The appliance produces
a strange smell.
The removable
window is dirty.
Clean the removable window carefully. If you
are unable to clean the removable window
properly, contact the Consumer Care Centre
in your country, your Philips dealer or a Philips
service centre to replace the removable window.
You have not shaved
the area to be treated
properly.
If there are hairs on the area to be treated, these
hairs may get burnt when you use the appliance.
As a result, you notice a strange smell. Shave the
area to be treated properly before you use the
appliance.
The treatment is more
perceptible than usual.
You used a too high
light intensity.
Check if you have selected the right light intensity.
If necessary, select a lower light intensity.
You did not shave the
areas to be treated.
Always shave the areas to be treated before you
use the appliance.
The appliance is
defective.
Contact the Consumer Care Centre in your
country, your Philips dealer or a Philips service
centre.
You stored the
appliance in a dusty
environment.
The strange smell disappears after a few ashes.
The lter glass in the
light exit window is
broken.
If the lter glass in the light exit window is broken,
do not use the appliance anymore. Contact the
Consumer Care Centre in your country, your
Philips dealer or a Philips service centre.
ENGLISH20
A página está carregando...
A página está carregando...
A página está carregando...
A página está carregando...
A página está carregando...
A página está carregando...
A página está carregando...
A página está carregando...
A página está carregando...
A página está carregando...
A página está carregando...
A página está carregando...
A página está carregando...
A página está carregando...
A página está carregando...
A página está carregando...
A página está carregando...
A página está carregando...
A página está carregando...
A página está carregando...
A página está carregando...
A página está carregando...
A página está carregando...
A página está carregando...
A página está carregando...
A página está carregando...
A página está carregando...
A página está carregando...
A página está carregando...
A página está carregando...
A página está carregando...
A página está carregando...
A página está carregando...
A página está carregando...
A página está carregando...
A página está carregando...
A página está carregando...
A página está carregando...
A página está carregando...
A página está carregando...
A página está carregando...
A página está carregando...
A página está carregando...
A página está carregando...
A página está carregando...
A página está carregando...
A página está carregando...
A página está carregando...
A página está carregando...
A página está carregando...
A página está carregando...
A página está carregando...
A página está carregando...
A página está carregando...
A página está carregando...
A página está carregando...
A página está carregando...
A página está carregando...
A página está carregando...
A página está carregando...
A página está carregando...
A página está carregando...
A página está carregando...
A página está carregando...
A página está carregando...
A página está carregando...
A página está carregando...
A página está carregando...
A página está carregando...
A página está carregando...
A página está carregando...
A página está carregando...
A página está carregando...
A página está carregando...
A página está carregando...
A página está carregando...
A página está carregando...
A página está carregando...
A página está carregando...
A página está carregando...
A página está carregando...
A página está carregando...
A página está carregando...
A página está carregando...
A página está carregando...
A página está carregando...
A página está carregando...
A página está carregando...
A página está carregando...
A página está carregando...
A página está carregando...
A página está carregando...
A página está carregando...
A página está carregando...
A página está carregando...
A página está carregando...
A página está carregando...
A página está carregando...
A página está carregando...
A página está carregando...
A página está carregando...
A página está carregando...
A página está carregando...
A página está carregando...
A página está carregando...
A página está carregando...
A página está carregando...
A página está carregando...
A página está carregando...
A página está carregando...
-
 1
1
-
 2
2
-
 3
3
-
 4
4
-
 5
5
-
 6
6
-
 7
7
-
 8
8
-
 9
9
-
 10
10
-
 11
11
-
 12
12
-
 13
13
-
 14
14
-
 15
15
-
 16
16
-
 17
17
-
 18
18
-
 19
19
-
 20
20
-
 21
21
-
 22
22
-
 23
23
-
 24
24
-
 25
25
-
 26
26
-
 27
27
-
 28
28
-
 29
29
-
 30
30
-
 31
31
-
 32
32
-
 33
33
-
 34
34
-
 35
35
-
 36
36
-
 37
37
-
 38
38
-
 39
39
-
 40
40
-
 41
41
-
 42
42
-
 43
43
-
 44
44
-
 45
45
-
 46
46
-
 47
47
-
 48
48
-
 49
49
-
 50
50
-
 51
51
-
 52
52
-
 53
53
-
 54
54
-
 55
55
-
 56
56
-
 57
57
-
 58
58
-
 59
59
-
 60
60
-
 61
61
-
 62
62
-
 63
63
-
 64
64
-
 65
65
-
 66
66
-
 67
67
-
 68
68
-
 69
69
-
 70
70
-
 71
71
-
 72
72
-
 73
73
-
 74
74
-
 75
75
-
 76
76
-
 77
77
-
 78
78
-
 79
79
-
 80
80
-
 81
81
-
 82
82
-
 83
83
-
 84
84
-
 85
85
-
 86
86
-
 87
87
-
 88
88
-
 89
89
-
 90
90
-
 91
91
-
 92
92
-
 93
93
-
 94
94
-
 95
95
-
 96
96
-
 97
97
-
 98
98
-
 99
99
-
 100
100
-
 101
101
-
 102
102
-
 103
103
-
 104
104
-
 105
105
-
 106
106
-
 107
107
-
 108
108
-
 109
109
-
 110
110
-
 111
111
-
 112
112
-
 113
113
-
 114
114
-
 115
115
-
 116
116
-
 117
117
-
 118
118
-
 119
119
-
 120
120
-
 121
121
-
 122
122
-
 123
123
-
 124
124
-
 125
125
-
 126
126
-
 127
127
-
 128
128
-
 129
129
-
 130
130


Philips SC2000/00 Manual do usuário
- Tipo
- Manual do usuário
- Este manual também é adequado para
em outras línguas
- español: Philips SC2000/00 Manual de usuario
- français: Philips SC2000/00 Manuel utilisateur
- italiano: Philips SC2000/00 Manuale utente
- English: Philips SC2000/00 User manual
- Nederlands: Philips SC2000/00 Handleiding
- Deutsch: Philips SC2000/00 Benutzerhandbuch
Artigos relacionados
-
Philips TT3000/01 Manual do usuário
-
Philips SC2003/00 Manual do usuário
-
Philips SC2004/11 Manual do usuário
-
Philips SC2001/00 Manual do usuário
-
-
-
Philips SC1991/00 Manual do usuário
-
Philips SC2002/00 Especificação
-