
TV Stand SU-B551S/SU-B461S/SU-B401S
Printed in Malaysia
http://www.sony.net/
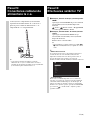
TV Stand/
Подставка для телевизора
Instructions
Mode d’emploi
Instrucciones
Gebrauchsanweisung
Instructies
Istruzioni
Bruksanvisning
Instrukcje
Instruções
Vejledning
Käyttöohje
Instruksjoner
δηγίες
Utasítások
Instrukce
Inštrukcie
Instrucţiuni
Инструкции
Инструкции
Інструкції
NO
FI
RU
UA
4-268-384-22(1)
© 2011 Sony Corporation
ES
GB
FR
DE
DKIT
SE
PL
PT
DK
NL
SU-B551S
SU-B461S
SU-B401S
HU
CZ
SK
TR
GR
RO
BG

2 (GB)
NOTICE FOR CUSTOMERS IN THE
UNITED KINGDOM
A moulded plug complying with BS1363 is fitted to this
equipment for your safety and convenience. Should the fuse
in the plug supplied need to be replaced with the same rating
of fuse approved by ASTA or BSI to BS 1362 (i.e., marked
with or ) must be used.
When an alternative type of plug is used it should be fitted
with the same rating of fuse, otherwise the circuit should be
protected by a 13 AMP FUSE at the distribution board. If the
plug supplied with this equipment has a detachable fuse
cover, be sure to attach the fuse cover after you change the
fuse. Never use the plug without the fuse cover. If you should
lose the fuse cover, please contact your nearest Sony service
station.
How to replace the fuse
Open the fuse compartment with a blade screwdriver, and
replace the fuse.
Please refer to the illustration that actually equipped with the
product.
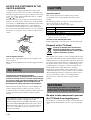
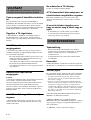
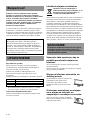
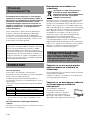
Thank you for purchasing this product.
Products by Sony are designed with safety in mind.
Incorrect use may result in a serious injury through
fire, electric shock, the product toppling over, or the
product being dropped. Be sure to observe the
precautions for safety to prevent such accidents.
This instructions manual shows the correct handling of the
product and important precautions necessary to prevent
accidents. Be sure to read this manual thoroughly and use the
product correctly. Keep this manual available for future
reference.
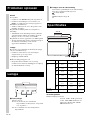
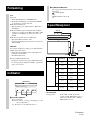
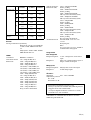
Specified products
This stand is designed for use with the Sony products
specified below. Do not install other than the specified
products.
The following products are subject to change without notice,
may be out of stock, or discontinued.
Also, certain models are sold in some regions.
* In the actual model names, the “x” indicates numbers and/or
characters specific to each model.
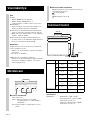
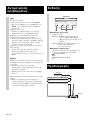
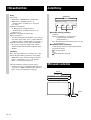
Location of the identification label
Label for Model No. is located on the rear of the TV Stand.
Disposal of the TV Stand
Disposal of Old Electrical & Electronic
Equipment (Applicable in the European
Union and other European countries with
separate collection systems)
This symbol on the product or on its packaging indicates that
this product shall not be treated as household waste. Instead it
shall be handed over to the applicable collection point for the
recycling of electrical and electronic equipment. By ensuring
this product is disposed of correctly, you will help prevent
potential negative consequences for the environment and
human health, which could otherwise be caused by
inappropriate waste handling of this product. The recycling
of materials will help to conserve natural resources. For more
detailed information about recycling of this product, please
contact your local Civic Office, your household waste
disposal service or the shop where you purchased the
product.
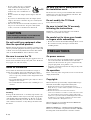
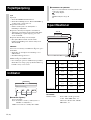
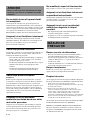
Be sure to take measures to prevent
the TV Stand from toppling over.
If you fail to do so, the TV may topple over and cause injury.
Anchor the TV Stand and the rack, etc., to prevent toppling
over.
On Safety
The manufacturer of this product is Sony Corporation, 1-7-
1 Konan Minato-ku Tokyo, 108-0075 Japan. The
Authorized Representative for EMC and product safety is
Sony Deutschland GmbH, Hedelfinger Strasse 61, 70327
Stuttgart, Germany. For any service or guarantee matters
please refer to the addresses given in separate service or
guarantee documents.
FUSE
FUSE
CAUTION
LCD colour TV
SU-B551S KDL-55HX92x/55HX82x/55NX72x
SU-B461S KDL-46HX92x/46HX82x/46NX72x
SU-B401S KDL-40NX72x
WARNING
If the following precautions are not observed,
serious injury or death can result through fire,
electric shock, or the product toppling over.

3 (GB)
Be sure to install the TV Stand on a
stable surface.
If you install the TV Stand on an unstable
surface, it may lose its balance and topple
over or fall off. This may cause injury or
property damage.
Do not lean on or hang from the TV
with the TV installed on the TV
Stand.
The TV Stand may topple over, or the TV
may fall and cause serious injury or death.
Do not cover the ventilation holes of
the TV.
The ventilation openings in the TV are
necessary to ensure reliable operation of the
TV and to protect it from overheating.
• Do not block or cover the ventilation
openings with cloth or other materials.
• Never allow liquid or solid objects to fall
into the ventilation openings.
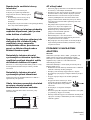
Do not place liquid filled objects
such as a vase or potted plant on the
TV.
Do not use a power line operated TV
set near water; for example, near a
bathtub, washbowl, kitchen sink,
laundry tub, wet basement or near a
swimming pool, etc.
Do not install the TV in places
subject to extreme temperature,
such as in direct sunlight, near a
radiator or a heating vent.
The TV may overheat in such conditions which can cause
deformation of the enclosure and/or TV malfunction.
Do not install the TV in a place
exposed to direct air conditioning.
Moisture may condense inside and may cause TV
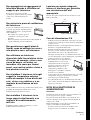
malfunction.
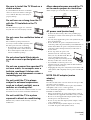
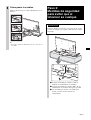
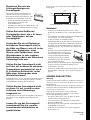
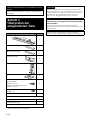
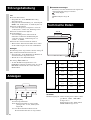
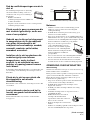
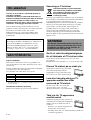
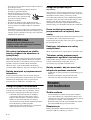
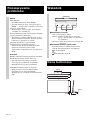
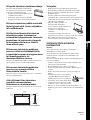
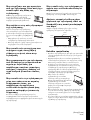
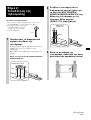
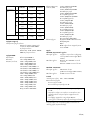
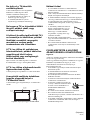
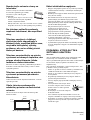
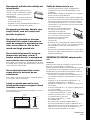
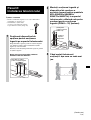
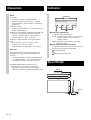
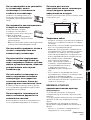
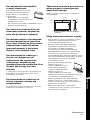
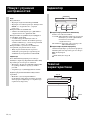
Allow adequate space around the TV
set to ensure proper air circulation.
Allow enough space around the TV as shown below.
AC power cord (mains lead)
• Connect the TV set using a three-wire grounding type
mains plug to a mains socket with a protective earthing
connection.
• Use only Sony supplied AC power cords (mains lead), not
those of other brands.
• Do not allow the AC power cord (mains lead) or the
connecting cable to be pinched when you install the TV on
the TV Stand. If the AC power cord (mains lead) or the
connecting cable is damaged, this may result in fire or
electric shock.
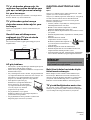
• Do not step on the AC power cord
(mains lead) or the connecting cable
when you carry the TV Stand. The AC
power cord (mains lead) or the
connecting cable may be damaged, and
this may result in fire or electric shock.
• If you stumble over the AC power cord
(mains lead) or the connecting cable, the TV Stand may
topple over and cause injury.
• Unplugging the AC power cord (mains lead) from the wall
outlet (mains) will completely remove power from the TV
Stand.
NOTE ON AC adapter (mains
adaptor)
Warning
To reduce the risk of fire or electric shock, do not expose this
apparatus to rain or moisture.
To prevent fire or shock hazard, do not place objects filled
with liquids, such as vases, on the apparatus.
Do not install this equipment in a confined space, such as a
bookshelf or similar unit.
• Please ensure that the AC power outlet (mains socket) is
installed near the equipment and shall be easily accessible.
• Be sure to use the supplied AC adapter (mains adaptor)
and AC power cords (mains lead).
• Do not use any other AC adapter (mains adaptor). It may
cause a malfunction.
• Connect the AC adapter (mains adaptor) to an easily
accessible AC power outlet (mains socket).
Leave at least this much space around the set.
30 cm
10 cm
10 cm
6 cm
GB
English
(Continued)

4 (GB)
• Do not coil the AC power cord (mains
lead) around the AC adapter (mains
adaptor). The core wire may be cut
and/or it may cause a malfunction of
the TV.
• Do not touch the AC adapter (mains adaptor) with wet
hands.
• If you notice an abnormality in the AC adapter (mains
adaptor), disconnect it from the AC power outlet (mains
socket) immediately.
• The set is not disconnected from the AC (mains) source as
long as it is connected to the AC power outlet (mains
socket), even if the set itself has been turned off.
Do not install any equipment other
than the specified product.
This TV Stand is designed for use with the specified product
only. If you install equipment other than specified, it may fall
or break, and cause injury. Illustrations used in this manual
show of the KDL-40NX72x, unless otherwise stated.
Be sure to secure the TV.
Secure the TV to the TV Stand using the supplied screws. If
the TV is not installed securely, it may fall, or the TV Stand
may topple over, and cause injury.
Notes on installation
Do not allow the TV Stand to be installed at an angle or
incline. To avoid this, observe the following precautions.
– If you install the TV Stand on a soft surface such as a
mat or a carpet, lay a board over the designated location
beforehand.
– Do not install the TV Stand in a place subject to direct
sunlight or near a heater.
– Do not install the TV Stand in a hot or humid place, or
outdoors.
Note on use
Cleaning
To keep the TV Stand clean, occasionally wipe it with a dry
soft cloth. Stubborn stains may be removed by wiping with a
cloth slightly dampened with mild soap. Be sure to dry the
area afterwards with a dry soft cloth. Do not use chemicals,
such as thinner or benzine, as they damage the finish of the
TV Stand.
Be sure that two or more persons do
the installation work.
Be sure that two or more persons install the TV on the TV
Stand. If one person does the installation work alone, this
may result in an accident or injury.
Do not modify the TV Stand.
It may fall and cause injury.
Be sure to install the TV securely
following the instructions.
Tighten the screws securely. If the TV is not installed
securely, it may fall and cause injury.
Be careful not to injure your hands
or fingers while assembling.
• Do not move the TV Stand with holding the Neck section.
• Be careful not to hurt your fingers or hands when
installing the TV.
On power sources
• If you are not going to use the TV Stand for a long time, be
sure to disconnect the TV Stand from the wall outlet
(mains). To disconnect the AC power cord (mains lead),
grasp the plug itself; never pull the cord.
• AC power cord (mains lead) must be changed only at the
qualified service shop.
On operation
Before connecting other components, be sure to turn off and
unplug the TV Stand.
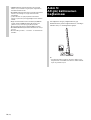
Copyrights
This TV Stand incorporates Dolby
*
Digital and Pro Logic
Surround and the DTS
**
Digital Surround System.
* Manufactured under license from Dolby Laboratories.
Dolby, Pro Logic, and the double-D symbol are trademarks of
Dolby Laboratories.
** Manufactured under license under U.S. Patent #’s:
5,451,942; 5,956,674; 5,974,380; 5,978,762; 6,487,535 & other
U.S. and worldwide patents issued & pending. DTS and the
Symbol are registered trademarks & DTS Digital Surround and
the DTS logos are trademarks of DTS, Inc. Product includes
software. © DTS, Inc. All Rights Reserved.
This TV Stand incorporates High-Definition Multimedia
Interface (HDMI™) technology.
HDMI, the HDMI Logo, and High-Definition Multimedia
Interface are trademarks or registered trademarks of HDMI
Licensing LLC in the United States and other countries.
CAUTION
If the following precautions are not observed,
injury or property damage may occur.
PRECAUTIONS

5 (GB)
“BRAVIA” is a trademark of Sony Corporation.

6 (GB)
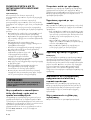
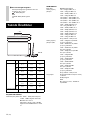
* For SU-B551S model only.
** For SU-B551S/461S models only.
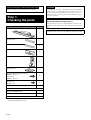
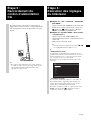
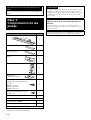
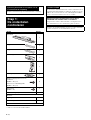
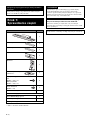
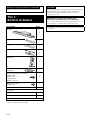
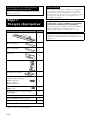
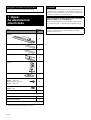
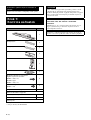
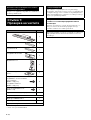
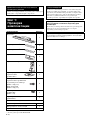
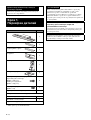
Be sure to hold the TV Stand and handle it carefully.
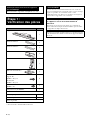
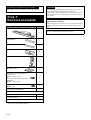
Step 1:
Checking the parts
Name Quantity
Stand
1
Rear Cover L
*
1
Rear Cover R
*
1
Joint
1
Neck
1
Neck-Spacer**
1
TV Stand Neck Attachment Screw
(PSW5 × 16) (× 3)
Joint Screw
(PSW5 × 16) (× 3)
6
Neck Screw
(PSW4 × 12)
4
AC adapter (mains adapter) (ACDP-001) 1
AC power cord (mains lead)
High Speed HDMI cable 1
Instructions manual 1
Warranty card
Note on taking the TV Stand out from the carton
If you allow the AC power cord (mains lead) to be pinched under
or between pieces of equipment, this may result in a short circuit
or an electric shock. If you stumble over the AC power cord
(mains lead) or the connecting cable, the TV Stand may topple
over and cause injury.
Decide on the installation location and lay the TV
Stand down before installing the TV.
Since the TV is heavy, it is recommended that you decide on the
installation location beforehand, and assemble the TV Stand on
site.
Refer to the operating instructions supplied with your TV for
information on how to remove the Table-Top Stand from the TV.
WARNING

7 (GB)
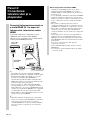
Before assembling
• Be sure to have a Phillips screwdriver that fits the screws prior to
the assembly.
• When using an electric screwdriver,
set the torque setting to approximately
1.5 N·m {15 kgf·cm}.
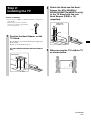
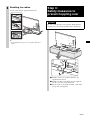
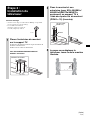
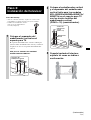
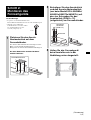
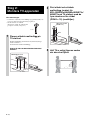
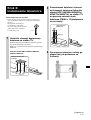
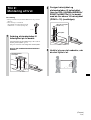
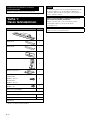
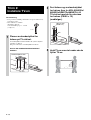
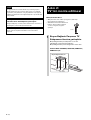
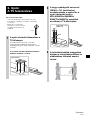
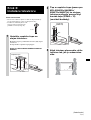
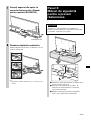
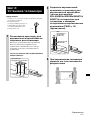
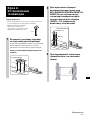
Step 2:
Installing the TV
1
Position the Neck-Spacer on the
TV Stand.
The Neck-Spacer is used for adjusting the height of the
Neck and TV.
Be sure to attach the Neck-Spacer.
For KDL-55HX82x/46HX82x/55NX72x/46NX72x
only:
12 cm ~
Neck-Spacer
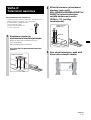
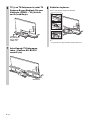
2
Attach the Neck and the Neck-
Spacer (for KDL-55HX82x/
46HX82x/55NX72x/46NX72x only)
to the TV Stand with the four
Neck Screws (PSW4 × 12)
(supplied).
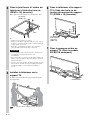
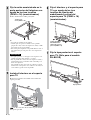
3
When moving the TV, hold the TV
as shown below.
Neck
Neck Screw
(PSW4 × 12)
(Continued)

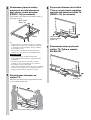
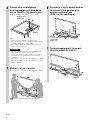
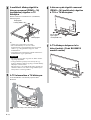
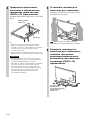
8 (GB)
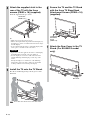
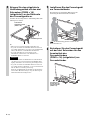
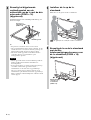
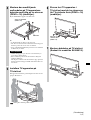
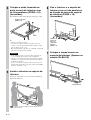
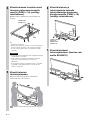
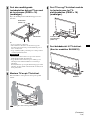
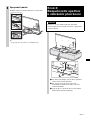
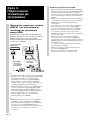
4
Attach the supplied Joint to the
rear of the TV with the three
screws (PSW5 × 16) (supplied).
Slide the supplied Joint up to attach.
~
• Make sure to keep the removed screws.
• When removing the Table-Top Stand from the Display, lay
the display face down on a stable work surface that is larger
than the Display.
• To prevent damaging the surface of the LCD display, make
sure to place a soft cloth on the work surface.
• If pressure or shock is applied to the surface of the Display,
the LCD display may break or become damaged.
• Lay the display face down on a stable and level surface
with the Table-Top Stand hanging over the edge of the
surface.
Having the display face and the base of the Table-Top
Stand on the same level surface will create an unstable
working condition and can damage the Display.
5
Install the TV onto the TV Stand.
The TV is installed by placing it in the groove of the
TV Stand.
Arrow direction shows front of the TV Stand.
Joint
Joint Screw
(PSW5 × 16)
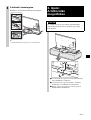
CAUTION
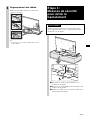
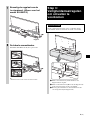
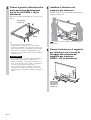
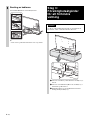
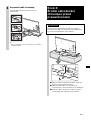
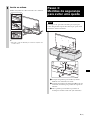
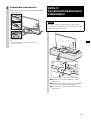
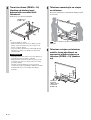
6
Secure the TV and the TV Stand
with the three TV Stand Neck
Attachment Screws (PSW5 × 16)
(supplied).
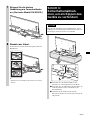
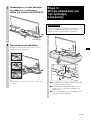
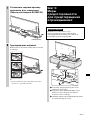
7
Attach the Rear Cover to the TV
Stand. (For SU-B551S model
only)
TV Stand Neck
Attachment
Screw
(PSW5 × 16)
Rear Cover

9 (GB)
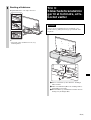
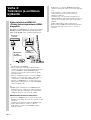
8
Bundling the cables.
Use the cable clamper supplied with the TV.
~
• Do not bundle the AC power cord together with other
cables.
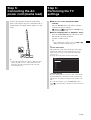
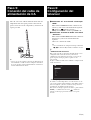
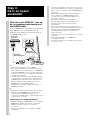
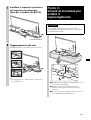
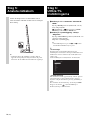
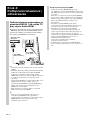
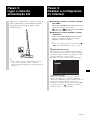
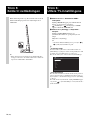
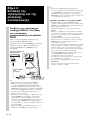
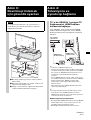
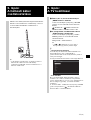
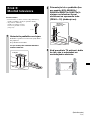
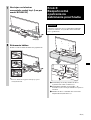
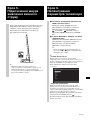
Step 3:
Safety measures to
prevent toppling over
WARNING
Be sure to take measures to prevent the TV Stand from
toppling over, and causing possible injury and damage.
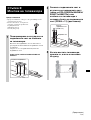
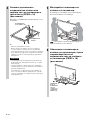
1 Install a wood screw (4 mm in diameter, not
supplied) in the board.
2 Install a machine screw (M4 × 16, not supplied)
into the screw hole of the TV Stand.
3 Tie the wood screw and the machine screw with a
strong cord (not supplied).

10 (GB)
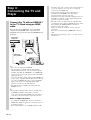
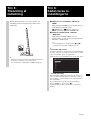
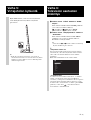
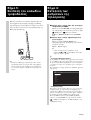
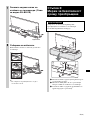
Step 4:
Connecting the TV and
Player
Connect the TV with an HDMI IN 1
to the TV Stand using an HDMI
cable.
By connecting Sony “BRAVIA” Sync-compatible
components using HDMI cables, operation can be
simplified when you set the Control for HDMI function
for the TV.
~
• Please do not connect PC with HDMI.
• The TV Stand is compatible with the Audio Return
Channel (ARC) function. If you connect the TV Stand to
the ARC compatible TV’s HDMI IN 1 via an HDMI cable,
you do not need to connect the TV to the TV Stand with the
digital optical cord.
• You can see the letters “ARC” beside the TV’s HDMI jack
(socket) if it is compatible with the ARC function. Even if
you connect an HDMI cable to the socket, if the HDMI
input jack (socket) is not compatible with the ARC
function, you cannot use the ARC function.
• The ARC function is available only when Control for
HDMI is set to on.
z
• Even if the TV Stand is turned off (active standby mode),
the HDMI signal will be sent from the connected
component to the TV via the HDMI connection. You can
enjoy image and sound from the component on the TV.
Notes on HDMI connections
• Use a High Speed HDMI cable. If you use a Standard
HDMI cable, 1080p, Deep Colour, or 3D images may not
be displayed properly.
• We recommend that you use an HDMI-authorized cable.
HDMI cable
(not supplied)
HDMI cable
(supplied)
Blu-ray Disc
Player, etc.
• Check the setup of the connected component if an image is
poor or the sound does not come out of a component
connected via the HDMI cable.
• Audio signals (sampling frequency, bit length, etc.)
transmitted from an HDMI jack (socket) may be
suppressed by the connected component.
• Sound may be interrupted when the sampling frequency or
the number of channels of audio output signals from the
playback component is switched.
• When the connected component is not compatible with
copyright protection technology (HDCP), the image and/or
the sound from the HDMI TV OUT socket may be
distorted or may not be output.
In this case, check the specification of the connected
component.
• We do not recommend using an HDMI-DVI conversion
cable.
• This system supports Deep Colour, “x.v.Colour,” and 3D
transmission.

11 (GB)
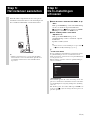
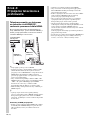
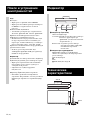
Step 5:
Connecting the AC
power cord (mains lead)
Connect all components and TV to the TV Stand
before connecting the AC power cord (mains lead) of
the TV Stand’s AC Adapter (mains adapter) to a wall
outlet.
~
• Connect the TV Stand to an easily accessible AC outlet
(mains). Should you notice an abnormality in the TV
Stand, disconnect the main plug from the AC outlet
(mains) immediately.
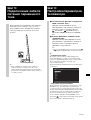
Step 6:
Performing the TV
settings
1 Set to “On” in the “Control for HDMI”
function.
Press the HOME button of the remote of the TV
and select the menu as follows;
Settings > External Inputs > HDMI Set-up
> Control for HDMI > On
2 Set to “Audio System” in “Speakers” menu.
Press the SYNC MENU button of the remote of the
TV and select the menu as follows;
Speakers > Audio System
~
• After completing the settings for procedure 1 and 2,
the : (power) indicator lights up in green.
z
• Scene Select mode
This TV Stand is synchronized with the TV sound settings
automatically, and works together with the Scene Select
function, for you to choose your preferred sound for the
selected scene.
To change the sound, change the TV sound settings.
• Position Control
If you set “External Device Control” to “On” of the TV, this
TV Stand adjusts the volume balance between the left and
right speakers according to viewing position. (Setting of the
TV)
To set “Position Control”, press the HOME button, then
select > System Settings > Position Control > the desired
option.
HDMI1
Auto
General
Cinema
Sports
Music
Animation
Photo
Game
Graphics
Scene Select

12 (GB)
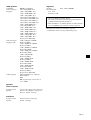
Amplifier section
Rated Output Power Front: 10 W + 10 W, (per channel)
8 ohms, 1 kHz, THD less than 1%
Subwoofer: 20 W, 6 ohms, 100 Hz,
THD less than 1%
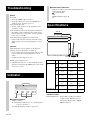
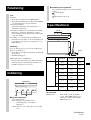
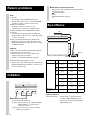
Troubleshooting
Sound
No sound:
• Check the HDMI cable connection.
• Check the settings for “Control for HDMI” and
“Audio System” in Step 6 (page 11).
Using with headphones:
• Switch “Audio System” to “TV Speakers” in the
“Speakers” setting.
Using with dual sound of the TV digital transmission:
• Depending on the transmission, the sound cannot
switch. Switch the “Optical Out” setting of the TV
from “Auto” to “PCM”.
Using with external equipment for dual sound:
• If the sound cannot be switched, switch the audio
output setting of the external equipment to activate
PCM.
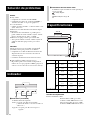
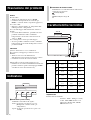
Indicator
Although the TV power is turned on, the : (power)
indicator of the TV Stand does not light up:
• Check whether the AC adapter (mains adapter)’s AC
power cord (mains lead) is plugged into a wall
outlet.
• Consult customer support services.
Flash : (power) indicator red:
• A malfunction may have occurred with this product.
Check how many times the LED flashes, and consult
Sony service center.
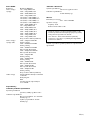
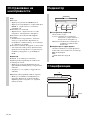
Indicator
1 : (power) indicator
Lights as follows:
Green: The TV Stand is power on. (“Audio System”
is set for “Speakers.”)
Off: The TV Stand is standby or power off.
2 Audio format indicators
Light up according to the audio format that is being
input to the TV Stand.
D: Dolby Digital
DTS
PLII: Dolby Pro Logic II
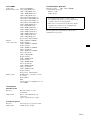
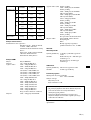
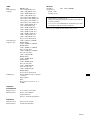
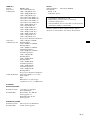
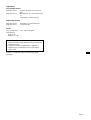
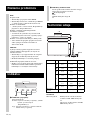
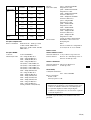
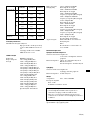
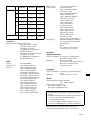
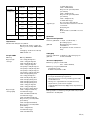
Specifications
SU-B551S SU-B461S SU-B401S
Dimensions:
cm
A 10.2 11.8 11.0
B 19.0 15.9 15.1
C 127.6 107.9 94.4
D
55HX92x:
79.6
46HX92x:
68.6
–
55HX82x:
79.8
46HX82x:
68.7
–
55NX72x:
79.7
46NX72x:
68.7
40NX72x:
61.2
E 29.2 27.7 26.1
Stand Weight:
6.3 kg 5.6 kg 4.9 kg
6.4 cm
3.8 cm
33.6 cm

13 (GB)
HDMI section
Connector HDMI™ Connector
Video inputs/outputs 720 × 480p (60Hz) 16:9
1280 × 720p (60Hz) 16:9
1920 × 1080i (60Hz) 16:9
1280 × 720p (50Hz) 16:9
720 (1440) × 480i (60Hz) 4:3
720 (1440) × 480i (60Hz) 16:9
720 (1440) × 576i (50Hz) 4:3
720 (1440) × 576i (50Hz) 16:9
1920 × 1080p (60Hz) 16:9
720 × 576p (50Hz) 16:9
1920 × 1080i (50Hz) 16:9
1920 × 1080p (50Hz) 16:9
1920 × 1080p (24Hz) 16:9
1920 × 1080p (30Hz) 16:9
1280 × 720p (24Hz) 16:9
1280 × 720p (30Hz) 16:9
Deep Colour: 30bit/36bit
Video inputs/ 1280 × [email protected]/60 Hz
outputs (3D) Frame packing
1920 × 1080i@59.94/60 Hz
Frame packing
1920 × 1080i@59.94/60 Hz
Side-by-Side (Half)
1920 × 1080p@59.94/60 Hz
Side-by-Side (Half)
1280 × 720p@50 Hz
Frame packing
1920 × 1080i@50 Hz
Frame packing
1920 × 1080i@50 Hz
Side-by-Side (Half)
1920 × 1080p@50 Hz
Side-by-Side (Half)
1920 × 1080p@24 Hz
Frame packing
Deep Colour: 30bit/36bit
Audio inputs Linear PCM 2ch/5.1ch/7.1ch
Dolby Digital
DTS
Each signal is compliant with 32, 44.1,
48 kHz.
Speakers
Front speaker unit
Speaker system 2-way 2-driver, Bass reflex type
Speaker unit Woofer: 30 × 100 mm cone type ×1
Tweeter: 30 mm cone type
Subwoofer unit
Speaker system Subwoofer, Bass reflex type
Speaker unit 70 mm cone type
General
Power requirements 100 – 240 V, 50/60 Hz
Power consumption
On: 12 W
Standby: 0.7 W
Design and specifications are subject to change without
notice.
• Standby power consumption: 0.7 W
• Halogenated flame retardants are not used in the certain
printed wiring boards.
• Over 85% power efficiency of amplifier block is
achieved with the full digital amplifier, S-Master.

2 (FR)
Merci d’avoir fait l’acquisition de ce produit.
Les produits Sony sont conçus pour vous offrir le
maximum de sécurité. Si vous n’utilisez pas ce
produit correctement, un incendie ou une secousse
électrique risque de se produire ; il est en outre
possible que l’appareil bascule hors de son support
et tombe, ce qui risque d’entraîner des blessures
graves. Veillez à observer les consignes de sécurité
préconisées pour éviter de tels accidents.
Ce mode d’emploi indique comment manipuler le produit
correctement et contient des précautions essentielles à
prendre pour éviter tout accident. Lisez attentivement ce
mode d’emploi et veillez à utiliser le produit correctement.
Conservez ce mode d’emploi pour toute référence ultérieure.
Produits spécifiés
Ce support est conçu pour être utilisé avec les produits Sony
spécifiés ci-dessous. N’installez aucun produit autre que ceux
spécifiés.
Les produits suivants sont sujets à modification sans préavis,
peuvent être épuisés ou leur fabrication peut être
interrompue.
Certains modèles peuvent aussi être disponibles uniquement
dans certaines régions.
* Dans les noms de modèle réels, « x » indique des chiffres et/ou
des caractères propres à chaque modèle.
Emplacement de l’étiquette d’identification
L’étiquette du numéro de modèle se trouve à l’arrière du
support TV.
Mise au rebut du support TV
Traitement des appareils électriques et
électroniques en fin de vie (Applicable
dans les pays de l’Union Européenne et
aux autres pays européens disposant de
systèmes de collecte sélective)
Ce symbole, apposé sur le produit ou sur son emballage,
indique que ce produit ne doit pas être traité avec les déchets
ménagers. Il doit être remis à un point de collecte approprié
pour le recyclage des équipements électriques et
électroniques. En s’assurant que ce produit est bien mis au
rebut de manière appropriée, vous aiderez à prévenir les
conséquences négatives potentielles pour l’environnement et
la santé humaine. Le recyclage des matériaux aidera à
préserver les ressources naturelles. Pour toute information
supplémentaire au sujet du recyclage de ce produit, vous
pouvez contacter votre municipalité, votre déchetterie ou le
magasin où vous avez acheté le produit.
Veillez à prendre toutes les mesures
nécessaires afin d’éviter que le
support TV ne bascule.
Dans le cas contraire, le téléviseur risque de basculer, ce qui
pourrait provoquer des blessures.
Fixez solidement le support TV et le support mural, entre
autres, afin d’éviter qu’ils ne basculent.
Veillez à installer le support TV sur
une surface stable.
Si vous installez le support TV sur une
surface instable, il risque de perdre son
équilibre, de basculer et de tomber. Vous
risquez par conséquent d’endommager le
téléviseur ou de vous blesser.
Ne vous appuyez pas sur le
téléviseur et ne vous suspendez pas
au support TV.
Le support TV risque de basculer ou le
téléviseur risque de tomber, ce qui peut
provoquer des blessures graves, voire la
mort.
À propos de la sécurité
Le fabricant de ce produit est Sony Corporation, 1-7-1
Konan Minato-ku Tokyo, 108-0075 Japon. Le représentant
autorisé pour les questions de compatibilité
électromagnétique (EMC) et la sécurité des produits est
Sony Deutschland GmbH, Hedelfinger Strasse 61, 70327
Stuttgart, Allemagne. Pour toute question relative au SAV
ou à la garantie, merci de bien vouloir vous référer aux
coordonnées contenues dans les documents relatifs au SAV
ou la garantie.
ATTENTION
Téléviseur couleur LCD
SU-B551S KDL-55HX92x/55HX82x/55NX72x
SU-B461S KDL-46HX92x/46HX82x/46NX72x
SU-B401S KDL-40NX72x
AVERTISSEMENT
Le non-respect des consignes suivantes peut
être fatal ou entraîner des blessures graves en
provoquant un incendie ou l’électrocution, ou
encore la chute de l’appareil hors de son
support.

3 (FR)
Ne couvrez pas les orifices de
ventilation du téléviseur.
Les orifices de ventilation du téléviseur sont
indispensables pour assurer son
fonctionnement fiable et le protéger contre
toute surchauffe.
• N’obstruez pas ou ne couvrez pas les
orifices de ventilation avec du tissu ou
tout autre matériau.
• Évitez toute pénétration de liquide ou d’objet solide dans
les orifices de ventilation.
Ne placez pas d’objet contenant du
liquide tel qu’un vase ou une plante
en pot sur le téléviseur.
N’utilisez pas de téléviseur alimenté
sur secteur à proximité de l’eau,
notamment près d’une baignoire, un
bac de lavage, un évier de cuisine,
une cuve de lessivage, un sous-sol
humide, une piscine, etc.
N’installez pas le téléviseur dans des
endroits exposés à des
températures extrêmes, notamment
à la lumière directe du soleil, à
proximité d’un radiateur ou d’une
bouche de chaleur.
Toute surchauffe dans de telles conditions pourrait engendrer
une déformation du boîtier et/ou un dysfonctionnement du
téléviseur.
N’installez pas le téléviseur dans un
endroit exposé directement à un
climatiseur.
De l’humidité pourrait se condenser à l’intérieur du téléviseur
et engendrer un dysfonctionnement.
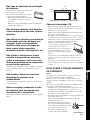
Maintenez un espace adéquat autour
du téléviseur pour assurer une
bonne circulation d’air.
Laissez un espace suffisant autour du téléviseur, comme
illustré ci-dessous.
Cordon d’alimentation CA
• Raccordez le téléviseur à l’aide d’une fiche secteur à trois
fils avec terre à une prise secteur avec terre.
• Utilisez exclusivement les cordons d’alimentation CA
Sony, pas ceux d’autres marques.
• Veillez à ne pas coincer le cordon d’alimentation CA ou le
câble de raccordement lors de l’installation du téléviseur
sur le support TV. Si vous endommagez le cordon
d’alimentation CA ou le câble de raccordement, un
incendie ou une secousse électrique risque de se produire.
• Veillez à ne pas marcher sur le cordon
d’alimentation CA ou sur le câble de
raccordement lorsque vous déplacez le
support TV. Vous risquez
d’endommager le cordon
d’alimentation CA ou le câble de
raccordement, ce qui risque de
provoquer un incendie ou une secousse électrique.
• Si vous trébuchez sur le cordon d’alimentation CA ou le
câble de raccordement, vous risquez de faire basculer le
support TV et de vous blesser.
• Le débranchement du cordon d’alimentation CA de la
prise murale désactive complètement l’alimentation du
support TV.
REMARQUE SUR L’ADAPTATEUR
SECTEUR
Avertissement
Pour éviter les risques d’incendie ou d’électrocution,
n’exposez pas cet appareil à la pluie ou à l’humidité.
Pour prévenir tout risque d’incendie ou d’électrocution, ne
placez pas d’objets remplis de liquides, comme des vases, sur
l’appareil.
N’installez pas cet appareil dans un espace confiné comme
une bibliothèque ou une armoire similaire.
• Veillez à ce que la prise secteur se trouve à proximité de
l’appareil et que son accès soit aisé.
• Veillez à raccorder l’adaptateur secteur et le cordon
d’alimentation secteur fournis.
• N’utilisez aucun autre adaptateur secteur. Cela pourrait
entraîner un dysfonctionnement.
• Raccordez l’adaptateur secteur à une prise secteur
facilement accessible.
• N’enroulez pas le cordon
d’alimentation secteur autour de
l’adaptateur secteur. Vous risqueriez de
couper le fil central et/ou de provoquer
un dysfonctionnement du téléviseur.
Laissez au moins cet espace autour de l’appareil.
30 cm
10 cm
10 cm
6 cm
FR
Français
(Suite)

4 (FR)
• Ne touchez pas l’adaptateur secteur avec des mains
humides.
• Si vous constatez que l’adaptateur secteur ne fonctionne
pas normalement, débranchez-le immédiatement de la
prise secteur.
• Cet appareil n’est pas débranché du secteur aussi
longtemps qu’il reste raccordé à la prise secteur, même s’il
a été mis hors tension.
N’installez aucun appareil autre que
ceux spécifiés.
Ce support TV est conçu pour être utilisé avec le produit
spécifié uniquement. Si vous installez un appareil autre que
ceux spécifiés, celui-ci pourrait tomber ou se briser, et vous
risquez de vous blesser. Les illustrations de ce document
montrent le modèle KDL-40NX72x, sauf indication
contraire.
Veillez à bien fixer le téléviseur.
Fixez le téléviseur au support TV à l’aide des vis fournies. Si
le téléviseur n’est pas correctement fixé, il risque de tomber
ou le support TV peut basculer, et vous risquez de vous
blesser.
Remarques à propos de l’installation
Le support ne doit jamais être installé selon un angle ou
incliné. Pour éviter cela, respectez les consignes de sécurité
suivantes.
– Si vous installez le support TV sur une surface molle,
notamment sur de la moquette ou sur un tapis, posez au
préalable une planche à l’emplacement correspondant.
– N’installez pas le support TV dans un endroit exposé à
la lumière directe ou à proximité d’une source de
chaleur.
– N’installez pas le support TV dans un endroit exposé à
la chaleur ou à l’humidité, ni à l’extérieur.
Remarque concernant l’utilisation
Nettoyage
Pour maintenir le support TV propre, nettoyez-le de temps en
temps avec un chiffon doux et sec. Pour éliminer les taches
tenaces, utilisez un chiffon légèrement imprégné de savon au
pH neutre. Essuyez ensuite la surface nettoyée avec un
chiffon doux et sec. N’utilisez pas de produits chimiques,
notamment du diluant ou de l’essence, car ils risquent
d’endommager la surface du support TV.
Veillez à ce que le travail
d’installation soit effectué par au
moins deux personnes.
L’installation du téléviseur sur le support TV doit être
effectuée par au moins deux personnes. Si une seule personne
se charge de l’installation, un accident ou des blessures
peuvent être occasionnés.
Ne modifiez pas le support TV.
Il risque de tomber et de vous blesser.
Veillez à monter le support TV
correctement en suivant les
instructions.
Serrez correctement les vis. Si le téléviseur n’est pas
correctement fixé, il risque de tomber et vous risquez de vous
blesser.
Prenez garde de ne pas vous blesser
les mains ou les doigts pendant le
montage.
• Ne déplacez pas le support TV en le saisissant par le pied.
• Veillez à ne pas vous blesser les mains ou les doigts lors de
l’installation du téléviseur.
À propos des sources d’alimentation
• Si vous envisagez de ne pas utiliser le support TV pendant
une période prolongée, veillez à le débrancher de la prise
murale. Pour débrancher le cordon d’alimentation CA,
saisissez la fiche proprement dite, mais ne tirez jamais sur
le cordon.
• Le remplacement du cordon d’alimentation CA doit être
effectué exclusivement dans un atelier de service qualifié.
À propos de l’utilisation
Avant de raccorder d’autres appareils, veillez à mettre le
support TV hors tension et à débrancher le cordon
d’alimentation CA.
ATTENTION
Le non-respect des consignes suivantes peut
entraîner des blessures ou des dommages
matériels.
PRÉCAUTIONS

5 (FR)
Copyrights
Ce support TV intègre les systèmes Dolby
*
Digital et Pro
Logic Surround, ainsi que DTS
**
Digital Surround System.
* Fabriqué sous licence de Dolby Laboratories.
Dolby, Pro Logic et le symbole double-D sont des marques de
Dolby Laboratories.
** Fabriqué sous licence des brevets américains suivants :
5 451 942 ; 5 956 674 ; 5 974 380 ; 5 978 762 ; 6 487 535, ainsi
que d’autres brevets délivrés ou en instance aux États-Unis et
dans le monde. DTS et son symbole sont des marques déposées
et DTS Digital Surround ainsi que les logos DTS sont des
marques commerciales de DTS, Inc. Ce produit comprend un
logiciel. © DTS, Inc. Tous droits réservés.
Ce support TV intègre la technologie High-Definition
Multimedia Interface (HDMI™).
HDMI, le logo HDMI et High-Definition Multimedia
Interface sont des marques commerciales ou des marques
déposées de HDMI Licensing LLC aux États-Unis et dans
d’autres pays.
« BRAVIA » est une marque de Sony Corporation.

6 (FR)
* Pour le modèle SU-B551S seulement.
** Pour les modèles SU-B551S/461S seulement.
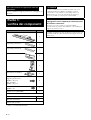
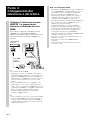
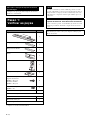
Tenez fermement le support TV et manipulez-le avec soin.
Étape 1 :
Vérification des pièces
Nom Quantité
Support
1
Panneau arrière G
*
1
Panneau arrière D
*
1
Joint
1
Montant
1
Entretoise du montant**
1
Vis de fixation du montant du
support TV
(PSW5 × 16) (× 3)
Vis du joint
(PSW5 × 16) (× 3)
6
Vis du montant
(PSW4 × 12)
4
Adaptateur CA (ACDP-001) 1
Cordon d’alimentation CA
Câble High Speed HDMI 1
Mode d’emploi 1
Fiche de garantie
Remarque concernant le retrait du support TV
de son emballage
Si vous coincez le cordon d’alimentation CA sous ou entre des
pièces de l’équipement, un court-circuit ou une secousse électrique
risque de se produire. Si vous trébuchez sur le cordon
d’alimentation CA ou le câble de raccordement, vous risquez de
faire basculer le support TV et de vous blesser.
Choisissez l’emplacement d’installation et posez
le support TV sur le sol avant d’installer le
téléviseur.
Étant donné que le téléviseur est lourd, il est recommandé de
choisir tout d’abord l’emplacement d’installation, puis de monter
le support TV à l’emplacement choisi.
Reportez-vous au mode d’emploi fourni avec votre téléviseur pour
toute information sur la manière de détacher le support de table du
téléviseur.
AVERTISSEMENT

7 (FR)
Avant le montage
• Assurez-vous de disposer d’un tournevis Phillips correspondant
aux vis avant de procéder au montage.
• Si vous utilisez un tournevis
électrique, réglez son couple sur
1,5 N·m {15 kgf·cm} environ.
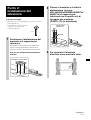
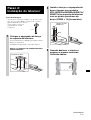
Étape 2 :
Installation du
téléviseur
1
Placez l’entretoise du montant
sur le support TV.
L’entretoise du montant permet de régler la hauteur du
montant et du téléviseur.
Veillez à fixer l’entretoise du montant.
Pour KDL-55HX82x/46HX82x/55NX72x/
46NX72x seulement :
12 cm ~
Entretoise du montant
2
Fixez le montant et son
entretoise (pour KDL-55HX82x/
46HX82x/55NX72x/46NX72x
seulement) au support TV à
l’aide des quatre vis du montant
(PSW4 × 12) (fournies).
3
Lorsque vous déplacez le
téléviseur, tenez-le de la manière
illustrée.
Montant
Vis du montant
(PSW4 × 12)
(Suite)

8 (FR)
4
Fixez le joint fourni à l’arrière du
téléviseur à l’aide des trois vis
(PSW5 × 16) (fournies).
Faites glisser le joint fourni vers le haut pour le fixer.
~
• Veillez à ne pas égarer les vis retirées.
• Lorsque vous retirez le support de table de l’écran, reposez
l’écran face vers le bas sur une surface de travail stable qui
est plus grande que l’écran.
• Pour éviter d’endommager la surface de l’écran LCD,
placez un chiffon doux sur la surface de travail.
• Si vous appliquez une pression ou un choc à la surface de
l’écran LCD, vous risquez de le briser ou de
l’endommager.
• Reposez l’écran face vers le bas sur une surface stable et de
niveau, en laissant pendre le support de table par-dessus sur
le bord de la surface.
Si la face de l’écran et la base du support de table reposent
sur une surface de même niveau, les conditions de travail
deviennent instables et vous risquez d’endommager
l’écran.
5
Installez le téléviseur sur le
support TV.
Le téléviseur est installé en le plaçant dans la rainure
du support TV.
Le sens de la flèche indique l’avant du support
TV.
Joint
Vis du joint
(PSW5 × 16)
ATTENTION
6
Fixez le téléviseur et le support
TV à l’aide des trois vis de
fixation du montant du support
TV (PSW5 × 16) (fournies).
7
Fixez le panneau arrière au
support TV. (Pour le modèle
SU-B551S seulement)
Vis de fixation
du montant du
support TV
(PSW5 × 16)
Panneau arrière
A página está carregando ...
A página está carregando ...
A página está carregando ...
A página está carregando ...
A página está carregando ...
A página está carregando ...
A página está carregando ...
A página está carregando ...
A página está carregando ...
A página está carregando ...
A página está carregando ...
A página está carregando ...
A página está carregando ...
A página está carregando ...
A página está carregando ...
A página está carregando ...
A página está carregando ...
A página está carregando ...
A página está carregando ...
A página está carregando ...
A página está carregando ...
A página está carregando ...
A página está carregando ...
A página está carregando ...
A página está carregando ...
A página está carregando ...
A página está carregando ...
A página está carregando ...
A página está carregando ...
A página está carregando ...
A página está carregando ...
A página está carregando ...
A página está carregando ...
A página está carregando ...
A página está carregando ...
A página está carregando ...
A página está carregando ...
A página está carregando ...
A página está carregando ...
A página está carregando ...
A página está carregando ...
A página está carregando ...
A página está carregando ...
A página está carregando ...
A página está carregando ...
A página está carregando ...
A página está carregando ...
A página está carregando ...
A página está carregando ...
A página está carregando ...
A página está carregando ...
A página está carregando ...
A página está carregando ...
A página está carregando ...
A página está carregando ...
A página está carregando ...
A página está carregando ...
A página está carregando ...
A página está carregando ...
A página está carregando ...
A página está carregando ...
A página está carregando ...
A página está carregando ...
A página está carregando ...
A página está carregando ...
A página está carregando ...
A página está carregando ...
A página está carregando ...
A página está carregando ...
A página está carregando ...
A página está carregando ...
A página está carregando ...
A página está carregando ...
A página está carregando ...
A página está carregando ...
A página está carregando ...
A página está carregando ...
A página está carregando ...
A página está carregando ...
A página está carregando ...
A página está carregando ...
A página está carregando ...
A página está carregando ...
A página está carregando ...
A página está carregando ...
A página está carregando ...
A página está carregando ...
A página está carregando ...
A página está carregando ...
A página está carregando ...
A página está carregando ...
A página está carregando ...
A página está carregando ...
A página está carregando ...
A página está carregando ...
A página está carregando ...
A página está carregando ...
A página está carregando ...
A página está carregando ...
A página está carregando ...
A página está carregando ...
A página está carregando ...
A página está carregando ...
A página está carregando ...
A página está carregando ...
A página está carregando ...
A página está carregando ...
A página está carregando ...
A página está carregando ...
A página está carregando ...
A página está carregando ...
A página está carregando ...
A página está carregando ...
A página está carregando ...
A página está carregando ...
A página está carregando ...
A página está carregando ...
A página está carregando ...
A página está carregando ...
A página está carregando ...
A página está carregando ...
A página está carregando ...
A página está carregando ...
A página está carregando ...
A página está carregando ...
A página está carregando ...
A página está carregando ...
A página está carregando ...
A página está carregando ...
A página está carregando ...
A página está carregando ...
A página está carregando ...
A página está carregando ...
A página está carregando ...
A página está carregando ...
A página está carregando ...
A página está carregando ...
A página está carregando ...
A página está carregando ...
A página está carregando ...
A página está carregando ...
A página está carregando ...
A página está carregando ...
A página está carregando ...
A página está carregando ...
A página está carregando ...
A página está carregando ...
A página está carregando ...
A página está carregando ...
A página está carregando ...
A página está carregando ...
A página está carregando ...
A página está carregando ...
A página está carregando ...
A página está carregando ...
A página está carregando ...
A página está carregando ...
A página está carregando ...
A página está carregando ...
A página está carregando ...
A página está carregando ...
A página está carregando ...
A página está carregando ...
A página está carregando ...
A página está carregando ...
A página está carregando ...
A página está carregando ...
A página está carregando ...
A página está carregando ...
A página está carregando ...
A página está carregando ...
A página está carregando ...
A página está carregando ...
A página está carregando ...
A página está carregando ...
A página está carregando ...
A página está carregando ...
A página está carregando ...
A página está carregando ...
A página está carregando ...
A página está carregando ...
A página está carregando ...
A página está carregando ...
A página está carregando ...
A página está carregando ...
A página está carregando ...
A página está carregando ...
A página está carregando ...
A página está carregando ...
A página está carregando ...
A página está carregando ...
A página está carregando ...
A página está carregando ...
A página está carregando ...
A página está carregando ...
A página está carregando ...
A página está carregando ...
A página está carregando ...
A página está carregando ...
A página está carregando ...
A página está carregando ...
A página está carregando ...
A página está carregando ...
A página está carregando ...
A página está carregando ...
A página está carregando ...
A página está carregando ...
A página está carregando ...
A página está carregando ...
A página está carregando ...
A página está carregando ...
A página está carregando ...
A página está carregando ...
A página está carregando ...
A página está carregando ...
A página está carregando ...
A página está carregando ...
A página está carregando ...
A página está carregando ...
A página está carregando ...
A página está carregando ...
A página está carregando ...
A página está carregando ...
A página está carregando ...
A página está carregando ...
A página está carregando ...
A página está carregando ...
A página está carregando ...
A página está carregando ...
A página está carregando ...
A página está carregando ...
A página está carregando ...
A página está carregando ...
A página está carregando ...
A página está carregando ...
-
 1
1
-
 2
2
-
 3
3
-
 4
4
-
 5
5
-
 6
6
-
 7
7
-
 8
8
-
 9
9
-
 10
10
-
 11
11
-
 12
12
-
 13
13
-
 14
14
-
 15
15
-
 16
16
-
 17
17
-
 18
18
-
 19
19
-
 20
20
-
 21
21
-
 22
22
-
 23
23
-
 24
24
-
 25
25
-
 26
26
-
 27
27
-
 28
28
-
 29
29
-
 30
30
-
 31
31
-
 32
32
-
 33
33
-
 34
34
-
 35
35
-
 36
36
-
 37
37
-
 38
38
-
 39
39
-
 40
40
-
 41
41
-
 42
42
-
 43
43
-
 44
44
-
 45
45
-
 46
46
-
 47
47
-
 48
48
-
 49
49
-
 50
50
-
 51
51
-
 52
52
-
 53
53
-
 54
54
-
 55
55
-
 56
56
-
 57
57
-
 58
58
-
 59
59
-
 60
60
-
 61
61
-
 62
62
-
 63
63
-
 64
64
-
 65
65
-
 66
66
-
 67
67
-
 68
68
-
 69
69
-
 70
70
-
 71
71
-
 72
72
-
 73
73
-
 74
74
-
 75
75
-
 76
76
-
 77
77
-
 78
78
-
 79
79
-
 80
80
-
 81
81
-
 82
82
-
 83
83
-
 84
84
-
 85
85
-
 86
86
-
 87
87
-
 88
88
-
 89
89
-
 90
90
-
 91
91
-
 92
92
-
 93
93
-
 94
94
-
 95
95
-
 96
96
-
 97
97
-
 98
98
-
 99
99
-
 100
100
-
 101
101
-
 102
102
-
 103
103
-
 104
104
-
 105
105
-
 106
106
-
 107
107
-
 108
108
-
 109
109
-
 110
110
-
 111
111
-
 112
112
-
 113
113
-
 114
114
-
 115
115
-
 116
116
-
 117
117
-
 118
118
-
 119
119
-
 120
120
-
 121
121
-
 122
122
-
 123
123
-
 124
124
-
 125
125
-
 126
126
-
 127
127
-
 128
128
-
 129
129
-
 130
130
-
 131
131
-
 132
132
-
 133
133
-
 134
134
-
 135
135
-
 136
136
-
 137
137
-
 138
138
-
 139
139
-
 140
140
-
 141
141
-
 142
142
-
 143
143
-
 144
144
-
 145
145
-
 146
146
-
 147
147
-
 148
148
-
 149
149
-
 150
150
-
 151
151
-
 152
152
-
 153
153
-
 154
154
-
 155
155
-
 156
156
-
 157
157
-
 158
158
-
 159
159
-
 160
160
-
 161
161
-
 162
162
-
 163
163
-
 164
164
-
 165
165
-
 166
166
-
 167
167
-
 168
168
-
 169
169
-
 170
170
-
 171
171
-
 172
172
-
 173
173
-
 174
174
-
 175
175
-
 176
176
-
 177
177
-
 178
178
-
 179
179
-
 180
180
-
 181
181
-
 182
182
-
 183
183
-
 184
184
-
 185
185
-
 186
186
-
 187
187
-
 188
188
-
 189
189
-
 190
190
-
 191
191
-
 192
192
-
 193
193
-
 194
194
-
 195
195
-
 196
196
-
 197
197
-
 198
198
-
 199
199
-
 200
200
-
 201
201
-
 202
202
-
 203
203
-
 204
204
-
 205
205
-
 206
206
-
 207
207
-
 208
208
-
 209
209
-
 210
210
-
 211
211
-
 212
212
-
 213
213
-
 214
214
-
 215
215
-
 216
216
-
 217
217
-
 218
218
-
 219
219
-
 220
220
-
 221
221
-
 222
222
-
 223
223
-
 224
224
-
 225
225
-
 226
226
-
 227
227
-
 228
228
-
 229
229
-
 230
230
-
 231
231
-
 232
232
-
 233
233
-
 234
234
-
 235
235
-
 236
236
-
 237
237
-
 238
238
-
 239
239
-
 240
240
-
 241
241
-
 242
242
-
 243
243
-
 244
244
-
 245
245
-
 246
246
-
 247
247
-
 248
248
-
 249
249
-
 250
250
-
 251
251
-
 252
252
-
 253
253
-
 254
254
-
 255
255


Artigos relacionados
-
Sony SU-B551S Manual do usuário
-
-
-
Sony BRAVIA KDL-46HX923 Manual do proprietário
-
Sony KDL-55NX725 Manual do proprietário
-
Sony SS-TBL700 Manual do proprietário
-
Sony SU-FL62 Manual do usuário
-
-
-
Sony KDL-48W585B Guia de usuario