Chef’sChoice 0120000 Manual do usuário
- Categoria
- Amoladores de faca
- Tipo
- Manual do usuário

© 2018 EdgeCraft Corp.
ELECTRIC KNIFE SHARPENER
120 Electric
READ THESE INSTRUCTIONS BEFORE USE.
IT IS ESSENTIAL THAT YOU FOLLOW THESE
INSTRUCTIONS TO ACHIEVE OPTIMUM RESULTS.

IMPORTANT SAFEGUARDS
When using electrical appliances, basic safety precautions should
always be followed including the following:
1. Read all instructions.
2. To protect against electrical hazards, do not immerse the
Chef’sChoice® in water or other liquid.
3. Make sure only clean knife blades are inserted in the
Chef’sChoice®.
4. Unplug from outlet when not in use, before putting on or taking
o parts and before cleaning.
5. Avoid contacting moving parts.
6. Do not operate any appliance with a damaged cord or plug or
after the appliance malfunctions, or is dropped or damaged in
any manner.
U.S. customers: You may return your sharpener to EdgeCraft’s
factory for service where the cost of repair or electrical or
mechanical adjustment can be estimated. When the electrical
cord on this appliance is damaged, it must be replaced by the
Chef’sChoice distributor or other qualified service to avoid the
danger of electrical shock.
Outside U.S.: Please return your sharpener to your local distributor
where the cost of repair or electrical or mechanical adjustment
can be estimated. If the supply cord of this appliance is
damaged, it must be replaced by a repair facility appointed by
the manufacturer because special tools are required. Please
consult your Chef’sChoice distributor.
7. CAUTION! This appliance may be fitted with a polarized plug
(one blade is wider than the other). To reduce the risk of electric
shock, this plug will fit in a polarized outlet only one way. If the
plug does not fit fully in the outlet, reverse the plug. If it still does
not fit, contact a qualified electrician. Do not modify the plug in
any way.
8. The use of attachments not recommended or sold by EdgeCraft
Corporation may cause fire, electric shock or injury.
English — 2

9. The Chef’sChoice® Model 120 is designed to sharpen kitchen
knives, pocket knives and most sports knives. Do not attempt to
sharpen scissors, ax blades or any blade that does not fit freely
in the slots.
10. Do not let the cord hang over edge of table or counter or touch
hot surfaces.
11. When in the “ON” position (Red flash on switch is exposed when
“on”) the Chef’sChoice® should always be on a stable countertop
or table.
12. WARNING: KNIVES PROPERLY SHARPENED ON YOUR
CHEF’SCHOICE® WILL BE SHARPER THAN YOU EXPECT. TO
AVOID INJURY, USE AND HANDLE THEM WITH EXTREME
CARE. DO NOT CUT TOWARD ANY PART OF YOUR FINGERS,
HAND OR BODY. DO NOT RUN FINGER ALONG EDGE. STORE
IN A SAFE MANNER.
13. Do not use outdoors.
14. Close supervision is necessary when any appliance is used by or
near children.
15. Do not use honing oils, water or any other lubricant with the
Chef’sChoice®.
16. For household use only.
SAVE THESE INSTRUCTIONS.
English — 3

English — 4
UNDERSTANDING THE VERSATILE
MODEL 120 EDGESELECT
®
SHARPENER
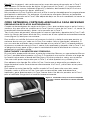
The unique Chef’sChoice® EdgeSelect® Diamond Hone® Sharpener is designed so that
you may sharpen each knife according to your intended use, such as gourmet food
preparation, butchering, dressing of game or filleting of fish. You can sharpen knives with
either straight or serrated edges. This three (3) stage sharpener has two precision conical
sharpening/honing stages with fine 100% diamond abrasives and one polishing/
stropping stage using proprietary flexible abrasive disks. These stages can be used in
dierent sequences to give you either an astonishingly sharp, smooth faceted edge for
eortless cutting and presentations or one with a selected amount of residual “bite” along
the facets. The edge is ultra sharp and non-serrated. This residual “bite” is created by
precisely polished micro flutes that are formed on the facet surface by the ultra honing
action of the stropping disks in Stage 3. You will find that these sharp flutes on each side
of the ultra sharp and non-serrated cutting edge aid substantially in those dicult cutting
chores experienced with fibrous foods, meats, stalky vegetables, dressing of game or
household chores such as cutting cardboard, leather, carpet, etc.
The sharpening and honing/polishing actions are controlled by using precision angle
guides for the blade and precisely matched conically shaped abrasive disks. The
sharpening angles are several degrees larger in each successive stage.
Fine diamond-coated conical disks in Stage 1 create microgrooves along the facets on
each side of the edge, establishing the first angled bevel of the Trizor
®
edge.
In Stage 2, finer microgrooves are created across the facets immediately adjacent to the
edge by still finer diamonds as they establish a well defined second bevel on the facets
that is a few degrees larger than the bevel developed in Stage 1.
In Stage 3, ultra fine abrasive disks are set at a third and slightly larger angle. They polish
and strop the facets immediately adjacent to the edge creating a third micro bevel and
establish a microscopically thin, straight and super polished edge of astonishing
sharpness. The stropping action simultaneously polishes and sharpens the boundaries of
those microgrooves created by the diamond abrasives in Stages 1 and 2 adjacent to the
edge until they become sharp micro flutes that will assist the cutting action of “dicult to
cut” materials.
This unique three stage design gives you an edge of remarkable sharpness and,
because of the triple angle bevel it creates on each facet, you will note knives stay sharp
much longer.
The following sections describe the general procedures for optimal sharpening in each
stage and then suggest how you can optimize the edge for your intended uses.
Unless you do a lot of heavy duty cutting, you will need to use Stage 1 only infrequently.
One of the important advantages of using the EdgeSelect Model 120 is that you can strop
and polish your knives to razor sharp edges as often as needed and yet experience little
knife wear compared to older sharpening methods. Resharpening can usually be done in
Stage 3. Use Stage 2 less often for resharpening and use Stage 1 only for the heaviest duty
applications. (See Resharpening Section).

English — 5
The Chef’sChoice
®
Model 120 EdgeSelect Sharpener is equipped with a manually activated
diamond dressing pad that can be used if necessary to clean any accumulated food or
sharp-ening debris o the surface of the polishing/stropping disks. We strongly urge you
to clean your knives before sharpening them. You will find you can go months or even a
year or more before you need to dress these disks. Only if you sense a distinct decrease in
polishing eciency will there by any need to use this convenient feature described further
in a subsequent section.
Each sharpening stage is equipped with elastomeric guide springs positioned over the
sharpening disks to provide a spring action that holds the face of your knife securely
against precision guide planes in the right and left slots of that stage during sharpening.
Unless you have special blades designed to be sharpened primarily on one side of the
edge (such as Japanese Kataba blades) you will want to sharpen equally in the right and
left slots of each stage you use. This will ensure that the facets on each side of the edge
are of equal size and that the edge will cut straight at all times.
When sharpening in any stage the knife should, on sequential strokes, be pulled
alternately through the left slot and the right slot of that stage. Generally only one pull
in the left and one in the right slot will be adequate in each stage; occasionally you may
need to make two pairs of pulls in a given stage (see subsequent sections for more detail).
Always operate the sharpener from the front side. Hold the blade horizontal and level,
slide it down between the plastic spring and the guide plane and pull it toward you at a
uniform rate as it contacts the sharpening or stropping disks. You will be able to feel and
hear the contact as it is made. Always keep the blade moving uniformly through each
stage; do not stop your pull in mid stroke. Consistent pull speed of about 4 seconds per
stroke for an eight (8) inch blade is recommended. The time can be less for shorter blades
and more for longer blades.
Never operate the sharpener from the back side.
Use just enough downward pressure when sharpening to ensure uniform and consistent
contact of the blade with the abrasive disks on each stroke. Additional pressure is
unnecessary and will not speed the sharpening process. Avoid cutting into the plastic
enclosure. Accidental cutting into the enclosure will not functionally impact operations
of the sharpener or damage the edge.
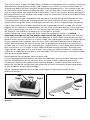
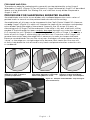
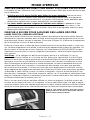
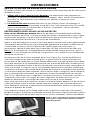
Figure 1 (below) identifies each of the three stages as described further in the
following sections.
Figure 1. Model 120 Diamond Hone EdgeSelect
Sharpener.
Figure 2. Typical kitchen knife.
Heel
Bolster
Handle
Edge
Tip
On/Off Switch
Stage 1
Stage 2
Stage 3
Spring

English — 6
INSTRUCTIONS
READ THIS BEFORE YOU START TO SHARPEN
The Chef’sChoice
®
Model 120 is designed to sharpen either Straight edge or Serrated
edge blades.
1. Sharpen Serrated Edge Blades only in Stage 3. Do not sharpen serrated blades in
Stages 1 and 2, as that will unnecessarily remove more metal from the serrations.
See Section titled Procedure for Sharpening Serrated Blades for more details.
2. Straight Edge Blades can be sharpened in all three stages, however, use of Stage 1 may
be necessary only if the knife is very dull or if you wish to create an edge with extra
“bite”. See following Section for more details.
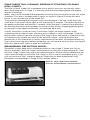
PROCEDURE FOR SHARPENING STRAIGHT EDGE BLADES
STRAIGHT EDGE BLADES: SHARPENING FIRST TIME
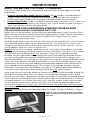
Before you turn on the power, remove the cover positioned over Stage 1 and slip a knife
blade smoothly into the slot between the left angle guide of Stage 1 and the elastomeric
spring. Do not twist the knife. (See Figure 3.) (Retain the Stage 1 cover as a ready
reminder of the sharpening steps.)
Move the blade down in the slot until you feel it contact the diamond disk. Pull it towards
you, lifting the handle slightly as you approach the tip. This will give you a feel for the
spring tension. Remove the knife and press the Power Switch. A red “indicator” on the
switch appears when this switch is turned “ON.”
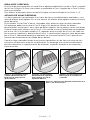
Stage 1: (If your knife is already reasonably sharp, skip Stage 1 and go directly to Stage
2.) If you are sharpening a knife for the first time or if the knife is very dull, start in Stage 1.
Pull the knife once through the left slot of Stage 1 (Figure 3) by slipping the blade
between the left angle guide and the polymeric spring while pulling the blade toward
you and simultaneously moving the blade downward in the slot until it engages the
diamond coated disk. You will hear it make contact with the disk. Insert the blade as close
as possible to its bolster or handle. If the blade is curved, lift the handle slightly as you
sharpen near the tip of the knife, keeping the blade edge approximately parallel to the
table. Sharpen the entire blade length. For an eight (8) inch blade, each pull should
take about 4 seconds. Pull shorter blades through in 2-3 seconds and longer blades in
6 seconds. Next, repeat with one full length pull in the right slot of Stage 1.
Note: Each time you insert the blade you should simultaneously pull the blade toward you.
Never push the blade away from you. Apply just enough downward pressure to make
contact with the wheel - added pressure does not modify or speed the sharpening process.
To ensure even sharpening along the entire blade length, insert the blade near its bolster
or handle and pull it at a steady rate until it exits the slot. In each stage, make an equal
number of pulls alternating in the left and right slots in order to keep the edge facets
symmetrical. Generally in Stage 1 you will find that only one pull in each (left and right)
slot is adequate. Then proceed to Stage 2.
Stage 2: Using the above procedure described for Stage 1, sharpen the blade in Stage 2.
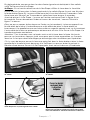
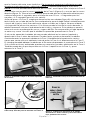
Figure 3. Stage 1. Inserting blade in slot between
guide and elastomeric spring. Alternate left and
right slots.

English — 7
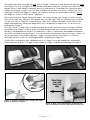
Pull the blade once through the left slot of Stage 2 (Figure 4) and once through the right
slot (Figure 5). For an eight (8) inch blade, take about four (4) seconds for each pull. For
longer knives, take about 6 seconds per pull and about 2-3 seconds for shorter blades.
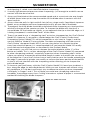
Before moving to Stage 3, you will find it helpful to confirm that a burr (Figure 6) exists
along one side of the edge. To check for the burr, move your forefinger carefully across
the edge as shown in the Figure 7 (below).
(Do not move your finger along the edge - to avoid cutting your finger). If the last pull
was in the right slot, the burr will appear only on the right side of the blade (as you hold
it) and vice versa. The burr, when present, feels like a rough and bent extension of the
edge; the opposite side of the edge feels very smooth by comparison. If a burr exists,
proceed to Stage 3.
If no burr exists, make one (1) additional pull in the left and right slots of Stage 2 before
proceeding to Stage 3. Slower pulls will help develop the burr. Confirm the presence of
the burr and proceed to Stage 3. (Incidentally, a burr is commonly developed whenever
the knife is pulled through Stage 1. It is not essential to develop a burr in Stage 1 unless, as
discussed later, you intend to bypass Stage 2 and go directly to Stage 3. It is always
desirable to have a burr on the edge before stropping in Stage 3.)
If the knife is extremely dull, additional pulls in Stage 2 may be needed or, alternately,
make one pair of pulls in Stage 1, then repeat in Stage 2 before proceeding to Stage 3.
Figure 4. Inserting blade in left slot of Stage 2. Figure 5. Inserting blade in right slot of Stage 2.
Burr
Figure 6. Develop a distinct burr along knife edge
before stropping in Stage 3.
Figure 7. Burr can be detected by sliding fingers
across and away from the edge. Caution! See text.
Move fingers
across and
away from
edge

English — 8
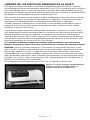
Stage 3: In general only one (1) or two (2) pairs of pulls in Stage 3 will be necessary to
obtain a razor sharp edge. As in Stages 1 and 2, make alternate pulls in left (Figure 8) and
right slots, pulling the knife through the slots at the same speed used in Stages 1 and 2.
More pulls in Stage 3 will refine the edge further, creating an edge particularly desirable
for gourmet preparations. Fewer pulls in Stage 3 may be preferable if you will be cutting
fibrous foods as discussed in more detail in the following sections.
OPTIMIZING THE KNIFE EDGE FOR EACH USE
GOURMET FOOD PREPARATION:
Where the finest and smoothest cuts are preferred in order to prepare smooth unmarked
sections of fruits or vegetables, sharpen in Stage 2 (or 1 & 2 as described above) and
make extra pulls through Stage 3. Three (3) or more pairs of pulls with each pull
alternating in the left and right slots of Stage 3 will refine the third facet and create
remarkably smooth and sharp edges, (Figure 9) ideal for the gourmet chef.
When resharpening the Gourmet edge, use Stage 3 each time (alternating left and right
slots). If, after a number of resharpenings, it is taking too long to resharpen, you can speed
the process by resharpening first in Stage 2, following the procedures detailed, and then
resharpen in Stage 3. By this means, you will retain very smooth edges and prolong
the life of your knives. This procedure, unlike conventional sharpening, will give you
extraordinarily sharp knives every day while removing very little metal.
FOR MEATS, FIELD DRESSING AND HIGHLY FIBROUS MATERIAL:
For butchering, field dressing or cutting fibrous materials, you may find it advantageous
to sharpen in Stage 1 - followed directly by Stage 3. This will leave sharpened micro flutes
along the facets near each side of the edge (Figure 10) that will assist in the cutting
of such materials. The edge will be very sharp and unserrated after only one or two
alternating pairs of pulls in Stage 3.
To prepare this type of edge, sharpen in Stage 1 until a burr is developed along the edge.
Then move directly to Stage 3 and make one or two pairs of pulls there.
To preserve this type of edge, when the knife needs resharpening, use Stage 3 for only
one or two resharpenings. Then go back to Stage 1 for one (1) pull in each of the left and
right slots and return directly to Stage 3. Do not over sharpen in Stage 1.
Figure 8. Inserting blade only in left slot of Stage 3.
Alternate left and right slots.

English — 9
FOR GAME AND FISH:
The optimum edge for cooked poultry generally can be obtained by using Stage 2
followed by Stage 3. (Figure 11) For raw poultry, Stage 1 followed by Stage 3, as described
above, may be preferable. For filleting fish, use a thin but sturdy blade sharpened in
Stages 2 and 3.
PROCEDURE FOR SHARPENING SERRATED BLADES:
Serrated blades are similar to saw blades with scalloped depressions and a series of
pointed teeth. In normal use the pointed teeth do most of the cutting.
Serrated blades of all types can be sharpened in the Chef’sChoice
®
Model 120. However,
use only Stage 3 (Figure 12), which will sharpen the teeth of the serrations and develop
micro blades along the edge of these teeth. Generally five (5) to ten (10) pairs of
alternating pulls in Stage 3 will be adequate. If the knife is very dull, more pulls will be
needed. If the knife edge has been severely damaged through use, make one fast pull
(2-3 seconds for an 8” blade) in each of the right and left slots of Stage 2, then make a
series of pulls in Stage 3, alternating right and left slots. Excessive use of Stage 2 will
remove more metal along the edge than is necessary in order to sharpen the teeth.
Because serrated blades are saw-like structures, the edges will never appear to be as
“sharp” as the edge on a straight edge knife. However, their tooth-like structure will,
at times, help break the skin on hard crusty foods and penetrate other materials such
as cardboard.
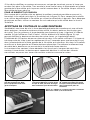
Figure 9. A larger polished facet
adjacent to edge is ideal for
gourmet preparations.
Figure 10. Retention of larger
microflutes adjacent to edge helps
when cutting fiberous foods.
Figure 11. For fish and poultry
retention of finer microflutes
adjacent to edge can be helpful.
Figure 12. Sharpen serrated blades only in Stage 3.
(See instructions).

English — 10
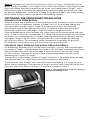
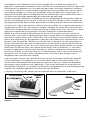
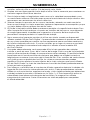
STAGE 3 DRESS TOOL: CLEANING/ DRESSING OF STROPPING/ POLISHING
DISKS—STAGE 3:
The Chef’sChoice
®
Model 120 is equipped with a built-in accessory to manually clean/
dress the honing disks in Stage 3. In the event these disks become glazed with grease,
food or sharpening
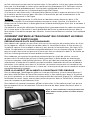
debris, they can be cleaned and reshaped by actuating the manual lever on the rear of the
sharpener. This lever is located within a recess as shown in Figure 13 on the left lower
corner as you face the rear of the Model 120.
To actuate the cleaning/dressing tool, make sure the power is on and simply press the
small lever in the recess to the right or left and hold for 3 seconds. Then press the lever in
the opposite direction and hold for 3 seconds. When the lever is moved in one direction,
the dressing tool cleans and reshapes the active surface of one stropping/polishing disk.
By moving it in the opposite direction, you clean the other disk.
Use this clean/dress accessory only if and when Stage 3 no longer appears to be
sharpening well or when it takes too many pulls to obtain a razor sharp edge. Using this
tool removes material from the surface of the Stage 3 disks and hence, if used excessively,
will unnecessarily remove too much of the abrasive surface - wearing the disks out
prematurely. If that should occur, factory replacement of the disks will become necessary.
If you clean knives regularly before sharpening, you will need to clean or dress the Stage 3
disks only about once a year or even less frequently
RESHARPENING: (SEE SECTIONS ABOVE.)
Resharpen straight edge knives whenever practical using Stage 3. When that fails to
quickly resharpen, return to Stage 2 and make one or two pairs of alternating pulls. Then
return to Stage 3 where only one to two alternating pairs of pulls will be adequate to put
a new razor-like edge on the knife. Use Stage 1 as a first step in resharpening only if you
wish to have more “bite” along the edge or if the knife has been dulled excessively.
Resharpen serrated blades in Stage 3 (See sections above.)
Figure 13. Stage 3 disks can be cleaned if
necessary. Use infrequently. (See instructions.)

English — 11
SUGGESTIONS
1. Always clean all food, fat and foreign materials from knife before sharpening or
resharpening. If soiled, wash the blade before sharpening.
2. Use only light downward pressure when sharpening - just enough to establish secure
contact with the abrasive disk.
3. Always pull the blade at the recommended speed and at a constant rate over length
of blade. Never interrupt or stop the motion of the blade when in contact with the
abrasive disks.
4. Always alternate pulls in right and left slots (of any stage used). Specialized Japanese
blades are an exception and are sharpened primarily on one side of the blade.
5. The edge of the knife blade should be maintained while sharpening at a level position
relative to the top of the counter or table. To sharpen the blade near the tip of a
curved blade, lift the handle up slightly as you approach the tip so that the edge, as it
is being sharpened, is maintained “level” to the table.
6. There is no need to use a “sharpening steel” on knives sharpened on the Chef’sChoice
®
Model 120. However, if you prefer a steeled edge, the Chef’sChoice
®
Professional
Sharpening Station
®
Model 130, which incorporates a mini steel in Stage 2, and the
manual SteelPro
®
Model 470 are available. Consider resharpening with the manual
Chef’sChoice
®
sharpener Model 450 if you are using knives at a remote location
away from electrical power. It is recommended that you keep the Model 120 readily
accessible and resharpen often, as described in the Sections above.
7. Used correctly, you will find you can sharpen the entire blade to within ⅛” of the
bolster or handle. This is a major advantage of the Chef’sChoice
®
Model 120 compared
to other sharpening methods - especially important when sharpening chef’s knives
where you need to sharpen the entire blade length in order to maintain the curvature
of the edge line. If your chef’s knives have a heavy bolster near the handle extending to
the edge, a commercial grinder can modify or remove the lower portion of the bolster
so that it will not interfere with the sharpening action allowing you to sharpen the
entire blade length.
8. To increase your proficiency with the Chef’sChoice
®
Model 120, learn how to detect a
burr along the edge (as described above). While you can sharpen well without using
this technique, it is the best and fastest way to determine when you have sharpened
suciently in Stages 1 and 2. This will help you avoid over sharpening and ensure
incredibly sharp edges every time. Cutting a tomato or a piece of paper is a convenient
method of checking for blade sharpness.
Figure 14. Clean-out cover.

English — 12
NORMAL MAINTENANCE
No lubrication is required for any moving parts, motor, bearings or sharpening surfaces.
There is no need for water on abrasives. The exterior of the sharpener may be cleaned by
carefully wiping with a damp cloth. Do not use detergents or abrasives.
Once a year or so, as needed, you can remove metal dust that will accumulate inside the
sharpener from repeated sharpenings. Remove the small rectangular clean-out cover
(Figure 14) that covers an opening on the underside of the sharpener. You will find metal
particles adhered to a magnet attached to the inside of that cover. Simply rub o or brush
o accumulated filings from the magnet with a paper towel or tooth brush and reinsert
the cover in the opening. If larger amounts of metal dust have been created or if the Stage
3 disk has been cleaned (using the cleaning/dressing means), you can shake out any
remaining dust through the bottom opening when the cover is removed. After cleaning,
replace the cover securely with its magnet in place.
SERVICE
In the event post-warranty service is needed, return your sharpener to the EdgeCraft
factory where the cost of repair can be estimated before the repair is undertaken. Outside
the USA, contact your retailer or national distributor.
Please include your return address, daytime telephone number and a brief description of
the problem or damage on a separate sheet inside the box. Retain a shipping receipt as
evidence of shipment and as your protection against loss in shipment.
Assembled in the U.S.A. chefschoice.com
This product may be covered by one or more EdgeCraft patents and/or patents pending as marked on the
product. Chef’sChoice®, EdgeCraft®, Diamond Hone®, EdgeSelect® and the overall design of this product are
registered trademarks of the EdgeCraft Corporation.
Conforms to UL Std. 982 Certified to CAN/CSA Std. C22.2 No. 64
Certified to EN 60335-1, EN 60335-2, EN 55014-1+A1, EN 61000-3-2, EN 61000-3-3
© EdgeCraft Corporation 2018 Printed in China.
K18 E/F/S C1283Z3
EdgeCraft Corporation
825 Southwood Road, Avondale, PA 19311 U.S.A.
Consumer Support 1-800-342-3255

120 Électrique
© 2018 EdgeCraft Corp.
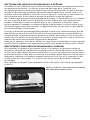
VEUILLEZ LIRE CES INSTRUCTIONS AVANT
TOUTE UTILISATION. IL EST ESSENTIEL QUE VOUS
RESPECTIEZ CES INSTRUCTIONS POUR OBTENIR DES
RÉSULTATS OPTIMAUX.
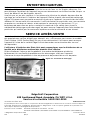
© 2018 EdgeCraft Corp.
AIGUISEUR DE COUTEAU

VOICI QUELQUES-UNES
DES PRÉCAUTIONS
Élémentaires que doit prendre l’utilisateur d’un appareil électrique :
1. Prendre connaissance de toutes les directives.
2. Pour éviter les chocs électriques, ne pas plonger le modèle 120
de l’aûteuse Chef’sChoice® dans l’eau ou tout autre liquide.
3. S’assurer que la lame du couteau est propre avant de la rentrer
dans le modèle 120 de l’aûteuse Chef’sChoice®.
4. Débrancher l’appareil lorsqu’il n’est pas en service, avant de le
nettoyer et avant de poser ou de retirer des pièces.
5. Eviter de toucher aux pièces mobiles.
6. Ne faites pas fonctionner un appareil dont le cordon ou la fiche
électrique sont endommagés ou après un dysfonctionnement de
l’appareil ou si l’appareil est tombé ou a été endommagé.
Clients aux E.U. : Vous pouvez renvoyer votre aiguiseur à la
fabrique EdgeCraft pour qu’il soit réparé. Un estimatif des coûts
des réparations ou des ajustements mécaniques ou électriques
sera fait. Lorsque le cordon électrique de cet appareil est
endommagé, il doit être remplacé par le distributeur
Chef’sChoice® ou tout service agréé afin d’éviter tout risque
d’électrocution.
En dehors des E.U. : Prière de renvoyer votre aiguiseur à votre
concessionnaire local qui estimera les coûts des réparations
ou des ajustements mécaniques ou électriques. Di le cordon
d’alimentation de cet appareil est endommagé il doit être
remplacé dans un atelier de reeparation désigné par le fabricant
car cette opération requiert des outils speeciaux. Veuillez
consulter votre distributeur Chef’sChoice®.
7. À l’intention des clients à l’extérieur des É.-U.: Tout cordon
d’alimentation abîmé doit être remplacé par un technicien
d’un atelier de réparation autorisé par le fabricant en raison de
l’outillage spécial que nécessite le travail. Communiquez avec le
distributeur Chef’sChoice® de la région.
Français — 2

8. L’usage d’accessoires qui ne sont pas homologués ou vendus
par la société EdgeCraft risque de provoquer des incendies, des
chocs électriques ou des blessures.
9. Le modèle 120 de l’aiguiseur Chef’sChoice® est conçu pour servir
avec des couteaux de cuisine, des canifs et la plupart des
couteaux de chasse. Ne pas essayer d’aûter des ciseaux, des
lames de hache ou d’autres lames qui ne rentrent pas aisément
dans les fentes de l’appareil.
10. Ne pas laisser pas le cordon d’alimentation pendre du bord de la
table ou du comptoir ou toucher à des surfaces chaudes.
11. Le modèle 120 de l’aûteuse Chef’sChoice® devrait toujours se
trouver sur un comptoir ou une table stable lorsque l’interrupteur
est placé sur «ON» (Marche).
12. MISE EN GARDE : LE FIL D’UN COUTEAU BIEN AFFÛTÉ EST
PLUS TRANCHANT QU’ON POURRAIT S’Y ATTENDRE. POUR
ÉVITER LES BLESSURES, FAIRE BIEN ATTENTION EN
MANIPULANT LE COUTEAU ET NE PAS DIRIGER LA LAME
VERS LES DOIGTS, LA MAIN OU LE CORPS. ÉVITER AUSSI DE
PASSER LE DOIGT LE LONG DU FIL. RANGER LE COUTEAU
D’UNE MANIÈRE SÛRE.
13. Ne pas utiliser l’appareil en plein air.
14. Faire très attention en utilisant un appareil électrique près
d’un enfant. Surveiller attentivement l’enfant qui utilise un
appareil électrique.
15. Eviter d’utiliser de l’huile pour rodage, de l’eau ou un lubrifiant
quelconque avec le modèle 120 de l’aûteuse Chef’sChoice®.
16. Le modèle 120 de l’aûteuse Chef’sChoice® est réservé aux
usages domestiques.
CONSERVEZ CES INSTRUCTIONS.
Français — 3

Français — 4
FONCTIONNEMENT DU MODÈLE 120
L’AFFUTEUSE POLYVALENTE EDGESELECT
®
L’exceptionnelle aûteuse à diamants Chef’sChoice
®
EdgeSelect
®
permet d’aler chaque
couteau en fonction de l’usage auquel il sert, que ce soit la préparation de mets
gastronomiques, le dépeçage, l’habillage ou le filetage. Elle sert à aûter les couteaux
à lame droite ou à lame dentelée. L’appareil est doté de trois (3) cellules (phases); deux
cellules d’aûtage de précision de forme conique, constituées de minuscules grains
d’abrasifs (diamants), et une cellule de polissage constituée de meules abrasives souples
brevetées. Les trois cellules peuvent être utilisées selon diverses séquences, selon que l’on
désire obtenir un tranchant à biseau incroyablement alé qui assure une coupe sans
eort ou un tranchant avec un mordant résiduel le long du biseau. Le tranchant est très
coupant et lisse. Le mordant résiduel est créé par les fins sillons minutieusement polis qui
se forment sur le biseau durant le polissage, à la troisième étape. Ces fins sillons créés de
chaque côté du tranchant alé et droit facilitent considérablement la coupe des aliments
à consistance fibreuse, des viandes ou des légumes, l’habillage, la découpe de carton, de
cuir, de tapis, etc.
Des cornières-guides de précision et des meules abrasives coniques réglées avec
précision guident la lame durant l’aûtage et le polissage. Les angles d’aûtage
augmentent de plusieurs degrés à mesure que l’opération se déroule.
Dans la 1ère cellule / phase, les meules coniques enrobées de minuscules grains de
diamant (étape 1) produisent de chaque côté du tranchant des mini-cannelures qui
forment le premier biseau du tranchant Trizor
®
.
Dans la 2e cellule / phase, des grains de diamant encore plus petits produisent sur les
faces voisines du tranchant des micro-cannelures (encore plus fines) qui forment le
deuxième biseau du tranchant. Ce biseau est plus ouvert que le premier.
Dans la 3e cellule / phase, les meules abrasives ultra-fines forment un biseau légèrement
plus ouvert que les précédents. Ces meules alent et polissent les biseaux
immédiatement à côté du tranchant et forment un troisième micro-biseau, qui rend le
tranchant très fin, très lisse et incroyablement elé. Dans cette cellule, les contours des
mini- et micro-cannelures produites par les meules abrasives de la 1ère et la 2e cellules
sont lissés et polis. Les fins sillons qui apparaissent alors faciliteront les coupes diciles.
Ce principe d’aûtage à trois étapes assure un tranchant d’une finesse remarquable en
raison du biseau triple formé de chaque côté du tranchant. Les couteaux conserveront
leur tranchant plus longtemps.
Voici les consignes générales à suivre pour optimiser les résultats à chaque étape et
donner au couteau le meilleur tranchant possible pour l’usage auquel il est destiné.
La première cellule de l’aûteuse ne sert que rarement, à moins que l’on ait beaucoup de
pièces diciles à couper. Grâce au modèle 120 de l’aûteuse EdgeSelect, il est possible
d’aiguiser et de polir un couteau autant de fois que l’on désire. Contrairement aux
autres méthodes d’aûtage, la lame ne s’usera que très peu. Le réaûtage se fait
habituellement à l’aide de la 3e cellule. La 2e cellule ne sert pas souvent. Quant à la 1ère
cellule, elle ne doit servir que pour les lames très abîmées (consulter le chapitre portant
sur le réaûtage).

Français — 5
Le modèle 120 de l’aûteuse Chef’sChoice
®
EdgeSelect
®
est doté d’un nettoyeur à
diamants à commande manuelle servant à éliminer les restes de nourriture et la poussière
d’aûtage qui se déposent sur les meules de polissage. Lorsqu’on nettoie les couteaux
avant de les aûter, les meules de polissage peuvent servir pendant des mois et même
une année complète, si ce n’est pas davantage, avant de nécessiter un dressage. Ce
dispositif commode, dont le fonctionnement est expliqué plus loin, ne doit servir que si
l’on note une diminution appréciable du rendement de polissage.
Chaque cellule de l’aûteuse est dotée de ressorts de guidage en élastomère situés sur
les meules d’aûtage et qui servent à maintenir la lame du couteau contre les plans de
guidage de précision dans la fente de gauche et la fente de droite durant les opérations.
À moins qu’il s’agisse de couteaux spéciaux qu’il faut aûter sur un côté seulement de la
lame (comme c’est le cas des couteaux japonais Kataba), les lames de couteau doivent
s’eler avec la fente droite et la fente gauche de chaque cellule. Ainsi, les biseaux seront
égaux de chaque côté et le tranchant assurera chaque fois une coupe droite.
Quelle que soit la cellule d’aûtage que l’on utilise, il faut toujours passer la lame du
couteau tour à tour dans la fente gauche et dans la fente droite. En règle générale, une
passe dans chaque fente sut. Parfois deux paires de passes dans certains cellules sont
nécessaires (consulter les paragraphes ci-dessous pour obtenir plus de précisions). Il faut
toujours faire fonctionner l’aûteuse en faisant face à l’appareil. Tout en maintenant la
lame à l’horizontale et de niveau, on doit rentrer la lame entre le ressort de plastique et
le plan de guidage et la tirer vers soi à vitesse constante pour qu’elle touche aux meules
d’aûtage. On devrait sentir son contact et percevoir le bruit qu’elle fait. La lame doit
toujours se déplacer à vitesse constante dans la cellule. Il ne faut pas interrompre une
passe à mi-chemin. Il faut mettre environ 4 secondes pour tirer à vitesse constante une
lame de 20 cm. On mettra moins longtemps pour une lame moins longue et plus
longtemps pour une lame plus longue.
Il ne faut jamais se servir de l’aûteuse en faisant face au panneau arrière de l’appareil.
Durant l’aûtage, il faut appuyer sur le couteau pour que la lame repose bien sur les
meules abrasives pendant toute la durée de la passe. Il n’est pas nécessaire d’appuyer
davantage; cela n’accélérera pas l’opération. Il faut éviter de couper les ouvertures en
plastique de l’aûteuse. Les entailles accidentelles ne gêneront pas le fonctionnement de
l’appareil et n’endommageront pas le tranchant des couteaux.
La figure I illustre les trois cellules qui sont décrites dans les chapitres ci-dessous.
Figure 1. Modèle 120 EdgeSelect
®
aiguiseur à
diamants.
Figure 2. Couteau de cuisine.
Talon
Mitre
Manche
Tranchant
Pointe
Interrupteur
Marche/Arrêt
1 ère cellule/phase
2e cellule/phase
3e cellule/
phase
ressort

Français — 6
MODE D’EMPLOI
LIRE LES PRÉSENTES DIRECTIVES AVANT D’UTILISER L’AFFÛTEUSE
Le modèle 120 de l’aûteuse Chef’sChoice
®
est conçu pour aler des lames droites ou des
lames dentelées.
1. N’utiliser que la 3e phase/cellule pour aler les lames dentelées. Ne pas se servir
de la 1ère et de la 2e cellule ; elles enlèvent inutilement trop de métal à la dentelure .
Consulter le chapitre intitulé Marche à suivre pour l’aûtage de lames dentelées pour
obtenir plus de précisions et pour connaître les cas d’exception.
2. Les lames droites peuvent s’aiguiser à l’aide des trois cellules. Cependant la 1ère
cellule est nécessaire seulement si la lame du couteau est très émoussée ou si l’on
désire donner plus de mordant au tranchant. Consulter le paragraphe cidessous pour
obtenir plus de précisions.
MARCHE À SUIVRE POUR AIGUISER DES LAMES DROITES
LAMES DROITES : PREMIER AFFÛTAGE
Avant de mettre l’aûteuse sous tension, enlever le protecteur de la 1ère cellule. Rentrer
doucement la lame du couteau dans la fente, entre le guide-cornière gauche et le ressort
en élastomère. Ne pas tourner le couteau. (Consulter la figure 3). (Conserver le protecteur
de la 1ère cellule; il servira d’aide-mémoire.)
Enfoncer la lame dans la fente de façon qu’elle touche à la meule diamantée. La tirer vers
soi. Soulever légèrement le manche à mesure qu’on approche de la point du couteau. On
devrait sentir la tension du ressort. Appuyer sur l’interrupteur MARCHE/ARRET lorsque
l’opération est terminée. Le voyant rouge de l’interrupteur s’allume lorsque l’appareil est
sous tension.
1ère Étape - (Si le couteau est déjà assez coupant, passer à la 2e Étape). Si c’est la
première fois qu’on l’aûte, ou si la lame est très émoussée, commencer à la 1ère Étape.
Rentrer la lame dans la fente gauche de la 1ère cellule (figure 3) entre le guide-cornière
gauche et le ressort en élastomère et tirer le couteau vers soi tout en enfonçant la lame
dans la fente pour qu’elle touche à la meule diamantée. On devrait entendre le bruit du
contact de la lame avec la meule. La lame devrait être rentrée aussi près que possible
de la mitre ou du manche. Si la lame est incurvée, lever légèrement le manche à mesure
qu’on approche de la pointe du couteau de manière que la lame reste à peu près parallèle
au bord de la table. Aûter la lame sur toute sa longueur. La passe d’une lame de 20 cm
dure environ 4 secondes. Celle d’une lame plus courte, 2 ou 3 secondes et celle d’une lame
longue, 6 secondes. Rentrer maintenant la lame dans la fente droite de la 1ère cellule et de
la même manière tirer le couteau vers soi.
Pour s’assurer que la lame a été bien aûtée sur toute sa longueur, la rentrer à partir de
la mitre ou du manche et tirer sur le couteau à vitesse constante jusqu’à ce que la pointe
sorte de la fente. Faire une nombre égal de passes dans chaque cellule en utilisant la fente
droite et la fente gauche en alternance pour que les faces de coupe restent symétriques.
Figure 3. I ève cellule: Insertion de la lame entre le
guide gauche et le ressort en élastomère. Alterner
dans les fentes gauche et droite.

Français — 7
En règle générale, une passe dans les deux fentes (gauche et droite) de la 1ère cellule
sut. Passer ensuite la 2e Étape.
2e Étape - En suivant les directives de la 1ère Étape, aûter la lame dans la 2e cellule.
Passer une fois la lame dans la fente gauche de la 2e cellule (figure 4), puis une fois dans
la fente droite (figure 5). La passe d’une lame de 20 cm dure environ 4 secondes. Celle
d’une lame plus courte 2 ou 3 secondes et celle d’une lame longue, 6 secondes.
Avant de passer à la 3e Étape , s’assurer qu’il existe une bavure (voir la figure 6) sur
le tranchant. Passer doucement l’index en travers du tranchant , comme l’illustre la
figure 7 ci-dessus.
(Pour ne pas se couper, éviter de passer l’index sur le tranchant). La bavure apparaît sur
le côté droit de la lame si la dernière passe a été eectuée dans la fente droite, et
inversement. On appelle bavure une mince crête ou rugosité apparaissant sur le tranchant.
L’autre côté de la lame ne présente pas de bavure et est très lisse. Passer la 3e Étape si le
tranchant présente une bavure.
Attention : Tirer le couteau vers soi après avoir re tré la lame dans la fente. Ne jamais
pousser sur le couteau. Appuyer juste assez pour que la lame repose bien sur la meule
abrasive. Il n’est pas nécessaire d’appuyer davantage; cela n’accélérera pas l’opération.
S’il n’y a pas de bavure, passer la lame une autre fois dans la fente droite et dans la fente
gauche de la 2e cellule avant de passer à la 3e Étape. Les passes lentes favorisent la
création d’une bavure. Passer à la 3e Étape après avoir trouvé la bavure. (D’habitude,
Figure 4. Lame rentrée dans la fente gauche de la
2e cellule.
Figure 5. Lame rentrée dans la fente droite de la
2e cellule.
Figure 6. Il faut créer une bavure sur le tranchant
avant de passer au polissage de la 3e cellule.
Figure 7. Il est possible de déceler la présence d’une
bavure en passant les doigts en travers de la lame.
Laire très attention. Suivre les directives ci-dessous.
Passer les doigts
seulement dans
la direction
indiquée

Français — 8
on fait une bavure en passant le couteau dans la 1ère cellule. Il n’est pas nécessaire d’en
faire une à la 1ère étape à moins qu’on veuille passer directement à la 3e Étape, comme
il a été mentionné précédemment. Il est toujours préférable d’avoir une bavure sur le
tranchant avant de passer à l’étape du polissage (3e Étape).
Si la lame est très émoussée, il sera peut-être nécessaire de la repasser plusieurs fois dans
la 2e cellule, ou de la passer deux fois dans la 1ère cellule, puis de recommencer la 2e
Étape avant de passer la 3e Étape.
3e Étape - En règle générale, il sut d’une ou de deux paires de passes dans la 3e
cellule pour obtenir un tranchant coupant comme un rasoir. Comme à la 1ère et la 2e
Étape, passer la lame dans la fente gauche et la fente droite (figure 8) et tirer le couteau à
la même vitesse.
On obtient le tranchant idéal pour les préparations gastronomiques en repassant plusieurs
fois la lame dans la 3e cellule. Il serait préférable de limiter le nombre de passes dans la
1ère cellule si l’on désire couper des aliments à consistance fibreuse, comme il est expliqué
plus loin.
COMMENT OBTENIR LE TRANCHANT QUI CONVIENT LE MIEUX
À UN USAGE PARTICULIER
PRÉPARATION DE PLATS GASTRONOMIQUES
Pour obtenir des coupes les plus fines et lisses ne laissant pas de marques dans les fruits
ou les légumes, aûter la lame du couteau dans la 2e cellule (ou dans la 1ère et dans la
2e cellule, comme il est expliqué ci-dessus), puis passer la lame plusieurs fois dans la 3e
cellule. On obtiendra un tranchant exceptionnellement lisse et coupant (figure 9), idéal
pour les chefs de cuisine, en passant la lame trois fois ou même plus dans la 3e cellule, en
utilisant la fente gauche et la fente droite en alternance.
Pour redonner au couteau le tranchant recherché par les chefs de cuisine, se servir
toujours de la 3e cellule (en utilisant la fente gauche et la fente droite en alternance).
Lorsqu’un couteau a été réaûté plusieurs fois et qu’il devient trop long de le réaûter
uniquement à l’aide de la 3e cellule, on peut accélérer l’opération en passant d’abord la
lame dans la 2e cellule, puis dans la 3e cellule. Le couteau conservera un tranchant très
lisse et sa durée de vie sera accrue. La lame ne s’usera que très peu et le tranchant restera
exceptionnellement coupant.
POUR LA VIANDE ET LES ALIMENTS À CONSISTANCE TRÈS FIBREUSE
Pour le dépeçage, l’habillage du gibier ou la coupe d’aliments à consistance fibreuse, il
peut être utile d’aûter les lames de couteau dans la 1ère cellule, puis dans la 3e cellule.
Les mini-cannelures sur les biseaux de chaque côté du tranchant (figure 10) s’eleront et
faciliteront le travail. Après une ou deux paires de passes dans la 3e cellule, le tranchant
sera très coupant et parfaitement lisse.
Pour obtenir ce type de tranchant, aûter la lame dans la 1ère cellule jusqu’à ce qu’une
bavure apparaisse sur le tranchant. Faire ensuite une ou deux paires de passes dans la
3e cellule.
Figure 8. Lame rentrée dans la fente gauche à la 3e
étape. Utiliser la fente gauche et la fente droite en
alternance.
A página está carregando...
A página está carregando...
A página está carregando...
A página está carregando...
A página está carregando...
A página está carregando...
A página está carregando...
A página está carregando...
A página está carregando...
A página está carregando...
A página está carregando...
A página está carregando...
A página está carregando...
A página está carregando...
A página está carregando...
A página está carregando...
-
 1
1
-
 2
2
-
 3
3
-
 4
4
-
 5
5
-
 6
6
-
 7
7
-
 8
8
-
 9
9
-
 10
10
-
 11
11
-
 12
12
-
 13
13
-
 14
14
-
 15
15
-
 16
16
-
 17
17
-
 18
18
-
 19
19
-
 20
20
-
 21
21
-
 22
22
-
 23
23
-
 24
24
-
 25
25
-
 26
26
-
 27
27
-
 28
28
-
 29
29
-
 30
30
-
 31
31
-
 32
32
-
 33
33
-
 34
34
-
 35
35
-
 36
36


Chef’sChoice 0120000 Manual do usuário
- Categoria
- Amoladores de faca
- Tipo
- Manual do usuário
em outras línguas
- español: Chef’sChoice 0120000 Manual de usuario
- français: Chef’sChoice 0120000 Manuel utilisateur
- English: Chef’sChoice 0120000 User manual
Artigos relacionados
Outros documentos
-
Hamilton Beach 86600 Guia de usuario
-
-
Princess 492900 Instruções de operação
-
Windmere CO20 Use And Care Book
-
-
Sammic GAE-350 Manual do usuário
-
Tristar BO-2102 Manual do usuário
-
Kenwood CAP070 Manual do proprietário
-
Hitachi P 20SB Handling Instructions Manual