Indesit CE6VP5 (X) GR Guia de usuario
- Categoria
- Fornos
- Tipo
- Guia de usuario

CE6VP5 GR
Contents
Installation, 2-3
Positioning and levelling
Electrical connection
Technical data
Description of the appliance, 4
Overall view
Control panel
Start-up and use, 5-8
Starting the oven
Cooking modes
Electronic timer
Practical cooking advice
Oven cooking advice table
Using the glass ceramic hob, 9
Cooking zones
Switching the cooking zones on and off
Precautions and tips, 10
General safety
Disposal
Respecting and conserving the environment
Care and maintenance, 11
Switching the appliance off
Cleaning the appliance
Replacing the oven light bulb
Cleaning the glass ceramic hob
Assistance
Operating Instructions
COOKER AND OVEN
GB
English, 1 ÅëëçíéêÜ,12
GRGB
Portuges, 23
PT

2
GB
Before operating your new appliance please read
this instruction booklet carefully. It contains important
information concerning the safe installation and
operation of the appliance.
Please keep these operating instructions for future
reference. Make sure that the instructions are kept with
the appliance if it is sold, given away or moved.
The appliance must be installed by a qualified
professional according to the instructions provided.
Any necessary adjustment or maintenance must be
performed after the appliance has been disconnected
from the electricity supply.
Positioning and levelling
It is possible to install the appliance alongside
cupboards whose height does not exceed that of the
hob surface.
Make sure that the wall in contact with the back of
the appliance is made from a non-flammable, heat-
resistant material (T 90°C).
To install the appliance correctly:
Place it in the kitchen, dining room or the bed-sit
(not in the bathroom).
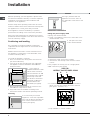
If the top of the hob is higher than the cupboards,
the appliance must be installed at least 200 mm
away from them.
If the cooker is
installed underneath a wall
cabinet, there must be a
minimum distance of 420
mm between this cabinet
and the top of the hob.
This distance should be
increased to 700 mm if
the wall cabinets are
flammable (see figure).
Do not position blinds behind the cooker or less
than 200 mm away from its sides.
Any hoods must be installed according to the
instructions listed in the relevant operating manual.
Levelling
If it is necessary to level the
appliance, screw the adjustable
feet* into the places provided on
each corner of the base of the
cooker (see figure).
The legs* provided with the
appliance fit into the slots on
the underside of the base of the
cooker.
Electrical connection
Fitting the power supply cable
Opening the terminal board:
Using a screwdriver, prise on the side tabs of the
terminal board cover;
Pull open the cover
of the terminal board.
To install the cable, proceed as follows:
unscrew the wire clamp screw and the contact
screws
The jumpers are factory-set for a single-phase
230V connection (see figure).
NL
230V 1N~
H07RN-F 3x4 CEI-UNEL 35364
1
3
2
4
5
to make the electrical connections illustrated in
figure, use the two jumpers housed in the box
(see figure - reference P)
N
L2
L1
L3
P
HOOD
420
Min.
min.
650
mm. with hood
min.
700
mm. without hood
mm.
600
Min. mm.
420
Min. mm.
Installation
*
Only available in certain models.

GB
3
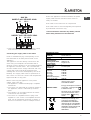
TECHNICAL DATA
Oven dimensions
(HxWxD)
32x43,5x40 cm
Volume
56 l
Useful
measurements
relating to the oven
compartment
width 42 cm
depth 44 cm
height 8,5 cm
Power supply
voltage and
frequency
see data plate
Electric hob
Front left
Back left
Back right
Front right
Maximum absorption
of the electric hob
1700 W
1200 W
1700 W
1200 W
5800 W
ENERGY LABEL
Directive 2002/40/EC on the
label of electric ovens.
Standard EN 50304
Energy consumption for Natural
convection – heating mode:
Traditional mode;
Declared energy consumption
for Forced convection Class –
heating mode:
Baking
mode.
EC Directives: 73/23/EEC dated
19/02/73 (Low Voltage) and
subsequent amendments -
89/336/EEC dated 03/05/89
(Electromagnetic Compatibility)
and subsequent amendments -
93/68/EEC dated 22/07/93 and
subsequent amendments -
2002/96/EC.
NL2L1
400V 2N~
H05RR-F 4x2.5 CEI-UNEL 35363
1
3
2
4
5
NL3L1L2
400V 3N~
H05RR-F 5x2.5 CEI-UNEL 35363
1
3
2
4
5
fasten the supply cable in place with the clamp
and close the cover of the terminal board.
Connecting the supply cable to the mains
Install a standardised plug corresponding to the
load indicated on the data plate located on the
appliance.
The appliance must be directly connected to the
mains using an omnipolar circuit-breaker with a
minimum contact opening of 3 mm installed between
the appliance and the mains. The circuit-breaker
must be suitable for the charge indicated and must
comply with current electrical regulations (the
earthing wire must not be interrupted by the circuit-
breaker). The supply cable must be positioned so
that it does not come into contact with temperatures
higher than 50°C at any point.
Before connecting the appliance to the power
supply, make sure that:
The appliance is earthed and the plug is compliant
with the law.
The socket can withstand the maximum power of
the appliance, which is indicated by the data
plate.
The voltage is in the range between the values
indicated on the data plate.
The socket is compatible with the plug of the
appliance. If the socket is incompatible with the
plug, ask an authorised technician to replace it.
Do not use extension cords or multiple sockets.
Once the appliance has been installed, the power
supply cable and the electrical socket must be
easily accessible.
The cable must not be bent or compressed.
The cable must be checked regularly and replaced
by authorised technicians only.
The manufacturer declines any liability should
these safety measures not be observed.

4
GB
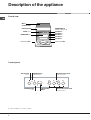
Description of the appliance
Overall view
Control panel
ELECTRONIC
TIMER*
THERMOSTAT
knob
ACTIVE HOTPLATE
indicator light
ELECTRIC HOTPLATE
control knobs
SELECTOR
knob
THERMOSTAT
indicator light
Control panel
GRILL rack
Glass
ceramic hob
DRIPPING pan
GUIDE RAILS
for the sliding racks
position 3
position 2
position 1
Adjustable foot
Adjustable foot
position 5
position 4
*
Only available in certain models.

GB
5
Start-up and use
The first time you use your appliance, heat the
empty oven with its door closed at its maximum
temperature for at least half an hour. Ensure that the
room is well ventilated before switching the oven off
and opening the oven door. The appliance may emit
a slightly unpleasant odour caused by protective
substances used during the manufacturing process
burning away.
Never put objects directly on the bottom of the
oven; this will avoid the enamel coating being
damaged.
Starting the oven
1. Select the desired cooking mode by turning the
SELECTOR knob.
2. Select the recommended temperature for the
cooking mode or the desired temperature by turning
the THERMOSTAT knob.
A list detailing cooking modes and suggested
cooking temperatures can be found in the relevant
table (see Oven cooking advice table).
During cooking it is always possible to:
Change the cooking mode by turning the
SELECTOR knob.
Change the temperature by turning the
THERMOSTAT knob.
Set the total cooking time and the cooking end
time (see below).
Stop cooking by turning the SELECTOR knob to
the 0 position.
Never put objects directly on the bottom of the
oven; this will avoid the enamel coating being
damaged. Only use position 1 in the oven when
cooking with the rotisserie spit.
Always place cookware on the rack(s) provided.
THERMOSTAT indicator light
When this is illuminated, the oven is generating heat. It
switches off when the inside of the oven reaches the
selected temperature. At this point the light illuminates
and switches off alternately, indicating that the
thermostat is working and is maintaining the
temperature at a constant level.
Oven light
This is switched on by turning the SELECTOR knob to
any position other than 0. It remains lit as long as the
oven is operating. By selecting
with the knob,
the light is switched on without any of the heating
elements being activated.
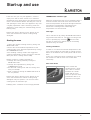
Cooling ventilation
In order to cool down the external temperature of the
oven, some models are fitted with a cooling fan that
blows out air between the control panel and the oven
door.
! Once the cooking has been completed, the cooling
fan remains on until the oven has cooled down
sufficiently.
Door lock device
Some models are
equipped with a door
lock device situated
between the control
panel and the oven
door. To open the door,
push down device A
indicated in the figure.
A

6
GB
Cooking modes
! A temperature value can be set for all cooking
modes between 50°C and Max, except for
BARBECUE (recommended: set only to MAX
power level);
GRATIN (recommended: do not exceed 200°C).
TRADITIONAL OVEN mode
Both the top and bottom heating elements will come
on. With this traditional cooking mode, it is best to
use one cooking rack only: if more than one rack is
used, the heat distribution will be uneven.
BAKING mode
The rear heating element and the fan come on,
guaranteeing the distribution of heat delicately and
uniformly throughout the oven. This mode is ideal for
baking and cooking temperature sensitive foods
such as cakes that need to rise and to prepare
certain tartlets on 3 shelves simultaneously.
FAST COOKING mode
The heating elements and the fan come on,
guaranteeing the distribution of heat consistently
and uniformly throughout the oven.
Pre-heating is not necessary for this cooking mode.
This mode is especially recommended for cooking
pre-packed food quickly (frozen or pre-cooked). The
best results are obtained if you use one cooking
rack only.
MULTI-COOKING mode
All the heating elements (top, bottom and circular),
as well as the fan, will come on. Since the heat
remains constant throughout the oven, the air cooks
and browns food uniformly. A maximum of two racks
may be used at the same time.
PIZZA mode
The heating elements (bottom and circular) and the
fan come on. This combination heats the oven
rapidly by producing a considerable amount of heat,
particularly from the bottom element. If you use more
than one rack simultaneously, switch the position of
the dishes halfway through the cooking process.
BARBECUE mode
The top heating element and the rotisserie (where
present) come on. The high and direct temperature of
the grill is recommended for food that requires high
surface temperature. Always cook in this mode with
the oven door closed.
GRATIN mode
The top heating element as well as the fan and the
rotisserie (where present) come on. This combination
of features increases the effectiveness of the
unidirectional thermal radiation of the heating
elements through forced circulation of the air
throughout the oven.
This helps prevent food from burning on the surface,
allowing the heat to penetrate right into the food.
Always cook in this mode with the oven door closed.
Electronic timer*
This function displays the time and works as a timer
which counts down to zero.
All functions will be implemented approximately 7
seconds after they have been set.
Resetting the clock
After the appliance has been connected to the power
supply, or after a power cut, the clock display will
begin to blink, showing the figure: 0:00
Press button
G and then buttons - and + to set
the exact time. Press and hold the buttons to
quicken the count upwards.
Any necessary modifications can be made by
repeating the above process.
Timer feature
This function may be accessed by pressing the
n
button, after which the display will show the symbol
n. Every time the + button is pressed it corresponds
to a time increase of 10 seconds, until it reaches 99
minutes and 50 seconds. After this point, each press
of the button represents an increase of one minute,
up to a maximum of 10 hours.
Pressing the
- button reduces the time.
* Only available in certain models.

GB
7
After the time period has been set, the timer will
begin to count down. When the timer reaches zero,
the buzzer will sound (this may be stopped by
pressing any button).
The time may be displayed by pressing the
G
button, and the n symbol indicates that the timer
function has been set. After approximately 7
seconds, the display will automatically revert to the
timer.
Cancelling a time that has already been set
Press the
button until the display shows 0:00.
Adjustin g the buzzer volume
After selecting and confirming the clock settings,
use the
button to adjust the volume of the alarm
buzzer.
Practical cooking advice
! Do not place racks in position 1 and 5 during fan-
assisted cooking. Excessive direct heat can burn
temperature sensitive foods.
! In the BARBECUE and GRATIN cooking modes,
particularly when using the rotisserie, place the
dripping pan in position 1 to collect cooking
residues (fat and/or grease).
MULTI-COOKING
Use position 2 and 4, placing the food that
requires more heat on 2.
Place the dripping pan on the bottom and the rack
on top.
BARBECUE
Insert the rack in position 3 or 4. Place the food in
the centre of the rack.
We recommend that you set the maximum power
level. The top heating element is regulated by a
thermostat and may not always be on.
PIZZA MODE
Use a light aluminium pizza pan. Place it on the
rack provided.
For a crispy crust, do not use the dripping pan
(prevents crust from forming by extending
cooking time).
If the pizza has a lot of toppings, we recommend
adding the mozzarella cheese on top of the pizza
halfway through the cooking process.

8
GB
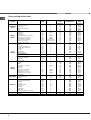
Oven cooking advice table
Cooking
modes
Foods Weight
(in kg)
Rack Position Pre-heating
time
(minutes)
Recommended
temperature
Cooking
time
(minutes)
Traditional
Oven
Duck
Roast veal or beef
Pork roast
Biscuits (short pastry)
Tarts
1
1
1
-
1
3
3
3
3
3
15
15
15
15
15
200
200
200
180
180
65-75
70-75
70-80
15-20
30-35
Baking
Mode
Tarts
Fruit cakes
Plum cake
Sponge cake
Stuffed pancakes (on 2 racks)
Small cakes (on 2 racks)
Cheese puffs (on 2 racks)
Cream puffs (on 3 racks)
Biscuits (on 3 racks)
Meringues (on 3 racks)
0.5
1
0.7
0.5
1.2
0.6
0.4
0.7
0.7
0.5
3
2 or 3
3
3
2 and 4
2 and 4
2 and 4
1 and 3 and 5
1 and 3 and 5
1 and 3 and 5
15
15
15
15
15
15
15
15
15
15
180
180
180
160
200
190
210
180
180
90
20-30
40-45
40-50
25-30
30-35
20-25
15-20
20-25
20-25
180
Frozen food
Pizza
Courgette and prawn pie
Country style spinach pie
Turnovers
Lasagne
Golden Rolls
Chicken morsels
0.3
0.4
0.5
0.3
0.5
0.4
0.4
2
2
2
2
2
2
2
-
-
-
-
-
-
-
250
200
220
200
200
180
220
12
20
30-35
25
35
25-30
15-20
Pre-cooked food
Golden chicken wings 0.4 2 - 200 20-25
Fast
cooking
Fresh Food
Biscuits (short pastry)
Plum cake
Cheese puffs
0.3
0.6
0.2
2
2
2
-
-
-
200
180
210
15-18
45
10-12
Multi-
cooking
Pizza (on 2 racks)
Lasagne
Lamb
Roast chicken + potatoes
Mackerel
Plum cake
Cream puffs (on 2 racks)
Biscuits (on 2 racks)
Sponge cake (on 1 rack)
Sponge cake (on 2 racks)
Savoury pies
1
1
1
1+1
1
1
0.5
0.5
0.5
1
1.5
2 and 4
3
2
2 and 4
2
2
2 and 4
2 and 4
2
2 and 4
3
15
10
10
15
10
10
10
10
10
10
15
230
180
180
200
180
170
190
180
170
170
200
15-20
30-35
40-45
60-70
30-35
40-50
20-25
10-15
15-20
20-25
25-30
Pizza Mode
Pizza
Roast veal or beef
Chicken
0.5
1
1
3
2
2 or 3
15
10
10
220
220
180
15-20
25-30
60-70
Barbecue
Soles and cuttlefish
Squid and prawn kebabs
Cuttlefish
Cod filet
Grilled vegetables
Veal steak
Sausages
Hamburgers
Mackerels
Toasted sandwiches (or toast)
0.7
0.6
0.6
0.8
0.4
0.8
0.6
0.6
1
4 and 6
4
4
4
4
3 or 4
4
4
4
4
4
-
-
-
-
-
-
-
-
-
-
Max
Max
Max
Max
Max
Max
Max
Max
Max
Max
10-12
8-10
10-15
10-15
15-20
15-20
15-20
10-12
15-20
3-5
Gratin
Grilled chicken
Cuttlefish
1.5
1.5
2
2
10
10
200
200
55-60
30-35

GB
9
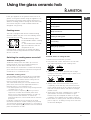
Using the glass ceramic hob
The glue applied on the gaskets leaves traces of
grease on the glass. Before using the appliance, we
recommend you remove these with a special non-
abrasive cleaning product. During the first few hours
of use there may be a smell of rubber which will
disappear very quickly.
Cooking zones
The hob is equipped with electric radiant heating
elements. When they are in use the following items
on the hob become red.
A. Radiant heating zones
B. Extendable radiant cooking
zones
C. The residual heat indicator
light: this indicates that the
temperature of the
corresponding cooking zone is greater than 60°C,
even when the heating element has been switched
off but is still hot.
Switching the cooking zones on and off
Traditional cooking zones
Traditional cooking zones are made up of circular
heating elements. They turn red approximately ten
seconds after they have been turned on.
Each cooking zone is fitted with a control knob allowing
you to select from 12 different temperature settings from
a minimum of 1 to a maximum of 12.
Extendable cooking zones
The extendable radiant elements (B) are recognisable
by the fact that they have a double heating zone. You
can turn on only the smaller internal cooking zone or
both the external and internal zones.
The control knob allows you to choose between two
power levels, which are both adjustable between a
minimum value of
1 to a maximum of 12:
The lowest power level can be set by turning the knob
clockwise from 1 to 12.
Turn the knob to completely (A) until you hear a
slight click, to enable the maximum power level,
which in turn can be adjusted between 12 and 1 by
turning
the knob anticlockwise. To restore the
minimum power level, turn the knob and set it back to
position 0.
For double cooking zones, the first part of the knob
movement activates the smaller cooking zone (internal).
To activate both (internal and external), it is necessary to
turn the knob completely (A) and
then select the desired
power level between 12 and 1.
Pos. Radiant hotplate
0
Off
1
Melting butter and chocolate
2
Heating liquids
3
4
Soups and sauces
5
6
Cooking at boiling point
7
8
Pan-roasting
9
10
Boiling large quantities
11
12
Frying
A
Activation of both cookin
g
zones
Practica l advice on using the hob
To obtain the best results with your hob:
Use pans with a thick, flat base to ensure that
they adhere perfectly to the cooking zone.
Always use pans with a diameter that is large
enough to cover the hotplate fully, in o
rder to use
all the heat produced.
Always make sure that the base of the pan is
completely clean and dry: this ensures that the
pans adhere perfectly to the cooking zones and
that both the p
ans and the hob last for a longer
period of time.
Avoid using the same cookware that is used on
gas burners: the heat concentration on gas
burners may have warped the base
of the pan,
causing it not to adhere to the surface correctly.
Never leave a cooking zone switched on without a
pan on top of it, as doing so may cause the zone
to become da
maged.
A
B
B
A
C

10
GB
Precautions and tips
This appliance has been designed and manufactured
in compliance with international safety standards.
The following warnings are provided for safety reasons
and must be read carefully.
General safety
These instructions are only valid for the
countries whose symbols appear in the manual
and on the serial number plate.
The appliance was designed for domestic use
inside the home and is not intended for commercial
or industrial use.
The appliance must not be installed outdoors, even
in covered areas. It is extremely dangerous to leave
the appliance exposed to rain and storms.
Do not touch the appliance with bare feet or with wet
or damp hands and feet.
The appliance must be used by adults only for the
preparation of food, in accordance with the
instructions provided in this booklet.
The instruction booklet accompanies a class 1
(insulated) or class 2 - subclass 1 (recessed
between 2 cupboards) appliance.
When
the appliance is in use, the heating
elements and some parts of the oven door
become extremely hot. Make sure you don't
touch them and
keep children well away.
Make sure that the power supply cables of other
electrical appliances do not come into contact with
the hot parts of the oven.
The openings used for the ventilation and dispersion
of heat must never be covered.
Do not place unstable or misshapen pans on the
electric hotplates; this will help to avoid spills.
Position them on the hob with the handles turned
towards the centre of the appliance.
Always use oven gloves when placing cookware in
the oven or when removing it.
Do not use flammable liquids (alcohol, petrol, etc...)
near the appliance while it is in use.
Do not place flammable material in the lower storage
compartment or in the oven itself. If the appliance is
switched on accidentally, it could catch fire.
Always make sure the knobs are in the 0 position
when the appliance is not in use.
When unplugging the appliance, always pull the
plug from the mains socket; do not pull on the
cable.
Never perform any cleaning or maintenance work
without having disconnected the appliance from the
electricity mains.
If the appliance breaks down, under no
circumstances should you attempt to repair the
appliance yourself. Repairs carried out by
inexperienced persons may cause injury or further
malfunctioning of the appliance. Contact
Assistance.
Do not rest heavy objects on the open oven door.
The internal surfaces of the compartment (where
present) may become hot.
Disposal
When disposing of packaging material: observe
local legislation so that the packaging may be
reused.
The European Directive 2002/96/EC relating to
Waste Electrical and Electronic Equipment (WEEE)
states that household appliances should not be
disposed of using the normal solid urban waste
cycle. Exhausted appliances should be collected
separately in order to optimise the cost of re-using
and recycling the materials inside the machine,
while preventing potential damage to the
atmosphere and to public health. The crossed-out
dustbin is marked on all products to remind the
owner of their obligations regarding separated waste
collection.
Exhausted appliances may be collected by the
public waste collection service, taken to suitable
collection areas in the area or, if permitted by
current national legislation, they may be returned to
the dealers as part of an exchange deal for a new
equivalent product.
All major manufacturers of household appliances
participate in the creation and organisation of
systems for the collection and disposal of old and
disused appliances.
Respecting and conserving the
environment
You can help to reduce the peak load of the
electricity supply network companies by using the
oven in the hours between late afternoon and the
early hours of the morning.
Always keep the oven door closed when using the
BARBECUE and GRATIN modes: to attain best
results and to save energy (approximately 10%).
Check the door seals regularly and wipe them clean
to ensure they are free of debris so that they adhere
properly to the door, thus avoiding heat dispersion.

GB
11
Switching the appliance off
Disconnect your appliance from the electricity supply
before carrying out any work on it.
Cleaning the appliance
Do not use abrasive or corrosive detergents such as
stain removers, anti-rust products, powder detergents
or sponges with abrasive surfaces: these may scratch
the surface beyond repair.
Never use steam cleaners or pressure cleaners on
the appliance.
Clean the glass part of the oven door using a
sponge and a non-abrasive cleaning product, then
dry thoroughly with a soft cloth. Do not use rough
abrasive material or sharp metal scrapers as these
could scratch the surface and cause the glass to
crack.
The stainless steel or enamel-coated external parts
and the rubber seals may be cleaned using a
sponge that has been soaked in lukewarm water
and neutral soap. Use specialised products for the
removal of stubborn stains. After cleaning, rinse and
dry thoroughly. Do not use abrasive powders or
corrosive substances.
The inside of the oven should ideally be cleaned
after each use, while it is still lukewarm. Use hot
water and detergent, then rinse well and dry with a
soft cloth. Do not use abrasive products.
The accessories can be washed like everyday
crockery, and are even dishwasher safe.
Dirt and grease should be removed from the control
panel using a non-abrasive sponge or a soft cloth.
Stainless steel can be marked by hard water that
has been left on the surface for a long time, or by
aggressive detergents containing phosphorus. After
cleaning, rinse well and dry thoroughly. Any
remaining drops of water should also be dried.
Inspecting the oven seals
Check the door seals around the oven regularly. If the
seals are damaged, please contact your nearest After-
sales Service Centre. We recommend that the oven is
not used until the seals have been replaced.
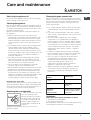
Replacing the oven light bulb
1. After disconnecting the oven
from the electricity mains,
remove the glass lid covering
the lamp socket (see figure).
2. Remove the light bulb and
replace it with a similar one:
voltage 230 V, wattage 25 W,
cap E 14.
3. Replace the lid and reconnect the oven to the
electricity supply.
Cleaning the glass ceramic hob
Do not use abrasive or corrosive detergents (for example,
products in spray cans for cleaning barbecues and ovens),
stain removers, anti-rust products, powder detergents or
sponges with abrasive surfaces: these may scratch the
surface beyond repair.
It is usually sufficient simply to wash the hob using
a damp sponge and dry it with absorbent kitchen
roll.
If the hob is particularly dirty, rub it with a special
glass cera
mic cleaning product, then rinse well and
dry thoroughly.
To remove more stubborn dirt, use a suitable
scraper (this is not supplied with the appliance).
Remove s
pills as soon as possible, without waiting
for the appliance to cool, to avoid residues forming
crusty deposits. You can obtain excellent results by
using a rustproof steel wire s
ponge - specifically
designed for glass ceramic surfaces - soaked in
soapy water.
If plastic or sugary substances have accidentally
been melted on the hob, remove them immediately
with the sc
raper, while the surface is still hot.
Once it is clean, the hob may be treated with a
special protective maintenance product: the
invisible film left by this product protects the
surface
from drips during cooking. This
maintenance should be carried out while the
appliance is warm (not hot) or cold.
Always remember to rinse the appliance well with
clean water an
d dry it thoroughly: residues can
become encrusted during subsequent cooking
processes.
Glass ceramic hob
cleaners
Available from
Window scraper Razor blade
scrapers
DIY Stores
Replacement blades DIY Stores,
supermarkets,
chemists
COLLO luneta
HOB BRITE
Hob Clean
SWISSCLEANER
Boots, Co-op stores,
department stores, Regional
Electricity Company shops,
supermarkets
Assistance
Please have the following information to hand:
The appliance model (Mod.).
The serial number (S/N).
This information can be found on the data plate located
on the appliance and/or on the packaging.
Care and maintenance

CE6VP5 GR
Ðåñéå÷üìåíá
ÅãêáôÜóôáóç, 13-14
ÈÝóç êáé ïñéæïíôßùóç
ÇëåêôñéêÞ óýíäåóç
Ôå÷íéêÜ óôïé÷åßá
ÐåñéãñáöÞ ôçò óõóêåõÞò, 15
ÓõíïëéêÞ Üðïøç
Ðßíáêáò ÷åéñéóôçñßùí
Åêêßíçóç êáé ÷ñÞóç, 16-19
Åêêßíçóç ôïõ öïýñíïõ
ÐñïãñÜììáôá
Çëåêôñïíéêü Timer
ÐñáêôéêÝò óõìâïõëÝò ãéá ôï øÞóéìï
Ðßíáêáò øçóßìáôïò óôï öïýñíï
×ñÞóç ôçò õáëïêåñáìéêÞò åðéöÜíåéáò
ìáãåéñÝìáôïò, 20
Ïé ðåñéï÷Ýò ìáãåéñÝìáôïò
ÁíÜøôå êáé óâÞóôå ôéò æþíåò ìáãåéñÝìáôïò
ÐñïöõëÜîåéò êáé óõìâïõëÝò, 21
ÃåíéêÞ áóöÜëåéá
ÄéÜèåóç
Óåâáóôåßôå êáé ðñïöõëÜîôå ôï ðåñéâÜëëïí
ÓõíôÞñçóç êáé öñïíôßäá, 22
Áðïêëåéóìüò ôïõ çëåêôñéêïý ñåýìáôïò
Êáèáñéóìüò ôçò óõóêåõÞò
ÁíôéêáôÜóôáóç ôçò ëõ÷íßáò öùôéóìïý ôïõ öïýñíïõ
Êáèáñéóìüò ôçò õáëïêåñáìéêÞò åðéöÜíåéáò
ìáãåéñÝìáôïò,
Ôå÷íéêÞ õðïóôÞñéîç
Ïäçãßåò ÷ñÞóçò
ÊÏÕÆÉÍÁ ÊÁÉ ÖÏÕÑÍÏÓ
GR
English, 1 ÅëëçíéêÜ,
12
GB GR
Portuges, 23
PT

13
GR
Ðñéí èÝóåôå óå ëåéôïõñãßá ôç íÝá óõóêåõÞ, äéáâÜóôå
ðñïóåêôéêÜ ôï ðáñüí åã÷åéñßäéï ïäçãéþí äéüôé ðåñéÝ÷åé
óçìáíôéêÝò ðëçñïöïñßåò ãéá ôçí åãêáôÜóôáóç êáé ôçí
áóöáëÞ ëåéôïõñãßá ôçò óõóêåõÞò.
ÖõëÜîôå ôéò ïäçãßåò ëåéôïõñãßáò ôçò óõóêåõÞò ãéá
ìåëëïíôéêÞ ÷ñÞóç: Âåâáéùèåßôå üôé ïé ïäçãßåò âñßóêïíôáé
ìáæß ìå ôç óõóêåõÞ óå ðåñßðôùóç ðþëçóçò,
ðáñá÷þñçóçò Þ ìåôáêüìéóçò.
Ç åãêáôÜóôáóç ôçò óõóêåõÞò äéåíåñãåßôáé áðü
åéäéêåõìÝíï ðñïóùðéêü óýìöùíá ìå ôéò ðáñå÷üìåíåò
ïäçãßåò.
ÏðïéáäÞðïôå åðÝìâáóç ñýèìéóçò Þ óõíôÞñçóçò
ðñÝðåé íá äéåíåñãåßôáé áöïý áðïóõíäÝóåôå ôç óõóêåõÞ
áðü ôï çëåêôñéêü.
ÔïðïèÝôçóç êáé ïñéæïíôßùóç
Ìðïñåßôå íá åãêáôáóôÞóåôå ôç óõóêåõÞ äßðëá áðü
Ýðéðëá ðïõ äåí îåðåñíÜíå óå ýøïò ôçí åðéöÜíåéá
ìáãåéñÝìáôïò.
Âåâáéùèåßôå üôé ôï ôïß÷ùìá óå åðáöÞ ìå ôï ðßóù ìÝñïò
ôçò óõóêåõÞò åßíáé áðü Üöëåêôï õëéêü êáé áíèåêôéêü óôç
èåñìüôçôá (Ô 90°C).
Ãéá ìéá óùóôÞ åãêáôÜóôáóç:
ôïðïèåôÞóôå ôç óõóêåõÞ óôçí êïõæßíá, óôçí
ôñáðåæáñßá Þ óå ãêáñóïíéÝñá (áëëÜ ü÷é óôï ìðÜíéï).
áí ôï ðëáßóéï ìáãåéñÝìáôïò åßíáé õøçëüôåñï ôùí
åðßðëùí, ç óõóêåõÞ ðñÝðåé íá ôïðïèåôçèåß óå
ôïõëÜ÷éóôïí 200 mm áðü áõôÜ.
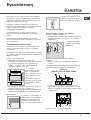
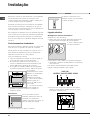
áí ç êïõæßíá
åãêáôáóôáèåß êÜôù áðü
ñÜöé, ôï ôåëåõôáßï èá
ðñÝðåé íá áðÝ÷åé áðü ôïí
ðÜãêï ôïõëÜ÷éóôïí 420
mm.
Ç áðüóôáóç ðñÝðåé íá
åßíáé 700 mm áí ôá ñÜöéá
åßíáé åýöëåêôá ( âëÝðå
åéêüíá)
ìçí ôïðïèåôåßôå êïõñôßíåò ðßóù áðü ôçí êïõæßíá Þ óå
ôïõëÜ÷éóôïí 200 mm áðü ôá ðëáúíÜ ôçò.
åíäå÷üìåíïé áðïññïöçôÞñåò ðñÝðåé íá åãêáèßóôáíôáé
óýìöùíá ìå ôéò õðïäåßîåéò ôïõ ó÷åôéêïý åã÷åéñéäßïõ
Ïñéæïíôßùóç
Áí ÷ñåéáóôåß íá ïñéæïíôéþóåôå ôç
óõóêåõÞ, âéäþóôå ôá ðïäáñÜêéá*
ñýèìéóçò óôéò áíôßóôïé÷åò Ýäñåò,
ðïõ âñßóêïíôáé óôéò ãùíßåò óôç
âÜóç ôçò êïõæßíáò (âëÝðå åéêüíá).
Ôá ðüäéá* ðïõ ðáñÝ÷ïíôáé ìå ôç
óõóêåõÞ ìïíôÜñïíôáé ÷ùíåõôÜ
êÜôù áðü ôç âÜóç ôçò êïõæßíáò.
ÇëåêôñéêÞ óýíäåóç
Óõíáñìïëüãçóç êáëùäßïõ ôñïöïäïóßáò
¢íïéãìá ðéíáêßäáò áêñïäåêôþí:
×ñçóéìïðïéþíôáò Ýíá êáôóáâßäé, êñáôÞóôå êüíôñá óôéò
ðëåõñéêÝò ãëùóóßôóåò ôïõ êáðáêéïý ôçò ðéíáêßäáò
áêñïäåêôþí.
ôñáâÞîôå êáé áíïßîôå
ôï êáðÜêé ôçò ðéíáêßäáò
áêñïäåêôþí.
Ãéá ôçí ôïðïèÝôçóç ôïõ êáëùäßïõ åêôåëÝóôå ôá
ðáñáêÜôù:
îåâéäþóôå ôç âßäá ôïõ êáëùäéïäÝôç êáé ôéò âßäåò ôùí
åðáöþí
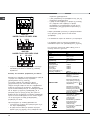
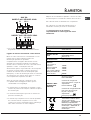
Ïé ãÝöõñåò åßíáé äéåõèåôçìÝíåò áðü ôï åñãïóôÜóéï ãéá
ôç óýíäåóç óå 230V ìïíïöáóéêü. âëÝðå åéêüíá)
HOOD
420
Min.
min.
650
mm. with hood
min.
700
mm. without hood
mm.
600
Min. mm.
420
Min. mm.
ÅãêáôÜóôáóç
*
ÕðÜñ÷åé ìüíï óå ïñéóìÝíá ìïíôÝëá
NL
230V 1N~
H07RN-F 3x4 CEI-UNEL 35364
1
3
2
4
5
N
L2
L1
L3
P
Ãéá ôç äéåíÝñãåéá ôùí çëåêôñéêþí óõíäÝóåùí ðïõ
áðåéêïíßæïíôáé óôçí åéêüíá, ÷ñçóéìïðïéÞóôå ôéò äýï
ãÝöõñåò ðïõ âñßóêïíôáé ìÝóá óôï êïõôß (âëÝðå åéêüíá
- áíáöïñÜ «P»)

14
GR
óôåñåþóôå ôï êáëþäéï ôñïöïäïóßáò óôï áíôßóôïé÷ï
êáëùäéïäÝôç êáé êëåßóôå ôï êáðÜêé ôçò ðéíáêßäáò
áêñïäåêôþí.
Óýíäåóç ôïõ êáëùäßïõ ôñïöïäïóßáò óôï äßêôõï
ÌïíôÜñåôå óôï êáëþäéï ìéá êáíïíéêïðïéçìÝíç ðñßæá ãéá
ôï öïñôßï ðïõ áíáöÝñåôáé óôçí ôáìðåëßôóá
÷áñáêôçñéóôéêþí åðß ôçò óõóêåõÞò.
Ç óõóêåõÞ óõíäÝåôáé áð åõèåßáò óôï äßêôõï
÷ñçóéìïðïéþíôáò Ýíáí ðïëõðïëéêü äéáêüðôç ìå
åëÜ÷éóôï Üíïéãìá åðáöþí 3 mm ðïõ ðáñåìâÜëëåôáé
ìåôáîý ôçò óõóêåõÞò êáé ôïõ äéêôýïõ. Ï äéáêüðôçò
ðñÝðåé íá äéáóôáóéïëïãåßôáé ãéá ôï åíäåäåéãìÝíï öïñôßï
êáé íá ðëçñïß ôéò éó÷ýïõóåò ðñïäéáãñáöÝò ãéá ôï
çëåêôñéêü ñåýìá (ï áãùãüò ãåßùóçò äåí ðñÝðåé íá
äéáêüðôåôáé áðü ôï äéáêüðôç). Ôï êáëþäéï ôñïöïäïóßáò
ðñÝðåé íá åßíáé ôïðïèåôçìÝíï Ýôóé ðïõ êáíÝíá óçìåßï
ôïõ íá ìçí Ýñ÷åôáé óå åðáöÞ ìå èåñìïêñáóßåò
ìåãáëýôåñåò ôùí 50°C .
Ðñéí äéåíåñãÞóåôå ôç óýíäåóç âåâáéùèåßôå üôé:
ç óõóêåõÞ Ý÷åé ôç ãåßùóç êáé ôï âýóìá ôçñïýí ôéò åê
ôïõ íüìïõ ðñïäéáãñáöÝò.
Ç ðñßæá íá åßíáé óå èÝóç íá õößóôáôáé ôï ìÝãéóôï
öïñôßï éó÷ýïò ôçò ìç÷áíÞò, üðùò áíáöÝñåôáé óôçí
N
L2
L1
L3
P
NL2L1
400V 2N~
H05RR-F 4x2.5 CEI-UNEL 35363
1
3
2
4
5
NL3L1L2
400V 3N~
H05RR-F 5x2.5 CEI-UNEL 35363
1
3
2
4
5
ôáìðåëßôóá ÷áñáêôçñéóôéêþí
ç ôÜóç ôñïöïäïóßáò íá ðåñéëáìâÜíåôáé óôéò ôéìÝò ôçò
ôáìðåëßôóáò ÷áñáêôçñéóôéêþí
ç ðñßæá íá åßíáé óõìâáôÞ ìå ôï âýóìá ôçò óõóêåõÞò.
Áí ç ðñßæá äåí åßíáé óõìâáôÞ ìå ôï âýóìá,
áðåõèõíèåßôå óå åîïõóéïäïôçìÝíï ôå÷íéêü ãéá ôçí
áíôéêáôÜóôáóç. Ìç ÷ñçóéìïðïéåßôå ðñïåêôÜóåéò Þ
ðïëýðñéæá.
Áöïý åãêáôáóôáèåß ç óõóêåõÞ, ôï çëåêôñéêü êáëþäéï
êáé ç çëåêôñéêÞ ðñßæá ðñÝðåé íá åßíáé åýêïëá
ðñïóâÜóéìá.
Ôï êáëþäéï äåí ðñÝðåé íá äéðëþíåé Þ íá óõìðéÝæåôáé.
Ôï êáëþäéï ðñÝðåé íá åëÝã÷åôáé ðåñéïäéêÜ êáé íá
áíôéêáèßóôáôáé ìüíï áðü åîïõóéïäïôçìÝíïõò ôå÷íéêïýò.
Ç åðé÷åßñçóç áðïðïéåßôáé êÜèå åõèýíçò üôáí ïé
êáíüíåò áõôïß äåí ôçñïýíôáé.
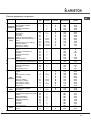
ÔÅ×ÍÉÊÁ ÓÔÏÉ×ÅÉÁ
ÄéáóôÜóåéò ÖïýñíïõÇxLxP
32x43,5x40 cm
¼ãêïò
56 l
ÙöÝëéìåò äéáóôÜóåéò ôïõ
öïýñíïõ
ðëÜôïò cm 42
âÜèïò cm 44
ýøïò cm 8,5
ÔÜóç êáé óõ÷íüôçôá
ôñïöïäïóßáò
âëÝðå ðéíáêßäá
÷áñáêôçñéóôéêþí
Çëåêôñéêüò ðÜãêïò
ìáãåéñÝìáôïò
Åìðñüò áñéóôåñÜ
Ðßóù áñéóôåñÜ
Ðßóù äåîéÜ
Åìðñüò äåîéÜ
ÌÝãéóôç áðïññüöçóç ôçò
çëåêôñéêÞò åðéöÜíåéáò
1700 W
1200 W
1700 W
1200 W
5800 W
ENERGY LABEL
Ïäçãßá 2002/40/CE ãéá ôçí
åôéêÝôá ôùí çëåêôñéêþí
öïýñíùí.
Êáíïíéóìüò EN 50304
ÅíåñãçôéêÞ êáôáíÜëùóç
ëüãù öõóéêÞò åðáãùãÞò –
ëåéôïõñãßá èÝñìáíóçò:
ÐáñáäïóéáêÞ
ÊáôáíÜëùóç åíÝñãåéáò
äçëùìÝíç ãéá êáôçãïñßá
äõíáìéêÞò áãùãéìüôçôáò -
ëåéôïõñãßá èÝñìáíóçò:
Öïýñíïò Æá÷áñïðëáóôéêÞò.
ÊïéíïôéêÝò Ïäçãßåò:
73/23/CEE ôçò 19/02/73
(×áìçëÞ ÔÜóç) êáé
ìåôáãåíÝóôåñåò
ôñïðïðïéÞóåéò -
89/336/CEE ôçò 03/05/89
(ÇëåêôñïìáãíçôéêÞ
Óõìâáôüôçôá) êáé
ìåôáãåíÝóôåñåò
ôñïðïðïéÞóåéò - 93/68/CEE
ôçò 22/07/93 êáé
ìåôáãåíÝóôåñåò
ô
ñ
ïðïðïé
Þ
óåé
ò
- 2002/96/CE.

15
GR
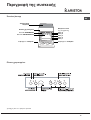
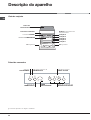
ÐåñéãñáöÞ ôçò óõóêåõÞò
ÓõíïëéêÞ Üðïøç
Ðßíáêáò ÷åéñéóôçñßùí
θέση 5
θέση 4
θέση 3
θέση 2
θέση 1
Ρυθμιζόμενο ποδαράκι
Ρυθμιζόμενο ποδαράκι
Επιφάνεια κατά
της υπερχείλισης
Πίνακας χειριστηρίων
Επίπεδο ΠΛΕΓΜΑΤΟΣ
Επίπεδο ΛΙΠΟΣΥΛΛΕΚΤΗ
Υαλοκεραμική
επιφάνεια
*
ÕðÜñ÷åé ìüíï óå ïñéóìÝíá ìïíôÝëá

16
GR
Åêêßíçóç êáé ÷ñÞóç
Óôï ðñþôï Üíáììá, ëåéôïõñãÞóôå ôï öïýñíï Üäåéï
ãéá ôïõëÜ÷éóôïí ìéóÞ þñá óôç ìÝãéóôç èåñìïêñáóßá
êáé ìå ôçí ðüñôá êëåéóôÞ. Âåâáéùèåßôå üôé ï ÷þñïò
áåñßæåôáé êáëÜ ðñéí óâÞóåôå êáé áíïßîåôå ôçí ðüñôá
ôïõ öïýñíïõ. Ç óõóêåõÞ ìðïñåß íá ðáñïõóéÜóåé
äõóÜñåóôç ïóìÞ ïöåéëüìåíç óôçí åîÜôìéóç ôùí
ðñïóôáôåõôéêþí ïõóéþí ðïõ ÷ñçóéìïðïéïýíôáé êáôÜ
ôç äéáäéêáóßá êáôáóêåõÞò.
Ìçí áðïèÝôåôå ðïôÝ áíôéêåßìåíá óôç âÜóç ôïõ
öïýñíïõ äéüôé ìðïñåß íá ðñïêëçèïýí æçìéÝò óôï
óìÜëôï.
Åêêßíçóç ôïõ öïýñíïõ
1. ÅðéëÝîôå ôï åðéèõìçôü ðñüãñáììá ìáãåéñÝìáôïò
óôñÝöïíôáò ôïí åðéëïãÝá ôùí ÐÑÏÃÑÁÌÌÁÔÙÍ.
2. ÅðéëÝîôå ôçí ðñïôåéíüìåíç èåñìïêñáóßá ãéá ôï
ðñüãñáììá Þ ôçí åðéèõìçôÞ óôñÝöïíôáò ôïí
åðéëïãÝá ÈÅÑÌÏÓÔÁÔÇ.
Ìéá ëßóôá ìå ôá ðñïãñÜììáôá ìáãåéñÝìáôïò êáé ôéò
ó÷åôéêÝò ðñïôåéíüìåíåò èåñìïêñáóßåò ìðïñåßôå íá
äåßôå óôï ó÷åôéêü ðßíáêá(âëÝðå Ðßíáêá ìáãåéñÝìáôïò
óôï öïýñíï).
ÊáôÜ ôï ìáãåßñåìá ìðïñåßôå ðÜíôá:
íá áëëÜîåôå ôï ðñüãñáììá ìáãåéñÝìáôïò
åíåñãþíôáò óôïí åðéëïãÝá ÐÑÏÃÑÁÌÌÁÔÙÍ
íá áëëÜîåôå ôç èåñìïêñáóßá åíåñãþíôáò óôïí
åðéëïãÝá ÈÅÑÌÏÓÔÁÔÇ
íá ðñïãñáììáôßóåôå ôç äéÜñêåéá êáé ôçí þñá
ôÝëïõò ìáãåéñÝìáôïò (âëÝðå êÜôù)
íá äéáêüðôåôå ôï ìáãåßñåìá öÝñíïíôáò ôïí
åðéëïãÝá ÐÑÏÃÑÁÌÌÁÔÙÍ óôç èÝóç 0.
Ìçí áðïèÝôåôå áíôéêåßìåíá áð åõèåßáò óôç âÜóç
ôïõ öïýñíïõ äéüôé ìðïñåß íá ðñïêëçèïýí æçìéÝò óôï
óìÜëôï. ×ñçóéìïðïéåßôå ìüíï ôç èÝóç 1 ôïõ öïýñíïõ
óå ðåñßðôùóç ìáãåéñåìÜôùí ìå ôç óïýâëá.
Íá èÝôåôå ðÜíôá ôá óêåýç ìáãåéñÝìáôïò óôï
ðáñå÷üìåíï ðëÝãìá.
Åíäåéêôéêü öùôÜêé ÈÅÑÌÏÓÔÁÔÇ
¼ôáí åßíáé áíáììÝíï, óçìáßíåé üôé ï öïýñíïò
ðáñÜãåé èåñìüôçôá. ÓâÞíåé üôáí óôï åóùôåñéêü ôïõ
öïýñíïõ åðéôõã÷Üíåôáé ç åðéëåãìÝíç èåñìïêñáóßá.
Óôï óçìåßï áõôü ôï åíäåéêôéêü öùôÜêé áíÜâåé êáé
óâÞíåé äéáäï÷éêÜ, äåß÷íïíôáò üôé ï èåñìïóôÜôçò åßíáé
óå ëåéôïõñãßá êáé äéáôçñåß óôáèåñÞ ôç èåñìïêñáóßá.
Öùò ôïõ öïýñíïõ
ÁíÜâåé óôñÝöïíôáò ôïí åðéëïãÝá ÐÑÏÃÑÁÌÌÁÔÙÍ
óå ìéá èÝóç äéáöïñåôéêÞ ôïõ «0» êáé ðáñáìÝíåé
áíáììÝíï üóï ï öïýñíïò åßíáé óå ëåéôïõñãßá.
ÅðéëÝãïíôáò ìå ôïí åðéëïãÝá, ôï öùò áíÜâåé
÷ùñßò íá åíåñãïðïéçèåß êáíÝíá èåñìáíôéêü óôïé÷åßï.
Áåñéóìüò øýîçò
Ãéá ôç ìåßùóç ôçò åîùôåñéêÞò èåñìïêñáóßáò ôïõ
öïýñíïõ, ïñéóìÝíá ìïíôÝëá äéáèÝôïõí Ýíáí
áíåìéóôÞñá øýîçò ðïõ ðáñÜãåé ñåýìá áÝñá ìåôáîý
ôïõ ðßíáêá åëÝã÷ïõ êáé ôçò ðüñôáò ôïõ öïýñíïõ.
! Óôï ôÝëïò ôïõ ìáãåéñÝìáôïò ï áíåìéóôÞñáò
ðáñáìÝíåé åíåñãüò ìÝ÷ñéò üôïõ ï öïýñíïò øõ÷èåß
éêáíïðïéçôéêÜ.
ÄéÜôáîç áóöÜëéóçò ðüñôáò
ÏñéóìÝíá ìïíôÝëá
ðáñïõóéÜæïõí ìéá
äéÜôáîç «áóöÜëéóçò
ðüñôáò» åõñéóêüìåíç
ìåôáîý ôïõ ðßíáêá
÷åéñéóìïý êáé ôçò
ðüñôáò ôïõ öïýñíïõ.
Ãéá íá áíïßîåôå ôçí
ðüñôá, ðéÝóôå ôç
äéÜôáîç A ðïõ
öáßíåôáé óôçí åéêüíá.
A

17
GR
ÐñïãñÜììáôá ìáãåéñÝìáôïò
! Ãéá üëá ôá ðñïãñÜììáôá ìáãåéñÝìáôïò ìðïñåßôå íá
èÝóåôå ìéá èåñìïêñáóßá ìåôáîý 50°C êáé MAX, åêôüò
áðü ôï:
BARBECUE (óõíéóôÜôáé íá èÝóåôå ìüíï óôï MAX)
GRATIN (óõíéóôÜôáé íá ìçí îåðåñíÜôå ôç
èåñìïêñáóßá ôùí 200°C).
Ðñüãñáììá ÐÁÑÁÄÏÓÉÁÊÏÓ ÖÏÕÑÍÏÓ
Åíåñãïðïéïýíôáé ôá äýï èåñìáíôéêÜ óôïé÷åßá, ôï
êÜôù êáé ôï åðÜíù. Ìå ôï ðáñáäïóéáêü ìáãåßñåìá,
åßíáé êáëýôåñá íá ÷ñçóéìïðïéåßôå ìüíï Ýíá åðßðåäï:
÷ñçóéìïðïéþíôáò ðåñéóóüôåñá åðßðåäá
åðéôõã÷Üíåôáé ìéá áíïìïéüìïñöç êáôáíïìÞ ôçò
èåñìüôçôáò.
ÐñüãñáììáÃËÕÊÙÍ
Åíåñãïðïéåßôáé ôï ðßóù èåñìáíôéêü óôïé÷åßï êáé
ôßèåôáé óå ëåéôïõñãßá ï áíåìéóôÞñáò, åîáóöáëßæïíôáò
ôçí êáôáíïìÞ ôçò èåñìüôçôáò óôï åóùôåñéêü ôïõ
öïýñíïõ ìå ôñüðï áðáëü êáé ïìïéüìïñöï. Ôï
ðñüãñáììá áõôü åíäåßêíõôáé ãéá ôï øÞóéìï
åõáßóèçôùí ôñïößìùí (ð.÷. ãëõêþí ðïõ áðáéôïýí
æýìùóç) êáé ïñéóìÝíá óêåõÜóìáôá mignon óå ôñßá
åðßðåäá ôáõôü÷ñïíá.
Ðñüãñáììá FAST COOKING
Åíåñãïðïéïýíôáé ôá èåñìáíôéêÜ óôïé÷åßá êáé ôßèåôáé
óå ëåéôïõñãßá ï áíåìéóôÞñáò åîáóöáëßæïíôáò ôç
äéáíïìÞ ôçò èåñìüôçôáò óôï åóùôåñéêü ôïõ öïýñíïõ,
óôáèåñÜ êáé ïìïéüìïñöá.
Ôï ðñüãñáììá äåí áðáéôåß ðñïèÝñìáíóç.
Åíäåßêíõôáé éäéáßôåñá ãéá ìáãåéñÝìáôá ãñÞãïñá
ðñïóõóêåõáóìÝíùí ôñïößìùí (êáôåøõãìÝíá Þ
ðñïìáãåéñåìÝíá). Ôá êáëýôåñá áðïôåëÝóìáôá
åðéôõã÷Üíïíôáé ÷ñçóéìïðïéþíôáò ìüíï Ýíá åðßðåäï.
Ðñüãñáììá ÐÏËÕÌÁÃÅÉÑÅÌÁ
Åíåñãïðïéïýíôáé üëá ôá èåñìáíôéêÜ óôïé÷åßá (êÜôù,
åðÜíù êáé êõêëéêü) êáé ôßèåôáé óå ëåéôïõñãßá ï
áíåìéóôÞñáò. ÅðåéäÞ ç èåñìüôçôá åßíáé óôáèåñÞ óå
üëï ôï öïýñíï, ï áÝñáò øÞíåé êáé ñïäïêïêêéíßæåé ôï
öáãçôü ïìïéüìïñöá. Ìðïñåßôå íá ÷ñçóéìïðïéåßôå ôï
ðïëý äýï åðßðåäá ôáõôü÷ñïíá.
ÐñüãñáììáÐÉÔÓÁ
Åíåñãïðïéïýíôáé ôï êÜôù êáé ôï êõêëéêü èåñìáíôéêÜ
óôïé÷åßá êáé ôßèåôáé óå ëåéôïõñãßá ï áíåìéóôÞñáò. Ï
óõíäõáóìüò áõôüò åðéôñÝðåé ãñÞãïñç èÝñìáíóç ôïõ
öïýñíïõ, ìå éó÷õñÞ äéï÷Ýôåõóç èåñìüôçôáò êõñßùò
áðü êÜôù. Áí ÷ñçóéìïðïéåßôå ðåñéóóüôåñá áðü Ýíá
åðßðåäá ôç öïñÜ, ðñÝðåé íá áëëÜîåôå ôç èÝóç ôùí
ðéÜôùí óôç ìÝóç ôïõ ìáãåéñÝìáôïò.
Ðñüãñáììá BARBECUE
Åíåñãïðïéåßôáé ôï åðÜíù êåíôñéêü èåñìáíôéêü
óôïé÷åßï êáé ôßèåôáé óå ëåéôïõñãßá ç óïýâëá (üðïõ
õðÜñ÷åé). Ç õøçëÞ êáé Üìåóç èåñìïêñáóßá ôïõ ãêñéë
óõíéóôÜôáé ãéá ôá ôñüöéìá ðïõ áðáéôïýí õøçëÞ
åðéöáíåéáêÞ èåñìïêñáóßá. Ãéá ôïí ôñüðï áõôüí
ìáãåéñÝìáôïò íá êñáôÜôå ðÜíôá ôçí ðüñôá ôïõ
öïýñíïõ êëåéóôÞ.
Ðñüãñáììá Ðñüãñáììá GRATIN
Åíåñãïðïéåßôáé ôï åðÜíù èåñìáíôéêü óôïé÷åßï êáé
ôßèåíôáé óå ëåéôïõñãßá ï áíåìéóôÞñáò êáé ç óïýâëá
(üðïõ õðÜñ÷åé). Ï óõíäõáóìüò ôùí ÷áñáêôçñéóôéêþí
áõôþí áõîÜíåé ôçí áðïôåëåóìáôéêüôçôá ôçò
ìïíïêáôåõèõíôéêÞò èåñìéêÞò áêôéíïâïëßáò ôùí
èåñìáíôéêþí óôïé÷åßùí ìÝóù ôçò äõíáìéêÞò
êõêëïöïñßáò ôïõ áÝñá óôï åóùôåñéêü ôïõ öïýñíïõ.
Áõôü ðáñåìðïäßæåé ôï åðéöáíåéáêü êÜøéìï ôùí
ôñïößìùí åðéôñÝðïíôáò óôç èåñìüôçôá íá åéó÷ùñÞóåé
óùóôÜ. Ãéá áõôüí ôïí ôñüðï ìáãåéñÝìáôïò íá
êñáôÜôå ôçí ðüñôá ôïõ öïýñíïõ êëåéóôÞ.
Çëåêôñïíéêü Timer*
ÅðéôñÝðåé ôçí áðåéêüíéóç ôçò þñáò êáé ôçò
ëåéôïõñãßáò ôïõ ÷ñïíïìÝôñïõ ìå áíôßóôñïöç ìÝôñçóç.
Ïëåò ïé ëåéôïõñãßåò êáèßóôáíôáé åíåñãÝò ìåôÜ áðü
ðåñßðïõ 7 äåõôåñüëåðôá áðü ôç ñýèìéóÞ ôïõò.
Ðùò ñõèìßæåôáé ôï ñïëüé
ÌåôÜ ôç óýíäåóç ôçò óõóêåõÞò óôï äßêôõï Þ ìåôÜ
áðü ìéá äéáêïðÞ ñåýìáôïò, ç ïèüíç áíáâïóâÞíåé
óôï: 0:00
ÐéÝóôå ôï êïõìðß
G êáé áêïëïýèùò ôá êïõìðéÜ -
êáé + ãéá íá èÝóåôå ôçí áêñéâÞ þñá. Ãéá ôçí ôá÷åßá
ðñïþèçóç êñáôÜôå ðáôçìÝíá ôá êïõìðéÜ.
Åíäå÷üìåíåò åíçìåñþóåéò ôçò þñáò ìðïñïýí íá
äéåíåñãïýíôáé åðáíáëáìâÜíïíôáò ôçí ðáñáðÜíù
ðåñéãñáöåßóá öÜóç.
Ëåéôïõñãßá ÷ñïíïìÝôñïõ
ÁíÜâåé óôç ëåéôïõñãßá áõôÞ ðéÝæïíôáò ôï êïõìðß
n
êáé óôçí ïèüíç áðåéêïíßæåôáé ôï óýìâïëï n. Óå êÜèå
ðßåóç ôïõ êïõìðéïý + áíôéóôïé÷åß ìéá áýîçóç ôïõ
÷ñüíïõ êáôÜ 10 äåõôåñüëåðôá ìÝ÷ñé 99 ëåðôÜ êáé 50
äåõôåñüëåðôá. ÌåôÜ áðü êÜèå ðßåóç ôïõ êïõìðéïý
áíôéóôïé÷åß ìéá áýîçóç ôïõ ÷ñüíïõ åíüò ëåðôïý ìÝ÷ñé
Ýíá ìÝãéóôï 10 ùñþí.
Ìå ôï êïõìðß åðéóôñÝöåôå ðßóù.
*ÕðÜñ÷åé ìüíï óå ïñéóìÝíá ìïíôÝëá

18
GR
Áöïý èÝóåôå ôïí åðéèõìçôü ÷ñüíï, ôï timer áñ÷ßæåé
ôçí áíôßóôñïöç ìÝôñçóç. Ìå ôç ëÞîç ôïõ ÷ñüíïõ,
åêðÝìðåôáé Ýíá ç÷çôéêü óÞìá ðïõ óôáìáôÜåé
ðéÝæïíôáò Ýíá ïðïéïäÞðïôå êïõìðß.
Ìðïñåßôå íá áðåéêïíßóåôå ôçí þñá ðéÝæïíôáò ôï
êïõìðß /, êáé ôï óýìâïëï
n äåß÷íåé üôé ç ëåéôïõñãßá
÷ñïíïìÝôñïõ Ý÷åé ôåèåß. ÌåôÜ áðü ðåñßðïõ 7
äåõôåñüëåðôá, ç ïèüíç åðéóôñÝöåé áõôüìáôá óôï
÷ñïíüìåôñï.
Ãéá íá áêõñþóåôå Ýíá Þäç ôåèÝíôá ÷ñüíï
ÐéÝóôå ôï êïõìðß ìÝ÷ñé ç ïèüíç íá áðåéêïíßóåé
0:00.
Ñýèìéóç Ýíôáóçò ôïõ ç÷çôéêïý óÞìáôïò
Áöïý åðéëÝîåôå êáé åðéâåâáéþóåôå ôéò ñõèìßóåéò ôïõ
ñïëïãéïý, ìÝóù ôïõ êïõìðéïý ìðïñåßôå íá
ñõèìßóåôå ôçí Ýíôáóç ôïõ ç÷çôéêïý óÞìáôïò
óõíáãåñìïý.
ÐñáêôéêÝò óõìâïõëÝò ìáãåéñÝìáôïò
Óôá ìáãåéñÝìáôá ìå áÝñá ìç ÷ñçóéìïðïéåßôå ôéò
èÝóåéò 1 êáé 5: ç ðïëý Üìåóç åðáöÞ ìå ôç èåñìüôçôá
ìðïñåß íá êÜøåé ôá ðëÝïí åõáßóèçôá ôñüöéìá óôéò
õøçëÝò èåñìïêñáóßåò.
Óôá ìáãåéñÝìáôá BARBECUE êáé GRATIN,
åéäéêüôåñá áí ÷ñçóéìïðïéåßôå ôç óïýâëá, íá
ôïðïèåôåßôå ôïí ëéðïóõëëÝêôç óôç èÝóç 1 ãéá ôç
óõëëïãÞ ôùí õðïëåéììÜôùí ìáãåéñÝìáôïò (æïõìéÜ Þ/
êáé ëßðç).
ÐÏËÕ-ÌÁÃźÑÅÌÁ
Íá ÷ñçóéìïðïéåßôå ôéò èÝóåéò 2 êáé 4, èÝôïíôáò óôç
2 ôá ôñüöéìá ðïõ áðáéôïýí ðåñéóóüôåñç
èåñìüôçôá.
Íá ôïðïèåôåßôå ôï ëéðïóõëëÝêôç ÷áìçëÜ êáé ôï
ðëÝãìá øçëÜ.
BARBECUE
Ôïðïèåôåßôå ôï ðëÝãìá óôç èÝóç 3 Þ 4, ôïðïèåôåßôå
ôá ôñüöéìá óôï êÝíôñï ôïõ ðëÝãìáôïò.
ÓõíéóôÜôáé íá èÝôåôå ôç óôÜèìç åíÝñãåéáò óôï
ìÝãéóôï. Ôï Üíù èåñìáíôéêü óôïé÷åßï åëÝã÷åôáé
áðü Ýíá èåñìïóôÜôç êáé ìðïñåß íá ìçí ðáñáìÝíåé
óõíå÷þò áíáììÝíï.
ÖϾÑÍÏÓ ÐºÔÓÁ
×ñçóéìïðïéÞóôå Ýíá ôáøß åëáöñïý áëïõìéíßïõ,
ôïðïèåôþíôáò ôï óôï ðëÝãìá ðïõ óáò ðáñÝ÷åôáé.
Ãéá ìéá ðßôóá ôñáãáíéóôÞ, ìç ÷ñçóéìïðïéåßôå ôï
ëéðïóõëëÝêôç ðïõ, åðéìçêýíïíôáò ôïõò ÷ñüíïõò
øçóßìáôïò, ðáñåìðïäßæåé ôï ó÷çìáôéóìü
êñïýóôáò.
Óå ðåñßðôùóç ìå ðßôóåò ìå ðëïýóéá ãÝìéóç,
óõíéóôÜôáé íá åéóÜãåôå ôç ìïôóáñÝëá óôç ìÝóç
ôïõ øçóßìáôïò.

19
GR
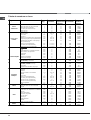
Ðßíáêáò øçóßìáôïò óôï öïýñíï
ÐñïãñÜììáô
á
Ôñ üö éìá ÂÜñïò
(Kg)
ÈÝó ç ôùí
åðéð Ýäùí
ÐñïèÝñ ìá íó
ç (ëåð ôÜ)
Ðñïôåéíüìåíç
èåñìï êñáóß á
× ñüíïò øçó ßìáôïò
(ëåðôÜ)
Ðáñáäïó éá ê
üò Öïýñíïò
ÐÜðéá
Øçôü ìïó÷áñßóéï Þ âïäéíü
Øçôü ÷ïéñéíü
Ìðéóêüôá (ðáóôáöñüëá)
ÊñïóôÜôåò
1
1
1
-
1
3
3
3
3
3
15
15
15
15
15
200
200
200
180
180
65-75
70-75
70-80
15-20
30-35
Öïýñíïò
Æá÷áñïðëá
óôéêÞò
ÊñïóôÜôåò
ÊÝéê öñïýôùí
Plum-cake
ÐáíôåóðÜíé
ÊñÝðåò ìå ãÝìéóç (óå 2 èÝóåéò)
Ìðéóêüôá ìéêñþí äéáóôÜóåùí (óå 2
èÝóåéò)
ÁëìõñÜ æýìçò ìå ôõñß (óå 2 èÝóåéò)
Ìðéíé Ý (óå 3 èÝóåéò)
Ìðéóêüôá (óå 3 èÝóåéò)
ÌáñÝãêåò (óå 3 èÝóåéò)
0.5
1
0.7
0.5
1.2
0.6
0.4
0.7
0.7
0.5
3
2 Þ 3
3
3
2 êáé 4
2 êáé 4
2 êáé 4
1, 3 êáé 5
1, 3 êáé 5
1, 3 êáé 5
15
15
15
15
15
15
15
15
15
15
180
180
180
160
200
190
210
180
180
90
20-30
40-45
40-50
25-30
30-35
20-25
15-20
20-25
20-25
180
ÊáôåøõãìÝíá
Ðßôóá
Ðáóôßôóéï ìå êïëïêõèÜêéá êáé
êáñáâßäåò
×ùñéÜôéêç óðáíáêüðéôá
ØùìÜêéá
ËáæÜíéá
ÔñáãáíÜ øùìÜêéá
0.3
0.4
0.5
0.3
0.5
0.4
0.4
2
2
2
2
2
2
2
-
-
-
-
-
-
-
250
200
220
200
200
180
220
12
20
30-35
25
35
25-30
15-20
ÐñïøçìÝíá
ÖôåñÜ êïôüðïõëïõ ñïäïêïêêéíéóìÝíá 0.4 2 - 200 20-25
Fast cooking
ÖñÝóêá Ôñüöéìá
Ìðéóêüôá (ðáóôáöñüëá)
Plum-cake
ÁëìõñÜ æýìçò ìå ôõñß
0.3
0.6
0.2
2
2
2
-
-
-
200
180
210
15-18
45
10-12
Ðïëõ-
ìá ãåßñåìá
Ðßôóá (óå 2 èÝóåéò)
ËáæÜíéá
Áñíß
Øçôü êïôüðïõëï + ðáôÜôåò
Óêïõìðñß
Plum-cake
Ìðéíé Ý (óå 2 èÝóåéò)
Ìðéóêüôá (óå 2 èÝóåéò)
ÐáíôåóðÜíé (óå 1 èÝóç)
ÐáíôåóðÜíé (óå 2 èÝóåéò)
ÁëìõñÜ êÝéê
1
1
1
1+1
1
1
0.5
0.5
0.5
1
1.5
2 êáé 4
3
2
2 êáé 4
2
2
2 êáé 4
2 êáé 4
2
2 êáé 4
3
15
10
10
15
10
10
10
10
10
10
15
230
180
180
200
180
170
190
180
170
170
200
15-20
30-35
40-45
60-70
30-35
40-50
20-25
10-15
15-20
20-25
25-30
Öïýñíïò
Ðßôóá
Ðßôóá
Øçôü ìïó÷áñßóéï Þ âïäéíü
Êïôüðïõëï
0.5
1
1
3
2
2 Þ 3
15
10
10
220
220
180
15-20
25-30
60-70
Barbecue
Ãëþóóåò êáé óïõðéÝò
ÓïõâëÜêéá áðü êáëáìÜñéá êáé ãáñßäåò
ÓïõðéÝò
ÖéëÝôï ìðáêáëéÜñïõ
Ëá÷áíéêÜ óôï ðëÝãìá
Ìðñé æüëåò ìïó÷áñßóéåò
ËïõêÜíéêá
Hamburger
Óêïõìðñß
Ôïóô (Þ öñõãáíéÜ)
0.7
0.6
0.6
0.8
0.4
0.8
0.6
0.6
1
4
êáé 6
4
4
4
4
3 Þ 4
4
4
4
4
4
-
-
-
-
-
-
-
-
-
-
Max
Max
Max
Max
Max
Max
Max
Max
Max
Max
10-12
8-10
10-15
10-15
15-20
15-20
15-20
10-12
15-20
3-5
Gratin
Êïôüðïõëï óôï ãêñéë
ÓïõðéÝò
1.5
1.5
2
2
10
10
200
200
55-60
30-35

20
GR
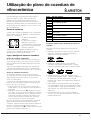
×ñÞóç ôçò õáëïêåñáìéêÞò åðéöÜíåéáò
ìáãåéñÝìáôïò,
Ç êüëëá ðïõ åöáñìüæåôáé óôéò åðåíäýóåéò áöÞíåé
ïñéóìÝíá ß÷íç ãñÜóïõ óôï ãõáëß. Ðñéí ÷ñçóéìïðïéÞóåôå
ôç óõóêåõÞ, ðñïôåßíåôáé íá ôá áðïìáêñýíåôå ìå Ýíá
åéäéêü ãéá ôç óõíôÞñçóç ìç áðïîõóôéêü ðñïúüí. Óôéò
ðñþôåò þñåò ëåéôïõñãßáò ìðïñåß íá áíôéëçöèåßôå ìéá
ïóìÞ ëÜóôé÷ïõ, ðïõ üìùò èá åîáöáíéóôåß óýíôïìá.
Ïé ðåñéï÷Ýò ìáãåéñÝìáôïò
Ôï ðëáßóéï ìáãåéñÝìáôïò äéáèÝôåé çëåêôñéêÜ èåñìáíôéêÜ
óôïé÷åßá. ÊáôÜ ôç ëåéôïõñãßá ãßíïíôáé êüêêéíá:
A. Áêôéíïâüëåò èåñìáíôéêÝò
ðåñéï÷Ýò
B. Áêôéíïâüëåò ðåñéï÷Ýò
ìáãåéñÝìáôïò åðåêôÜóéìåò
C. Åíäåéêôéêü öùôÜêé õðüëïéðçò
èåñìüôçôáò: åðéóçìáßíåé üôé ç
èåñìïêñáóßá ôçò ðåñéï÷Þò ìáãåéñÝìáôïò åßíáé
ìåãáëýôåñç ôùí 60°C, áêüìç êáé óôçí ðåñßðôùóç ðïõ ôï
èåñìáíôéêü óôïé÷åßï Ýóâçóå áëëÜ åßíáé áêüìç æåóôü.
ÁíÜøôå êáé óâÞóôå ôéò æþíåò ìáãåéñÝìáôïò
ÐáñáäïóéáêÝò ðåñéï÷Ýò ìáãåéñÝìáôïò
Ïé ðáñáäïóéáêÝò ðåñéï÷Ýò ìáãåéñÝìáôïò áðïôåëïýíôáé
áðü êõêëéêÜ èåñìáíôéêÜ óôïé÷åßá. Êáèßóôáíôáé êüêêéíá
ìåôÜ áðü äÝêá äåõôåñüëåðôá ðåñßðïõ áðü ôï ÜíáììÜ
ôïõò.
ÊÜèå ðåñéï÷Þ ìáãåéñÝìáôïò äéáèÝôåé Ýíá ÷åéñéóôÞñéï ðïõ
åðéôñÝðåé ôçí åðéëïãÞ 12 äéáöïñåôéêþí èåñìïêñáóéþí,
áðü ìéá åëÜ÷éóôç ôéìÞ 1 Ýùò ìéá ìÝãéóôç 12.
ÅðåêôÜóéìåò ðåñéï÷Ýò ìáãåéñÝìáôïò
Ôá åðåêôÜóéìá èåñìáíôéêÜ óôïé÷åßá (B) áíáãíùñßæïíôáé
áðü ôçí ðáñïõóßá äéðëÞò èåñìáíôéêÞò ðåñéï÷Þò.
Ìðïñåßôå íá áíÜøåôå ìüíï ôçí ìéêñüôåñç åóùôåñéêÞ
æþíç Þ áìöüôåñåò.
Ôï ÷åéñéóôÞñéï åðéôñÝðåé ôçí åðéëïãÞ ìåôáîý äýï
åðéðÝäùí éó÷ýïò, áìöüôåñá ñõèìéæüìåíá áðü ìéá
åëÜ÷éóôç ôéìÞ 1 ìÝ÷ñé ìéá ìÝãéóôç 12:
óôñÝöïíôáò ôïí åðéëïãÝá äåîéüóôñïöá áðü 1 ìÝ÷ñé
12 ôßèåôáé ôï ÷áìçëüôåñï åðßðåäï éó÷ýïò.
ÓôñÝöïíôáò ôïí åðéëïãÝá ìÝ÷ñé ôï ôÝëïò ôçò
äéáäñïìÞò (
A), ðïõ åíôïðßæåôáé áðü Ýíá åëáöñý
ôßíáãìá, åéóÜãåôáé ç ìÝãéóôç éó÷ýò ðïõ ìðïñåß íá
ñõèìéóôåß ìå ôç óåéñÜ ôçò ìåôáîý 12 êáé 1 óôñÝöïíôáò
ôïí åðéëïãÝá áñéóôåñüóôñïöá. Ãéá áí åðáíáöÝñåôå
ôçí åëÜ÷éóôç ôéìÞ éó÷ýïò, åßíáé áíáãêáßï íá
åðáíáöÝñåôå ôïí åðéëïãÝá óôç èÝóç 0.
Óôçí ðåñßðôùóç äéðëþí æùíþí ìáãåéñÝìáôïò, ôï ðñþôï
ìÝñïò ôçò ðåñéóôñïöÞò åíåñãïðïéåß ôç ìéêñüôåñç æþíç
ìáãåéñÝìáôïò (åóùôåñéêÞ). Ãéá íá åíåñãïðïéÞóåôå
áìöüôåñåò (åóùôåñéêÞ êáé åîùôåñéêÞ), åßíáé áíáãêáßï íá
óôñÝøåôå ôïí åðéëïãÝá ìÝ÷ñé ôÝëïò äéáäñïìÞò (
A) êáé íá
åðéëÝîåôå ôï åðéèõìçôü åðßðåäï éó÷ýïò ìåôáîý 12 êáé 1.
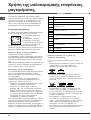
ÐñáêôéêÝò óõìâïõëÝò ãéá ôç ÷ñÞóç ôçò
åðéöÜíåéáò ìáãåéñÝìáôïò
Ãéá íá ðåôý÷åôå ôéò âÝëôéóôåò åðéäüóåéò áðü ôï ðëáßóéï
åóôéþí:
Íá ÷ñçóéìïðïéåßôå êáôóáñüëåò ìå âÜóç, åðßðåäç êáé
ìåãÜëïõ ðÜ÷ïõò, ãéá íá åßóôå âÝâáéïé üôé
åöáñìüæïõí ôÝëåéá óôç èåñìáíôéêÞ ðåñéï÷Þ.
Íá ÷ñçóéìïðïéåßôå ðÜíôá êáôóáñüëåò äéáìÝôñïõ
åðáñêïýò ãéá ôçí êÜëõøç ôçò èåñìáíôéêÞò åóôßáò,
ãéá íá åðùöåëçèåßôå áðü ôç óõíïëéêÞ ðáñáãüìåíç
èåñìüôçôá.
Íá âåâáéùèåßôå üôé ç âÜóç ôùí êáôóáñïëþí åßíáé
áðüëõôá óôåãíÞ êáé êáèáñÞ: ç åöáñìïãÞ ìå ôéò
æþíåò ìáãåéñÝìáôïò, Ýôóé, èá åßíáé âÝëôéóôç êáé ôüóï
ôï ðëáßóéï ìáãåéñÝìáôïò üóï êáé ïé êáôóáñüëåò èá
áíôÝîïõí ðåñéóóüôåñï.
Íá áðïöåýãåôå íá ÷ñçóéìïðïéåßôå ôéò ßäéåò
êáôóáñüëåò ðïõ ÷ñçóéìïðïéåßôå óôïõò êáõóôÞñåò
áåñßïõ: ç óõãêÝíôñùóç èåñìüôçôáò óôïõò êáõóôÞñåò
áåñßïõ ìðïñåß íá ðáñáìïñöþóåé ôç âÜóç ôçò
êáôóáñüëáò, ðïõ ÷Üíåé ôçí åöáñìïãÞ ôçò.
Ìçí áöÞíåôå ðïôÝ ìéá æþíç ìáãåéñÝìáôïò áíáììÝíç
÷ùñßò êáôóáñüëá åðÜíù äéüôé èá ìðïñïýóå íá
÷áëÜóåé.
A
B
B
A
C
ÈÝóç ÁêôéíùôÞ åóôßá
0
ÓâçóôÞ
1
Ãéá ôï ëéþóéìï âïõôýñïõ êáé óïêïëÜôáò
2
3
Ãéá
èÝñìáíóç õãñþí
4
5
Ãéá êñÝìåò êáé óÜëôóåò
6
7
Ãéá ìáãåßñåìá óôç èåñìïêñáóßá âñáóìïý
8
9
Ãéá øçôÜ
10
11
Ãéá ìåãÜëá âñáóôÜ
12
Ãéá ôçãÜíéóìá
)
ÅéóáãùãÞ áìöüôåñùí ôùí æùíþí øçóßìáôïò
A página está carregando...
A página está carregando...
A página está carregando...
A página está carregando...
A página está carregando...
A página está carregando...
A página está carregando...
A página está carregando...
A página está carregando...
A página está carregando...
A página está carregando...
A página está carregando...
A página está carregando...
A página está carregando...
A página está carregando...
A página está carregando...
-
 1
1
-
 2
2
-
 3
3
-
 4
4
-
 5
5
-
 6
6
-
 7
7
-
 8
8
-
 9
9
-
 10
10
-
 11
11
-
 12
12
-
 13
13
-
 14
14
-
 15
15
-
 16
16
-
 17
17
-
 18
18
-
 19
19
-
 20
20
-
 21
21
-
 22
22
-
 23
23
-
 24
24
-
 25
25
-
 26
26
-
 27
27
-
 28
28
-
 29
29
-
 30
30
-
 31
31
-
 32
32
-
 33
33
-
 34
34
-
 35
35
-
 36
36


Indesit CE6VP5 (X) GR Guia de usuario
- Categoria
- Fornos
- Tipo
- Guia de usuario
em outras línguas
- English: Indesit CE6VP5 (X) GR User guide
- slovenčina: Indesit CE6VP5 (X) GR Užívateľská príručka