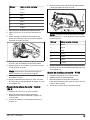
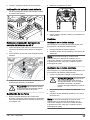
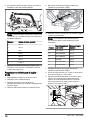
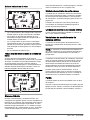
Husqvarna P 535HX Manual do usuário
- Categoria
- Cortadores de grama
- Tipo
- Manual do usuário

P 535HX
EN Operator's manual 2-74
ES Manual de usuario 75-153
IT Manuale dell'operatore 154-231
PT Manual do utilizador 232-309

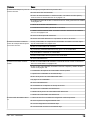
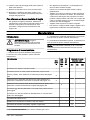
Contents
Introduction..................................................................... 2
Safety............................................................................12
Assembly...................................................................... 27
Operation...................................................................... 31
Maintenance................................................................. 40
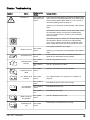
Troubleshooting............................................................ 60
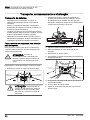
Transportation, storage and disposal........................... 65
Technical data.............................................................. 67
Service..........................................................................72
EC Declaration of Conformity....................................... 73
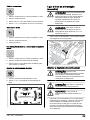
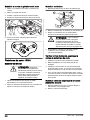
Introduction
Pre-delivery inspection and product
numbers
Note: A pre-delivery inspection has been done of
this product. Make sure that you receive a signed
copy of the pre-delivery inspection document from your
champion.
Service agent contact informa-
tion:
This operator’s manual belongs to product with product number / serial number:
/
Engine:
Transmission:
Product description
The product is a front mower with hybrid technology.
The power sources are a diesel engine and a 48
V system with batteries, motors and generator. The
product has headlights and an easy to use touch
display. The speed is adjusted with forward and
rearward pedals. The product has all-wheel drive (AWD)
and automatic brake. You can use the product with
different types of cutting decks or other Husqvarna
approved equipment.
Intended use
The product is made for operation in commercial areas.
Use the product with cutting decks to cut grass, or
with other equipment for other tasks. Speak to your
Husqvarna dealer for more information about which
cutting decks or equipment that are available. The
product does not operate when the temperature in the
48 V batteries is less then 0 °C/32 °F. For winter use,
we recommend you to park your product indoors with an
ambient temperature temperature more than 0 °C.
Insure your product
Make sure that you have insurance coverage for your
new product. Speak to your insurance company if you
are not sure. We recommend a fully comprehensive
insurance that includes third party, fire, damage, theft
and liability.
Firmware
Make sure that the latest software versions are installed
on the product. Speak to your Husqvarna servicing
dealer.
21591 - 007 - 18.03.2022

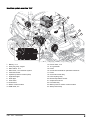
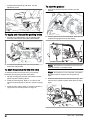
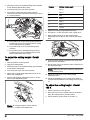
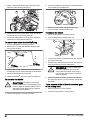
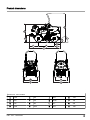
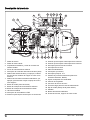
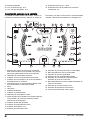
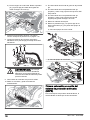
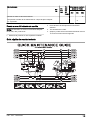
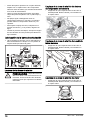
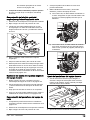
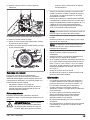
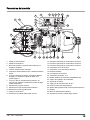
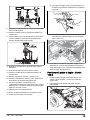
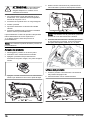
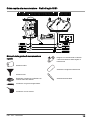
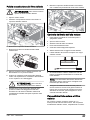
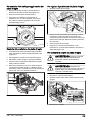
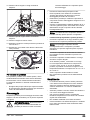
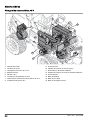
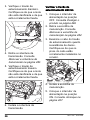
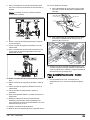
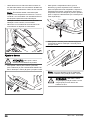
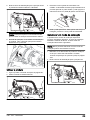
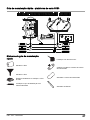
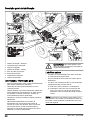
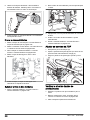
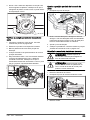
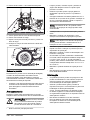
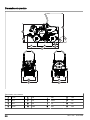
Product overview
12
4
5
6
78 9 1110 12
13
14
17 16 15
21
22
27
28
29
23
18
20
25 24 19
3
26
1. Forward pedal
2. Rearward pedal
3. Hydraulic coupling and power outlet for the auxiliary
system.
4. Manual parking brake
5. Power switch for the auxiliary (AUX) system
6. Lever for the auxiliary system, for example cutting
height for the cutting deck models with the mark X
7. Lever for the hydraulic lifting arms, for example to lift
or lower the cutting deck or other equipment
8. PTO (Power Take Off) button
9. Start button for the electrical drive
10. Start button for the hybrid drive
11. Power key
12. PTO speed switch
13. Optional position for accessory switch
14. Optional position for accessory switch
15. Optional position for accessory switch
16. Power switch for the power outlet
17. Power switch for the headlights
18. Type plate
19. Counterweight (accessory)
20. Main switch, 12 V
21. ROPS (roll over protective structure)
22. Fuel tank cap
23. Seat belt
24. 48 V servicing plug
25. Charging socket for the power supply
26. PTO shaft (below bottom plate)
27. Display
28. Hydraulic lifting arms
29. Service stay, Combi cutting decks
1591 - 007 - 18.03.2022 3

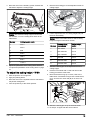
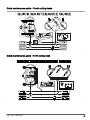
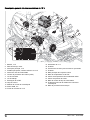
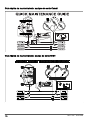
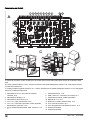
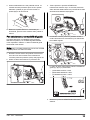
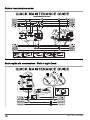
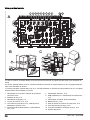
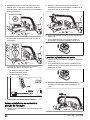
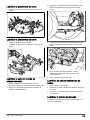
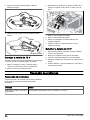
Electrical system
Electrical system overview 48 V
12
11
1
1
8 7
6
4
3
10
14
9
15
5
2
2
13
16
1. Wheel motors
2. Motor controls
3. DC/DC charger, 48 V/12 V
4. Batteries 48 V
5. Generator 48 V
6. Charging socket 48 V
7. Cooling fan for the 48 V batteries
8. Servicing plug 48 V
9. Fuse 48 V
10. Vehicle control unit (VCU)
11. Electrical motor for hydraulic pump
12. Motor control unit for the hydraulic system
13. Fuse 48 V
14. Interlock relay
15. Precharge relay
16. DC/DC charger relay
41591 - 007 - 18.03.2022

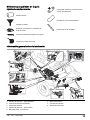
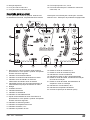
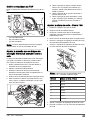
Electrical system overview 12 V
10
11
1
7
8
3
9
6
5
13
20
12
2
4
23
17
16
15
18
21
19
14
22
24
1. Battery, 12 V
2. Glow plug relay, engine
3. Main switch, 12 V
4. Main fuses, 12 V electrical system
5. Fuel level sensor
6. Operator presence control (OPC)
7. High beam light
8. Work light
9. PTO clutch
10. Control box
11. Mower control module
12. USB outlet, 5 V
13. Power outlet, 12 V
14. 12 V generator
15. Fuses
16. Connection terminal for optional accessories
17. Fuses
18. Control box main relay
19. PTO coupling relay
20. Diesel temperature sensor
21. Oil pressure sensor
22. Fuel hold relay
23. Memory fuse for mower control module
24. Start prevent relay
1591 - 007 - 18.03.2022 5

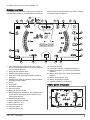
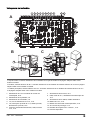
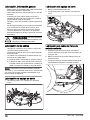
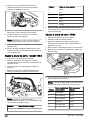
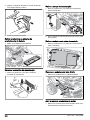
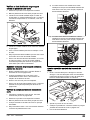
Fuse overview
12
14
15
16
17
18
13
1 2 10 113 4 5 6 7 8 9
A
BC
19
A: Control box. Refer to
To replace the fuses in the fuse box on page 50
for how to replace a fuse.
B: Fuses, 48 V electrical system. Refer to
To replace the fuses of the 48 V electrical system on page 50
for how to
replace a fuse.
C: Main fuses, 12 V electrical system. Refer to
To replace the fuses of the 12 V electrical system on page 50
for how
to replace a fuse.
1. 12 V power to the mower control module , 20 A.
2. Display power, 5 A.
3. Ignition power, 5 A.
4. J14, 12 V warning light, 10 A.
5. J16, 12 V optional switch, optional out, optional
power, 10 A.
6. Parking brake/seat, USB, 12 V outlet, 10 A.
7. Light power, 10 A.
8. USB, 12 V outlet, 12 V switch power.
9. Cabin power, auto fuse.
10. 12 V battery, 10 A.
11. Mower control module AUX, 10 A.
12. 48 V to pre-charge relay, 10 A.
13. 48 V to DC/DC charger in, 10 A.
14. Available position.
15. Available position.
16. 12 V to glow plug relay, 50 A.
17. 12 V to fuse box, 50 A.
18. 12 V main fuse, 150 A
61591 - 007 - 18.03.2022

19. Memory fuse for mower control module, 3 A
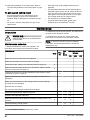
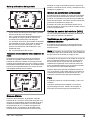
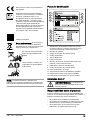
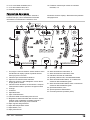
Display overview
The display shows the status of the product. When an
indication light comes on, an information box will show
with information and instructions. Also refer to
Display -
Troubleshooting on page 63
.
1 3
18 1721
22
24
20 19
4
6 8 11
12
13
14
15
16
10
752 9
23
1. Time, language and system menu. This symbol
shows on the display when the product is stationary
for more than 6 seconds.
2. Gauge for the electrical drive
3. Manual parking brake indicator
4. Work light or high beam light indicator / Road kit
work light
5. Speed in km/h when in operation / Total operation
time when in idle position
6. Clock
7. Hour meter
8. Bluetooth® indicator
9. Service indicator
10. Gauge for the PTO speed
11. Screen brightness adjustment. This symbol shows
on the display when the product is stationary for
more than 6 seconds.
12. Generator fault indicator
13. Engine temperature indicator
14. Battery indicator, 12 V
15. Oil pressure indicator
16. Fuel level status, %
17. Fuel level status, bar
18. Fuel level indicator
19. PTO button indicator, engaged/disengaged
20. Battery level status, % / Drive mode selection
indicator
21. Battery level status, bar / Drive mode selection
indicator
22. Battery level indicator, 48 V
23. Battery temperature indicator
24. Operator presence control (OPC)
Display guides and gauges
C
B D
A
1591 - 007 - 18.03.2022 7

• (A): The blue field in the guide is the charge and the
upper half of the guide is the discharge.
• (B): The charge or discharge from the 48 V batteries.
The batteries charge when the indication is in the
lower half of the gauge.
• (C): The green field in the guide shows the
recommended PTO speed. If the load is to high,
the PTO rpm drops and can cause decreased
performance or an engine stop.
• (D): The PTO speed in rpm.
Total operation time and hour meter
The total operation time (A) of the engine shows on
the display when the product is in idle position. The
hour meter (B) shows the operation time in hours and
minutes when hybrid drive is on. The trip meter is
automatically set to 0 when the engine is off for more
than 6 hours.
A
B
Hybrid system
During operation, the 48 V batteries are charged by the
generator when the engine is on. The 48 V batteries are
also charged by the wheel motors through regenerative
braking. The engine also charges the 12 V battery.
The state of charge of the 48 V batteries shows on
the display. You can connect the power supply to the
product to increase the charge of the the 48 V batteries
during stops. Refer to
Display guides and gauges on
page 7
.
Mower control module
The product has a mower control module that gives the
operator information about the product. The information
shows on the display on the instrument panel. Refer to
Display overview on page 7
.
The mower control module enables the servicing dealer
to connect to the product when they do servicing.
Vehicle control unit (VCU)
The VCU controls the different units in the 48 V system,
such as motors and batteries.
Cooling fans for the electrical system
The cooling fan for the 48 V batteries prevents the
temperature in the 48 V batteries to become too hot.
Note: The cooling fan for the 48 V batteries can
continue to operate for until an hour after the power key
is set to OFF.
The cooling fan for the motor control unit for the
hydraulic system operates when the power key is in
the ON position. You find the cooling fan for the motor
control unit for the hydraulic system directly above the
motor control unit for the hydraulic system.
Refer to
Electrical system overview 48 V on page 4
to
see where the cooling fan for the 48 V batteries and
the motor control unit for the hydraulic system is on the
product.
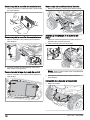
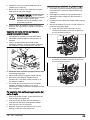
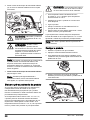
Headlights
The product has a work light and a high beam light.
Push the power switch to position (A) to make the lights
go off. Push the power switch to position (B) to make the
work light come on. Push the power switch to position
(C) to also make the high beam light come on.
AC
B
The work light stays on for 3 minutes after the power key
is set to STOP. When the headlights are on, the display
shows the headlight symbol. Refer to
Display overview
on page 7
.
Power outlet
The voltage of the power outlet is 12 V. The power outlet
has a fuse. Refer to
Fuse overview on page 6
.
Set the power outlet to ON or OFF with the power switch
found on the control panel.
81591 - 007 - 18.03.2022

Operator presence control (OPC)
The OPC is engaged when the operator lifts from the
seat. The OPC indicator in the display comes on. The
OPC engages the safety circuit. Refer to
Safety circuit
on page 22
.
Drive mode
The product has 3 available drive modes (Comfort,
Standard and Dynamic). Standard drive mode is set
from the factory. The last selected drive mode is saved.
To select a drive mode refer to
To select a drive mode
on page 36
.
PTO (Power Take-Off) button
The PTO button engages and disengages the PTO
clutch and the cutting deck or other equipment
connected to it. The correct start conditions must be
obeyed to engage the drive of the blades. Refer
to
Safety circuit on page 22
for the correct start
conditions.
• Pull the PTO button out to engage the drive to the
blades or other equipment.
• Push the PTO button in to disengage the drive to the
blades or other equipment.
PTO speed switch
The PTO speed switch can be set in 3 positions for
operation with different types of cutting decks or other
equipment. When the PTO button is engaged, the
engine speed is supplied to the cutting deck or other
equipment that is attached to the PTO shaft. Refer to
To
set the PTO speed on page 37
and
Technical data on
page 67
.
Note: For operation with cutting decks, use the high
PTO speed.
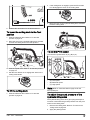
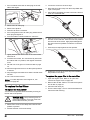
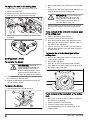
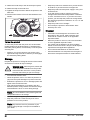
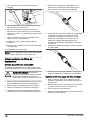
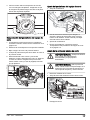
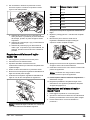
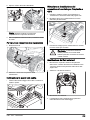
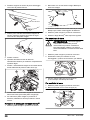
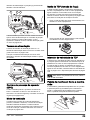
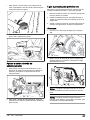
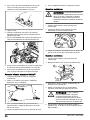
Forward and rearward pedals
The speed is gradually adjusted with 2 pedals. The left
pedal (A) is used to move forward, and the right pedal
(B) is used to move rearward. The product brakes when
the pedals are released.
B
A
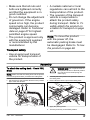
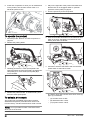
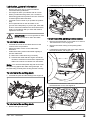
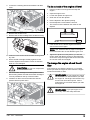
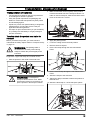
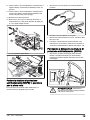
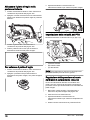
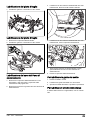
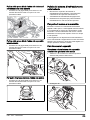
Lever for the hydraulic lifting arms
The lever for the hydraulic lifting arms is used to lift and
lower the cutting deck and other equipment.
A
B
CD
WARNING: It is possible to lower the
hydraulic lifting arms after you stopped the
product. Make sure to stop the product
where the cutting deck or other equipment
can be lowered safely.
• (A) Float position (mow position), the cutting deck or
other equipment follows the ground independently of
the product.
• (B) To lower the cutting deck or other equipment.
• (C) Neutral position.
• (D) To lift the cutting deck or other equipment.
1591 - 007 - 18.03.2022 9

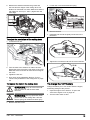
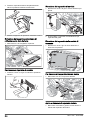
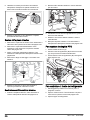
Auxiliary power switch (AUX)
The auxiliary power switch has different functions for
different cutting decks and for other equipment. Refer
to the operator's manual of the cutting deck or other
equipment.
Cutting deck
With this product you can use the Combi cutting decks
or the R180 cutting deck. Refer to
Technical data on
page 67
.
The Combi cutting decks operate with BioClip® or rear
discharge. The R180 cutting decks operate with rear
discharge. BioClip® cuts the grass into smaller pieces
(mulch), that works as a fertilizer to the lawn. When the
BioClip® plug is removed, the cutting deck discharges
the grass rearward.
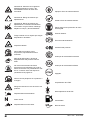
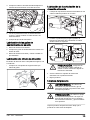
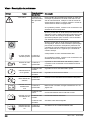
Symbols on the product
WARNING: This product can be
dangerous and cause serious injury or
death to the operator or others. Be careful
and use the product correctly.
Read the operator's manual carefully
and make sure that you understand the
instructions before you use this product.
Keep persons and animals at a safe
distance from the work area.
Remove the power key before you do
maintenance on the product.
Rotating blades. Keep body parts away
from the cutting deck when the engine is
on.
Warning: rotating parts. Keep body parts
away.
Warning: rotating belt pulley. Keep body
parts away when the engine is on.
Warning: risk of crush injuries.
Warning: risk of crush injuries. The lift
arms will move with great force, keep
body parts away.
Look out for thrown objects and ricochets.
Hot surface.
Never use the product if persons,
especially children, or animals, are in the
vicinity.
Look behind you before and while you
move the product rearward.
Never cut grass across a slope. Do not
cut grass on ground that slopes more than
10°. See
To cut grass on slopes on page
17
.
Never carry passengers on the product or
equipment.
Risk of injury if the product overturns.
Move forward.
Neutral gear.
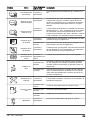
10 1591 - 007 - 18.03.2022

Move rearward.
Apply parking brake.
Release parking brake.
Always use approved hearing protection.
Float position.
Parking brake.
Activate the product.
Start electrical drive.
Start hybrid drive.
Power off.
Push in the PTO button.
Pull out the PTO button.
Fuel.
Oil level.
This product is in accordance with
applicable EC directives.
Noise emission to the environment
as per EU and UK directives and
regulations, and New South Wales
legislation "Protection of the Environment
Operations (Noise Control) Regulation
2017". The guaranteed sound power level
of the product is specified is specified in
Technical data on page 67
and on the
label.
Scannable code
Environmental mark. The product or
package of the product is not domestic
waste. Recycle it at a recycling station for
electrical and electronic equipment.
Do not use the seat belt if the
ROPS is down.
Always use the seat belt when
the ROPS is up.
Note: Other symbols/decals on the product refer to
certification requirements for some commercial areas.
1591 - 007 - 18.03.2022 11

Type plate
1
2
3
4
5
6
7
8
9
10
11
12
13
1. Husqvarna Identity (HID) with article number, factory
and line, date, sequence number and control number
2. Model name
3. Product number code (PNC)
4. Scannable code
5. Production year
6. Rated power
7. Serial number with production date, year, week and
sequence number
8. Manufacturer and manufacturer address
9. Product number code (PNC)
10. Product weight, unladen
11. Maximum front axle weight (GAWR)
12. Maximum rear axle weight (GAWR)
13. Maximum laden weight (GCWR)
Euro V Emissions
WARNING: Tampering with the engine
voids the EU type-approval of this product.
Product liability
As referred to in the product liability laws, we are not
liable for damages that our product causes if:
• the product is incorrectly repaired.
• the product is repaired with parts that are not
from the manufacturer or not approved by the
manufacturer.
• the product has an accessory that is not from the
manufacturer or not approved by the manufacturer.
• the product is not repaired at an approved service
center or by an approved authority.
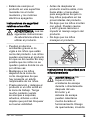
Safety
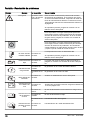
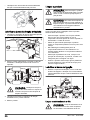
Safety definitions
Warnings, cautions and notes
are used to point out specially
important parts of the manual.
WARNING: Used if
there is a risk of
injury or death for the
operator or bystanders
if the instructions in the
manual are not obeyed.
CAUTION: Used if there
is a risk of damage to the
product, other materials
or the adjacent area if
the instructions in the
manual are not obeyed.
Note: Used to give more
information that is necessary in
a given situation.
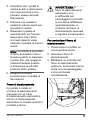
General safety instructions
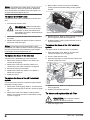
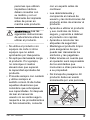
WARNING: This product
can cut off hands and
feet and throw objects.
Serious injury or death
may occur if you do
12 1591 - 007 - 18.03.2022

not obey the safety
instructions.
WARNING: Do not
continue to use a product
with damaged cutting
equipment. Damaged
cutting equipment can
throw objects and
cause serious injury or
death. Replace damaged
blades immediately.
WARNING: This
product produces an
electromagnetic field
during operation. This
field may under some
circumstances interfere
with active or passive
medical implants. To
reduce the risk of
serious or fatal injury
we recommend persons
with medical implants to
consult their physician
and the medical implant
manufacturer before
operating this product.
WARNING: Read the
warning instructions that
follow before you use the
product.
• Do not use the product
with cutting decks or other
equipment that is not
approved by Husqvarna.
• Do not apply too much load to
the product. For example do
not tow or lift more than the
product is approved for.
• Always be careful and use
your common sense. Avoid all
situations which you consider
to be beyond your capability.
If you feel uncertainty about
the operating procedures
after you read the operator's
manual, consult an expert
before you continue.
• Read and understand the
operator's manual and the
instructions on the product
carefully before you start the
product.
• Learn how to use the product
and its controls safely and
learn how to stop the product
quickly.
• Learn to recognize the safety
decals.
• Keep the product clean
to make sure that you
can clearly read signs and
stickers.
• Keep in mind that the
operator will be held
1591 - 007 - 18.03.2022 13

responsible for accidents that
involve other persons or their
property.
• Do not transport passengers.
The product must only be
used by one person.
• Do not let the product stay
unsupervised with the engine
or the electrical motors on.
Always stop the blades, apply
the parking brake, stop the
engine and the electrical
motors, and remove the
power key before you let the
product stay unsupervised.
• Only use the product in
daylight or in other well-lit
conditions. Keep the product
at a safe distance from holes
or other irregularities in the
ground. Look out for other
possible risks.
• Do not use the product in
bad weather, for example
in fog, in rain, moist or in
wet locations, strong winds,
intense cold, risk of lightning,
etc.
• Find and mark stones and
other fixed objects to prevent
collision.
• Clear the area of objects such
as stones, toys, wires, etc.
that may become caught in
the blades and be thrown out.
• Do not let children or other
persons not approved for
operation of the product to
use or do servicing on it.
Local laws may regulate the
age of the user.
• Make sure that nobody else
is in the vicinity of the
product when you start the
electrical motors and the
engine, engage the drive or
start to move the product.
• Keep an eye on the traffic
when you mow near a road or
move across a road.
• Do not use the product if you
are fatigued, while under the
influence of alcohol or drugs,
medicine or anything that
14 1591 - 007 - 18.03.2022

can have a negative effect
on your vision, alertness,
coordination or judgement.
• Do not change the adjustment
for the engine speed control.
• Always park the product on a
level surface with the engine
and the electrical motors
stopped.
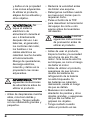
Safety instructions regarding
children
WARNING: Read the
warning instructions that
follow before you use the
product.
•Serious accidents can occur
if you are not on your guard
for children in the vicinity of
the product. Children may
come near the product when
you do not see them. It is
very possible that children do
not stay where you last saw
them.
•Keep children away from the
area to be mowed. Make sure
that an adult is responsible for
the children.
•Keep an eye out and stop
the product if children enter
the work area. Be very careful
near corners, bushes, trees or
other objects that prevents a
clear view.
•Before and while you move
the product in reverse, look
behind you and look down to
make sure there are no small
children in the vicinity of the
product.
•Do not let children ride along.
They can fall off and get
seriously injured or prevent
safe maneuvering of the
product.
•Do not let children operate
the product.
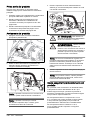
Safety instructions for operation
WARNING: Do not touch
the engine or exhaust
system during or directly
after operation. The
engine and the exhaust
system become very hot
during operation. Risk of
burn injuries, fire and
damage to property or
adjacent areas. When
you operate the product,
1591 - 007 - 18.03.2022 15

keep away from bushes
and other objects.
WARNING: Do not touch
the power electronics
during or directly
after operation. The
batteries, generator,
motor controls, fuses
or electrical cables
become very hot during
operation. Risk of burn
injuries, electrical shock,
fire and damage to
property or adjacent
areas.
WARNING: Read the
warning instructions that
follow before you use the
product.
•Always look down and behind
you before and while you
move in reverse. Look out for
large and small obstacles.
•Decrease the speed before
you turn around a corner.
•Stop the blades when you
move across areas that you
do not cut.
•Push the PTO button to
disengage the drive on
the cutting deck or other
equipment before you lift from
the seat.
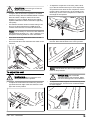
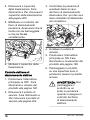
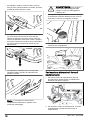
CAUTION: Read the
caution instructions that
follow before you use the
product.
•Before you operate the
product, clear the cold air
intake of the engine from
grass and dirt. If the cold air
intake is blocked, there is a
risk of engine damage.
•Before you operate the
product, make sure that the
air intake to the battery
cooling system is not blocked.
There is a risk of damage to
the batteries if they get too
hot.
•Move around stones and
other larger objects carefully
and make sure that the
blades do not hit the objects.
•Be careful if you operate the
product near water. Do not
use the ROPS and the seat
belt near water.
•Do not operate the product
across objects. Stop and
examine the product and
cutting deck if you operate
the product across or into
an object. If it is necessary,
make repairs before you
restart.
16 1591 - 007 - 18.03.2022

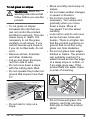
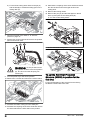
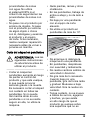
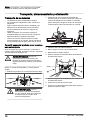
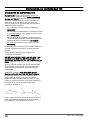
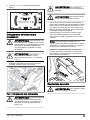
To cut grass on slopes
WARNING: Read the
warning instructions that
follow before you use the
product.
•To cut grass on slopes
increases the risk that you
can not control the product
and that it overturns. This can
cause injury or death. It is
necessary to cut the grass
carefully on all slopes. If you
cannot reverse up a slope or
if you do not feel safe, do not
cut it.
•Remove stones, branches
and other obstacles.
•Cut up and down the slope,
not from side to side.
•Do not move down a slope
with the cutting deck lifted.
•Do not operate the product on
ground that slopes more than
10°.
•Do not start or stop on a
slope.
•Move smoothly and slowly on
slopes.
•Do not make sudden changes
in speed or direction.
•Do not turn more than
necessary. Turn slowly and
gradually when you move
down a slope. Move at
low speed. Turn the wheel
carefully.
•Look out for and do not move
across furrows, holes and
bumps. There is a higher risk
that the product overturns on
ground that is not flat. Long
grass can hide obstacles.
•Do not cut grass near edges,
ditches or banks. The product
can suddenly overturn if a
wheel moves across the edge
of a steep slope or a ditch, or
if an edge gives way. If the
product falls into water, there
is a risk of drowning.
•Do not mow wet grass. It is
slippery, and tires can lose
their grip so that the product
skids.
1591 - 007 - 18.03.2022 17

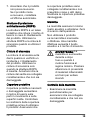
•Do not put your foot on the
ground to try to make the
product more stable.
•Move very carefully if an
accessory or other object is
attached that can make the
product less stable.
•To make the product
more stable, attach the
counterweights. Speak to
your dealer for more
information.
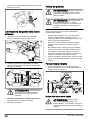
Personal protective equipment
WARNING: Read the
warning instructions that
follow before you use the
product.
•Use approved personal
protective equipment when
you use the product. Personal
protective equipment cannot
fully prevent injury but it
decreases the degree of
injury if an accident does
occur. Let your dealer
help you select the right
equipment.
•Use approved hearing
protection that provides
adequate noise reduction.
Long-term exposure to
noise can result
in permanent hearing
impairment. Husqvarna
recommends that operators
use hearing protectors when
using products for a longer
coherent time of a day.
Continual and regular users
should have their hearing
checked regularly. Note that
hearing protectors limit the
ability to hear sounds and
warning signals.
•Use approved eye protection.
If you use a visor, you must
also use approved protective
goggles. Approved protective
goggles must agree with
the ANSI Z87.1 standard in
the USA or EN 166 in EU
countries.
•Always wear protective shoes
or protective boots. Steel toes
are recommended. Do not
use the product barefoot.
•Wear gloves when necessary,
for example when you attach,
18 1591 - 007 - 18.03.2022

examine or clean the cutting
equipment.
•Do not wear loose-fitting
clothing, jewelry or other
items that can get caught in
moving parts.
•Keep first aid equipment
and fire extinguisher close at
hand.
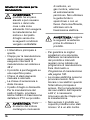
Battery safety
WARNING: Read the
warning instructions that
follow before you use the
product.
General:
•Read all safety warnings
and all instructions. Failure
to follow the warnings and
instructions may result in
electric shock and fire and/or
serious injury.
•Regular check that the
batteries are intact. Damaged
or modified batteries may
exhibit unpredictable behavior
resulting in fire, explosion or
risk of injury. Never repair or
open damaged batteries.
•A damaged battery can cause
an explosion and cause
injury. If the battery has a
deformation or is damaged,
do not use the product
and speak to an approved
Husqvarna service agent.
•Do not dismantle, open or
shred batteries.
•Do not subject batteries to
mechanical shock.
•Do not expose cells or
batteries to heat or fire. Avoid
storage in direct sunlight.
•Do not short circuit batteries.
Do not keep batteries in
storage where they can short
circuit each other or be
short circuited by other metal
objects.
•Do not allow battery content
to come in contact with
the skin or eyes. If contact
has been made, wash the
affected area with copious
amounts of water and seek
medical advice.
•Do not use any battery which
is not designed for use with
the equipment.
•Do not mix cells of different
manufacture, capacity, size or
type within a device.
•Keep cells or batteries out of
the reach of children.
•Keep the battery clean and
dry.
•Use only the battery in the
application for which it was
intended.
12 V battery:
1591 - 007 - 18.03.2022 19

•Observe the plus (+) and
minus (-) marks on the battery
and equipment, and ensure
correct use.
•Always purchase the correct
battery for the equipment.
•Wipe the battery terminals
with a clean dry cloth if they
become dirty.
48 V batteries:
•The Husqvarna 48 V
batteries, are exclusively
used as power supply for the
Husqvarna hybrid P 535HX.
To avoid injury, the battery
must not be used as a power
source for other devices.
•Never use batteries or
appliances that is faulty,
modified or damaged.
•Never attempt to modify or
repair the appliances or the
batteries. Entrust all repairs
to your authorized servicing
dealer only.
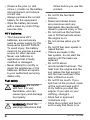
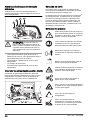
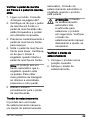
Fuel safety
WARNING: Be careful
with fuel. It is very
flammable, and can
cause injury and damage
to property.
WARNING: Read the
warning instructions that
follow before you use the
product.
•Do not fill the fuel tank
indoors.
•Diesel and diesel fumes
are poisonous and very
flammable. Be careful with
diesel to prevent injury or fire.
•Do not remove the fuel tank
cap or fill the fuel tank when
the engine is on.
•Do not smoke when you fill
fuel.
•Do not fill fuel near sparks or
naked flames.
•If there are leaks in the
fuel system, do not start the
engine until the leaks are
repaired.
•Do not fill above
recommended fuel level. The
heat from the engine and the
sun makes the fuel expand
and the fuel overflows if the
tank is filled too much.
•Do not fill too much. If you
spill fuel on the product, clean
up the spill and wait until it
is dry before you start the
engine. If you spill on your
clothing, change it.
•Store fuel in approved
containers only.
•Store the product and fuel in
such a way that there is no
20 1591 - 007 - 18.03.2022
A página está carregando...
A página está carregando...
A página está carregando...
A página está carregando...
A página está carregando...
A página está carregando...
A página está carregando...
A página está carregando...
A página está carregando...
A página está carregando...
A página está carregando...
A página está carregando...
A página está carregando...
A página está carregando...
A página está carregando...
A página está carregando...
A página está carregando...
A página está carregando...
A página está carregando...
A página está carregando...
A página está carregando...
A página está carregando...
A página está carregando...
A página está carregando...
A página está carregando...
A página está carregando...
A página está carregando...
A página está carregando...
A página está carregando...
A página está carregando...
A página está carregando...
A página está carregando...
A página está carregando...
A página está carregando...
A página está carregando...
A página está carregando...
A página está carregando...
A página está carregando...
A página está carregando...
A página está carregando...
A página está carregando...
A página está carregando...
A página está carregando...
A página está carregando...
A página está carregando...
A página está carregando...
A página está carregando...
A página está carregando...
A página está carregando...
A página está carregando...
A página está carregando...
A página está carregando...
A página está carregando...
A página está carregando...
A página está carregando...
A página está carregando...
A página está carregando...
A página está carregando...
A página está carregando...
A página está carregando...
A página está carregando...
A página está carregando...
A página está carregando...
A página está carregando...
A página está carregando...
A página está carregando...
A página está carregando...
A página está carregando...
A página está carregando...
A página está carregando...
A página está carregando...
A página está carregando...
A página está carregando...
A página está carregando...
A página está carregando...
A página está carregando...
A página está carregando...
A página está carregando...
A página está carregando...
A página está carregando...
A página está carregando...
A página está carregando...
A página está carregando...
A página está carregando...
A página está carregando...
A página está carregando...
A página está carregando...
A página está carregando...
A página está carregando...
A página está carregando...
A página está carregando...
A página está carregando...
A página está carregando...
A página está carregando...
A página está carregando...
A página está carregando...
A página está carregando...
A página está carregando...
A página está carregando...
A página está carregando...
A página está carregando...
A página está carregando...
A página está carregando...
A página está carregando...
A página está carregando...
A página está carregando...
A página está carregando...
A página está carregando...
A página está carregando...
A página está carregando...
A página está carregando...
A página está carregando...
A página está carregando...
A página está carregando...
A página está carregando...
A página está carregando...
A página está carregando...
A página está carregando...
A página está carregando...
A página está carregando...
A página está carregando...
A página está carregando...
A página está carregando...
A página está carregando...
A página está carregando...
A página está carregando...
A página está carregando...
A página está carregando...
A página está carregando...
A página está carregando...
A página está carregando...
A página está carregando...
A página está carregando...
A página está carregando...
A página está carregando...
A página está carregando...
A página está carregando...
A página está carregando...
A página está carregando...
A página está carregando...
A página está carregando...
A página está carregando...
A página está carregando...
A página está carregando...
A página está carregando...
A página está carregando...
A página está carregando...
A página está carregando...
A página está carregando...
A página está carregando...
A página está carregando...
A página está carregando...
A página está carregando...
A página está carregando...
A página está carregando...
A página está carregando...
A página está carregando...
A página está carregando...
A página está carregando...
A página está carregando...
A página está carregando...
A página está carregando...
A página está carregando...
A página está carregando...
A página está carregando...
A página está carregando...
A página está carregando...
A página está carregando...
A página está carregando...
A página está carregando...
A página está carregando...
A página está carregando...
A página está carregando...
A página está carregando...
A página está carregando...
A página está carregando...
A página está carregando...
A página está carregando...
A página está carregando...
A página está carregando...
A página está carregando...
A página está carregando...
A página está carregando...
A página está carregando...
A página está carregando...
A página está carregando...
A página está carregando...
A página está carregando...
A página está carregando...
A página está carregando...
A página está carregando...
A página está carregando...
A página está carregando...
A página está carregando...
A página está carregando...
A página está carregando...
A página está carregando...
A página está carregando...
A página está carregando...
A página está carregando...
A página está carregando...
A página está carregando...
A página está carregando...
A página está carregando...
A página está carregando...
A página está carregando...
A página está carregando...
A página está carregando...
A página está carregando...
A página está carregando...
A página está carregando...
A página está carregando...
A página está carregando...
A página está carregando...
A página está carregando...
A página está carregando...
A página está carregando...
A página está carregando...
A página está carregando...
A página está carregando...
A página está carregando...
A página está carregando...
A página está carregando...
A página está carregando...
A página está carregando...
A página está carregando...
A página está carregando...
A página está carregando...
A página está carregando...
A página está carregando...
A página está carregando...
A página está carregando...
A página está carregando...
A página está carregando...
A página está carregando...
A página está carregando...
A página está carregando...
A página está carregando...
A página está carregando...
A página está carregando...
A página está carregando...
A página está carregando...
A página está carregando...
A página está carregando...
A página está carregando...
A página está carregando...
A página está carregando...
A página está carregando...
A página está carregando...
A página está carregando...
A página está carregando...
A página está carregando...
A página está carregando...
A página está carregando...
A página está carregando...
A página está carregando...
A página está carregando...
A página está carregando...
A página está carregando...
A página está carregando...
A página está carregando...
A página está carregando...
A página está carregando...
A página está carregando...
A página está carregando...
A página está carregando...
A página está carregando...
A página está carregando...
A página está carregando...
A página está carregando...
A página está carregando...
A página está carregando...
A página está carregando...
A página está carregando...
A página está carregando...
A página está carregando...
A página está carregando...
A página está carregando...
A página está carregando...
A página está carregando...
A página está carregando...
A página está carregando...
A página está carregando...
A página está carregando...
A página está carregando...
A página está carregando...
A página está carregando...
A página está carregando...
A página está carregando...
A página está carregando...
A página está carregando...
A página está carregando...
-
 1
1
-
 2
2
-
 3
3
-
 4
4
-
 5
5
-
 6
6
-
 7
7
-
 8
8
-
 9
9
-
 10
10
-
 11
11
-
 12
12
-
 13
13
-
 14
14
-
 15
15
-
 16
16
-
 17
17
-
 18
18
-
 19
19
-
 20
20
-
 21
21
-
 22
22
-
 23
23
-
 24
24
-
 25
25
-
 26
26
-
 27
27
-
 28
28
-
 29
29
-
 30
30
-
 31
31
-
 32
32
-
 33
33
-
 34
34
-
 35
35
-
 36
36
-
 37
37
-
 38
38
-
 39
39
-
 40
40
-
 41
41
-
 42
42
-
 43
43
-
 44
44
-
 45
45
-
 46
46
-
 47
47
-
 48
48
-
 49
49
-
 50
50
-
 51
51
-
 52
52
-
 53
53
-
 54
54
-
 55
55
-
 56
56
-
 57
57
-
 58
58
-
 59
59
-
 60
60
-
 61
61
-
 62
62
-
 63
63
-
 64
64
-
 65
65
-
 66
66
-
 67
67
-
 68
68
-
 69
69
-
 70
70
-
 71
71
-
 72
72
-
 73
73
-
 74
74
-
 75
75
-
 76
76
-
 77
77
-
 78
78
-
 79
79
-
 80
80
-
 81
81
-
 82
82
-
 83
83
-
 84
84
-
 85
85
-
 86
86
-
 87
87
-
 88
88
-
 89
89
-
 90
90
-
 91
91
-
 92
92
-
 93
93
-
 94
94
-
 95
95
-
 96
96
-
 97
97
-
 98
98
-
 99
99
-
 100
100
-
 101
101
-
 102
102
-
 103
103
-
 104
104
-
 105
105
-
 106
106
-
 107
107
-
 108
108
-
 109
109
-
 110
110
-
 111
111
-
 112
112
-
 113
113
-
 114
114
-
 115
115
-
 116
116
-
 117
117
-
 118
118
-
 119
119
-
 120
120
-
 121
121
-
 122
122
-
 123
123
-
 124
124
-
 125
125
-
 126
126
-
 127
127
-
 128
128
-
 129
129
-
 130
130
-
 131
131
-
 132
132
-
 133
133
-
 134
134
-
 135
135
-
 136
136
-
 137
137
-
 138
138
-
 139
139
-
 140
140
-
 141
141
-
 142
142
-
 143
143
-
 144
144
-
 145
145
-
 146
146
-
 147
147
-
 148
148
-
 149
149
-
 150
150
-
 151
151
-
 152
152
-
 153
153
-
 154
154
-
 155
155
-
 156
156
-
 157
157
-
 158
158
-
 159
159
-
 160
160
-
 161
161
-
 162
162
-
 163
163
-
 164
164
-
 165
165
-
 166
166
-
 167
167
-
 168
168
-
 169
169
-
 170
170
-
 171
171
-
 172
172
-
 173
173
-
 174
174
-
 175
175
-
 176
176
-
 177
177
-
 178
178
-
 179
179
-
 180
180
-
 181
181
-
 182
182
-
 183
183
-
 184
184
-
 185
185
-
 186
186
-
 187
187
-
 188
188
-
 189
189
-
 190
190
-
 191
191
-
 192
192
-
 193
193
-
 194
194
-
 195
195
-
 196
196
-
 197
197
-
 198
198
-
 199
199
-
 200
200
-
 201
201
-
 202
202
-
 203
203
-
 204
204
-
 205
205
-
 206
206
-
 207
207
-
 208
208
-
 209
209
-
 210
210
-
 211
211
-
 212
212
-
 213
213
-
 214
214
-
 215
215
-
 216
216
-
 217
217
-
 218
218
-
 219
219
-
 220
220
-
 221
221
-
 222
222
-
 223
223
-
 224
224
-
 225
225
-
 226
226
-
 227
227
-
 228
228
-
 229
229
-
 230
230
-
 231
231
-
 232
232
-
 233
233
-
 234
234
-
 235
235
-
 236
236
-
 237
237
-
 238
238
-
 239
239
-
 240
240
-
 241
241
-
 242
242
-
 243
243
-
 244
244
-
 245
245
-
 246
246
-
 247
247
-
 248
248
-
 249
249
-
 250
250
-
 251
251
-
 252
252
-
 253
253
-
 254
254
-
 255
255
-
 256
256
-
 257
257
-
 258
258
-
 259
259
-
 260
260
-
 261
261
-
 262
262
-
 263
263
-
 264
264
-
 265
265
-
 266
266
-
 267
267
-
 268
268
-
 269
269
-
 270
270
-
 271
271
-
 272
272
-
 273
273
-
 274
274
-
 275
275
-
 276
276
-
 277
277
-
 278
278
-
 279
279
-
 280
280
-
 281
281
-
 282
282
-
 283
283
-
 284
284
-
 285
285
-
 286
286
-
 287
287
-
 288
288
-
 289
289
-
 290
290
-
 291
291
-
 292
292
-
 293
293
-
 294
294
-
 295
295
-
 296
296
-
 297
297
-
 298
298
-
 299
299
-
 300
300
-
 301
301
-
 302
302
-
 303
303
-
 304
304
-
 305
305
-
 306
306
-
 307
307
-
 308
308
-
 309
309
-
 310
310
-
 311
311
-
 312
312


Husqvarna P 535HX Manual do usuário
- Categoria
- Cortadores de grama
- Tipo
- Manual do usuário
em outras línguas
- español: Husqvarna P 535HX Manual de usuario
- italiano: Husqvarna P 535HX Manuale utente
- English: Husqvarna P 535HX User manual
Outros documentos
-
Simplicity 5901667 Manual do usuário
-
Troy-Bilt 13A877KT309 Manual do usuário
-
-
Craftsman 19A70043799 Manual do proprietário
-
-
-
-
-
Simplicity 2691295-00 Manual do usuário