Creative Zen Vision Cell Phone Guia rápido
- Categoria
- Leitores de MP3 / MP4
- Tipo
- Guia rápido
Este manual também é adequado para

i
English............................................ 1
Français........................................ 16
Español......................................... 32
Brasileiro...................................... 47
CLI_Monet QS_Rev 2.book Page i Tuesday, August 30, 2005 10:28 AM

ii
CLI_Monet QS_Rev 2.book Page ii Tuesday, August 30, 2005 10:28 AM

Congratulations! 1
English
Congratulations!
Thank you for purchasing Creative’s multiformat player, Creative Zen™
Vision. Read on to learn how to get started with your new player!
To get the most out of your player, also read the comprehensive User’s
Guide on your Installation and Applications CD.
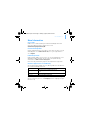
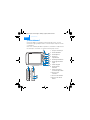
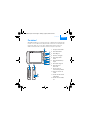
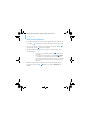
1
3
2
4
5
6
8
7
9
10
11
12
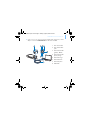
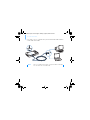
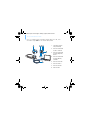
1. Infrared receiver
2. Menu/Back button
3. Options button
4. Navigation buttons
5. Play/Pause button
6. Next/Fast-Forward
button
7. Integrated speaker
8. Previous/Rewind button
9. Compact Flash memory
card slot
10. Headphone jack
11. A/V Out jack
12. DC IN 5V jack
CLI_Monet QS_Rev 2.book Page 1 Tuesday, August 30, 2005 10:28 AM

2 Congratulations!
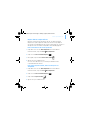
Selecting Options
In the following sections of this document, we use the term ‘Select’ to
indicate that you should use the Navigation buttons (Up, Down, Left or
Right) to highlight menu options, then press the OK button to select the
option.
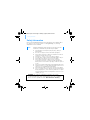
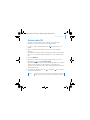
1 2 3 4 5
7 6
1. Volume Decrease button
2. Volume Increase button
3. Power switch
4. Lock icon
5. Microphone
6. Docking connector
7. USB 2.0 port
1. Up button
2. OK button
3. Right button
4. Down button
5. Left button
1
2
3
4
5
CLI_Monet QS_Rev 2.book Page 2 Tuesday, August 30, 2005 10:28 AM
Getting Started 3
Getting Started
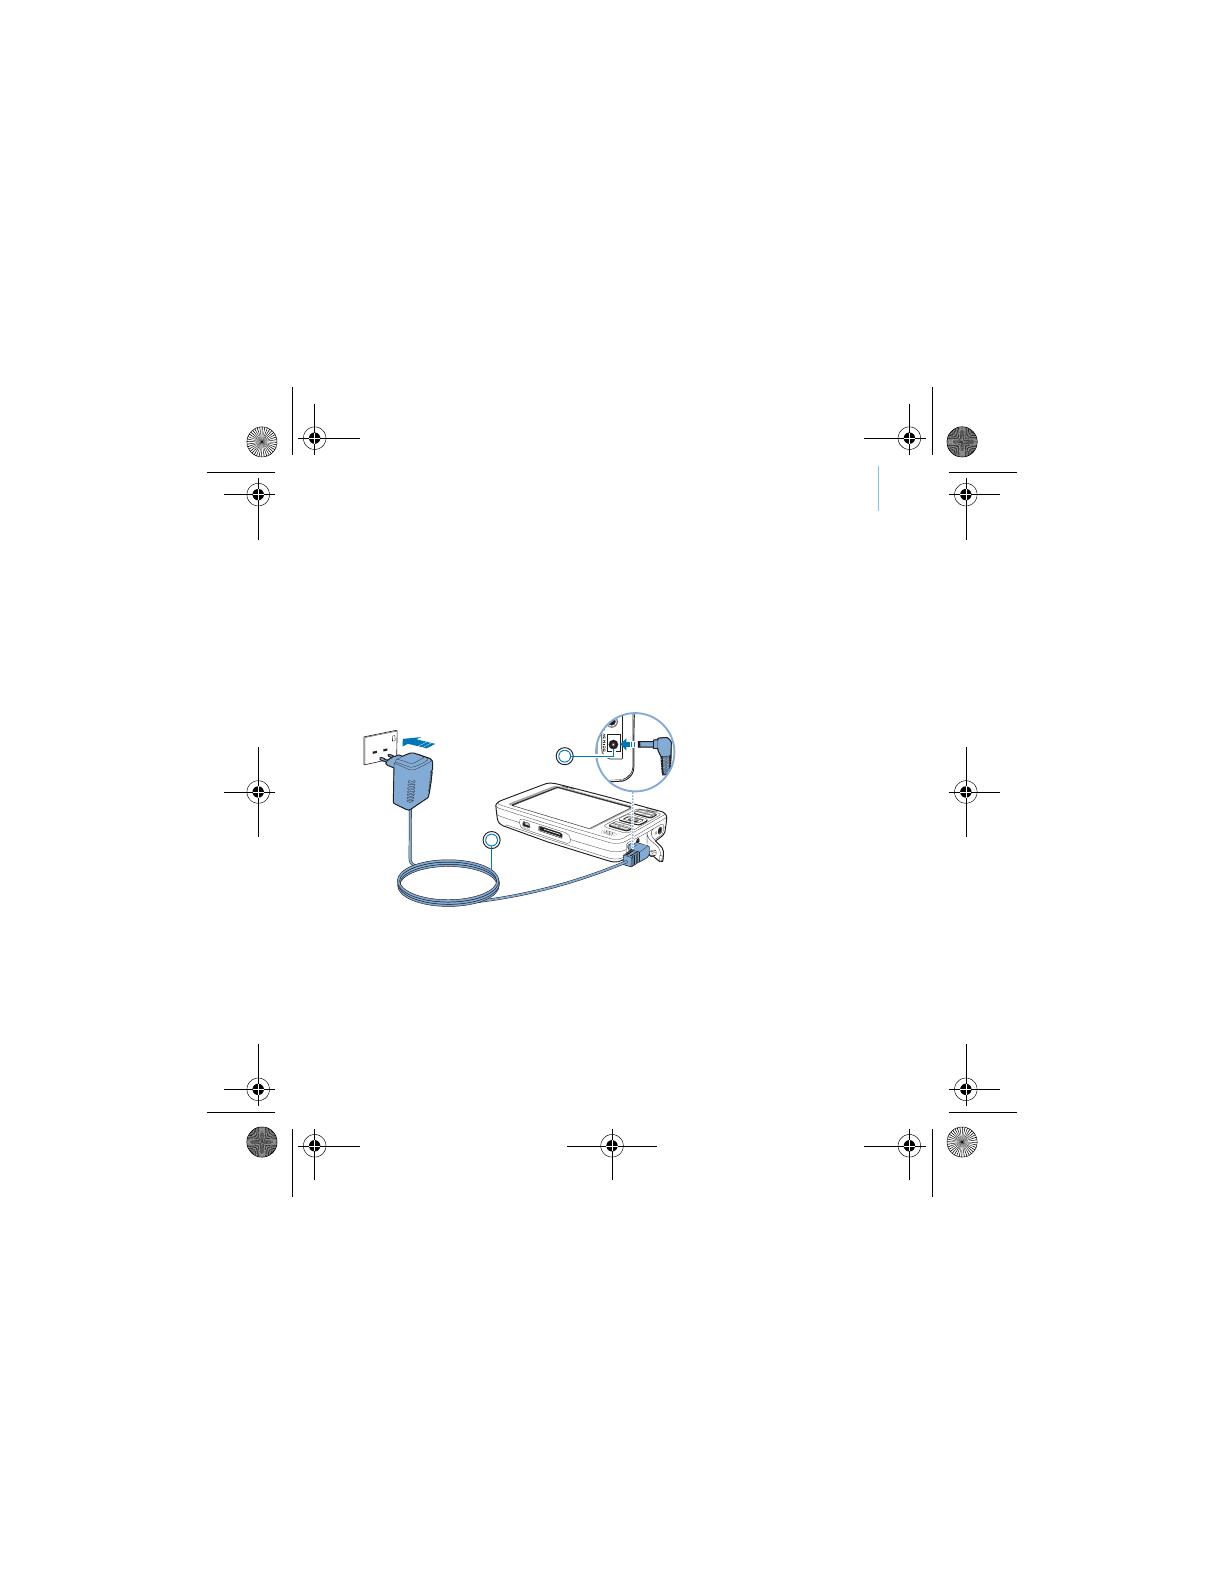
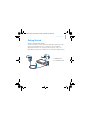
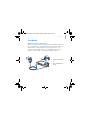
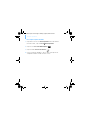
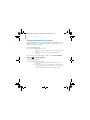
Step 1: Charge Your Player
The high performance lithium-ion battery supplied with your player needs
to be fully charged before you use it. The battery is fully charged in
approximately two hours. To charge your player's battery, connect the
power adapter to your player and wall outlet as shown in the diagram below.
1
2
1. DC IN 5V jack
2. Power adapter cable
CLI_Monet QS_Rev 2.book Page 3 Tuesday, August 30, 2005 10:28 AM

4 Set up the software
Step 2: Set up the software
1 Turn on your computer.
You must log in as an administrator in Windows before you can set up the
software. For more information, refer to your operating system’s online
Help.
2 Insert the Installation and Applications CD into your CD-ROM/DVD-ROM
drive.
Your CD should start automatically. If it does not, follow the steps below:
i. Double-click the My Computer icon.
Alternatively, click Start My Computer.
ii. Right-click the CD-ROM/DVD-ROM drive icon, and then click
Autoplay.
3 Follow the instructions on the screen and when prompted, restart your
computer.
4 When your computer restarts, follow the product registration instructions
on the screen.
WARNING DO NOT connect your player to your computer before setting up the
software.
NOTE You need an Internet connection to register your product.
CLI_Monet QS_Rev 2.book Page 4 Tuesday, August 30, 2005 10:28 AM

Set up the software 5
5 When prompted, connect your player to your computer’s USB port using the
supplied USB cable.
NOTE Connect to a computer USB port only; avoid connecting to a USB hub.
CLI_Monet QS_Rev 2.book Page 5 Tuesday, August 30, 2005 10:28 AM

6 Turn On Your Player
Step 3: Turn On Your Player
1 To turn on your player, slide the Power switch towards the Power icon
and hold it there until the LCD lights up.
2 Connect your earphones and use the Volume Increase and Volume
Decrease buttons to adjust the volume.
3 When you turn on your player for the first time, the menu is in English. To
change the language:
i. Press and hold the Menu/Back button. The main menu
appears.
ii. Use the Navigation buttons to select System Language, and then
select the language that you want. For tips on using the Navigation
buttons, see “Selecting Options” on page 2, or refer to the User’s
Guide on the Installation and Applications CD.
4 After you have finished using your player, slide the Power switch towards
the power icon until the
Shutting Down message appears.
CLI_Monet QS_Rev 2.book Page 6 Tuesday, August 30, 2005 10:28 AM

Rip and Copy Music 7
Step 4: Rip and Copy Music
Rip music from your CD collection to your player, or copy audio files (such
as music you have purchased online) from your computer. Before ripping or
copying files, make sure your player is connected to your computer as
shown on page 5.
To rip music from your CD collection
1 Double-click the My Computer icon on your desktop.
Alternatively, click Start
My Computer.
2 Click the Zen Vision Media Explorer icon .
3 Click the Rip Audio CDs button .
4 Follow the instructions on the screen.
If you are connected to the Internet, album information is automatically
retrieved.
To copy audio files, videos or photos from your computer
1 Double-click the My Computer icon on your desktop.
Alternatively, click Start
My Computer.
2 Click the Zen Vision Media Explorer icon .
3 Click the Import Media button .
4 Follow the instructions on the screen.
CLI_Monet QS_Rev 2.book Page 7 Tuesday, August 30, 2005 10:28 AM

8 Rip and Copy Music
To copy data files
1 Double-click the My Computer icon on your desktop.
Alternatively, click Start
My Computer.
2 Click the Zen Vision Media Explorer icon .
3 Click the Transfer Documents button .
4 Locate your data files and copy them to your player or computer using the
drag-and-drop method.
CLI_Monet QS_Rev 2.book Page 8 Tuesday, August 30, 2005 10:28 AM

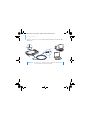
Connecting Your Player to a TV 9
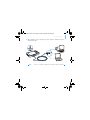
Connecting Your Player to a TV
To view your player’s content on a larger screen, connect your player to a TV.
To do this, you must use the supplied video cable.
1 Slide the Power switch on your player towards the Power icon and
hold it there until the LCD lights up.
2 Select Settings Photo/Video Settings Video Out.
3 Select Auto (NTSC) or Auto (PAL).
Be sure to choose the display format that matches your TV so that you can
better enjoy your videos. See the User’s Guide for your TV if you are not sure
about your TV’s display format.
NOTE Your player has been developed and tested to display photos and
videos of high quality. When you view these photos and videos from a
TV monitor, the display may vary in quality because of the TV model
and/or display format (for example, PAL or NTSC).
CLI_Monet QS_Rev 2.book Page 9 Tuesday, August 30, 2005 10:28 AM

10 Connecting Your Player to a TV
4 Connect your player to a TV with the supplied video cable, as shown below.
DO NOT use a standard video cable.
1 2
7
3 4
5
8
6
1. A/V Out jack
2. Video In jack - Yellow
3. Audio In (Left) jack -
White
4. Audio In (Right) jack -
Red
5. Red connector
6. White connector
7. Yellow connector
8. Video cable
CLI_Monet QS_Rev 2.book Page 10 Tuesday, August 30, 2005 10:28 AM

Listening to FM Radio 11
Listening to FM Radio
You can automatically scan for all available radio stations and save up to 32
radio presets.
1 Press and hold the Menu/Back button. The main menu appears.
2 Connect the earphone cable to your player’s Headphone jack.
The earphone cable acts as an antenna for radio reception and must be
connected to your player when using FM Radio.
3 Select FM Radio.
4 To automatically scan and save radio stations, press the Options button
and select Autoscan.
The player scans for all radio stations that can be received clearly. At the
end of the autoscan, Zen Vision automatically saves all stations as preset
channels and tunes in to the first preset.
5 Use the Up or Down navigation buttons to select a different preset.
NOTE Press the Left or Right navigation button to fine tune or manually
scan for a radio station.
CLI_Monet QS_Rev 2.book Page 11 Tuesday, August 30, 2005 10:28 AM

12 Managing Music and Data
Managing Music and Data
Creative Media Explorer and Creative MediaSource™ are included with your
player. Install and try out both applications to decide which one is more
suitable for your needs.
Creative Media Explorer
Use Creative Media Explorer if you:
■ are new to MP3 and WMA ripping and want to build up a library
■ prefer to manage Zen Vision as a removable disk drive
To start Creative Media Explorer, click the Zen Vision Media Explorer icon
under My Computer.
Creative MediaSource
Use Creative MediaSource if you:
■ frequently need to play back or organize music in your computer
■ require other features such as recording and audio conversion,
Smart Playlist, CD burning and MusicStore services (available only
in certain regions)
To start Creative MediaSource, double-click . For more information
about using Creative MediaSource, double-click the Creative MediaSource
icon on your desktop, refer to the Creative MediaSource online Help,
which offers a comprehensive “How do I” section.
CLI_Monet QS_Rev 2.book Page 12 Tuesday, August 30, 2005 10:28 AM

More Information 13
More Information
User’s Guide
Read the User's Guide found on your Installation and Application CD to
learn more about your player's many features. Go to
d:\manual\<language>\manual.pdf
Creative Knowledge Base
Resolve and troubleshoot technical queries at Creative's 24-hour self-help
Knowledge Base. Go to www.creative.com, select your region and then
select Support.
Product Registration
Registering your product ensures you receive the most appropriate service
and product support available. You can register your product during
installation or at www.creative.com/register.
Please note that your warranty rights are not dependent on registration.
Customer Support Services and Warranty
You can find Customer Support Services, Warranty and other information in
the Installation and Applications CD.
(replace d:\ with the drive letter of your CD-ROM/DVD-ROM drive, <region>
with the region that you are in, and <language> with the language that your
document is in)
Customer Support Services d:\support\<region>\<language>\support.chm
Warranty
d:\warranty\<region>\<language>\warranty.chm
Please keep your Proof of Purchase for the duration of the warranty
period.
Regulatory Information d:\fcc\<language>\doc.chm
User’s Guide d:\manual\<language>\manual.pdf
CLI_Monet QS_Rev 2.book Page 13 Tuesday, August 30, 2005 10:28 AM

14 Safety Information
Safety Information
Refer to the following information to use your player safely, and to reduce
the chance of electric shock, short-circuiting, damage, fire, hearing
impairment or other hazards.
■ Do not dismantle or attempt to repair your player, battery or
power adapter.
■ Refer all servicing to Creative or authorized repair agents.
■ Do not expose your player or battery to temperatures outside the
range of 0°C to 45°C (32°F to 113°F).
■ Do not pierce, crush or set fire to your player or battery.
■ Keep your player or battery away from strongly magnetic objects.
■ Do not subject your player to excessive force or impact.
■ Do not expose your player or battery to water or moisture.
If your player is moisture-resistant (see product packaging for
details), take care not to immerse your player in water or expose it
to rain.
■ Do not listen to audio at high volume for prolonged periods of time.
■ The battery must be recycled or disposed of properly. Contact local
agencies for recycling and disposal information.
■ Do not allow metal objects to touch the terminals of your battery.
■ If there is leakage, an offensive odor, discoloration or deformation
during charging or use, remove the battery and do not use it again.
Clean your hands well before touching food or sensitive areas, for
example, your eyes.
NOTE Improper handling may void the warranty for your player. For more
information, read the Warranty available with your product.
WARNING: The cord(s) included with this product may contain
chemicals known to the State of California to cause cancer and birth
defects or other reproductive harm. Wash hands after handling.
CLI_Monet QS_Rev 2.book Page 14 Tuesday, August 30, 2005 10:28 AM

Safety Information 15
WARNING As with any digital media-based storage device, data should be
backed up regularly. We strongly recommend that you observe the
usage precautions laid out in this booklet, and also back up the data
in your player regularly. In no event will Creative be liable for any
indirect, incidental, special or consequential damages to any persons
caused by Creative's negligence, or for any lost profits, lost savings,
loss of use, lost revenues or lost data arising from or relating to this
device, even if Creative has been advised of the possibility of such
damages. In no event will Creative’s liability or damages to you or any
other person ever exceed the amount paid by you for the device,
regardless of the form of the claim. Some countries/states do not
allow the limitation or exclusion of liability for incidental or
consequential damages, so the above limitation or exclusion may not
apply to you.
Copyright © 2005 Creative Technology Ltd. All rights reserved. The Creative logo, Creative MediaSource
and Zen are trademarks or registered trademarks of Creative Technology Ltd. in the United States and/
or other countries. Microsoft, Windows and the Windows logo are registered trademarks of Microsoft
Corporation.
CLI_Monet QS_Rev 2.book Page 15 Tuesday, August 30, 2005 10:28 AM

16 Félicitations !
Français
Félicitations !
Nous vous remercions d’avoir acheté le lecteur multiformat de Creative :
Creative Zen™ Vision. Lisez la suite pour savoir comment utiliser votre
nouveau lecteur.
Pour tirer le meilleur parti de votre lecteur, lisez également le Guide
d’utilisateur situé sur le CD d’installation et des applications.
1
3
2
4
5
6
8
7
9
10
11
12
1. Récepteur infrarouge
2. Bouton Menu/Retour
3. Bouton Options
4. Boutons de navigation
5. Bouton Lecture/Pause
6. Bouton Suivant/Avance
rapide
7. Haut-parleur intégré
8. Bouton Précédent/
Retour rapide
9. Emplacement carte
mémoire Compact Flash
10. Prise des écouteurs
11. Prise de sortie A/V
12. Prise d’alimentation
courant continu 5 V
CLI_Monet QS_Rev 2.book Page 16 Tuesday, August 30, 2005 10:28 AM

Félicitations ! 17
Sélection d’options
Dans les sections suivantes de ce document, nous utilisons le terme
« Sélectionner » pour indiquer que vous devez choisir une option de menu à
l’aide des boutons de navigation (Haut, Bas, Gauche ou Droite) puis que
vous devez appuyer sur le bouton OK pour valider votre sélection.
1 2 3 4 5
7 6
1. Bouton de diminution du
volume
2. Bouton d’augmentation
du volume
3. Interrupteur
d’alimentation
4. Icône Verrouiller
5. Microphone
6. Connecteur de station
d'accueil
7. Port USB 2.0
1. Bouton Haut
2. Bouton OK
3. Bouton Droite
4. Bouton Bas
5. Bouton Gauche
1
2
3
4
5
CLI_Monet QS_Rev 2.book Page 17 Tuesday, August 30, 2005 10:28 AM

18 Prise en main
Prise en main
Etape 1 : Chargement du lecteur
La pile lithium-ion hautes performances fournie avec le lecteur doit être
totalement chargée pour que vous puissiez l’utiliser. Le temps de charge est
d’approximativement deux heures. Pour recharger la pile du lecteur,
branchez l’adaptateur secteur au lecteur et à la prise de courant, comme
indiqué dans le schéma ci-dessous.
1
2
1. Prise d’alimentation
courant continu 5 V
2. Câble de l’adaptateur
secteur
CLI_Monet QS_Rev 2.book Page 18 Tuesday, August 30, 2005 10:28 AM
A página está carregando...
A página está carregando...
A página está carregando...
A página está carregando...
A página está carregando...
A página está carregando...
A página está carregando...
A página está carregando...
A página está carregando...
A página está carregando...
A página está carregando...
A página está carregando...
A página está carregando...
A página está carregando...
A página está carregando...
A página está carregando...
A página está carregando...
A página está carregando...
A página está carregando...
A página está carregando...
A página está carregando...
A página está carregando...
A página está carregando...
A página está carregando...
A página está carregando...
A página está carregando...
A página está carregando...
A página está carregando...
A página está carregando...
A página está carregando...
A página está carregando...
A página está carregando...
A página está carregando...
A página está carregando...
A página está carregando...
A página está carregando...
A página está carregando...
A página está carregando...
A página está carregando...
A página está carregando...
A página está carregando...
A página está carregando...
A página está carregando...
A página está carregando...
-
 1
1
-
 2
2
-
 3
3
-
 4
4
-
 5
5
-
 6
6
-
 7
7
-
 8
8
-
 9
9
-
 10
10
-
 11
11
-
 12
12
-
 13
13
-
 14
14
-
 15
15
-
 16
16
-
 17
17
-
 18
18
-
 19
19
-
 20
20
-
 21
21
-
 22
22
-
 23
23
-
 24
24
-
 25
25
-
 26
26
-
 27
27
-
 28
28
-
 29
29
-
 30
30
-
 31
31
-
 32
32
-
 33
33
-
 34
34
-
 35
35
-
 36
36
-
 37
37
-
 38
38
-
 39
39
-
 40
40
-
 41
41
-
 42
42
-
 43
43
-
 44
44
-
 45
45
-
 46
46
-
 47
47
-
 48
48
-
 49
49
-
 50
50
-
 51
51
-
 52
52
-
 53
53
-
 54
54
-
 55
55
-
 56
56
-
 57
57
-
 58
58
-
 59
59
-
 60
60
-
 61
61
-
 62
62
-
 63
63
-
 64
64


Creative Zen Vision Cell Phone Guia rápido
- Categoria
- Leitores de MP3 / MP4
- Tipo
- Guia rápido
- Este manual também é adequado para
em outras línguas
Artigos relacionados
-
Creative ZEN Vision Guia rápido
-
Creative zen nano plus 1gb Manual do usuário
-
Creative Zen Vision M Manual do proprietário
-
-
Creative Zen V Manual do proprietário
-
-
-
Creative MUVO TX FM Guia rápido
-
-