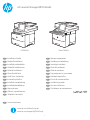
HP LaserJet Managed MFP E52645 series Guia de instalação
- Tipo
- Guia de instalação

1
HP LaserJet Managed MFP E52645
www.hp.com/videos/LaserJet
www.hp.com/support/ljE52645mfp
E52645dn Flow E52645c
EN
Installation Guide
FR
Guide d’installation
DE
Installationshandbuch
IT
Guida all’installazione
ES
Guía de instalación
CA
Guia d’instal·lació
HR
CS
DA
Installationsvejledning
NL
Installatiehandleiding
FI
Asennusopas
EL
HU
Telepítési útmutató
KK
NO
Installasjonsveiledning
PL
PT
Guia de instalação
RO
RU
SK
SL
SV
Installationsguide
TR
UK
AR
ES
Lea esto primero

2
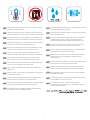
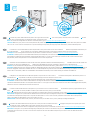
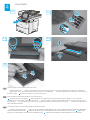
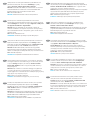
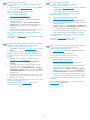
EN
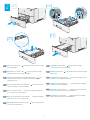
Select a sturdy, well-ventilated, dust-free area, away from direct
sunlight to position the printer.
32.5°C
10°C
91°F
50°F
FR
Choisissez un support solide et un endroit propre, bien aéré et à
l'abri du rayonnement direct du soleil pour placer votre imprimante.
DE
IT
Posizionare la stampante su un'area piana robusta, ben ventilata,
priva di polvere e lontana dalla luce diretta del sole.
ES
CA
Seleccioneu una superfície sòlida, ben ventilada, sense pols
HR
CS
DA
Placer printeren i et stabilt, godt udluftet, støvfrit område uden
NL
FI
EL
HU
KK
NO
PL
PT
exposição direta à luz do sol para instalar a impressora.
RO
RU
SK
SL
SV
TR
UK
AR

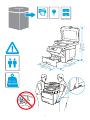
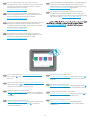
3
Flow E52645c
29.1 kg
64.1 lb
674 mm
26.5 in
482 mm
19.0 in
750 mm
29.5 in

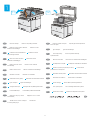
4
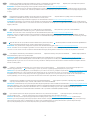
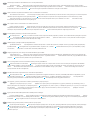
1
1.1 1.2
EN
1.1
Remove all tape.
1.2
FR
1.1
Retirez tous les rubans adhésifs.
1.2
Retirez tous les
matériaux d'emballage.
DE
1.1
Entfernen Sie das Klebeband.
1.2
Entfernen Sie das
IT
1.1
Rimuovere tutto il nastro.
1.2
Rimuovere tutto il
ES
1.1
Retire todas las cintas.
1.2
Retire todo el material
CA
1.1
Retireu tota la cinta.
1.2
Retireu el material d’embalatge.
HR
1.1
1.2
CS
1.1
1.2
DA
1.1
Fjern al tapen.
1.2
Fjern al emballagen.
NL
1.1
Verwijder alle tape.
1.2
FI
1.1
1.2
EL
1.1
1.2
HU
1.1
1.2
KK
1.1
1.2
NO
1.1
Fjern all tape.
1.2
Fjern all emballasje.
PL
1.1
1.2
PT
1.1
1.2
Remova todo o material da embalagem.
RO
1.1
1.2
RU
1.1
1.2
SK
1.1
1.2
SL
1.1
1.2
SV
1.1
Ta bort all tejp.
1.2
TR
1.1
1.2
UK
1.1
1.2
AR
1.2 1.1

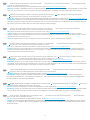
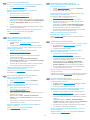
5
2.1 2.2
2.3
2.4
2
/RUHPLSVXPGRORUVLW
DPHWFRQVHFWHWXUDOOLV
ODFXV3UDHVHQWLQH[DIHOLV
IDFLOLVLVJUDYLGD
1XQFPDWWLVODFXVQHFOHR
ORERUWLVTXLVYLYHUUDVDSLHQ
FRQGLPHQWXP,QWHJHU
YHKLFXODYHOHOLWQRQ
HXLVPRG'XLPHQWXP
6XVSHQGLVVHGUHULWODFXVHW
HURVPDOHVXDHUGLHWPDXULV
HJHWYHOLWHƫLFLWXUIDXFLEXV
&XUDELWXUQLVLPHWXVVDJLWWLV
YLWDHWRUWRUHWSHOOHQWHVTXH
FRQJXHWHOOXV9HVWLEXOXP
OXFWXVEODQGLWORUHPD
HOHPHQWXP
/RUHPLSVXPGRORUVL
DPHWFRQVHFWHWXUDOOLV
ODFXV3UDHVHQWLQ H
IDFLOLVLVJUDYLGD
1XQFPD
ORER
F
/RUHPLSVXPGRORUVLW
DPHWFRQVHFWHWXUDOOLV
ODFXV3UDHVHQWLQH[DIHOLV
IDFLOLVLVJUDYLGD
1XQFPDWWLVODFXVQHFOHR
ORERUWLVTXLVYLYHUUDVDSLHQ
FRQGLPHQWXP,QWHJHU
YHKLFXODYHOHOLWQRQ
HXLVPRG'XLPHQWXP
6XVSHQGLVVHGUHULWODFXVHW
HURVPDOHVXDHUGLHWPDXULV
HJHWYHOLWHƫLFLWXUIDXFLEXV
&XUDELWXUQLVLPHWXVVDJLWWLV
YLWDHWRUWRUHWSHOOHQWHVTXH
FRQJXHWHOOXV9HVWLEXOXP
OXFWXVEODQGLWORUHPD
HOHPHQWXP
EN
NOTE: The paper guides
2.2
not be adjustable.
FR
REMARQUE: Les guides papier
2.2
peuvent être bloqués avant
utilisation et peuvent ne pas être réglables.
DE
HINWEIS:
2.2
vor der
angepasst werden.
IT NOTA: è possibile che le guide della carta
2.2
siano bloccate prima
dell’uso e pertanto non siano regolabili.
ES
NOTA: Las guías de papel
2.2
pueden estar bloqueadas antes de
su uso y pueden no ser ajustables.
CA
NOTA: és possible que les guies del paper
2.2
estiguin bloquejades
abans de l'ús i que no es puguin ajustar.
HR
NAPOMENA:
2.2
CS
POZNÁMKA:
2.2
DA
BEMÆRK: Papirstyrene
2.2
NL
OPMERKING: De papiergeleiders
2.2
FI
HUOMAUTUS: Paperinohjaimet
2.2
EL
2.2
HU
MEGJEGYZÉS:
2.2

6
KK
2.2
NO
MERK:
2.2
PL
UWAGA: Prowadnice papieru
2.2
regulowane.
PT
NOTA: As guias de papel
2.2
podem ser bloqueadas antes de usar
e não podem ser ajustadas.
RO
Este posibil ca ghidajele pentru hârtie
2.2
RU
2.2
SK
POZNÁMKA: Vodiace lišty papiera
2.2
SL
OPOMBA: vodila za papir
2.2
SV
OBS! Pappersledarna
2.2
TR
NOT:
2.2
ayarlanamayabilir.
UK
2.2
AR
2.2

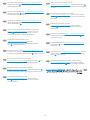
7
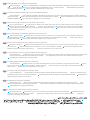
EN
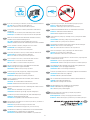
CAUTION: Do not extend more than one paper tray at a time.
when closing. All trays must be closed when moving the printer.
FR
N’utilisez pas plus d’un bac à papier à la fois. N’utilisez
pas le bac à papier comme marchepied. Écartez vos mains des bacs
à papier lors de la fermeture. Lorsque vous déplacez l’imprimante,
tous les bacs doivent être fermés.
DE
ACHTUNG: Ziehen Sie jeweils nur ein Papierfach heraus. Benutzen
Sie das Papierfach nicht als Stufe. Achten Sie darauf, dass Sie Ihre
IT
ATTENZIONE: non estendere più di un vassoio della carta alla volta.
Non utilizzare il vassoio della carta come gradino. Tenere le mani
lontane dai vassoi della carta quando vengono chiusi. Tutti i vassoi
devono essere chiusi durante il trasporto della stampante.
ES
PRECAUCIÓN:
vez. No utilice la bandeja para papel como apoyo para subirse
encima. Mantenga las manos alejadas de las bandejas para papel
cuando las cierre. Todas las bandejas deben estar cerradas para
mover la impresora.
CA
PRECAUCIÓ: no obriu més d’una safata p er a paper a la vegada.
a les safates per a paper quan les tanqueu. S’han de tancar totes
les safates en desplaçar la impressora.
HR
OPREZ: Nemojte istodobno otvarati više od jedne ladice za papir.
CS
DA
ADVARSEL:
NL
PAS OP:
een papierlade niet als een opstapje. Houd uw handen uit de
papierladen wanneer deze worden gesloten. Alle laden moeten zijn
gesloten als u de printer verplaatst.
FI
VAROITUS:
tulostinta.
EL
HU
FIGYELEM!
KK
NO
FORSIKTIG:
PL
PT
CUIDADO: Não estenda mais de uma bandeja de papel ao mesmo
tempo. Não use a bandeja de papel como um degrau. Afaste suas
estar fechadas quando transportar a impressora.
RO
RU
SK
UPOZORNENIE:
SL
OPOZORILO:
Pladnja za papir ne uporabljajte za stopnico. Pri zapiranju pladnjev
morajo biti vsi pladnji zaprti.
SV
VARNING:
TR
UK
AR

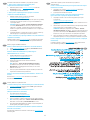
8
EN
CAUTION: Do not connect the USB cable now.
NOTE: The cables are not included with the printer.
FR
Si vous vous connectez à un réseau, branchez le câble réseau
maintenant.
Ne connectez pas le câble USB pour le moment.
REMARQU Les câbles ne sont pas fournis avec l'imprimante.
DE
ACHTUNG:
HINWEIS:
IT
Se ci si connette a una rete, collegare ora il cavo di rete.
ATTENZIONE: non collegare il cavo USB ora.
NOTA: i cavi non sono inclusi con la stampante.
ES
PRECAUCIÓN:
NOTA: Los cables no se incluyen con la impresora.
CA
Si us connecteu a una xarxa, connecteu el cable de xarxa.
PRECAUCIÓ: no connecteu encara el cable USB.
NOTA: els cables no s'inclouen amb la impressora.
HR
NAPOMENA:
CS
POZNÁMKA:
DA
ADVARSEL:
BEMÆRK:
NL
PAS OP:
OPMERKING:
FI
VAROITUS:
HUOMAUTUS:
EL
HU
FIGYELEM!
MEGJEGYZÉS:
KK
NO
FORSIKTIG:
MERK:
sieciowy.
UWAGA:
PL
PT
Se você estiver se conectando a uma rede, conecte o cabo de rede agora.
CUIDADO: Não conecte o cabo USB agora.
NOTA: Os cabos não são fornecidos com a impressora.
RO
: Cablurile nu sunt incluse cu imprimanta.
RU
SK
UPOZORNENIE:
POZNÁMKA:
SL
OPOZORILO:
OPOMBA:
SV
VARNING:
OBS!
TR
NOT:
UK
.
AR

9
3
3.1
3.3
3.2
3.1
Connect the power cable between the printer and a grounded AC outlet.
3.2
Turn on the printer, and then wait for it to initialize.
3.3
On the
control panel, set the language, the date/time format, and the time zone.
NOTE: www.hp.com/support/ljE52645mfp
CAUTION:
100-127 Vac or 220-240 Vac and 50/60 Hz. To prevent damage to the printer, use only the power cable that is provided with the printer.
EN
3.1
Connectez le cordon d'alimentation entre l'imprimante et une prise secteur CA avec mise à la terre.
3.2
Allumez l'imprimante et attendez que
le produit s'initialise.
3. 3
www.hp.com/support/ljE52645mfp
l'imprimante, utilisez uniquement le cordon d'alimentation fourni avec l'imprimante.
FR
3.1
3.2
und warten Sie, bis er sich initialisiert hat.
3.3
Stellen Sie im Bedienfeld die Sprache, das Datum-/Zeitformat und die Zeitzone ein.
HINWEIS: www.hp.com/support/ljE52645mfp
ACHTUNG:
DE
3.1
Collegare il cavo di alimentazione della stampante a una presa CA con messa a terra.
3.2
Accendere la stampante e attendere il processo di
inizializzazione.
3.3
Sul pannello di controllo, impostare la lingua, il formato data/ora e il fuso orario.
NOTA: www.hp.com/support/ljE52645mfp
ATTENZIONE: accertarsi che la fonte di alimentazione sia adeguata alla tensione nominale della stampante. La tensione nominale richiesta è
utilizzare solo il cavo di alimentazione fornito in dotazione.
IT
3.1
Conecte el cable de alimentación a la impresora y a una toma de CA con conexión a tierra.
3.2
Encienda la impresora y aguarde hasta que se
inicie.
3.3
En el panel de control, establezca el idioma, el formato de fecha y hora y la zona horaria.
NOTA: www.hp.com/support/ljE52645mfp
PRECAUCIÓN: Asegúrese de que la fuente de alimentación sea adecuada para el voltaje de la impresora. La información sobre el voltaje se
ADVERTENCIA:
ES
3.1
Connecteu el cable d'alimentació a la impressora i a una presa de CA connectada a terra.
3.2
Engegueu la impressora i espereu que s'iniciï.
3.3
Al tauler de control, establiu l'idioma, el format de data i hora i la zona horària.
NOTA: www.hp.com/support/ljE52645mfp
PRECAUCIÓ: assegureu-vos que la font d'energia sigui adequada per a la tensió nominal de la impressora, la qual trobareu indicada a l'etiqueta.
que s'hi inclou.
CA

10
3.1
3.2
3.3
NAPOMENA: www.hp.com/support/ljE52645mfp
OPREZ:
HR
3.1
3.2
3.3
POZNÁMKA: www.hp.com/support/ljE52645mfp.
CS
3.1
3.2
3.3
BEMÆRK: www.hp.com/support/ljE52645mfp
ADVARSEL:
DA
3.1
3.2
3.3
Stel op het bedieningspaneel de taal, de datum-/tijdsnotatie en de tijdzone in.
OPMERKING: www.hp.com/support/ljE52645mfp
PAS OP:
NL
3.1
3.2
3.3
HUOMAUTUS: www.hp.com/support/ljE52645mfp
VAROITUS:
tulostin voi vahingoittua.
FI
3.1
3.2
3.3
www.hp.com/support/ljE52645mfp
EL
3.1
3.2
3.3
MEGJEGYZÉS: www.hp.com/support/ljE52645mfp
FIGYELEM:
HU
3.1
3.2
3.3
www.hp.com/support/ljE52645mfp
KK

11
3.1
3.2
3.3
MERK: www.hp.com/support/ljE52645mfp
FORSIKTIG:
NO
3.1
3.2
3.3
UWAGA: www.hp.com/support/ljE52645mfp
PL
3.1
Conecte o cabo de alimentação entre a impressora e uma tomada CA aterrada.
3.2
Ligue a impressora e espere sua inicialização.
3.3
NOTA: www.hp.com/support/ljE52645mfp
CUIDADO:
etiqueta da impressora. A impressora utiliza 100-127 Vca ou 220-240 Vca e 50/60 Hz. Para evitar danos à impressora, utilize somente o cabo de
alimentação fornecido com a impressora.
AVISO:
PT
3.1
3.2
3.3
www.hp.com/support/ljE52645mfp
RO
3.1
3.2
3.3
www.hp.com/support/ljE52645mfp
RU
3.1
3.2
3.3
POZNÁMKA: www.hp.com/support/ljE52645mfp.
UPOZORNENIE:
SK
3.1
3.2
3.3
Na nadzorni
OPOMBA: www.hp.com/support/ljE52645mfp
OPOZORILO:
SL
3.1
3.2
3.3
OBS! www.hp.com/support/ljE52645mfp
VARNING:
SV

12
3.1
3.2
3.3
Kontrol panelinde, dil,
NOT: www.hp.com/support/ljE52645mfp adresine gidin.
TR
3.1
3.2
3.3
www.hp.com/support/ljE52645mfp
UK
AR
3.3 3.2 3.1

13
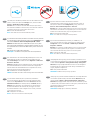
4
4.1
4.2
4.3 4.4
4.5
Flow E52645c
EN
4.1
4.2
4.3
4.4
the labels in place.
4.5
Peel at a sharp angle to remove the clear sheet.
FR
Certaines langues nécessitent l'installation d'un cache de clavier.
4.1
Poussez le clavier vers l'extérieur.
4.2
Retirez la pellicule à un angle très prononcé pour retirer le support papier du cache. Toutes les
étiquettes doivent rester collées à la feuille transparente.
4.3
Alignez les angles supérieurs de la feuille transparente avec les angles des touches
Echap et Suppr.
4.4
Soutenez le clavier par dessous, puis appuyez fermement sur les languettes pour les placer.
4.5
Décollez à un angle aigu pour
retirer la feuille transparente.
DE
4.1
Ziehen Sie die Tastatur heraus.
4.2
sollten auf der Klarsichtfolie haften.
4.3
4.4
Halten Sie die
4.5

14
IT
Alcune lingue richiedono l'installazione di un overlay della tastiera.
4.1
Estrarre la tastiera.
4.2
Rimuovere il foglio trasparente mantenendo un angolo molto stretto. Tutte le etichette devono aderire al foglio
trasparente.
4.3
Allineare gli angoli superiori del foglio trasparente agli angoli dei tasti Esc ed Elimina.
4.4
Tenere la tastiera dal basso e far aderire
le etichette premendo con decisione.
4.5
Rimuovere il foglio trasparente mantenendo un angolo molto stretto.
ES
Algunos idiomas requieren la instalación de un recubrimiento en el teclado.
4.1
Tire del teclado hacia fuera.
4.2
deberían quedarse pegadas en la hoja transparente.
4.3
4.4
4.5
Para retirar la hoja
CA
Per a alguns idiomes cal instal·lar una caràtula del teclat.
4.1
Estireu el teclat cap enfora.
4.2
Estireu el paper protector en angle agut per separar-lo de la caràtula. Totes les etiquetes han de quedar
enganxades al full transparent.
4.3
Alineeu els cantons superiors del full transparent amb els cantons de les tecles Esc i de supressió.
4.4
Subjecteu
el teclat per la part de baix i premeu amb força les etiquetes al seu lloc.
4.5
Estireu el full transparent en angle agut per treure'l.
HR
4.1
4.2
foliju.
4.3
4.4
4.5
CS
4.1
4.2
4.3
4.4
4.5
DA
4.1
4.2
4.3
4.4
på plads.
4.5
NL
Voor sommige talen moet een toetsenbordoverlay worden geïnstalleerd.
4.1
4.2
4.3
Delete.
4.4
4.5
Pel het doorzichtige vel onder een
FI
4.1
4.2
4.3
4.4
4.5
EL
4.1
4.2
4.3
4.4
4.5
HU
4.1
4.2
4.3
Igazítsa
4.4
4.5
KK
4.1
4.2
4.3
4.4
4.5

15
NO
4.1
4.2
4.3
4.4
Støtt tastaturet fra undersiden,
4.5
PL
4.1
4.2
czystej powierzchni.
4.3
4.4
4.5
PT
Alguns idiomas exigem a instalação de uma sobreposição de teclado.
4.1
Puxe o teclado para fora.
4.2
4.3
Alinhe os cantos superiores da folha em branco aos cantos das teclas Esc e Delete.
4.4
4.5
Faça a remoção no sentido de um ângulo agudo
RO
4.1
4.2
4.3
4.4
4.5
RU
4.1
4.2
4.3
4.4
4.5
SK
4.1
4.2
4.3
4.4
4.5
SL
4.1
4.2
4.3
Zgornja
4.4
njihovo mesto.
4.5
Odlepite ostri rob, da odstranite prozorno folijo.
SV
4.1
Dra ut tangentbordet.
4.2
4.3
4.4
4.5
TR
4.1
4.2
4.3
Temiz
4.4
4.5
UK
4.1
4.2
4.3
4.4
4.5
AR
4.2 4.1
4.4 4.3
4.5

16
EN
The USB port is disabled by default and must be enabled from the
printer control panel. Open the Settings menu, and then select
General > Enable Device USB > Enabled.
Windows: Do not connect the USB cable until prompted during
connected previously, proceed to the next section.
Mac: Connect the USB cable now.
NOTE: The cables are not included with the printer.
FR
Le port USB est désactivé par défaut et doit être activé du panneau
Paramètres, puis
sélectionnez Général > Activer le Périphérique USB > Activé.
Windows Ne branchez pas le câble USB tant que vous n'y êtes
pas invité durant l'installation du logiciel à l'étape suivante. Si vous
avez précédemment connecté le câble réseau, passez à la section
suivante.
Les câbles ne sont pas fournis avec l'imprimante.
DE
EinstellungenAllgemein > USB-Gerät
aktivieren > Aktiviert.
Windows:
Mac:
HINWEIS:
IT
deve essere attivata dal pannello di controllo della stampante.
Aprire il menu Impostazioni e selezionare General >
> Enabled
Windows:
durante l'installazione del software nel passaggio successivo.
Mac: collegare il cavo USB ora.
NOTA: i cavi non sono inclusi con la stampante.
ES
El puerto USB se encuentra desactivado de manera
predeterminada y debe activarse desde el panel de control de
y, luego, seleccione
General > Activar USB del dispositivo > Activado.
Windows: No conecte el cable USB hasta que se le indique durante
la instalación del software en el siguiente paso. Si se ha conectado
el cable de red anteriormente, vaya a la siguiente sección.
Mac: Conecte ahora el cable USB.
NOTA: Los cables no se incluyen con la impresora.
CA
El port USB està inhabilitat per defecte; per habilitar-lo, cal
fer-ho des del tauler de control de la impressora. Obriu el menú
i seleccioneu General > Habilita el port USB del
dispositiu > Habilitat.
Windows:
Mac: connecteu el cable USB.
NOTA: els cables no s'inclouen amb la impressora.
HR
Postavke,
.
Windows:
Mac:
NAPOMENA:
CS
Nastavení
.
Windows:
Mac:
POZNÁMKA:

17
DA
Indstillinger
derefter Generelt > Aktiver enheds-USB > Aktiveret.
Windows:
Mac:
BEMÆRK:
NL
menu Instellingen en selecteer vervolgens Algemeen > USB-poort
van apparaat inschakelen > Ingeschakeld.
Windows:
software-installatie in de volgende stap daarom wordt gevraagd.
volgende sectie.
Mac:
OPMERKING:
Settings
General > Enable Device USB
> Enabled
Windows:
Mac:
HUOMAUTUS:
FI
SettingsGeneral > Enable
Device USB > Enabled
Windows:
Mac:
EL
HU
Az USB-port alapértelmezés szerint le van tiltva, és a nyomtató
Settings
General > Enable Device
USB > Enabled
Windows:
Mac:
MEGJEGYZÉS:
KK
Settings
General > Enable Device USB > Enabled
Windows:
Mac:
NO
Innstillinger-menyen og velg
Generelt > Aktiver enhets-USB > Aktivert.
Windows:
Mac:
MERK:
PL
Ustawienia
.
System Windows:
System Mac:
UWAGA:
PT
A porta USB é desabilitada por padrão e deve ser habilitada no
painel de controle da impressora. Abra o menu
Geral > Habilitar dispositivo USB > Habilitado.
Windows: não conecte o cabo USB até que seja solicitado a fazê-lo
durante a instalação do software na próxima etapa. Se o cabo de
Mac: conecte o cabo USB agora.
NOTA: Os cabos não são fornecidos com a impressora.
RO
Settings General > Enable Device USB
Enabled
Windows:
Mac:
Cablurile nu sunt incluse cu imprimanta.

18
RU
.
Windows.
Mac:
SK
Nastavenia a vyberte
Všeobecné > Enable Device USB >
Enabled
Windows:
Mac:
POZNÁMKA:
SL
Settings
pa izberite General > Enable Device USB > Enabled
Windows:
Mac:
OPOMBA:
SV
Inställningar
Allmänt > Aktivera enhets-USB > Aktiverad.
Windows:
Mac:
OBS!
TR
Ayarlar
seçin.
Windows:
Mac:
NOT:
UK
Settings
General > Enable
Device USB> Enabled
Windows:
Mac:
AR

19
EN
Method 1: Download HP Easy Start (Windows and macOS clients)
1. Go to 123.hp.com/laserjet Download.
2. Follow the onscreen instructions.
Method 2: Download from product support website
(Windows clients and servers)
1.
www.hp.com/support/ljE52645mfp.
Select Software and Drivers.
2. Download the software for your printer model and
operating system.
NOTE: Driver - Product Installation Software for
clients, Basic Drivers V3 and V4 for clients and servers.
3.
saved, and follow the on-screen instructions
Method 3: IT managed setup (Windows only - clients and servers)
Visit hp.com/go/upd to download and install the
HP Universal Print Driver.
FR
macOS)
1. Accédez à 123.hp.com/laserjet, puis cliquez sur Télécharger.
2.
produit (clients et serveurs Windows)
1.
www.hp.com/support/ljE52645mfp.
Sélectionnez Pilotes et logiciels.
2. Téléchargez le logiciel adapté à votre modèle d'imprimante et
à votre système d'exploitation.
REMARQUE:Pilote - logiciel d'installation de
produits pour les clients, Pilotes de base v3 et v4 pour les
clients et les serveurs.
3.
Visitez la page hp.com/go/upd pour télécharger et installer le
DE
Laden Sie die Software-Installationsdateien herunter.
1. 123.hp.com/laserjet
auf Herunterladen.
2. Befolgen Sie die angezeigten Anweisungen.
(Windows-Clients und -Server)
1.
www.hp.com/support/ljE52645mfp.
Software und Treiberaus.
2.
Betriebssystem herunter.
HINWEIS:Treiberprodukt-Installationssoftware
Basic Treiber
3.
gespeichert wurde, und befolgen Sie die Anweisungen auf
dem Bildschirm
hp.com/go/upd auf, um den
HP Universal Print Driver herunterzuladen und zu installieren.
IT
Metodo 1: download di HP Easy Start (client Windows e macOS)
1. Accedere a 123.hp.com/laserjet e fare clic su Scarica.
2. Seguire le istruzioni visualizzate.
Metodo 2: download dal sito Web dell'assistenza del prodotto
(client e server Windows)
1.
www.hp.com/support/ljE52645mfp.
Selezionare Software and Drivers
2. Scaricare il software per il modello della stampante e il
sistema operativo in uso.
NOTA:Driver - Software d'installazione del
prodotto per client, Driver di base V3 e V4 per client e server.
3.
Metodo 3: installazione gestita dall'IT (solo per client e server
Windows)
Accedere a hp.com/go/upd per scaricare e installare
HP Universal Print Driver.

20
ES
Descargue los archivos de instalación del software.
1. Vaya a 123.hp.com/laserjet y haga clic en Descargar.
2. Siga las instrucciones que se muestran en la pantalla.
(clientes y servidores de Windows)
1.
www.hp.com/support/ljE52645mfp.
Seleccione .
2. Descargue el software para su modelo de impresora y sistema
operativo.
NOTA:
producto para clientes, V3 y V4 para
clientes y servidores.
3. Inicie el archivo de software desde la carpeta donde se guardó
y, a continuación, siga las instrucciones que aparecen en pantalla.
y servidores de Windows)
Visite hp.com/go/upd para descargar e instalar el controlador de
impresión universal HP.
CA
1. Aneu a 123.hp.com/laserjet i feu clic a Descàrrega.
2. Seguiu les instruccions de la pantalla.
Mètode 2: Descàrrega des del lloc web d'assistència tècnica del
producte (clients i servidors Windows)
1.
www.hp.com/support/ljE52645mfp.
Seleccioneu Programari i controladors.
2. Descarregueu el programari per al vostre model d'impressora
i sistema operatiu.
NOTA:
del producte per a clients, Controladors bàsics V3 i V4 per
3.
desat i seguiu les instruccions de la pantalla.
Visiteu hp.com/go/upd per descarregar i instal·lar el Controlador
d'impressió universal HP.
HR
1. Posjetite 123.hp.com/laserjet Download
2. Slijedite upute na zaslonu.
1.
www.hp.com/support/ljE52645mfp.
Odaberite .
2.
NAPOMENA:
programi
3.
Posjetite hp.com/go/upd da biste preuzeli i instalirali
CS
1. 123.hp.com/laserjet
.
2.
1.
www.hp.com/support/ljE52645mfp.
.
2.
POZNÁMKA:
produktu
3.
systémem Windows)
hp.com/go/upd
DA
Metode 1: Download HP Easy Start (Windows- og macOS-klienter)
1. Gå til 123.hp.com/laserjet Download.
2.
Metode 2: Download fra webstedet med produktsupport
(Windows-klienter og -servere)
1.
www.hp.com/support/ljE52645mfp.
Software og drivere.
2. Download softwaren til din printermodel og dit
operativsystem.
BEMÆRK:Driver - Produktinstallationssoftware
Basisdrivere
3.
Metode 3: It-administreret opsætning (kun Windows - klienter og
servere)
Besøg hp.com/go/upd for at downloade og installere
HP Universal-printerdriveren.
NL
Download de software-installatiebestanden.
Methode 1: HP Easy Start downloaden (Windows- en macOS-clients)
1. Ga naar 123.hp.com/laserjet Downloaden.
2. Volg de instructies op het scherm.
Methode 2: Downloaden vanaf de website voor
productondersteuning (Windows-clients en -servers)
1.
www.hp.com/support/ljE52645mfp.
Selecteer Software en drivers.
2. Download de software voor uw printermodel en
besturingssysteem.
OPMERKING:Driver-Productinstallatiesoftware
voor clients, Basisdrivers V3 en V4 voor clients en servers.
3. Start het softwarebestand vanuit de map waar het is
opgeslagen, en volg de instructies op het scherm
Methode 3: IT-beheerde installatie (alleen Windows - clients en
servers)
Ga naar hp.com/go/upd om de HP Universal Print Driver te
downloaden en te installeren.
A página está carregando ...
A página está carregando ...
A página está carregando ...
A página está carregando ...
A página está carregando ...
A página está carregando ...
A página está carregando ...
A página está carregando ...
-
 1
1
-
 2
2
-
 3
3
-
 4
4
-
 5
5
-
 6
6
-
 7
7
-
 8
8
-
 9
9
-
 10
10
-
 11
11
-
 12
12
-
 13
13
-
 14
14
-
 15
15
-
 16
16
-
 17
17
-
 18
18
-
 19
19
-
 20
20
-
 21
21
-
 22
22
-
 23
23
-
 24
24
-
 25
25
-
 26
26
-
 27
27
-
 28
28


HP LaserJet Managed MFP E52645 series Guia de instalação
- Tipo
- Guia de instalação
em outros idiomas
- español: HP LaserJet Managed MFP E52645 series Guía de instalación
- français: HP LaserJet Managed MFP E52645 series Guide d'installation
- italiano: HP LaserJet Managed MFP E52645 series Guida d'installazione
- English: HP LaserJet Managed MFP E52645 series Installation guide
- русский: HP LaserJet Managed MFP E52645 series Инструкция по установке
- Nederlands: HP LaserJet Managed MFP E52645 series Installatie gids
- slovenčina: HP LaserJet Managed MFP E52645 series Návod na inštaláciu
- Deutsch: HP LaserJet Managed MFP E52645 series Installationsanleitung
- dansk: HP LaserJet Managed MFP E52645 series Installationsvejledning
- čeština: HP LaserJet Managed MFP E52645 series instalační příručka
- svenska: HP LaserJet Managed MFP E52645 series Installationsguide
- polski: HP LaserJet Managed MFP E52645 series Instrukcja instalacji
- Türkçe: HP LaserJet Managed MFP E52645 series Yükleme Rehberi
- suomi: HP LaserJet Managed MFP E52645 series Asennusohje
- română: HP LaserJet Managed MFP E52645 series Ghid de instalare
Artigos relacionados
-
HP LaserJet Managed MFP E52645 series Guia de instalação
-
-
-
HP LaserJet Enterprise MFP M528 series Guia de instalação
-
-
-
HP Color LaserJet Enterprise MFP M578 Printer series Guia de instalação
-
-
-