Electrolux END42395W Manual do usuário
- Categoria
- Geladeira-freezers
- Tipo
- Manual do usuário

UUsseerr mmaannuuaall
MMaannuuaall ddee iinnssttrruuççõõeess
END 42395 W
Fridge - Freezer
Frigorífico - Congelador

2
electrolux
Welcome to the world of Electrolux
You’ve chosen a first class product from Electrolux, which hopefully will provide
you with lots of pleasure in the future. Electrolux ambition is to offer a wide variety
of quality products that would make your life even more comfortable. You can look
at some examples on the cover in this manual. But now it’s time to study this
manual and start using and enjoying the benefits from your new machine. We
promise that it’ll make your life a little easier. Good luck!

electrolux
3
The following symbols are used in this manual:
Important information concerning your personal safety and information on
how to avoid damaging the appliance.
General information and tips
Environmental information
The symbol on the product or on its packaging indicates that this product
may not be treated as household waste. Instead it shall be handed over to the
applicable collection point for the recycling of electrical and electronic equipment.
By ensuring this product is disposed of correctly, you will help prevent potential
negative consequences for the environment and human health, which could
otherwise be caused by inappropriate waste handling of this product. For more
detailed information about recycling of this product, please contact your local city
office, your household waste disposal service or the shop where you purchased
the product.

4
electrolux
CONTENTS
Safety IInformation 05
Use 008
Cleaning the interior 08
Control panel 08
Operation 08
Switching off 08
Temperature regulation 09
Adjusting the temperature 09
Action Freeze Function 09
Fresh food refrigeration 09
How to use the water dispenser with
BRITA MAXTRA filter cartridge BRITA
water filter unit 10
Movable shelves 16
Bottle rack 16
Positioning the door shelves 16
Drawer 17
Humidity Control 17
Air recycling 18
Freezing Calendar 18
Ice cubes 18
Freezing fresh food 19
Storing deep-frozen food 19
Thawing 19
Hints 20
Hints for refrigeration 20
Hints for freezing 20
Hints for storage of frozen food 21
Interior light 21
Maintenance 222
Periodic cleaning 22
Defrosting 22
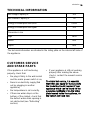
Technical information 23
Customer sservice aand sspare pparts 223
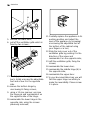
Installation 24
Location 24
Rear spacers 24
Electrical connection 25
Door reversibility 25

electrolux
5
SAFETY
INFORMATION
It iis mmost iimportant tthat tthis
instruction bbook sshould bbe rretained
with tthe aappliance ffor ffuture rreference.
Should tthe aappliance bbe ssold oor
transferred tto aanother oowner, oor
should yyou mmove hhouse aand lleave tthe
appliance, aalways eensure tthat tthe
book iis ssupplied wwith tthe aappliance iin
order tthat tthe nnew oowner ccan bbe
acquainted wwith tthe ffunctioning oof tthe
appliance aand tthe rrelevant wwarnings.
If tthis aappliance ffeaturing mmagnetic
door sseals iis tto rreplace aan oolder
appliance hhaving aa sspring llock ((latch)
on tthe ddoor oor llid, bbe ssure tto mmake
that sspring llock uunusable bbefore yyou
discard tthe oold aappliance. TThis wwill
prevent iit ffrom bbecoming aa ddeath-ttrap
for aa cchild.
These wwarnings aare pprovided iin tthe
interest oof ssafety. YYou mmust rread tthem
carefully bbefore iinstalling oor uusing tthe
appliance.
General Safety
• This appliance is not intended for
use by persons (including children)
with reduced physical, sensory or
mental capabilities, or lack of
experience and knowledge, unless
they have been given supervision
or instruction concerning use of the
appliance by a person responsible
for their safety.
Children should be supervised to
ensure that they do not play with
the appliance.
• It is dangerous to alter the
specifications or modify this
product in any way.
• Before any cleaning or
maintenance work is carried out,
be sure to switch off and unplug
the appliance.
• This appliance is heavy. Care
should be taken when moving it
• Ice lollies can cause frost burns if
consumed straight from the
appliance.
• Take uutmost ccare wwhen hhandling
your aappliance sso aas nnot tto ccause
any ddamages tto tthe ccooling uunit
with cconsequent ppossible ffluid
leakages.
• The aappliance mmust nnot bbe llocated
close tto rradiators oor ggas ccookers.
• Avoid pprolonged eexposure oof tthe
appliance tto ddirect ssunlight.
• There mmust bbe aadequate vventilation
round tthe bback oof tthe aappliance
and aany ddamage tto tthe rrefrigerant
circuit mmust bbe aavoided.
• For ffreezers oonly ((except bbuilt-iin
models): aan iideal llocation iis tthe
cellar oor bbasement.
• Do nnot uuse oother eelectrical
appliances ((such aas iice ccream
makers) iinside oof rrefrigerating
appliances.
Service/Repair
• Any electrical work required to
install this appliance should be
carried out by a qualified electrician
or competent person

6
electrolux
• This product should be serviced by
an authorized Service Centre, and
only genuine spare parts should be
used.
• Under no circumstances should
you attempt to repair the appliance
yourself. Repairs carried out by
inexperienced persons may cause
injury or more serious
malfunctioning. Refer to your local
Service Centre, and always insist
on genuine spare parts.
• This appliance contains
hydrocarbons in its cooling unit;
maintenance and recharging must
therefore only be carried out by
authorized technicians.
Use
• The domestic refrigerators and
freezers are designed to be used
specifically for the storage of edible
foodstuffs only.
• Best performance is obtained with
ambient temperature between
+18°C and +43°C (class T); +18°C
and +38°C (class ST); +16°C and
+32°C (class N); +10°C and +32°C
(class SN). The class of your
appliance is shown on its rating
plate.
Warning: when the ambient
temperature is not included within
the range indicated for the class of
this appliance, the following
instructions must be observed:
when the ambient temperature
drops below the minimum level, the
storage temperature in the freezer
compartment cannot be
guaranteed; therefore it is advisable
to use the food stored as soon as
possible.
• Frozen food must not be re-frozen
once it has been thawed out.
• Manufacturers’ storage
recommendations should be strictly
adhered to. Refer to relevant
instructions.
• The inner lining of the appliance
consists of channels through which
the refrigerant passes. If these
should be punctured this would
damage the appliance beyond
repair and cause food loss. DO
NOT USE SHARP INSTRUMENTS
to scrape off frost or ice. Frost may
be removed by using the scraper
provided. Under no circumstances
should solid ice be forced off the
liner. Solid ice should be allowed to
thaw when defrosting the
appliance.
• Do not place carbonated or fizzy
drinks in the freezer as it creates
pressure on the container, which
may cause it to explode, resulting
in damage to the appliance.
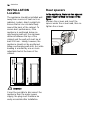
Installation
• During normal operation, the
condenser and compressor at the
back of the appliance heat up
considerably. For safety reasons,
minimum ventilation must be as
shown in the instructions.
Attention: kkeep vventilation oopenings
clear oof oobstruction.

electrolux
7
Environment
Protection
This aappliance ddoes nnot ccontain
gasses wwhich ccould ddamage tthe oozone
layer, iin eeither iits rrefrigerant ccircuit oor
insulation mmaterials. TThe aappliance
shall nnot bbe ddiscarded ttogether wwith
the uurban rrefuse aand rrubbish. AAvoid
damaging tthe ccooling uunit, eespecially
at tthe rrear nnear tthe hheat eexchanger.
Information oon yyour llocal ddisposal ssites
may bbe oobtained ffrom mmunicipal
authorities. TThe mmaterials uused oon tthis
appliance mmarked bby tthe ssymbol
are rrecyclable.
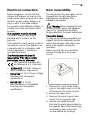
• Care must be taken to ensure that
the appliance does not stand on
the electrical supply cable.
Important:
if the supply cord is
damaged, it must be replaced by a
special cord or assembly availa-ble
from the manufacturer or its service
agent.
• If the appliance is transported
horizontally, it is possible that the
oil contained in the compressor
flows in the refrigerant circuit. It is
advisable to wait at least two hours
before connecting the appliance to
allow the oil to flow back in the
compressor.
• There are working parts in this
product which heat up. Always
ensure that there is adequate
ventilation as a failure to do this will
result in component failure and
possible food loss. See installation
instructions.
• Parts which heat up should not be
exposed. Wherever possible the
back of the product should be
against a wall.

8
electrolux
USE
Cleaning the interior
Before using the appliance for the first
time, wash the interior and all internal
accessories with luke-warm water and
some neutral soap so as to remove
the typical smell of a brand-new
product, then dry thoroughly.
Do nnot uuse ddetergents oor
abrasive ppowders, aas tthese wwill
damage tthe ffinish.
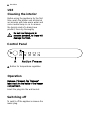
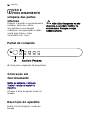
+2 +4 +5 +6 +8
Control Panel
A.
Button for temperature regulation
Operation
Remove, iif ppresent, tthe ““Remove”
label sstuck oon tthe iinside oof tthe ffreezer
compartment.
Insert the plug into the wall socket.
Switching off
To switch off the appliance remove the
mains plug.

electrolux
9
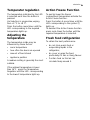
Action Freeze Function
To quickly lower the freezer
compartment temperature activate the
Action Freeze function .
Press the button A more times until the
LED corresponding to the symbol (*)
lights up.
To deselect the Action Freeze function
press mote times the button until the
required temperature is selected.
Fresh food refrigeration
To obtain the best performance:
• do not store warm food or
evaporating liquids in the
refrigerator;
• do cover or wrap the food,
particularly if it has a strong flavour.
• Position food so that air can
circulate freely around it.
Temperatur regulation
The temperature indicated by the LED
is selected each time the button is
pressed.
Lla Selection is progressive,varying
from +2 °C to +8 °C.
Press the button more times until the
LED corresponding to the required
temperature lights up.
Adjusting the
temperature
The temperature inside may be
influenced by these factors.
• room temperature
• how often the doors are opened
• amount of food stored
• appliance position
A medium setting is generally the most
suitable.
If the ambient temperature is lower
than 16°C press the Temperature
Regulator until the LED corresponding
to the lowest temperature lights up.

10
electrolux
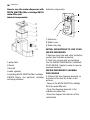
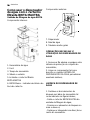
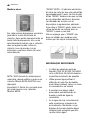
How to use the water dispenser with
BRITA MAXTRA filter cartridge BRITA
water filter unit
Internal components:
1.water tank
2.funnel
3.tank lid
4.valve +gasket
5.including BRITA MAXTRA filter cartridge
6.BRITA Memo -the electronic cartridge
exchange indicator
External components:
7.Dispenser
8.Water Lever
9.Water drop tray
INITIAL OPERATIONS TO USE YOUR
WATER DISPENSER
1.Remove every tape and other protection
system from the tank assembly;
2.Clean the components as described
into the WATER DISPENSER CLEANING
PROCEDURE chapter in order to remove
eventual residues;
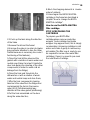
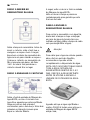
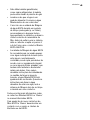
WATER DISPENSER CLEANING
PROCEDURE
1.Unblock the two stopping elements on
the sides of the tank as shown in the
pictures;
-Take out the BRITA MAXTRA cartridge
from the water filter unit
-Press the stopping elements in the
middle and move it up.
-Move the stopper into direction of the
central tank
1
2
3

electrolux
11
2.2.Push up the tank along the direction
of the Valve
3.Remove the lid and the funnel
4.Unscrew the valve in counter clockwise
(pay particular attention to lose the Valve
Gasket because is necessary toa correct
functioning of the features);
5.Clean the tank lid,the valve and the
gasket with a solution of warm water and
neutral soap.Rinse it and put it inside the
door hole during the cleaning of the other
components (in order to avoid cold air
leakage from the fridge);
6.Clean the tank and funnel into the
dishwasher or with a solution of warm
water and neutral soap and rinse them;
7.After the tank components cleaning
take back the valve from the fridge door
and assembly the tank in the inverse
order (4;3;2;1)of disassembly (pay
attention at the valve gasket positioning);
8.Put the tank assembled on the door
along the valve direction;
9.Block the stopping elements in inverse
order of unblock;
10.Insert again the BRITA MAXTRA
cartridge in the funnel as described in
chapter "How to change the BRITA
MAXTRA cartridge".
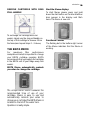
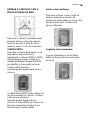
How to use the BRITA MAXTRA
filter cartridge
STEP 1:PREPARING THE
CARTRIDGE
To prepare your BRITA filter
cartridge,please remove protective
wrapper (note:cartridge and inside
wrapper may appear moist, this is simply
condensation). Immerse cartridge in cold
water and shake it gently to remove any
air bubbles.The filter now is ready to use.
As required for some other water filter
cartridges, there is no need to pre-soak
the new Maxtra Cartridge.

12
electrolux
STEP 2:INSERT IN THE WATER
TANK
Remove the tank lid.Before inserting the
cartridge,remove the funnel and clean it
thoroughly by rising it and wiping it
dry.Then thoroughly clean the inside of the
water tank with a dump cloth and wipe it
dry as well. Place the cartridge into the
filter tank and push downwards until it
'clicks' firmly into place.The cartridge
should stay in place if the funnel is turned
upside down.
STEP 3:RINSE CARTRIDGE
Take the funnel out of the BRITA water filter
unit,fill it under the tap with cold tap water
and allow it to filter through.Discard the first
two fillings into the sink.These first two
fillings are used to flush the filter cartridge.
Then place the funnel back into BRITA
water filter unit.
Place the cover back onto the jag and
press it carefully downwards to ensure it
fits correctly into place.
STEP 4:REFILL WATER TANK
To fill the tank with cold water, simply
open the flip top lid, take a jug of tap
water and pour it inside the tank through
the cover as shown into the picture (use
the lid every time that you want to filter
your water).
Important!
In order to avoid risk of spillage of water
during closing and opening of the
refrigerator door,we recommend to not fill
completely the water tank but leave a
head space of air.
NOTE:IF YOU HAVE NOT USED ALL
FILTERED WATER IN THE WATER TANK
WITHIN 1-2 DAYS PLEASE DISCARD
ANY WATER LEFT INSIDE THE BRITA
WATER FILTER UNIT BEFORE
REFILLING IT.
Allow the water to filter through and
repeat STEP 4 on page 15 as many times
as you want until the BRITA water filter
unit is filled up.

electrolux
13
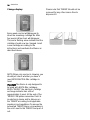
REMOVE CARTRIDGE WITH RING
PULL HANDLE
To exchange the cartridge after four
weeks, simply use the ring pull handle on
the top of the cartridge to remove it from
the funnel,and repeat steps 1 -3 above;
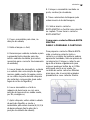
THE BRITA MEMO
For maximum filter performance
andoptimum taste,it is important to change
your BRITA cartridge regularly. BRITA
recommends that you replace the cartridge
in the BRITA unit of your fridge every four
weeks.
BRITA Memo automatically reminds
you when to change the cartridge.
The unique BRITA Memo measures the
recommended time of use of your
cartridge. Memo is easy to use and
automatically reminds your when to
change your cartridge.The BRITA Memo is
located on the lid of the water tank.
Operation is really simple.
Start the Memo display:
To start Memo please press and hold
down the start button on the lid until all four
bars appear in the display and flash
twice.The Memo is now set.
Functional control:
The flashing dot in the bottom right corner
of the Memo indicates that the Memo is
working.

14
electrolux
Change display:
Every week one bar will disappear to
show the remaining cartridge life. After
four weeks all four bars will disappear.
This,and a flashing arrow indicate that the
cartridge should now be changed. Insert
a new cartridge according to the
instructions and reactivate the Memo as
described above.
NOTE:When only one bar is showing, you
should just check whether you have a
new BRITA MAXTRA filter cartridge to
hand.
Important:
The Memo is only designed to
be used with BRITA filter cartridges.
BRITA "MEMO"-the electronic cartridge
exchange indicator has a life of
approximately 5 years. At the end of the
"MEMO's"life please remember that it is
an electronic device and to dispose on
the "MEMO"according to all applicable
provisions and regulations.To remove the
exhausted "MEMO"place a screwdriver in
the notch next to the "MEMO"and push it
out.
Please note that "MEMO"should not be
removed for any other reason than to
dispose of it.

electrolux
15
IMPORTANT INFORMATION
• The fridge door valve hole MUST
BE CLOSED with the WATER
VALVE during the regular
functioning of the appliance.
• Use only drinking water.The use of
any other drink type can leave
residues,taste or odor in the
reservoir and in the tap.
• It is possible to hear some noises
caused by air entering when the
water left the reservoir.
• In case the water does not flow
well, press the driving lever once
again. Keep the glass below the tap
for some instants,in order to assure
that all the water is collected by the
glass.
• Do not use gasified drinks,such as
soft drinks.The drink can leak due
to the gas pressure.
• Remember that water is a foodstuff.
Please consume filtered water
within one to two days.
• Should your BRITA water filter unit
not be in use for a prolonged
period (e.g. vacation),we
recommend that you discard any
water left inside the system and
leave the cartridge inside the filter
tank.Before using the system again
take out the cartridge and repeat
steps 1 to 4 of “How to use the
BRITA MAXTRA water filter
cartridge ” on page 15.
• The BRITA water filter unit is
designed for use only with
municipally treated tap water
(note:this water is constantly
controlled and according to legal
regulations safe to drink)or with
water from private supplies which
has been tested safe to drink.If an
instruction is received from the
authorities that mains water must
be boiled,the BRITA filtered water
also be boiled. When the instruction
to boil water is no longer in force,
the entire filter system must be
cleaned and a new cartridge
inserted.
More information on the use of
BRITA filter cartridges and the
‘Memo ’ can be found in the BRITA
information guide.
You can purchase new BRITA filter
cartridges and 'Memo' through
consumer service network of
Electrolux or BRITA.

16
electrolux
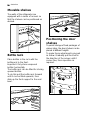
Movable shelves
The walls of the refrigerator are
equipped with a series of runners so
that the shelves can be positioned as
desired.
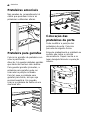
Bottle rack
Place bottles in the rack with the
bottleneck to the front.
Important: Only store unopened
bottles horizontally.
The bottle rack can be tilted for storing
opened bottles.
To do this pull the bottle rack forward
until it can be tilted upwards, then
slide up the front support to the next
level .
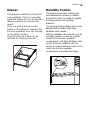
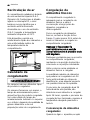
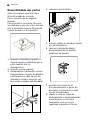
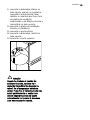
Positioning the door
shelves
To permit storage of food packages of
various sizes, the door shelves can be
placed at different heights.
To make these adjustments proceed
as follow: Gradually pull the shelf in
the direction of the arrows until it
comes free, then reposition as
required.
D338
PRXXX

electrolux
17
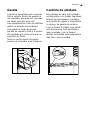
Drawer
The drawer is suitable for storing fruit
and vegetables. There is a separator
inside the drawer that can be placed in
different positions to suit personal
needs.
There is a grille (if forseen) on the
bottom of the drawer to separate the
fruit and vegetables from any humidity
on the bottom surface.
All parts inside the drawer can be
removed for cleaning purposes.
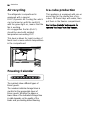
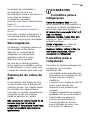
Humidity Control
The drawer incorporates a device with
slots (adjustable by means of a sliding
lever),which makes it possible to regulate
the temperature in the vegetable
drawer(s).
The opening in the ventilation slots can be
adjusted with the slider. Right slider:
Ventilation slots opened.
With the ventilation slots opened, more air
circulation results in a lower air moisture
content in the fruit and vegetable
compartments. Left slider: Ventilation slots
closed. When the ventilation slots are
closed, the natural moisture content of the
food in the fruit and vegetable
compartments is preserved for longer.
PR271

18
electrolux
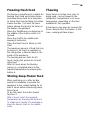
Air recycling
The refrigerator compartment is
equipped with a special
D.A.C.(Dynamic Air Cooling) fan which
can be turned on with the switch B
with the green light on, means that the
fan is working.
As a suggestion the fan (D.A.C.)
should be used with ambient
temperature exceeding 25°C .
This device allows for rapid cooling of
foods and a more uniform temperature
in the compartment.
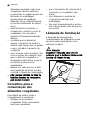
Freezing Calendar
The symbols show different types of
frozen goods.
The numbers indicate storage times in
months for the appropriate types of
frozen goods. Whether the upper or
lower value of the indicated storage time
is valid depends on the quality of the
foods and pre-treating before freezing.
10 - 1210 - 1210 - 1210 -1 23-63-63-63-63-41-2
Ice-cube production
This appliance is equipped with one or
more trays for the production of ice-
cubes. Fill these trays with water, then
put them in the freezer compartment.
Do nnot uuse mmetallic iinstruments tto
remove tthe ttrays ffrom tthe ffreezer.

electrolux
19
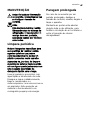
Thawing
Deep-frozen or frozen food, prior to
being used, can be thawed in the
refrigerator compartment or at room
temperature, depending on the time
available for this operation.
Small pieces may even be cooked still
frozen, directly from the freezer: in this
case, cooking will take longer.
Freezing fresh food
The freezer compartment is suitable for
freezing fresh food and storing frozen
and deep-frozen food for a long time.
To freeze fresh food activate the Action
Freeze function (*) at least 24 hours
before placing the food to be frozen in
the freezer compartment.
Move the Twist&Serve ice dispenser to
the middle of the shelf on which it is
hooked.
Move the shelf to the middle seat,
keeping it horizontal.
Place the fresh food to freeze on the
shelf.
The maximum amount of food that can
be frozen in 24 hours is specified on
the rating plate ,a label located on the
inside of the appliance.
The freezing process lasts for 24
hours: during this period do not add
other food .
After 24 hours,when the freezing
process is completed,return to the
required temperature by pressing the
button A.
Storing deep-frozen food
When switching on or after an idle
period,it is advisable to operate the
appliance to the coldest setting for at
least 2 hours before introducing deep-
frozen food.
To do this,select the Action Freeze
function (*).
After 2 hours select the required
temperature by pressing the button A.
To obtain best results it is advisable to
keep the freezer shelf on the middle
seats.

20
electrolux
• the freezing process takes 24
hours. No further food to be frozen
should be added during this period;
• only freeze top quality, fresh and
thoroughly cleaned, foodstuffs;
• prepare food in small portions to
enable it to be rapidly and
completely frozen and to make it
possible subsequently to thaw only
the quantity required;
• wrap up the food in aluminium foil
or polythene and make sure that
the packages are airtight;
• do not allow fresh, unfrozen food to
touch food which is already frozen,
thus avoiding a rise in temperature
of the latter;
• lean foods store better and longer
than fatty ones; salt reduces the
storage life of food;
• ice cubes, if consumed immediately
after removal from the freezer
compartment, can possibly cause
the skin to be freeze burnt;
• it is advisable to show the freezing-
in date on each individual pack to
enable you to keep tab of the
storage time;
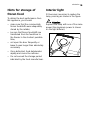
• do nnot pput ccarbonated lliquids ((fizzy
drinks, eetc.) iin tthe ffreezer
compartment aas tthey mmay bburst.
HINTS
Hints for refrigeration
Useful hints:
Meat ((all ttypes):
wrap in polythene
bags and place on the glass shelf
above the vegetable drawer.
For ssafety, sstore iin tthis wway oonly oone
or ttwo ddays aat tthe mmost.
Cooked ffoods, ccold ddishes, eetc..:
these should be covered and may be
placed on any shelf.
Fruit aand vvegetables:
these should be
thoroughly cleaned and placed in the
special drawer(s) provided.
Butter aand ccheese:
these should be
placed in special airtight containers or
wrapped in aluminium foil or polythene
bags to exclude as much air as
possible.
Milk bbottles:
these should have a cap
and should be stored in the bottle rack
on the door.
Bananas, ppotatoes, oonions aand ggarlic,
if nnot ppacked, mmust nnot bbe kkept iin tthe
refrigerator.
Hints for freezing
To help you make the most of the
freezing process, here are some
important hints:
• the maximum quantity of food
which can be frozen in 24 hrs. is
shown on the rating plate;
A página está carregando ...
A página está carregando ...
A página está carregando ...
A página está carregando ...
A página está carregando ...
A página está carregando ...
A página está carregando ...
A página está carregando ...
A página está carregando ...
A página está carregando ...
A página está carregando ...
A página está carregando ...
A página está carregando ...
A página está carregando ...
A página está carregando ...
A página está carregando ...
A página está carregando ...
A página está carregando ...
A página está carregando ...
A página está carregando ...
A página está carregando ...
A página está carregando ...
A página está carregando ...
A página está carregando ...
A página está carregando ...
A página está carregando ...
A página está carregando ...
A página está carregando ...
A página está carregando ...
A página está carregando ...
A página está carregando ...
A página está carregando ...
A página está carregando ...
A página está carregando ...
A página está carregando ...
A página está carregando ...
-
 1
1
-
 2
2
-
 3
3
-
 4
4
-
 5
5
-
 6
6
-
 7
7
-
 8
8
-
 9
9
-
 10
10
-
 11
11
-
 12
12
-
 13
13
-
 14
14
-
 15
15
-
 16
16
-
 17
17
-
 18
18
-
 19
19
-
 20
20
-
 21
21
-
 22
22
-
 23
23
-
 24
24
-
 25
25
-
 26
26
-
 27
27
-
 28
28
-
 29
29
-
 30
30
-
 31
31
-
 32
32
-
 33
33
-
 34
34
-
 35
35
-
 36
36
-
 37
37
-
 38
38
-
 39
39
-
 40
40
-
 41
41
-
 42
42
-
 43
43
-
 44
44
-
 45
45
-
 46
46
-
 47
47
-
 48
48
-
 49
49
-
 50
50
-
 51
51
-
 52
52
-
 53
53
-
 54
54
-
 55
55
-
 56
56


Electrolux END42395W Manual do usuário
- Categoria
- Geladeira-freezers
- Tipo
- Manual do usuário
em outros idiomas
- English: Electrolux END42395W User manual
Artigos relacionados
-
Electrolux END42405W Manual do usuário
-
-
-
-
-
-
-
-
-
Outros documentos
-
Candy CHSBSV5172XK FFREEZER SILVER Manual do usuário
-
Aeg-Electrolux S72438DT18 Manual do usuário
-
HAEGER CR-27S.015A Manual do usuário
-
Hoover CHSBSV 5172XN Manual do usuário
-
Midea HD-403RWEN Manual do usuário
-
Zerowatt CVBN 6184WBF/S1 Manual do usuário
-
Hoover HOTB 174 DE Manual do usuário
-
-
Infiniton FGC-893PZ Manual do proprietário
-