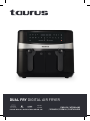
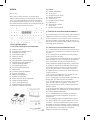
Taurus 973922 Manual do usuário
- Categoria
- Fritadeiras
- Tipo
- Manual do usuário

DUAL FRY DIGITAL AIR FRYER
ENGLISH / AFRIKAANS
/ SPANISH / FRENCH / PORTUGUESE
Model:
973922
complies with
INTERNATIONAL
IEC60335
SAFETY SPECIFICATIONS
PLEASE READ ALL INSTRUCTIONS BEFORE USE
1750W 2 YEAR
WARRANTY

ENGLISH
Dear customer
Thank you for choosing to purchase a Taurus brand
product. Thanks to its technology, design and opera-
tion and the fact that it exceeds the strictest quality
standards, a fully satisfactory use and long product
life can be assured.
Thank you for choosing to purchase a Taurus brand
product. Thanks to its technology, design and opera-
tion
and the fact that it exceeds the strictest quality
standards, a fully satisfactory use and long product
life can be assured.
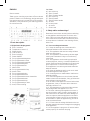
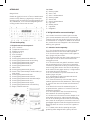
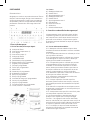
1. Parts description
1.1. Digital touch display panel:
A) Zone 1 selection
B) Temperature control +/-
C) Digital display
D) Time control +/-
E) Zone 2 selection
F) Power ON/OFF
G) Pre-programmed dehydrate
H) Pre-programmed re-heat
I) Pre-programmed vegetable
J) Pre-programmed pizza
K) Pre-programmed fish
L) Match Cook
M) Pre-programmed shrimp
N) Smart Finish
O) Pre-programmed cake
P) Pre-programmed steak
Q) Pre-programmed chicken drumsticks
R) Pre-programmed meat
S) Pre-programmed chips
T) Pre-programmed pre-heat
U) Start / Pause cooking
1.2. Parts:
A) Non-stick tray
B) Zone 1 Drawer
C) Zone 1 Drawer handle
D) Non-stick tray
E) Zone 2 Drawer
F) Zone 2 Drawer handle
G) Air inlet
H) Control panel
I) Air outlet
J) Power cord
2. Safety advice and warnings!
Read these instructions carefully before switching
on the appliance and keep them for future refer-
ence. Failure to follow and observe these instruc-
tions could lead to an accident. Clean all the parts
of the product as indicated in the cleaning section,
before use.
2.1. Use or working environment:
2.1.1. Keep the working area clean and well lit.
Cluttered and dark areas invite accidents.
2.1.2. This appliance shall not be used by children
aged less than 8 years.
2.1.3. This appliance can be used by children aged
from 8 years and above if they are continuously
supervised.
2.1.4. This appliance can be used by people with
reduced physical, sensory, or mental capabilities or
lack of experience and knowledge if they have been
given supervision or instruction concerning use
of the appliance in a safe way and understand the
hazards involved.
2.1.5. Keep the appliance and its cord out of reach
of children aged less than 8 years.
2.1.6. Cleaning and user maintenance shall not be
made by children.
2.1.7. Place the appliance on a horizontal, flat and
stable surface with the handles, if any, positioned to
avoid spillage of the hot liquids.
2.1.8. Do not use the appliance in association with a
programmer, timer, or another device that auto-
matically switches it on.
2.1.9. The temperature of the accessible surfaces
may be high when the appliance is in use.
2.1.10. Never submerge the appliance in water or
any other liquid or place it under running water. If
the connection to the mains has been damaged, it
must be replaced, take the appliance to an autho-
rised technical support service. Do not attempt to
disassemble or repair the appliance by yourself in
order to avoid a hazard.
2.1.11. Ensure that the voltage indicated on the rat-
ing label matches the mains voltage before plugging
in the appliance.
2.1.12. The appliance’s plug must fit into the mains
socket properly. Do not alter the plug.

2.1.13. Do not force the power cord. Never use the
power cord to lift, carry or unplug the appliance.
2.1.14. Do not wrap the power cord around the
appliance.
2.1.15. Do not clip or crease the power cord.
2.1.16. Do not allow the power cord to come into
contact with the appliance’s hot surfaces.
2.1.17. Check the state of the power cord. Damaged
or tangled cables increase the risk of electric shock.
2.1.18. Do not touch the plug with wet hands.
2.1.19. Do not use the appliance if the cable or plug
is damaged.
2.1.20. If any of the appliance casings breaks,
immediately disconnect the appliance from the
mains to prevent the possibility of an electric shock.
2.1.21. Do not use the appliance if it has fallen on
the floor if there are visible signs of damage or if it
has a leak.
2.1.22. Place the appliance on a horizontal, flat,
stable surface, suitable for withstanding high
temperatures and away from other heat sources and
contact with water.
2.1.23. Keep the appliance away from flammable
material such as textiles, cardboard, or paper, etc.
2.2. Personal safety:
2.2.1. CAUTION: Do not leave the appliance unat-
tended during use as there is a risk of an accident.
2.2.2. Do not touch the heated parts of the appliance,
as it may cause serious burns.
2.2.3. This appliance is only for domestic use, not
for industrial or professional use. It is not intended
to be used by guests in hospitality environments
such as bed and breakfast, hotels, motels, and other
types of residential environments, even in farm-
houses, areas of the kitchen staff in shops, offices
and other work environments.
2.2.4. This appliance is not intended for use by
persons (including children) with reduced physical,
sensory or mental capabilities, or lack of experience
and knowledge, unless they have been given super-
vision or instruction concerning use of the appliance
by a person responsible for their safety.
2.2.5. This appliance is not a toy. Children should be
supervised to ensure that they do not play with the
appliance.
2.3. Use and care:
2.3.1. Fully unroll the appliance’s power cable before
each use.
2.3.2. Clean the parts that will be directly in contact
with food with a soft, damp cloth and dry thoroughly.
2.3.3. Place the hot air fryer housing on a stable,
heat-resistant surface, at a height that is comfort-
able for the user.
2.3.4. Connect the hot air fryer to a suitable power
supply.
2.3.5. NOTE: When using the hot air fryer for the
first time, a slight smoke or distinctive smell may
be emitted. This is normal and will soon subside.
Ensure that there is sufficient provision of fresh air
around the hot air fryer during use. It is strongly
advised to run the hot air fryer without food for
approximately 10 minutes before first use. This will
prevent the initial smoke or funny smell from affect-
ing the taste of the food.
2.3.6. Do not use the power cord to switch off the
appliance, first switch the appliance of the On/Off
button, and then remove it from the mains.
2.3.7. Disconnect the appliance from the mains
when not in use and before undertaking any cleaning
task.
2.3.8. This appliance should be stored out of reach
of children and/or the disabled.
2.3.9. Do not store or transport the appliance if it is
still hot.
2.3.10. Never leave the appliance unattended while
in use.
2.3.11. Never leave the appliance unattended when
in use and keep out of the reach of children, as
this is an electrical appliance that heats up to high
temperatures and it can cause serious burns.
2.3.12. If, for some reason, the appliance was to
catch fire, disconnect the appliance from the mains
power supply and DO NOT USE WATER TO PUT THE
FIRE OUT.
2.4. Assembling the hot air fryer
2.4.1. Fit the non-stick coated tray into the cook-
ing compartment of the drawers and push down
completely.
2.4.2. Slide the drawers in towards the hot air fryer
main unit to close it.
2.4.3. The hot air fryer comes pre-assembled. En-
sure that the cooking compartment is closed tightly
before use, as not doing so will prevent the hot air
fryer from working. NOTE: Do not switch on the hot
air fryer without food inside.
2.5. Service:
2.5.1. Make sure that the appliance is serviced only
by suitably qualified technicians, and that only origi-
nal spare parts or accessories are used to replace
existing parts/accessories.
2.5.2. If the power cord is damaged, the manufactur-
er or its service agent or a similarly qualified person
must replace it to avoid a hazard.
2.5.3. Any misuse or failure to follow the instructions
for use renders the guarantee and the manufac-
turer’s liability null and void.
3. Instructions for use

3.1. Before use:
3.1.1. Remove the protective film from the device (if
applicable).
3.1.2. Before using the product for the first time,
clean the parts that will come in contact with food.
3.2. Use and care:
3.2.1. Using the hot air fryer
3.2.1.1. Unroll the power cord completely before
plugging it in.
3.2.1.2. Place your appliance on a flat, dry, stable
surface.
3.2.1.3. Connect the appliance to the mains power
Supply and switch it on. The hot air fryer will beep
once and be on standby mode. The will be
illuminated in red.
3.2.1.4. To turn on the hot air fryer, press the power
ON/OFF button, the LED display will illuminate.
3.2.1.5. Press and select the cooking function.
You can adjust the time and temperature freely
by using the Time (B) +/- and the Temperature (D)
+/- button. You can also press any pre-programmed
function icon to cook different food.
3.2.1.6. After selecting the cooking function for zone
1, press and select the cooking function. You can
adjust the time and temperature freely by using the
Time (B) +/- and the Temperature (D) +/- button. You
can also press any pre-programmed function icon to
cook different food.
3.2.1.7. Once the above steps are completed, you
may press the start/pause and the hot air fryer
will begin to cook. Each pre-programmed cooking
functions
has its own default time and temperature as il-
lustrated in the table below. The user can adjust the
time and temperature freely by selecting the zone
and using the Time (B) +/- and the Temperature (D)
+/- button.
3.2.1.8. The temperature control range is between
50°C-200°C. The temperature is adjusted in incre-
ments of 10°C either way.
3.2.1.9. The time control range is between 1-60 min-
utes. The time is adjusted in increments of 1 minute
either way.
3.2.1.10. After selecting the functions, setting the
temperature and time, press . The will start
to flicker and you will hear a beep sound and the
hot air fryer will start cooking. Pressing while
the hot air fryer is cooking you will hear a beep and
the will stop flickering and the hot air fryer will
pause cooking. Pressing the will put the hot air
fryer back in standby mode. NOTE: If you remove the
drawer during the cooking cycle the hot air fryer will
stop cooking and the timer will stop counting down
and will only resume on the same program once the
drawer is back in place.
3.2.1.11. At the end of the cooking cycle the timer
will show “00”, the heating element will stop heating
but the fan will continue running for about 1 minute,
thereafter the hot air fryer will beep +/-11 times and
the hot air fryer will go onto standby mode.
3.2.1.12. Smart Cooking: If you are cooking 2
different meals at the same time you can select
the cooking functions as illustrated above, press
and your meals will finish cooking
at the same time.
Step 1: PROGRAM ZONE 1: Place food into the
drawer, press and select the cooking function.
Step 2: PROGRAM ZONE 2: Place food into the
drawer, press and select the cooking function.
Step 3: BEGIN COOKING: Press
then press to begin cooking.
3.2.1.13. Match Cook: If you are cooking the same
food in each zone press and your
meals will cook on the same function.
Step 1: PROGRAM ZONE 1: Place food into the
drawers and press .
Step 2: Press and select a cooking function.
Step 3: Press to begin cooking. Zone 1 and 2 will
begin cooking on the same function.
3.2.1.14. Some ingredients may require shaking
halfway or throughout the cooking time.
3.2.1.15. WARNING: Nominal voltage is still present
even when the thermostat is turned to the off posi-
tion. To permanently switch off the hot air fryer,
ensure it is turned off at the mains power supply.
3.3. Once you have finished using the appliance:
3.3.1. Allow appliance to cool down.
3.3.2. Unplug the appliance from the mains power
supply.
3.3.3. Clean the appliance as described in the clean-
ing section.
4. Cleaning
4.1. Disconnect the appliance from the mains power
supply and allow it to cool completely before under-
taking any cleaning task.
4.2. Clean the hot air fryer main unit with a soft,
damp cloth and dry thoroughly.
4.3. Wash the accessories in warm, soapy water,
then rinse and dry thoroughly.
4.4. CAUTION! Do not immerse electrical parts of the
appliance in any liquid.
4.5. Do not use solvents, or products with an acid
or base pH such as bleach, or abrasive products, for
cleaning the appliance.
4.6. Never submerge the appliance in water or any
other liquid or place it under running water.
4.7. The fry basket and fry basket container are
dishwasher safe.

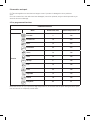
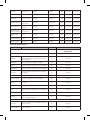
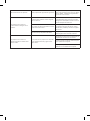
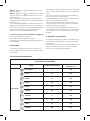
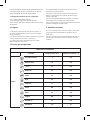
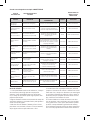
PROGRAM LOGISTICS
Menu Default time (min) Default temperature (°C)
Function
Pre-heat 3180
French fries 18 200
Meat 12 200
Drumsticks 20 200
Steak 12 180
Cake 25 160
Shrimp 8180
Fish 10 180
Pizza 20 180
Vegetable 10 160
Reheat 15 150
Dehydrate 360 60
CAUTION: The hot air fryer operates at high temperatures, do not touch the hot parts during and after opera-
tion until the unit is completely cooled down.
5. Anomalies and repair
5.1. Take the appliance to an authorised support centre if product is damaged or other problems
arise.
5.2. If the connection to the mains has been damaged, it must be replaced, and you should proceed as you
would in the case of damage.
6. Pre-programmed functions

7. Cooking guide
Below are guidelines for cooking certain types of food with the hot air fryer. This is a guideline only, cooking
should be monitored.
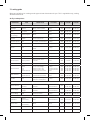
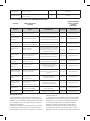
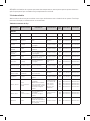
Air Fry Cooking Chart:
INGREDIENT AMOUNT PER
ZONE PREPARATION TOSS IN OIL TEMP
(°C) SINGLE
COOKING DUAL
COOKING
VEGETABLES
Asparagus 1 bunch Whole, stems trimmed 2 Tsp 200 8-12 mins 20-25 mins
Beets 6-7 small Whole None 200 30-35 mins 35-40 mins
Bell Peppers
(for roasting) 3 small peppers Whole None 200 10-15 mins 15-20 mins
Broccoli 1 head Cut in 1-inch florets 1 Tbsp 200 8-10 mins 15-17 mins
Brussels Sprouts 1 lb Cut in half, stem removed 1 Tbsp 200 15-20 mins 20-25 mins
Brussels Squash 1½ lbs Cut in 1-2-inch pieces 1 Tbsp 200 20-25 mins 35-40 mins
Carrots 1 lb Peeled, cut in ½-inch
pieces 1 Tbsp 200 13-16 mins 25-30 mins
Cauliflower 1 head Cut in 1-inch florets 2 Tbsp 200 17-20 mins 20-25 mins
Corn on the Cob 2 ears, cut in half Husks removed 1 Tbsp 200 12-15 mins 18-20 mins
Green Beans 1 bag (12 oz) Trimmed 1 Tbsp 200 8-10 mins 10-15 mins
Kale (for chips) 5 cups, packed Torn in pieces, stem
removed None 200 7-9 mins 15-20 mins
Mushrooms 8 oz Rinsed, cut in quarters 1 Tbsp 200 7-9 mins 13-15 mins
Russet Potatoes
1½ lbs
1 lb
1 lb
3 whole (6-8 oz)
Cut in 1-inch wedges
Hand-cut fries*, thin
Hand-cut fries*, thick
Pierced with fork 3 times
1 Tbsp
½-3 Tbsp Canola
½-3 Tbsp Canola
None
200
200
200
200
20-22 mins
20-24 mins
19-24 mins
30-35 mins
35-38 mins
30-35 mins
35-40 mins
37-40 mins
Sweet Potatoes 1½ lbs
3 whole (6-8 oz) Cut in 1-inch chunks
Pierced with fork 3 times 1 Tbsp
None 200
200 15-20 mins
36-42 mins 30-35 mins
40-45 mins
Zucchini 1 lb Cut in quarters lengthwise,
then cut in 1-inch pieces 1 Tbsp 200 15-18 mins 25-28 mins
POULTRY
Chicken Breasts 2 breasts
4 breasts Bone in
Boneless Brushed with oil
Brushed with oil 200 25-30 mins
22-24 mins 30-35 mins
25-28 mins
Chicken Thighs 2 thighs
4 thighs Bone in
Boneless Brushed with oil
Brushed with oil 200 22-28 mins
18-22 mins 26-29 mins
25-28 mins
Chicken Wings 2 lbs Drumettes & flats 1 Tbsp 200 18-22 mins 43-47 mins
FISH & SEAFOOD
Crab Cakes 2 cakes
(6-8 oz each) None Brushed with oil 200 5-10 mins 10-13 mins
Lobster Tails 4 tails
(3-4 oz each) Whole None 200 5-8 mins 15-18 mins
Salmon Fillets 3 fillets (4 oz each) None Brushed with oil 200 7-12 mins 13-17 mins
Shrimp 1 lb Whole, peeled, tails 1 Tbsp 200 7-10 mins 10-13 mins

BEEF
Burgers 2 quarter-pound
patties, 80% lean ½ inch thick Brushed with oil 200 8-10 mins 10-13 mins
Steaks 2 steaks
(8 oz each) Whole Brushed with oil 200 10-20 mins 14-18 mins
PORK
Bacon 3 strips, cut in half None None 170 8-10 mins 9-12 mins
Pork Chops
2 thick-cut, bone-
in chops (10-12 oz
each)
2 boneless chops
(8 oz each)
Bone in
Boneless Brushed with oil
Brushed with oil 200
200 15-17 mins
14-17 mins 23-27 mins
17-20 mins
Pork Tenderloins 1 lbs None Brushed with oil 190 15-20 mins 20-25 mins
Sausages 5 sausages None None 200 7-10 mins 17-22 mins
FROZEN FOODS
Chicken Cutlets 3 cutlets None None 200 18-21 mins 20-25 mins
Chicken Nuggets 1 box (12 oz) None None 200 10-13 mins 18-21 mins
Fish Fillets 1 box (6 fillets) None None 200 14-16 mins 17-22 mins
Fish Sticks 18 fish sticks
(11 oz) None None 200 10-13 mins 16-19 mins
French Fries 1 lbs None None 200 18-22 mins 28-32 mins
Mozzarella Sticks 1 box (11 oz) None None 190 8-10 mins 10-12 mins
Pot Stickers 2 bags (10.5 oz) None 1 Tbsp 200 12-14 mins 16-18 mins
Pizza Rolls 1 bag
(20 oz, 40 count) None None 200 12-15 mins 15-18 mins
Popcorn Shrimp 1 box (14-16 oz) None None 200 9-11 mins 14-18 mins
Sweet Potato Fries 1 lbs None None 200 20-22 mins 30-32 mins
Tater Tots 1 lbs None None 190 18-22 mins 25-27 mins
Onion Rings 10 oz None None 190 13-16 mins 18-22 mins
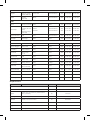
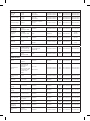
Dehydrate Chart:
INGREDIENT PREPARATION TEMP (°C) SINGLE ZONE DUALZONE
TIMES ARE THE SAME FOR BOTH ZONES
FRUITS & VEGETABLES
Apples Cored, cut in 1/8-inch slices, rinsed in lemon
water, patted dry 60 7-8 hours
Asparagus Cut in 1-inch pieces, lanced 60 6-8 hours
Bananas Peeled, cut in 3/8-inch slices 60 8-10 hours
Beets Peeled, cut in 1/8-inch slices 60 6-8 hours
Eggplant Peeled, cut in ¼-inch slices, blanched 60 6-8 hours
Fresh Herbs Rinsed, patted dry, stems removed 60 4 hours

Ginger Root cut in 3/8-inch slices 60 6 hours
Mangoes Peeled, cut in 3/8-inch slices, pit removed 60 6-8 hours
Mushrooms Cleaned with soft brush (do not wash) 60 6-8 hours
Pineapple Peeled, cut in 3/8-½-inch slices 60 6-8 hours
Strawberries Cut in half or in ½-inch slices 60 6-8 hours
Tomatoes Cut in 3/8-inch slices or grated; steam if planning
to rehydrate 60 6-8 hours
MEAT, POULTRY, FISH
Beef Jerky Cut in ¼-inch slices, marinated overnight 70 5-7 hours
Chicken Jerky Cut in ¼-inch slices, marinated overnight 70 5-7 hours
Turkey Jerky Cut in ¼-inch slices, marinated overnight 70 5-7 hours
Salmon Jerky Cut in ¼-inch slices, marinated overnight 70 3-5 hours
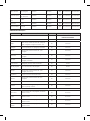
Using Dual Cooking Technology: SMART FINISH
CHOOSE ANY TWO ADD ONE RECIPE PER ZONE SET BOTH ZONES AND
USE SMART FINISH
RECIPE AMOUNT MIX OR COMBINE THESE
INGREDIENTS FUNCTION TEMP/TIME
Crab Cakes 2 crab cakes Brush with melted butter Air Fry 195°C/15 mins
Balsamic Roasted
Tomatoes 2 pints cherry tomatoes ½ cup balsamic vinegar
1 Tbsp Canola oil Roast 195°C/15 mins
Maple Sage Pork
Chops 2-3 boneless pork chops
(4 oz each) 2 Tbsp canola oil
2 Tbsp Cajun seasoning Roast 195°C/17-20 mins
Cajun Russet
Potatoes 4 medium potatoes, diced
¼ cup ketchup, ¼ cup yellow
mustard, 1 egg, ½ cup Panko
breadcrumbs, ¼ cup Parmesan
cheese
Air Fry 200°C/30 mins
Classic Meatloaf 1 lb meatloaf mix
(beef, pork, veal) 2 Tbsp Canola oil
½ cup sliced almonds Air Fry 165°C/35 mins
Green Beans with
Almonds 1 lb green beans, ends
trimmed 2 Tbsp Canola oil
½ cup sliced almonds Air Fry 195°C/15 mins
Miso Glenzed
Salmon 3 salmon fillets (6 oz each) 2 Tbsp miso paste,1 teaspoon
Canola oil, rub onto salmon Air Fry 195°C/15 mins
Honey Hazelnut
Brussels Sprouts 1 lb Brussels sprouts,
cut in half 2 Tbsp Canola oil,¼ cup honey,
½ cup chopped hazelnuts Air Fry 195°C/23 mins
Buffalo Chicken
Thighs 4 boneless skin-on chicken
thighs (4-5 oz each) 1 cup buffalo sauce,
toss with chicken Air Fry 200°C/27 mins
Plant Based ''Meat
“Burger 1 lb plant-based ground
''meat"(4 4-oz patties) 1 Tbsp minced garlic,
1 Tbsp minced onion Air Fry 185°C/20 mins
Mediterranean 1 head cauliflower, cut in
½-inch florets ½ cup tahini, 2 Tbsp Canola oil Air Fry 195°C/35 mins
French Fries 1 lb French fries Season as desired Air Fry 200°C/30 mins

Cooking Tips:
1. With larger amounts of food, the cooking time may
only require a small increase. With smaller amounts
of food, the cooking time may only require a small
decrease.
2. Shaking smaller foods halfway through the
cooking time improves the end result and can help
prevent unevenly fried foods.
3. Add oil to fresh potatoes / chips for a crispy result.
Fry the potatoes / chips within a few minutes of
adding the oil.
4. When adding oil to any food always add the oil
before you add the food to the basket. To do this put
the food in a bowl or similar container, then add the
oil, stir the food until it is evenly coated then add the
food to the basket.
5. Be careful when cooking food with a high fat
content such as sausages as they tend to be greasy.
These types of foods can produce a significant
amount of smoke, particularly when cooked at high
temperatures. This will not harm the air fryer or
affect the final cooking result of the food.
6. Snacks that can be cooker in the oven can be
cooked in the air fryer.
7. When baking, use a baking tin or oven dish placed
inside the basket.
8. Storage
8.1. Before storing, make sure that the hot air fryer
is cool, clean and dry. Never store the hot air fryer
while it is wet.
8.2. Never wrap the cord tightly around the hot air
fryer, wrap it loosely to avoid causing damage. Store
in a cool, dry place.
9. Specifications
Product code: 973922
Input: 220-240V ~ 50/60Hz
Output: 1450-1750W
Total capacity: 9 Litres
Working capacity: 2 x 4.5 Litres
10. Recycling
10.1. These electrical products, cables, batteries,
packaging, and the manual, should not be mixed
with general household waste. For proper recycling,
please take these products to your nearest Creative
Housewares office where they will be accepted for
recycling free of charge.
10.2. Alternatively, please contact your local author-
ity or household waste disposal service for further
details of your nearest designated collection point.
Correct product disposal saves resources and
prevents negative effects on human health and the
environment.
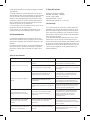
Troubleshooting
PROBLEM POSSIBLE CAUSE SOLUTION
The air fryer does not work.
The appliance is not plugged into the
mains. Put the mains plug in an earthed wall
socket.
You have not set the timer. Turn the timer knob to the required
preparation time to switch on the ap-
pliance.
Food not fully cooked
The amount of the ingredients in the Fry-
ing Tray is too much.
Put smaller batches of ingredients in the
Frying Tray. Smaller batches are fried
more evenly.
The set temperature is too low. Turn the temperature control knob to
the required temperature setting (see
section 'Settings').
The preparation time is too short. Turn the timer knob to the required
preparation time (see section 'Settings').
The ingredients are fried unevenly
in the air fryer.
Certain types of the ingredients need
to be shaken halfway throughout the
preparation time.
Ingredients that lie on the top of or
across each other (e.g. fries) need to be
shaken halfway throughout the prepara-
tion time (see section 'Settings').
Fried snacks are not crispy when
they come out of the air fryer You use a type of snack meant to be
prepared in a traditional deep fryer. Use oven snacks or lightly brush some
oil onto the snacks for a crispier result.

Cannot slide the pan into the
appliance properly. There is too much food in the Frying
Tray.
Do not fill the tray beyond the maximum
amount indicated in the table on the
earlier page.
White smoke comes out of the
appliance You are preparing greasy ingredients. Note that the temperature is well-
controlled to be under 180°C, when you
fry greasy ingredients in the air fryer.
Fresh potato fries are fried
unevenly in the air fryer.
The pan still contains greasy residues
from the previous use.
White smoke is caused by grease heating
up in the pan. Make sure you clean the
pan properly after each use.
You did not soak the potato sticks prop-
erly before you fried them.
Soak the potato sticks in a bowl of water
for at least 30 minutes; take them out
and dry them with kitchen paper.
You did not use the right potato type. Use fresh potatoes and make sure they
stay firm during frying.
Fresh potato fries are not crispy
when they come out of the air
fryer.
The crispiness of the fries depends on
the amount of oil and water in the fries.
Make sure you dry the potato sticks
properly before you coat them with oil.
Cut the potato into thinner sticks for a
crispier result.
Add slightly more oil for a crispier result.

AFRIKAANS
Geagte kliënt
Dankie dat jy gekies het om 'n Taurus-handelsmerk
produk te koop. Danksy sy tegnologie, ontwerp en
werking en die feit dat dit die strengste kwaliteit oor-
skry standaarde, 'n ten volle bevredigende gebruik
en lang produk lewe te kan verseker.
Thank you for choosing to purchase a Taurus brand
product. Thanks to its technology, design and opera-
tion
and the fact that it exceeds the strictest quality
standards, a fully satisfactory use and long product
life can be assured.
1. Parte beskrywing
1.1. Digitale aanraak skerm paneel:
A) Sone 1 seleksie
B) Temperatuur kontrole +/-
C) Digitale vertoning
D) Tyd kontrole +/-
E) Sone 2 seleksie
F) Krag AAN/AF
G) Vooraf geprogrammeerde dehidreer
H) Vooraf geprogrammeerde herverhitting
I) Vooraf geprogrammeerde groente
J) Vooraf geprogrammeerde pizza
K) Vooraf geprogrammeerde vis
L) Match Cook
M) Vooraf geprogrammeerde garnale
N) Smart Finish (twee maaltye wat dieselfde tyd
klaar kook)
O) Vooraf geprogrammeerde koek
P) Vooraf geprogrammeerde biefstuk
Q) Vooraf geprogrammeerde hoenderboudjies
R) Vooraf geprogrammeerde vleis
S) Vooraf geprogrammeerde skyfies
T) Vooraf geprogrammeerde voorverhitting
U) Begin / Onderbreek kook
1.2. Parte:
A) Kleefvrye plaat
B) Sone 1-laai
C) Sone 1-laaihandvatsel
D) Kleefvrye plaat
E) Sone 2-laai
F) Sone 2-laaihandvatsel
G) Lug inlaat
H) Beheer paneel
I) Luguitlaat
J) Kragkabel
2. Veiligheidsadvies en waarskuwings!
Lees hierdie instruksies noukeurig deur voordat
jy die toestel aanskakel en hou dit vir toekomstige
verwysing. Versuim om hierdie instruksies te volg en
na te kom kan tot 'n ongeluk lei. Maak al die dele van
die produk skoon soos aangedui in die skoonmaak
afdeling, voor gebruik.
2.1. Gebruik of werksomgewing:
2.1.1. Hou die werkarea skoon en goed verlig. Deur-
mekaar en donker areas veroorsaak ongelukke.
2.1.2. Hierdie toestel mag nie deur kinders gebruik
word jonger as 8 jaar oud nie.
2.1.3. Hierdie toestel kan deur kinders gebruik word
vanaf 8 jaar en ouer as hulle voortdurend onder
toesig gehou word.
2.1.4. Hierdie toestel kan gebruik word deur mense
met verminderde fisiese, sensoriese of geestelike
vermoëns of gebrek aan ervaring en kennis as hulle
onder toesig gehou word of instruksies rakende ge-
bruik van die toestel gegee word op 'n veilige manier
en verstaan die gevare betrokke.
2.1.5. Hou die toestel en sy koord buite bereik van
kinders jonger as 8 jaar.
2.1.6. Skoonmaak en gebruik onderhoud kan nie
deur kinders gedoen word nie.
2.1.7. Plaas die toestel op 'n horisontale, plat en
stabiele oppervlak met die handvatsels, indien enige,
in 'n posisie om mors van die warm vloeistowwe te
vermy.
2.1.8. Moenie die toestel in samewerking met 'n
programmeerder, tydhouer of 'n ander toestel wat
outomaties skakel nie.
2.1.9. Die temperatuur van die toestel kan hoog
wees wanneer die toestel in gebruik is.
2.1.10. Moet nooit die toestel in water dompel nie of
enige ander vloeistof of onder lopende water hou
nie. As die verbinding met die hoofstroom beskadig
word, moet dit vervang word, neem die toestel na 'n
gemagtigde tegniese ondersteunings dienssentrum.
Moenie probeer om self te herstel om 'n gevaar te
vermy.
2.1.11. Maak seker dat die spanning wat op die
gradering etiket aangedui word, pas by die hoof-

spanning voordat dit ingeprop word in die toestel.
2.1.12. Die toestel se prop moet in die hoofkrag
toevoer pas. Moenie die prop verander nie.
2.1.13. Moenie die kragkoord forseer nie. Moet nooit
die kragkoord gebruik om die toestel op te lig, te dra
of af te skakel nie.
2.1.14. Moenie die krag kabel om die toestel draai
nie.
2.1.15. Moenie die kragkabel buig of kreukel nie.
2.1.16. Moenie toelaat dat die kragkabel in kontak
kom met die toestel se warm oppervlaktes nie.
2.1.17. Gaan die toestand van die kragkabel na.
Beskadig of verstrengelde kabels verhoog die risiko
van elektriese skok.
2.1.18. Moenie met nat hande aan die prop raak nie.
2.1.19. Moenie die toestel gebruik as die kabel of
prop beskadig is.
2.1.20. As enige van die toestel omhulsels breek,
ontkoppel onmiddellik die toestel van die hoofkrag
toevoer om die moontlikheid van 'n elektriese skok
te voorkom.
2.1.21. Moenie die toestel gebruik as dit op die vloer
geval het nie, en as daar sigbare tekens van skade is
en as dit 'n lekkasie het.
2.1.22. Plaas die toestel op 'n horisontale, plat,
stabiele oppervlak, geskik vir hoë temperature en
weg van ander hittebronne en kontak met water.
2.1.23. Hou die toestel weg van vlambare materiaal
soos tekstiele, karton of papier, ens.
2.2. Persoonlike veiligheid:
2.2.1. WAARSKUWING: Moenie die toestel sonder
toesig laat nie tydens gebruik aangesien daar 'n
risiko van 'n ongeluk is.
2.2.2. Moenie aan die verhitte dele van die toestel
raak nie, aangesien dit ernstige brandwonde kan
veroorsaak.
2.2.3. Hierdie toestel is slegs vir huishoudelike ge-
bruik, nie vir industriële of professionele gebruik. Dit
is nie bedoel om gebruik word deur gaste in gasvry-
heid omgewings soos soos bed-en-ontbyt, hotelle,
motelle en ander tipes van residensiële omgewings,
selfs in plaashuise, areas van die kombuispersoneel
in winkels, kantore en ander werksomgewings.
2.2.4. Hierdie toestel is nie bedoel vir gebruik deur
persone (insluitend kinders) met verminderde
fisiese, sensoriese of verstandelike vermoëns, of
gebrek aan ervaring en kennis, tensy hulle toesig
gegee is of instruksies oor die gebruik van die
toestel deur 'n persoon wat verantwoordelik is vir
hul veiligheid.
2.2.5. Hierdie toestel is nie 'n speelding nie. Kinders
moet onder toesig gehou word om te verseker dat
hulle nie speel met die toestel.
2.3. Gebruik en sorg:
2.3.1. Rol die toestel se krag kabel heeltemal uit
voor elke gebruik.
2.3.2. Maak die dele skoon wat direk in kontak sal
wees met kos met 'n sagte, klam lap en droog
deeglik af.
2.3.3. Plaas die warmlug braaier op 'n stewige,
hitte bestande oppervlak, op 'n hoogte wat gemaklik
is vir die gebruiker.
2.3.4. Koppel die warmlug braaier aan 'n geskikte
krag prop.
2.3.5. LET WEL: Wanneer die warmlug braaier vir die
eerste keer gebruik word kan 'n effense rook of ken-
merkende reuk uitgestuur word. Dit is normaal en
sal binnekort bedaar. Verseker dat daar voldoende
voorsiening van vars lug is rondom die warmlug
braaier tydens gebruik. Dit is sterk aanbeveel om
die warmlug braaier sonder kos aan te skakel vir
ongeveer 10 minute voor die eerste gebruik. Hierdie
sal verhoed dat die aanvanklike rook of snaakse
reuk die smaak van die kos sal affekteer.
2.3.6. Moenie die kragkabel gebruik om die toestel
af te skakel nie, skakel eers die toestel af met die
die Aan/Af knoppie, en verwyder dit dan van die
kragtoevoer.
2.3.7. Ontkoppel die toestel van die kragtoevoer
wanneer dit nie gebruik word nie en voordat enige
skoonmaak gedoen word.
2.3.8. Hierdie toestel moet buite bereik gestoor word
van kinders en/of gestremdes.
2.3.9. Moenie die toestel berg of vervoer as dit nog
warm is nie.
2.3.10. Moet nooit die toestel sonder toesig laat
terwyl dit in gebruik is nie.
2.3.11. Moet nooit die toestel sonder toesig laat wan-
neer in gebruik en hou buite bereik van kinders,
dit is 'n elektriese toestel wat verhit en dit kan ern-
stige brandwonde veroorsaak.
2.3.12. As, om een of ander rede, die toestel sou
aan die brand slaan, koppel die toestel van die
kragtoevoer en MOENIE WATER GEBRUIK OM DIE
BRAND TE BLUS NIE.
2.4. Die samestelling van die warmlug braaier:
2.4.1. Pas die kleefvrye bedekte laai in die kook kom-
partement van die laaie en druk heeltemal af.
2.4.2. Skuif die laaie in die warmlug braaier hoof
eenheid om dit toe te maak.
2.4.3. Die warmlug braaier kom vooraf saamgestel.
verseker dat die kook kompartement dig toegemaak
is voor gebruik, aangesien dit sal voorkom dat die
braaier kan werk nie. LET WEL: Moenie die warmlug
braaier aanskakel sonder kos binne nie.
2.5. Diens:
2.5.1. Maak seker dat die toestel slegs gediens word
deur toepaslik gekwalifiseerde tegnikus, en dat
slegs oorspronklik onderdele of bykomstighede
word gebruik om bestaande onderdele/bykoms-
tighede te vervang.

2.5.2. As die krag kabel beskadig is, moet die ver-
vaardiger of sy diensagent of 'n soortgelyke gekwali-
fiseerde persoon dit vervang om gevaar te vermy.
2.5.3. Enige misbruik of versuim om die instruks-
ies te volg vir gebruik lewer die waarborg en die
vervaardiger s'n aanspreeklikheid nietig.
3. Gebruiksaanwysings
3.1. Voor gebruik:
3.1.1. Verwyder die beskermende film van die toestel
(indien van toepassing).
3.1.2. Voordat u die produk vir die eerste keer
gebruik, maak al die dele skoon wat met kos in
aanraking sal kom.
3.2. Gebruik en sorg:
3.2.1. Gebruik die warmlug braaier
3.2.1.1. Rol die kragkabel heeltemal uit voor dit aan
die krag toevoer gekoppel word.
3.2.1.2. Plaas jou toestel op 'n plat, droë, stewige
oppervlak.
3.2.1.3. Koppel die toestel aan die krag toevoer en
skakel dit aan. Die warmlugbraaier sal een keer piep
en op bystand modus wees. Die lig sal in rooi
verlig word.
3.2.1.4. Om die warmlug braaier aan te skakel, druk
die krag AAN/AF-knoppie, die LED-skerm sal verlig.
3.2.1.5. Druk en kies die gaarmaak funksie. Jy
kan die tyd aanpas deur die temperatuur knoppie te
druk deur die Tyd (B) +/- gebruik en die temperatuur
(D) +/- knoppie. Jy kan ook enige vooraf geprogram-
meerde funksie-ikoon druk om verskillende kos te
kook.
3.2.1.6. Nadat u die kookfunksie vir sone 1 gekies
het, druk en kies die kookfunksie. Jy kan die
aanpas tyd en temperatuur vrylik deur die Tyd (B)
+/- en te gebruik die temperatuur (D) +/- knoppie.
Jy kan ook enige vooraf geprogrammeerde druk
funksie-ikoon om verskillende kos te kook.
3.2.1.7. Sodra die bogenoemde stappe voltooi is, kan
jy die begin druk en die warmlug braaier sal be-
gin kook. Elke vooraf geprogrammeerde kookfunks-
ies het sy eie tyd en temperatuur soos geïllustreer
in die tabel hieronder. Die gebruiker kan die tyd en
temperatuur vryelik aanpas deur die sone te kies
en die Tyd (B) +/- en te gebruik die temperatuur (D)
+/- knoppie.
3.2.1.8. Die temperatuur beheer reeks is tussen
50°C-200°C. Die temperatuur word in inkremente
van 10°C in enige rigting aangepas.
3.2.1.9. Die tydbeheer reeks is tussen 1-60 minute.
Die tyd word in inkremente van 1 minuut in elk geval
aangepas.
3.2.1.10. Nadat u die funksies gekies het, die tem-
peratuur en tyd ingestel het, druk . Die sal
begin flikker en jy sal 'n piepgeluid en die warm hoor
lugbraaier sal begin kook. Druk terwyl die
warm-lugbraaier kook jy sal hoor 'n piep en die
sal ophou flikker en die warmlugbraaier sal
kook onderbreek. Deur op die te druk, sal die
warmlugbraaier terug in bystand modus plaas. LET
WEL: As jy die laai tydens die kooksiklus verwyder,
sal die warmlug braaier ophou kook en die tyd sal
ophou aftel en sal eers hervat op die dieselfde pro-
gram sodra die laai terug in plek is.
3.2.1.11. Aan die einde van die kook siklus sal die tyd
"00" wys, die verwarmingselement sal ophou verhit,
maar die waaier sal vir ongeveer 1 minuut aanhou
loop, daarna sal die warmlugbraaier sal +/-11 keer
piep en die warmlugbraaier sal na bystand modus
gaan.
3.2.1.12. Smart Finish: As jy 2 verskillende maal-
tye op dieselfde tyd kook jy kan die gaarmaak
funksies kies soos hierbo geïllustreer, druk
en jou etes sal terselfdertyd klaar
gekook word.
Stap 1: PROGRAM SONE 1: Plaas kos in die laai,
druk en kies die gaarmaakfunksie.
Stap 2: PROGRAM SONE 2: Plaas kos in die laai,
druk en kies die gaarmaakfunksie.
Stap 3: BEGIN KOOK: Druk en
druk dan om te begin kook.
3.2.1.13. Match Cook: As jy dieselfde kos in elke
sone kook, druk en jou etes sal op
dieselfde funksie kook.
Stap 1: PROGRAM SONE 1: Plaas kos in die laaie en
druk .
Stap 2: Druk en kies 'n kookfunksie.
Stap 3: Druk om te begin kook. Sone 1 en 2 sal
op dieselfde funksie begin kook.
3.2.1.14. Sommige bestanddele moet dalk geskud
word halfpad of regdeur die kooktyd.
3.2.1.15. WAARSKUWING: Nominale spanning is
steeds teenwoordig selfs wanneer die termostaat
afgeskakel is. Om die warmlug braaier permanent af
te skakel, maak seker dat dit by die hoofkrag toevoer
afgeskakel is.
3.3. Sodra jy die toestel klaar gebruik het:
3.3.1. Laat toestel afkoel.
3.3.2. Ontkoppel die toestel van die hoofkrag
verskaf.
3.3.3. Maak die toestel skoon soos beskryf in die
skoonmaak afdeling.
4. Skoonmaak
4.1. Ontkoppel die toestel van die hoofkrag
verskaf en laat dit heeltemal afkoel voordat dit aan-
pak enige skoonmaaktaak.
4.2. Maak die warmlugbraaier hoofeenheid skoon
met 'n sagte, klam lap en droog deeglik af.
4.3. Was die bykomstighede in warm, seperige
water, spoel en droog dan deeglik.

4.4. VERSIGTIG! Moenie elektriese dele van die
onderdompel nie toestel in enige vloeistof.
4.5. Moenie oplosmiddels of produkte met 'n suur
gebruik nie of basis pH soos bleikmiddel, of skuur
produkte, vir die toestel skoonmaak.
4.6. Moet nooit die toestel in water of enige iets
onderdompel nie ander vloeistof of plaas dit onder
lopende water.
4.7. Die braaimandjie en braaimandjiehouer is skot-
telgoedwasser veilig teen redelike hitte.
5. Anomalieë en herstel
5.1. Neem die toestel na 'n gemagtigde ondersteun-
ing sentrum indien produk beskadig is of ander
probleme ontstaan.
5.2. As die verbinding met die hoof krag toevoer
beskadig is, moet dit vervang word, en jy moet voort-
gaan soos jy sou in die geval van skade.
WAARSKUWING: Die warmlug braaier werk teen hoë temperature, moenie aan die warmdele raak tydens
werking en laat dit heeltemal afkoel.
7. Kookgids
Hieronder is riglyne vir die kook van sekere soorte kos met die warmlug braaier. Dit is slegs 'n riglyn, kook
moet nog gemonitor word.
6. Vooraf geprogrammeerde funksies
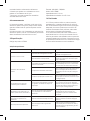
PROGRAM LOGISTIEK
Spyskaart Verstek tyd (min) Verstek temperatuur (°C)
Funksie
Voorverhit 3180
Franse skyfies 18 200
Vleis 12 200
Hoenderboudjies 20 200
Biefstuk 12 180
Koek 25 160
Garnale 8180
Vis 10 180
Pizza 20 180
Groente 10 160
Herverhit 15 150
Dehidreer 360 60

Air Fry Kookkaart:
BESTANDELE HOEVEELHEID
PER SONE VOORBEREIDING OLIE TEMP
(°C) ENKEL
SONE DUBBEL
SONE
GROENTE
Aspersies 1 bondel Heel, stamme afgesny 2 Teelepels 200 8-12 mins 20-25 mins
Beet 6-7 klein Heel Geen 200 30-35 mins 35-40 mins
Soetrissie
(vir braai) 3 klein peppers Heel Geen 200 10-15 mins 15-20 mins
Broccoli 1 kop Sny in klein stukkies 1 Eetlepel 200 8-10 mins 15-17 mins
Brusselse Spruite 1 lb Sny in halfte stam verwyder 1 Eetlepel 200 15-20 mins 20-25 mins
Brusselse
Stampmielies 1½lbs Sny in 1-2-dm stukke 1 Eetlepel 200 20-25 mins 35-40 mins
Wortels 1 lb Geskil, in ½-duim stukke
gesny 1 Eetlepel 200 13-16 mins 25-30 mins
Blomkool 1 kop Sny in 1-duim blommetjies 2 Eetlepels 200 17-20 mins 20-25 mins
Groenmielies Sny in die helfte Blare verwyder 1 Eetlepel 200 12-15 mins 18-20 mins
Groenboontjies 1 sak (12 oz) Skoongemaak 1 Eetlepel 200 8-10 mins 10-15 mins
Kale (vir skyfies) 5 koppies, gepak In stukke geskeur, steel
verwyder Geen 200 7-9 mins 15-20 mins
Sampioene 8 oz Gewas, sny in kwarte 1 Eetlepel 200 7-9 mins 13-15 mins
Aartappels
1½ lbs
1 lb
1 lb
3 heel (6-8 oz)
Sny in 1-duim wiggies
Handgesnyde patat*, dun
Handgesnyde patat*, dik
Gesteek met vurk 3 keer
1 Eetlepel
½-3 Etl Canola
½-3 Etl Canola
Geen
200
200
200
200
20-22 mins
20-24 mins
19-24 mins
30-35 mins
35-38 mins
30-35 mins
35-40 mins
37-40 mins
Patats 1½ lbs
3 heel (6-8 oz) Sny in 1-duim stukke
Gesteek met vurk 3 keer 1 Eetlepel
Geen 200
200 15-20 mins
36-42 mins 30-35 mins
40-45 mins
Zucchini 1 lb Sny in die lengte in kwarte,
sny dan in 1-duim-stukke 1 Eetlepel 200 15-18 mins 25-28 mins
HOENDER
Hoenderborsies 2 borsies
4 borsies Been in
Sonder been Borsel met olie
Borsel met olie 200 25-30 mins
22-24 mins 30-35 mins
25-28 mins
Hoenderdye 2 dye
4 dye Been in
Sonder been Borsel met olie
Borsel met olie 200 22-28 mins
18-22 mins 26-29 mins
25-28 mins
Hoendervlerkies 2 lbs Plat gedruk 1 Eetlepel 200 18-22 mins 43-47 mins
VIS & SEEKOS
Krapkoekies 2 koekies
(6-8 oz each) Geen Borsel met olie 200 5-10 mins 10-13 mins
Kreefsterte 4 sterte
(3-4 oz each) Heel Geen 200 5-8 mins 15-18 mins
Salmon Fillette 3 fillette
(4 oz each) Geen Borsel met olie 200 7-12 mins 13-17 mins
Garnale 1 lb Heel, geskil, sterte 1 Eetlepel 200 7-10 mins 10-13 mins

BIEF
Burgers 2 kwart pond
patties, 80% lean ½ dm dik Borsel met olie 200 8-10 mins 10-13 mins
Fillette 2 fillette
(8 oz each) Heel Borsel met olie 200 10-20 mins 14-18 mins
VARK
Spek 3 strips, sny in
helfte Geen Geen 170 8-10 mins 9-12 mins
Varktjops
2 dik gesny
(10-12 oz each)
2 geen been
(8 oz elk)
Been in
Sonder been Borsel met olie
Borsel met olie 200
200 15-17 mins
14-17 mins 23-27 mins
17-20 mins
Varkvleis 1 lb Geen Borsel met olie 190 15-20 mins 20-25 mins
Worsies 5 worsies Geen Geen 200 7-10 mins 17-22 mins
GEVRIESDE VOEDSEL
Hoenderkoelette 3 koelette Geen Geen 200 18-21 mins 20-25 mins
Hoender Nuggets 1 boks (12 oz) Geen Geen 200 10-13 mins 18-21 mins
Visfillette 1 boks (6 fillets) Geen Geen 200 14-16 mins 17-22 mins
Visstokkies 18 visstokkies
(11 oz) Geen Geen 200 10-13 mins 16-19 mins
Franse Skyfies 1 lb Geen Geen 200 18-22 mins 28-32 mins
Mozzarella
Stokkies 1 boks (11 oz) Geen Geen 190 8-10 mins 10-12 mins
Pot Stickers 2 sakke (10.5 oz) Geen 1 Eetlepel 200 12-14 mins 16-18 mins
Pizza Roll 1 sak
(20 oz, 40 count) Geen Geen 200 12-15 mins 15-18 mins
Popcorn Shrimp 1 boks (14-16 oz) Geen Geen 200 9-11 mins 14-18 mins
Patatskyfies 1 lb Geen Geen 200 20-22 mins 30-32 mins
Tater Tots 1 lbs Geen Geen 190 18-22 mins 25-27 mins
Uieringe 10 oz Geen Geen 190 13-16 mins 18-22 mins
Dehidreer Grafiek:
BESTANDELE VOORBEREIDING TEMP (°C) ENKEL SONE DUBBEL SONE
TIMES ARE THE SAME FOR BOTH ZONES
VRUGTE & GROENTE
Appels Ontkern, in 1/8-duim skywe gesny, in suur-
lemoenwater afgespoel, droog gemaak 60 7-8 ure
Aspersies Sny in 1-duim stukke, 60 6-8 ure
Piesangs Geskil, sny in 3/8-dm snye 60 8-10 ure
Beet Geskil, sny in 1/8-dm snye 60 6-8 ure
Eiervrug Geskil, sny in ¼-dm skywe 60 6-8 ure
Vars Kruie Gespoel, droog gemaak, stingels verwyder 60 4 ure

Gemmer Wortel Sny in 3/8-dm skywe 60 6 ure
Mangoes Skil, sny in 3/8-dm skywe, pit verwyder 60 6-8 ure
Sampioene Maak skoon met sagte borsel 60 6-8 ure
Pynappel Skil, sny in 3/8-½-dm skywe 60 6-8 ure
Aarbeie Sny in helfte of in ½-dm skywe 60 6-8 ure
Tamaties Sny in 3/8-dm skywe of rasper; stoom as jy
beplan om te rehidreer 60 6-8 ure
VLEIS, HOENDER, VIS
Beesbiltong Sny in ¼-dm skywe, gemarineer oornag 70 5-7 ure
Hoenderbiltong Sny in ¼-dm skywe, gemarineer oornag 70 5-7 ure
Kalkoenbiltong Sny in ¼-dm skywe, gemarineer oornag 70 5-7 ure
Salmonbiltong Sny in ¼-dm skywe, gemarineer oornag 70 3-5 ure
Gebruik Dubbel Sone Tegnologie: SMART FINISH
KIES ENIGE TWEE VOEG EEN RESEP
PER SONE BY SET BOTH ZONES AND
USE SMART FINISH
RECIPE AMOUNT MIX OR COMBINE THESE
INGREDIENTS FUNCTION TEMP/TIME
Krapkoekies 2 krapkoekies Smeer met gesmelte botter Lugbraai 195°C/15 mins
Balsamiese
Geroosterde
tamaties 2 pinte kersie tamaties ½ koppie balsamiese asyn
1 Eetlepel Canola olie Braai 195°C/15 mins
Maple Sage
Varktjops 2-3 sonder been varktjops
(4 oz elk) 2 Eetlepels Canola olie
2 Eetlepel Cajun geurmiddel Braai 195°C/17-20 mins
Cajun Russet
Aartappels 4 medium aartappels,
in blokkies gesny
¼ koppie tamatiesous, ¼ koppie
geel mosterd, 1 eier, ½ koppie
Panko broodkrummels, ¼ koppie
Parmesaankaas
Lugbraai 200°C/30 mins
Klassieke
Vleisbrood 1 lb vleisbroodmengsel
(bees, vark, kalfsvleis) 2 Eetlepels Canola olie
½ koppie gesnyde amandels Lugbraai 165°C/35 mins
Groenbone met
Amandels 1 lb groenbone, punte
afgewerk 2 Eetlepels Canola olie
½ koppie gesnyde amandels Lugbraai 195°C/15 mins
Miso Glenzed
Salmon 3 salm filette (6 oz elk) 2 Eetlepels misopasta, 1 teelepel
Canola olie en vryf op salm Lugbraai 195°C/15 mins
Heuning Hazel
Spruitjies 1 pond Brusselse spruite,
in die helfte gesny 2 Eetlepels Canola olie, ¼ koppie
heuning, ½ koppie gekapte haselneute Lugbraai 195°C/23 mins
Buffel Hoenderdye 4 beenlose vel hoenderdye
(4-5 oz elk) 1 koppie buffelsous,
meng met hoender Lugbraai 200°C/27 mins
Plantgebaseerde
''Vleis' Burger
1 lb plant-gebaseerde
gemaalde "vleis"
(4 4-oz patties)
1 Eetlepel gemaalde knoffel,
1 Eetlepel gemaalde ui Lugbraai 185°C/20 mins
Mediterreense 1 kop blomkool, in 1/2-duim
blommetjies gesny ½ koppie tahini, 2 eetlepels
Canola olie Lugbraai 195°C/35 mins
Franse Skyfies 1 lb Franse skyfies Geur soos verlang Lugbraai 200°C/30 mins

Kookwenke:
1. Met groter hoeveelhede kos mag die gaarmaaktyd
net 'n klein toename vereis. Met kleiner hoeveelhede
kos kan die kooktyd net 'n klein verlaging vereis.
2. Skud kleiner kos halfpad deur die gaarmaaktyd
omdat dit die eindresultaat verbeter, en kan help om
oneweredig gebraaide kosse te voorkom.
3. Voeg olie by vars aartappels / skyfies vir 'n bros
resultaat. Braai die aartappels / skyfies binne 'n paar
minute nadt die olie by gevoeg is.
4. Wanneer jy olie by enige kos voeg, voeg altyd die
olie by voordat jy die kos by die mandjie voeg. Om dit
te doen, sit die kos in 'n bak of soortgelyke houer,
voeg dan die olie by, roer die kos sodat dit eweredig
bedek is en voeg dan die kos in die mandjie.
5. Wees versigtig wanneer jy kos met 'n hoë vetin-
houd soos wors kook, aangesien dit geneig is om
vetterig te wees. Hierdie soort kosse kan 'n aansien-
like hoeveelheid rook produseer, veral wanneer dit
by hoë temperature gekook word. Dit sal nie die
lugbraaier beskadig of die finale kookresultaat van
die kos beïnvloed nie.
6. Peuselhappies wat in die oond gekook kan word,
kan in die lugbraaier gaargemaak word.
7. Wanneer jy bak, gebruik 'n bakpan of oondbak wat
in die mandjie geplaas word.
8. Berging
8.1. Voor berging, maak seker dat die warmlugbraai-
er koel is, skoon en droog. Moet nooit die warmlug-
braaier bêre wanneer dit nog nat is nie.
8.2. Moet nooit die koord styf om die warm lugbraai-
er draai nie. Draai dit los om om skade te voorkom.
Bêre in 'n koel, droë plek.
9. Spesifikasies
Produkkode: 973922
Invoer: 220-240V ~ 50/60Hz
Uitset: 1450-1750W
Totale kapasiteit: 9 Liters
Werkvermoë: 2 x 4.5 Liters
10. Herwinning
10.1. Hierdie elektriese produkte, kabels, bat-
terye, verpakking en die handleiding moet nie met
algemene huishoudelike afval gemeng word nie. Vir
behoorlike herwinning, neem hierdie produkte na
u naaste kantoor vir Creative Housewares, waar dit
gratis aanvaar word vir herwinning.
10.2. Kontak u plaaslike owerheid of huishoude-
like vullisdiens vir nadere besonderhede oor u
naaste aangewese versamelingspunt. Korrekte
produkverwydering bespaar hulpbronne en voorkom
negatiewe gevolge vir menslike gesondheid en die
omgewing.
Probleemgids
PROBLEEM MOONTLIKE REDE OPLOSSING
Die lug braaier werk nie.
Die toestel is nie by die krag ingeprop nie. Konnekteer aan die muurprop.
Jy het nie die tyd gestel nie. Draai die tydskakelaar na die vereiste
voorbereidings tyd om die toestel aan
te skakel.
Kos nie heeltemal gaar nie.
Die hoeveelheid bestanddele in die
braaimandjie is te veel.
Gooi kleiner hoeveelhede bestandele in
die braaimandjie. Kleiner porsies word
meer eweredig gebraai.
Die ingestelde temperatuur is te laag. Draai die temperatuur beheerknop na
die vereiste temperatuur instelling (sien
afdeling 'Instellings').
Die voorbereidingstyd is te kort. Draai die tyd knop na die vereiste voor-
bereidingstyd (sien afdeling 'Instellings').
Die bestanddele word oneweredig
in die lugbraaier gebraai. Sekere soorte bestanddele moet halfpad
deur die voorbereidings tyd geskud word.
Bestanddele wat bo-op of oor mekaar lê
(bv. patat) moet halfpad deur die voor-
bereidingstyd geskud word (sien afdeling
'Instellings').
Gebraaide versnaperinge is
nie bros wanneer dit uit die lug
braaier kom nie.
Jy gebruik 'n soort versnapering wat be-
doel is om in 'n tradisionele diep braaier
voorberei moet word.
Gebruik oond peuselhappies of smeer
bietjie olie liggies op die peuselhappies
vir 'n kraak varser resultaat.

Kan nie die pan behoorlik in die
toestel skuif nie. Daar is te veel kos in die braaimandjie Moenie die mandjie vul as die maksimum
hoeveelheid, wat in die tabel op die
vorige bladsy aangedui is, bereik het nie.
Wit rook kom uit die toestel. Jy berei vetterige bestanddele voor.
Let daarop dat die temperatuur goed
beheer word om onder 180°C te wees,
wanneer jy vetterige bestanddele in die
lug braaier voorberei.
Vars aartappel skyfies word one-
weredig in die lugbraaier gebraai.
Die pan bevat steeds vetterige oorblyf-
sels van die vorige gebruik.
Wit rook word veroorsaak deur vet wat
in die pan verhit word. Maak seker dat
jy die pan behoorlik skoonmaak na elke
gebruik.
Jy het nie die aartappelstokkies behoor-
lik geweek voordat jy dit gebraai het nie.
Week die aartappelstokkies vir minstens
30 minute in ’n bak water; haal dit uit en
droog dit met kombuispapier af.
Jy het nie die regte aartappel tipe
gebruik nie. Gebruik vars aartappels en maak seker
dit bly ferm tydens braai.
Vars aartappelskyfies is nie bros
wanneer dit uit die lugbraaier
kom nie.
Die brosheid van die skyfies hang af
van die hoeveelheid olie en water in die
skyfies.
Maak seker jy droog die aartappelstok-
kies behoorlik af voordat jy dit met olie
bedek.
Sny die aartappel in dunner stokkies vir
'n brosser resultaat.
Voeg effens meer olie by vir 'n brosser
resultaat.

SPANISH
Estimado cliente
Gracias por elegir comprar un producto de la marca
Taurus. Gracias a su tecnología, diseño y funciona-
miento, y al hecho de que supera los más estrictos
estándares de calidad, se puede garantizar un uso
totalmente satisfactorio y una larga vida útil del
producto.
Thank you for choosing to purchase a Taurus brand
product. Thanks to its technology, design and opera-
tion
and the fact that it exceeds the strictest quality
standards, a fully satisfactory use and long product
life can be assured.
1. Descripción de las piezas
1.1. Panel de pantalla táctil digital:
A) Selección de la zona 1
B) Control de temperatura +/-
C) Pantalla digital
D) Control de tiempo +/-
E) Selección de la zona 2
F) Encendido/apagado
G) Deshidratación preprogramada
H) Recalentamiento preprogramado
I) Verdura preprogramada
J) Pizza preprogramada
K) Pescado preprogramado
L) Match Cook
M) Camarones preprogramados
N) Acabado inteligente
O) Pastel preprogramado
P) Filete preprogramado
Q) Muslos de pollo preprogramados
R) Carne preprogramada
S) Chips preprogramados
T) Precalentamiento preprogramado
U) Iniciar/Pausar la cocción
1.2. Partes:
A) Bandeja antiadherente
B) Cajón Zona 1
C) Tirador cajón zona 1
D) Bandeja antiadherente
E) Cajón Zona 2
F) Tirador cajón Zona 2
G) Entrada de aire
H) Panel de control
I) Salida de aire
J) Cable de alimentación
2. ¡Consejos y advertencias de seguridad!
Lea atentamente estas instrucciones antes de
encender el aparato y guárdelas para futuras
consultas. El incumplimiento de estas instruccio-
nes podría provocar un accidente. Limpie todas las
partes del producto como se indica en la sección de
limpieza, antes de su uso.
2.1. Uso o entorno de trabajo:
2.1.1. Mantenga el área de trabajo limpia y bien ilu-
minada. Las áreas desordenadas y oscuras invitan a
los accidentes.
2.1.2. Este aparato no debe ser utilizado por niños
menores de 8 años.
2.1.3. Este aparato puede ser utilizado por niños a
partir de los 8 años si son supervisados continu-
amente.
2.1.4. Este electrodoméstico puede ser utilizado
por personas con capacidades físicas, sensoriales
o mentales reducidas o falta de experiencia y cono-
cimiento si han recibido supervisión o instrucciones
sobre el uso del electrodoméstico de manera segura
y comprenden los peligros involucrados.
2.1.5. Mantenga el aparato y su cable fuera del
alcance de los niños menores de 8 años.
2.1.6. La limpieza y el mantenimiento del usuario no
deben ser realizados por niños.
2.1.7. Coloque el aparato sobre una superficie hori-
zontal, plana y estable con las asas, si las hubiera,
colocadas de manera que no se derramen los
líquidos calientes.
2.1.8. No utilice el aparato junto con un programa-
dor, temporizador u otro dispositivo que lo encienda
automáticamente.
2.1.9. La temperatura de las superficies accesibles
puede ser alta cuando el aparato está en uso.
2.1.10. No sumerja nunca el aparato en agua ni en
ningún otro líquido ni lo coloque bajo el chorro de
agua. – Si la conexión a la red eléctrica se ha es-
tropeado, hay que sustituirla, llevar el aparato a un
servicio de asistencia técnica autorizado. No intente
desmontar o reparar el aparato usted mismo para
evitar peligros.
A página está carregando...
A página está carregando...
A página está carregando...
A página está carregando...
A página está carregando...
A página está carregando...
A página está carregando...
A página está carregando...
A página está carregando...
A página está carregando...
A página está carregando...
A página está carregando...
A página está carregando...
A página está carregando...
A página está carregando...
A página está carregando...
A página está carregando...
A página está carregando...
A página está carregando...
A página está carregando...
A página está carregando...
A página está carregando...
A página está carregando...
A página está carregando...
A página está carregando...
A página está carregando...
A página está carregando...
A página está carregando...
A página está carregando...
A página está carregando...
A página está carregando...
A página está carregando...
-
 1
1
-
 2
2
-
 3
3
-
 4
4
-
 5
5
-
 6
6
-
 7
7
-
 8
8
-
 9
9
-
 10
10
-
 11
11
-
 12
12
-
 13
13
-
 14
14
-
 15
15
-
 16
16
-
 17
17
-
 18
18
-
 19
19
-
 20
20
-
 21
21
-
 22
22
-
 23
23
-
 24
24
-
 25
25
-
 26
26
-
 27
27
-
 28
28
-
 29
29
-
 30
30
-
 31
31
-
 32
32
-
 33
33
-
 34
34
-
 35
35
-
 36
36
-
 37
37
-
 38
38
-
 39
39
-
 40
40
-
 41
41
-
 42
42
-
 43
43
-
 44
44
-
 45
45
-
 46
46
-
 47
47
-
 48
48
-
 49
49
-
 50
50
-
 51
51
-
 52
52


Taurus 973922 Manual do usuário
- Categoria
- Fritadeiras
- Tipo
- Manual do usuário
em outras línguas
- español: Taurus 973922 Manual de usuario
- français: Taurus 973922 Manuel utilisateur
- English: Taurus 973922 User manual
Artigos relacionados
Outros documentos
-
Becken fritadeira sem oleo BAF7528 Manual do proprietário
-
-
Create PRO COMPACT Manual do usuário
-
HAEGER AF-G45.006A Manual do usuário
-
 Create FRYER AIR PRO Manual do proprietário
-
BLACK DECKER BXAFO1200E Manual do usuário
-
-
Princess 01.182085.01.001 Manual do usuário
-
Silvercrest SHFR 1450 A1 Instruções de operação
-
Princess 182068 Manual do usuário
