
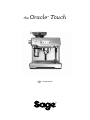
the Oracle™ Touch
BES990/SES990
EN QUICK GUIDE DE KURZANLEITUNG
FR GUIDE RAPIDE NL SNELSTARTGIDS
ES GUÍA RÁPIDA
IT GUIDA RAPIDA
PT MANUAL RÁPIDO

2
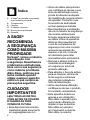
SAGE®
RECOMMENDS
SAFETY FIRST
At Sage® we are very
safety conscious. We design
and manufacture appliances
with your safety foremost in
mind. We also ask that you
exercise a degree of care
when using any electrical
appliance and adhere to
the following precautions.
IMPORTANT
SAFEGUARDS
READ ALL INSTRUCTIONS
BEFORE USE AND SAVE
FOR FUTURE REFERENCE
• A downloadable version of
this document is also available
at sageappliances.com
• Before using for the rst time,
please ensure thatyour electricity
supply is the same as shown on
the rating label on the underside
of the appliance. If you have
any concerns, please contact
your local electricity company.
• The installation of a residual
current safety switch is
recommended to provide
additional safety when using
all electrical appliances. Safety
switches with a rated operating
current not more than 30mA
are recommended. Consult an
electrician for professional advice.
2 Sage® Recommends Safety First
6 Components
8 Functions
11 Care & Cleaning
15 Troubleshooting
19 Guarantee
Contents

3
EN
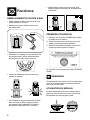
• Remove and discard
any packaging materials
safely, before rst use.
• To eliminate a choking hazard
for young children, discard
the protective cover tted
to the power plug safely.
• Ensure the product is properly
assembled before rst use.
• This appliance is for household
use only. Do not use the
appliance for anything other
than its intended purpose.
Do not use in moving vehicles
or boats. Do not use outdoors.
Misuse may cause injury.
• Position the appliance on a
stable, heat resistant, level, dry
surface away from the counter
edge, and do not operate on
or near a heat source such as
a hot plate, oven or gas hob.
• Fully unwind the power
cord before operating.
• Do not let the power cord
hang over the edge of a
counter or table. Do not let
the power cord touch hot
surfaces or become knotted.
• Do not leave the appliance
unattended when in use.
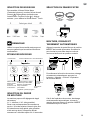
• If the appliance is to be:
- left unattended
- cleaned
- moved
- assembled; or
- stored
Always switch o the
espresso machine by
pressing the POWER button
to OFF. Switch o and unplug
from the power outlet.
• Regularly inspect the power
cord, plug and actual appliance
for any damage. If found to be
damaged in any way, immedi-
ately cease use of the appliance
and return the entire appliance
to the nearest authorised Sage
Service Centre for examination,
replacement or repair.
• Keep the appliance and
accessories clean. Follow the
cleaning instructions provided
in this book. Any procedure not
listed in this instruction booklet
should be performed at an
authorised Sage Service Centre.
• The appliance can be used
by children aged 8 years
or older and persons with
reduced physical, sensory or
mental capabilities or a lack of
experience and knowledge,
only if they have been given
supervision or instruction
concerning use of the appliance
in a safe way and understand
the hazards involved.
• Children should not play
with the appliance.
• Cleaning of the appliance should
not be carried out by children
unless they are 8 years or older
and under adult supervision.
• The appliance and it’s
cord should be kept out
of reach of children aged
8 years and younger.

4
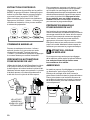
• Do not use attachments
other than those provided
with the appliance.
• Do not attempt to operate
the appliance by any
method other than those
described in this booklet.
• Do not move the appliance
whilst in operation
• Do not use any other liquid apart
from cold mains/town water.
We do not recommend the use
of highly ltered, de-mineralised
or distilled water as this may
aect the taste of the coee
and how the espresso machine
is designed to function.
• Never use the appliance
without water in the water tank.
• Ensure the portalter is rmly
inserted and secured into
the brewing head before
using the machine.
• Never remove the portalter
during the brewing operation as
the machine is under pressure.
• Do not place anything, other
than cups for warming, on
top of the appliance.
• Use caution when operating
machine as metal surfaces are
liable to get hot during use.
• Do not touch hot surfaces. Allow
the product to cool down before
moving or cleaning any parts.
• Heating element surface is
subject to residual heat after use.
• Use caution after milk texturing
as the ‘Auto Purge’ function
may purge hot steam when
the steam wand is lowered.
• Use caution when using
the de-scale feature as hot
steam may be released.
Before de-scaling, ensure
drip tray is empty and
inserted. Refer to page 14
for further instructions.
• Do not operate the grinder
without the hopper lid in
position. Keep ngers,
hands, hair, clothing and
utensils away from the
hopper during operation.

5
EN
FOR HOUSEHOLD USE ONLY
SAVE THESE INSTRUCTIONS
NOTICE TO CUSTOMERS
REGARDING MEMORY
STORAGE
Please note that in order to better
serve our customers, internal
memory storage has been
imbedded into your appliance.
This memory storage consists
of a small chip to collect certain
information about your appliance
including the frequency of use
of the appliance and the manner
in which your appliance is being
used. In the event your appliance
is returned for service, the
information collected from the
chip enables us to quickly and
eciently service your appliance.
The information collected also
serves as a valuable resource
in developing future appliances
to better serve the needs of our
consumers. The chip does not
collect any information regarding
the individuals who use the
product or the household where
the product is used. If you have
any questions regarding the
memory storage chip please
contact us at
SPECIFIC INSTRUCTIONS
FOR WATER FILTER
• Filter cartridge should be kept
out of reach of children.
• Store lter cartridges in a dry
place in the original packaging.
• Protect cartridges from
heat and direct sunlight.
• Do not use damaged
lter cartridges.
• Do not open lter cartridges.
• If you are absent for a prolonged
period of time, empty the water
tank and replace the cartridge.
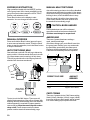
The symbol shown
indicates that this appliance
should not be disposed of
in normal household waste.
It should be taken to a local
authority waste collection centre
designated for this purpose or to
a dealer providing this service.
For more information, please
contact your local council oce.
To protect against electric
shock, do not immerse
the power cord, power plug
or appliance in water or any
other liquid.

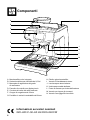
6
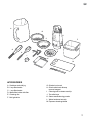
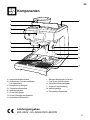
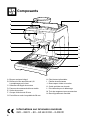
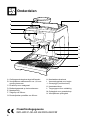
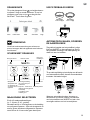
Components
A. Integrated conical burr grinder
B. Top-ll 2.5L removable water tank
C. Grind size dial
D. Touch screen control panel
E. Grind outlet
F. 58mm group head
G. 58mm stainless steel portalter
H. Drop down swivel foot
I. Heated cup warming tray
J. Cool touch steam wand
K. Dedicated hot water outlet
L. Descale access point
M. Tool storage tray
N. Removable drip tray
G
H
E
D
F
B
C
A
J
L
N
M
K
I
Rating Information
220–240V~50–60Hz 2000–2400W

7
EN
A
E
F
I
G
HJ
D
C
K
L
M
B
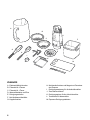
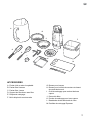
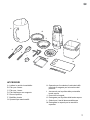
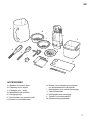
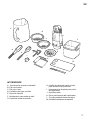
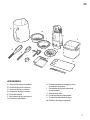
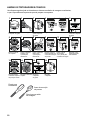
ACCESSORIES
A. Stainless steel milk jug
B. 2 cup lter basket
C. 1 cup lter basket
D. Water lter holder with lter
E. Cleaning disc
F. Mini grinds bin
G. Grinder burr brush
H. Grind outlet brush & tamp
removal magnet
I. Cleaning tool for steam wand tip
J. Two allen keys
K. Steam wand cleaning powder
L. Water hardness test strip
M. Espresso cleaning tablets

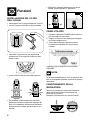
8
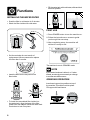
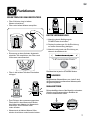
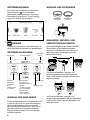
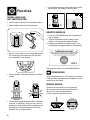
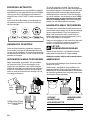
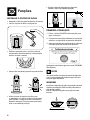
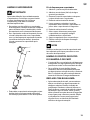
INSTALLING THE WATER FILTER
• Soak the lter in cold water for 5 minutes.
• Wash the lter holder with cold water.
• Set the reminder for next month of
replacement. We recommend to replace
the lter after 3 months.
• Insert the lter into the two parts of the
lter holder.
• To install the assembled filter holder into
the water tank, align the base of the lter
holder with the adapter inside the water tank.
Push down to lock into place.
• Fill the water tank with cold water, slide and lock
back into position.
FIRST USE
1. Press POWER button to turn the machine on.
2. Follow the instructions on screen to guide
you through rst use setup.
3. After completing setup, the machine will
tell that it is ready to use.
The machine is now in STANDBY mode.
NOTE
If your water hardness is either 4 or 5 when
tested, we strongly recommend you change
to an alternate water source.
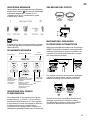
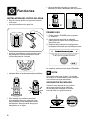
GRINDING OPERATION
Insert bean hopper into position on-top of
the machine. Turn dial to lock into place.
Fill hopper with fresh beans.
Functions

9
EN
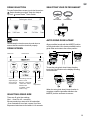
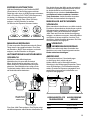
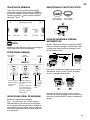
DRINK SELECTION
To enter Drinks Menu screen, touch the Home icon
. Swipe & select your drink. Touch the ‘Help &
Tip’ icon to see Oracle™ Touch Guide.
NOTE
Please keep the touch screen dry and clean to
ensure that the machine functions properly.
DRINK SCREEN
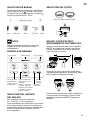
SELECTING GRIND SIZE
There are 45 grind size settings
(No.1 – nest, No. 45 – coarsest).
We recommend you start at No. 30 and adjust
– ner if extraction is too fast, coarser if too slow.
Expresso should start to ow within 8–12 seconds.
SELECTING YOUR FILTER BASKET
AUTO GRIND DOSE & TAMP
Align portalter handle with the INSERT position
on the grind outlet. Lift to insert portalter into the
grind outlet and rotate to the centre position.
To start the auto grind, dose & tamp function,
touch the ‘Grind’ button on the display. Grinding
will commence.
When the auto grind, dose & tamp function is
complete, rotate the portalter handle to the
INSERT position and lower to remove.
‘Home’ icon ‘Setting’ icon
Milk froth
level
Grind size
Adjust using the
dial on the side
of the machine Milk
temperature
Brew setting: touch this
button to scroll
Espresso – single shot
/ double shot / custom
extraction time
Long Black – small /
medium / large
Drink chosen
2 Cup
Filter Basket
1 Cup
Filter Basket

10
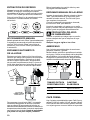
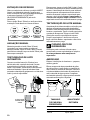
ESPRESSO EXTRACTION
Align portalter handle with the INSERT position
on the group head. Lift to insert portalter into the
group head and rotate towards the LOCK TIGHT
position until resistance is felt.
Press ‘Brew’ button on the display to start
extraction. You can change the shot volume.
MANUAL OVERRIDE
Press and hold the ‘Brew’ button (approx 2 secs)
to enter manual extraction mode. Touch the ‘Brew’
button to start the extraction, touch the ‘Brew’ button
to stop the extraction.
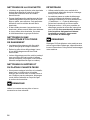
AUTO TEXTURING MILK
Start with fresh cold milk. Fill milk jug to below the
spout position. Lift steam wand and insert into milk
jug. Lower steam wand, ensuring it is fully down.
The milk jug should rest on the drip tray and milk
should cover the steam wand seal.
To start, touch the ‘Milk’ button. The screen will
display the temperature of the milk as it heats. Milk
texturing will stop automatically when the selected
milk temperature is reached. Lift steam wand to
remove milk jug. Wipe the wand & tip with a clean
damp cloth. Lower steam wand to the down
position and the wand will automatically purge.
MANUAL MILK TEXTURING
Auto milk texturing and auto shut-o are disabled
during manual milk texturing mode. Lift the steam
wand. Start frothing by touching the button. When
frothing is done, touch the Milk button to stop.
Wipe the wand & tip with a clean damp cloth.
Lower steam wand to the down position and
the wand will automatically purge.
CAUTION: BURN HAZARD
Pressurised steam can still be released,
even after machine has been switched o.
Children must always be supervised.
AMERICANO
There are 3 preset Americano settings –
small, medium and large.
Grind dose & tamp your porta-lter & insert into
the group head. Position your cup underneath
the porta-lter spouts & the hot water spout.
Espresso will be extracted rst, the hot water
is delivered automatically after the espresso.
PRESET CUP SIZE AMOUNT
BREWED
Small Approx. 6oz / 180ml
Medium Approx. 8oz / 240ml
Large Approx. 12oz / 360ml
CAFÉ CREMA
There are 3 presets for the Café Crema setting,
Small (120ml), Meduim (150ml), Large (180ml).
Insert the single cup lter basket, adjust grinder
to a coarse setting as prompted on screen.
MILK MUST
COVER THIS
SEAL
MAX
MIN

11
EN
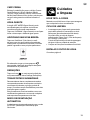
HOT WATER
The HOT WATER function can be used to
pre-heat cups or add hot water manually.
To start & stop hot water, touch ‘Hot Water’
on the screen.
ADDING NEW DRINK
Touch ‘Create New’ in the menu screen to create
a customised drink. You can adjust parameters
based on a standard style and save your own.
Alternatively, after manually adjusting parameters
touch the small icon to save the current setting.
SETTINGS
To enter settings menu, touch the icon
on the upper right on the screen.
TRANSPORTING AND STORING
We recommend draining both boilers completely
before transporting the machine or storing for an
extended period of time. Refer to the Descale
section for the step by step instructions.
This procedure is also intended as an anti-freeze
measure in the event the machine is exposed
to extreme cold temperatures.
AUTO OFF MODE
The machine automatically switches
to AUTO OFF mode after 30 minutes.
COLOUR TOUCH SCREEN DISPLAY
Please keep the touch screen dry and clean
to ensure that the machine functions properly.
CLEANING CYCLE
• A message for cleaning will be displayed to
indicate when a cleaning cycle is required
(approx. 200 shots). Or you can start cleaning
cycle by choosing ‘Clean Cycle’ in ‘Settings’.
The cleaning cycle cleans the shower screen
and back-ushes the group head.
• Follow the instruction on the touch screen.
INSTALLING THE WATER FILTER
Refer to page 8.
Care & Cleaning

12
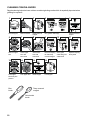
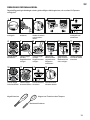
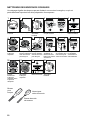
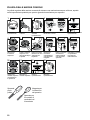
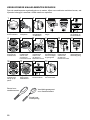
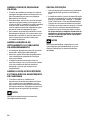
CLEANING CONICAL BURRS
Regular cleaning helps the burrs achieve consistent grinding results which is especially important when
grinding for espresso.
13
1 2 3 4 5
6 7 88 9 10 11
12
14 15
Burr
brush Tamp removal
magnet
Grind outlet
brush
Unlock hopper
Remove upper
burr
Push upper
burr rmly into
position
Remove beans
Clean upper
burr with
burr brush
Lock upper burr
Replace & lock
hopper
Clean lower
burr with
burr brush
Insert hopper
Run grinder until empty
Remove tamping
fan with tamp
removal magnet
Lock hopper
Clean grind
outlet with grind
outlet brush
Unlock & remove
hopper
Replace tamping
fan by hand

13
EN
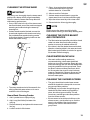
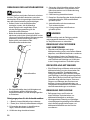
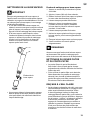
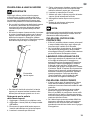
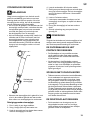
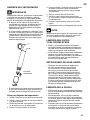
CLEANING THE STEAM WAND
IMPORTANT
After every use, thoroughly wipe the steam wand
and tip with a damp cloth & purge immediately.
Failure to clean the steam wand may aect the
milk texturing performance.
• If any of the holes in the tip of the steam wand
become blocked, ensure the machine stopped
steaming and unblock using the steam tip
cleaning tool.
• If steam wand remains blocked, remove the
tip and soak together with steam wand using
the provided steam wand cleaning powder
(instructions below). Screw tip back onto the
steam wand after rinsing.
Steam Wand
Tip
• The steam wand can be left immersed in the
milk jug lled with water when not in use to
reduce the risk of blockages.
Steam Wand Cleaning Powder
1. Add 1 packet into an empty milk jug.
2. Add 1 cup (8oz/240ml) hot water into
milk jug.
3. Remove steam tip and place with steam wand
into jug.
4. Leave to soak for 20 minutes.
5. Clean, rinse and replace steam tip.
Place wand back into the jug and
activate steam for 10 seconds.
6. Allow to soak for 5 minutes.
7. Activate steam several times to purge the
steam wand, then rinse the wand thoroughly.
8. Wipe the steam wand dry with a clean cloth.
9. Discard solution & rinse jug thoroughly.
NOTE
Please ensure the steam wand tip is tightly
fastened after cleaning to avoid temp sensing error.
CLEANING THE FILTER BASKET
AND PORTAFILTER
• The lter basket and portalter should be rinsed
under hot water after each coee making
session to remove all residual coee oils.
• If the holes in the lter basket become blocked,
dissolve a cleaning tablet in hot water and soak
lter basket and portalter in solution for approx.
20 minutes. Rinse thoroughly.
CLEAR WATER BACKFLUSH
• After each coee making session we
recommend doing a clear water backush
before you turn o the machine. Empty drip tray.
Insert the cleaning disc into the lter basket then
insert the portalter into the group head. Touch
the ‘Brew’ button and allow pressure to build
for 20 seconds, then touch to stop & release
pressure. Repeat this 5 times to purge any ne
coee grounds and residual coee oils from
the brew water paths.
CLEANING THE SHOWER SCREEN
• The group head interior and shower screen
should be wiped with a damp cloth to remove
any ground coee particles.
• Periodically, run hot water through the group
head with the lter basket and portalter in
place, but without ground coee. This will
remove any residual ground coee particles
from the shower screen.
• If there seems to be stubborn build up on the
shower screen, use the allen key to undo the
screw in the middle of the shower screen,
making note of which side faces into the
group head.

14
CLEANING THE DRIP TRAY
& STORAGE TRAY
• The drip tray should be removed,
emptied and cleaned after each use.
• Remove grill from the drip tray.
Wash the drip tray in warm soapy water.
• The storage tray can be removed
and cleaned with a soft, damp cloth
(do not use abrasive cleansers, pads
or cloths which can scratch the surface).
CLEANING THE OUTER HOUSING
& CUP WARMING TRAY
• The outer housing and cup warming tray can
be cleaned with a soft, damp cloth. Polish with
a soft, dry cloth. Do not use abrasive cleansers,
pads or cloths which can scratch the surface.
NOTE
Do not clean any of the parts or accessories
in the dishwasher.
DESCALE
• Use this function to access the descale
procedure when promoted on screen.
• The machine will enter descale mode if you
choose to descale from the pop-up message
or if you choose ‘Settings’ > ‘Descale Cycle’.
Follow the instruction on the touch screen.
• Please ensure you allow approximately
1.5 hours to complete the entire descale process
and follow the step by step instructions.
and allow to cool for at least 1 hour
before starting your descale process.
NOTE
DO NOT attempt to descale your machine without
using the Descale procedure in the Settings menu.
Damage to your machine could occur.

15
EN
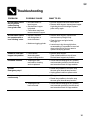
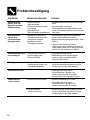
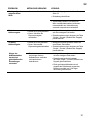
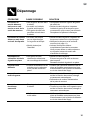
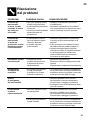
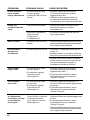
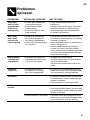
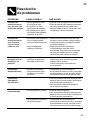
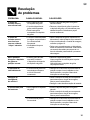
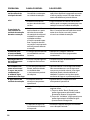
Troubleshooting
PROBLEM POSSIBLE CAUSE WHAT TO DO
Grinder Motor starts
but no ground
from grind outlet
• No coee beans in
bean hopper.
• Grinder/bean hopper
is blocked.
• Coee bean may have
become stuck in hopper.
• Fill bean hopper with fresh coee beans.
• Remove bean hopper. Inspect bean hopper
& grinding burrs for blockage. Replace
parts and try again.
Grinder Motor starts
but operates with a
loud ‘clicking’ noise
• Grinder is blocked
with foreign item or
chute is blocked.
• Moisture clogging grinder.
• Remove bean hopper, inspect burrs
and remove any foreign body.
• Clean the burrs and grind outlet,
see page 12.
• Leave burrs to dry thoroughly before
re-assembling. It is possible to use a hair
dryer to blow air into the burr area to
quicken the drying process.
Unable to lock bean
hopper into position
• Coee beans
obstructing bean
hopper locking device.
• Remove bean hopper.
Clear coee beans from top of burrs.
Re-lock bean hopper into position.
• Tamping fan was
removed for cleaning
and not replaced.
• Check that the tamping fan is in position
and mounted correctly to the drive shaft,
see Instruction Book on Sage website.
Grinder
Emergency stop?
• Rotate the portalter to the left to stop
the auto grind, dose & tamp function.
• Unplug power cord from power outlet.
Grinder running
continuously
• No beans in hopper. • Fill hopper with beans.
• Rotate the portalter to the left to stop
the auto grind, dose & tamp function.
• Tamping fan has
been removed.
• Check that the tamping fan is in position
and mounted correctly to the drive shaft,
see Instruction Book on Sage website.

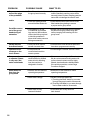
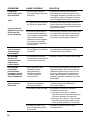
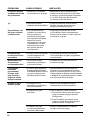
16
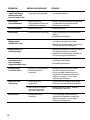
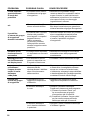
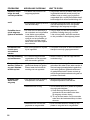
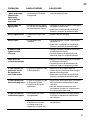
PROBLEM POSSIBLE CAUSE WHAT TO DO
Espresso runs out
around the edge
and/or
out of the group
head during an
extraction
• Portalter not inserted in
the group head correctly.
• Ensure portalter is rotated to the right
until the handle is past the centre and is
securely locked in place. Rotating past the
centre will not damage the silicone seal.
• There are coee grounds
around the lter basket rim.
• Clean excess coee from the rim of the
lter basket after grinding to ensure
a proper seal in group head.
• Filter basket rim is wet
or underside of portalter
lugs are wet. Wet surfaces
reduce the friction required
to hold the portalter in
place whilst under pressure
during an extraction.
• Always ensure lter basket and portalter
are dried thoroughly before lling with
coee, tamping and inserting into the
group head.
Issues with the
Auto Start feature
• Clock not set or clock is
set with incorrect time.
• Check that the clock and Auto Start time
have been programmed correctly.
Operation Error
message on the
touch screen
• A major fault has
occurred and machine
cannot operate.
• Contact Sage Customer Service Centre.
Pumps continue
to operate / Steam
is very wet / Hot
water outlet leaks
• Using highly ltered,
demineralised or distilled
water which is aecting
how the machine is
designed to function.
• We recommend using cold, ltered water.
We do not recommend using water with
no/low mineral content such as highly
ltered, demineralised or distilled water.
If the problem persists, contact Sage
Consumer Support.
Water does not
group head
• Machine has not reached
operating temperature.
• Allow time for the machine to reach
operating temperature.
• Water tank is empty. • Fill tank. Prime the system by:
1) Touching the ‘Brew’ button to run water
through the group head for 30 seconds.
• 2) Touching ‘Hot Water’ to run water through
the hot water outlet for 30 seconds.
• Water tank not fully
inserted & locked.
• Push water tank in fully and lock
latch closed.

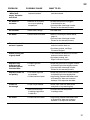
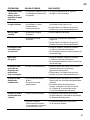
17
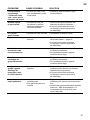
EN
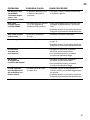
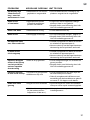
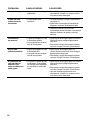
PROBLEM POSSIBLE CAUSE WHAT TO DO
Display says
“Water tank
empty” but water
tank is full
• Water tank not fully
inserted & locked.
• Push water tank in fully and
lock latch closed.
No steam or
hot water
• Machine is not turned
on or up to operating
temperature.
• Ensure the machine is plugged
in and ready for use.
• You may have a blockage in scale.
Please run the descale process.
No hot water • Water tank is empty. • Fill water tank.
No steam • Steam wand is blocked. • Refer to ‘Cleaning the Steam Wand’,
page 13.
• You may have a blockage in scale.
Please run the descale process.
The machine is ‘On’
but won’t operate
• Turn machine o. Wait for 60 minutes
and turn machine back on.
• If problem persists, call Sage
Consumer Support.
Steam pouring out
of group head
• Turn machine o. Wait for 60 minutes
and turn machine back on.
• If problem persists, call
Sage Consumer Support.
Espresso only
drips from the
• Coee is ground
too nely.
• Adjust the grind size to a higher number
to make the grind size slightly coarser.
• You may have a blockage in scale.
Please run the descale process.
too quickly
• The coee is ground
too coarsely.
• Coee beans are stale.
• Adjust the grind size to a lower number
to make the grind size slightly ner.
• Use freshly roasted coee beans with
a ‘Roasted On’ date and consume
between 5–20 days after that date.
hot enough
• Cups not pre-heated. • Rinse cups under hot water outlet
and place on cup warming tray.
• Milk not hot enough
(if making cappuccino
or latté etc).
• Increase the milk temperature
in settings menu.
No crema • Coee beans are stale. • Use freshly roasted coee beans with
a ‘Roasted On’ date and consume
between 5–20 days after that date.

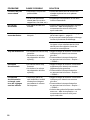
18
PROBLEM POSSIBLE CAUSE WHAT TO DO
Not enough
milk texture
• Steam wand is blocked. • Refer to ‘Cleaning the Steam Wand’,
page 13.
• You may have a blockage in scale.
Please run the descale process.
• Dierent brands and types of milk and milk
alternatives will texture dierently. You may
need to adjust the froth level accordingly.
Too much
• Coee is ground too
coarsely.
• Shot duration/volume
needs to be adjusted.
• Adjust the grind size to a lower number
to make the grind size slightly ner.
• Customise extraction time by touching
the ‘Single’ / ‘Double’ button.
Not enough
• Coee is ground too nely.
• Shot duration/volume
needs to be adjusted.
• Adjust the grind size to a higher number
to make the grind size slightly coarser.
• Customise extraction time by touching
the ‘Single’ / ‘Double’ button.
extracted has
all settings are
the same.
• As coee beans age,
the extraction rate
changes and can aect
the shot volume.
• Adjust the grind size to a lower number
to make the grind size slightly ner.
• Customise extraction time by touching
the ‘Single’ / ‘Double’ button.
• Use freshly roasted coee beans with
a ‘Roasted On’ date and consume between
5–20 days after that date.

19
EN
Guarantee
2 YEAR LIMITED GUARANTEE
Sage Appliances guarantees this product for
domestic use in specied territories for 2 years
from the date of purchase against defects caused
by faulty workmanship and materials. During this
guarantee period Sage Appliances will repair,
replace, or refund any defective product (at the
sole discretion of Sage Appliances).
All legal warranty rights under applicable national
legislation will be respected and will not be
impaired by our guarantee. For full terms and
conditions on the guarantee, as well as instructions
on how to make a claim, please visit
www.sageappliances.com.

20
Note
A página está carregando...
A página está carregando...
A página está carregando...
A página está carregando...
A página está carregando...
A página está carregando...
A página está carregando...
A página está carregando...
A página está carregando...
A página está carregando...
A página está carregando...
A página está carregando...
A página está carregando...
A página está carregando...
A página está carregando...
A página está carregando...
A página está carregando...
A página está carregando...
A página está carregando...
A página está carregando...
A página está carregando...
A página está carregando...
A página está carregando...
A página está carregando...
A página está carregando...
A página está carregando...
A página está carregando...
A página está carregando...
A página está carregando...
A página está carregando...
A página está carregando...
A página está carregando...
A página está carregando...
A página está carregando...
A página está carregando...
A página está carregando...
A página está carregando...
A página está carregando...
A página está carregando...
A página está carregando...
A página está carregando...
A página está carregando...
A página está carregando...
A página está carregando...
A página está carregando...
A página está carregando...
A página está carregando...
A página está carregando...
A página está carregando...
A página está carregando...
A página está carregando...
A página está carregando...
A página está carregando...
A página está carregando...
A página está carregando...
A página está carregando...
A página está carregando...
A página está carregando...
A página está carregando...
A página está carregando...
A página está carregando...
A página está carregando...
A página está carregando...
A página está carregando...
A página está carregando...
A página está carregando...
A página está carregando...
A página está carregando...
A página está carregando...
A página está carregando...
A página está carregando...
A página está carregando...
A página está carregando...
A página está carregando...
A página está carregando...
A página está carregando...
A página está carregando...
A página está carregando...
A página está carregando...
A página está carregando...
A página está carregando...
A página está carregando...
A página está carregando...
A página está carregando...
A página está carregando...
A página está carregando...
A página está carregando...
A página está carregando...
A página está carregando...
A página está carregando...
A página está carregando...
A página está carregando...
A página está carregando...
A página está carregando...
A página está carregando...
A página está carregando...
A página está carregando...
A página está carregando...
A página está carregando...
A página está carregando...
A página está carregando...
A página está carregando...
A página está carregando...
A página está carregando...
A página está carregando...
A página está carregando...
A página está carregando...
A página está carregando...
A página está carregando...
A página está carregando...
A página está carregando...
A página está carregando...
A página está carregando...
A página está carregando...
A página está carregando...
A página está carregando...
A página está carregando...
A página está carregando...
A página está carregando...
A página está carregando...
-
 1
1
-
 2
2
-
 3
3
-
 4
4
-
 5
5
-
 6
6
-
 7
7
-
 8
8
-
 9
9
-
 10
10
-
 11
11
-
 12
12
-
 13
13
-
 14
14
-
 15
15
-
 16
16
-
 17
17
-
 18
18
-
 19
19
-
 20
20
-
 21
21
-
 22
22
-
 23
23
-
 24
24
-
 25
25
-
 26
26
-
 27
27
-
 28
28
-
 29
29
-
 30
30
-
 31
31
-
 32
32
-
 33
33
-
 34
34
-
 35
35
-
 36
36
-
 37
37
-
 38
38
-
 39
39
-
 40
40
-
 41
41
-
 42
42
-
 43
43
-
 44
44
-
 45
45
-
 46
46
-
 47
47
-
 48
48
-
 49
49
-
 50
50
-
 51
51
-
 52
52
-
 53
53
-
 54
54
-
 55
55
-
 56
56
-
 57
57
-
 58
58
-
 59
59
-
 60
60
-
 61
61
-
 62
62
-
 63
63
-
 64
64
-
 65
65
-
 66
66
-
 67
67
-
 68
68
-
 69
69
-
 70
70
-
 71
71
-
 72
72
-
 73
73
-
 74
74
-
 75
75
-
 76
76
-
 77
77
-
 78
78
-
 79
79
-
 80
80
-
 81
81
-
 82
82
-
 83
83
-
 84
84
-
 85
85
-
 86
86
-
 87
87
-
 88
88
-
 89
89
-
 90
90
-
 91
91
-
 92
92
-
 93
93
-
 94
94
-
 95
95
-
 96
96
-
 97
97
-
 98
98
-
 99
99
-
 100
100
-
 101
101
-
 102
102
-
 103
103
-
 104
104
-
 105
105
-
 106
106
-
 107
107
-
 108
108
-
 109
109
-
 110
110
-
 111
111
-
 112
112
-
 113
113
-
 114
114
-
 115
115
-
 116
116
-
 117
117
-
 118
118
-
 119
119
-
 120
120
-
 121
121
-
 122
122
-
 123
123
-
 124
124
-
 125
125
-
 126
126
-
 127
127
-
 128
128
-
 129
129
-
 130
130
-
 131
131
-
 132
132
-
 133
133
-
 134
134
-
 135
135
-
 136
136
-
 137
137
-
 138
138
-
 139
139
-
 140
140


em outras línguas
- español: Sage BES990 Guía del usuario
- français: Sage BES990 Mode d'emploi
- italiano: Sage BES990 Guida utente
- English: Sage BES990 User guide
- Nederlands: Sage BES990 Gebruikershandleiding
- Deutsch: Sage BES990 Benutzerhandbuch
Artigos relacionados
-
Sage SES990 - the Oracle Touch Manual do proprietário
-
Sage BES880 Guia de usuario
-
Sage THE BARISTA TOUCH STAINLESS STEEL (SES880BSS4EEU1) Manual do proprietário
-
Sage THE BARISTA PRO BLACK TRUFFLE (SES878BTR4EEU1) Manual do proprietário
-
-
-
-
Sage SES881BSS4FEU1 Guia de usuario
-
-
Sage BES920 Guia de usuario
