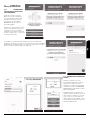
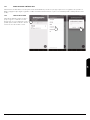
INSTRUCCIONES DE INSTALACIÓN,
USO Y MANTENIMIENTO
MÓDULO WIFI-1 PARA CONTROL REMOTO
INSTALLATION, OPERATING
AND SERVICING INSTRUCTIONS
REMOTE CONTROL WIFI-1 MODULE
INSTRUCTIONS D’INSTALLATION,
D’UTILISATION ET D’ENTRETIEN
MODULE WIFI-1 POUR COMMANDE À DISTANCE
INSTRUÇÕES DE INSTALAÇÃO,
USO E MANUTENÇÃO
MÓDULO WIFI-1 PARA CONTROLO REMOTO
ISTRUZIONI DI INSTALLAZIONE,
USO E MANUTENZIONE
MODULO WIFI-1 PER CONTROLLO REMOTO


3
V. 161020
Los datos y modelos incluidos en este manual no son vinculantes.
La empresa se reserva el derecho de aportar modificaciones y mejoras sin ningún preaviso.
Data and models included in this manual are not binding.
The company reserves the right to include modifications or improvements without previous notice.
Les données et modèles inclus dans ce manuel ne sont pas contraignants.
La sociète se réserve le droit d’apporter les modifications et améliorations sans aucun préavis.
Os dados e modelos incluídos neste manual não são vinculantes.
A empresa reserva-se o direito de fazer alterações e melhorias sem nenhum pré-aviso.
I dati e i modelli inclusi in questo manuale non sono vincolanti.
La società si riserva il diritto di apportare modificazioni e miglioramenti senza preavviso.
ES
INSTRUCCIONES DE INSTALACIÓN,
USO Y MANTENIMIENTO
MÓDULO WIFI-1 PARA CONTROL REMOTO 4
EN
INSTALLATION, OPERATING
AND SERVICING INSTRUCTIONS
REMOTE CONTROL WIFI-1 MODULE 15
FR
INSTRUCTIONS D’INSTALLATION,
D’UTILISATION ET D’ENTRETIEN
MODULE WIFI-1 POUR COMMANDE À DISTANCE 26
PT
INSTRUÇÕES DE INSTALAÇÃO,
USO E MANUTENÇÃO
MÓDULO WIFI-1 PARA CONTROLO REMOTO 37
IT
ISTRUZIONI DI INSTALLAZIONE,
USO E MANUTENZIONE
MODULO WIFI-1 PER CONTROLLO REMOTO 48
CONDICIONES DE GARANTÍA
WARRANTY CONDITIONS
CONDITIONS DE LA GARANTIE
CONDIÇÕES DA GARANTIA
CONDIZIONI DI GARANZIA 59

4
INDICE
1. INTRODUCCION ��������������������������������������������������������������������������������������������� 5
2. ACCESORIOS SUMINISTRADOS �������������������������������������������������������������������������������� 5
3. ESPECIFICIONES TECNICAS ����������������������������������������������������������������������������������� 5
4. SIGNIFICADO DE LOS LEDS ����������������������������������������������������������������������������������� 5
5. INSTALACIÓN Y CONFIGURACIÓN ������������������������������������������������������������������������������ 6
6. REGISTRO DEL PRODUCTO Y USUARIO ������������������������������������������������������������������������� 7
6.1. REGISTRO DEL USUARIO ������������������������������������������������������������������������������������������� 7
6.2. REGISTRO DEL PRODUCTO ����������������������������������������������������������������������������������������� 8
6.3 CONECTAR EL MÓDULO A LA RED WIFI ������������������������������������������������������������������������������ 9
6.3.1. CONEXIÓN A LA RED WIFI VIA BLUETOOTH (RECOMENDADO) ������������������������������������������������������������� 9
6.3.2. CONEXIÓN A LA RED WIFI VIA WIFI ������������������������������������������������������������������������������������� 10
7. FUNCIONAMIENTO DE LA APLICACION��������������������������������������������������������������������������11
7.1 INFORMACIONES �������������������������������������������������������������������������������������������������� 11
7.2 REGULACIONES ��������������������������������������������������������������������������������������������������� 11
7.3 CRONOTERMOSTATO ���������������������������������������������������������������������������������������������� 12
7.4 OTRAS GESTIONES DE LA APLICACION ����������������������������������������������������������������������������� 13
7.4.1 ELIMINAR ESTUFA REGISTRADA ������������������������������������������������������������������������������� 13
7.4.2 AJUSTE DEL RELOJ ������������������������������������������������������������������������������������������� 13
7.4.3 MODIFICAR DATOS DE UBICACIÓN DE LA ESTUFA �������������������������������������������������������������� 13
7.4.4 GENERAR CÓDIGO DE SERVICIO ������������������������������������������������������������������������������ 14
7.4.5 CAMBIAR IDIOMA ��������������������������������������������������������������������������������������������� 14
7.4.6 CONFIGURACIONES ������������������������������������������������������������������������������������������ 14
7.4.7. RESET DEL MODULO WIFI ������������������������������������������������������������������������������������� 14
7.4.8 SALIR DE LA APLICACIÓN ������������������������������������������������������������������������������������� 14
Lea atentamente estas instrucciones antes de la instalación y uso.
ES
INSTRUCCIONES DE INSTALACIÓN Y USO MÓDULO WIFI1 PARA CONTROL REMOTO

5
1. INTRODUCCION
El módulo KIT WIFI 1 que ha adquirido, permite controlar y configurar a distancia, a través de un Smartphone mediante una app, los
productos que funcionan con pellet de la marca Bronpi Calefacción de la serie aire, de la serie radiofrecuencia y de las termoestufas
hydro y termoestufas hydro de la serie radiofrecuencia (estufas, estufas canalizables, insertables, estufas extraplanas, estufas extraplanas
canalizables, etc.), siempre que haya conexión a internet.
Las funciones principales de la aplicación son:
- Encendido y apagado de la estufa.
- Visualización del estado de funcionamiento de la estufa en tiempo real.
- Ajuste de la potencia de trabajo.
- Ajuste de la temperatura del aire (aparatos aire) y ajuste de la temperatura del agua (aparatos hydro).
- Programación del cronotermostato.
- Temperatura real detectada por la estufa.
- Condición de alarma.
- Gestión de varias estufas a través sus correspondientes módulos KIT WIFI 1
- Elegir idioma.
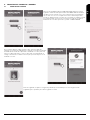
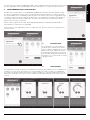
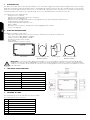
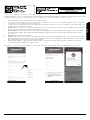
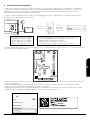
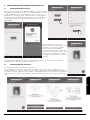
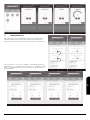
2. ACCESORIOS SUMINISTRADOS
El módulo KIT WIFI 1 está compuesto por:
- Módulo KIT WIFI-1: dispositivo que conexiona la placa electrónica de la estufa con el router wifi local.
- Cable de conexión serie MODU II - MODU II.
- Cable de conexión serie MODU II - DSUB 9.
- Dos tiras adhesivas para fijar el módulo.
- Fuente de alimentación
- Manual de instrucciones de instalación y utilización.
Módulo WIFI Cable interconexión
MODU II - MODU II
Cable interconexión
MODU II - DSUB 9
Alimentador
IMPORTANTE: Para los modelos de insertables, Tavira, Neva y Alpes-H se recomienda la adquisición del cable opcional MODU
II- MODU II de 2 metros de longitud (ref: 2002-04057) así como el adaptador puerto serie (ref : PE-176), para que el módulo
wifi quede fuera del revestimiento realizado al insertable y pueda recepcionar correctamente la señal wifi de su vivienda y tenga
visualización a los leds del módulo wifi.
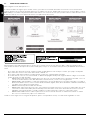
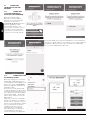
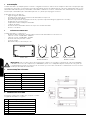
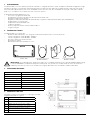
A
G
F
E
BCD
3. ESPECIFICIONES TECNICAS
Frecuencia WIFI
Alimentación eléctrica 12 V CC (mediante alimentador)
Consumo 0.4 W
Posición de montaje Cualquiera
Temperatura de trabajo Entre 0 ºC y 50 ºC
Humedad relativa máxima 95%
Rango de frecuencia 2.4 GHz – 2.5 GHz (2402 – 2472 MHz)
Nivel EIRP 14/16 dBm
La red wifi no debe ser de tipo mixed
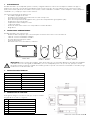
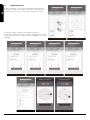
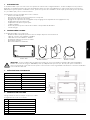
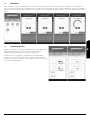
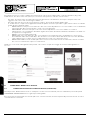
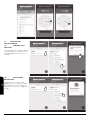
4. SIGNIFICADO DE LOS LEDS
En la siguiente imagen se muestran los leds que compone el módulo:
El significado de los leds es el siguiente:
A Led de estado encendido (Verde)
B Led estado Bluetooth (azul)
C Led de estado de Internet (amarillo)
D Led estado Servidor Remoto (amarillo)
E Conexión con la estufa cable serie
F Conector de alimentación eléctrica
G Reset módulo
ES
INSTRUCCIONES DE INSTALACIÓN Y USO MÓDULO WIFI1 PARA CONTROL REMOTO

6
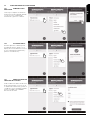
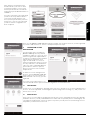
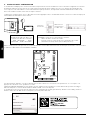
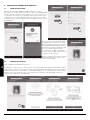
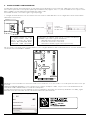
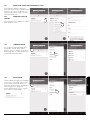
5. INSTALACIÓN Y CONFIGURACIÓN
El módulo wifi es idóneo para el funcionamiento en ámbito doméstico, a través de una red wifi activa y conectada a internet. El dispositivo se
suministra con dos tiras adhesivas para fijarlo a una superficie plana cercana a la estufa (soporte, pared, etc.), no se debe instalar en zonas
expuestas al calor directo o transmitido por radiación, la temperatura máxima de uso del módulo es de 50 ºC.
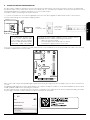
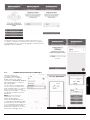
Para la instalación del módulo, debe seguir los siguientes pasos:
1.- Conectar el módulo a la estufa con el cable apropiado de interconexión suministrado, el módulo WIFI se debe conectar a la corriente
eléctrica a través del alimentador externo facilitado.
Conexión red 12V Conexión
estufa a través
de cable serie
El fabricante declara que el tipo
de equipo de radio (kit Wifi-
1) cumple con las siguientes
directivas: RED 2014/53/UE; ROHS
2011/65/UE; RAEE 2012/19/UE.
La fuente de alimentación de apoyo suministrada en el kit cumple con
la directiva EN60950-1 y tiene las siguientes características:
- VELV: voltaje de seguridad muy bajo;
- Protegido contra cortocircuitos y sobrecorrientes;
- Fuente de alimentación limitada (fuente de baja potencia LPS).
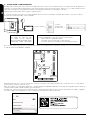
En el caso de estufas sin puerto serie, el módulo WIFI se debe conectar directamente a la tarjeta electrónica en el conector CN13 mediante
el cable de interconexión MODU II - MODU II:
CN9 CN7
CN6 CN4
CN8
CN13
CN5
CN19
PE
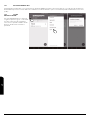
En la primera puesta en uso, hay que esperar que el led A se encienda con luz verde permanente. En caso de que esto no ocurra, deberá
presionar por 2 segundos el botón G “reset”.
Debe descargarse en su ordenador, smartphone o su tablet la aplicación BRONPI HOME que se la puede descargar directamente desde los
servidores PLAY STORE o APPLE STORE, según su dispositivo.
El módulo wifi, creara una red que sirve solamente para la configuración del módulo (no tiene internet), identificada como T009� seguida de
los 6 últimos dígitos del código MAC descrito en la etiqueta (véase parte trasera) del módulo wifi:
246F28842BD4
1891923
ES
INSTRUCCIONES DE INSTALACIÓN Y USO MÓDULO WIFI1 PARA CONTROL REMOTO

7
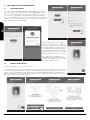
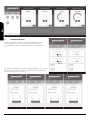
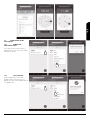
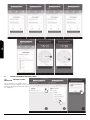
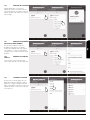
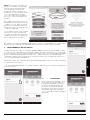
6. REGISTRO DEL PRODUCTO Y USUARIO
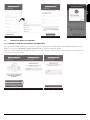
6.1. REGISTRO DEL USUARIO
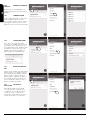
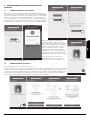
Una vez descargada la aplicación BRONPI HOME, debe proceder a
registrarse. Para ello debe pulsar sobre SUSCRIBIR. Deberá introducir
una dirección de email así como una contraseña que usted elija para
que le sirva como acceso a la aplicación. Esta contraseña por tanto,
puede ser distinta a la de su email y que sea fácil de recordar por usted,
la contraseña debe tener al menos 8 caracteres. Debe de aceptar el
tratamiento de sus datos personales y pulsar en REGISTRARSE.
En su email recibirá un código numérico de 6 cifras que debe de
introducir en la siguiente pantalla para confirmar la suscripción pulsando
ACTIVAR. Revise todas las carpetas de entrada de su correo personal,
incluso la carpeta de spam o correo no deseado. Si ha introducido el
código correctamente, recibirá un mensaje de que la inscripción se ha
realizado con éxito:
Una vez registrado, le aparece la siguiente pantalla que le informará que no tiene ninguna estufa
registrada, por lo que debe proceder a registrar su estufa:
ES
INSTRUCCIONES DE INSTALACIÓN Y USO MÓDULO WIFI1 PARA CONTROL REMOTO

8
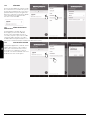
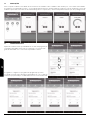
6.2. REGISTRO DEL PRODUCTO
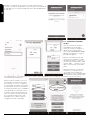
Para configurar la estufa, debe pulsar en “+”
A continuación debe de elegir la opción “módulo externo” y proceder al conexionado del módulo a la estufa así como a la red eléctrica
según el capítulo 5 de este manual, la propia aplicación le recordará como hacerlo. También debe tener presente el número MAC, el número
REG CODE que encontrará en la parte trasera del módulo wifi así como el número de serie que lo puede localizar en el libro de instrucciones
de la de la estufa así como en la etiqueta CE existente en la parte trasera de la estufa:
246F28842BD4
1891923
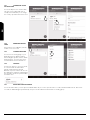
Para registrar la estufa, debe rellenar todos los campos que se solicitan: número de serie, dirección MAC, código de registración (Reg
code), modelo de artículo, descripción de la estufa, estado (pais) en el que se encuentra la estufa, provincia y localidad de ubicación de la
estufa.
- En el campo “descripción de la estufa”, asignar el nombre elegido libremente a la estufa por el usuario, por ejemplo: estufa planta
baja, estufa salón, estufa cocina, estufa casa montaña, caldera1, etc.
- En el campo estado, debe introducir el nombre del país en inglés, por ejemplo España sería Spain.
- En “modelo articulo”, tan solo con teclear la letra B, se abrirá un desplegable donde puede elegir las distintos códigos en función del
modelo de estufa conectado al módulo:
• BRONPI AUTO. Para estufas más antiguas de la serie “aire” pero cuyo año de fabricación es posterior al año 2015, como es el
caso de los modelos Dama, Leticia, Kira, Alba, Nina, Lola, Eva, Eva- Nc y Coral. Con tecnología OASYS.
• BRONPI RADIO. Para insertables y estufas más antiguas pero cuyo año de fabricación es posterior al año 2015, con mando a
distancia de radiofrecuencia, como los modelos Neva, Neva-Extra, Agatha, Alexia, Alicia, Alicia Extra, Clara Extra, Olivia Extra y
Cleo Extra. Que incorporan tecnología OASYS.
• BRONPI. Únicamente para el modelo Tina de 6 kW.
• BRONPI PLUS. Para estufas de la serie “aire”, que incorporan tecnología Oasys Plus en concreto los modelos Rita, Zoe, nueva
versión de los modelos Nina, Alba y Kira, modelo Mayo, Noa, Noa Visión, nueva versión del modelo Neva, Princesa, Leticia,
Abril Extra, Carmen Extra, Eva-NC, Coral-NC. También los modelos Tavira, Nicol, Clara, Cleo, Olivia, Lupe y Dora.
• BRONPI PLUS HIDRO: Para los modelos hydro: Noa-H, la nueva versión de Leticia-H con OASYS Plus, Clara-H con OASYS
Plus, Cleo-H con OASYS Plus y Alpes-H con OASYS Plus.
Cuando no existe ningún error en el registro del producto, aparece en la pantalla el mensaje “tu estufa ha sido registrada con éxito”.
ES
INSTRUCCIONES DE INSTALACIÓN Y USO MÓDULO WIFI1 PARA CONTROL REMOTO

9
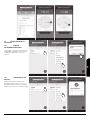
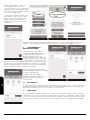
6.3 CONECTAR EL MÓDULO A LA RED WIFI
6.3.1. CONEXIÓN A LA RED WIFI VIA BLUETOOTH (RECOMENDADO)
Antes de continuar, habilite el bluetooth en su teléfono inteligente y permanezca cerca del módulo wifi (a una distancia inferior a 4-5 m).
Después, seleccionar CONFIGURAR A TRAVES DE BLUETOOTH y seguir el procedimiento guiado:
Debe seleccionar la red wifi de su vivienda a la que desea conectar el módulo, colocar la contraseña del router de su vivienda y pulsar en
“conectarse a la red seleccionada”
ES
INSTRUCCIONES DE INSTALACIÓN Y USO MÓDULO WIFI1 PARA CONTROL REMOTO

10
El módulo le informará que ya ha sido conectado y debe pulsar en
“concluir” y le aparecerá la pantalla con la estufa que tiene registrada. En
el modo Bluetooth no le permite añadir otra estufa, debe añadirla desde
el modo wifi.
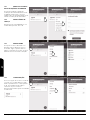
6.3.2. CONEXIÓN A LA RED WIFI
VIA WIFI
Antes de continuar, aconsejamos
deshabilitar la opción de datos
móviles de su teléfono inteligente y
habilite la opción wifi. Después,
seleccionar CONFIGURAR A TRAVES
DE WIFI en la aplicación y seguir el
procedimiento guiado:
Busque en el listado de redes wifi
que su teléfono visualiza, la red wifi
creada por el módulo y conéctese a
ella, la red wifi creada siempre tendrá
el prefijo T009….. y termina con los 6
últimos caracteres del numero MAC
del kit.
NOTA: Esta conexión es temporal y
no permite el uso de datos, por lo
que cuando termine tendrá que
abandonarla y se recomienda borrarla
de su listado de redes para descartar
que automáticamente su smartpohne se conecte a ella, lo que le imposibilitará el uso de datos de su smatphone así como el correcto
funcionamiento de la aplicación.
Después regrese a la APP y seleccione
la red wifi de su vivienda a la que desee
que el módulo se conecte, e introduzca
la contraseña de la red wifi seleccionada
(contraseña del router de su vivienda) en
el campo password y pulse en CONNECT:
Si ha introducido la contraseña correcta,
en la parte superior observará que el kit
wifi se encuentra conectado a la red wifi
de su vivienda. Posteriormente cierre
la pantalla en X y le aparecerá que la
configuración ha sido completada:
INSTRUCCIONES DE INSTALACIÓN Y USO MÓDULO WIFI1 PARA CONTROL REMOTO
ES

11
A continuación cierre la aplicación BRONPI HOME y vuelva a abrirla nuevamente. Debe aparecerle la estufa
que tiene registrada. Si desea añadir alguna otra estufa, debe pulsar en + y repetir los pasos anteriores.
7. FUNCIONAMIENTO DE LA APLICACION
El módulo wifi se puede utilizar con la app BRONPI HOME desde cualquier terminal (smartphone, tablet,
etc). Una vez registrada la estufa según se ha explicado anteriormente, podremos acceder a ella desde
otro terminal distinto sin necesidad de registrar nuevamente la estufa. Es decir, una vez registrada la estufa,
se puede acceder a ella desde cualquier otro dispositivo, esto permitirá que una misma estufa pueda ser
controlada por diferentes personas-dispositivos, pero para ello todas las personas-dispositivos deben
utilizar el mismo usuario y contraseña.
Para acceder a la gestión de la estufa, abra la app BRONPI HOME, y visualizará la pantalla donde le
informará de la/s estufa/s que tiene registradas:
Si pulsa sobre la estufa registrada, puede ver y editar sobre tres opciones: Informaciones, Regulaciones o
Cronotermostato
7.1 INFORMACIONES
En esta pantalla, se puede visualizar el
estado de funcionamiento de la estufa: si
está encendida o apagada, la potencia de
trabajo de la estufa, el día de la semana,
la temperatura ambiente de la estancia, la
fase de trabajo (limpieza final, limpieza de
quemador, etc), e incluso puede encender
o apagar la estufa.
7.2 REGULACIONES
En esta pantalla, se puede modificar la velocidad de funcionamiento del ventilador o de los ventiladores de
canalización en caso de que opcionalmente se hayan instalado a la estufa (consultar con su distribuidor
los modelos que pueden instalar opcionalmente el kit de canalización). Se puede modificar la potencia de
trabajo de la estufa (potencia 1 a potencia 5) y modificar la temperatura ambiente que desea alcanzar en la
estancia.
INSTRUCCIONES DE INSTALACIÓN Y USO MÓDULO WIFI1 PARA CONTROL REMOTO
ES

12
7.3 CRONOTERMOSTATO
Desde el módulo wifi, se tiene la opción de realizar una programación
semanal de la estufa, para ello debe activar tanto el cronotermostato
general de la estufa como el termostato del temporizador semanal:
A continuación debe configurar los 4 programas posibles de
programación, eligiendo la hora de encendido y apagado de la estufa, así
como los días de la semana que desea que la estufa trabaje en el horario
establecido.
INSTRUCCIONES DE INSTALACIÓN Y USO MÓDULO WIFI1 PARA CONTROL REMOTO
ES

13
7.4 OTRAS GESTIONES DE LA APLICACION
7.4.1 ELIMINAR ESTUFA
REGISTRADA
Si desea por cualquier circunstancia
eliminar una estufa registrada, bastará
con hacer un clic en la barra de
herramientas y pulsar en “eliminar”.
7.4.2 AJUSTE DEL RELOJ
Desde la aplicación, también puede
actualizar la hora que aparece en el
display de la estufa, bastará con hacer
un clic en la barra de herramientas y
pulsar en “actualizar reloj”.
7.4.3 MODIFICAR DATOS DE
UBICACIÓN DE LA ESTUFA
Puede modificar los datos de ubicación
de la estufa, bastará con hacer un clic
en la barra de herramientas y pulsar en
“modificar” lo que le permitirá cambiar
el pais, la ciudad y la localidad de
ubicación de la estufa.
INSTRUCCIONES DE INSTALACIÓN Y USO MÓDULO WIFI1 PARA CONTROL REMOTO
ES

14
7.4.4 GENERAR CÓDIGO DE
SERVICIO
Esta función no está habilitada en su
módulo wifi, por tanto no tiene ninguna
utilidad.
7.4.5 CAMBIAR IDIOMA
Puede elegir el idioma de su aplicación
entre las distintas opciones que se
ofrece: inglés, español, francés, italiano
y portugués. Debe hacer un clic en la
barra de menú y seleccionar el deseado.
7.4.6 CONFIGURACIONES
Tiene opción de elegir el modo de
conexión con el módulo wifi: a través de
una red wifi o través del bluetooth si se
encuentra próximo al kit. También puede
visualizar los caracteres un poco más
grandes. Esta operación también se
puede realizar en la pantalla inicial:
7.4.7. RESET DEL MODULO
WIFI
Para resetear el módulo wifi, debe pulsar
durante al menos 5 segundos el botón
G (ver apartado 4) de RESET, hasta que
todos los leds se apaguen. Después
durante algunos segundos, los leds se
encenderán de forma intermitente. El
proceso finalizará cuando el led A, se
quede encendido fijo (verde).
7.4.8 SALIR DE LA
APLICACIÓN
Para salir de la aplicación, bastará
con elegir la opción “cerrar sesión” y
confirmar la elección. De esta forma
cerrará su sesión y cuando desee
nuevamente entrar, deberá colocar su
nombre de usuario y su contraseña.
ES
INSTRUCCIONES DE INSTALACIÓN Y USO MÓDULO WIFI1 PARA CONTROL REMOTO

15
1. INTRODUCTION��������������������������������������������������������������������������������������������� 16
2. SUPPLIED ACCESSORIES ������������������������������������������������������������������������������������ 16
3. TECHNICAL SPECIFICATIONS ��������������������������������������������������������������������������������� 16
4. MEANING OF LEDS ����������������������������������������������������������������������������������������� 16
5. INSTALLATION AND CONFIGURATION �������������������������������������������������������������������������� 17
6. USER AND PRODUCT REGISTRATION �������������������������������������������������������������������������� 18
6.1 USER REGISTRATION ���������������������������������������������������������������������������������������������� 18
6.2 PRODUCT REGISTRATION ������������������������������������������������������������������������������������������ 18
6.3 CONNECTING THE MODULE TO THE WIFI NETWORK ����������������������������������������������������������������� 20
6.3.1. CONNECTION TO THE WIFI NETWORK VIA BLUETOOTH (RECOMMENDED) ���������������������������������������� 20
6.3.2. CONNECTION TO THE WIFI NETWORK VIA WIFI ����������������������������������������������������������������� 20
7. OPERATION OF THE APPLICATION����������������������������������������������������������������������������� 21
7.1 INFORMATION ����������������������������������������������������������������������������������������������������� 21
7.2 REGULATIONS ���������������������������������������������������������������������������������������������������� 21
7.3 CHRONOTHERMOSTAT ��������������������������������������������������������������������������������������������� 22
7.4 OTHER STEPS IN THE APPLICATION ��������������������������������������������������������������������������������� 23
7.4.1 REMOVE THE REGISTERED STOVE ����������������������������������������������������������������������������� 23
7.4.2 CLOCK SETTING ���������������������������������������������������������������������������������������������� 23
7.4.3 CHANGE THE STOVE LOCATION DATA. ������������������������������������������������������������������������� 24
7.4.4 GENERATE SERVICE CODE ������������������������������������������������������������������������������������ 24
7.4.5 CHANGE LANGUAGE ����������������������������������������������������������������������������������������� 24
7.4.6 SETTINGS ���������������������������������������������������������������������������������������������������� 24
7.4.7 RESETTING THE WI-FI MODULE �������������������������������������������������������������������������������� 24
7.4.8 LEAVE THE APPLICATION �������������������������������������������������������������������������������������� 25
EN
INDEX
Please read carefully these instructions before the installation and use
INSTALLATION, OPERATING AND SERVICING INSTRUCTIONS REMOTE CONTROL WIFI1 MODULE

16
1. INTRODUCTION
The WIFI 1 KIT module that you have purchased allows you to control and configure remotely, through a Smartphone by means of an app
application, the products that work with pellet from the company Bronpi Calefacción from the air series, the radio frequency series and the
hydro stoves from the radio frequency series (stoves, stoves that can be channelled, inserts, extra slim stoves, extra slim stoves that can be
channelled, hydro inserts, hydro stoves, extra slim hydro stoves, etc.), provided that there is an internet connection.
The main functions of the application are:
- Turning the stove on and off.
- Display of the operating status of the stove in real time.
- Adjustment of the working power.
- Adjustment of the air temperature (air devices) and adjustment of the water temperature (hydro devices).
- Programming the chronothermostat.
- Current temperature detected by the stove.
- Alarm condition.
- Management of several stoves through their corresponding WIFI 1 KIT modules.
- Choose your language.
2. SUPPLIED ACCESSORIES
The WIFI KIT 1 module is composed of:
- WIFI-1 KIT module: device that connects the electronic board of the stove with the local wifi router.
- Series Connection Cable MODU II – MODU II.
- Serial Connection Cable MODU II – DSUB 9
- Two adhesive strips to fix the module.
- Power Supply.
- Installation and use instruction manual.
WIFI Module Serial Connection Cable
MODU II-MODU II
Serial Connection Cable
MODU II- DSUB 9
Power Supply
IMPORTANT: For the insert models, Tavira, Neva and Alpes-H, we recommend the acquisition of the optional cable MODU II
– MODU II of 2 metres length (ref: 2002-04057), as well as the serial port adapter (ref: PE-176), so that the wifi module remains
outside the cover made to the insert and can correctly receive the wifi signal from your home and have a visualization to the leds
of the wifi module.
A
G
F
E
BCD
3. TECHNICAL SPECIFICATIONS
Frequency WIFI
Power Supply 12 V CC (via power supply unit)
Consumption 0.4 W
Installation Position Anyone you want.
Working Temperature Between 0 ºC and 50 ºC
Maximum relative humidity 95%
Frequency range 2.4 GHz – 2.5 GHz (2402 – 2472 MHz)
EIRP Level 14/16 dBm
The wifi network must not be mixed
4. MEANING OF LEDS
The following image shows the leds that make up the module:
The meaning of the leds is as follows:
A Status Led (Green)
B Led Bluetooth status (Blue)
C Internet Status Led (Yellow)
D Remote Server Status Led (Yellow)
E Connection with the stove serial cable
F Power Supply Connector
G Reset module
EN
INSTALLATION, OPERATING AND SERVICING INSTRUCTIONS REMOTE CONTROL WIFI1 MODULE

17
5. INSTALLATION AND CONFIGURATION
The wifi module is suitable for operation in the home, through an active wifi network connected to the internet. The device is supplied with
two adhesive strips to fix it to a flat surface near the stove (stand, wall, etc.). It should not be installed in areas exposed to direct heat or heat
transmitted by radiation; the maximum temperature of use of the module is 50 ºC.
To install the module, the following steps must be followed:
1. - Connect the module to the stove with the appropriate interconnection cable supplied; the WIFI module must be connected to the
electrical current through the external power supply provided.
Network
Connection 12V
Connection to
the stove via
serial cable
The manufacturer declares that
the type of radio equipment (Wifi-
1 kit) complies with the following
directives: RED 2014/53/EU; ROHS
2011/65/EU; RAEE 2012/19/EU.
The back-up power supply supplied in the kit complies with the
EN60950-1 directive and has the following characteristics:
- VELV: very low safety voltage;
- Protected against short circuits and over currents;
- Limited power supply (low power source LPS).
In the case of stoves without a serial port, the WIFI module must be connected directly to the electronic board at the CN13 connector using
the MODU II - MODU II interconnection cable.
CN9 CN7
CN6 CN4
CN8
CN13
CN5
CN19
PE
When you first start using it, wait until LED A lights up with a permanent green light. If this does not happen, press the G “reset” button for 2
seconds.
The BRONPI HOME application must be downloaded to your computer, Smartphone or tablet. It can be downloaded directly from the PLAY
STORE or APPLE STORE servers, depending on your device.
The wifi module will create a network that serves only for the configuration of the module (it has no internet), identified as T009� followed by
the last 6 digits of the MAC code described on the label (see back) of the wifi module:
246F28842BD4
1891923
EN
INSTALLATION, OPERATING AND SERVICING INSTRUCTIONS REMOTE CONTROL WIFI1 MODULE

18
6. USER AND PRODUCT REGISTRATION
6.1 USER REGISTRATION
Once you have downloaded the BRONPI HOME application, you must
proceed to register. To do this procedure, click on SUBSCRIBE. You will
have to enter an email address as well as a password that you choose to
use to access the application. This password can therefore be different
from your email address and be easy for you to remember. The password
must be at least 8 characters long. You must accept the processing of your
personal data and click on REGISTER.
In your email you will receive a 6-digit
numerical code that you must enter in the
next screen to confirm the subscription by
pressing ACTIVATE. Check all the inboxes
of your personal mail, including the spam
or junk mail folder. If you have entered the
code correctly, you will receive a message
that the registration has been successful:
Once registered, the following screen
will appear informing you that you do not
have any stove registered, so you should
proceed to register your stove:
6.2 PRODUCT REGISTRATION
In order to configure the stove, you must click on “+”.
You must then choose the option “external module” and proceed to connect the module to the stove as well
as to the power network according to chapter 5 of this manual; the application itself will remind you how to
do this. You should also bear in mind the MAC number, the REG CODE number which you will find on the
back of the wifi module as well as the serial number which you can find in the instruction book of the stove
and on the CE label on the back of the stove:
INSTALLATION, OPERATING AND SERVICING INSTRUCTIONS REMOTE CONTROL WIFI1 MODULE
EN

19
246F28842BD4
1891923
In order to register the stove, you must fill in all the requested fields: serial number, MAC address, registration code (Reg code), article model,
description of the stove, state (country) where the stove is located, province and locality where the stove is located.
- In the state field, you must enter the name of the country in English.
- In the space “stove description”, assign the name freely chosen by the user to the stove, for example: ground floor stove, living room
stove, kitchen stove, mountain house stove, boiler1, etc.
- In “article model”, just by typing the letter B, a drop-down menu will open where you can choose the different codes depending on the
model of stove connected to the module:
• BRONPI AUTO. For older stoves of the “air” series but whose year of manufacture is after 2015, such as the Dama, Leticia, Kira, Alba,
Nina, Lola, Eva, Eva- Nc and Coral models. With OASYS technology.
• BRONPI RADIO. For older inserts and stoves but whose year of manufacture is after 2015 with radio frequency control, such as the
Neva, Neva-Extra, Agatha, Alexia, Alicia, Alicia Extra, Clara Extra, Olivia Extra and Cleo Extra models. Which incorporate OASYS
technology.
• BRONPI. Only for the Tina model 6 kW.
• BRONPI PLUS. For “air” series stoves incorporating Oasys Plus technology, specifically the Rita, Zoe, new version of the Nina, Alba
and Kira, model Mayo, Noa, Noa Vision, new version of the Neva, Princesa, Leticia, Abril Extra, Carmen Extra, Eva-Nc and Coral-Nc.
Also models Tavira, Nicol, Clara, Cleo, Olivia, Lupe and Dora.
• BRONPI PLUS HIDRO: For all hydro models: Noa-H models, new version of Leticia-H with OASYS Plus, Clara-H with Oasys Plus,
Cleo-H with Oasys Plus and Alpes-H with Oasys Plus.
When there is no error in the product registration, the message “your stove has been registered successfully” appears on the screen:
INSTALLATION, OPERATING AND SERVICING INSTRUCTIONS REMOTE CONTROL WIFI1 MODULE
EN

20
6.3 CONNECTING
THE MODULE TO THE WIFI
NETWORK
6.3.1. CONNECTION
TO THE WIFI NETWORK VIA
BLUETOOTH (RECOMMENDED)
Before proceeding, enable
Bluetooth on your Smartphone
and stay close to the wifi module
(within 4-5 m). Then select
CONFIGURE BY BLUETOOTH and
follow the guided procedure:
Select the wifi network in your
home to which you wish to connect
the module, enter the password
for your home router and click on
“connect to the selected network”.
The module will inform you that it has already been connected and you
must click on “finish” and the screen with the stove you have registered
will appear. In Bluetooth mode, it does not allow you to add another
stove, you must add it from the wifi mode.
6.3.2. CONNECTION TO THE
WIFI NETWORK VIA WIFI
Before proceeding, we recommend
disabling the mobile data option on
your Smartphone and enabling the wifi
option. Then select CONFIGURE BY
WIFI in the application and follow the
guided procedure:
Look at the list of wifi networks that
your phone displays, the wifi network
created by the module and connect to
it, the wifi network created will always
have the prefix T009..... And it ends
with the last 6 characters of the kit’s
MAC number.
NOTE: This connection is temporary
and does not allow the use of data, so
when it ends, you will have to leave it
and it is recommended that you delete it
from your network list so that your
Smartphone doesn’t connect to
it automatically, which will make
impossible that you use data from
your Smartphone as well as the
correct functioning of the application.
INSTALLATION, OPERATING AND SERVICING INSTRUCTIONS REMOTE CONTROL WIFI1 MODULE
EN
A página está carregando...
A página está carregando...
A página está carregando...
A página está carregando...
A página está carregando...
A página está carregando...
A página está carregando...
A página está carregando...
A página está carregando...
A página está carregando...
A página está carregando...
A página está carregando...
A página está carregando...
A página está carregando...
A página está carregando...
A página está carregando...
A página está carregando...
A página está carregando...
A página está carregando...
A página está carregando...
A página está carregando...
A página está carregando...
A página está carregando...
A página está carregando...
A página está carregando...
A página está carregando...
A página está carregando...
A página está carregando...
A página está carregando...
A página está carregando...
A página está carregando...
A página está carregando...
A página está carregando...
A página está carregando...
A página está carregando...
A página está carregando...
A página está carregando...
A página está carregando...
A página está carregando...
A página está carregando...
A página está carregando...
A página está carregando...
A página está carregando...
A página está carregando...
A página está carregando...
A página está carregando...
A página está carregando...
A página está carregando...
-
 1
1
-
 2
2
-
 3
3
-
 4
4
-
 5
5
-
 6
6
-
 7
7
-
 8
8
-
 9
9
-
 10
10
-
 11
11
-
 12
12
-
 13
13
-
 14
14
-
 15
15
-
 16
16
-
 17
17
-
 18
18
-
 19
19
-
 20
20
-
 21
21
-
 22
22
-
 23
23
-
 24
24
-
 25
25
-
 26
26
-
 27
27
-
 28
28
-
 29
29
-
 30
30
-
 31
31
-
 32
32
-
 33
33
-
 34
34
-
 35
35
-
 36
36
-
 37
37
-
 38
38
-
 39
39
-
 40
40
-
 41
41
-
 42
42
-
 43
43
-
 44
44
-
 45
45
-
 46
46
-
 47
47
-
 48
48
-
 49
49
-
 50
50
-
 51
51
-
 52
52
-
 53
53
-
 54
54
-
 55
55
-
 56
56
-
 57
57
-
 58
58
-
 59
59
-
 60
60
-
 61
61
-
 62
62
-
 63
63
-
 64
64
-
 65
65
-
 66
66
-
 67
67
-
 68
68


em outras línguas
- español: Bronpi KIT WIFI 1 Instrucciones de operación
- français: Bronpi KIT WIFI 1 Mode d'emploi
- italiano: Bronpi KIT WIFI 1 Istruzioni per l'uso
- English: Bronpi KIT WIFI 1 Operating instructions