JATA MC735N Manual do usuário
- Categoria
- Máquinas de costura
- Tipo
- Manual do usuário
A página está carregando ...

MANUAL DE INSTRUCCIONES • INSTRUCTION MANUAL • MANUAL DE INSTRUÇÕES
22
PROTECCION DEL MEDIO AMBIENTE
• En su calidad de consumidor, cuando desee desprenderse del aparato deposítelo para su posterior tratamiento en
un centro de recogida de residuos o contenedor destinado a tal fin.
• Proceda de igual forma cuando tenga que eliminar las pilas usadas.
• Nunca tire el aparato ni las pilas a la basura. De esta manera estará contribuyendo al cuidado y mejora del medio
ambiente.
ENVIRONMENT PROTECTION
• Dispose the appliance according to the local garbage regulations.
• Dispose the batteries according to the local garbage regulation.
• Never throw it away to the rubbish. So you will help to the improvement of the environment.
PROTECÇÃO DO MEIO AMBIENTE
• Na sua qualidade de consumidor, quando desejar desfazer-se do aparelho deposite-o, para o seu posterior trata-
mento, num centro de recolha de resíduos ou contentor destinado para tal efeito.
• Proceda de igual forma quando tiver que eliminar as pilhas usadas.
• Nunca deite o aparelho, nem as pilhas, para o lixo. Desta forma estará contribuindo para o cuidado e a melhoria
do meio ambiente.

3
MANUAL DE INSTRUCCIONES • INSTRUCTION MANUAL • MANUAL DE INSTRUÇÕES
3
Advertencias de seguridad
Piezas principales
Accesorios
Armar su máquina
Devanado de la camilla
Colocar y quitar la canilla de
la cápsula.
Enhebrado de la cápsula porta
canillas
Insertar el porta bobinas en la
lanzadera
Sustitución de la aguja
Enhebrado del hilo superior
Enhebrador automático de
la aguja
Extracción del hilo inferior
Ajustar la tensión del hilo
Colocación del prensatelas
Selector e indicador de
puntada
Palanca de puntada al revés
Control del largo de puntada /
puntada super
Control del ancho de puntada
Brazo libre
Puntada recta
Comenzar a coser
Retirar la tela
Cambio de la dirección de la
costura
Colocación de cremalleras
Puntada en zigzag
Puntada dobladillo invisible/
lencería
Puntadas de sobrepunto
Cosido de botones
Costura de ojales en 4 tiempos
Zurcido, punteado y
monogramas
Remendar
Puntada de nido de abeja
Puntadas comunes
Cuidado de su máquina
4
6
7
8
10
11
13
13
13
14
15
15
16
17
19
19
19
19
19
21
21
23
23
25
27
27
29
29
31
31
33
33
35
37
5
6
7
8
10
11
13
13
13
15
15
15
16
17
19
19
19
19
19
21
21
23
23
25
27
27
29
29
31
31
33
33
35
37
4
6
7
8
10
11
12
12
12
14
14
15
16
17
18
18
18
18
18
20
20
22
22
24
26
26
28
28
30
30
32
32
34
36
Important safety instructions
Machine identification
Accessories
Setting up your machine
Winding bobbin
Removing bobbin case from
shuttle
Inserting bobbin into bobbin
case
Inserting bobbin case into
shuttle
Changing the needle
Using automatic needle
threader
Threading the top thread
Picking up bobbin thread
Adjusting top thread tension
Snap-on presser feet
Stitch selector and indicator
Reverse stitch lever
Stitch length/ super stitch
control
Stitch width control
Converting to free-arm sewing
Starting to sew
Straight stitch
Removing fabric
Turning a square corner
Inserting zips and piping
Zigzag stitch
Blind hem/ Lingerie stitch
Overedge stitches
Sewing on buttons
Sewing 4-step buttonholes
Darning, stippling, and
monogram
Mending
Honeycomb stitch
Practical stitches
Caring for your machine
Instruções importantes de
segurança
Peças principais
Acessórios
Colocar a sua máquina pronta a
funcionar
Enchimento da bobina
Colocar e retirar a bobina da caixa
da bobina
Enfiamento da caixa da bobina
Inserir a caixa da bobina na
lançadeira
Substituição da agulha
Enchimento do fio superior
Enfiador automático da agulha
Extracção da linha inferior
Ajustar a tensão da linha
Colocação do pé-calcador
Selector e indicador do ponto
Alavanca ponto de retrocesso
Controlo do comprimento do ponto/
ponto super
Controlo da largura do ponto
Braço livre
Ponto a direito
Começar a coser
Retirar o tecido
Mudança da direcção da costura
Colocação de fechos
Ponto em zigzag
Ponto invisível
Pontos duplos
Pregar botões
Costura de casas em 4 tempos
Cerzido, pespontos e monogramas
Remendar
Ponto de ninho de abelha
Pontos comuns
Cuidados com a sua máquina
Índice · Index · Índice
A página está carregando ...

5
MANUAL DE INSTRUCCIONES • INSTRUCTION MANUAL • MANUAL DE INSTRUÇÕES
5
Esta máquina de costura foi concebida e fabricada exclusiva-
mente para uso doméstico. Por favor leia todas as instruções
antes da sua utilização e siga os cuidados de segurança bási-
cos que seguem em pormenor.
ATENÇÃO
Para evitar o risco de choque eléctrico:
• A máquina nunca deve ser deixada sozinha e des-
ligue-a da corrente eléctrica sempre que a não for
utilizar ou a vá limpar.
• Desligue o aparelho antes de mudar a lâmpada. Utili-
ze sempre lâmpadas de substituição de 15W.
Instruções importantes
de segurança
ADVERTÊNCIA
Para reduzir o risco de queimaduras, incêndio ou
lesões:
• Faça funcionar a máquina de costura somente quan-
do estiver montada sobre a sua mesa de trabalho.
• Este aparelho não é destinado para ser usado por
pessoas (incluindo crianças) com capacidades físicas,
sensoriais ou mentais reduzidas; falta de experiência e
conhecimento, a não ser que sejam supervisionadas ou
recebam instruções concretas sobre a utilização do apa-
relho por uma pessoa responsável pela sua segurança.
• Use este aparelho somente para o fim para o qual foi
concebido, utilizando exclusivamente os acessórios
recomendados pelo fabricante, como se indica neste
manual.
• Nunca faça funcionar este aparelho se o cabo ou a
ficha estiverem danificados. Se não funcionar adequa-
damente, se tiver caído, estiver danificado ou se tiver
apanhado água, contacte o distribuidor ou o centro
de serviço técnico autorizado mais próximo para que o
verifiquem, reparem ou façam os ajustes eléctricos ou
mecânicos necessários.
• Nunca use este aparelho com alguma das saídas de ven-
tilação bloqueadas. Mantenha as grelhas de ventilação e
o pedal limpos, sem acumulações de pelos, pó ou fios de
tecido soltos.
• Nunca deixe cair, ou insira objectos nas aberturas.
• Não a use ao ar livre.
• Não a use onde estiverem a ser usados produtos em ae-
rossol (sprays) ou onde esteja a ser libertado oxigénio.
• Para a desligar, coloque todos os controlos na posição
“Apagado” (“0”) e desligue a ficha da tomada da corrente.
• Desligue-a sempre puxando pela ficha e nunca pelo
cabo.
• Mantenha os dedos das mãos afastados das peças em
movimento. Necessitam-se cuidados especiais perto da
agulha.
• Use sempre a chapa adequada à agulha. Usar uma chapa
errada poderá provocar a quebra da agulha.
• Não use agulhas tortas.
• Evite puxar, ou empurrar, o tecido com a mão enquanto
cose, já que o seu movimento é efectuado pela própria
máquina. Forçar o processo só provocará a quebra da
agulha.
• Desligue a máquina de costura ao fazer qualquer ajuste
perto da agulha como enfiar, ou mudar, a agulha, encher
a bobina, trocar o pé-calcador, etc.
• Desligue sempre a máquina de costura da tomada de
corrente para retirar a tampa, ao lubrificar, ou ao fazer
qualquer outro ajuste de serviço mencionado neste ma-
nual de instruções.
GUARDE ESTAS INSTRUÇÕES
ded by the manufacturer as contained in this manual.
• Never operate this appliance if it has a damaged cord
or plug, if it is not working properly, if it has been dro-
pped or damaged, or dropped into water. Return the
appliance to the nearest authorized dealer or service
center for examination, repair, electrical or mechanical
adjustment.
• Never operate the appliance with any air openings
blocked. Keep ventilation openings of the sewing ma-
chine and foot controller free from the accumulation
of lint, dust, and loose cloth.
• Never drop or insert any object into any opening.
• Do not use outdoors.
• Do not operate where aerosol (spray) products are be-
ing used or where oxygen is being administered.
• To disconnect, turn all controls to the off (“0”) position,
then remove plug from outlet.
• Do not unplug by pulling on cord. To unplug, grasp the
plug, not the cord.
• Keep fingers away from all moving parts. Special care
is required around the sewing machine needle.
• Always use the proper needle plate. The wrong plate
can cause the needle to break.
• Do not use bent needles.
• Do not pull or push fabric while stitching. It may de-
flect the needle causing it to break.
• Unplug the sewing machine when making any ad-
justments in the needle area, such as threading nee-
dle, changing needle, threading bobbin, or changing
presser foot, etc.
• Always unplug sewing machine from the electrical
outlet when removing covers, lubricating, or when
making any other user servicing adjustments mentio-
ned in the instruction manual.
SAVE THESE INSTRUCTIONS

MANUAL DE INSTRUCCIONES • INSTRUCTION MANUAL • MANUAL DE INSTRUÇÕES
6
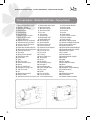
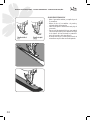
Guía del devanado de la canilla
Guía-hilos superior
Palanca tensora del hilo
Tensión del hilo
Cubierta frontal
Cortador de hilo
Soporte y caja de accesorios
Devanador de la canilla
Tope del devanador
Indicador del ancho de puntada
Indicador del largo de puntada
Selector de diseño de puntada
Palanca de retroceso
Enhebrador automático (Opción)
Palanca liberadora del prensatelas
Tornillo del prensatelas
Prensatelas
Dientes del transportador
Tornillo sujeta aguja
Guía del hilo
Aguja
Placa de la aguja
Portacarrete telescópico
Volante
Placa de identificación
Interruptor de energía y luz
Toma del enchufe
Asa
Palanca alza prensatelas
Pedal de Control
Indicador de puntada seleccionada
Bobbin winder thread guide
Upper thread guide
Thread take-up lever
Thread tension dial
Face cover
Thread cutter
extension table
Bobbin winder shaft
Bobbin winder stop
Stitch width dial
Stitch length dial
Pattern selector dial
Reverse stitch lever
Automatic theader (Option)
Foot release lever
Presser foot screw
Presser foot
Feed dogs
Needle clamp screw
Thread guide
Needle
Needle plate
Retractable spool pin
Hand wheel
Identification plate
Power and light switch
Plug socket
Handle
Presser foot lifter
Foot speed control
Selected stitch indicator
Guia do enchedor da bobina
Guia-fios superior
Alavanca estica-fio
Tensão do fio
Cabeçote
Cortador de linha
Suporte e caixa de acessórios
Enchedor da bobina
Topo do enchedor
Indicador da largura do ponto
Indicador do comprimento do ponto
Selector de modelo do ponto
Alavanca de retrocesso
Enfiador de linha automático (Opção)
Alavanca libertadora do pé-calcador
Parafuso do pé-calcador
Pé-calcador
Dentes impelentes
Parafuso prendedor da agulha
Guia do fio
Agulha
Placa da agulha
Porta-carrinhos telescópico
Volante
Placa de identificação
Interruptor de energia e iluminação
Tomada da corrente
Pega
Alavanca do pé-calcador
Pedal de Controlo
Indicador de ponto selecionado
1.
2.
3.
4.
5.
6.
7.
8.
9.
10.
11.
12.
13.
14.
15.
16.
17.
18.
19.
20.
21.
22.
23.
24.
25.
26.
27.
28.
29.
30.
31.
1.
2.
3.
4.
5.
6.
7.
8.
9.
10.
11.
12.
13.
14.
15.
16.
17.
18.
19.
20.
21.
22.
23.
24.
25.
26.
27.
28.
29.
30.
31.
1.
2.
3.
4.
5.
6.
7.
8.
9.
10.
11.
12.
13.
14.
15.
16.
17.
18.
19.
20.
21.
22.
23.
24.
25.
26.
27.
28.
29.
30.
31.
6
Piezas principales · Machine identification · Peças principais

7
MANUAL DE INSTRUCCIONES • INSTRUCTION MANUAL • MANUAL DE INSTRUÇÕES
7
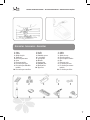
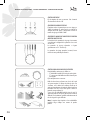
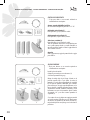
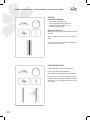
Agujas
Canillas
Abridor de ojales
Tornillo en L
Discos del portacarrete
Aceite
Placa para zurcidos
Prensatelas para ojales
Prensatelas para dobladillos
invisibles
Prensatelas para cremalleras
1.
2.
3.
4.
5.
6.
7.
8.
9.
10.
Needles
Bobbins
Buttonhole opener
L-screw driver
Spool pin disc
Oil bottle
Darning plate
Buttonhole foot
Blind hem foot
Zipper foot
1.
2.
3.
4.
5.
6.
7.
8.
9.
10.
Agulhas
Bobinas
Abridor de casas
Chave de parafusos
Discos do porta-carrinhos
Óleo
Placa para cerzir
Pé-calcador para casas
Pé-calcador para costuras
invisíveis
Pé-calcador para fechos
1.
2.
3.
4.
5.
6.
7.
8.
9.
10.
Accesorios · Accessories · Acessórios
A página está carregando ...

9
MANUAL DE INSTRUCCIONES • INSTRUCTION MANUAL • MANUAL DE INSTRUÇÕES
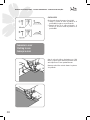
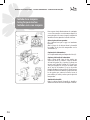
Be sure to wipe off any surplus oil from needle plate
area before using your machine the first time.
FOOT CONTROL
Push foot control plug into the connector socket on the
back of the machine.
POWER/LIGHT SWITCH
Your machine will not operate until the power/light
switch is turned on. The same switch controls both the
power and the light.
When servicing the machine or changing needles or
lamps, etc, machine must be disconnected from the
mains supply.
SPOOL PINS
Pull up the spool pin and place a felt disc over it. Place a
spool of thread on the spool pin.
PRESSER FOOT LEVER
There are three positions for your presser foot.
1. Lower the presser foot to sew.
2. Raise the lifter to the middle position to insert or
remove fabric.
3. Lift it to its highest position to change the presser
foot or to remove thick fabric.
Certifique-se de que não existe qualquer excedente de
óleo na placa da agulha antes de usar a sua máquina
pela primeira vez.
PEDAL DE CONTROLO
Coloque a ficha do pedal de controlo na tomada
localizada na parte posterior da máquina
INTERRUPTOR DE ENERGIA /LUZ
A sua máquina não funcionará enquanto o interruptor
de energia/iluminação não estiver aceso. O mesmo
interruptor controla as duas funções.
Quando se está a fazer a manutenção ou a mudar
alguma peça, a máquina deve de estar desligada da
tomada da corrente.
PORTA-CARRINHOS
Levante o porta-carrinhos e coloque um disco sobre ele.
Coloque um carro de linhas.
ALAVANCA DO PÉ-CALCADOR
Existem três posições para o seu pé-calcador.
1. Baixo para coser
2. Colocado a meia altura para inserir ou retirar o
tecido.
3. Na sua posição mais alta para trocar o pé-calcador
ou para retirar tecidos grossos.
9

MANUAL DE INSTRUCCIONES • INSTRUCTION MANUAL • MANUAL DE INSTRUÇÕES
10
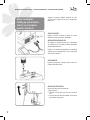
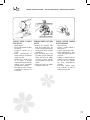
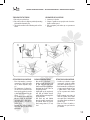
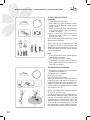
DEVANADO DE LA CANILLA
1. Pase el hilo desde el carrete a
través del guía-hilos, tal y como
se muestra.
2. Inserte el hilo a través de uno de
los orificios de la canilla desde
dentro hacia fuera.
3. Corte el hilo
4. Empuje la canilla hacía la
izquierda y retírela.
5. Empuje el eje del tensor a la
derecha hasta que sienta un
clic.
6. Sostenga la punta del hilo
7. Pise el pedal de control. El hilo
sostenido se cortará. La canilla
se detendrá cuando esté llena.
WINDING BOBBIN
1. Pass thread from spool through
thread guides as shown..
2. Pull end of thread through
hole in bobbin as shown. Place
bobbin onto shaft with end
of thread coming from top of
bobbin.
3. Push bobbin winder shaft to
right until it clicks.
4. Hold onto end of thread.
5. Step on foot control pedal. The
thread that is held will snap.
Bobbin will cease turning when
completely filled.
6. Cut thread.
7. Push bobbin to left and
remove.
ENCHIMENTO DA BOBINA
1. Passe a linha desde o carrinho
através do guia-fios, tal como se
mostra.
2. Insira a linha através de um dos
orificios da bobina de dentro
para fora.
3. Empurre o eixo do tensor para a
direita até sentir um clic.
4. Segure a ponta da linha
5. Pise no pedal de controlo. A
linha qure está segura cortar-
se-á. A bobina parará quando
estiver cheia.
6. Corte a linha
7. Empurre a bobina para a
esquerda e retire
10

11
MANUAL DE INSTRUCCIONES • INSTRUCTION MANUAL • MANUAL DE INSTRUÇÕES
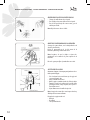
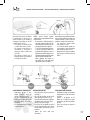
COLOCAR Y QUITAR LA CANILLA
DE LA CÁPSULA.
• Abra la cubierta.
• Eleve la aguja girando el volante
hacia usted.
• Sostenga la cápsula por el
pestillo.
• Inserte completamente la
cápsula dentro de la lanzadera
y suelte el pestillo.
• Verifique que el rabillo encaje
en la ranura y presione
suavemente hasta que un sonido
confirme que ha enganchado
adecuadamente en su tope.
• Para quitar la canilla, sostenga
el pestillo de la cápsula y tire
hacia afuera.
REMOVING BOBBIN CASE FROM
SHUTTLE
1. Remove the extension table
from the machine. Raise the
needle to its highest position by
turning hand wheel manually
towards you.
2. Open the bobbin access cover
by pulling it down. With your
fingers, pull open the bobbin
case latch as shown, and take
out the bobbin case from the
shuttle.
3. Release the latch, and bobbin
will drop out of the case.
COLOCAR E RETIRAR A BOBINA
DA CAIXA DA BOBINA
• Abra a cobertura.
• Levante a agulha rodando o
volante para si.
• Segure a caixa pelo prendedor
• Insira completamente a caixa
dentro da lançadeira e liberte o
prendedor.
• Verifique se a patilha encaixa na
ranhura e pressione suavemente
até que um som confirme
que ficou adequadamente
engatado.
• Para retirar a bobina, segure
pelo prendedor da caixa da
bobina e puxe para fora.
11
A página está carregando ...

13
MANUAL DE INSTRUCCIONES • INSTRUCTION MANUAL • MANUAL DE INSTRUÇÕES
13
INSERTING BOBBIN INTO BOBBIN CASE
• Hold the bobbin in your right hand with the thread
running clockwise.
• Insert the bobbin into the case with about 10 cm of
thread showing outside the case.
• Pull the thread through the slit in the case and then
underneath the flat tension spring. It will click when
it is in place
ENFIAMENTO DA CAIXA DA BOBINA
• Coloque a bobina dentro da sua caixa.
• Passe a linha pela ranhura do rebordo da caixa da
bobina.
• Passe a linha por baixo do tensor e pelo orifício para
a linha.
Nota: Deixe de fora uns 10 cm. de linha.
INSERTING BOBBIN CASE INTO SHUTTLE
Hold the latch open, with locating pin straight up.
Slide the bobbin case onto the center spindle of the
shuttle, keeping the thread toward you.
NOTE: Be sure the locating pin fits into the locating
groove at the top of the shuttle.
Release the latch to lock the bobbin case in place.
INSERIR A CAIXA DA BOBINA NA LANÇADEIRA
Segure a caixa aberta, com a patilha localizada para a
direita e para cima
Faça deslizar a caixa da bobina no eixo do centro da
lançadeira e mantenha a linha virada para si.
NOTA: Certifique-se de que a patilha se ajusta
adequadamente à ranhura da parte superior da
lançadeira.
Liberte o prendedor para fixar a caixa da bobina no
local a ela destinado.
CHANGING THE NEEDLE
1. Raise the needle bar to its highest position by
turning the hand wheel toward you.
2. Loosen the needle clamp screw by turning it toward
you.
3. Remove the needle by pulling it downward.
4. Insert the new needle into the needle clamp with
the flat side away from you.
5. Push the needle up as far as it can go.
6. Tighten the needle clamp screw firmly with the
screw driver.
SUBSTITUIÇÃO DA AGULHA
Importante: Apague o interruptor principal antes de co-
locar ou retirar a agulha.
• Rode o volante para si até que a agulha esteja na sua
posição mais elevada.
• Liberte levemente o parafuso na sua direcção.
• Retire a agulha a substituir puxando-a para baixo.
• Empurre a agulha para cima o mais possível até que
chegue a tocar a sua parte superior, com a parte re-
donda que se encontra virada para si.
• Ajuste firmemente o parafuso que a segura.
Nota: A agulha deve estar sempre direita e afiada para
se obter uma costura uniforme.
Substitua a agulha quando estiver:
• Dobrada
• Romba
• Com a ponta danificada

MANUAL DE INSTRUCCIONES • INSTRUCTION MANUAL • MANUAL DE INSTRUÇÕES
1414
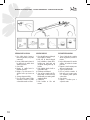
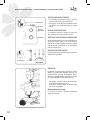
ENHEBRADO DEL HILO SUPERIOR
1. Levante el prensatelas.
2. Coloque la aguja a su más alta posición girando el
volante hacia usted.
3. Enhebre la máquina en el orden que se muestra en
el dibujo.
ENHEBRADOR AUTOMÁTICO DE
LA AGUJA
• Eleve la aguja a su posición más
alta.
• Pase el hilo alrededor de la guía
del hilo.
• Presione la palanca al máximo
hacia abajo.
• El enhebrador baja automáti-
camente a la posición de enhe-
brado.
• Pase el hilo enfrente de la aguja
alrededor del garfio.
• Libere la palanca.
• Tire del hilo a través del ojo de
la aguja.
USING AUTOMATIC NEEDLE
THREADER
Raise the needle to its highest
position by rotating the hand wheel
towards you.
• Pull down lever and hook thread to
thread guide as illustrated.
• Pull down lever holding downright.
• Guide thread into hooked end and
pull it upward.
• Pull thread lightly and releasethe
lever, needle will be threaded
automatically.
• Pull thread away from needle,back
to machine.
NOTE: For smooth threading it is
recommended to set the machine at
straight stitching (center position)
when using needle threader.
ENFIADOR AUTOMÁTICO DA
AGULHA
• Levante a agulha para a sua
posição mais elevada.
• Passe a linha à volta da guia do
fio.
• Pressione a alavanca ao máximo
para baixo.
• O enfiador baixa automaticamente
para a posição de enfiado.
• Passe a linha pela frente da
agulha à roda do gancho.
• Liberte a alavanca.
• Puxe pela linha através do
buraco da agulha.

15
MANUAL DE INSTRUCCIONES • INSTRUCTION MANUAL • MANUAL DE INSTRUÇÕES
15
THREADING THE TOP THREAD
1. Raise the presser foot lever.
2. Raise the needle to its highest position by rotating
the hand wheel towards you.
3. Thread the machine in the following order as illus-
trated.
ENCHIMENTO DO FIO SUPERIOR
1. Levante o pé-calcador.
2. Coloque a agulha na sua posição mais elevada ro-
dando o volante para si.
3. Enfie a máquina pela ordem que se apresenta no
desenho.
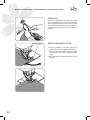
EXTRACCIÓN DEL HILO INFERIOR
• Eleve el prensatelas y sostenga
suavemente el hilo de la aguja
con su mano izquierda. (Fig.1
y 2)
• Gire lentamente el volante ha-
cia usted con su mano derecha
hasta que la aguja baje y vuelva
a subir hasta su punto más alto.
(Fig.2)
• Tire levemente hacia arriba del
hilo de la aguja, de esta forma
conseguirá que el hilo inferior
salga al exterior en forma de
lazada. (Fig.3)
• Extienda unos 15cm de ambos
hilos hacia atrás por debajo del
prensatelas.
PICKING UP BOBBIN THREAD
• Raise the presser foot lever.
• Holding needle thread loosely
by your left hand, turn hand
wheel towards you by your right
hand until the needle comes to
its highest position.
• Lightly pull up the top thread,
and pick up bobbin thread,
which will appear through the
needle plate slot.
• Pull both top and bobbin
threads together towards back
of machine under the presser
foot, leaving about 6” (15 cm)
clear.
EXTRACÇÃO DA LINHA INFERIOR
• Levante o pé-calcador e segure
suavemente a linha da agulha
com a mão esquerda. (Fig.1 e 2)
• Rode lentamente o volante para
si com a sua mão direita até que
a agulha baixe e volte a subir
até ao seu ponto mais elevado.
(Fig.2)
• Puxe levemente para cima da
linha da agulha; desta forma
conseguirá que a linha inferior
saia para o exterior em forma de
laçada. (Fig.3)
• Puxe uns 15cms de ambas as
linhas para trás por baixo do
pé-calcador.

MANUAL DE INSTRUCCIONES • INSTRUCTION MANUAL • MANUAL DE INSTRUÇÕES
16
AJUSTAR LA TENSION DEL HILO
PUNTADA RECTA
La buena apariencia de su puntada
está en gran parte determinada por
el balance de la tensión tanto del
hilo superior como el de la canilla.
La tensión está bien regulada
cuando ambos hilos “cierran” en la
mitad de las capas de la tela, que
usted está cosiendo. Si cuando usted
comienza a coser, se encuentra que
la puntada es irregular, necesitará
ajustar el control de la tensión.
Haga los ajustes con el prensatelas
bajado.
ADJUSTING TOP THREAD TENSION
STRAIGHT STITCHING
The good looking appearance of
your stitching is largely determined
by the balanced tension of both top
and bobbin threads. The tension
is well balanced when these two
threads ‘lock’ in the middle of layers
of fabric you are sewing.
If, when you start to sew, you find
that the stitching is irregular, you
will need to adjust the tension
control.
Make any adjustments with presser
foot ‘down’.
AJUSTAR A TENSÃO DA LINHA
PONTO A DIREITO
A boa aparência do ponto é, em
grande parte, determinada pelo
equilíbrio da tensão, tanto da linha
superior como da linha da bobina. A
tensão está bem regulada quando
as duas linhas “fecham” na metade
da espessura do tecido que estiver
a coser. Se, quando começar a coser,
verificar que o ponto é irregular,
necessitará de ajustar o controlo
da tensão. Faça os ajustes com o pé-
calcador baixo.
PUNTADA EN ZIG ZAG
El hilo superior puede aparecer en
la parte inferior, dependiendo del
hilo, de la tela, del tipo de puntada
y de la velocidad de costura, pero
el hilo de la canilla nunca debe
aparecer en la parte superior de la
tela.
ZIGZAG STITCHING
The top thread may appear on the
bottom depending on the thread,
fabric, type of stitch and sewing
speed, but the bobbin thread must
never appear on the top of the
fabric.
PONTO EM ZIG-ZAG
A linha superior pode aparecer na
parte inferior, dependendo da linha,
do tecido, do tipo de ponto e da
velocidade da costura, mas a linha
da bobina nunca deve aparecer na
parte superior do tecido.
16

17
MANUAL DE INSTRUCCIONES • INSTRUCTION MANUAL • MANUAL DE INSTRUÇÕES
Para verificar la tensión del hilo de
la canilla quite la cápsula, con la
canilla colocada, de la máquina y
sosténgala suspendida por el hilo.
Sacúdala un par de veces.
• Si la tensión es correcta, el hilo
se saldrá entre unos 2 ó 5 cmts.
• Si la tensión es muy alta, no se
desenrollará. Si la tensión es
muy baja, el hilo se saldrá más
de 5 cmts.
• Para ajustar la tensión, gire el
tornillo pequeño del costado de
la cápsula de la canilla.
Bobbin thread tension requires
adjustment less frequently than the top
thread tension.
• If the tension is well balanced, but
the fabric puckers badly, both top
and bobbin thread tensions may be
too tight and have to be adjusted.
• To test if the bobbin thread tension
is correct, suspend the bobbin case
by the thread and jerk it once. Correct
bobbin tension will result too loose it
will unwind continuously. If too tight
the thread will not unwind at all.
• When adjusting the tension on
the bobbin case, make only slight
adjustments with a screwdriver.
Para verificar a tensão da linha da bobina
retire a caixa da bobina da máquina, com
a bobina colocada e segure-a, suspensa
pela linha. Sacuda-a duas ou três vezes.
• Se a tensão for a correcta, a linha
sairá entre uns 2 e 5 cms.
• Se a tensão for muito elevada, não
se desenrolará. Se a tensão for muito
baixa, a linha sairá mais de 5 cms.
• Para ajustar a tensão, rode o parafuso
pequeno que se encontra na caixa da
bobina.
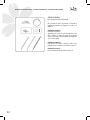
COLOCACIÓN DEL PRENSATELAS
• Importante: apague el inte-
rruptor principal antes de
colocar o quitar accesorios.
• Coloque el prensatelas de tal
forma que la clavija de la pata
esté justo debajo de la ranura
de la barra.
• Desciéndala hasta que se adapte
en el prénsatelas.
SNAP-ON PRESSER FEET
• Raise foot release lever to remove the
foot. (Fig.1)
• Place the desired foot on the needle
plate aligning needle holes. (Fig.1)
• Lower the presser foot lever so that the
foot holder snaps on the foot. (Fig.2)
• One-piece presser feet (Fig.3)
• Loosen presser foot thumb screw, and
remove foot holder. Place the desired
foot in position, and lower the presser
foot lever.
• Tighten the screw with large
screwdriver.
COLOCAÇÃO DO PÉ-CALCADOR
• Importante: desligue o interruptor
principal antes de colocar ou retirar
acessórios.
• Coloque o pé-calcador de tal
forma que a cavilha do pé fique
exactamente por baixo da ranhura
da barra.
• Faça-a descer até que se adapte no
pé-calcador
17
Fig.1 Fig.2 Fig.3
A página está carregando ...

19
MANUAL DE INSTRUCCIONES • INSTRUCTION MANUAL • MANUAL DE INSTRUÇÕES
SELECTOR E INDICADOR DO PONTO
1. Ao seleccionar um ponto, certifique-se de que a
agulha está colocada na sua posição mais elevada.
2. Depois, rode o selector até que o ponto desejado
esteja alinhado com o símbolo do ponto no painel
frontal.
ALAVANCA PONTO DE RETROCESSO
Recomenda-se começar e terminar a costura com vários
pontos em retrocesso para reforçar a costura.
CONTROLO DO COMPRIMENTO DO PONTO/PONTO
SUPER
O comprimento do ponto pode ser facilmente
seleccionado de acordo com a espessura e o tipo do
tecido. Os desenhos do ponto Super (elástico) podem
ser seleccionados rodando o mesmo botão assinalando
“S1” ou “S2” onde poderá realizar-se um bom ajuste
CONTROLO DA LARGURA DO PONTO
A largura do ponto desejado pode ser ajustado através
do botão correspondente.
STITCH SELECTOR AND INDICATOR
1. To select a stitch, be sure needle is out of fabric at its
highest position.
2. Then turn the selector until the required stitch is
aligned by the dot symbol on the front panel.
REVERSE STITCH LEVER
It is recommended to begin, or end seams with several
stitches in reverse for reinforcement. As long as you are
pressing down this lever while sewing, the machine
will continue to feed the fabric backwards.
STITCH LENGTH/SUPER STITCH CONTROL
Stitch length can be selected easily according to thickness
and type of fabric.
Super (stretch) stitch patterns can be selected by turning
the same dial to ‘S1’ or ‘S2’ mark where fine adjustment
can be made.
STITCH WIDTH CONTROL
The width of all the stitches produced on this machine
can be made narrower or wider by adjusting the stitch
width control.
BRAÇO LIVRE
A extensão proporciona uma superfície de costura
adicional e pode retirar-se facilmente para coser com
movimento livre.
A costura com movimento livre é utilizada para coser
peças tubulares e de difícil acesso como, por exemplo,
bainhas de calças ou mangas.
• Para a retirar segure o extremo da extensão e
desprenda-a da máquina de costura.
• Para voltar a colocá-la empurre a extensão até que
encaixe na máquina.
Armazenamento de acessórios
Os acessórios de costura guardam-se comodamente
dentro da extensão.
CONVERTING TO FREE-ARM SEWING
Your machine can be used either as a flat- bed, or as a
free- arm model.
• With the extension table in position, it provides
a large working surface as a standard flat- bed
model.
• By removing the extension table (just pull it off to
the right as shown), the machine converts into a
free- arm model.
19
A página está carregando ...

21
MANUAL DE INSTRUCCIONES • INSTRUCTION MANUAL • MANUAL DE INSTRUÇÕES
STRAIGHT STITCH
Turn the stitch selection dial so that the pointer is set at
pattern A (straight stitch).
1. Straight stitch at center needle position with stitch
width dial set at Min.
2. Straight stitch at right needle position
PONTO A DIREITO
Rode o botão selector de pontos para a posição A.
1. Coloque o selector de comprimento do ponto na
posição MIN. e a agulha na posição média.
2. Ponto a direito com a agulha posicionada à direita e
o selector de largura do ponto na posição MAX.
Before placing the material on the machine, see that
the ends of the threads have been drawn about 15 cm
to the rear of the machine. Hold on the threads during
the sewing of the first 3 or 4 stitches of the seam.
Fasten each seam by back tacking at the beginning and
end of the seam.
Antes de colocar o tecido na máquina passe a linha
inferior e superior pela metado do pé-calcador para
trás deixando uns 15 cms. aproximadamente.
Mantenha as duas linhas esticadas durante os primeiros
3 ou 4 pontos.
21
A página está carregando ...

23
MANUAL DE INSTRUCCIONES • INSTRUCTION MANUAL • MANUAL DE INSTRUÇÕES
23
REMOVING FABRIC
First turn the hand wheel towards you until the needle
is at its highest position, then raise the presser foot,
draw materials to the rear and cut off excess thread
with the thread cutter located on the bottom of face
cover or on the foot release lever as shown.
RETIRAR O TECIDO
Rode primeiro o volante para si até que a agulha esteja
na sua posição mais elevada; depois, levante o pé-
calcador, retire o material para trás e corte o excesso do
fio com o cortador de linha localizado na parte inferior
do cabeçote, ou na alavanca que liberta o pé, tal como
se mostra.
TURNING A SQUARE CORNER
1. To turn a square corner 5/8” (16 mm) from the fabric
edge, stop stitching with the needle tip piercing
the fabric, when reaching the cornering guide as
shown.
2. Raise the presser foot, turn fabric.
3. New stitching line will align with 5/8”(16 mm) seam
guide on side of needle plate. Lower the presser foot
and begin stitching in new direction.
MUDANÇA DA DIRECÇÃO DA COSTURA
1. Pare a máquina no ponto onde deseja mudar a
direcção com a agulha cravada no tecido.
2. Levante o pé calcador e rode o tecido para o colocar
na nova direcção usando a agulha como ponto de
rotação.
3. Baixe o pé-calcador e continue a coser na nova
direcção.
A página está carregando ...

25
MANUAL DE INSTRUCCIONES • INSTRUCTION MANUAL • MANUAL DE INSTRUÇÕES
25
COLOCAÇÃO DE FECHOS
• Retire o pé-calcador multiuso e substitua-o pelo do
de fechos.
• Alinhave o tecido do fecho à peça do tecido e
coloque-o por baixo do pé-calcador.
• Puxe as linhas superior e inferior para trás e baixe
o pé-calcador.
• Para coser o lado esquerdo do fecho, vá guiando
o bordo do pé-calcador para fechos ao longo dos
dentes do fecho fazendo os pontos através do tecido
e a fita do fecho.
• Dê a volta ao tecido e cosa o outro lado do fecho da
mesma forma que fez com o lado esquerdo.
INSERTING ZIPS AND PIPING
SETTING
Use zipper foot which allows you to sew to the right or
left of the zipper or close to the cord.
PIPING
To pipe soft furnishings, cover cord with a bias strip of
fabric and pin or tack it to the main piece of fabric.
Attach right side of zipper foot to foot holder so that
needle passes through the opening on the right side of
the foot.
INSERTING ZIPPERS
To sew down the right side, attach left side of zipper
foot to presser foot holder so that the needle passes
through the opening on the left side of the foot.
To sew down the left side, attach right side of foot to
foot holder.
A página está carregando ...

27
MANUAL DE INSTRUCCIONES • INSTRUCTION MANUAL • MANUAL DE INSTRUÇÕES
27
ZIGZAG STITCH
Set the machine as illustrated. Turn the pattern selector
dial to “B”
FUNCTION OF ZIGZAG DIAL
The maximum zigzag stitch width for zigzag stitching
is “MAX.”; however, the width can be reduced on any
patterns. The width increases as you move zigzag dial
from “MIN.” - “MAX.”
FUNCTION OF STITCH LENGTH DIAL WHILE
ZIGZAGGING
The density of zigzag stitches increase as the setting of
stitch length dial approaches “0”.
Neat zigzag stitches are usually achieved at “2.5” or
below (2).
Dense zigzag stitches (close together) are referred to as
a satin stitch.
PONTO EM ZIGZAG
Fixe a máquina, tal como se mostra. Rode o botão
seleccionador do ponto para “B”.
FUNÇÃO DO BOTÃO DE ZIG-ZAG
A largura máxima do ponto para coser em zig-zag é
“MAX”; no entanto, a largura pode ser reduzida em
qualquer ponto. A largura é aumentada se o botão de
zig-zag for mudado de “MIN” para “MAX”.
FUNÇÃO DO BOTÃO DE COMPRIMENTO DO PONTO
ENGUANTO FAZ ZIG-ZAG
A densidade dos pontos de zig-zag é aumentado à
medida que o comprimento do ponto se faz mais
próximo de “0”.
Os pontos de zig-zag adequados conseguem-se,
geralmente, em “2.5” ou menos (2).
Os pontos de zig-zag apertados (próximos) são os que
produzem os pontos festão.
BLIND HEM/ LINGERIE STITCH
For hems, curtains, trousers, skirts, etc.
• “E” Blind hem/ lingerie for firm fabrics.
• “F” Reverse blind hem/ lingerie for firm fabrics.
Set the machine as illustrated.
Fold the fabric as illustrated with the wrong side upper
most (1).
Place the fabric under the foot. Turn the hand wheel
forwards by hand until the needle swings fully to the
left. It should just pierce the fold of the fabric. If it does
not, adjust the stitch width accordingly (2).
If using the blind hem foot, adjust the guide (3) by
turning the knob (4) so that the guide just rests against
the fold. Sew slowly, guiding the fabric carefully along
the edge of the guide.
It takes practice to sew blind hems. Always make a
sewing test first.
Note: It takes practice to sew blind hems.
Always make a sewing test first.
PONTO INVISÍVEL
Para bainhas, cortinas, fatos, saias, etc.
• “E” bainhas invisíveis para tecido pesados
• “F” avesso para bainhas invisíveis para tecidos
pesados
Fixe a máquina como se mostra.
Dobre o tecido, tal como se ilustra, com o avesso do
tecido na parte superior (1). Coloque o tecido por baixo
do pé. Rode o volante para a frente com a mão, até que
a agulha oscile totalmente para a esquerda. Deverá
atravessar as dobras do tecido. Se tal não acontecer
ajuste a largura do ponto correspondente (2).
Se usar o pé-calcador de costura invisível, ajuste a
guia (3) rodando o regulador (4) de tal forma que a
guia descanse contra a parte dobrada do tecido. Cosa
lentamente, guiando cuidadosamente o tecido ao
longo da guia do rebordo.
Note: Requere-se alguma prática para coser bainhas
invisíveis. Faça sempre primeiro uma experiência.
A página está carregando ...

29
MANUAL DE INSTRUCCIONES • INSTRUCTION MANUAL • MANUAL DE INSTRUÇÕES
29
OVEREDGE STITCHES
* The overcastting foot is an optional accessory not
supplied with your machine.
Seams, neatening, visible hems.
Turn the stitch length dial to “S1” or “S2”.
Slant overedge (1)
For fine knits, jerseys, neck edges, ribbing.
Double overedge stitch (2)
For fine knits, handknits, seams.
Standard overlock (3)
For fine knits, jerseys, neck edges, ribbing.
All overedge stitches are suitable for sewing and
overcastting edges and visible seams in one operation.
When overcastting, the needle should just go over the
edge of the fabric.
Attention
Use new needles or ball point needles or stretch
needle!
PONTOS DUPLOS
* O pé para cobrir é um acessório adicional não
fornecido com a sua máquina.
Costura, arranjos, bainhas invisíveis
Rode o botão do comprimento do ponto para “S1” ou
para “S2”.
Inclinação sobre o rebordo (1)
Para tecidos finos, casacos de malha, decotes.
Ponto duplo sobre o rebordo (2)
Para tecidos finos, tecidos manufacturados, costuras.
Ponto padrão (3)
Para tecidos finos, casacos de malha, decotes.
Todos os pontos sobre rebordos são apropriados para
coser e sobre-coser rebordos e costuras invisíveis numa
só operação. Quando se cobrir a agulha deverá ir sobre
o rebordo do tecido.
Atenção
Utilize agulhas novas, agulhas de ponta de bola ou
agulhas para elásticos.
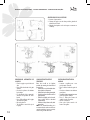
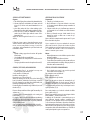
SEWING ON BUTTONS
* The button foot is an optional accessory not supplied
with your machine.
Install the darning plate. (1)
Change presser foot to button sewing foot (2) .
Select zigzag stitch.
Position the work under the foot. Place the button on
the marked position, lower the foot. Adjust stitch width
to “0” and sew a few securing stitches. Set the stitch
width to MID.-MAX. turn the handwheel to check that
the needle goes cleanly into the left and right holes of
the button (adjust the stitch width according to the
button), and slowly sew on the button with about 10
stitches. Adjust the stitch width to “0” and sew a few
securing stitches (3).
If a shank is required, place a darning needle on top of
the button and sew (4).
For buttons with 4 holes, sew through the front two
holes first (3), push the work forward and then sew
through the back two holes.
PREGAR BOTÕES
* O pé para botões é um acessório opcional não
fornecido com a sua máquina.
Instale a placa de cerzir.
Coloque o pé-calcador para pregar botões (2)
Seleccione o ponto de zig-zag
Coloque o trabalho por baixo pé. Coloque o botão na
posição marcada, baixe o pé. Ajuste a largura do ponto
para “0” e cosa alguns pontos de segurança. Fixe a
largura do ponto para MID-MAX, rode o volante para
verificar que a agulha entra facilmente nos orifícios
direito e esquerdo do botão (ajuste a largura do ponto
de acordo com o tamanho do botão) e pregue-o
lentamente com cerca de 10 pontos. Ajuste a largura do
ponto para “0” e faça uns quantos pontos de segurança
(3).
Se se requer de um eixo, coloque uma agulha para cerzir
na parte superior do botão e cosa (4). Para botões com
4 orifícios, cosa primero os dois orifícios da frente (3),
puxe o trabalho para si e, depois, cosa os dois orifícios
posteriores.
A página está carregando ...

31
MANUAL DE INSTRUCCIONES • INSTRUCTION MANUAL • MANUAL DE INSTRUÇÕES
31
SEWING 4-STEP BUTTONHOLES
Prepare
1. Take off the Zigzag foot and attach the buttonhole foot.
2. Measure diameter and thinkness of button and add
0.3cm (1/8”) for bar tacks; mark buttonhole size on
fabric.
3. place fabric under the foot, so that marking on the
buttonhole foot aligns with starting marking on fabric.
4. lower the foot, so that the buttonhole center line
marked on the fabric aligns with the center of the
buttonhole foot.
Adjust the stitch length dial in the 0.5-1 to set stitch
density.
Follow the 4-step sequence changing from one step to
another with the stitch pattern selector dial. Take care
not to sew too many stitches in stages 2 and 4. Use
seam ripper and cut buttonhole open from both ends
towards the middle.
Tips:
• Slightly reducing upper thread tension will produce
better results.
• Use a backing for fine or stretchy fabrics.
• It is advisable to use heavy thread or cord for stretch or
knit fabrics.
• The zig-zag should sew over the heavy thread or cord (5).
COSTURA DE CASAS EM 4 TEMPOS
Preparação
1. Coloque o pé-calcador para casas.
2. Meça o diâmetro e a espessura do botão e acrescente
0.3 cm. para a barra do alinhavo; marque o tamanho da
casa no tecido.
3. Coloque o tecido sob o pé, de tal forma que a marca no
pé-carregador da casa se alinhe com o início da marca
no tecido.
4. Baixe o pé fazendo com que a linha central da casa,
marcada no tecido se alinhe com o centro do pé-
calcador para casas.
Ajuste o botão de comprimento do ponto em 0.5-1 para
fixar a densidade do ponto.
Siga a sequência de 4 passos mudando de um para
outro com o botão de selecção do desenho do ponto.
Tenha cuidado para não fazer muitos pontos nos passos
2 e 4. Utilize um cortador e abra a casa cortando de
ambos os extremos para o centro.
Notas:
• Reduza ligeiramente a tensão da linha superior e obterá
melhores resultados.
• Use um apoio para tecidos finos ou elásticos.
• É aconselhável usar uma linha pesada, ou um cordão, em
tecidos manufacturados ou elásticos. O zig-zag deverá ser
feito sobre um fio ou um cordão. (5)
DARNING, STIPPLING, AND MONOGRAM
* The darning foot is an optional accessory not
included you’re your machine. (1)
Set the machine as illustrated.
Install the darning plate. (2)
Remove the presser foot clamp.(3)
Attach the darning foot to the presser foot holder. The
lever(a) should be behind the needle clamp screw (b).
Press the darning foot on firmly from behind with your
index finger and tighten the screw (c). (4)
For darning, first sew around the edge of the hole (to secure
the threads). (5)
First row: Always work from left to right. Turn work by 1/4
and oversew.
A darning hoop is recommended for easier sewing and
better results.
For stippling, stitch in any direction without repositioning
the quit. It is used to create texture and fill the background.
For monograms draw or trace your design onto your fabric
using a marking pencil.
Sew a straight or zigzag stitch following your design line.
Using the optional darning foot will help guide you as you
sew.
CERZIDO, PESPONTOS E MONOGRAMAS
* O pé-calcador para cerzir é um acessório opcional
não incluído na sua máquina. (1)
Fixe a máquina como está ilustrado.
Instale a placa de cerzir. (2)
Retire a abraçadera do pé-calcador
Ajuste o pé de cerzir ao sistema de sustentação do pé-
carregador. O dispositivo (a) deverá estar por detrás da
abraçadeira da agulha (b). Pressione firmemente, com o
seu dedo indicador, por detrás do pé-calcador para cerzir e
aperte o parafuso (c). (4)
Para cerzir; primeiro cosa à volta do rebordo do orifício
(para segurar os fios). (5)
Primeira regra: trabalhe sempre da esquerda para a direita.
Rode o trabalho _ de volta e volte a coser.
A utilização de um bastidor é recomendável para coser
mais facilmente obtendo melhores resultados. Para
pespontos, cosa em qualquer direcção sem fechar. Utiliza-
se este sistema para criar textura e preencher o fundo. Para
bordar monogramas ou traçar o desenho sobre o tecido use
um marcador. Cosa uns pontos em recta ou em zig-zag para
acompanhar a linha do bordado. Utilizar o pé-calcador de
cerzir opcional ajudará a guiar-se enquanto cose.
A página está carregando ...
A página está carregando ...
A página está carregando ...
A página está carregando ...
A página está carregando ...
A página está carregando ...
A página está carregando ...
A página está carregando ...
A página está carregando ...
-
 1
1
-
 2
2
-
 3
3
-
 4
4
-
 5
5
-
 6
6
-
 7
7
-
 8
8
-
 9
9
-
 10
10
-
 11
11
-
 12
12
-
 13
13
-
 14
14
-
 15
15
-
 16
16
-
 17
17
-
 18
18
-
 19
19
-
 20
20
-
 21
21
-
 22
22
-
 23
23
-
 24
24
-
 25
25
-
 26
26
-
 27
27
-
 28
28
-
 29
29
-
 30
30
-
 31
31
-
 32
32
-
 33
33
-
 34
34
-
 35
35
-
 36
36
-
 37
37
-
 38
38
-
 39
39
-
 40
40


JATA MC735N Manual do usuário
- Categoria
- Máquinas de costura
- Tipo
- Manual do usuário
em outros idiomas
- español: JATA MC735N Manual de usuario
- English: JATA MC735N User manual
Artigos relacionados
Outros documentos
-
Alfa Network 2622 Instruction book
-
-
Brother LS 2125 Manual do usuário
-
-
-
-
-
-
Medion sewing machine MD11836 Manual do proprietário
-
SINGER 3150 Manual do proprietário