
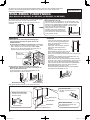
SJ-WS360T
SJ-WP360T
SJ-WS320T SJ-RP320T
SJ-WP320T SJ-RM320T
SJ-WS360T SJ-RP360T
SJ-WP360T SJ-RM360T
Device of this mark is a trademark of
Sharp Corporation.
Plasmacluster is a registered trademark
or a trademark of Sharp Corporation.
Un appareil de cette marque est une
marque déposée de Sharp Corporation.
Plasmacluster est une marque déposée
inscrite ou une marque déposée de
Sharp Corporation.
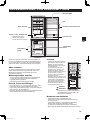
REFRIGERATOR-FREEZER
OPERATION MANUAL ...................4
FRIGORIFICO-CONGELADOR
MANUAL DE MANEJO. . . . . . . . . . . . . . . . . . . 15
FRIGORIFERO-FREEZER
MANUALE DI ISTRUZIONI. . . . . . . . . . . . . . . . 26
REFRIGERATEUR-CONGELATEUR
MODE D’EMPLOI ......................37
FRIGORÍFICO-CONGELADOR
FUNCIONAMENTO MANUAL .............48
ΨΥΓΕΙΟ - ΚΑΤΑΨΥΚΤΗΣ
ΕΓΧΕΙΡΙΔΙΟ ΛΕΙΤΟΥΡΓΙΑΣ . . . . . . . . . . . . . . . 59
KÜHLSCHRANK MIT TIEFKÜHLFACH
BEDIENUNGSANLEITUNG . . . . . . . . . . . . . . . 70
KOELKAST-VRIEZER
GEBRUIKSAANWIJZING. . . . . . . . . . . . . . . . . 81
CHŁODZIARKO - ZAMRAŻARKA
INSTRUKCJA OBSŁUGI ................. 92
HŰTŐSZEKRÉNY-FAGYASZTÓ
HASZNÁLATI UTASÍTÁS . . . . . . . . . . . . . . . . 103
FRIGIDER-CONGELATOR
MANUAL DE UTILIZARE ............... 114
CHLADNIČKA-MRAZÁK
NÁVOD K OBSLUZE ...................125
CHLADNIČKA-MRAZNIČKA
NÁVOD NA OBSLUHU .................136
ŠALDYTUVAS - ŠALDIKLIS
EKSPLOATAVIMO INSTRUKCIJA .. . . . . . . . 147
LEDUSSKAPIS – SALDĒTĀJKAMERA
ROKASGRĀMATA .....................158
KÜLMIK-SÜGAVKÜLMIK
KASUTUSJUHEND ....................169
HLADILNIK-ZAMRZOVALNIK
PRIROČNIK Z NAVODILI ZA DELOVANJE. . 180
ХОЛОДИЛЬНИК-МОРОЗИЛЬНИК
ІНСТРУКЦІЯ З ЕКСПЛУАТАЦІЇ . . . . . . . . . . . 191
ХЛАДИЛНИК – ФРИЗЕР
РЪКОВОДСТВО ЗА РАБОТА. . . . . . . . . . . . 202
ХАЛАДЗІЛЬНІК-ЛЯДОЎНЯ
ІНСТРУКЦЫЯ ПА ЭКСПЛУАТАЦЫІ. . . . . . . 213
BY
SJ-RP360T
SJ-RM360T
(B144)-West.indb 1 2011/01/31 15:11:13

2
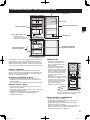
CONTENTS
DUAL SWING DOOR• ............................................... 4
WARNING• ................................................................ 5
CAUTION• ................................................................. 5
INSTALLATION• ........................................................ 6
DESCRIPTION• ......................................................... 7
OPERATION• ............................................................ 8
STORING FOOD• .................................................... 13
CARE AND CLEANING• .......................................... 14
BEFORE YOU CALL FOR SERVICE• ..................... 14
ΠΕΡΙΕΧΟΜΕΝΑ
ΠΟΡΤΑ ΔΙΠΛΗΣ ΤΑΛΑΝΤΩΣΗΣ• ............................ 59
ΠΡΟΣΟΧΗ• .............................................................. 60
ΠΡΟΦΥΛΑΚΤΙΚΑ ΜΕΤΡΑ• ...................................... 60
ΕΓΚΑΤΑΣΤΑΣΗ• ...................................................... 61
ΠΕΡΙΓΡΑΦΗ• ........................................................... 62
ΛΕΙΤΟΥΡΓΙΑ• ........................................................... 63
ΔΙΑΤΗΡΗΣΗ ΤΡΟΦΙΜΩΝ• ....................................... 68
ΣΥΝΤΗΡΗΣΗ ΚΑΙ ΠΕΡΙΠΟΙΗΣΗ• ............................ 69
ΠΡΙΝ ΖΗΤΗΣΕΤΕ ΤΟ ΣΕΡΒΙΣ• ................................ 69
CONTENIDO
PUERTA DE APERTURA DUAL• ............................ 15
ADVERTENCIA• ...................................................... 16
PRECAUCION• ........................................................ 16
INSTALACION• ........................................................ 17
DESCRIPCION• ....................................................... 18
FUNCIONAMIENTO• ............................................... 19
PARA ALMACENAR LOS ALIMENTOS• ................ 24
CUIDADOS Y LIMPIEZA• ........................................ 25
ANTES DE LLAMAR AL SERVICIO TECNICO• ..... 25
INHALT
DUAL-SWING TÜRÖFFNUNG• .............................. 70
VORSICHT• ............................................................. 71
ACHTUNG• .............................................................. 71
AUFSTELLEN• ........................................................ 72
BESCHREIBUNG• ................................................... 73
BEDIENUNG• .......................................................... 74
AUFBEWAHRUNG VON LEBENSMITTELN• ......... 79
PFLEGE UND REINIGUNG• ................................... 80
BEVOR SIE DIE SHARP-SERVICESTELLE RUFEN•
... 80
SOMMARIO
PORTA A DOPPIA ANTA• ....................................... 26
AVVERTENZE• ........................................................ 27
ATTENZIONE• ......................................................... 27
INSTALLAZIONE• .................................................... 28
DESCRIZIONE• ....................................................... 29
COMANDI• ............................................................... 30
CONSERVAZIONE DEGLI ALIMENTI• ................... 35
MANUTENZIONE E PULIZIA• ................................. 36
PRIMA DI CHIAMARE IL SERVIZIO DI •
ASSISTENZA ......................................................... 36
INHOUDSOPGAVE
DUBBEL OPENSLAANDE DEUR• .......................... 81
WAARSCHUWING• ................................................. 82
LET OP• ................................................................... 82
INSTALLATIE• ......................................................... 83
BESCHRIJVING• ..................................................... 84
GEBRUIK• ............................................................... 85
OPBERGEN VAN VOEDSEL• ................................. 90
ONDERHOUD EN SCHOONMAKEN• .................... 91
ALVORENS VOOR REPARATIE TE BELLEN• ....... 91
TABLE DES MATIERES
PORTE AUTO-REVERSIBLE• ................................ 37
AVERTISSEMENT• ................................................. 38
ATTENTION• ........................................................... 38
INSTALLATION• ...................................................... 39
DESCRIPTION• ....................................................... 40
UTILISATION• ......................................................... 41
CONSERVATION DES ALIMENTS• ....................... 46
ENTRETIEN ET NETTOYAGE• .............................. 47
AVANT D’APPELER LE SERVICE APRES-VENTE•
.... 47
SPIS TREŚCI
DRZWI OTWIERANE NA DWIE STRONY• ............. 92
OSTRZEŻENIE• ...................................................... 93
ŚRODKI OSTROŻNOŚCI• .....
................................. 93
INSTALACJA• .......................................................... 94
OPIS CZĘŚCI• ......................................................... 95
OBSŁUGA• .............................................................. 96
PRZECHOWYWANIE ŻYWNOŚCI• ...................... 101
CZYSZCZENIE LODÓWKI• ................................... 102
ZANIM WEZWIESZ SERWIS• ............................... 102
ÍNDICE
PORTA DE ROTAÇÃO DUPLA• ............................. 48
AVISO• ..................................................................... 49
CUIDADO• ............................................................... 49
INSTALAÇÃO• ......................................................... 50
DESCRIÇÃO• .......................................................... 51
FUNCIONAMENTO• ................................................ 52
CONSERVAÇÃO DE ALIMENTOS• ........................ 57
CUIDADOS E LIMPEZA• ......................................... 58
ANTES DE CHAMAR PELO SERVIÇO DE •
ASSISTÊNCIA TÉCNICA ....................................... 58
TARTALOMJEGYZÉK
KÉTIRÁNYÚ AJTÓNYITÁS• .................................. 103
FIGYELMEZTETÉS• .............................................. 104
VIGYÁZAT• ............................................................ 104
ÜZEMBE HELYEZÉS• ........................................... 105
LEÍRÁS• ................................................................. 106
MŰKÖDTETÉS• ..................................................... 107
ÉLELMISZER-TÁROLÁS• ..................................... 112
ÁPOLÁS ÉS TISZTÍTÁS• ...................................... 113
MIELŐTT SZERVIZHEZ FORDULNA• .................. 113
(B144)-West.indb 1 2011/01/31 15:11:16

3
CUPRINS
UŞĂ CU DESCHIDERE DUBLĂ• .......................... 114
AVERTISMENTE• .................................................. 115
PRECAUŢII• .......................................................... 115
INSTALARE• .......................................................... 116
DESCRIERE• ......................................................... 117
FUNCŢIONAREA• ................................................. 118
PĂSTRAREA ALIMENTELOR• ............................. 123
ÎNGRIJIRE ŞI CURĂŢARE• ................................... 124
ÎNAINTE DE A CHEMA SERVICIUL DE DEPANARE•
... 124
SISUKORD
KAHEPOOLSELT AVATAV UKS• ......................... 169
ETTEVAATUST• .................................................... 170
TÄHELEPANU• ...................................................... 170
PAIGALDAMINE• ................................................... 171
KIRJELDUS• .......................................................... 172
TÖÖTAMINE• ........................................................ 173
TOIDUAINETE HOIDMINE• .................................. 178
HOOLDUS JA PUHASTAMINE• ............................ 179
ENNE MEHAANIKU KUTSUMIST• ....................... 179
OBSAH
DVEŘE S OBOUSTRANNÝM OTVÍRÁNÍM• ......... 125
BEZPEČNOSTNÍ POKYNY• .................................. 126
UPOZORNĚNÍ• ...................................................... 126
INSTALACE• .......................................................... 127
POPIS• ................................................................... 128
OBSLUHA• ............................................................ 129
ULOŽENÍ POTRAVIN• ........................................... 134
PÉČE A ČIŠTĚNÍ• ................................................. 135
NEŽ ZAVOLÁTE OPRAVÁŘE• .............................. 135
VSEBINA
VRATA Z ODPIRANJEM V OBE SMERI• ............. 180
OPOZORILO• ........................................................ 181
PREVIDNOST• ...................................................... 181
NAMESTITEV• ....................................................... 182
OPIS• ..................................................................... 183
DELOVANJE• ........................................................ 184
SHRANJEVANJE HRANE• .................................... 189
VZDRŽEVANJE IN ČIŠČENJE• ............................ 190
PREDEN POKLIČETE SERVISNO SLUŽBO• ...... 190
OBSAH
OBOJSTRANNE OTVÁRATEĽNÉ DVERE• .......... 136
UPOZORNENIE• ................................................... 137
POZOR• ................................................................. 137
INŠTALÁCIA• ......................................................... 138
POPIS• ................................................................... 139
PREVÁDZKA• ........................................................ 140
SKLADOVANIE POTRAVÍN• ................................. 145
STAROSTLIVOSŤ A ČISTENIE• ........................... 146
SKÔR NEŽ ZAVOLÁTE DO SERVISU• ................ 146
ЗМІСТ
ДВЕРЦЯТА ЩО ВІДЧИНЯЮТЬСЯ ВЛІВО/ВПРАВО•
... 191
ПОПЕРЕДЖЕННЯ• .............................................. 192
УВАГА• .................................................................. 192
ВСТАНОВЛЕННЯ• ................................................ 193
ОПИС• ................................................................... 194
ЕКСПЛУАТАЦІЯ• .................................................. 195
ЗБЕРІГАННЯ ПРОДУКТІВ• .................................. 200
ДОГЛЯД І ПРИБИРАННЯ• ................................... 201
ПЕРЕД ТИМ ЯК ЗАТЕЛЕФОНУВАТИ ДО •
СЕРВІСНОГО ЦЕНТРУ ...................................... 201
TURINYS
IŠ DVIEJŲ PUSIŲ ATIDAROMOS DURYS• .......... 147
ĮSPĖJIMAS• ........................................................... 148
ATSARGUMO PRIEMONĖS• ................................ 148
INSTALIAVIMAS• .................................................. 149
APRAŠYMAS• ....................................................... 150
APTARNAVIMAS• ................................................. 151
MAISTO LAIKYMAS• ............................................. 156
PRIEŽIŪRA IR VALYMAS• .................................... 157
PRIEŠ SKAMBINANT Į APTARNAVIMO SKYRIŲ•
.... 157
СЪДЪРЖАНИЕ
ДВУСТРАННО ОТВАРЯЩА СЕ ВРАТА• ............ 202
ПРЕДУПРЕЖДЕНИЕ• .......................................... 203
ВНИМАНИЕ•
......................................................... 203
МОНТАЖ• ............................................................. 204
ОПИСАНИЕ• ......................................................... 205
РАБОТА• ............................................................... 206
СЪХРАНЕНИЕ НА ХРАНИ• ................................. 211
ГРИЖИ И ПОЧИСТВАНЕ• ................................... 212
ПРЕДИ ДА ПОВИКАТЕ ТЕХНИК• ........................ 212
SATURS
DIVĒJĀDI ATVERAMAS DURVIS• ........................ 158
BRĪDINĀJUMS• ..................................................... 159
UZMANĪBU• ........................................................... 159
UZSTĀDĪŠANA• .................................................... 160
APRAKSTS• .......................................................... 161
DARBĪBA• .............................................................. 162
PĀRTIKAS UZGLABĀŠANA• ................................ 167
KOPŠANA UN TĪRĪŠANA• .................................... 168
PIRMS ZVANĪT APKALPES DIENESTAM• ............ 168
ЗМЕСТ
ДВУХБАКОВЫЯ ДЗВЕРЫ• .................................. 213
ПАПЯРЭДЖАННЕ• ............................................... 214
УВАГА• .................................................................. 214
УСТАНОЎКА• ........................................................ 215
АПІСАННЕ• ........................................................... 216
КІРАВАННЕ• ......................................................... 217
ЗАХОЎВАННЕ ПРАДУКТАЎ• ............................... 222
ДОГЛЯД І ЧЫСТКА• ............................................. 223
ПЕРШ, ЧЫМ ЗВЯРТАЦЦА Ў СЭРВІС• ................ 223
BY
(B144)-West.indb 2 2011/01/31 15:11:18
A página está carregando...
A página está carregando...

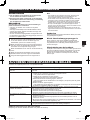
6
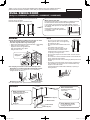
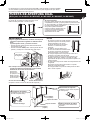
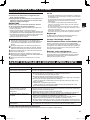
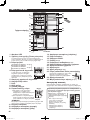
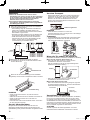
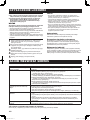
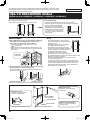
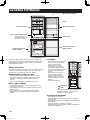
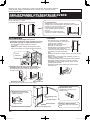
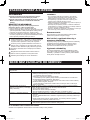
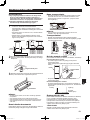
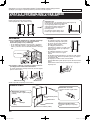
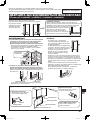
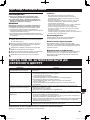
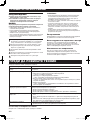
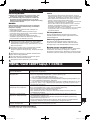
INSTALLATION
WARNING
Do not install the refrigerator in a damp or wet location ■
as this may cause damage to the insulation and a
leakage. Condensation may also build on the outer
cabinet and cause rust.
In order to prevent possible electric shock, connect ■
the receptacle of earth to the earth terminal properly.
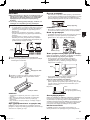
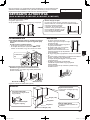
1
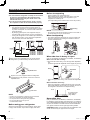
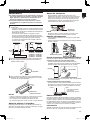
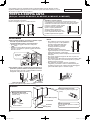
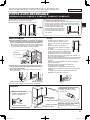
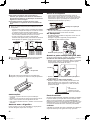
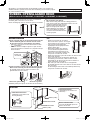
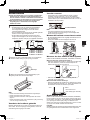
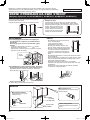
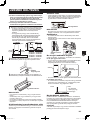
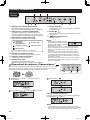
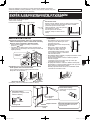
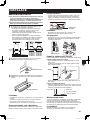
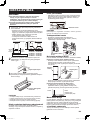
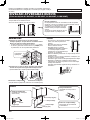
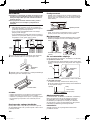
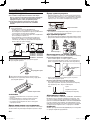
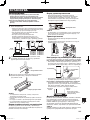
Keep adequate ventilation space around the refrigerator.
• The gure shows the minimum required space for
installing the refrigerator. The measurement condition
of power consumption is conducted under a different
space dimension.
• By keeping greater space, the refrigerator may be
operated under a less amount of power consumption.
• If using the refrigerator in the smaller space dimension
than the below gure, it may cause the temperature
rise in the unit, loud noise and failure.
2
Use the two front adjustable feet, to ensure that the
refrigerator is positioned rmly and at on the oor.
3
Clip the foot cover (supplied inside the refrigerator
compartment) in the position on the front of the two
adjustable feet.
90mm
or more
60mm
or more
60mm
or more
60mm
or more
1350mm
1300mm
1040mm
SJ-WS320T
SJ-WP320T
SJ-RP320T
SJ-RM320T
SJ-WS360T
SJ-WP360T
SJ-RP360T
SJ-RM360T
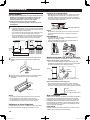
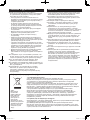
NOTE
Position your refrigerator so that the plug is accessible. •
Keep your refrigerator out of direct sunlight.•
Do not place next to heat generating appliance.•
Do not place directly on the ground. •
Provide suitable stand.
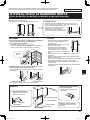
Before using your refrigerator
Clean the inside parts with a cloth soaked in warm water.
If soapy water is used, wipe
it off thoroughly with water.
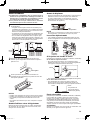
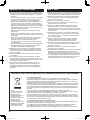
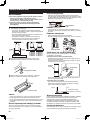
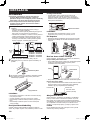
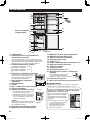
Before transporting
• Wipe up water in the evaporating pan.
Before wiping up the water, wait more than 1 hour after
pulling out the plug because the refrigeration cycle
equipment is extremely hot.
(The evaporating pan is located on the rear of the product.)
NOTE
Do not bend or damage the ductwork located on the inside of •
the evaporating pan. It may cause failure.
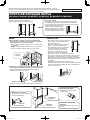
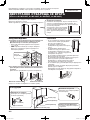
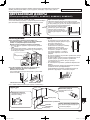
When transporting
• The casters allow the refrigerator to move back and forth.
• Carry the refrigerator by holding the handles located on
the rear and the bottom.
When the door is heavy to open
(Only for SJ-WS320T, SJ-WP320T, SJ-WS360T, SJ-WP360T)
When one side door is heavy
• When the left side is heavy, lower the right side adjustable
foot.
(Until the opposite side adjustable foot is slightly off-ground.)
• When the right side is heavy, lower the left side adjustable
foot.
When both sides are heavy
• When the refrigerator is tilted backwards, insert a wooden
board (with relatively large width), etc. between the rear of
the refrigerator and the oor to adjust the tilting.
Adjustable
foot
Heavy
Adjustable foot
Foot cover
Free standing type
Reversible door
(Only for SJ-RP320T, SJ-RM320T, SJ-RP360T, SJ-RM360T)
It is possible to change the door to left side opening. To modify the
door a REFRIGERATOR HINGE KIT (for left side opening) will be
required, SJ-LR320TD. For details of the kit and the modication
work, please contact the service agent approved by SHARP.
CAUTION
SHARP recommends that all modication work
will be carried out by the approved service agent.
Evaporating
Pan
Casters
(4pcs.)
A wooden board
(with relatively
large width)
Front Back
(B144)-West.indb 3 2011/01/31 15:11:21

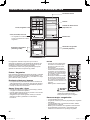
7
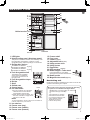
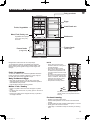
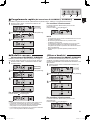
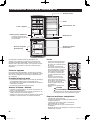
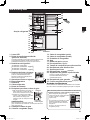
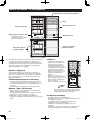
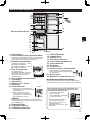
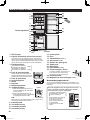
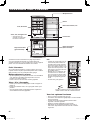
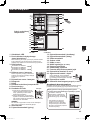
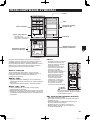
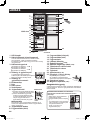
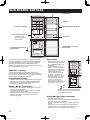
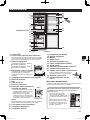
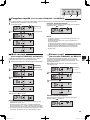
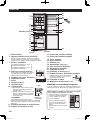
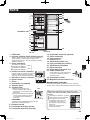
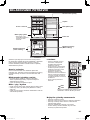
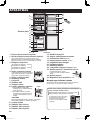
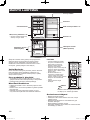
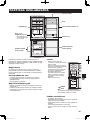
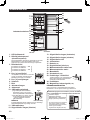
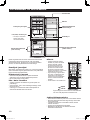
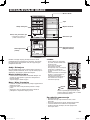
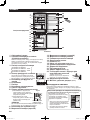
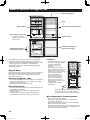
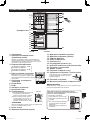
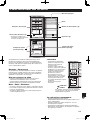
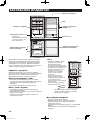
DESCRIPTION
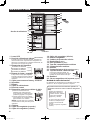
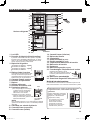
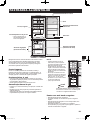
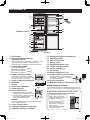
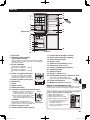
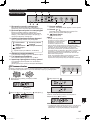
1. LED lights
2. Hybrid cooling panel (Aluminum panel)
The panel is cooled from the rear, thus indirectly cools
the refrigerator compartment. In this way, food is
refrigerated gently, without exposing it to cold air ow.
3. Refrigerator shelves
SJ-WS320T,SJ-RP320T
SJ-WP320T,SJ-RM320T
:
SJ-WS360T,SJ-RP360T
SJ-WP360T,SJ-RM360T
:
4. Fruit & vegetable shelf
The airow to the vegetable
crisper can be controlled by
moving the vent hole lever to
the right or left.
5. Fruit & vegetable crisper
6. Divider
7. Shelf
8. Chilled case
9. Control panel
10. Ice cube maker
1) Do not over ll the ice cube trays;
otherwise the ice cubes will be
joined together when frozen.
2) When the ice cubes are made, turn
the lever clockwise to empty the ice
into the ice cube box.
NOTE
To prevent damage to the ice cube box, do not make ice
in the ice cube box or pour oil into it.
11. Ice cube box
12. Freezer case (top)
13. Freezer case (middle)
14. Freezer case (bottom)
SJ-WS360T
1
2
3
4
5
6
7
8
9
10
11
12
13
15
14
16
17
18
25
20
21
22
23
24
25
19
Lever
Ice cube box
15. Freezer shelf
16. Foot cover
17. Casters
(4 pcs.)
18. Adjustable feet
(2 pcs.)
19. Utility pocket cover
20. Utility pocket
21. Egg holder
22. Door pockets
(2 pcs.)
23. Bottle stopper / Tube stand
Prevents bottles etc. from falling.
Stick-type food products stored inside.
24. Bottle pocket
25. Magnetic door seals
(2 pcs.)
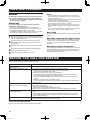
Deodorizing unit
Deodorizing catalyst is installed on the routes of cold air. No
operation and cleaning are required.
More foods can be stored by removing the following
accessories as indicated in the gure below.
Chilled case, Ice cube maker, Ice cube box,
Freezer case (top & middle)
• If the refrigerator is operated
with these accessories taken
out, it will work under the most
energy-efcient condition.
• Please do not remove
Freezer case (bottom).
Chilled section
2 pcs.
3 pcs.
(B144)-West.indb 4 2011/01/31 15:11:22

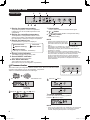
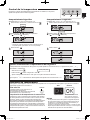
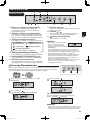
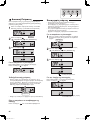
8
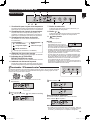
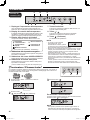
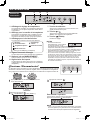
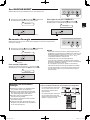
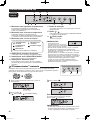
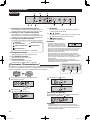
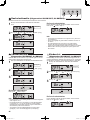
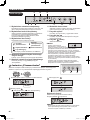
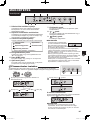
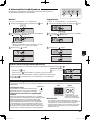
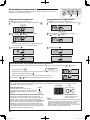
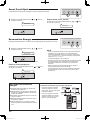
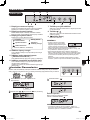
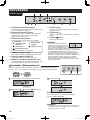
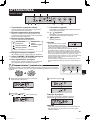
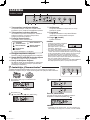
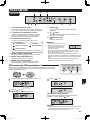
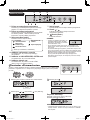
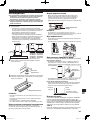
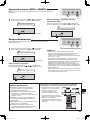
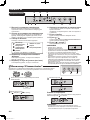
1. Display for temperature setting
The preset temperature of selected compartment
is displayed. It is not the actual temperature in the
compartment.
2. Display for controlling temperature
The temperature of refrigerator and freezer can be
selected. The indicator of the temperature will light when
the compartment is selected to change its temperature.
3. Display for feature icon
Icons of features in operation are displayed.
Plasmacluster Child lock*
Express Freezing* Power failure
Vacation mode*
(*: Except for SJ-RM320T, SJ-RM360T)
4. Energy saving indication
This indication shows energy saving "ON".
5. Sound ON/OFF indication
This indication shows sound "OFF".
6. Door alarm indication
This indication shows door alarm "ON".
(Door alarm is only for the refrigerator compartment.)
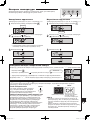
OPERATION
Control panel
7. Select button
Press to select feature icon and door alarm signal.
8. / button
Press to select feature ON/OFF or temperature setting.
9. (Enter) button
Finalize the setting.
NOTE
Features start automatically like right •
gure when inserting the power plug.
(The initial content is only Door alarm
"ON".)
When there is no operation for 1 minute, the display will •
automatically return to the initial content.
Additionally, the display will be turned off when there is no
operation for 1 minute.
When either of the button is pressed, the display will blink •
once and show the initial content. When the refrigerator stops
with power failure, the display shows similarly as before
having a power failure at the time of re-power distribution.
However,
when it has a power failure during operation of
Express Freezing, the operation is stopped at the time of re-
power distribution.
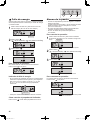
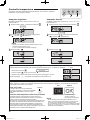
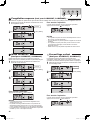
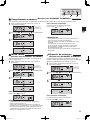
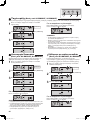
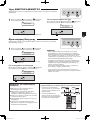
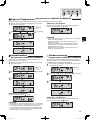
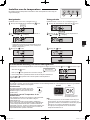
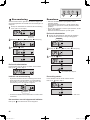
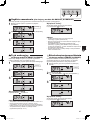
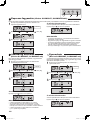
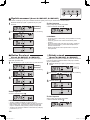
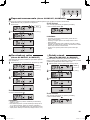
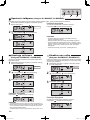
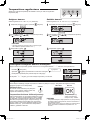
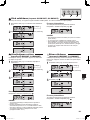
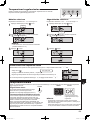
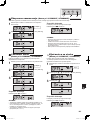
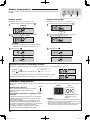
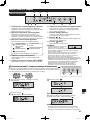
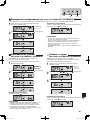
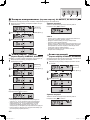
Plasmacluster
The ionizer inside your refrigerator releases clusters of ions, which are collective masses
of positive and negative ions, into the refrigerator compartment.
These ion clusters inactivate airborne mold fungus.
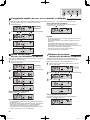
1
Press the Select button and select Plasmacluster icon.
2
Press the button. [ : ON, : OFF ]
3
Press the
button.
To cancel operation
It is the same method as starting operation.
Press the
button in step 2.
NOTE
There may be a slight odor in the refrigerator. This is the smell •
of ozone generated by the ionizer. The amount of ozone is
minimal, and quickly decomposes in the refrigerator.
mold
fungus
1 32
4 5 7 8 966
Flashing
2 3
1
(B144)-West.indb 5 2011/01/31 15:11:25

9
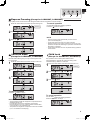
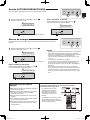
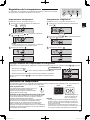
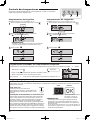
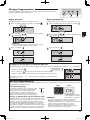
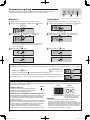
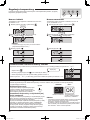
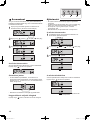
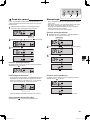
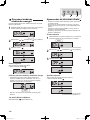
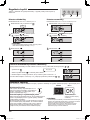
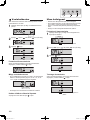
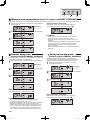
Express Freezing
(Except for SJ-RM320T, SJ-RM360T)
High-quality frozen foods can be made using this feature and is convenient for home-freezing.
1
Press the select button and select express freezing icon.
2
Press the button. [
: ON, : OFF ]
3
Press the button.
To cancel operation
It is the same
method as starting operation.
Press the
button in step 2.
NOTE
Express Freezing ends automatically in about 2 hours. •
(The icon will disappear.)
Large foods cannot be frozen in a single operation.•
Express Freezing may require more than 2 hours in the case •
operation overlaps with defrosting as operation is started after
defrosting is completed.
Avoid opening the door as much as possible during operation •
of this feature.
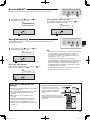
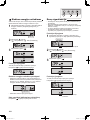
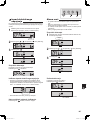
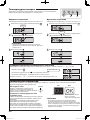
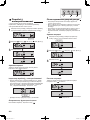
Vacation Mode
(Except for SJ-RM320T, SJ-RM360T)
Use this feature when going on a trip or leaving the house
for a long time.
1
Press the select button and select vacation mode icon.
2
Press the button. [
: ON, : OFF ]
3
Press the
button.
To cancel operation
Press the button in step 2.
NOTE
The temperature inside the refrigerator compartment will be •
adjusted to about 10°C.
Food storage period in the refrigerator compartment •
becomes approx.1/2-1/3 of normal operation. Please utilize
only when there is no perishable food.
Temperature of refrigerator compartment cannot be modied. •
("10°C" is indicated on the display.)
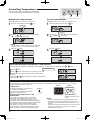
Child Lock
(Except for SJ-RM320T, SJ-RM360T)
Key operation of the control panel will be locked.
Use this feature to prevent the panel from being used
unintentionally by children or someone.
1
Press the select button and select the child lock icon.
2
Press the button. [
: ON, : OFF ]
3
Press the button.
To cancel operation
It is the same
method as starting operation.
Press the
button in step 2.
2 3
1
Flashing
Flashing
Flashing
(B144)-West.indb 6 2011/01/31 15:11:28

10
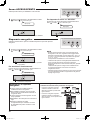
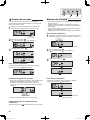
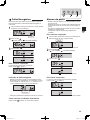
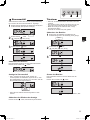
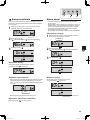
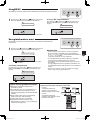
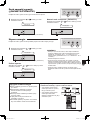
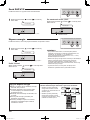
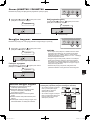
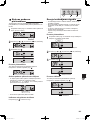
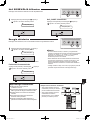
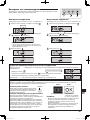
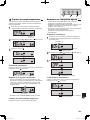
Controlling Temperature
The refrigerator controls its temperature automatically.
However, if needed, adjust the temperature as follows.
Refrigerator compartment
Adjustable between
0°C
and 6
°C
in steps of 1
°C
.
1
Press the select button and select icon.
2
Press the / button and set the temperature.
[
: increase, : decrease ]
NOTE
During vacation mode is operating, this compartment •
cannot be set. ( "10°C" is indicated on the display. )
3
Press the button.
Freezer compartment
Adjustable between -13
°
C and -21
°
C in steps of 1
°
C.
1
Press the select button and select icon.
2
Press the /
button and set the temperature.
[
: increase, : decrease ]
3
Press the
button.
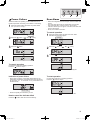
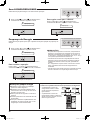
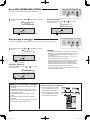
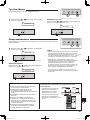
Indicator of Temperature
This refrigerator is provided with an indicator of temperature in the refrigerator compartment to allow you to control the
average temperature in the coldest zone.
Coldest zone
The symbol indicates the coldest zone in
the refrigerator compartment.
(The door pocket positioned at the same
height isn't the coldest zone.)
Checking the temperature in the
coldest zone
You can carry out regular checks to ensure the
temperature in the coldest zone is correct and,
if necessary, adjust the refrigerator temp. control.
To maintain a correct temperature inside the appliance,
check that the indicator of temperature is always BLUE.
If the indicator of temperature turns WHITE, the
temperature is too high; in this case, increase the
refrigerator temp. control setting and wait for 6 hours
before checking the indicator of temperature again.
NOTE
The internal temperature of the refrigerator depends on •
various factors such as the ambient temperature of the
room, the amount of food stored and the frequency of door
opening.
When fresh food has been introduced or the door has been •
left open for some time, it is normal for the indicator of
temperature to turn WHITE.
BLUE
WHITE
Correct setting Temperature too high,
adjust the refrigerator temp.
control.
Symbol
2 3
1
Flashing
Flashing
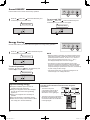
Advanced Setting of Refrigerator compartment
The temperature of refrigerator compartment can be adjusted in steps of 0.5
°C
by following steps 1 to 3 below.
1
Select icon.
2
Press button continuously for 3 seconds or more.
3
Adjust the temperature in the same way as steps 2 to 3
above.
Follow steps
1
to
2
again if you want to adjust the temperature
in steps of 1
°C.
Beep beep beep
(B144)-West.indb 7 2011/01/31 15:11:30
A página está carregando...
A página está carregando...
A página está carregando...
A página está carregando...
A página está carregando...
A página está carregando...
A página está carregando...

18
DESCRIPCION
Luces LED1.
Panel de enfriamiento híbrido2.
(Panel de aluminio)
El panel se enfría por la parte de atrás, enfriando así
de forma indirecta el compartimiento refrigerador. De
esta forma, los alimentos se congelan suavemente, sin
exponerlos a la corriente de aire frío.
Estanterías del frigoríco3.
SJ-WS320T,SJ-RP320T
SJ-WP320T,SJ-RM320T
:
SJ-WS360T,SJ-RP360T
SJ-WP360T,SJ-RM360T
:
Estante de frutas y vegetales4.
El ujo de aire al cajón para Vegetales
se puede controlar moviendo a derecha
o izquierda la palanca de la ranura de
ventilación.
Cajón para conservar frutas y verduras5.
Separador6.
Estante7.
Cajón de enfriamiento8.
Panel de control9.
Dispositivo para hacer cubitos de hielo10.
No llene excesivamente las 1)
bandejas para cubitos de hielo;
de lo contrario los cubitos de hielo
quedarían pegados al congelarse.
Cuando estén hechos los cubitos, 2)
gire la palanca en el sentido horario
para vaciarlos en la cubitera.
NOTA
No haga hielo con la cubitera
ni vierta aceite en ella pues ésta puede
agrietarse.
Cubitera11.
Cajón12.
del congelador (superior)
Cajón13.
del congelador (central)
SJ-WS360T
1
2
3
4
5
6
7
8
9
10
11
12
13
15
14
16
17
18
25
20
21
22
23
24
25
19
Palanca
Cubitera
Cajón14.
del congelador (inferior)
Estante congelador15.
Cubierta de protección inferior16.
Ruedecillas 17.
(4 pzas.)
Pies ajustables 18.
(2 pzas.)
Tapa del compartimiento multiuso19.
Compartimiento multiuso20.
Huevera21.
Compartimientos de la puerta 22.
(2 pzas.)
Tope de botellas / Base de tubo23.
Previene la caída de botellas, etc.
Los productos alimenticios tipo barra
también se pueden almacenar aquí.
Botellero24.
Cierres magnéticos de la puerta 25.
(2 pzas.)
Unidad de desodorizacion
El catalizador de desodorización es instalado en las rutas
del aire frío. No se requiere operación o limpieza.
Sección de enfriamiento
Se pueden almacenar más alimentos quitando los
siguientes accesorios como se indica en la gura de
abajo.
Cajón de enfriamiento,
dispositivo para hacer
cubitos de hielo, cubitera,
cajón del congelador
(superior y central)
Si opera el frigoríco sin estos •
accesorios, trabajará bajo la
condición más eciente de
energía.
No quite el cajón del congelador •
(inferior).
2 pzas.
3 pzas.
(B144)-West.indb 4 2011/01/31 15:11:39
A página está carregando...

20
Congelado rápido
(Excepto para SJ-RM320T, SJ-RM360T)
Se pueden congelar alimentos de alta calidad utilizando esta característica que es conveniente para congelar en casa.
1
Pulse el botón de selección y seleccione el icono de
congelado rápido.
2
Pulse el botón . [ : ON (ACTIVACIÓN), : OFF (DESACTIVACIÓN)]
3
Pulse el botón “ ”.
Para cancelar la operación
Es el mismo método cuando inicia el funcionamiento.
Pulse el botón
en el paso 2.
NOTAS
El congelado rápido termina automáticamente en unas 2 horas.•
(El icono desaparece).
Los alimentos grandes no se pueden congelar en una sola •
operación.
El congelado rápido puede que requiera más de 2 horas •
en el caso de que la operación se sobreponga con la
descongelación en cuanto comienza la operación después de
que se haya completado el descongelado.
Trate al máximo de no abrir la puerta durante el •
funcionamiento de esta característica.
Modo vacaciones
(Excepto para SJ-RM320T, SJ-RM360T)
Utilice esta característica cuando vaya de viaje o se vaya de
casa durante un largo tiempo.
1
Pulse el botón de selección y seleccione el icono de
modo de vacaciones.
2
Pulse el botón . [ : ON (ACTIVACIÓN), : OFF (DESACTIVACIÓN)]
3
Pulse el botón “ ”.
Para cancelar la operación
Pulse el botón en el paso 2.
NOTAS
La temperatura en el interior del compartimiento del frigoríco •
se ajustará a 10 °C.
El periodo de almacenamiento de los alimentos en el compartimiento •
del frigoríco es aproximadamente 1/2 - 1/3 del funcionamiento
normal. Utilice sólo cuando no haya alimentos perecederos.
La temperatura del compartimiento del frigoríco no se puede •
modicar. (Se indican “10 °C” en la pantalla).
Bloqueo para niños
(Excepto para SJ-RM320T, SJ-RM360T)
Se pueden bloquear las teclas de funcionamiento del
panel de control. Utilice esta función para evitar el uso no
intencionado de niños o de cualquier persona.
1
Pulse el botón de selección y seleccione el icono de
bloqueo para niños.
2
Pulse el botón . [ : ON (ACTIVACIÓN), : OFF (DESACTIVACIÓN)]
3
Pulse el botón “ ”.
Para cancelar la operación
Es el mismo método cuando inicia el funcionamiento.
Pulse el botón
en el paso 2.
2 3
1
Parpadeando
Parpadeando
Parpadeando
(B144)-West.indb 6 2011/01/31 15:11:44

21
Control de la temperatura
El frigoríco controla automáticamente la temperatura. No obstante, si es preciso,
ajuste la temperatura de la manera siguiente.
Compartimiento frigoríco
Ajustable entre 0°C y 6°C en intervalos de 1°C.
1
Pulse el botón de selección y seleccione el icono .
2
Pulse el botón / y ajuste la temperatura.
[
: aumentar, : disminuir ]
NOTA
Durante el modo de vacaciones, este compartimiento no •
se puede ajustar. (Se indican “10 ºC” en la pantalla).
3
Pulse el botón “ ”.
Compartimiento congelador
Ajustable entre -13°C y -21°C en intervalos de 1°C.
1
Pulse el botón de selección y seleccione el icono .
2
Pulse el botón / y ajuste la temperatura.
[
: aumentar, : disminuir ]
3
Pulse el botón “ ”.
Indicador de temperatura
Este frigoríco está equipado con un indicador de temperatura en el compartimiento del frigoríco que permite controlar la
temperatura media en la zona más fría.
Zona más fría
El símbolo indica la zona más fría en el
compartimiento del frigoríco.
(El compartimiento de la puerta colocada a la
misma altura no es la zona más fría).
Comprobación de la temperatura en la zona más fría
Puede llevar a cabo comprobaciones regulares para asegurar
que la temperatura en la zona más fría es la correcta, en caso
necesario, ajuste el control de temperatura del frigoríco.
Para mantener la temperatura correcta dentro del electrodoméstico,
compruebe que el indicador de temperatura esté siempre AZUL.
Si el indicador de temperatura se vuelve BLANCO, la temperatura
es demasiado alta; en este caso, aumente el ajuste del control de
la temperatura del frigoríco y espere 6 horas antes de controlar el
indicador de temperatura de nuevo.
NOTAS
La temperatura interna del frigoríco-congelador depende •
de varios factores tales como la temperatura ambiente de
la habitación, la cantidad de alimentos almacenados y la
frecuencia con la que se abre la puerta.
Cuando se introduzcan alimentos frescos o cuando se haya •
dejado la puerta abierta durante un tiempo, es normal que el
indicador de temperatura se vuelva BLANCO.
AZUL
BLANCO
Ajuste correcto Temperatura demasiado
alta, ajuste el control de
temperatura del frigoríco.
Símbolo
2 3
1
Parpadeando
Parpadeando
Seleccione el icono
1
.
Pulse el botón
2
durante 3 segundos o más.
Ajuste la temperatura del mismo modo que en los pasos
3
2 a 3 antes descritos.
Siga los pasos
1
a
2
nuevamente si desea ajustar la temperatura en incrementos de 1 °C.
Ajustes avanzados del compartimiento del frigoríco
La temperatura del compartimiento del frigoríco se puede ajustar en incrementos de 0,5 °C siguiendo los pasos
1
a
3
presentados a continuación.
Pitido pitido pitido
(B144)-West.indb 7 2011/01/31 15:11:46

22
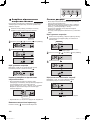
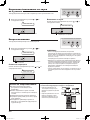
Alarma de la puerta
Cuando se deje abierta la puerta del frigorífico, sonará la •
alarma de la puerta.
La alarma de la puerta sonará 1 minuto después de haber •
abierto la puerta y de nuevo después de 1 minuto
(una vez en cada caso).
Si se deja la puerta abierta durante aproximadamente •
3 minutos, la alarma sonará continuamente.
Al inicio, la alarma de la puerta está ajustada en •
“ACTIVADA”.
Para cancelar la operación
1
Pulse el botón de selección y seleccione el indicador
de alarma de la puerta como se muestra en la gura de
abajo.
2
Pulse el botón .
[
: ON (ACTIVACIÓN), : OFF (DESACTIVACIÓN)]
3
Pulse el botón “ ”.
Para comenzar la operación
Es el mismo método cuando cancela el funcionamiento.
Pulse el botón
en el paso 2.
Fallo de energía
Cuando esta función esté en operación, indicará el aumento
de la temperatura interna ocasionado por un fallo de energía
o problema similar.
1
Pulse el botón de selección y seleccione el icono de
fallo de energía. (El icono es de color naranja.)
2
Pulse el botón .
[
: ON (ACTIVACIÓN), : OFF (DESACTIVACIÓN)]
3
Pulse el botón “ ”.
Para cancelar la operación
Es el mismo método cuando inicia el funcionamiento.
Pulse el botón
en el paso 2.
Indicador de fallo de energía
En el momento de redistribuir la energía, si la temperatura •
interna del compartimiento del frigoríco y del congelador
llega a ser como se muestra, R: más de 7 °C, F: más
de -10 °C, el icono de fallo de energía parpadeará
lentamente.
Verique la calidad de los alimentos antes de comerlos.•
Cómo cancelar el parpadeo del indicador
Pulse el botón cuando estén parpadeando los iconos.
2 3
1
Parpadeando
Parpadea
lentamente
Indicador de alarma de puerta
El indicador desaparecerá.
Muestra que la alarma de la puerta
está “ACTIVADA”.
Parpadeando
(B144)-West.indb 8 2011/01/31 15:11:49

23
1
Pulse simultáneamente el botón y el botón
durante 3 segundos o más.
Para cancelar la operación
Pulse simultáneamente el botón y el botón
nuevamente durante 3 segundos o más.
Sonido ACTIVADO/DESACTIVADO
Use esta función para apagar el sonido de operación de las teclas.
1
Pulse simultáneamente el botón y el botón
durante 3 segundos o más.
Para “ACTIVAR” el sonido
Pulse simultáneamente el botón y el botón
nuevamente durante 3 segundos o más.
Ahorro de energía
Use esta función cuando desee cambiar el aparato al funcionamiento de ahorro de
energía.
NOTAS
Mientras esta función esté en funcionamiento, la temperatura •
interior del compartimento del frigoríco y del congelador
será superior a la temperatura preestablecida de la siguiente
manera; R: alrededor de 1ºC, F: alrededor de 2ºC.
(Si la temperatura preestablecida está ajustada en R: 3ºC,
F: -18ºC.)
La temperatura visualizada no cambiará.
La ecacia del ahorro de energía dependerá del ambiente •
de uso (control de temperatura, temperatura ambiente,
frecuencia de apertura o cierre de la puerta, la cantidad de
alimentos).
Si se activa al mismo tiempo la función de congelación
rápida, la ecacia del ahorro de energía también cambiará.
Cancele esta función cuando sienta que las bebidas no se •
enfrían lo suciente o cuando tarda más tiempo en producir
hielo.
1 1
1 1
Sugerencias para ahorrar
energía
Mantenga un espacio de ventilación adecuado ■
alrededor del frigoríco.
Mantenga el frigoríco alejado de la luz solar ■
directa y no lo coloque junto a aparatos
generadores de calor.
Abra la puerta del frigoríco el menor tiempo ■
posible.
Los alimentos calientes deben enfriarse antes ■
de colocarlos en el frigoríco.
Coloque de manera uniforme la comida en los ■
estantes para permitir que el aire frío circule
ecientemente.
La cantidad de consumo de energía de este modelo ha sido
medida en conformidad con el estándar internacional de
funcionamiento del frigoríco.
La cantidad de consumo de •
energía de este modelo ha
sido medida en relación con
las dimensiones de espacio
mostradas en la gura de la
derecha.
La cantidad de consumo de energía •
de este modelo ha sido medida sin
algunos accesorios como se muestra
en la gura de la derecha.
300mm300mm
90mm
60mm
Muestra que el sonido está “DESACTIVADO”.
Pitido pitido pitido
Muestra la “ACTIVACIÓN” del ahorro de energía.
El indicador desaparecerá.
El indicador desaparecerá.
Pitido pitido pitido
Pitido pitido pitido
Pitido pitido pitido
Indicador de alarma de puerta
(B144)-West.indb 9 2011/01/31 15:11:51
A página está carregando...
A página está carregando...

26
Solo per uso domestico.
AVVERTENZE
Nelle seguenti condizioni, non aprire o chiudere la porta ■
con forza. La porta del freezer è la stessa.
La porta potrebbe cedere e provocare lesioni.
Quando alcuni oggetti si bloccano nella porta. •
(
parti)
Quando la porta è difcile da aprire, aprirla dal lato •
opposto e controllare se qualche oggetto sia rimasto
bloccato o meno.
Non mettere le mani o i piedi sotto la porta aperta. In ■
particolare, prestare attenzione alla parte meccanica.
(Pericolo di lesioni, le mani o i piedi potrebbero rimanere
intrappolati nella parte meccanica.)
NOTA
Non mettere la mano sul lato opposto •
per aprire la porta. Le dita potrebbero
rimanere intrappolate nella porta.
Non tirare entrambe le maniglie •
contemporaneamente perché
potrebbero rompersi.
Non danneggiare o posizionare •
oggetti sulla parte meccanica installata
sull’armadio-frigorifero e sulle porte.
Potrebbe causare problemi nell’apertura e nella chiusura
della porta.
Non posare oggetti sul supporto del rullo. La porta non •
può essere chiuso.
Non riempire l'olio della parte meccanica del mobile e delle •
porte, rulli e portarulli. A seconda dei tipi di oli, le parti in
plastica possono incrinarsi.
Non calpestare il portarullo del vano congelatore. •
Il frigorifero può cadere in avanti o trasformazione può
accadere sul porta a rulli. Il titolare del rullo danneggiato
porta a difcoltà di aprire o chiudere la porta.
Struttura
La porta può essere aperta da destra e sinistra.
La porta del freezer è la stessa.
Usare la maniglia per aprire o chiudere la porta.
Quando si chiude la porta
Premere la porta con decisione per assicurarsi che sia
completamente chiusa perché la porta non ha una funzione
automatica di chiusura. Se si lascia la maniglia quando la
porta non è del tutto chiusa, questa
potrebbe rimanere parzialmente
aperta. La porta parzialmente
aperta potrebbe causare una
perdita di aria fredda. Se la porta
non è completamente chiusa, non è
possibile aprirla dal lato opposto.
(Lo stesso vale quando si apre dal lato sinistro.)
Meccanismi del corpo
(Installati ai quattro angoli di
ciascun vano)
Portarullo
Rulli (2 pezzi)
Rulli (2 pezzi)
Portarullo
Meccanismi della porta
(Installati ai quattro angoli di ogni
porta)
Rullo & Portarullo
Per un’ottimale aperture e chiusura
della porta.
Vi ringraziamo per avere acquistato questo prodotto SHARP. Prima di utilizzare il vostro
frigorifero SHARP, leggete per favore con attenzione questo manuale di istruzioni, in modo
da sfruttare al massimo le sue prestazioni.
Fondo del
frigorifero
Parte meccanica
Camma
Perno cerniera
Parte meccanica
PORTA A DOPPIA ANTA
(Solo per i modelli SJ-WS320T, SJ-WP320T, SJ-WS360T, SJ-WP360T)
(B144)-West.indb 1 2011/01/31 15:11:53
A página está carregando...
A página está carregando...

29
DESCRIZIONE
Luci LED1.
Pannello di alluminio (Hybrid cooling)2.
Il pannello è raffreddato dal retro, quindi il comparto
frigorifero viene raffreddato indirettamente. In questo
modo, il cibo viene raffreddato delicatamente, senza
essere esposto al usso di aria fredda.
Ripiani del frigorifero3.
SJ-WS320T,SJ-RP320T
SJ-WP320T,SJ-RM320T
:
SJ-WS360T,SJ-RP360T
SJ-WP360T,SJ-RM360T
:
Ripiano frutta & verdura4.
La circolazione dell’aria all’interno della
vasca per verdura fresca puó essere
controllata spostando verso destra o verso
sinistra la leva per i fori di aerazione.
Cassetto frutta & verdura5.
Pannello di separazione6.
Ripiano7.
Vetrina refrigerata8.
Pannello di controllo LCD9.
Produzione ghiaccio10.
Non riempite troppo le formelle per 1)
i cubetti di ghiaccio. Questi ultimi,
altrimenti, una volta congelati, si
attaccheranno l’uno all’altro.
Quando sono pronti i cubetti di 2)
ghiaccio, girate la leva in senso
orario per scaricare il ghiaccio nella
vaschetta sottostante.
NOTA
Non preparare il ghiaccio con la vaschetta per cubetti di
ghiaccio né versare olio in essa. La vaschetta potrebbe
spaccarsi.
Vaschetta per cubetti di ghiaccio11.
Cassetti freezer 12. (superiore)
Cassetti freezer 13. (medio)
SJ-WS360T
1
2
3
4
5
6
7
8
9
10
11
12
13
15
14
16
17
18
25
20
21
22
23
24
25
19
Leva
Vaschetta
per cubetti di
ghiaccio
Cassetti freezer 14. (inferiore)
Ripiano del freezer15.
Copripiedini16.
Ruote orientabili 17.
(4 pezzi)
Piedini regolabili 18.
(2 pezzi)
Coperchio del balconcino di servizio19.
Balconcino di servizio20.
Portauova21.
Balconcini sportello 22.
(2 pezzi)
Fermabottiglie23. / Dispositivo anti caduta
Impedisce alle bottiglie e altro di
cadere. Può essere utilizzato anche per
contenere prodotti alimentari di forma
allungata.
Balconcino portabottiglie24.
Guarnizioni magnetiche della porta 25.
(2 pezzi)
Unità di deodorizzazione
Un catalizzatore di deodorizzazione è installato nel percorso del
usso d’aria fredda. Non sono necessarie manutenzione e pulizia.
Sezione refrigerata
Più alimenti possono essere conservati rimuovendo
i seguenti accessori, come indicato nella gura
sottostante.
Vetrina refrigerata, produzione
ghiaccio, vaschetta per cubetti
di ghiaccio, cassetti freezer
(superiore & medio)
Se il frigorifero è in funzione •
senza questi accessori,
lavorerà nelle condizioni
energetiche più efcienti.
Si prega di non rimuovere la •
cassetti freezer (inferiore)
2 pezzi
3 pezzi
(B144)-West.indb 4 2011/01/31 15:11:57
A página está carregando...

31
Congelamento rapido
(Ad eccezione di SJ-RM320T, SJ-RM360T)
È possibile congelare alimenti di alta qualità utilizzando questa funzione, adatta per il congelamento domestico.
1
Premere il tasto “Select” e selezionare il simbolo del
congelamento veloce.
2
Premere il tasto . [ : ON (ACCESO), : OFF (SPENTO)]
3
Premere il tasto “ ”.
Per annullare il funzionamento
Lo stesso metodo si utilizza anche per l’avvio del
funzionamento.
Premere il tasto
nel passaggio 2.
NOTA
Il congelamento veloce termina automaticamente in circa 2 ore. •
(Il simbolo scomparirà.)
Gli alimenti di grandi dimensioni non possono essere •
congelati in un'unica volta.
Il congelamento rapido può richiedere più di 2 ore nel caso •
in cui questa operazione si sovrapponga a quella dello
scongelamento quando l'operazione viene avviata al termine
dello scongelamento.
Evitare di aprire lo sportello quando questa funzione è •
attivata.
Modalità vacanza
(Ad eccezione di SJ-RM320T, SJ-RM360T)
Utilizzare questa funzione quando si parte per un viaggio o
se si rimane lontani da casa per un lungo periodo di tempo.
1
Premere il tasto “Select” e selezionare il simbolo della
modalità vacanza.
2
Premere il tasto . [ : ON (ACCESO), : OFF (SPENTO)]
3
Premere il tasto “ ”.
Per annullare il funzionamento
Premere il tasto nel passaggio 2.
NOTA
La temperatura all'interno del vano frigorifero sarà regolata a 10°C.•
Il periodo di conservazione del cibo nel vano frigorifero •
diventa circa 1/2-1/3 del funzionamento normale. Utilizzare
solo quando non sono presenti alimenti deteriorabili.
La temperature del vano frigorifero non può essere modicata. •
(“10°C” è la temperatura indicata sul display.)
Blocco bambini
(Ad eccezione di SJ-RM320T, SJ-RM360T)
Il funzionamento dei tasti del pannello di controllo verrà
disattivato. Impostare questa funzione per evitare che il
pannello venga utilizzato involontariamente da bambini o da
altre persone.
1
Premere il tasto “Select” e selezionare il simbolo del
blocco bambini.
2
Premere il tasto . [ : ON (ACCESO), : OFF (SPENTO)]
3
Premere il tasto “ ”.
Per annullare il funzionamento
Lo stesso metodo si utilizza anche per l’avvio del
funzionamento.
Premere il tasto
nel passaggio 2.
2 3
1
Luce ash
Luce ash
Luce ash
(B144)-West.indb 6 2011/01/31 15:12:03

32
Controllo temperatura
Il frigorifero controlla la temperatura automaticamente. Se necessario, regolate la
temperatura come spiegato di seguito.
Comparto frigorifero
Regolabile nell'intervallo compreso tra 0°C e 6°C con
incrementi di 1°C.
1
Premere il tasto “Select” e selezionare il simbolo .
2
Premere il tasto / e impostare la temperatura.
[
: aumento, : diminuzione ]
NOTA
Durante il funzionamento della modalità vacanza, non è •
possibile impostare questo vano.
(“10°C” è la temperatura indicata sul display.)
3
Premere il tasto “ ”.
Comparto freezer
Regolabile nell'intervallo compreso tra -13°C e -21°C con
incrementi di 1°C.
1
Premere il tasto “Select” e selezionare il simbolo .
2
Premere il tasto / e impostare la temperatura.
[
: aumento, : diminuzione ]
3
Premere il tasto “ ”.
Indicatore della temperatura
Questo frigorifero è dotato di un indicatore della temperatura nello scomparto congelatore, per consentire di controllare la
temperatura media nella zona più fredda.
Zona più fredda
Il simbolo indica la zona più fredda dello
scomparto congelatore. (Il balconcino sportello
posto alla stessa altezza non è la zona più
fredda.)
Controllo della temperatura nella zona più fredda
È possibile eseguire controlli regolari per assicurarsi che la
temperatura della zona più fredda sia corretta e, se necessario,
regolare il controllo della temperatura del frigorifero.
Per mantenere una temperatura corretta all’interno dell’apparecchio,
controllare che l’indicatore della temperatura sia sempre BLU. Se
l’indicatore della temperatura diventa BIANCO, la temperatura
è troppo elevata; in questo caso, aumentare l’impostazione del
controllo della temperatura del frigorifero e attendere 6 ore prima di
controllare di nuovo l’indicatore della temperatura.
NOTA
La temperatura interna del frigorifero dipende da vari •
fattori, come la temperatura del locale, la quantità di cibo
conservata e la frequenza di apertura dello sportello.
Se si è introdotto cibo da poco o se si è lasciato lo sportello •
aperto per un certo tempo, è normale che l’indicatore della
temperatura diventi BIANCO.
BLU
BIANCO
Impostazione corretta Temperatura troppo
elevata, regolare la
temperatura del frigorifero.
Simbolo
2 3
1
Selezionare il simbolo
1
.
Premere il tasto
2
per almeno 3 secondi.
Regolare la temperature allo stesso modo seguendo I passaggi
3
2 e 3 in alto.
Seguire i passaggi
1
e
2
per regolare la temperatura ad intervalli di 1°C.
Luce ash
Impostazione Avanzata del vano frigorifero
La temperatura del vano frigorifero può essere regolata ad intervalli di 0,5 ° C seguendo i passaggi
1
-
3
sotto.
Luce ash
Bip bip bip
(B144)-West.indb 7 2011/01/31 15:12:05
A página está carregando...
A página está carregando...
A página está carregando...
A página está carregando...
A página está carregando...
A página está carregando...
A página está carregando...

40
DESCRIPTION
Lampes LED1.
Panneau d’aluminium hybride2.
Le panneau est refroidi par l’arrière, le compartiment du
réfrigérateur est ainsi indirectement refroidi. De cette
manière, les aliments sont réfrigérés doucement, sans
les exposer à des ux d’air froid.
Clayette de réfrigérateur3.
SJ-WS320T,SJ-RP320T
SJ-WP320T,SJ-RM320T
:
SJ-WS360T,SJ-RP360T
SJ-WP360T,SJ-RM360T
:
Clayette à fruits & légumes4.
L'afux d'air dans le bac à légumes se
règle en déplaçant le manette des trous
d'aération vers la droite ou vers la gauche.
Bac à fruits & légumes5.
Plaque de séparation6.
Clayette7.
Compartiment refroidi8.
Panneau de commandes9.
Fabrication des glaçons10.
Ne remplissez pas trop les boîtiers 1)
à glaçons, sinon les glaçons seront
collés les uns aux autres.
Lorsque les glaçons sont prêts, 2)
tournez le manette dans le sens des
aiguilles d’une montre, pour vider
les glaçons dans le bac à glaçons.
NOTE
Ne fabriquez pas de glaçons avec le bac à glaçons, et n’y
versez pas d’huile. Le bac à glaçons risque de se briser.
Bac à glaçons11.
Casier congélateur 12. (haut)
Casier congélateur 13. (milieu)
SJ-WS360T
1
2
3
4
5
6
7
8
9
10
11
12
13
15
14
16
17
18
25
20
21
22
23
24
25
19
Manette
Bac à glaçons
Casier congélateur 14. (fond)
Clayette congélateur15.
Plinthe16.
Roulettes 17.
(4 pièces)
Pieds réglables 18.
(2 pièces)
Couvercle du balconnet fonctionnel19.
Balconnet fonctionnel20.
Casier à œufs21.
Balconnet de porte 22.
(2 pièces)
Séparateur de bouteille23. /
Porte-tube
Empêchez les bouteilles, etc. de
tomber. Produits alimentaires de type
collant rangés à l’intérieur.
Balconnet de rangement bouteilles24.
Joint de porte magnétique 25.
(2 pièces)
Zone désodorisante
Le catalyseur de désodorisation est installé sur les ux d’air
froid. Il n’y a ni manipulation, ni nettoyage particuliers.
Section refroidie
Plus d’aliments peuvent être rangés en retirant les
accessoires suivants comme indiqué dans la gure
ci-dessous.
Compartiment refroidi,
fabrication des glaçons, bac à
glaçons, casier congélateur
(haut & milieu)
Si le réfrigérateur est en •
fonctionnement sans ces
accessoires, il fonctionnera en
condition d’économie d’énergie la
plus efcace.
Veuillez ne pas retirer la casier •
congélateur (fond).
2
pièces
3
pièces
(B144)-West.indb 4 2011/01/31 15:12:14
A página está carregando...

42
Congélation express
(Sauf pour SJ-RM320T, SJ-RM360T)
Des aliments congelés de qualité élevée peuvent être faits en utilisant cette fonction, bien pratique pour la congélation chez soi.
1
Appuyez sur la touche de sélection et sélectionnez l’icône
de congélation express.
2
Appuyez sur la touche . [ : ON (MARCHE), : OFF (ARRET) ]
3
Appuyez sur la touche “ ”.
Pour annuler l’opération
C’est la même méthode que pour démarrer l’opération.
Appuyez sur la touche
dans l’étape 2.
NOTES
La congélation express se termine automatiquement au bout •
de 2 heures. (L’icône disparaîtra.)
Les gros aliments ne peuvent pas être congelés en une seule •
opération.
La congélation express peut durer plus de 2 heures si celle-•
ci chevauche le dégivrage, car elle démarre une fois le
dégivrage terminé.
Evitez d’ouvrir la porte pendant l'opération de cette fonction.•
Mode vacances
(Sauf pour SJ-RM320T, SJ-RM360T)
Utilisez cette fonction lorsque vous partez en voyage ou
laissez votre maison inhabitée pendant une période prolongée.
1
Appuyez sur la touche de sélection et sélectionnez
l’icône de mode vacances.
2
Appuyez sur la touche . [ : ON (MARCHE), : OFF (ARRET) ]
3
Appuyez sur la touche “ ”.
Pour annuler l’opération
Appuyez sur la touche dans l’étape 2.
NOTES
La température dans le compartiment réfrigérateur sera •
ajustée à environ 10°C.
La période de stockage d’aliments dans le compartiment du •
réfrigérateur devient alors d’environ 1/2-1/3 du fonctionnement
normal. Veuillez l’utiliser lorsqu’il n’y a pas d’aliments périssables.
La température du compartiment du réfrigérateur ne peut être •
modiée. (« 10°C » est indiqué à l’écran.)
Verrouillage enfant
(Sauf pour SJ-RM320T, SJ-RM360T)
Les opérations clés du panneau de commande seront
verrouillées. Utilisez cette fonction pour éviter que le panneau
soit utilisé non intentionnellement par des enfants ou quelqu’un.
1
Appuyez sur la touche de sélection et sélectionnez l’icône
de verrouillage enfant.
2
Appuyez sur la touche . [ : ON (MARCHE), : OFF (ARRET) ]
3
Appuyez sur la touche “ ”.
Pour annuler l’opération
C’est la même méthode que pour démarrer l’opération.
Appuyez sur la touche
dans l’étape 2.
2 3
1
Allumé
Allumé
Allumé
(B144)-West.indb 6 2011/01/31 15:12:20

43
Régulation de la température
Le réfrigérateur est à régulation de température automatique. Toutefois, il est possible,
en cas de besoin, de régler la température comme suit.
Compartiment réfrigérateur
Réglable de 0°C à 6°C par incréments de 1°C.
1
Appuyez sur la touche de sélection et sélectionnez
l’icône
.
2
Appuyez sur la touche / et réglez la température.
[
: plus, : moins ]
NOTE
Lorsque le mode vacances est en fonctionnement, ce compartiment •
ne peut pas être réglé. (« 10°C » est indiqué à l’écran.)
3
Appuyez sur la touche “ ”.
Compartiment congélateur
Réglable de -13°C à -21°C par incréments de 1°C.
1
Appuyez sur la touche de sélection et sélectionnez
l’icône
.
2
Appuyez sur la touche / et réglez la température.
[
: plus, : moins ]
3
Appuyez sur la touche “ ”.
Indicateur de température
Ce réfrigérateur est fourni avec un indicateur de température dans le compartiment du réfrigérateur pour vous permettre de
contrôler la température moyenne dans la zone la plus froide.
Zone la plus froide
Le symbole indique l’emplacement de la zone la
plus froide du compartiment réfrigérateur.
(le balconnet de porte placé à la même hauteur
n’est pas la zone la plus froide).
Vérication de la température dans la zone la plus froide
Vous pouvez vérier régulièrement que la température dans
la zone la plus froide est correcte et, au besoin, ajuster la
régulation de température du réfrigérateur.
Pour maintenir une température correcte dans l’appareil,
assurez-vous que l’indicateur de température reste en
permanence BLEU. Si l’indicateur de température vire au
BLANC, la température est trop élevée ; le cas échéant,
augmentez le réglage de la régulation de temp. du réfrigérateur
et attendez 6 heures avant d’effectuer une nouvelle vérication
de l’indicateur de température.
NOTES
La température à l’intérieur du réfrigérateur dépend de •
nombreux facteurs comme la température ambiante de
la pièce, la quantité de denrées stockées et la fréquence
d’ouverture de la porte.
À l’introduction de produis frais dans le réfrigérateur ou •
lorsque la porte reste ouverte pendant un certain temps, il est
normal que l’indicateur de température vire au BLANC.
BLEU
BLANC
Réglage correct Température trop élevée,
ajustez la régulation de
temp. du réfrigérateur.
Symbole
2 3
1
Allumé
Allumé
Réglages avancés du compartiment du réfrigérateur
La température du compartiment du réfrigérateur peut être ajustée par pas de 0,5°C en suivant les étapes 1 à 3 ci-dessous.
Sélectionnez l’icône
1
.
Appuyez sur la touche
2
de façon continue pendant 3 secondes ou plus.
Ajustez la température de la même manière que les étapes
3
2 à 3 ci-dessus.
Suivez à nouveau les étapes 1 à 2 si vous voulez ajuster la température par
pas de 1°C.
Bip bip bip
(B144)-West.indb 7 2011/01/31 15:12:22
A página está carregando...
A página está carregando...
A página está carregando...
A página está carregando...
A página está carregando...
A página está carregando...
A página está carregando...
A página está carregando...
A página está carregando...
A página está carregando...
A página está carregando...
A página está carregando...
A página está carregando...
A página está carregando...
A página está carregando...
A página está carregando...
A página está carregando...
A página está carregando...
A página está carregando...
A página está carregando...
A página está carregando...
A página está carregando...
A página está carregando...
A página está carregando...
A página está carregando...
A página está carregando...
A página está carregando...
A página está carregando...
A página está carregando...
A página está carregando...
A página está carregando...
A página está carregando...
A página está carregando...
A página está carregando...
A página está carregando...
A página está carregando...
A página está carregando...
A página está carregando...
A página está carregando...
A página está carregando...
A página está carregando...
A página está carregando...
A página está carregando...
A página está carregando...
A página está carregando...
A página está carregando...
A página está carregando...
A página está carregando...
A página está carregando...
A página está carregando...
A página está carregando...
A página está carregando...
A página está carregando...
A página está carregando...
A página está carregando...
A página está carregando...
A página está carregando...
A página está carregando...
A página está carregando...
A página está carregando...
A página está carregando...
A página está carregando...
A página está carregando...
A página está carregando...
A página está carregando...
A página está carregando...
A página está carregando...
A página está carregando...
A página está carregando...
A página está carregando...
A página está carregando...
A página está carregando...
A página está carregando...
A página está carregando...
A página está carregando...
A página está carregando...
A página está carregando...
A página está carregando...
A página está carregando...
A página está carregando...
A página está carregando...
A página está carregando...
A página está carregando...
A página está carregando...
A página está carregando...
A página está carregando...
A página está carregando...
A página está carregando...
A página está carregando...
A página está carregando...
A página está carregando...
A página está carregando...
A página está carregando...
A página está carregando...
A página está carregando...
A página está carregando...
A página está carregando...
A página está carregando...
A página está carregando...
A página está carregando...
A página está carregando...
A página está carregando...
A página está carregando...
A página está carregando...
A página está carregando...
A página está carregando...
A página está carregando...
A página está carregando...
A página está carregando...
A página está carregando...
A página está carregando...
A página está carregando...
A página está carregando...
A página está carregando...
A página está carregando...
A página está carregando...
A página está carregando...
A página está carregando...
A página está carregando...
A página está carregando...
A página está carregando...
A página está carregando...
A página está carregando...
A página está carregando...
A página está carregando...
A página está carregando...
A página está carregando...
A página está carregando...
A página está carregando...
A página está carregando...
A página está carregando...
A página está carregando...
A página está carregando...
A página está carregando...
A página está carregando...
A página está carregando...
A página está carregando...
A página está carregando...
A página está carregando...
A página está carregando...
A página está carregando...
A página está carregando...
A página está carregando...
A página está carregando...
A página está carregando...
A página está carregando...
A página está carregando...
A página está carregando...
A página está carregando...
A página está carregando...
A página está carregando...
A página está carregando...
A página está carregando...
A página está carregando...
A página está carregando...
A página está carregando...
A página está carregando...
A página está carregando...
A página está carregando...
A página está carregando...
A página está carregando...
A página está carregando...
A página está carregando...
A página está carregando...
A página está carregando...
A página está carregando...
A página está carregando...
A página está carregando...
A página está carregando...
A página está carregando...
A página está carregando...
A página está carregando...
A página está carregando...
A página está carregando...
A página está carregando...
A página está carregando...
A página está carregando...
A página está carregando...
A página está carregando...
A página está carregando...
A página está carregando...
-
 1
1
-
 2
2
-
 3
3
-
 4
4
-
 5
5
-
 6
6
-
 7
7
-
 8
8
-
 9
9
-
 10
10
-
 11
11
-
 12
12
-
 13
13
-
 14
14
-
 15
15
-
 16
16
-
 17
17
-
 18
18
-
 19
19
-
 20
20
-
 21
21
-
 22
22
-
 23
23
-
 24
24
-
 25
25
-
 26
26
-
 27
27
-
 28
28
-
 29
29
-
 30
30
-
 31
31
-
 32
32
-
 33
33
-
 34
34
-
 35
35
-
 36
36
-
 37
37
-
 38
38
-
 39
39
-
 40
40
-
 41
41
-
 42
42
-
 43
43
-
 44
44
-
 45
45
-
 46
46
-
 47
47
-
 48
48
-
 49
49
-
 50
50
-
 51
51
-
 52
52
-
 53
53
-
 54
54
-
 55
55
-
 56
56
-
 57
57
-
 58
58
-
 59
59
-
 60
60
-
 61
61
-
 62
62
-
 63
63
-
 64
64
-
 65
65
-
 66
66
-
 67
67
-
 68
68
-
 69
69
-
 70
70
-
 71
71
-
 72
72
-
 73
73
-
 74
74
-
 75
75
-
 76
76
-
 77
77
-
 78
78
-
 79
79
-
 80
80
-
 81
81
-
 82
82
-
 83
83
-
 84
84
-
 85
85
-
 86
86
-
 87
87
-
 88
88
-
 89
89
-
 90
90
-
 91
91
-
 92
92
-
 93
93
-
 94
94
-
 95
95
-
 96
96
-
 97
97
-
 98
98
-
 99
99
-
 100
100
-
 101
101
-
 102
102
-
 103
103
-
 104
104
-
 105
105
-
 106
106
-
 107
107
-
 108
108
-
 109
109
-
 110
110
-
 111
111
-
 112
112
-
 113
113
-
 114
114
-
 115
115
-
 116
116
-
 117
117
-
 118
118
-
 119
119
-
 120
120
-
 121
121
-
 122
122
-
 123
123
-
 124
124
-
 125
125
-
 126
126
-
 127
127
-
 128
128
-
 129
129
-
 130
130
-
 131
131
-
 132
132
-
 133
133
-
 134
134
-
 135
135
-
 136
136
-
 137
137
-
 138
138
-
 139
139
-
 140
140
-
 141
141
-
 142
142
-
 143
143
-
 144
144
-
 145
145
-
 146
146
-
 147
147
-
 148
148
-
 149
149
-
 150
150
-
 151
151
-
 152
152
-
 153
153
-
 154
154
-
 155
155
-
 156
156
-
 157
157
-
 158
158
-
 159
159
-
 160
160
-
 161
161
-
 162
162
-
 163
163
-
 164
164
-
 165
165
-
 166
166
-
 167
167
-
 168
168
-
 169
169
-
 170
170
-
 171
171
-
 172
172
-
 173
173
-
 174
174
-
 175
175
-
 176
176
-
 177
177
-
 178
178
-
 179
179
-
 180
180
-
 181
181
-
 182
182
-
 183
183
-
 184
184
-
 185
185
-
 186
186
-
 187
187
-
 188
188
-
 189
189
-
 190
190
-
 191
191
-
 192
192
-
 193
193
-
 194
194
-
 195
195
-
 196
196
-
 197
197
-
 198
198
-
 199
199
-
 200
200
-
 201
201
-
 202
202
-
 203
203
-
 204
204
-
 205
205
-
 206
206
-
 207
207
-
 208
208
-
 209
209
-
 210
210
-
 211
211
-
 212
212
-
 213
213
-
 214
214
-
 215
215
-
 216
216
-
 217
217
-
 218
218
-
 219
219
-
 220
220
-
 221
221
-
 222
222
-
 223
223
-
 224
224


Sharp SJ-RM360T Manual do proprietário
- Categoria
- Geladeiras
- Tipo
- Manual do proprietário
em outras línguas
- español: Sharp SJ-RM360T El manual del propietario
- français: Sharp SJ-RM360T Le manuel du propriétaire
- italiano: Sharp SJ-RM360T Manuale del proprietario
- English: Sharp SJ-RM360T Owner's manual
- Nederlands: Sharp SJ-RM360T de handleiding
- slovenčina: Sharp SJ-RM360T Návod na obsluhu
- Deutsch: Sharp SJ-RM360T Bedienungsanleitung
- eesti: Sharp SJ-RM360T Omaniku manuaal
- čeština: Sharp SJ-RM360T Návod k obsluze
- polski: Sharp SJ-RM360T Instrukcja obsługi
- română: Sharp SJ-RM360T Manualul proprietarului
Artigos relacionados
-
Sharp SJ-RM320T Manual do proprietário
-
Sharp SJ-FP760VBK Manual do usuário
-
Sharp SJ-F79PSSL Manual do proprietário
-
Sharp SJPT690RS Instruções de operação
-
Sharp SJ-PB300S Manual do proprietário
-
Sharp SJ-F740STSL Manual do proprietário
-
Sharp SJ-GC480VBK Manual do usuário
-
Sharp SJF800SPBK Manual do proprietário
-
Sharp SJGC700VBK Manual do proprietário
-
