A página está carregando...

Grandstream Networks, Inc.
126 Brookline Ave, 3rd Floor
Boston, MA 02215. USA
Tel : +1 (617) 566 - 9300
www.grandstream.com
For Certication, Warranty and RMA information, please visit
www.grandstream.com
GWN7001 & GWN7002 & GWN7003
Multi-WAN Gigabit VPN Router
Quick Installation Guide

Content
English...................................................................................1
简体中文...............................................................................5
Español..................................................................................7
Français................................................................................11
Deutsch................................................................................15
Italiano.................................................................................19
Русскй................................................................................. 23
Português.............................................................................25
Regulatory Information.......................................................29

~ 2 ~~ 1 ~
EN OVERVIEW
GWN7001/7002/7003 are Multi-WAN Gigabit VPN routers with built-in rewalls
that allow businesses to build comprehensive wired, wireless and VPN networks
for one or many locations. They oer high-performance routing and switching
power along with built-in VPN support for secure in-oce and inter-oce con-
nectivity. To provide enterprise-grade security protection and ensure stable
network operation,the GWN 7001/7002/7003 features a built-in rewall with ad-
vanced content security, ltering, threat detection, attack prevention and more.
To maximize network reliability, they support trac load balancing, failover and
bandwidth management capabilities. The GWN7001 includes 6 Gigabit ether-
net ports.The GWN7002/7003 include 2 Gigabit SFP ports, 4/9 Gigabit ether-
net ports, and 2 PoE output ports that allow them to provide power to other
endpoints. These routers can manage themselves and up to 150 Grandstream
GWN Series Wi-Fi APs thanks to an embedded controller located in the prod-
ucts’ web user interface. These routers can also be managed with GWN.Cloud
and GWN Manager, Grandstream’s free cloud and on-premise network man-
agement tools. By providing high-performance routing, VPN support, powerful
security protection and easy-to-use network management tools, the GWN Giga-
bit VPN routers are ideal for a wide variety of deployments including small-to-
medium businesses, retail, education, hospitality, healthcare and more.
PRECAUTIONS
• Do not attempt to open, disassemble, or modify the device.
• Do not expose this device to temperature outside range of 0 °C to 40 °C for
operation and -30 °C to 60 °C for storage.
• Do not expose the device to environments outside of the following humidity
range: 10-90% RH (non-condensing).
• Do not power cycle the device during system boot up or rmware upgrade.
You may corrupt rmware images and cause the unit to malfunction.
PACKAGE CONTENTS
1x Quick Installation Guide
GWN7001/7002/7003 PORTS
No. Port Description
1
GWN7001: 6x Gigabit Ethernet ports
GWN7002: 4x Gigabit Ethernet ports
GWN7003: 9x Gigabit Ethernet ports
Note: All ports support WAN/LAN congurable.
The Gigabit Ethernet ports include 2 x PoE OUT ports
and 1 x PoE IN port (GWN7002/7003 only).
22 x Gigabit SFP ports (GWN7002/7003 only).
3USB 2.0 port
4
GWN7001: Power adapter connector (DC 12V, 1A)
GWN7002: Power adapter connector (DC 24V, 1A)
GWN7003: Power adapter connector (DC 24V, 1A)
5Grounding terminal (GWN7003 only).
6Factory Reset pinhole. Press for 5 seconds to reset
factory default settings
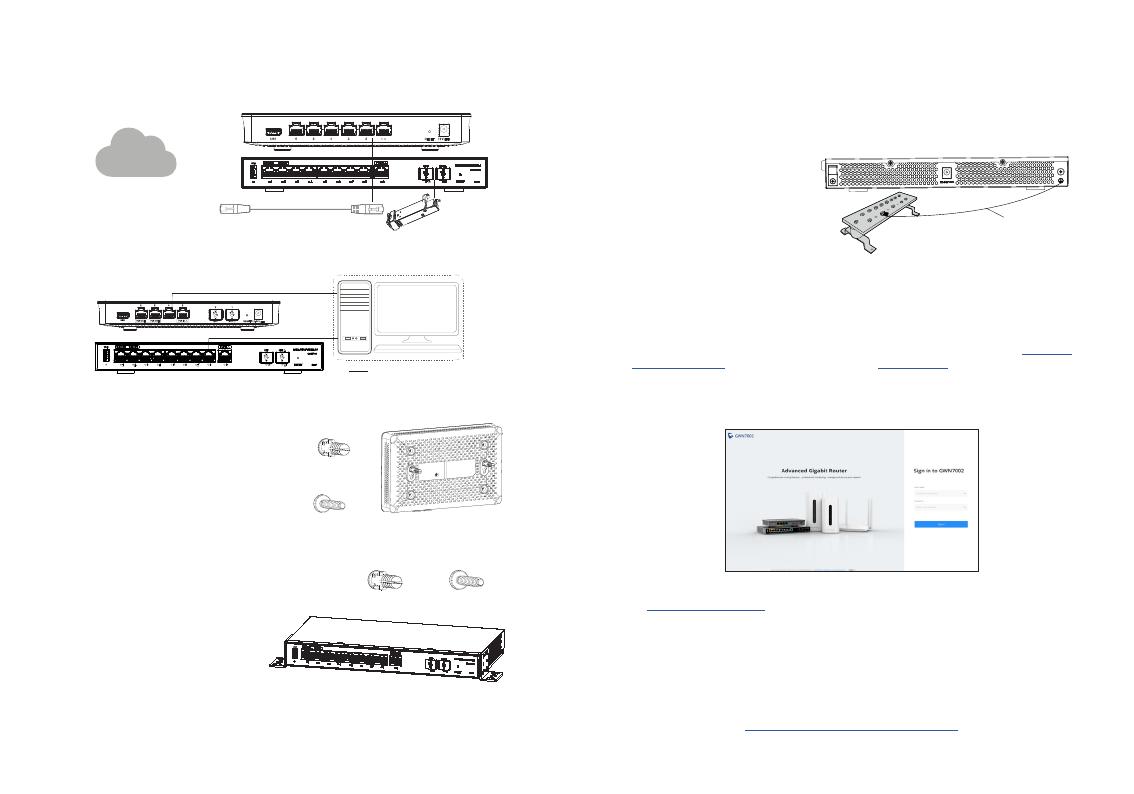
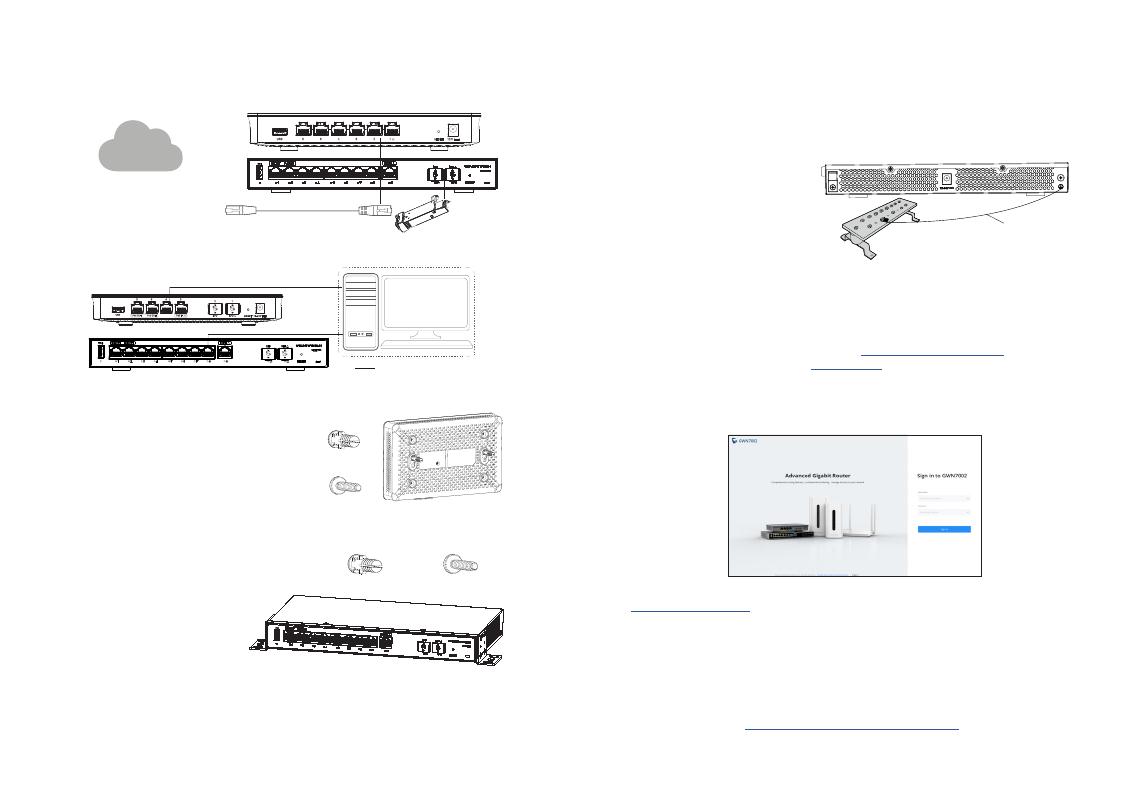
CONNECTING THE GWN7001/7002/7003
1. Power the GWN7001/7002/7003
GWN7001/7002/7003 can be
powered on using the right PSU
or PoE (IEEE 802.3af/at) only for
GWN7002/7003.
1x Ethernet Cable
1x Power Adapter
1x GWN7001 or GWN7002 or GWN7003
GWN7002
GWN7003
Note: Ports with this symbol are congured to be used as a WAN port by
default at the factory.
Ground Wire
2x Mounting Bracket
8x Screws
Only for GWN7003
GWN7001

~ 4 ~~ 3 ~
Connect the LAN/WAN or SFP/WAN (GWN7002/7003 only) port to an optical
ber broadband modem, ADSL broadband modem or community broadband
interface.
2. Connect to the Internet
3. Connect to GWN7001/7002/7003 Network
INSTALLATION
Optical Fiber
ADSL Modem
Community Broadband
Internet
Ethernet Cable
1. Using a drill, make two holes in the
wall with 135.0mm spacing, 6.0mm
diameter. Put a plastic anchor and
screw (not provided) on each hole.
2. Mount the GWN7001/7002 router
on the mounting screws.
Mounting GWN7003 to the Wall
3. Use a screwdriver to tighten the screws (prepared by yourself) that have
passed through the L-shaped mounting brackets to ensure that the GWN7003
router is rmly installed on the wall.
Mounting GWN7001/7002 to the Wall
Bottom of the
GWN7001/GWN7002
Router
1. Use the provided screws to x the two L-shaped
Mounting bracket (rotated 90°) on both sides of
the GWN7003 router.
2. Stick the router port up
and horizontally on the
selected wall, mark the
position of the screw
hole on the L-shaped
mounting brackets with a
Front of the GWN7003 Router
Connect your computer to one of the LAN ports.
ACCESSING THE CONFIGURATION INTERFACE
Now that you are connected to the GWN7001/GWN7002/GWN7003’s LAN port
with network cable, you can access into its conguration interface with:
myrouter.grandstream.com or default IP address (192.168.80.1), then enter the
password to login.
Note: GWN7001/GWN7002/GWN7003’s default password information is printed
on the MAC tag at the bottom of the unit.
To manage GWN7001/GWN7002/GWN7003 over cloud, please refer to https://
www.gwn.cloud.
The GNU GPL license terms are incorporated into the device rmware and an be
accessed via the Web user interface of the device at my_device_ip/gpl_license. It can
also be accessed here: https://www.grandstream.com/legal/open-source-software
To obtain a CD with GPL source code information please submit a written request to:
info@grandstream.com
Refer to online documents and FAQ for more detailed information:
https://www.grandstream.com/our-products
1. Remove the ground screw
from the back of the router,
and connect one end of the
ground cable to the wiring
terminal of the router.
2. Put the ground screw back into
the screw hole, and tighten it
with a screwdriver.
3. Connect the other end of the ground cable to other device that has been
grounded or directly to the terminal of the ground bar in the equipment room.
Grounding GWN7003
Plastic anchor Screw
Plastic anchor
Screw
marker. Then, drill a hole at the marked position with an impact drill, and drill
the plastic anchors (prepared by yourself) into the drilled hole in the wall.
Ground Wire

~ 6 ~~ 5 ~
ZH
GWN7001/7002/7003作为一款功能强大的企业级千兆多WAN口防
火墙路由器,可为企业在多个场景下提供全面的有线、无线和VPN解
决方案,通过高性能路由和交换能力以及内置VPN,来实现内外安全
连接。作为一款高性能防火墙产品,GWN 7001/7002/7003内置防火
墙,支持内容安全、过滤、攻击检测防护等功能,同时支持负载均衡、
故障转移和带宽管理,可以有效保证企业核心应用和服务的持续稳定运
行。GWN7001包含6个千兆以太网端口。GWN7002/7003包括2个千
兆SFP端口、4/9个千兆以太网端口和2个PoE Out端口,可为其他设备
供电。内嵌Web用户界面,最多可管理150个GWN 系列AP设备,同时
支持GWN.Cloud和GWN Manager以实现大规模的部署管理。通过提供
高性能路由、VPN、安全防护和易于使用的网络管理功能,GWN千兆
VPN路由器是中小型企业、零售业、教育、酒店、医疗保健市场等网络
部署环境的理想选择。
包装清单
1x 快速安装指南
GWN7001/7002/7003 端口
序号 端口 描述
1
GWN7001: 6 x 千兆以太网端口
GWN7002: 4 x 千兆以太网端口
GWN7003: 9 x 千兆以太网端口
注意:所有端口都支持WAN/LAN自
定义配置。千兆以太网端口中包括2个
PoE OUT端口和1个PoE IN端口(仅限
GWN7002/7003)。
22 x 千兆SFP口(仅限 GWN7002/7003)
3USB 2.0 端口
4
GWN7001: 电源适配器(DC 12V, 1A)
GWN7002: 电源适配器(DC 24V, 1A)
GWN7003: 电源适配器(DC 24V, 1A)
5防雷接地柱 (仅限 GWN7003)。
6恢复出厂设置按钮 按5秒恢复出厂默认
设置
1x 网线
1x 电源适配器
1x GWN7001 或 GWN7002 或 GWN7003
GWN7002
GWN7003
注意:在设备出厂时,带有 标识的端口将默认作为WAN口使用
接地线
2x 安装支架
8x
螺丝
仅适用于 GWN7003
• 不要尝试打开,拆解或修改设备。
• 不要将本设备暴露在温度超出 0℃至40℃的工作环境或超出-30℃
至 60℃的储存环境。
• 不要将本设备暴露在环境湿度如下范围以外:10-90%RH (无冷凝)
• 系统启动或固件升级期间不要中断电源。这可能会损坏设备固件,
并导致设备故障。
GWN7001
概述
注意事项

~ 8 ~~ 7 ~
ES RESUMEN
Los GWN7001/7002/7003 son routers VPN Gigabit Multi Wan con rewall integrado
que permiten a las empresas crear redes VPN, inalámbricas y cableadas para una o
varias ubicaciones. Ofrecen enrutamiento de alto rendimiento y una poderosa conmu-
tación junto con soporte de VPN integrado para una conectividad segura en la ocina
y entre ocinas. Para brindar protección de seguridad de nivel empresarial y garantizar
un funcionamiento estable de la red, el GWN7001/7002/7003 cuenta con un rewall
incorporado con seguridad de contenido avanzada, ltrado, detección de amenazas,
prevención de ataques y más. Para maximizar la conabilidad de la red, soporta bal-
anceo de carga/tráco sobre sus WANs, failover y administración de ancho de banda.
El GWN7001 incluye 6 puertos Gigabit ethernet. El GWN7002/7003 incluye 2 puertos
Gigabit SFP, 4/9 puertos Gigabit ethernet y 2 puertos con salida PoE que les permiten
proporcionar energía a otros terminales. Estos routers pueden administrarse a sí mis-
mos y hasta 150 puntos de acceso Wi-Fi de la serie GWN de Grandstream gracias a
su controlador integrado en la interfaz de usuario web. Estos enrutadores también se
pueden administrar desde el GWN.Cloud y GWN Manager, las herramientas gratuitas
de administración de redes en la nube y locales de Grandstream. Al proporcionar enru-
tamiento de alto rendimiento, compatibilidad con VPN, protección de seguridad potente
y herramientas de administración de red fáciles de usar, los routers VPN Gigabit GWN
son ideales para una amplia variedad de implementaciones, incluidas pequeñas y me-
dianas empresas, comercio minorista, educación, hoteles, salud y más.
PRECAUCIONES
CONTENIDO DEL PAQUETE
1x Guia de Instalación Rapida
PUERTOS GWN7001/7002/7003
No. Puerto Descripción
1
GWN7001: 6x puertos Ethernet Gigabit
GWN7002: 4x puertos Ethernet Gigabit
GWN7003: 9x puertos Ethernet Gigabit
Nota: Todos los puertos son congurables como WAN/LAN.
Los puertos Gigabit Ethernet incluyen 2 puertos PoE OUT y 1
puerto PoE IN (solo GWN7002/7003).
22x puertos SFP Gigabit (solo GWN7002/7003).
3Puerto USB 2.0
4
GWN7001: Conector del adaptador de corriente (DC 12V, 1A).
GWN7002: Conector del adaptador de corriente (DC 24V, 1A).
GWN7003: Conector del adaptador de corriente (DC 24V, 1A).
5
Terminal de puesta a tierra (solo GWN7003).
6
Botón de restablecimiento de fábrica. Presione durante 5 se-
gundos para restablecer la conguración predeterminada de
fábrica.
CONECTANDO EL GWN7001/7002/7003
1. Encienda el GWN7001/7002/GWN7003
El GWN7001/7002/GWN7003
puede ser encendido utilizando
una fuente de alimentación
o PoE (IEEE 802.3af/at) solo
para GWN7002/7003.
1x Cable de Ethernet
1x Adaptador de Alimentación
1x GWN7001 o GWN7002 o GWN7003
Nota: Los puertos con el símbolo están congurados para usarse como puerto
WAN por defecto.
Cable de tierra
2x Soporte de montaje
8x Tornillos
Solo para GWN7003
• No intente abrir, desarmar o modicar el dispositivo.
• No exponga este dispositivo a temperaturas fuera del rango de 0 °C a 40 °C en
funcionamiento y desde -30 °C a 60 °C cuando se encuentre almacenado.
• No exponga el dispositivo a entornos fuera del siguiente rango de humedad: 10-
90% RH (sin condensación).
• No apague el dispositivo durante el reinicio del sistema o actualización de Firm-
ware. Puede corromper la imagen del rmware y causar un mal funcionamiento
de la unidad.
GWN7002
GWN7003
GWN7001
~ 10 ~~ 9 ~
2. Conectado a Internet
3. Conéctese a la red del equipo GWN7001/7002/7003
INSTALACIÓN
Fibra óptica
Módem ADSL
Banda ancha comunitaria
Internet
Ethernet Cable
1. Con un taladro, haga dos oricios en
la pared con un espacio entre oricio
de 135,0 mm y un diámetro de 6,0
mm. Coloque un anclaje plástico y un
tornillo (no incluido) en cada oricio.
2. Posicione el router GWN7001/7002 en
los tornillos de montaje.
3. Use un destornillador para apretar los tornillos
(preparados por usted mismo)
a
través de los soportes de montaje en forma de L para asegurarse de que el router
GWN7003 esté rmemente instalado en la pared.
Montaje del GWN7001/7002 en pared
Parte inferior del Router
GWN7001/7002
1. Utilice los tornillos provistos para jar los dos
soportes de montaje en forma de L (girados
90°) en ambos lados del router GWN7003.
2. Coloque el router con los puertos de
red hacia arriba y horizontalmente
en la pared seleccionada, marque
la posición del oricio del tornillo
en los soportes de montaje en
forma de L con un marcador.
Luego,
Parte frontal del Router GWN7003
Conecte su computadora a uno de los puertos LAN del equipo.
ACCESO A LA INTERFAZ DE CONFIGURACIÓN
Ahora que ya estás conectado el puerto LAN del GWN7001/7002/7003 con un
cable de red, podrás acceder a la interfaz de conguración por medio de: myrouter.
grandstream.com la dirección IP por defecto 192.168.80.1. Una vez estés en la
página de inicio de sesión; ingrese la contraseña.
Los términos de licencia GNU GPL son incorporados en el rmware del dispositivo y
puede ser accedido a través de la interfaz de usuario Web del dispositivo en http(s)://
IP/gpl_license Para obtener un CD con la información del código fuente GPL, por
favor, remita una solicitud escrita a info@grandstream.com
Para obtener el manual de usuario, favor haga click aquí:
https://www.grandstream.com/our-products
1. Retire el tornillo de conexión a
tierra de la parte posterior del
router y conecte un extremo
del cable de conexión a tierra al
terminal de cableado del router.
2. Coloque nuevamente el tornillo
de tierra en el oricio del tornillo
y apriételo con un destornillador.
3. Conecte el otro extremo del cable de tierra a otro dispositivo que haya sido
puesto a tierra o directamente a la terminal de la barra de tierra de la sala de
equipos.
Conectando a tierra el GWN7003
Anclaje de
plástico
Tornillo
perfore un oricio en la posición marcada con un taladro de percusión e inserte los
expansores (preparados por usted mismo) en el oricio perforado en la pared.
Conecte el puerto LAN/WAN o SFP/WAN (solo GWN7002/7003) a un módem de
banda ancha de bra óptica, módem de banda ancha ADSL, o una interfaz de
banda ancha comunitaria.
Anclaje de plástico Tornillo
Nota: La información de la contraseña predeterminada de GWN7001/7002/7003
está impresa en la etiqueta MAC en la parte inferior de la unidad.
Para administrar el GWN7001/7002/7003 a través de la plataforma en la nube, entre
en https://www.gwn.cloud
Cable de tierra
Montaje del GWN7003 en pared

~ 12 ~~ 11 ~
FR PRESENTATION
Les GWN7001/7002/7003 sont des routeurs VPN Gigabit Multi-WAN avec pare-feu
intégrés qui permettent aux entreprises de créer des réseaux câblés, sans l et VPN
complets pour un ou plusieurs sites. Ils orent une puissance de routage et de switch-
ing hautes performances ainsi qu’une prise en charge VPN intégrée pour une con-
nectivité sécurisée au bureau et entre les bureaux. Pour fournir une protection de
sécurité de niveau entreprise et assurer un fonctionnement stable du réseau, le GWN
7001/7002/7003 dispose d’un pare-feu intégré avec sécurité de contenu avancée,
ltrage, détection des menaces, prévention des attaques et plus encore. Pour opti-
miser la abilité du réseau, ils prennent en charge les fonctionnalités d’équilibrage de
la charge du trac, de basculement et de gestion de la bande passante. Le GWN7001
comprend 6 ports Ethernet Gigabit. Le GWN7002/7003 comprend 2 ports SFP
Gigabit, des ports Ethernet 4/9 Gigabit et 2 ports de sortie PoE qui leur permettent
d’alimenter d’autres terminaux. Ces routeurs peuvent gérer eux-mêmes et jusqu’à
150 points d’accès Wi-Fi de la série Grandstream GWN grâce à un contrôleur intégré
situé dans l’interface utilisateur Web du produit. Ces routeurs peuvent également être
gérés avec GWN.Cloud et GWN Manager, les outils gratuits de gestion de réseau
cloud et sur site de Grandstream. En fournissant un routage haute performance, une
prise en charge VPN, une protection de sécurité puissante et des outils de gestion de
réseau faciles à utiliser, les routeurs VPN GWN Gigabit sont idéaux pour une grande
variété de déploiements, y compris les petites et moyennes entreprises, la vente au
détail, l’éducation, l’hôtellerie, soins de santé et plus encore.
PRECAUTIONS
CONTENU DU PACK
1x Guide d’installation rapide
GWN7001/7002/7003 PORTS
No. Port Description
1GWN7001: 6 x Ports Gigabit Ethernet
GWN7002: 4 x Ports Gigabit Ethernet
GWN7003: 9 x Ports Gigabit Ethernet
Note: Tous les ports prennent en charge la conguration
WAN/LAN. Les ports Gigabit Ethernet comprennent 2 ports
PoE OUT et 1 port PoE IN (GWN7002/7003 uniquement).
22 x Ports Gigabit SFP (GWN7002/7003 uniquement).
3Port USB 2.0
4GWN7001: Connecteur de l’adaptateur secteur (DC 12V, 1A)
GWN7002: Connecteur de l’adaptateur secteur (DC 24V, 1A)
GWN7003: Connecteur de l’adaptateur secteur (DC 24V, 1A)
5
Borne de mise à la terre (GWN7003 uniquement).
6
Bouton de réinitialisation d’usine. Appuyez pendant 5 secondes
pour réinitialiser les paramètres d’usine par défaut
CONNECTER LE GWN7001/7002/7003
1. Alimenter le GWN7001/7002/7003
1x Câble Ethernet
1x Adaptateur d’alimentation
1x GWN7001 ou GWN7002 ou GWN7003
Câble de masse
2x Support de montage
8x
Vis
Uniquement pour GWN7003
• Ne pas tenter d’ouvrir, de désassembler, ou de modier le dispositif.
• Ne pas exposer cet appareil à des températures situées hors de la plage de 0 °C
à 40 °C en opération et -30 °C à 60 °C en stockage.
• Ne pas exposer cet appareil à un environnement avec humidité hors de la plage
de 10-90% RH (sans condensation).
• Ne pas éteindre l’appareil pendant le démarrage du système ou la mise à jour du
rmware. Cela risque de rompre l’image du rmware et en conséquence rendre
l’unité inutilisable.
Remarque : Les ports avec ce symbole sont congurés pour être utilisés comme
port WAN par défaut en usine.
Le GWN7001/7002/7003 peut être
mis sous tension à l’aide d’un bloc
d’alimentation ou PoE 1x Ethernet
(IEEE 802.3af/at) uniquement pour
GWN7002/7003.
GWN7002
GWN7003
GWN7001

~ 14 ~~ 13 ~
INSTALLATION
Optical Fiber
ADSL Modem
Community Broadband
Internet
Ethernet Cable
3. Utilisez un tournevis pour serrer les vis (préparées par vous-même) qui ont
traversé les supports de montage en forme de L pour vous assurer que le routeur
GWN7003 est fermement installé sur le mur.
1. Utilisez les vis fournies pour xer les deux
supports de montage en forme de L (pivotés
à 90°) des deux côtés du routeur GWN7003.
2. Collez le port du routeur vers
le haut et horizontalement sur
le mur sélectionné, marquez
la position du trou de vis sur
les supports de montage en
forme de L avec un marqueur.
Ensuite, percez un trou à la
Panneau frontal de routeur GWN7003
ACCÈS À L’INTERFACE DE CONFIGURATION
Maintenant que vous êtes connecté au port LAN du GWN7001/7002/7003 avec un
câble réseau, vous pouvez accéder à son interface de conguration avec : myrouter.
grandstream.com ou adresse IP par défaut 192.168.80.1. Entrez ensuite le mot de
passe pour vous connecter.
The GNU GPL license terms are incorporated into the device rmware and an be
accessed via the Web user interface of the device at my_device_ip/gpl_license. It can
also be accessed here: https://www.grandstream.com/legal/open-source-software
To obtain a CD with GPL source code information please submit a written request to:
info@grandstream.com
Refer to online documents and FAQ for more detailed information:
https://www.grandstream.com/our-products
1. Retirez la vis de terre à l’arrière
du routeur et connectez une
extrémité du câble de terre à
la borne de câblage du routeur.
2. Remettez la vis de terre dans le
trou de vis et serrez-la avec un
tournevis.
3. Connectez l’autre extrémité du câble de terre à un autre appareil qui a été mis
à la terre ou directement à la borne de la barre de terre dans le local technique.
Mise à la terre du GWN7003
position marquée avec une perceuse à percussion et percez les chevilles en
plastique (préparées par vous-même) dans le trou percé dans le mur.
2. Connecter à Internet
Connectez-vous au port LAN/WAN ou SFP/WAN (GWN7002/7003 uniquement) à
un modem haut débit en bre optique, un modem haut débit ADSL ou une interface
haut débit communautaire.
3. Connectez-vous au réseau GWN7001/7002/7003
Connectez votre ordinateur à l’un des ports LAN.
Montage mural du GWN7001/7002
1. À l’aide d’une perceuse, faites deux
trous dans le mur avec un espacement
de 135,0 mm et un diamètre de 6,0 mm.
Mettez une cheville en plastique et une
vis (non fournie) sur chaque trou.
2. Montez le routeur GWN7001/7002 sur les
vis de montage.
Cheville en
plastique
Vis Le fond du routeur
GWN7001/7002
Montage mural du GWN7003
Cheville en
plastique
Vis
Câble de masse
Remarque : Les informations de mot de passe par défaut du GWN7001/7002/7003
sont imprimées sur l’étiquette MAC au bas de l’unité.
Pour gérer le GWN7001/7002/7003 sur le cloud, veuillez vous référer à https://
www.gwn.cloud.

~ 16 ~~ 15 ~
DE ÜBERSICHT
GWN7001/7002/7003 sind Multi-WAN-Gigabit-VPN-Router mit integrierten Firewalls,
mit denen Unternehmen umfassende kabelgebundene, drahtlose und VPN-Netzwerke
für einen oder mehrere Standorte aufbauen können. Sie bieten leistungsstarke Rout-
ing- und Switching-Möglichkeiten sowie eine integrierte VPN-Unterstützung für si-
chere Verbindungen im Büro und zwischen den Büros. Um Sicherheitsstandards auf
Unternehmensniveau zu bieten und einen stabilen Netzwerkbetrieb zu gewährleisten,
verfügt der GWN7001/7002/7003 über eine integrierte Firewall mit erweiterter Sicher-
heit für Inhalte, Filterung, Bedrohungserkennung, Angrisprävention und mehr. Für
maximale Netzwerkzuverlässigkeit unterstützen die Router Lastausgleich-, Failover-
und Bandbreitenverwaltungsfunktionen für den Datenverkehr. Der GWN7001 umfasst
6 Gigabit-Ethernet-Ports. Die Modelle GWN7002/7003 bieten 2 Gigabit-SFP-Ports, 4/9
Gigabit-Ethernet-Ports und 2 PoE-Ausgangsports über den andere Endpunkte mit Strom
versorgt werden können. Diese Router können sich selbst und bis zu 150 Wi-Fi-APs der
Grandstream GWN-Serie über den integrierten Controller verwalten, dieser ist in die We-
boberäche der Router eingebettet. Des Weiteren können die Router über GWN.Cloud,
der kostenlosen Cloud-Management-Plattform oder der On-Premise-Managementlö-
sung GWN Manager verwaltet und administriert werden. Durch die Bereitstellung von
Hochleistungs-Routing, VPN-Unterstützung, hoher Systemsicherheit und den benutzer-
freundlichen Netzwerkverwaltungstools, sind die GWN Gigabit VPN-Router ideal für eine
Vielzahl von Anwendungen in kleinen und mittelgroßen Unternehmen, im Einzelhandel,
Gesundheitswesen oder im Gastgewerbe sowie in Bildungseinrichtungen und mehr.
SICHERHEITSHINWEISE
VERPACKUNGSINHALT
1x Kurzinstallationsanleitung 1x Ethernet-Kabel
1x Netztei
Erdungs
(Masse) Kabel
2x Montagewinkel
8x Schrauben
Nur für GWN7003
• Das Produkt darf nicht geönet, zerlegt oder verändert werden.
• Bitte beachten Sie die zulässigen Temperaturbereiche für Nutzu ng(0 °C bis 40 °C)
und Lagerung (-30 °C bis 60 °C).
• Das Produkt darf nur in Umgebungen mit einem relativen Luftfeuchtebereichs von
10% bis 90% (nicht kondensierend) genutzt werden.
• Die Stromversorgung darf während des Start- bzw. Upgradevorgangs nicht un-
terbrochen werden. Dies kann die Firmware beschädigen und zu unerwünschten
Fehlfunktionen führen.
GWN7001/7002/7003 ANSCHLÜSSE
Nr. Port Beschreibung
1GWN7001: 6x Gigabit Ethernet Ports
GWN7002: 4x Gigabit Ethernet Ports
GWN7003: 9x Gigabit Ethernet Ports
Hinweis: Alle Ports sind WAN oder LAN kongurierbar. Die
Gigabit Ethernetports bieten 2x PoE In und 1x PoE Out (nur
GWN7002/7003).
22x SFP Gigabit Ports (nur GWN7002/7003).
3USB 2.0 port
4GWN7001: Netzteilanschluss (DC 12V, 1A).
GWN7002: Netzteilanschluss (DC 24V, 1A).
GWN7003: Netzteilanschluss (DC 24V, 1A).
5Massegehäuse (nur GWN7003).
6Werkseinstellungen zurücksetzen. 5 Sekunden lang drücken,
um die Werkseinstellungen zurückzusetzen.
ANSCHLIESSEN DES GWN7001/7002/7003
1. Stromversorgung des GWN7001/7002/7003
Zur Stromversorgung des
GWN7001/7002/7003 nutzen Sie
bitte nur ein Netzteil oder PoE (IEEE
802.3af/at) nur für GWN7002/7003.
Hinweis: Ports mit diesem Symbol sind werksseitig bei Auslieferung als WAN
Port konguriert.
1x GWN7001 oder GWN7002 oder GWN7003
GWN7002
GWN7003
GWN7001
~ 18 ~~ 17 ~
INSTALLATION
Glasfaser
ADSL-Modem
Community-Breitband
Internet
Ethernet Cable
3. Befestigen Sie den Router GWN7003 nun mit dem Schraubendreher und den
Schrauben (nicht im Lieferumfang enthalten) durch die Haltewinkel an der
Wand.
1. Befestigen Sie sie mit den beiliegenden
Schrauben die beiden Haltewinkel seitlich
am Gehäuse des GWN7003 Routers.
2. Zum markieren der
Bohrlöcher halten Sie
bitte den Router mit den
Ports nach oben an die
vorgesehene Wand.
Zeichnen Sie dann die Front des GWN7003 Routers
1. Lösen Sie die Masseschraube
von der Rückseite des Routers
und verbinden Sie das
Massekabel mit dem Gehäuse.
2. Drehen Sie die Schraube
wieder ein - ziehen Sie
die Schraube mit einem
Schraubendreher fest.
3. Befestigen Sie das andere Ende des Massekabels am allgemeinen
Masseanschluss (Erdung) im Raum.
Erdung GWN7003
Plastikdübel
Schraube
Bohrlöcher durch die Löcher an den Haltewinkeln an.
Bohren Sie
dann an der
markierten Stelle mit einem Schlagbohrer ein Loch, anschließend stecken Sie
die Dübel (nicht im Lieferumfang enthalten) in die Bohrlöcher.
Verbinden Sie den WAN Port mit einem optischen Breitbandmodem, ADSL-
Breitbandmodem oder einen allgemeinen Breitbandmodem.
2. Mit dem Internet verbinden
3. Mit dem GWN7001/7002/7003 Netzwerk verbinden
Verbinden Sie Ihren Computer mit einer der LAN Schnittstellen.
Wandmontage des GWN7001/7002
1. Bohren Sie zwei Löcher (6mm) im
Abstand von 135mm. Stecken Sie
einen Dübel hinein und drehen Sie die
passenden Schrauben in die Dübel.
2. Stecken Sie den Router auf die beiden
Schrauben. Unterseite des
GWN7001/7002 Routers
Wandmontage des GWN7003
Plastikdübel Schraube
ZUGRIFF AUF DIE KONFIGURATIONSOBERFLÄCHE
Nachdem Sie mit dem GWN7001/7002/7003 LAN-Kabel verbunden sind, können
Sie über die Kongurations-Schnittstelle: myrouter.grandstream.com oder die IP
Adresse auf das Gerät zugreifen 192.168.80.1. Geben Sie nach Auorderung das
Passwort ein.
Hinweis: Das GWN7001/7002/7003 Admin-Passwort ist auf dem Aufkleber auf der
Rückseite des Geräts aufgedruckt.
Um den GWN7001/7002/7003 der Cloud zu verwalten, wechseln Sie bitte zu
https://www.gwn.cloud.
Die GNU GPL Lizenz ist in der Gerätesoftware hinterlegt und kann über die Web-
Schnittstelle unter http (s):// IP/gpl_license. Um eine CD mit der Lizenz zu erhalten,
senden Sie uns bitte eine Email an info@ Grandstream.com.
Das ausführliche Benutzerhandbuch kann geladen werden von:
https://www.grandstream.com/our-products
Erdungs (Masse)
Kabel

~ 20 ~~ 19 ~
IT
1x Guida installazione rapida 1x Cavo Ethernet
1x Alimentatore
Cavo di terra
2x Staa di montaggio
8x Viti
Solo per GWN7003
PANORAMICA
GWN7001/7002/7003 sono router Multi-WAN Gigabit VPN con rewall integrati che
consentono alle aziende di creare reti cablate, wireless e VPN complete per una
o più sedi. Orono un routing e una commutazione ad alte performance, insieme
al supporto VPN integrato, per una connettività interna e tra più uci sicura. Per
fornire protezione a livello aziendale e garantire un funzionamento di rete stabile,
GWN 7001/7002/7003 è dotato di un rewall integrato con sicurezza avanzata dei
contenuti, ltro, rilevamento minacce, prevenzione attacchi e molto altro. Per ot-
timizzare l’adabilità della rete, supportano le funzioni di bilanciamento del traco,
failover e gestione della banda larga. GWN7001 include porte Ethernet da 6 Gigabit.
GWN7002/7003 includono porte SFP da 2 Gigabit, porte Ethernet da 4/9 Gigabit e
2 porte di uscita PoE per fornire alimentazione agli altri endpoint. Questi router sono
autogestiti e possono gestire no a 150 AP Wi-FI serie GWN Grandstream, grazie a
un controller integrato situato nell’interfaccia utente Web del prodotto. Inoltre, questi
router possono essere gestiti con GWN.Cloud e GWN Manager, gli strumenti di ges-
tione rete cloud e in locale di Grandstream. Fornendo routing ad alte performance,
supporto VPN, protezione avanzata e strumenti di gestione rete intuitivi, i router
GWN Gigabit VPN sono ideali per una vasta gamma di implementazioni, incluse
piccole e medie aziende, vendita al dettaglio, istruzione, ospitalità, sanità e altro.
PRECAUZIONI
• Non tentare di aprire, smontare o modicare il dispositivo.
• Non esporre il dispositivo a temperature esterne alla gamma da 0 °C a 40 °C per
il funzionamento e alla gamma da -30 °C a 60°C per la conservazione.
• Non esporre il dispositivo ad ambienti fuori dal seguente intervallo di umidità:
10-90% UR (senza condensa).
• Non spegnere/accendere il dispositivo durante l’avvio del sistema o
l’aggiornamento del rmware. Ciò potrebbe comportare il danneggiamento del
rmware e il malfunzionamento dell’unità.
CONTENUTO DELLA CONFEZIONE
PORTE GWN7001/7002/7003
N° Porta Descrizione
1GWN7001: 6x porte Gigabit Ethernet
GWN7002: 4x porte Gigabit Ethernet
GWN7003: 9x porte Gigabit Ethernet
Nota: Tutte le porte supportano WAN/LAN congurabile. Le
porte Gigabit Ethernet includono 2 porte PoE OUT e 1 porta
PoE IN (solo GWN7002/7003).
22x porte Gigabit SFP (solo GWN7002/7003).
3Porta USB 2.0
4
GWN7001: Connettore adattatore di alimentazione (DC 12V, 1A)
GWN7002: Connettore adattatore di alimentazione (DC 24V, 1A)
GWN7003: Connettore adattatore di alimentazione (DC 24V, 1A)
5Terminale di terra (solo GWN7003).
6Pulsante di ripristino delle impostazioni di fabbrica Premere per
5 secondi per ripristinare le impostazioni predenite di fabbrica
CONNETTI IL GWN7001/7002/7003
1. Alimenta il GWN7001/7002/7003
GWN7001/7002/7003 si attiva tramite
un alimentatore o PoE (IEEE 802.3af/
at) solo per GWN7002/7003.
Nota: le porte con questo simbolo sono congurate per essere usate come porta
WAN come predenita di fabbrica.
1x GWN7001 o GWN7002 o GWN7003
GWN7002
GWN7003
GWN7001

~ 22 ~~ 21 ~
Fibra ottica
Modem ADSL
Banda larga comunitaria
Internet
Ethernet Cable
3. Utilizzare un cacciavite per stringere le viti (non incluse) che sono state fatte
passare attraverso le stae di montaggio a L, per garantire che il router GWN7003
sia installato saldamente sulla parete.
Fondo del router
GWN7001/7002
1. Utilizzare le viti fornite per ssare le due
stae di montaggio a L (ruotate di 90°)
su entrambi i lati del router GWN7003.
2. Appoggiando il router sulla
parete disegnata in modo
orizzontale e con le porte verso
l’alto, segnare la posizione del
foro per la vite sulla staa di
montaggio a L mediante un
Lato anteriore del router GWN7003
ACCESSO ALL’INTERFACCIA DI CONFIGURA-
ZIONE
1. Allentare la vite di terra dal retro
del router così da collegare una
delle estremità del cavo di terra
al medesimo.
2. Rimettere la vite di terra nel foro
e serrarla con un cacciavite.
3. Collegare l’altra estremità del cavo di terra a un altro dispositivo con messa a
terra o direttamente al terminale della barra di terra nella sala apparecchiature.
Messa a terra GWN7003
Ancoraggio in
plastica
Viti
pennarello Quindi, praticare un foro nella posizione contrassegnata con un trapano
a percussione e inserire le viti a espansione (non incluse) nel foro.
Collegare la porta WAN a un modem a banda larga in bra ottica, a un modem
ADSL a banda larga o a un’interfaccia comunitaria a banda larga.
2. Connettersi a Internet
3. Collegare alla rete GWN7001/7002/7003
Collegare il proprio computer a una delle porte LAN.
INSTALLAZIONE
Montaggio del GWN7001/7002 a parete
1. Utilizzando un trapano, eettuare
due fori alla parete con una distanza
di 135 mm, 6 mm di diametro. Porre
un ancoraggio in plastica e la vite
(non fornita) su ogni foro.
2. Montare il router GWN7001/7002
sulle viti di montaggio.
Ancoraggio in
plastica
Viti
Per gestire il GWN7001/7002/7003 sul cloud , far riferimento a: https://www.gwn.
cloud.
I termini della licenza GNU GPL sono incorporati nel rmware del dispositivo e sono
accessibili tramite l’interfaccia utente Web del dispositivo a: http(s)://IP/ gpl_license.
Per ottenere un CD con informazioni sul codice sorgente GPL, si prega di inviare una
richiesta scritta a info@grandstream.com
Scaricare il manuale utente dettagliato da:
https://www.grandstream.com/our-products
Dopo aver eettuato il collegamento alla porta LAN del router GWN7001/7002/7003
con il cavo di rete, è possibile accedere all’interfaccia di congurazione con:
myrouter.grandstream.com o l’indirizzo IP predenito 192.168.80.1. Al termine,
inserire la password per eseguire l’accesso.
Nota: Le informazioni sulla password predenita di GWN7001/7002/7003 sono
stampate sul tag MAC nella parte inferiore dell’unità.
Cavo di terra
Montaggio del GWN7003 a parete

~ 24 ~~ 23 ~
RU
1x Руководство по быстрой установке 1x кабель Ethernet
1x Блок питания
Заземляющий
кабель
2x Монтажный кронштейн
8x Винта
только для GWN7003
ОБЗОР ПРОДУКТА
GWN7001/7002/7003 — это Multi-WAN Gigabit VPN маршрутизаторы со встроенными
брандмауэрами, которые позволяют предприятиям создавать комплексные
проводные, беспроводные и VPN-сети для одного или нескольких оффисов. Они
имеют высокие мощности маршрутизации и коммутации, а также поддержку
VPN для безопасного подключения внутри и между офисами. Для обеспечения
сервисов безопасности корпоративного уровня и стабильной работу сети, GWN
7001/7002/7003 оснащен встроенным брандмауэром с расширенными функциями
защиты контента, фильтрации, обнаружения угроз, предотвращения атак и т. д.
Для обеспечения максимальной надежности сети маршрутизаторы поддерживают
балансировку нагрузки трафика, аварийное переключение и управление полосой
пропускания. GWN7001 имеет 6 гигабитных портов Ethernet. GWN7002/7003 имеет
2 гигабитных порта SFP, 4/9 гигабитных портов Ethernet и 2 порта с поддержкой PoE,
для подачи питания на другие утсройства. Эти маршрутизаторы могут управлять
до 150 точек доступа Wi-Fi Grandstream серии GWN благодаря встроенному
контроллеру, с управлением через WEB-интерфейс. Этими маршрутизаторами
также можно управлять с помощью GWN.Cloud и GWN Manager, бесплатных
облачных и локальных инструментов управления сетью Grandstream. Обеспечивая
высокопроизводительную маршрутизацию, поддержку VPN, мощные сервисы
безопасности и простые в использовании инструменты управления сетью,
гигабитные VPN-маршрутизаторы GWN идеально подходят для широкого спектра
заказчиков, включая малый и средний бизнес, розничную торговлю, образование,
гостиничный бизнес, здравоохранение и многое другое.
МЕРЫ ПРЕДОСТОРОЖНОСТИ
• Не пытайтесь открыть, разобрать или изменить устройство.
• Не подвергайте воздействию температуры вне диапазона от 0 °C до 40 °C при
эксплуатации и от -30°C до 60°C при хранении.
• Не используйте данное устройство в среде, где значение влажности выходит за
диапазон: Относит. влажность 10%-90% (без конденсации).
• Не включать-выключать устройство в процессе начального запуска системы
или в процессе обновления прошивки. Вы можете тем самым повредить
заводскую прошивку устройства и вывести его из строя.
СОДЕРЖИМОЕ УПАКОВКИ
ПОРТЫ GWN7001/7002/7003
Нет. Порты Описание
1GWN7001: 6x порта Gigabit Ethernet
GWN7002: 4x порта Gigabit Ethernet
GWN7003: 9x порта Gigabit Ethernet
Примечание. Все порты поддерживают
настройку WAN/LAN. Порты Gigabit Ethernet
включают 2 порта PoE OUT и 1 порт PoE IN
(только GWN7002/7003).
22x порта Gigabit SFP (только GWN7002/7003).
3порт USB 2.0
4
GWN7001: Разъем адаптера питания (24 В
постоянного тока, 1 А)
GWN7002/7003: Разъем адаптера питания (24 В
постоянного тока, 1 А)
5Клемма заземления (только GWN7003).
6Кнопка сброса к заводским настройкам. Нажмите и
удерживайте 5 секунд, чтобы сбросить заводские
настройки по умолчанию.
Примечание. Порты с этим символом настроены на использование в
качестве порта WAN по умолчанию на заводе.
1x GWN7001 или GWN7002 или GWN7003
GWN7002
GWN7003
GWN7001

~ 26 ~~ 25 ~
PT
1x Guia de Instalação Rápido 1x Cabo Ethernet
1x Adaptador de Corrente
Cabo terra
2x Suporte de montagem
8x Parafuso
Apenas para GWN7003
RESUMO
Os GWN7001/7002/7003 são roteadores Multi-WAN Gigabit VPN com rewalls in-
tegrados que permitem às empresas construir redes com o, sem o e VPN abran-
gentes para um ou vários locais. Eles oferecem roteamento de alto desempenho e
poder de comutação junto com suporte VPN integrado para conectividade segura
no escritório e entre escritórios. Para fornecer proteção de segurança de nível em-
presarial e garantir uma operação de rede estável, o GWN 7001/7002/7003 possui
um rewall integrado com segurança de conteúdo avançada, ltragem, detecção de
ameaças, prevenção de ataques e muito mais. Para maximizar a conabilidade da
rede, eles suportam recursos de balanceamento de carga de tráfego, failover e ge-
renciamento de largura de banda. O GWN7001 inclui 6 portas Gigabit ethernet. O
GWN7002/7003 inclui 2 portas Gigabit SFP, 4/9 portas Gigabit ethernet e 2 portas
de saída PoE que permitem fornecer energia a outros terminais. Esses roteadores
podem gerenciar até 150 APs Wi-Fi Grandstream GWN Series graças a um contro-
lador integrado localizado na interface web dos produtos. Esses roteadores também
podem ser gerenciados através do GWN.Cloud e do GWN Manager, as ferramentas
gratuitas de gerenciamento de rede local e de nuvem da Grandstream. Ao fornecer
roteamento de alto desempenho, suporte a VPN, poderosa proteção de segurança
e ferramentas de gerenciamento de rede fáceis de usar, os roteadores GWN Gigabit
VPN são ideais para uma ampla variedade de implantações, incluindo pequenas e
médias empresas, varejo, educação, hotelaria, saúde e muito mais.
PRECAUÇÕES
• Não tente abrir, desmontar, ou modicar o dispositivo.
• Não expor o dispositivo a temperaturas fora do intervalo dos 0 °C até os 40 °C em
operação e o intervalo dos -30 °C até os 60 °C em armazenamento
• Não exponha este dispositivo em ambientes com umidade fora do intervalo: 10-
90% HR (sem condensação).
• Não desligue e ligue o dispositivo durante o reinicio do sistema ou durante a
atualização de rmware. Você pode corromper o rmware e causar a avaria do
dispositivo
CONTEÚDO DO PACOTE
PORTAS DO GWN7001/7002/7003
No. Porta Descrição
1GWN7001: 6x Portas Ethernet Gigabit
GWN7002: 4x Portas Ethernet Gigabit
GWN7003: 9x Portas Ethernet Gigabit
Nota: Todas as portas suportam WAN/LAN congurável. As
portas ethernet Gigabit incluem 2 x Portas PoE OUT e 1 x
Porta PoE IN (Unicamente para o GWN7002/7003).
22 x Portas SFP Gigabit (Unicamente para o GWN7002/7003).
3Porta USB 2.0
4
GWN7001: Conector do adaptador de alimentação (DC 12V, 1A)
GWN7002: Conector do adaptador de alimentação (DC 24V, 1A)
GWN7003: Conector do adaptador de alimentação (DC 24V, 1A)
5Terminal de aterramento (Unicamente para o GWN7003).
6Botão de redenição de fábrica. Pressione por 5 segundos
para redenir as congurações padrão de fábrica
CONECTE O GWN7001/7002/7003
1. Ligue o GWN7001/7002/7003
O GWN7001/7002/7003 pode ser
ligado usando uma PSU ou PoE
(IEEE 802.3af/at) apenas para
GWN7002/7003.
Nota: As portas com o símbolo estão conguradas para ser utilizadas como
portas WAN por padrão.
1x GWN7001 ou GWN7002 ou GWN7003
GWN7002
GWN7003
GWN7001

~ 28 ~~ 27 ~
Fibra ótica
modem ADSL
banda larga comunitária
Internet
Ethernet Cable
3. Use uma chave de fenda para apertar os parafusos (preparados por você)
através dos suportes de montagem em forma de L para garantir que o roteador
GWN7003 esteja rmemente instalado na parede.
Parte inferior do roteador
GWN7001/7002
1. Use os parafusos fornecidos para xar os dois
suportes de montagem em forma de L (girados
90°) em ambos os lados do roteador GWN7003.
2. Coloque o roteador com as por-
tas de rede para cima e horizon-
talmente na parede selecionada,
marque a posição do orifício do
parafuso nos suportes de mon-
tagem em forma de L com um
marcador. Use uma chave de
fenda para apertar os parafusos
Frente do roteador GWN7003
1. Remova o parafuso de aterra-
mento da parte traseira do rote-
ador e conecte uma extremidade
do cabo de aterramento ao termi-
nal de ação do roteador.
2. Coloque o parafuso de aterramen-
to de volta no orifício do parafuso
e aperte-o com uma chave de
fenda.
3. Conecte a outra extremidade do cabo de aterramento a outro dispositivo que
tenha sido aterrado ou diretamente ao terminal da barra de aterramento na sala
de equipamentos.
Aterramento do GWN7003
Âncora de
plástico
Parafuso
(preparados por você) através dos suportes de montagem em forma de L para
garantir que o roteador GWN7003 esteja rmemente instalado na parede
Conecte à porta WAN um modem de banda larga de bra óptica, modem de banda
larga ADSL ou uma interface de banda larga comunitária.
2. Conecte-se à Internet
3. Conecte à rede do GWN7001/7002/7003
Conecte seu computador a uma das portas LAN.
INSTALAÇÃO
Montagem do GWN7001/7002 na parede
1. Com uma furadeira, faça dois furos
na parede com espaço de 135,0mm,
diâmetro de 6,0mm. Coloque uma
âncora de plástico e parafuso (não
fornecido) em cada orifício.
2. Monte o roteador GWN7001/7002
nos parafusos de montagem.
Montagem do GWN7003 na parede
Parafuso
Âncora de plástico
Para gerenciar o GWN7001/7002/7003 através da plataforma na nuvem viste
https://www.gwn.cloud.
Os termos de licença GNU GPL estão dentro do rmware do dispositivo e você pode
visualizar o documento através da interface web do dispositivo, em http(s)://IP/gpl_li-
cense. Para obter um CD com a informação do código fonte GPL, por favor solicite-o
através de info@grandstream.com
Para o manual do usuário detalhado, faça o download desde:
https://www.grandstream.com/our-products
ACESSO À INTERFACE DE CONFIGURAÇÃO
Agora que você está conectado à porta LAN do GWN7001/7002/7003 com cabo de
rede, você pode acessar à interface de conguração com: myrouter.grandstream.
com ou com o endereço IP padrão 192.168.80.1. Em seguida, digite a senha para
fazer o login.
Nota: As informações de senha padrão do GWN7001/7002/7003 estão impressas
na etiqueta MAC na parte inferior da unidade.
Cabo terra

~ 29 ~
U.S. FCC Part 15 Regulatory Information
This device complies with part 15 of the FCC Rules. Operation is subject to the
following two conditions: (1) this device may not cause harmful interference, and (2)
this device must accept any interference received, including interference that may
cause undesired operation.
Any Changes or modications not expressly approved by the party responsible for
compliance could void the user’s authority to operate the equipment.
Note: This equipment has been tested and found to comply with the limits for a Class
B digital device, pursuant to part 15 of the FCC Rules. These limits are designed
to provide reasonable protection against harmful interference in a residential
installation. This equipment generates, uses and can radiate radio frequency
energy and, if not installed and used in accordance with the instructions, may cause
harmful interference to radio communications. However, there is no guarantee that
interference will not occur in a particular installation. If this equipment does cause
harmful interference to radio or television reception, which can be determined
by turning the equipment o and on, the user is encouraged to try to correct the
interference by one or more of the following measures:
• Reorient or relocate the receiving antenna.
• Increase the separation between the equipment and receiver.
• Connect the equipment into an outlet on a circuit dierent from that to which the
receiver is connected.
• Consult the dealer or an experienced radio/TV technician for help.
Canada Regulatory Information
CAN ICES-003(B)/NMB-003(B)
This product meets the applicable Innovation, Science and Economic Development
Canada technical specications.
Le présent produit est conforme aux spécications techniques applicables
d’Innovation, Sciences et Développement économique Canada.
1/17