ResMed Other Mirage masks Guia de usuario
- Tipo
- Guia de usuario

Global leaders in sleep and respiratory medicine www.myresmed.com
Mirage Liberty™
FULL FACE MASK
User Guide
English • Français • Español • Português
618360/1 2020-06
MIRAGE LIBERTY
USER
AMER ML
618360
618300 cover.indd 1618300 cover.indd 1 30/06/2020 9:32:18 AM30/06/2020 9:32:18 AM

Manufacturer:
ResMed Pty Ltd 1 Elizabeth Macarthur Drive Bella Vista NSW 2153 Australia
See www.resmed.com for other ResMed locations worldwide.
For patent information, see www.resmed.com/ip.
Mirage and Mirage Liberty are trademarks of ResMed Pty Ltd and Mirage is registered in U.S.
Patent and Trademark Office.
Velcro is a registered trademark of Velcro Industries B.V.
STERRAD and CIDEX are trademarks of Johnson & Johnson.
© 2020 ResMed.
618300 cover.indd 2618300 cover.indd 2 30/06/2020 9:32:18 AM30/06/2020 9:32:18 AM

A
Mask parts / Composants du masque / Piezas de la mascarilla /
Peças da máscara
M
i
r
a
g
e
L
i
b
e
r
t
y
™
Mask cushion /
Bulle du masque /
Almohadilla bucal /
Almofada bucal
Mask frame / Entourage rigide /
Armazón de la mascarilla / Armação
da máscara
Ports cap / Bouchon d’entrées / Tapón de
los puertos / Tampa das portas
Valve / Valve /
Válvula / Válvula
Exhaust vents / Orifices de
ventilation / Orificios de
ventilación / Portas de exalação
Lower straps / Sangles inférieures /
Correas inferiores / Correias inferiores
Lower clip / Clip inférieur / Broche
inferior / Presilha inferior
B
Fitting the mask / Mise en place du masque / Colocación de la mascarilla / Ajuste da máscara
1
2
1 2
3 4 5
C
Disassembling for cleaning / Démontage pour le nettoyage / Desmontaje para la limpieza / Desmontagem para limpeza
3 4 5 6 7
© 2020 ResMed.
© 2020 ResMed.
Inlet tube / Tuyau d’entrée / Tubo de entrada /
Tubo de entrada
Swivel / Pièce pivotante / Pieza
giratoria / Peça giratória
Nasal pillows /
Coussins narinaires /
Almohadillas nasales /
Almofadas nasais
Valve clip / Clip de la valve / Traba
de la válvula / Clipe da válvula
Right upper clip / Clip supérieur droit /
Broche superior derecho / Presilha superior
direita
Lower clip / Clip inférieur / Broche
inferior / Presilha inferior
Headgear parts / Composants du harnais / Piezas del arnés / Peças
do arnês
Elbow / Coude /
Codo / Cotovelo
Left upper clip / Clip supérieur
gauche / Broche superior
izquierdo / Presilha superior
esquerda
Valve flap / Clapet de
la valve / Aleta de la
válvula / Aba da válvula
Valve hinge / Charnière
de la valve / Bisagra de
la válvula / Articulação
da válvula
1 8
Cushion alignment guide / Repère d’alignement de la
bulle / Guía para alineación de la almohadilla / Guia de
alinhamento da almofada
© 2020 ResMed.
2
Upper straps / Sangles supérieures / Correas
superiores / Correias superiores
618300 illo sheets.indd 1618300 illo sheets.indd 1 30/06/2020 9:22:57 AM30/06/2020 9:22:57 AM

D
Reassembling the mask / Remontage du masque / Montaje de la mascarilla / Montagem da máscara
1 2 3 4
7 8
Mirage Liberty
Full Face Mask
Illustrations Sheet / Fiche d’illustrations /
Hoja de figuras / Folheto de ilustrações
Note: For complete instructions, please read the text section in
conjunction with the illustrations on this sheet.
Remarque : pour les instructions complètes, veuillez lire le texte du
guide avec cette fiche d’illustrations.
Nota: Para entender bien las instrucciones, lea el texto junto con
las figuras de esta hoja.
Nota: para obter instruções completas, leia a seção de texto em
conjunto com as ilustrações constantes deste folheto.
Component of: 618360/1
5
E
Reassembling the headgear / Remontage du harnais / Montaje
del arnés / Montagem do arnês
1
© 2020 ResMed.
96
© 2020 ResMed.
2
618300 illo sheets.indd 2618300 illo sheets.indd 2 30/06/2020 9:22:58 AM30/06/2020 9:22:58 AM

English
1
Mirage Liberty™
FULL FACE MASK
Thank you for choosing ResMed’s Mirage Liberty. The Mirage Liberty is a full
face mask that combines nasal pillows and a mouth cushion, creating a mask
that is both unobtrusive and easy to use without compromising seal, stability
and comfort.
The mask incorporates vent holes and a built-in valve so that you can continue
to breathe fresh air if the airflow to your mask is impeded for any reason.
Intended Use
The Mirage Liberty channels airflow noninvasively to a patient from a positive
airway pressure device such as a continuous positive airway pressure (CPAP)
or bilevel system.
The Mirage Liberty is to be used by adult patients (>66 lb/30 kg) for whom
positive airway pressure has been prescribed.
The Mirage Liberty is intended for single-patient re-use in the home
environment and multipatient re-use in the hospital/institutional environment.
CAUTION
In the USA, federal law restricts this device to sale by, or on the order of,
a physician.
Before Using the Mask
WARNING
• The Mirage Liberty must be used under qualified supervision with
patients who are unable to remove the mask by themselves. The mask
may not be suitable for those predisposed to aspiration.
• The elbow and valve assembly have specific safety functions. They
allow you to breathe fresh air if the airflow from your flow generator
to your mask is impeded. The mask should not be worn if the valve is
618300 content.book Page 1 Wednesday, May 2, 2018 8:46 AM

2
damaged as it will not be able to perform its safety function. The valve
should be replaced if it is damaged, distorted or torn.
• The vent holes must be kept clear.
• Follow all precautions when using supplemental oxygen.
• Any supplemental oxygen flow must be turned off when the flow
generator is not operating, so that unused oxygen does not
accumulate within the flow generator enclosure and create a risk of
fire.
• At a fixed flow rate of supplemental oxygen flow, the inhaled oxygen
concentration will vary, depending on the pressure settings, patient
breathing pattern, mask, point of application and leak rate.
• The technical specifications of the mask and flow generator are
provided for your clinician to check that they are compatible. If used
outside specification or if used with incompatible devices, the seal and
comfort of the mask may not be effective, optimum therapy may not
be achieved, and leak, or variation in the rate of leak, may affect the
flow generator function.
• Discontinue using the Mirage Liberty if you have ANY adverse
reaction to the mask system, and consult your physician or sleep
therapist.
• Discontinue using the Mirage Liberty if you experience nasal irritation,
and consult your physician or sleep therapist.
• Refer to your flow generator manual for details on settings and
operational information.
• Using a mask may cause tooth, gum or jaw soreness or aggravate an
existing dental condition. If symptoms occur, consult your physician or
dentist.
CAUTION
Avoid connecting flexible PVC products (eg. PVC tubing) directly to any
part of this mask. Flexible PVC contains elements that can be detrimental
to the materials of the mask, and may cause the components to crack or
break.
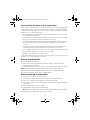
Using the Mask
Select ‘Mir Full’ or ‘Full Face’ as the mask option when using the Mirage
Liberty with ResMed flow generators that have mask setting options.
618300 content.book Page 2 Wednesday, May 2, 2018 8:46 AM

3
English
Fitting the mask
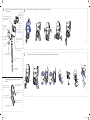
The diagrams in section A on the illustrations sheet show how the parts of the
mask fit together.
The diagrams in section B show the suggested sequence for obtaining the
best fit and comfort in using your mask. Please follow these instructions
carefully.
1 Wash your face thoroughly before fitting the mask. It is recommended that
you do not apply moisturizer where the mask contacts your face as it can
affect the mask seal.
2 Place the headgear on your head, like you would a cap, and pull the mask
forward onto your face (B-1). Make sure that the headgear fits evenly on the
top of your head.
3 Fit the mask over your mouth. Insert the pillows so that they sit gently just
inside the entrance to your nostrils.
4 Push the lower headgear clips into the slots on the mask frame until they
click into place (B-2).
5 To tighten or loosen the headgear straps, peel the Velcro
®
tab off the
headgear and reposition it. Gently and evenly adjust the upper headgear
straps (B-3), then the lower straps (B-4). Alternate the adjustment of each
set of straps until they are comfortable and firm and so that the upper
headgear clips rest between your eye and your ear. The mask should gently
‘float’ on your face. Do not overtighten the headgear straps.
6 Connect one end of the main air tubing to your flow generator and the other
end to the swivel.
7 Connect the elbow to the mask frame, holding the sides of the elbow then
firmly pushing it onto the frame until it clicks into place (B-5). Rotate the
elbow to check that it rotates freely and does not separate from the frame.
8 Turn your flow generator on.
9 If you feel air leaks, you may need to adjust your headgear. Return to step 5
or check through the suggestions in “Optimizing mask seal and comfort”
below.
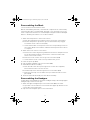
Optimizing mask seal and comfort
To receive effective therapy it is important to have the best seal possible
between your mask and your face. If you are experiencing leaks, please ensure
that you have followed the fitting instructions carefully. Carry out a quick check
after fitting your mask:
• Is the mouth cushion creased? Creases can allow air to leak out of the
mask.
618300 content.book Page 3 Wednesday, May 2, 2018 8:46 AM

4
• Have you cleaned your mask recently? Oils on the cushion and pillows can
affect the seal.
• Are the pillows correctly seated in your nostrils? Re-seat or adjust the
pillows to obtain a proper seal.
• Are your headgear straps overtightened? Try not to alter the upper headgear
straps once they have been tightened by your clinician.
• If you cannot establish a comfortable seal, do not overtighten the headgear.
Consult your clinician.
• Try another nasal pillow size.
If you cannot resolve any problems, look at the Troubleshooting section, or talk
to your clinician.
Removing the Mask
To remove the Mirage Liberty:
1 Detach the elbow by squeezing the elbow on both sides and pulling it away
from the frame (C-1).
2 Unclip both of the lower headgear clips (C-2) and remove the mask.
Note: You can detach the elbow from the mask frame and leave the mask on
your face. You may prefer to do this when briefly stopping therapy, for
example to go to the bathroom.
Disassembling the Mask
See section C on the illustrations sheet.
1 Unclip the upper headgear clips from the frame (C-3).
2 Carefully pull the mouth cushion away from the frame (C-4).
3 Push the two nasal pillows down through the mouth cushion (C-5).
4 Remove the ports cap (C-6).
5 Detach the inlet tube assembly from the elbow.
Note: The swivel does not need to be disconnected from the inlet tube.
6 Detach the valve clip from the elbow (C-7).
7 Peel the valve from the valve clip (C-8).
Note: Do not pull on the valve flap, as this may cause it to tear.
Cleaning the Mask in the Home
Notes:
• The mask and headgear can only be cleaned by handwashing.
• The headgear may be washed without removing the headgear clips.
618300 content.book Page 4 Wednesday, May 2, 2018 8:46 AM

5
English
WARNING
• Do not use aromatic-based solutions or scented oils (eg, eucalyptus or
essential oils), bleach, alcohol or products that smell strongly (eg,
citrus) to clean any of the mask components. Residual vapours from
these solutions can be inhaled if not rinsed thoroughly. They may also
damage the mask, causing cracks.
• Do not iron the headgear as the material is heat sensitive and will be
damaged.
Daily/After Each Use
To optimize the mask seal, facial oils should be removed from the cushion and
pillows before use.
Handwash the mask by gently rubbing in warm (86°F/30°C) water using mild
soap or diluted dishwashing detergent.
Clean the walls of the nasal pillows, including the space between the walls, of
any debris using a small brush.
Do not twist the valve during cleaning as this may damage or tear the valve
membrane or hinge. Take care when handling the valve.
If the vent requires cleaning use a soft bristle brush.
Rinse all components well with drinking quality water and allow them to air dry
out of direct sunlight. Do not soak the mask.
Weekly
Handwash the headgear in warm (approx. 86°F/30°C) water using mild soap or
diluted dishwashing detergent. Rinse the headgear well and allow it to air dry
out of direct sunlight.
Cleaning the Mask between Patients
The Mirage Liberty should be disinfected or sterilized when used between
patients. All components, except the headgear, are validated for up to 20
disinfection or sterilization cycles using one of the following processes:
• Thermal disinfection at a maximum temperature-time combination of 194°F
(90°C) for one minute
• Chemical disinfection (eg, Cidex™ OPA)
• The STERRAD™ Sterilization System (eg, 100S or NX).
The inlet tube and swivel should be replaced between patients.
The headgear should be thoroughly washed between patients, as described in
“Cleaning the Mask in the Home”.
Detailed disinfection and sterilization instructions are available from the
ResMed website, www.resmed.com/masks/sterilization/americas and must
be consulted before multipatient use.
618300 content.book Page 5 Wednesday, May 2, 2018 8:46 AM

6
Reassembling the Mask
See section D on the illustrations sheet.
Before reassembling the mask, check that all components are clean and dry.
Check that the valve is not damaged, distorted or torn, and that none of the
other components are broken or cracked. Replace any parts that are damaged.
Refer to “Ordering Information” for re-order numbers.
1 Attach the nasal pillows to the mouth cushion:
a Push the nasal pillows through the holes in the mouth cushion (D-1).
b Pull the nasal pillows up until the grooves at their base fully engage
around the mouth cushion holes (D-2).
c Check that the tabs on each pillow fit into the corresponding notches on
the cushion (D-3). Check that the seal between the pillows and cushion
is complete.
2 Attach the mouth cushion to the frame:
a Position the cushion alignment guide between the two nasal pillows and
line up the triangle symbols on the bottom of the mask frame with
those on the mouth cushion.
b Press the mouth cushion into the groove in the frame (D-4).
c Check that the mouth cushion is fully seated in the groove.
3 Insert the ports cap (D-5).
4 Clip the upper headgear clips onto the mask (D-6).
5 Assemble the elbow assembly:
a Push the tab of the valve up through the slot in the valve clip (D-7).
Ensure that the valve locks into the slot.
b Feed the flap of the valve through the slot in the elbow (D-8).
c Press the valve clip onto the elbow until you hear both sides click into
place (D-9).
6 Push the inlet tube assembly onto the elbow assembly.
Reassembling the Headgear
If taken apart, the headgear has five parts: headgear straps, left and right upper
headgear clips, and two lower clips.
1 Attach the upper headgear clips to the mask frame (D-6). The mask
incorporates lock-out features to ensure that each upper clip attaches to the
correct side of the mask frame.
2 Clip the lower headgear clips into the mask frame.
618300 content.book Page 6 Wednesday, May 2, 2018 8:46 AM

7
English
3 Lay out the headgear straps, label side down. The label is on the outer side
of the headgear. The internal side is smooth, to be comfortable against your
face.
4 Thread the top (short) straps through the upper headgear clips (E-1, E-2).
5 Thread the bottom (long) straps through the lower clips (E-1, E-2).
6 Check that the headgear is not twisted.
Storage
Ensure that the mask is thoroughly clean and dry before storing it for any
length of time. Store the mask in a cool dry place out of direct sunlight.
Disposal
The Mirage Liberty does not contain any hazardous substances and may be
disposed of with your normal household refuse.
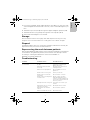
Reprocessing the mask between patients
Only Sleep Lab Mask (SLM) variants of the mask are intended for multi-patient
re-use. When using between patients, these masks must be reprocessed
according to cleaning and disinfection instructions available on
ResMed.com/downloads/masks.
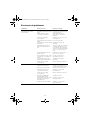
Troubleshooting
Problem Possible reason Possible solution
Mask won’t seal properly or is
uncomfortable
Mouth cushion or pillows may
be dirty.
Clean mask according to
instructions in “Cleaning the
Mask in the Home”.
Mask may have been fitted
incorrectly.
Carefully follow instructions in
“Fitting the mask”.
Mask is incorrectly adjusted. Check headgear is not over-
tightened.
Mouth cushion is wrong size. Talk to your clinician.
Mouth cushion is skewed in
mask frame.
Check insertion of cushion.
Mouth cushion is misaligned or
creased on face.
Ensure cushion is properly
aligned and that there are no
creases in it: undo headgear clip,
check cushion and reposition the
mask on your face.
Mask pillows are the wrong size. Try another size or talk to your
clinician.
Mask pillows are not correctly
seated in your nostrils.
Re-seat pillows into nostrils.
Mask pillows are skewed in
cushion.
Check insertion of pillows.
Mask is assembled incorrectly. Reassemble mask.
618300 content.book Page 7 Wednesday, May 2, 2018 8:46 AM

8
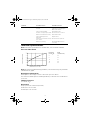
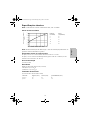
Technical Specifications
Note: The mask system does not contain latex, PVC or DEHP materials.
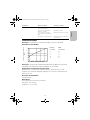
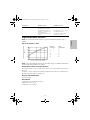
Pressure–Flow Curve
Note: As a result of manufacturing variations, the vent flow may vary from that
indicated in the graph.
Dead Space Information
Dead space is the empty volume of the mask up to the elbow.
The maximum dead space of the Mirage Liberty for all mask size combinations
is 151 mL.
Therapy Pressure
4 to 20 cm H
2
O
Resistance
Drop in pressure measured (nominal)
at 50 L/min: 0.5 cm H
2
O
at 100 L/min: 1.6 cm H
2
O
Mask is too noisy Vents are blocked or partially
blocked.
Clean vents according to
instructions in “Cleaning the
Mask in the Home”.
Valve is misassembled. Reassemble valve.
Cushion is not properly inserted. Check insertion of cushion.
Mask is assembled incorrectly. Reassemble mask.
Valve is damaged, torn or
distorted.
Replace valve.
Pillows are not inserted correctly
into cushion.
Check insertion of pillows.
Mask is not sealing. Check and adjust mask as
necessary.
Problem Possible reason Possible solution
Vent Flow Rate (L/min)
Pressure
(cm H
2
O)
Flow
(± 6.0 L/min)
422
832
12 41
16 48
20 54
0.0
10.0
20.0
30.0
40.0
50.0
60.0
70.0
2 4 6 8 10 12 14 16 18 20 22 24 26 28 30
Mask Pressure (cm H
2
O)
618300 content.book Page 8 Wednesday, May 2, 2018 8:46 AM

9
English
Mask sizes
(excludes inlet tube and headgear)
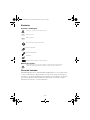
Symbols
System and Packaging
User Guide
Limited Warranty
ResMed warrants that your ResMed system, including its components—as
shown in Section A of the illustration sheet (“Product”)—shall be free from
defects in material and workmanship for a period of ninety (90) days from the
date of purchase by the initial consumer.
For further details refer to the Warranty.
size width (mm) height (mm) depth (mm)
small 110 92 95
large 110 100 100
Caution, consult accompanying documents
Lot number
Part number
Does not contain natural rubber latex
Humidity limitation
Temperature limitation
Manufacturer
European Authorised Representative
Indicates a warning or caution and alerts you to a possible injury or explains
special measures for the safe and effective use of the device.
LOT
REF
618300 content.book Page 9 Wednesday, May 2, 2018 8:46 AM

Français
11
Mirage Liberty™
MASQUE FACIAL
Merci d'avoir choisi le masque Mirage Liberty de ResMed. Le Mirage Liberty
est un masque facial qui combine des coussins narinaires à une bulle buccale
pour former un masque à la fois discret et facile à utiliser sans compromettre
l'étanchéité, la stabilité ou le confort.
Le masque comprend des orifices de ventilation et une valve anti-asphyxie qui
vous permettent de continuer à respirer de l'air frais en cas de blocage de
l'arrivée d'air à votre masque.
Usage prévu
Le Mirage Liberty achemine au patient de façon non-invasive le débit d'air
produit par un appareil à pression positive tel qu'un appareil de PPC (CPAP) ou
d'aide inspiratoire avec PEP.
Le Mirage Liberty est prévu pour une utilisation par des patients adultes
(> 66 lb / 30 kg) à qui une pression positive a été prescrite.
Le Mirage Liberty est prévu pour un usage multiple par un seul patient à
domicile ou pour un usage multiple par plusieurs patients en milieu hospitalier.
ATTENTION
Selon la loi fédérale américaine, cet appareil ne peut être vendu aux
U.S.A. que par un médecin ou sur prescription médicale.
Avant d'utiliser le masque
AVERTISSEMENT
• Le Mirage Liberty doit être utilisé sous le contrôle d’une personne
qualifiée lorsque le patient n’est pas en mesure d’enlever le masque
de lui-même. Le masque peut ne pas convenir aux patients sujets aux
vomissements.
618300 content.book Page 11 Wednesday, May 2, 2018 8:46 AM

12
•
L'ensemble coude et valve possède des caractéristiques de sécurité
spécifiques. Il vous permet de respirer de l'air frais si le débit d'air de
votre appareil est entravé. Le masque ne doit pas être porté si la valve
est endommagée, auquel cas le masque n'est pas en mesure de
remplir sa fonction de sécurité. La valve doit être remplacée si elle est
endommagée, déformée ou déchirée.
• Les orifices de ventilation ne doivent jamais être obstrués.
• Prendre toutes les précautions applicables lors de l'utilisation
d'oxygène additionnel.
• L'arrivée d'oxygène additionnel doit être fermée lorsque l'appareil
n'est pas en marche afin d'empêcher l'oxygène inutilisé de
s'accumuler dans le boîtier de l'appareil et de créer un risque
d'incendie.
• Lorsque de l’oxygène additionnel est délivré à un débit fixe, la
concentration de l’oxygène inhalé varie en fonction des réglages de
pression, de la respiration du patient, du masque, du point d'arrivée
de l'oxygène ainsi que du niveau de fuites.
• Les caractéristiques de votre masque et de votre appareil sont
fournies afin que votre clinicien puisse vérifier qu'ils sont compatibles.
L'utilisation du masque en dehors de ses caractéristiques ou avec des
appareils incompatibles peut compromettre son étanchéité et son
confort ainsi que l'efficacité du traitement, et les fuites ou la variation
du niveau de fuites peuvent affecter le fonctionnement de l'appareil.
• Cesser d'utiliser le Mirage Liberty en cas d'une QUELCONQUE
réaction indésirable au masque et consulter votre médecin ou votre
prestataire de soins.
• En cas d’irritation nasale, cesser d’utiliser le masque Mirage Liberty et
consulter votre médecin ou votre spécialiste du sommeil.
• Voir le manuel de l'appareil pour de plus amples informations sur les
réglages et le fonctionnement.
• L'utilisation d'un masque peut provoquer des douleurs dans les dents,
les gencives ou la mâchoire ou aggraver un problème dentaire
existant. En cas de symptômes, consulter un médecin ou un dentiste.
ATTENTION
Éviter de raccorder des produits en PVC souple (par ex. un tube en PVC)
directement aux composants de ce masque. Le PVC souple contient des
éléments qui peuvent altérer les matériaux du masque et entraîner leur
fissuration ou leur rupture.
618300 content.book Page 12 Wednesday, May 2, 2018 8:46 AM

13
Français
Utilisation du masque
Lorsque vous utilisez le masque Mirage Liberty sur des appareils ResMed
disposant d'une fonction de sélection du masque, sélectionnez l'option de
masque « Facial ».
Mise en place du masque
Les diagrammes de la section A de la fiche d'illustrations vous indiquent
comment les composants de votre masque s'emboîtent les uns dans les
autres.
Les diagrammes de la section B vous suggèrent comment mettre votre
masque en place pour obtenir le meilleur ajustement et le meilleur confort
possibles. Veuillez suivre ces instructions à la lettre.
1 Lavez-vous le visage soigneusement avant de mettre le masque. Nous vous
déconseillons d'utiliser un produit hydratant sur les zones de votre visage
qui seront en contact avec le Mirage Liberty au risque de compromettre
l'étanchéité du masque.
2 Mettez le harnais sur votre tête comme s'il s'agissait d'une casquette, puis
tirez le masque vers l'avant pour le mettre en place sur votre visage (B-1),
tout en veillant à ce que le harnais repose uniformément sur le dessus de
votre tête.
3 Couvrez votre bouche avec le masque et mettez les coussins narinaires en
place de manière à ce qu'ils reposent légèrement à l'entrée de vos narines.
4 Introduisez les clips inférieurs du harnais dans les fentes du masque
prévues à cet effet jusqu'à ce qu'ils se verrouillent en position (B-2).
5 Pour serrer ou desserrer les sangles du harnais, détachez la bande Velcro
®
du harnais et repositionnez-la. Ajustez les sangles supérieures (B-3) puis les
sangles inférieures (B-4) uniformément et sans forcer. Ajustez chaque jeu
de sangles l’un après l’autre de manière à ce que les sangles soient
confortables et bien en place et que les parties latérales du harnais reposent
entre vos yeux et vos oreilles. Le masque devrait 'flotter' légèrement sur
votre visage. Ne serrez pas trop les sangles du harnais !
6 Raccordez une extrémité du circuit respiratoire à votre appareil et l’autre
extrémité à la pièce pivotante.
7 Raccordez le coude à l'entourage rigide en le pinçant des deux côtés et en
le poussant dans l'entourage rigide jusqu'à ce qu'il se verrouille en position
(B-5). Faites tourner le coude pour vous assurer qu'il tourne librement et ne
se détache pas de l'entourage rigide.
8 Mettez votre appareil en marche.
618300 content.book Page 13 Wednesday, May 2, 2018 8:46 AM

14
9 Si vous sentez des fuites d'air, vous devrez peut-être réajuster votre harnais.
Pour cela, retournez à l'étape 5 ou vérifiez les suggestions données dans la
section « Optimisation de l'étanchéité et du confort du masque »
ci-dessous.
Optimisation de l'étanchéité et du confort du masque
Pour que votre traitement soit efficace, il est important d'avoir une étanchéité
aussi bonne que possible entre votre masque et votre visage. Si vous êtes
confronté à des fuites, vérifiez que vous avez bien suivi les instructions de mise
en place. Vérifiez les points suivants rapidement après avoir mis votre masque
en place :
• Y a-t-il des plis au niveau de la bulle du masque ? Les plis peuvent laisser
l'air s'échapper du masque.
• Avez-vous nettoyé votre masque récemment ? Du sébum sur la bulle et les
coussins peut affecter l'étanchéité.
• Les coussins sont-ils bien en place dans vos narines ? Ajustez les coussins
pour obtenir une bonne étanchéité.
• Les sangles de votre harnais sont-elles trop serrées ? Essayez de ne pas
changer le serrage des sangles supérieures du harnais une fois que votre
technicien les a ajustées.
• S'il n'est pas possible d'obtenir une étanchéité satisfaisante sans serrage
excessif du harnais, contacter votre prestataire de soins.
• Essayez une autre taille de coussins narinaires.
Si vous ne réussissez pas à résoudre un problème, reportez-vous à la section
Dépannage ou contactez votre clinicien.
Retrait du masque
Pour retirer le Mirage Liberty :
1 Détachez le coude en le pinçant des deux côtés et en tirant pour le retirer
de l'entourage rigide (C-1).
2 Détachez les deux clips inférieurs du harnais (C-2) et retirez le masque.
Remarque : vous pouvez détacher le coude de l'entourage rigide sans
enlever le masque. Cette option peut s'avérer utile lorsque vous devez arrêter
votre traitement brièvement, par exemple pour aller aux toilettes.
Démontage du masque
Voir la section C de la fiche d’illustrations.
1 Détachez les clips supérieurs du harnais de l'entourage rigide (C-3).
2 Tirez avec précaution sur la bulle buccale pour la retirer de l'entourage rigide
(C-4).
618300 content.book Page 14 Wednesday, May 2, 2018 8:46 AM

15
Français
3 En procédant de l'extérieur de la bulle, appuyez sur les deux coussins
narinaires pour les retirer de la bulle buccale (C-5).
4 Retirez le bouchon d'entrées (C-6).
5 Détachez le tuyau d'entrée du coude.
Remarque : il n'est pas nécessaire de détacher la pièce pivotante du tuyau
d'entrée.
6 Détachez du coude le clip de la valve (C-7).
7 Enlevez la valve de son clip (C-8).
Remarque : ne tirez pas sur le clapet de la valve au risque de le déchirer.
Nettoyage du masque à domicile
Remarques :
• Le masque et le harnais ne peuvent être nettoyés qu'à la main.
• Il est possible de nettoyer le harnais sans détacher ses clips.
AVERTISSEMENT
• Ne pas utiliser de solutions à base d'aromates ou d'huiles parfumées
(par ex. de l'essence d'eucalyptus ou des huiles essentielles), d’eau de
Javel, d’alcool ou de produits fortement parfumés (par ex. au citron)
pour le lavage des composants du masque. Les vapeurs résiduelles de
ces produits peuvent être inhalées si les composants ne sont pas
correctement rincés. Ces produits peuvent également endommager le
masque et provoquer des fissures.
• Ne pas repasser le harnais au risque d'endommager le matériau dans
lequel il est fabriqué, celui-ci étant sensible à la chaleur.
Quotidien/Après chaque utilisation
Pour optimiser l'étanchéité du masque, toute trace de sébum doit être retirée
de la bulle et des coussins avant utilisation.
Nettoyez le masque à la main en le frottant légèrement dans de l'eau tiède
(86°F/30°C) à l'aide d'un savon doux ou d'un liquide vaisselle dilué.
Nettoyez les parois des coussins narinaires, y compris entre chaque coussin, à
l'aide d'une petite brosse pour éliminer toute saleté.
Ne tordez pas la valve pendant le nettoyage au risque d'endommager ou de
déchirer la membrane ou la charnière de la valve. Manipulez la valve avec
précaution.
Si les orifices de ventilation sont sales, utilisez une brosse à poils doux pour les
nettoyer.
Rincez tous les composants soigneusement à l'eau potable et laissez-les
sécher à l'abri de la lumière directe du soleil. Ne laissez pas le masque tremper.
618300 content.book Page 15 Wednesday, May 2, 2018 8:46 AM

16
Hebdomadaire
Lavez le harnais à la main dans de l’eau tiède (env. 86°F/30°C) à l'aide d'un
savon doux ou d'un liquide vaisselle dilué. Rincez soigneusement et laissez-le
sécher à l’abri de la lumière directe du soleil.
Nettoyage du masque entre les patients
Le masque Mirage Liberty doit être désinfecté ou stérilisé entre chaque
patient. Tous les composants, à l'exception du harnais, ont été validés pour
20 cycles de désinfection ou stérilisation maximum à l'aide de l'une des
procédures suivantes :
• Désinfection thermique avec une combinaison température maximale/
durée de 194°F (90°C) pendant une minute
• Désinfection chimique (p. ex. Cidex™ OPA)
• Le système de stérilisation STERRAD™ (p. ex. 100S ou NX).
Le tuyau d'entrée et la pièce pivotante doivent être remplacés entre chaque
patient.
Le harnais doit être nettoyé soigneusement entre chaque patient comme
indiqué dans la section « Nettoyage du masque à domicile ».
Vous trouverez des instructions de désinfection et de stérilisation détaillées sur
le site Internet de ResMed, www.resmed.com/masks/sterilization/americas.
Vous devez obligatoirement lire ces instructions avant une utilisation sur
plusieurs patients.
Remontage du masque
Voir la section D de la fiche d’illustrations.
Avant de remonter le masque, vérifiez que tous les composants sont bien
propres et secs. Vérifiez que la valve n'est ni endommagée, ni déformée ni
déchirée et qu'aucun des composants restants n'est cassé ou fissuré.
Remplacez tout composant endommagé. Veuillez vous référer à la section
« Informations de commande » pour les codes produit.
1 Fixez les coussins narinaires à la bulle buccale :
a Faites passer les coussins narinaires dans les orifices de la bulle buccale
(D-1).
b Tirez sur les coussins narinaires jusqu'à ce que les rainures qui se
trouvent à leur base s'engagent complètement autour des orifices de la
bulle buccale (D-2).
c Vérifiez que les pattes d'attache de chaque coussin sont bien en place
dans leurs fentes respectives sur la bulle (D-3). Assurez-vous de
l'étanchéité au niveau de la jonction entre les coussins et la bulle.
618300 content.book Page 16 Wednesday, May 2, 2018 8:46 AM

17
Français
2 Fixez la bulle buccale à l'entourage rigide :
a Positionnez les repères d'alignement de la bulle entre les deux coussins
narinaires et alignez les symboles de triangle au bas de l'entourage
rigide avec ceux de la bulle du masque.
b Appuyez sur la bulle buccale pour l'insérer dans la rainure de l'entourage
rigide (D-4).
c Vérifiez que la bulle buccale repose entièrement dans la rainure.
3 Mettez le bouchon d'entrées en place (D-5).
4 Attachez les clips supérieurs du harnais au masque (D-6).
5 Montez l'ensemble coude et valve :
a Poussez la patte d'attache de la valve dans la fente du clip de la valve
prévue à cet effet (D-7). Veillez à ce que la valve se verrouille en position
dans la fente.
b Faites passer le clapet de la valve par la fente du coude (D-8).
c Mettez le clip de la valve en place sur le coude en appuyant jusqu'à ce
que vous entendiez les deux côtés se verrouiller en position (D-9).
6 Raccordez le tuyau d'entrée au coude en poussant.
Remontage du harnais
Une fois démonté, le harnais se compose de cinq pièces : les sangles du
harnais, les clips supérieurs gauche et droit du harnais et les deux clips
inférieurs.
1 Attachez les clips supérieurs du harnais à l'entourage rigide (D-6). Le
masque a été conçu de telle manière qu'il est impossible de fixer les clips
supérieurs au mauvais côté de l'entourage rigide.
2 Attachez les clips inférieurs du harnais à l'entourage rigide.
3 Mettez les sangles du harnais à plat, avec l'étiquette en dessous. L'étiquette
se trouve sur l'extérieur du harnais. L'intérieur du harnais est lisse pour qu'il
soit confortable sur votre visage.
4 Faites passer les sangles supérieures (courtes) dans les clips supérieurs du
harnais (E-1, E-2).
5 Faites passer les sangles inférieures (longues) dans les clips inférieurs (E-1,
E-2).
6 Vérifiez que le harnais n'est pas entortillé.
Rangement
Veillez à ce que le masque soit bien propre et sec avant de le ranger. Rangez
le masque dans un endroit frais et sec à l'abri de la lumière directe du soleil.
618300 content.book Page 17 Wednesday, May 2, 2018 8:46 AM
A página está carregando...
A página está carregando...
A página está carregando...
A página está carregando...
A página está carregando...
A página está carregando...
A página está carregando...
A página está carregando...
A página está carregando...
A página está carregando...
A página está carregando...
A página está carregando...
A página está carregando...
A página está carregando...
A página está carregando...
A página está carregando...
A página está carregando...
A página está carregando...
A página está carregando...
A página está carregando...
A página está carregando...
A página está carregando...
A página está carregando...
-
 1
1
-
 2
2
-
 3
3
-
 4
4
-
 5
5
-
 6
6
-
 7
7
-
 8
8
-
 9
9
-
 10
10
-
 11
11
-
 12
12
-
 13
13
-
 14
14
-
 15
15
-
 16
16
-
 17
17
-
 18
18
-
 19
19
-
 20
20
-
 21
21
-
 22
22
-
 23
23
-
 24
24
-
 25
25
-
 26
26
-
 27
27
-
 28
28
-
 29
29
-
 30
30
-
 31
31
-
 32
32
-
 33
33
-
 34
34
-
 35
35
-
 36
36
-
 37
37
-
 38
38
-
 39
39
-
 40
40
-
 41
41
-
 42
42
-
 43
43


ResMed Other Mirage masks Guia de usuario
- Tipo
- Guia de usuario
em outras línguas
- español: ResMed Other Mirage masks Guía del usuario
- français: ResMed Other Mirage masks Mode d'emploi
- English: ResMed Other Mirage masks User guide