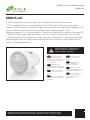
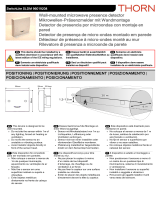
CP Electronics EBDHS-AD High Bay Presence Detectors Guia de instalação
- Categoria
- Detectores de movimento
- Tipo
- Guia de instalação

EBDHS-AD
1–10V analogue dimming, high bay/high level, PIR presence/absence detector
1–10 V analoges Dimmen, Hochregal/High-Level, PIR-Präsenz-/Abwesenheitsmelder
Detector PIR de presencia / ausencia, de gran altura y alto alcance, regulación analógica 1-10V
Detector PIR de presença/ausência High Bay .Dimerização analógica 1-10V
Variation analogique 1–10 V, grande hauteur / haut niveau, détecteur de présence / absence PIR
1-10V dimming analogico,grandi altezze / alti livelli, rilevatore di presenza / assenza PIR
1-10V analoge dimming, hoogbouw / hoog niveau, PIR aanwezigheids- / afwezigheidsdetector
Инфракрасный датчик присутствия, скрытый монтаж в потолок, полуавтоматический
режим, 1-10В диммирование
WD409 Issue 11 Installation Guide
EBDHS-AD
Downloads and Videos | Downloads und Videos | Descargas y Videos | Descargas e Videos |
Téléchargements & Vidéos | Downloads e Video | Downloads en Video’s | Загрузки и Видео
cpelectronics.co.uk/cp/409
Warning | Warnung | Advertencia |
Aviso | Attention | Attenzione |
Waarschuwing | Внимание
EN This device should
be installed by a qualied
electrician in accordance with
the latest edition of the IEE
wiring regulations.
DE Dieses Gerät ist
ausschließlich von qualizierten
Elektrofachkräen zu installieren.
ES Sólo un electricista
cualicado debe instalar este
dispositivo.
PT Somente um eletricista
qualicado deve instalar este
dispositivo.
FR Seul un électricien
qualié peut installer ce
dispositif.
IT Il dispositivo deve
essere installato da un
elettricista qualicato.
NL Dit apparaat moet
worden geïnstalleerd door een
gekwaliceerde elektricien.
RU Это устройство
должно быть установлено
квалифицированным
электриком.

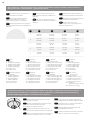
88 49 63
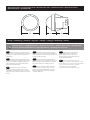
Dimensions (mm) | Abmessungen (mm) | Dimensiones (mm) | Dimensões (mm) | Dimensioni (mm) |
Dimensies (mm) | Размеры (мм)
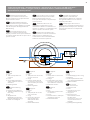
Wiring | Verkabelung | Cableado | Ligações | Câblage | Cablaggio | Bedrading | Кабель
Dimming ouputs | Ausgänge dimmen | Salidas de atenuación | Saída de dimerização | Gradation des
sorties | Uscite di dimmerazione | Uitgangen dimmen | Диммируемые выходы
EN Basic insulation only. Although low
voltage, this is not an SELV output and should
be treated as if mains potential. Use mains
rated wiring.
DE Nur Basisisolierung. Obwohl es sich
um eine niedrige Spannung handelt, handelt
es sich nicht um einen SELV-Ausgang und
sollte als Netzpotential behandelt werden.
Verwenden Sie Netzkabel.
ES Aislamiento básico solamente.
Aunque es de bajo voltaje, esta no es una
salida SELV y debe tratarse como si fuera un
potencial de red. Utilice el cableado nominal
de red.
PT Isolamento básico apenas. Apesar
de baixa tensão, esta não é uma saída SELV e
deve ser tratada como potencial de rede. Use
a fiação nominal da rede.
FR Isolation de base seulement. Bien
que basse tension, il ne s’agit pas d’une sortie
SELV et doit être traité comme un potentiel
de secteur. Utilisez un câblage nominal.
IT Solo isolamento di base. Anche se
a bassa tensione, questa non è un’uscita
SELV e dovrebbe essere trattata come se
il potenziale di rete. Utilizzare il cablaggio
nominale della rete.
NL Alleen basisisolatie. Hoewel
dit een laag voltage is, is dit geen
SELV-uitgang en moet het worden
behandeld als netpotentiaal. Gebruik
hoofdstroombedrading.
RU Только базовая изоляция.
Несмотря на низкое напряжение, это не
выход SELV, и его следует рассматривать
как потенциал сети. Используйте
проводку соответствующую
номинальному напряжению сети.

3
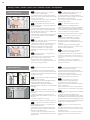
EN Key
1. Neutral
2. Live
3. 10A circuit protection if
required
4. Load
5. Centre biased retractive
switch, 230V (for absence
detection)
6. Dimming ballast
DE Zeichenerklärung
1. Neutral
2. Netzspannungsführend
3. 10A Kurzschlusssicherung,
falls nötig
4. Last
5. Wipptaster mit
Mittelstellung, 230 V (für
Abwesenheitserkennung)
6. Dimm-Vorschaltgerät
ES Leyenda
1. Neutro
2. Fase
3. 10A protección de circuito,
en caso necesario
4. Carga
5. Pulsador doble retractil
con reposo en la posición
central a 230 V (para modo
ausencia)
6. Balasto regulable
PT Legenda
1. Neutro
2. Fase
3. 10A proteção do circuito,
caso necessário
4. Carga
5. Interruptor retractivo
central, 230V (para
detecção em modo
ausência)
6. Balasto Dimerizador
FR Légende
1. Neutre
2. Phase
3. 10A protection du circuit si
nécessaire
4. Charge
5. Commutateur avec retour
en position centrale, 230V
(pour détection d’absence)
6. Ballast de variation
IT Legenda
1. Neutro
2. Fase
3. 10A protezione del circuito,
se necessario
4. Carico
5. Pulsante esterno, 230V (per
rilevamento assenza)
6. Ballast dimerabile
NL Legenda
1. Nul
2. Fase
3. 10A beveiliging indien nodig
4. Belasting
5. Externe pulsdrukker, 230V
(voor afwezigheidsdetectie)
6. Dimbare bellast
RU Условные
обозначения
1. Нейтральный
2. Фаза
3. 10А защита цепи при
необходимости
4. Загрузить
5. Выключатель с
механизмом клавиш
без фиксации
«звонкового типа» (для
полуавтоматического
режима)
6. Диммируемый драйвер
N
L/Out
L
4
6
1
3
5
2SW1/UP
DIM –
DIM +
SW2 DOWN
Single channel dimming | Einzelkanal-Dimmen | Regulación de un solo canal | On/O canal único |
Canal unique pour variation | Singolo canale per variazione dimmer | Enkel kanaals dimming |
Одноканальное диммирование
EN Switches the luminaire with
occupancy and maintains illuminance.
Dims and switches using optional centre
biased retractive switch.
DE Schaltet die Beleuchtung bei
Anwesenheitserfassung und erhält die
Beleuchtung aufrecht. Dimmt und schaltet
mithilfe des optionalen Wipptasters mit
Mittelstellung.
ES Enciende la luminaria con la
ocupación y mantiene la iluminación.
Regula y conmuta usando opcionalemente
un pulsador doble retractil con reposo en la
posición central
PT Liga a luminaria com ocupação
e mantém a iluminação/luminosidade.
Dimeriza e liga-desliga usando o
interruptor de retracção com polarização
central opcional.
FR Allume le luminaire en cas
d’occupation et maintient le niveau
d’éclairement. Pilote en commutation et
variation en utilisant un commutateur avec
retour en position centrale en option.
IT Gestisce iil corpo illuminante n
base alla presenza. Controllo automatico
della luce diurna, dimmerazione e
commutazione del canale dimmerabile
tramite un interruttore opzionale
NL Schakelt de verlichting op
aanwezigheid en automatische
daglichtregeling. Dimmen en schakelen
door gebruik te maken van een externe
optionele pulsdrukker.
RU Коммутирует светильник по
присутсвию с поддержкой освещенность.
Диммирование и коммутация с помощью
внешнего выключателя с возвратными
клавишами.

4
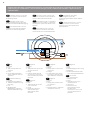
Single channel switching | Einzelkanalumschaltung | Conmutación de un solo canal | Interruptor de um canal só |
Canal unique pour commutation | Communtazione singolo canale | Enkel kanaals schakelen | Одноканальное
переключение
EN Switches channel 1 only with
occupancy, optional override switch.
No dimming output.
DE Schaltet nur Kanal 1 bei
Anwesenheitserfassung, optionaler
Korrekturschalter. Kein Dimmausgang.
ES Conmuta el canal 1 solo con
ocupación, interruptor de apagado
opcional. Sin salida de regulación.
PT Controla o canal 1 apenas com
ocupação, interruptor de cancelamento
opcional. Nenhuma saída dimmer
FR Commute le canal 1 uniquement
en fonction de l’occupation, commande
de dérogation optionnelle. Pas de sortie
variation.
IT Commuta il canale 1 solo con
occupazione, interruttore di forzatura
opzionale. Nessuna uscita dimmerizata.
NL Schakelt kanaal 1 alleen
bij aanwezigheid, optioneel
overbruggingsschakelaar. Geen dimbare
uitgang.
RU Переключает канал 1 только
по присутствию, опциональный
переключатель блокировки. Нет
диммирования.
EN Key
1. Neutral
2. Live
3. 10A circuit protection if
required
4. Load
5. Centre biased retractive
switch, 230V (for absence
detection)
DE Zeichenerklärung
1. Neutral
2. Netzspannungsführend
3. 10A Kurzschlusssicherung,
falls nötig
4. Last
5. Wipptaster mit
Mittelstellung, 230 V (für
Abwesenheitserkennung)
ES Leyenda
1. Neutro
2. Fase
3. 10A protección de circuito,
en caso necesario
4. Carga
5. Pulsador doble retractil
con reposo en la posición
central a 230 V (para modo
ausencia)
PT Legenda
1. Neutro
2. Fase
3. 10A proteção do circuito,
caso necessário
4. Carga
5. Interruptor retractivo
central, 230V (para
detecção em modo
ausência)
FR Légende
1. Neutre
2. Phase
3. 10A protection du circuit si
nécessaire
4. Charge
5. Commutateur avec retour
en position centrale, 230V
(pour détection d’absence)
IT Legenda
1. Neutro
2. Fase
3. 10A protezione del circuito,
se necessario
4. Carico
5. Pulsante esterno, 230V (per
rilevamento assenza)
NL Legenda
1. Nul
2. Fase
3. 10A beveiliging indien nodig
4. Belasting
5. Externe pulsdrukker, 230V
(voor afwezigheidsdetectie)
RU Условные
обозначения
1. Нейтральный
2. Фаза
3. 10А защита цепи при
необходимости
4. Загрузить
5. Выключатель с
механизмом клавиш
без фиксации
«звонкового типа» (для
полуавтоматического
режима)
N
L/Out
L
4
1
35
2SW1/UP
DIM –
DIM +
SW2 DOWN

5
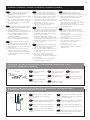
Presence or absence detection | Anwesenheits- oder Abwesenheitserkennung | Detección de presencia o ausencia
| Deteçao em presença ou ausência | Détection de présence ou d’absence | Rilevazione di presenza o assenza |
Aanwezigheids- of afwezigheidsdetectie | Обнаружение присутствия или полуавтоматический режим
EN The unit ships with presence detection as default.
• To change over to absence detection, press and release the
external switch 5 times within the rst minute of power up.
The LED will turn on red for 30 seconds to indicate absence
mode has been selected.
• To change back to presence detection, repeat the above
procedure – the LED will ash red for 30 seconds to indicate
presence mode has been selected.
To use absence detection a retractive (momentary) switch must be
connected between the 2 terminals on the diagram. Note that this
will be switching mains voltage.
Note: the above adjustments can also be made using the optional
UHS5 or UNLCDHS handsets.
DE Das Modell wird in Werkseinstellung als Bewegungsmelder
ausgeliefert.
• Um den Halbautomatikmodus zu aktivieren müssen Sie
innnerhalb der 1 Minute nach dem Einschalten den Taster 5
mal betätigen. Die für 30s aktivierte rote LED zeigt an, dass der
Halbautomatikbetrieb aktiviert wurde.
• Um den Automatikbetrieb wieder einzustellen, wiederholen
Sie einfach die obengenannte Vorgehensweise. Die für 30s
blinkende LED zeigt den ausgewählten Automatikbetrieb an.
Um den Halbautomatikbetrieb zu ermöglichen muss ein Taster
gemäß Schaltbild angeschlossen werden. Beachten Sie , das dieser
dann Netzspannung schaltet!
Hinweis: Die obengenannten Einstellungen können auch via
optionale Fernbedienunungen UHS5 oder UNLECDHS erfolgen.
ES El sensor se envía con detección de presencia por defecto.
• Para cambiar a detección de ausencia, presionar el pulsador
externo 5 veces en el primer minuto de encendido. El LED se
encenderá en rojo durante 30 segundos para indicar el modo
ausencia.
• Para volver al modo presencia, repita el procedimiento anterior-
el LED parpadeará en rojo durante 30 segundos para indicar que
se ha seleccionado el modo presencia.
Para el uso en modo ausencia, el pulsador debe estar conectado
entre los 2 terminales como en el esquema. Nota: el pulsador está
conectado a la tensión de red.
Nota: Los ajustes anteriores también pueden relizarse con los
mandos (opcionales) UHS5 y UNLCHDS.
PT A unidade é enviada com detecção de presença predenida.
• Para mudar para à detecção de ausência, pressione e libere o
interruptor externo 5 vezes no primeiro minuto da energização.
O LED acenderá em vermelho por 30 segundos para indicar que
o modo de ausência foi selecionado.
• Para voltar à detecção de presença, repita o procedimento acima
- o LED piscará em vermelho por 30 segundos para indicar o
modo de presença foi selecionado.
Para usar a detecção de ausência, um botão de pressão deve ser
ligado entre os 2 terminais no diagrama. Note que este estará a
comutar a tensão da rede.
Nota: os ajustes acima também podem ser feitos usando os
telecomandos opcionais UHS5 ou UNLCDHS.
FR Le produit est livré avec le mode détection de présence
par défaut.
• Pour activer le mode détection d’absence, appuyer et relâcher
le bouton poussoir 5 fois dans la première minute de la mise
sous tension. La LED s’allume pendant 30 secondes pour
indiquer que le mode détection d’absence a bien été activé.
• Pour revenir au mode détection de présence, répéter la
procédure ci-dessus : la LED clignote pendant 30 secondes pour
indiquer que le mode détection de présence a bien été activé.
Pour utiliser la détection d’absence, un bouton poussoir doit
être connecté entre les 2 bornes du schéma (commutation de la
tension secteur).
Remarque : les réglages ci-dessus peuvent également être eectués
à l’aide des outils de conguration UHS5 ou UNLCDHS.
IT L’unità viene fornita con rilevamento di presenza come
predenito.
• Per passare al rilevamento di assenza, premere e rilasciare il
pulsante esterno 5 volte entro il primo minuto di accensione.
Il LED si accende in rosso per 30 secondi per indicare che la
modalità di assenza è stata selezionata
• Per tornare al rilevamento di presenza, ripetere la procedura
sopra indicata : il LED lampeggerà in rosso per 30 secondi per
indicare che la modalità di presenza è stata selezionata.
Per utilizzare il rilevamento di assenza deve essere presente un
pulsante collegato tra i 2 terminali sul diagramma. Si noti che questo
cambierà la tensione di rete.
Nota: le regolazioni di cui sopra possono anche essere eettuate
utilizzando l’opzionale telecomando UHS5 o UNLCDHS.
NL De melder wordt standaard als aanwezigheidsdetector geleverd.
• Om te veranderen naar afwezigheidsdetectie, druk de externe
schakelaar 5 keer in binnen een eerste minuut van inschakelen.
De LED gaat 30 seconden branden om aan te geven dat de
afwezigheidsmodus is geselecteerd.
• Om terug te veranderen naar aanwezigheidsdetectie herhaalt u
de bovenstaande procedure - de LED knippert 30 seconden rood
om aan te geven dat de aanwezigheidsmodus is geselecteerd.
Om afwezigheidsdetectie te gebruiken moet er een (externe)
schakelaar worden aangesloten tussen de 2 klemmen op het schema
(punt 6). Let op, deze schakelaar schakelt de netspanning (230V).
Opmerking: de bovenstaande aanpassing kan ook worden
uitgevoerd met de optionele UHS5- of UNLCDHS-handsets.
RU Устройство поставляется с обнаружением присутствия
по умолчанию.
• Чтобы переключиться на обнаружение отсутствия, нажмите
и отпустите внешний выключатель 5 раз в течение первой
минуты включения. Светодиод загорится красным на 30
секунд, указывая на то, что выбран полуавтоматический режим.
• Чтобы вернуться к режиму присутствия, повторите
описанную выше процедуру - светодиод будет мигать
красным в течение 30 секунд, указывая на то, что выбран
режим присутствия.
Чтобы использовать полуавтоматический, выключатель с
возвратными клавишами должен быть подключен между
двумя клеммами на схеме. Обратите внимание, что это будет
переключение сетевого напряжения.
Примечание: вышеуказанные настройки можно также выполнить
с помощью пульта UHS5 или UNLCDHS.
cpelectronics.co.uk/cp/pa
Presence & absence explained | Erläuterung automatik & halbautomatikbetrieb | Explicación Presencia & Ausencia |
Presença e Ausência explicadas | Présence et absence expliquées | Spiegazione Presenza e Assenza | Aanwezigheid
& afwezigheid uitgelegd | Объяснение полуавтоматического режима и режима детекции присутствия

6
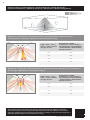
Detection pattern | Erfassungsbereich | Patrón de detección | Padrão de detecção |
Performance de détection | Modello di rilevazione | Detectie zone | Шаблон обнаружения
high sensitivity low
15m
40m
Height | Höhe | Altura |
Altura | La taille | Altezza
| Hoogte | Высота
Range Diameter | Bereich
Durchmesser | Diámetro de rango |
Faixa de Diâmetro | Gamme Diamètre
| Gamma Diametro | Bereik diameter |
Диаметр диапазона
15m 40m
10m 26m
6m 16m
3m 9m
Height | Höhe | Altura |
Altura | La taille | Altezza
| Hoogte | Высота
Range Diameter | Bereich
Durchmesser | Diámetro de rango |
Faixa de Diâmetro | Gamme Diamètre
| Gamma Diametro | Bereik diameter |
Диаметр диапазона
15m 30m
10m 20m
6m 12m
3m 8m
Walk towards | Annäherung | Aproximación frontal | Aproximaçao frontal | Marcher vers | Avvicinamento |
Naar toe lopen | Движение по направлению к центру
Walk across | Durchquerung | Aproximación lateral | Aproximaçao lateral | Marcher à travers |
Attraversamento | Langs lopen | Движение перпендикулярно центру
cpelectronics.co.uk/cp/wta
Walk towards & walk across explained | Erläuterung von Durchquerung und Annäherung | Explicación
de aproximación frontal / lateral | Explicaçao da Aproximaçao lateral e frontal | Marcher vers et à travers
expliqués | Spiegazione di avvicinamento e attraversamento | Verklaring van naar toe lopen en langs lopen |
Движение перпендикулярно или по направлению к центру

7
Alignment marks | Ausrichtungsmarkierungen | Marcas de alineación | Marcas de alinhamento |
Marques d’alignement | Segni di allineamento | Uitlijningsmarkeringen | Знаки выравнивания
EN The sensor head has 4 alignment
marks. These correspond to the 4 outer
passive infrared sensors under the lens.
Use these marks to align with aisles and
corridors to ensure the best detection
characteristics.
DE Der Sensorkopf hat 4
Ausrichtungsmarkierungen. Diese
entsprechen den vier äußeren, passiven
Infrarotsensoren unter der Linse. Verwenden
Sie diese Markierungen, um das Produkt an
Gängen und Korridoren auszurichten, um die
bestmögliche Erfassung zu gewährleisten.
ES Este sensor tiene 4 marcas de
alineación. Estas corresponden a los 4
sensores infrarrojos pasivos externos bajo
las lentes. Utilice estas marcas para alinearse
con esquinas y pasillos para garantizar las
mejores características de detección.
PT A cabeça do sensor possui 4
marcas de alinhamento. Estes
correspondem aos 4 sensores
infravermelhos passivos externos sob a
lente. Use essas marcas para alinhar-se
com corredores e corredores para garantir
as melhores características de detecção.
FR La tête du capteur a 4 marques
d’alignement. Celles-ci correspondent aux
4 capteurs infrarouges passifs situés sous
la lentille. Utilisez ces marques pour aligner
les allées et les couloirs an d’assurer les
meilleures caractéristiques de détection.
IT La testa del sensore ha 4 segni di
allineamento. Questi corrispondono ai 4
sensori infrarossi passivi rivolti lateralmente
sotto la lente. Utilizzare questi segni per
allinearli agli angoli e ai corridoi per garantire
le migliori caratteristiche di rilevamento.
NL De sensor hee 4 markeringen.
Deze komen overeen met de 4 naar de
zijkant gerichte PIR sensoren onder de lens.
Gebruik deze markeringen om gangpaden
en gangen uit te lijnen om de beste detectie
te garanderen.
RU Головка датчика имеет 4 метки
совмещения. Они соответствуют 4
внешним пассивным инфракрасным
сенсорам под линзой. Используйте
эти метки для выравнивания с
проходами и коридорами, чтобы
обеспечить наилучшие характеристики
обнаружения.

8
Masking shields | Abschirmungen | Protectores | Máscaras delimitadoras de deteçao | Ecrans de masquage |
Schermi di mascheramento | Maskeerafscherming | Маски
1
2
EN The detector includes two clip-on
masking shields, enabling precise masking of
the detection shape for aisles and corners as
well as narrowing the detection diameter.
1. Lateral trim pattern for slot style
detection.
2. Radial trim pattern for narrowing the
detection diameter.
Ensure all infra-red (IR) programming
is completed before axing the
masking shields to the detector.
DE Der detektor beinhaltet zwei
klemmbare Abschirmungen, mit denen
eine präzise Erfassung von Gängen
und Ecken sowie eine Begrenzung des
Erfassungsdurchmessers gewährleistet wird.
1. Seitliches Verkleidungsprol für die
Erfassung durch schlitzförmige Aussparung.
2. Kreisförmiges Verkleidungsprol für die
Begrenzung des Erfassungsdurchmessers.
Stellen Sie sicher, dass die
Infrarot(IR)-Programmierung
vollständig durchgeführt wurde,
bevor die Abschirmungen am
Detektor befestigt werden.
ES El detector incluye 2 protectores
con clip, que permiten la denición precisa
de la forma de detección para pasillos y
esquinas, así como el estrechamiento del
diámetro de detección.
1. Patrón de corte lateral para ajustar
espacio de detección longitudinal.
2. Patrón de corte radial para estrechar el
diámetro de detección.
Asegúrese de que toda la programación
de infrarrojos (IR) se completa antes de
colocar los protectores en el detector.
PT O detector inclui dois protetores
de mascaramento clip-on, permitindo
um mascaramento preciso do formato de
detecção para corredores e cantos, bem
como estreitando o diâmetro de detecção.
1. Padrão de acabamento lateral para
detecção de estilo de slot.”
2. Padrão de acabamento radial para
estreitar o diâmetro de detecção.
Certique-se de que toda a
programação de infravermelho (IV)
esteja concluída antes de xar as
proteções de máscara ao detector.
FR L’article détecteur comprend deux
écrans de masquage à clipser, permettant
un masquage précis de la zone de détection
pour les allées et les angles, ainsi que la
réduction du diamètre de détection.
1. Motif de rognage latéral pour la détection
en forme de fente.
2. Motif de rognage radial pour un diamètre
de détection réduit.
Assurez-vous que toute la
programmation infrarouge (IR) est
terminée avant de xer les écrans de
masquage au détecteur.
IT L’articolo rivelatore include due
schermi di mascheramento a clip, che
consentono una mascheramentoprecisa
della forma di rilevamento per i corridoi e gli
angoli, oltre al restringimento del diametro
di rilevamento.
1. Taglio laterale per regolare lo spazio di
rilevamento longitudinale.
2. Sezione regoloabile radiale per
il restringimento del diametro di
rilevamento.
Assicurarsi che tutta la
programmazione a raggi infrarossi
(IR) sia completata prima di ssare
gli schermi di mascheramento al
rivelatore.
NL De detector bevat twee
opklikbare maskeringsafschermingen,
die een nauwkeurige maskering van het
detectiegebied voor gangpaden en hoeken
alsmede versmalling van het detectiebereik
mogelijk maken.
1. Areekpatroon voor afscherming bereik
in de lengterichting.
2. Circelvormig areekpatroon voor het
verkleinen van de detectiezone.
Zorg ervoor dat alle infrarood
(IR)-programmering is voltooid
voordat u de maskeerschilden op de
detector bevestigt.
RU «Датчик включает в себя два
маски, позволяющих точно маскировать
форму обнаружения проходов и углов, а
также сужать диаметр обнаружения.
1. Боковой шаблон для определения
стиля прорези.
2. Радиальный шаблон для сужения
диаметра обнаружения.
Убедитесь, что всё инфракрасные
(ИК) настройки завершены,
прежде чем прикреплять маски к
датчику.

9
Masking shield application | Anbringung der Abschirmungen | Aplicación de los protectores | Aplicaçao das
Máscaras delimitadoras | Application d’écran de masquage | Applicazione dello schermo di mascheramento |
Toepassing maskeerafscherming | Применение маски
Aisles | Gänge | Pasillos | Corredores | Couloirs | Navate | Gangpaden | Корридор
Install shields to detector | Abschirmungen am Detektor anbringen | Instalar los protectores en el detector |
Instalar máscaras no detector | Installer des écrans sur le détecteur | Installare gli schermi sul rilevatore |
Monteer maskering aan detector | Установить маки на датчик
EN Trim the masks laterally to reduce
the detection width for aisles.
DE Kürzen Sie die seitlichen
Abschirmungen, um die Erfassungsbreite
für Gänge zu verringern.
ES Recorte las protecciones
lateralmente para reducir el ancho de
detección de los pasillos.
PT Corte as máscaras lateralmente para
reduzir a largura de detecção dos corredores.
FR Découpez les masques latéralement
pour réduire la largeur de détection pour les
allées.
IT Tagliare le maschere lateralmente
per ridurre la larghezza di rilevamento per i
corridoi.
NL Breek de maskering zijdelings om
de detectiebreedte voor gangpaden te
verkleinen
RU Обрежьте маски по бокам, чтобы
уменьшить ширину обнаружения
проходов.
EN Align trimmed shields with sensor head
alignment marks and aisle.
DE Richten Sie die gekürzten Abschirmungen
an den Ausrichtungsmarkierungen des
Sensorkopfes und des Korridors aus.
ES Alinee los protectores recortados con las
marcas de alineación del cabezal del sensor y el pasillo.
PT Alinhe as proteções aparadas com as marcas
de alinhamento da cabeça do sensor e o corredor.
FR Alignez les écrans de masquage avec les
marques d’alignement de la tête du capteur et l’allée.
IT Allineare i tagli con i segni di allineamento
sulla testa del sensore e il corridoio.
NL Richt de afgebroken maskering uit met
uitlijningsmarkering op de sensor.
RU Совместите обрезанные маски с метками
совмещения головки датчика и проходом.
abcde
1wa 18m x 40m
wt 13.5m x 30m wa 11.7m x 26m
wt 9m x 20m wa 7.2m x 16m
wt 5.4m x 12m wa 4m x 9m
wt 3.6m x 8m
2wa 12.8m x 40m
wt 9.6m x 30m wa 8.3m x 26m
wt 6.4m x 20m wa 5.1m x 16m
wt 3.8m x 12m wa 2.8m x 9m
wt 2.5m x 8m
3wa 8.8m x 40m
wt 6.6m x 30m wa 5.7m x 26m
wt 4.4m x 20m wa 3.5m x 16m
wt 2.6m x 12m wa 1.9m x 9m
wt 1.7m x 8m
4wa 4.4m x 40m
wt 3.3m x 30m wa 2.8m x 26m
wt 2.2m x 20m wa 1.7m x 16m
wt 1.3m x 12m wa 0.9m x 9m
wt 0.8m x 8m
EN Key
a. Trim line
b. 15m Mounting height
c. 10m Mounting height
d. 6m Mounting height
e. 3m Mounting height
wa = walk across
wt = walk towards
DE Zeichenerklärung
a. Randverlauf
b. 15 m Montagehöhe
c. 10m Montagehöhe
d. 6m Montagehöhe
e. 3m Montagehöhe
wa = Durchquerung
wt = Annäherung
ES Leyenda
a. Línea de corte
b. Altura de montaje 15m
c. Altura de montaje 10m
d. Altura de montaje 6m
e. Altura de montaje 3m
wa = Aproximación frontal
wt = Aproximación lateral
PT Legenda
a. Linha d corte
b. Montagem a 15m altura
c. Montagem a 10m altura
d. Montagem a 6m altura
e. Montagem a 3m altura
wa = aproximaçao lateral
wt = aproximaçao frontal
FR Légende
a. Ligne de découpe
b. 15m hauteur de montage
c. 10m hauteur de montage
d. 6m hauteur de montage
e. 3m hauteur de montage
wa = marcher à travers
wt = marcher vers
IT Legenda
a. Linea di taglio
b. Altezza di montaggio 15m
c. Altezza di montaggio 10m
d. Altezza di montaggio 6m
e. Altezza di montaggio 3m
wa = Attraversamento
wt = Avvicinamento
NL Legenda
a. Areeklijn
b. 15m montagehoogte
c. 10m montagehoogte
d. 6m montagehoogte
e. 3m montagehoogte
wa = langs lopen
wt = naar toe lopen
RU Условные
обозначения
a. Линия обрезки
b. 15м Монтажная высота
c. 10м Монтажная высота
d. 6м Монтажная высота
e. 3м Монтажная высота
wa = движение
перпендикулярно центру
wt = движение к центру
4 43 32 21 1

10
Install shields to detector | Abschirmungen am Detektor anbringen | Instalar los protectores en el detector |
Instalar máscaras no detector | Installer des écrans sur le détecteur | Installare gli schermi sul rilevatore |
Monteer maskering aan detector | Установить маки на датчик
EN Trim the masks along radial lines to
narrow the detection diameter.
DE Kürzen Sie die Abschirmungen
entlang der radialen Linien, um den
Erfassungsdurchmesser zu verringern.
ES Recorte los protectores a lo largo de
las líneas radiales para reducir el diámetro de
detección.
PT Corte as máscaras ao longo das
linhas radiais para estreitar o diâmetro de
detecção.
FR Déoupez les masques le long de
lignes radiales pour réduire le diamètre de
détection.
IT Tagliare le maschere lungo le linee
radiali per ridurre il diametro di rilevamento.
NL Breek de circelvormige maskering af
om de detectiezone te verkleinen.
RU Обрезать маски вдоль
радиальных линий, чтобы уменьшить
диаметр обнаружения.
EN Align trimmed shields with sensor head
alignment marks and aisle.
DE Richten Sie die gekürzten Abschirmungen
an den Ausrichtungsmarkierungen des
Sensorkopfes und des Korridors aus.
ES Alinee los protectores recortados con las
marcas de alineación del cabezal del sensor y el pasillo.
PT Alinhe as proteções aparadas com as marcas
de alinhamento da cabeça do sensor e o corredor.
FR Alignez les écrans de masquage avec les
marques d’alignement de la tête du capteur et l’allée.
IT Allineare i tagli con i segni di allineamento
sulla testa del sensore e il corridoio.
NL Richt de afgebroken maskering uit met
uitlijningsmarkering op de sensor.
RU Совместите обрезанные маски с метками
совмещения головки датчика и проходом.
abcde
1wa 35.6m
wt 26.7m wa 23.1m
wt 17.8m wa 14.2m
wt 10.6m wa 8m
wt 7.1m
2wa 25.2m
wt 18.9m wa 16.3m
wt 12.6m wa 10m
wt 7.5m wa 5.6m
wt 5m
3wa 18m
wt 13.5m wa 11.7m
wt 9m wa 7.2m
wt 5.4m wa 4m
wt 3.6m
4wa 12.8m
wt 9.6m wa 8.3m
wt 6.4m wa 5.1m
wt 3.8m wa 2.8m
wt 2.5m
5wa 8.8m
wt 6.6m wa 5.7m
wt 4.4m wa 3.5m
wt 2.6m wa 1.9m
wt 1.7m
Narrow detection | Erfassungsbegrenzung | Detección longitudinal | Deteçao Limitada | Détection étroite |
Rilevazione ridotta | Smalle detectie | Узкое обнаружение
4 25 13 32 41 5
EN Key
a. Trim line
b. 15m Mounting height
c. 10m Mounting height
d. 6m Mounting height
e. 3m Mounting height
wa = walk across
wt = walk towards
DE Zeichenerklärung
a. Randverlauf
b. 15 m Montagehöhe
c. 10m Montagehöhe
d. 6m Montagehöhe
e. 3m Montagehöhe
wa = Durchquerung
wt = Annäherung
ES Leyenda
a. Línea de corte
b. Altura de montaje 15m
c. Altura de montaje 10m
d. Altura de montaje 6m
e. Altura de montaje 3m
wa = Aproximación frontal
wt = Aproximación lateral
PT Legenda
a. Linha d corte
b. Montagem a 15m altura
c. Montagem a 10m altura
d. Montagem a 6m altura
e. Montagem a 3m altura
wa = aproximaçao lateral
wt = aproximaçao frontal
FR Légende
a. Ligne de découpe
b. 15m hauteur de montage
c. 10m hauteur de montage
d. 6m hauteur de montage
e. 3m hauteur de montage
wa = marcher à travers
wt = marcher vers
IT Legenda
a. Linea di taglio
b. Altezza di montaggio 15m
c. Altezza di montaggio 10m
d. Altezza di montaggio 6m
e. Altezza di montaggio 3m
wa = Attraversamento
wt = Avvicinamento
NL Legenda
a. Areeklijn
b. 15m montagehoogte
c. 10m montagehoogte
d. 6m montagehoogte
e. 3m montagehoogte
wa = langs lopen
wt = naar toe lopen
RU Условные
обозначения
a. Линия обрезки
b. 15м Монтажная высота
c. 10м Монтажная высота
d. 6м Монтажная высота
e. 3м Монтажная высота
wa = движение
перпендикулярно центру
wt = движение к центру

11
EN This device is designed to be ush
ceiling-mounted. See page 20 for
additional mounting options.
• Do not site the unit where direct sunlight
might enter the sensor.
• Do not site the sensor within 1m of any
lighting, forced air heating or ventilation.
• Do not x the sensor to an unstable or
vibrating surface.
DE Das Modell ist für den Deckeneinbau
vorgesehen. Siehe Seite 20 für weitere
Mntagemöglichkeiten.
• Einheit so anbringen, dass der Sensor vor
direkter Sonneneinstrahlung geschützt ist.
• Sensor mit Mindestabstand von 1m
zu Lichtquellen, Luheizung oder
Ventilation anbringen.
• Sensor nicht an einer instabilen oder
vibrierenden Oberäche montieren.
ES Este producto está diseñado para
montarse empotrado en techo. Ver pag.
20 para otras opciones de montaje.
• Evite que la luz del sol incida directamente
sobre el sensor.
• No coloque el sensor a menos de 1m
de fuentes de iluminación, salidas de
calefacción por aire forzado o ventilación.
• No je el sensor a supercies que vibren o
no sean estables.
PT Este dispositivo foi projetado para
ser montado no teto. Veja a página 20
para opções adicionais de montagem.
• Não instale a unidade num local onde a
luz solar direta possa incidir no sensor.
• Não coloque o sensor a menos de 1m de
qualquer iluminação, aquecimento ou
ventilação de ar forçado.
• Não xe o sensor em uma superfície
instável ou sujeito a vibrações.
FR Le produit est conçu pour être monté
au plafond en encastré. Voir page 20 pour
les options additionnelles de montage.
• Ne pas placer l’unité dans une position
où la lumière directe du soleil pourrait
pénétrer dans le capteur.
• Ne pas placer le capteur à moins
d’unmètre de tout dispositif d’éclairage,
de chauage ou de ventilation à air forcé.
• Ne pas xer le capteur sur une surface
instable ou vibrante.
IT Questo dispositivo è progettato per
essere a lo sotto. Vedi pagina 20 per
opzioni di montaggio aggiuntive.
• Non collocare l’unità in una posizione in
cui la luce diretta del sole possa entrare
nel sensore.
• Non posizionare il sensore a meno
di un metro da un qualsiasi tipo di
illuminazione, sistema di riscaldamento
o ventilazione.
• Non installare il sensore su superci
instabili o soggette a vibrazioni.
NL Dit apparaat is ontworpen voor
inbouwmontage in het plafond. Zie
pagina 20 voor optionele montage opties.
• Plaats het apparaat niet op een locatie
waar direct zonlicht de sensor kan
binnendringen.
• Plaats de sensor niet op minder dan 1
meter afstand van verlichting, geforceerde
luchtverwarming of ventilatie.
• Bevestig de sensor niet op een onstabiel
of trillend oppervlak.
RU Это устройство предназначено
для скрытого монтажа на потолке.
Смотрите стр. 20 для дополнительных
опций монтажа.
• Не размещайте устройство в местах,
где прямой солнечный свет может
попасть в датчик.
• Не размещайте датчик в пределах 1
м от освещения, принудительного
воздушного отопления или
вентиляции.
• Не закрепляйте датчик на
неустойчивой или вибрирующей
поверхности.
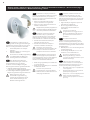
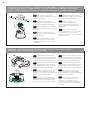
Installation | Instalación | instalação | Installazione | Installatie | Установка
Ø 64mm
1
35mm
6mm
2
Create cut out | Erstellen Sie einen Ausschnitt | Oricio de corte | Fixação no teto | Percer |
Creare il foro | Sparing maken | Вырезать
EN Cut a 64mm diameter
hole in the ceiling.
DE Deckenausschnitt
64mm.
ES Cortar un oricio de 64
mm de diámetro en el techo
PT Efectuar um corte de
diâmetro de 64mm no teto.
FR Percer un trou de
64mm de diamètre dans le
plafond
IT Realizzare un foro di
64mm di diametro a sotto.
NL Maak een 64mm
diameter sparing in het
plafond.
RU Вырежьте отверстие
диаметром 64 мм в потолке.
Wire stripping | Abisolieren | Pelado de cables | Descascamento do o | Dénudage des câbles |
Spelatura del lo | Kabelstrippen | Зачистка проводов
EN Strip the wires as shown opposite.
Presence detector does not require
earth conductor.
DE Abisolieren Sie die Kabel wie dargestellt.
Der Melder benötigt keinen Erdanschluß.
ES Pele los cables como se muestra en el
dibujo. El detector no requiere cable de tierra.
PT Descarne os cabos como mostrado
ao lado. Este detector não requer conductor
de terra.
FR Dénudez les câbles comme indiqué ci-
contre. Le détecteur de présence ne nécessite
pas de conducteur de terre.
IT Spelare i li come mostrato. Il rilevatore
di presenza non richiede il cavo di terra.
NL Strip de aders zoals weergegeven op
de aeelding hiernaast. Aardingsdraad is niet
vereist.
RU Зачистите провода, как показано на
рисунке. Детектор присутствия не требует
заземляющий проводник

12
4
Clamp cable | Zugentlastung | Abrazadera para el cable | Fixação do cabo | Serrer les câbles |
Morsetto per il cavo | Trekontlasting | Фиксация кабеля
EN Continue tightening the screws
until the clamp bar snaps out and is tightly
engaged against the cable/s. The cable
clamp must clamp the outer sheath only.
DE Ziehen Sie die Schrauben weiterhin
an, bis die Klemme einrastet und fest am
Kabel sitzt. Die Kabelklemme darf nur die
äußere Ummantellung einklemmen.
ES Continuar apretando los tornillos
hasta que la barra abrazadera salga y se
ajuste bien con el cable. La abrazadera para
cables solo debe sujetar la funda.
PT Apertar os parafusos até que a
barra de xação se encaixe totalmente e
prenda bem o cabo. O grampo do cabo
deve xar apenas o revestimento externo.
FR Continuez de serrer les vis jusqu’à
ce que la barre de xation sorte et se serre
fortement sur le câble. Le serre-câbles doit
uniquement serrer la gaine extérieure.
IT Continuare a stringere le viti no
a quando la barra del morsetto non scatti
e si ssi leggermente sul cavo. Applica il
morsetto alla sola guaina esterna del cavo.
NL Blijf de schroeven aandraaien
totdat de beugel los komt en de kabel
stevig vastklemt. De beugel moet alleen de
buitenmantel vastklemmen.
RU Завинчивайте шурупы до
тех пор, пока зажимная планка не
защелкнется и не будет плотно
прилегать к кабелю. Кабельный хомут
должен обжимать только внешнюю
оболочку.
3
Wire in plugs & connect to detector | Verdrahtugn & Anschluß des Melders | Cableado y conexión del sensor |
Cablagem e ligação do sensor | Câbler le bornier et connecter au détecteur | Cablaggio e connessione al
rilevatore | Bedrading & aansluiten op detector | Соединение проводов и подключение к датчику
EN Wire in plug/s, using wiring
diagram on page 3 as a guide. Connect the
plug/s to the detector.
DE Zum Anschluß des Melders
verwenden Sie das Schaltbild. Verwenden
Sie dazu den /die beiliegenden Stecker.
ES Cablear siguiendo el esquema de
la página 3 como guía. Conectar las bornas
al sensor.
PT Efectuar as ligações seguindo o
esquema na pág.3 como indicação. Ligar
os bornes ao sensor.
FR Raccorder les câbles au bornier
débrochable en respectant le schéma
de câblage page 3. Connecter le bornier
au détecteur.
IT Collegare il morsetto usando il
cablaggio indicato a pagina 3 come guida.
Connetti il morsetto al rilevatore.
NL Aders aansluiten in de
aansluitklem(men), gebruik het
bedradingsschema op pagina 3 als
richtlijn. Steek de aansluitklem(men) in
de detector.
RU Подключите провода в
контактный разъем, используя схему
соединений на стр. 3 в качестве
руководства. Подключите контактный
разъем к датчику.

13
5
Default Settings | Werkseinstellung | Parámetros por defecto | Congurações por omissão |
Paramètres par défaut | Impostazioni predenite | Standaard instellingen | Настройки по умолчанию
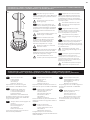
EN Bend the springs up and push
detector through hole in ceiling. When fully
inserted the springs snap back to hold the
device in place.
To avoid injury, take care when
bending springs.
DE Federn nach oben biegen und
Detektor durch die Önung in der Decke
schieben. Sobald der Detektor vollständig
eingeschoben ist, schnappen die Federn
zurück und halten das Gerät fest an Ort
und Stelle.
Achten Sie auf die Spannfedern um
Verletzungen zu vermeiden
ES Doble los muelles hacia arriba
e introduzca el detector por el oricio
del techo. Cuando esté totalmente
introducido, los muelles saltan para
mantener el dispositivo en su lugar.
Doble los muelles con cuidado al
montar la unidad.
PT Dobre as molas para cima e empurre
detector através do furo no teto. Ao serem
totalmente inseridas as molas saltam de volta
para manter o dispositivo no lugar.
Para evitar ferimentos, tenha
cuidado quando manipule as molas.
FR Replier les ressorts vers le haut
et pousser le détecteur à travers le trou
dans le plafond. Quand les ressorts sont
complètement insérés, ils se remettent
dans leur position initiale pour maintenir le
dispositif en place.
Pour éviter toute blessure, faire
attention lors de la compression
des ressorts.
IT Piegare le molle verso l’alto e
inserire il rilevatore nel foro sul sotto.
Una volta inserito, le molle si riassestano
ssando il dispositivo in posizione.
per evitare infortuni, prestare
attenzione quando si piegano le
molle.
NL Buig de veren omhoog en duw het
apparaat door de sparing in het plafond.
Wanneer de veren volledig door de sparing
zijn klappen deze terug om het apparaat op
zijn plek te houden.
Om letsel te voorkomen, wees
voorzichtig met het buigen van de
veren.
RU Отведите пружины в верхнее
положение и вставьте датчик в
отверстие в потолке. После полного
погружения в отверстие пружины
вернутся в обратное положение для
фиксации устройства.
Во избежание травм, отводите
пружины с осторожностью.
Install detector | Melder installieren | Instalación del detector | Instalaçao do detector | Installer le détecteur |
Installazione del sensore | Installeer detector | Установка датчика
EN Time out: 20 minutes.
LUX on level: 9
LUX o level: 9
Sensitivity: 9
Detection: Presence
Adjustments can be made using the
optional UHS5 or UNLCDHS handsets.
DE Nachlaufzeit: 20 Minuten
LUX Einschaltschwelle: 9
Lux Ausschaltschwelle: 9
Empndlichkeit: 9
Betriebsart: Automatikbetrieb
Einstellungsänderungen können mit den
Ferbedienungen UHS 5 oder UNLCD HS
vorgenommen werden.
ES Tiempo retardo hasta apagado: 20
minutos
Nivel Lux Encendido: 9
Nivel Lux Apagado: 9
Sensibilidad: 9
Detección: Presencia
Los ajustes se pueden hacer usando los
mandos UHS5 y UNLCDHS
PT Tempo limite: 20 minutos.
LUX on nível: 9
LUX o : 9
Sensibilidade: 9
Detecção: Presença
Os ajustes podem ser efectuados usando os
telecomandos opcionais UHS5 ou UNLCDHS.
FR Temporisation: 20 minutes
Seuil de luminosité pour
activation PIR: 9
Seuil de luminosité pour
désactivation PIR: 9
Sensibilité: 9
Détection: Présence
Toutes modications peuvent être faites en
utilisant les outils de conguration UHS5 ou
UNLCDHS.
IT Time out: 20 minuti.
Livello accensione LUX: 9
Livello spegnimento LUX: 9
Sensibilità : 9
Rilevamento : Presenza
Le regolazioni possono anche essere
eettuate utilizzando l’opzionale telecomando
UHS5 o UNLCDHS.
NL Uitschakeltijd: 20 minuten
Lichtdrempel aan niveau: 9
Lichtdrempel uit niveau: 9
Gevoeligheid: 9
Detectie: aanwezigheid
Aanpassingen kunnen worden uitgevoerd
met de optionele UHS5- of UNLCDHS-
handset.
RU Время задержки: 20 минут.
LUX вкл уровень: 9
LUX выкл уровень: 9
Чувствительность: 9
Обнаружение: Присутствие
Регулировки могут быть сделаны с
использованием пультов UHS5 или
UNLCDHS.

14
Presence Detection
Absence Detection
1 2
3
1
2
3
Testing | Prüfen | Pruebas | Teste | Test | Veriche | Testen | Тестирование
EN 1. Power up the sensor. The load
should come on immediately.
2. Vacate the room or remain very still and
wait for the load to switch o (this should take
less than 20 minutes).
3. Enter the room or make some movement
and check that the load switches on.
DE 1. Schließen Sie den Sensor an die
Stromversorgung an - das System sollte sich
sofort einschalten.
2. Verlassen Sie den Raum oder stehen Sie
ganz still, um zu prüfen, ob das System sich
ausschaltet (Dies erfolgt nach ca. 20Minuten
nach der letzten Erfassung).
3. Betreten Sie den Raum oder bewegen Sie
sich, um sicherzustellen, dass das System
sich einschaltet.
ES 1. Encienda el sensor: la carga debería
encenderse inmediatamente.
2. Salga de la habitación o permanezca muy
quieto y espere a que la carga se apague
(deberían requerirse menos de 20 min).
3. Entre en la habitación o realice algún
movimiento y compruebe que la carga se
enciende.
PT 1.
Ligue o sensor - a carga deve ser
ativada imediatamente.
2. Desocupe a sala ou permaneça imóvel e
aguarde até a carga ser desativada
(isto deve levar menos de 20 minutos).
3. Entre na sala ou faça algum movimento e
verique se a carga é ativada.
FR 1. Alimenter le capteur: la charge
devrait s’allumer immédiatement.
2. Quitter la pièce ou rester immobile et
attendre que la charge s’éteigne (ceci devrait
prendre moins de 20 minutes).
3. Entrer dans la pièce ou bouger et vérier
que la charge s’allume.
IT 1. Accendi il sensore: il carico
dovrebbe attivarsi immediatamente.
2. Abbandona la stanza o cerca di restare il più
fermo possibile e attendi lo spegnimento del
carico (dovrebbe richiedere meno di 20 minuti).
3. Entra nella stanza o esegui qualche
movimento per vericare che il carico si attivi.
NL 1. Zet spanning op de sensor. De
ballast moet onmiddellijk inschakelen.
2. Verlaat de ruimte of zorg dat er geen
beweging is binnen de detectiezone en
wacht tot de ballast uitschakelt (dit duurt 20
minuten).
3. Ga de ruimte in of maak bewegingen
binnen de detectiezone en controleer of de
ballast wordt ingeschakeld.
RU 1. Включите датчик. Нагрузка
должна включиться немедленно.
2. Выйдите из комнаты или оставайтесь
на месте и подождите, пока нагрузка не
отключится (это должно занять не более
2 минут).
3. Войдите в комнату или сделайте
какое-нибудь движение и убедитесь, что
нагрузка включена.
EN 1. Power up the sensor. Switch the
load on.
2. Vacate the room and wait for the load to
switch o (this should under than 20 minutes).
3. Enter the room, the load will remain o until
you switch it on again.
DE 1. Spannung einschalten. Beleuchtung
durch Taster einschalten.
2. Verlassen Sie den Raum. Die Beleuchtung
sollte nach 20 Minuten ausschalten.
3. Beim Betreten des Raumes bleibt die
Beleuchtung aus, solange sich nicht den Taster
betätigten.
ES 1. Presione el pulsador asociado al
sensor, este se activará y se encenderá la carga
asociada.
2. Salga de la habitación y espere a que la
carga se apague (esto debería ocurrir a los 20
minutos).
3. Entre en la habitación, la carga
permanecerá apagada hasta que la encienda.
PT 1. Ligue o sensor através do botão de
pressão ligado ao mesmo - a carga deve ser
ativada imediatamente.
2. Desocupe a sala ou permaneça imóvel e
aguarde até a carga ser desativada (isto deve
levar menos de 20 minutos).
3. Entre na sala ou faça algum movimento a
carga deve car desligada até que for activada
pelo pulsador.
FR 1. Alimenter le capteur. Actionner le
poussoir pour allumer la charge.
2. Quitter la pièce ou rester immobile et
attendre que la charge s’éteigne (ceci devrait
prendre moins de deux minutes).
3. Entrer dans la pièce, la charge doit rester
éteinte jusqu’à l’action sur le poussoir.
IT 1. Accendi il sensore: il carico
dovrebbe attivarsi immediatamente.
2. Abbandona la stanza e attendi lo
spegnimento del carico (dovrebbe richiedere
meno di 20 minuti).
3. Entra nella stanza, il carico rimarrà spento
no a quando non lo accenderai nuovamente.
NL 1. Zet spanning op de sensor. Schakel
de ballast in.
2. Verlaat de ruimte of zorg dat er geen
beweging is binnen de detectiezone en wacht
tot de ballast uitschakelt (dit duurt 20 minuten).
3. Ga de ruimte in of maak bewegingen binnen
de detectiezone, de ballast blij uitgeschakeld
totdat je de schakelaar bediend.
RU 1. Включите датчик. Включите
нагрузку.
2. Выйдите из комнаты и подождите, пока
нагрузка не отключится (это должно быть
менее 20 минут).
3. Войдите в комнату, нагрузка останется
выключенной, пока вы не включите ее
снова.

15
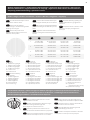
Compliance
IP rating
Insulation class
Material (casing)
Humidity
Working temperature range
Time out range
Number of drivers/ballasts
Low voltage halogen
Fans and ventilation equipment
Resistive heaters
LED lighting
Compact uorescent lighting
Fluorescent lighting
Incandescent lighting
Max load:
Terminal capacity
Power consumption parasitic
Circuit protection
Supply frequency
Supply voltage AC
Weight
Part code
EMC-2014/30/EU,
LVD-2014/35/EU
40
2
Flame retardant ABS
and PC/ABS
5 to 95% non-
condensing
-10 to 35ºC
10 seconds to
99 minutes
Up to 10
10A
10A
10A
10A
10A
10A
10A
2.5mm²
305mW
10A
50Hz
230 VAC +/- 10%
0.200kg
EBDHS-AD
EN Technical Data
Eingehaltene normen
IP-schutzklasse
Isolationsklasse
Material (gehäuse)
Feuchtigkeit
Arbeitstemperaturbereich
Zeitüberschreitungsbereich
Anzahl der Fahrer / Vorschaltgeräte
Niederspannungshalogen
Induktiv/ventilatoren und
lüungssysteme
Widerstandsfähige heizungen
LED-beleuchtung
Kompakte neonbeleuchtung
Neonbeleuchtung
Glühlampen
Max. Last:
Leiterkapazität
Parasitäre stromverbrauch
Sicherung
Versorgungsfrequenz
Versorgungsspannung AC
Gewicht
Teile-code
EMC-2014/30/EU,
LVD-2014/35/EU
40
2
Flammenhemmendes
ABS und PC/ABS
5 bis 95 %
Luftfeuchtigkeit,
nicht kondensierend
-10 bis 35ºC
10 Sekunden bis
99 Minuten
Bis zu 10
10A
10A
10A
10A
10A
10A
10A
2.5mm²
305mW
10A
50Hz
230 VAC +/- 10%
0.200kg
EBDHS-AD
DE Technische Daten

16
Conformidad con
normativas
Grado de protección IP
Clase de aislamiento
Material (carcasa)
Humedad
Rango de temperatura de trabajo
Rango de tiempo fuera
Número de conductores / balastos
Halógeno de baja tensión
Inductivo/equipo de ventilación y
ventiladores
Calentadores resistiva
Iluminación LED
Iluminación uorescente
compacta
Iluminación uorescente
Iluminación incandescente
Carga máx.:
Capacidad del terminal
Consumo energético parasitaria
Protección del circuito
Frecuencia de suministro
Voltaje de entrada de CA
Peso
Código de pieza
EMC-2014/30/EU,
LVD-2014/35/EU
40
2
Ignífugo ABS y PC/ABS
5 a 95 % sin
condensación
-10 a 35°C
10 segundos para
99 minutos
Hasta 10
10A
10A
10A
10A
10A
10A
10A
2.5mm²
305mW
10A
50Hz
230 VAC +/- 10%
0.200kg
EBDHS-AD
ES Datos Técnicos PT Dados Técnicos
Compatibilidade
Classicação IP
Classe de isolamento
Material (caixa)
Umidade
Faixa de temperatura de trabalho
Intervalo de tempo limite
Número de condutores / reatores
Halogênio de baixa tensão
Iindutivo/ventiladores e equipa-
mentos de ventilação
Resistivas aquecedores
Lâmpada de LED
Lâmpada uorescente compacta
Lâmpada uorescente
Iluminação incandescente
Carga max.:
Capacidade do terminal
Consumo de energia parasitária
Proteção de circuito
Freqüência de fornecimento
Tensão de alimentação CA
Peso
Código da peça
EMC-2014/30/EU,
LVD-2014/35/EU
40
2
Retardante de chamas
ABS e PC/ABS
5 a 95% sem
condensação
-10 a 35°C
10 segundos para
99 minutos
Até 10
10A
10A
10A
10A
10A
10A
10A
2.5mm²
305mW
10A
50Hz
230 VAC +/- 10%
0.200kg
EBDHS-AD

17
FR Données Techniques
Conformité
Indice IP
Classe d’isolation
Matériau (boîtier)
Humidité
Plage de température de travail
Plage de temps mort
Nombre de conducteurs / ballasts
Halogène basse tension
Ventilateurs et équipements de
ventilation
Réchaueurs résistif
Éclairage LED
Éclairage uorescent compact
Éclairage uorescent
Éclairage incandescent
Charge max.:
Capacité des terminaux
Consommation électrique parasite
Protection de circuit
Fréquence d’alimentation
Tension d’alimentation CA
Poids
Code de la pièce
EMC-2014/30/EU,
LVD-2014/35/EU
40
2
Agent Ignifuge ABS et
PC/ABS
5 à 95 %
noncondensable
-10 à 35°C
10 secondes pour
99 minutes
Jusqu’à 10
10A
10A
10A
10A
10A
10A
10A
2.5mm²
305mW
10A
50Hz
230 VAC +/- 10%
0.200kg
EBDHS-AD
IT Speciche Tecnichev
Conformità
Classicazione IP
Classe di isolamento
Materiale (rivestimento)
Umidità
Intervallo di temperatura di lavoro
Intervallo di tempo
Numero di driver / reattori
Alogena a bassa tensione
Induttivo/ventole e apparecchia-
ture di ventilazione
Resistivo
Illuminazione LED
Illuminazione uorescente
compatta
Illuminazione uorescente
Luce a incandescenza
Carico max:
Capacità del morsetto
Consumo di energia parassita
Protezione del circuito
Frequenza di alimentazione
Tensione di alimentazione CA
Peso
Codice parte
EMC-2014/30/EU,
LVD-2014/35/EU
40
2
ABS ignifugo e PC/ABS
Dal 5 al 95% senza
condensa
-10 al 35°C
10 secondi a
99 minuti
Fino a 10
10A
10A
10A
10A
10A
10A
10A
2.5mm²
305mW
10A
50Hz
230 VAC +/- 10%
0.200kg
EBDHS-AD

18
Conformiteit
IP classicatie
Isolatieklasse
Materiaal (behuizing)
Luchtvochtigheid
Werktemperatuurbereik
Time-outbereik
Aantal bestuurders /
voorschakelapparaten
Laagspanning halogeen
Ventilatoren en ventilatieap-
paratuur
Resistent kachels
LED verlichting
Compacte tl-verlichting
Tl-verlichting
Gloeilampverlichting
Max belasting
Eindcapaciteit
Energieverbruik in ruststand
Circuitbeveiliging
Voedingsfrequentie
Voedingsspanning AC
Gewicht
Onderdeelcode
EMC-2014/30/EU,
LVD-2014/35/EU
40
2
Brandvertragend ABS
en PC/ABS
5 tot 95%, niet
condenserend
-10 tot 35°C
10 seconden tot
99 minuten
Tot 10
10A
10A
10A
10A
10A
10A
10A
2.5mm²
305mW
10A
50Hz
230 VAC +/- 10%
0.200kg
EBDHS-AD
NL Technische data
Требование
уровень IP
Класс изоляции
Материал (корпус)
Влажность
Диапазон рабочих температур
Диапазон времени ожидания
Колличество устройств /
драйверов
Низковольтный галоген
Вентиляторы и вентиляционное
оборудование
Резистивные нагреватели
Светодиодные светильники
Компактные люминесцентные
лампы
Люминесцентные лампы
Лампа накаливания
Максимальная нагрузка:
Терминальная емкость
Потребляемая мощность
паразитная
Защита цепи
Частота питания
Переменное напряжение питания
(AC)
Вес
Номер
EMC-2014/30/EU,
LVD-2014/35/EU
40
2
Огнестойкие пластик
АБС и ПК/АБС
От 5 до 95% без
конденсации
от -10 до 35ºC
10 секунд до
99 минут
до 10
10A
10A
10A
10A
10A
10A
10A
2.5mm²
305mW
10A
50Гц
230 В AC +/- 10%
0.200кг
EBDHS-AD
RU Техническая информация

19
This page is intentionally le blank | Diese Seite wurde absichtlich leer gelassen | Esta página se ha dejado en
blanco intencionalmente | Esta página foi intencionalmente deixada em branco | Cette page a été laissée
blanche intentionnellement | Questa pagina è stata lasciata vuota intenzionalmente | Deze pagina is met
opzet leeg gelaten | Эта страница намеренно оставлена пустой

20
WD409 Issue 11 Installation Guide, EBDHS-AD
CP Electronics
Brent Crescent, London NW10 7XR
t. +44 (0)333 900 0671
enquir[email protected]
www.cpelectronics.co.uk connect with us
Due to our policy of continual product improvement CP Electronics reserves the right to alter the specication of this product without prior notice.
Part Number | Artikelnummer |
Referencia | Referéncia | Référence |
Codice | Artikelnummer | Номер
Description | Beschreibung | Descripción | Descripção | Description |
Descrizione | Omschrijving | Описание
DBB Surface mounting box | Deckenauaudose | Caja para montaje en supercie |
Caixa para supercie | Accessoire pour montage en saillie | Scatola a supercie |
Opbouwdoos | Коробка для поверхностного монтажа
DBB-EXT
Surface mount back box extender | Erweiterung für Deckenauaudose | Extensión
para montaje en supercie | Extensor de caixa de montagem em superfície | Extension
d’accessoire pour montage en saillie | Estensore per scatola per montaggio a supercie |
Verhogingsring | Поверхностный монтаж удлинителя задней коробки
EBD-ENCIP1
Pre-drilled 64mm hole IP65 detector enclosure | Vorgebohrtes 64mm-Aussparung für
den IP 65 Sensor | Carcasa IP65 para detectores diámetro 64 mm | Boîtier étanche IP65
pré-percé d’un diamètre de 64mm | Boîtier étanche IP65 pré-percé d’un diamètre de
64mm | Scatola IP65 con foro di 64mm | IP65 behuizing met voorgeboorde 64mm sparing
| Предварительно просверленный корпус IP65 с отверстием 64 мм
EXD-HSC
Extended wiring housing | Erweiterter Verdrahtungsraum | Ampliación de alojamiento
de cables | Extensor adicional para cabos | Enveloppe allongée pour câblage |
Estensore per i cavi | Verlengde behuizing voor bedrading | Удлиненный корпус
проводки
UHS5
Compact, programming/commissioning handset | Kompakte Fernbedienung und
Einstellhilfe | Mando para programación y puesta en marcha | Controle remoto para
ajustes/commisionamento | Combiné compact de programmation / mise en service |
Telecomando per programmazione/messa in servizio | Compacte conguratie handset |
Компактный пульт для программирования / ввода в эксплуатацию
UHS7 Compact, user handset | Kompakte Endanwender Fernbedienung | Mando de usuario
| Controle para usuário | Combiné compact de contrôle pour utilisateur | Telecomando
per utente | Compacte handset gebruikers | Компактная трубка пользователя
UNLCDHS
Universal LCD IR handset/commissioning handset | Fernbedienung und
Einstellwerkzeug | Mando profesional con pantalla LCD para programación y puesta
en marcha | Controle remoto LCD Universal | Outil universel de conguration / mise
en service avec écran LCD | Telecomando Universale LCD | Gevanceerde handset |
Универсальный ИК-пульт для ввода в эксплуатацию
Accessories & associated products | Zubehör | Accesorios y productos asociados | Acessórios e productos
associados | Accessoires et produits associés | Accessori e prodotti associati | Toebehoren | Аксессуары и
сопутствующие товары
-
 1
1
-
 2
2
-
 3
3
-
 4
4
-
 5
5
-
 6
6
-
 7
7
-
 8
8
-
 9
9
-
 10
10
-
 11
11
-
 12
12
-
 13
13
-
 14
14
-
 15
15
-
 16
16
-
 17
17
-
 18
18
-
 19
19
-
 20
20


CP Electronics EBDHS-AD High Bay Presence Detectors Guia de instalação
- Categoria
- Detectores de movimento
- Tipo
- Guia de instalação
em outras línguas
- español: CP Electronics EBDHS-AD High Bay Presence Detectors Guía de instalación
- français: CP Electronics EBDHS-AD High Bay Presence Detectors Guide d'installation
- italiano: CP Electronics EBDHS-AD High Bay Presence Detectors Guida d'installazione
- English: CP Electronics EBDHS-AD High Bay Presence Detectors Installation guide
- русский: CP Electronics EBDHS-AD High Bay Presence Detectors Инструкция по установке
- Nederlands: CP Electronics EBDHS-AD High Bay Presence Detectors Installatie gids
- Deutsch: CP Electronics EBDHS-AD High Bay Presence Detectors Installationsanleitung
Artigos relacionados
-
CP Electronics EBDMR-AD Guia de instalação
-
CP Electronics EBDMR-PRM Guia de instalação
-
CP Electronics EBDSPIR-PRM Guia de instalação
-
CP Electronics EBDHS-B-MB-CB-DD Guia de instalação
-
CP Electronics EBDRC-AD Guia de instalação
-
CP Electronics EBDHS-KNX Guia de instalação
-
CP Electronics EBDRC-DD Guia de instalação
-
CP Electronics EBMPIR-MB-AD-LT30 Guia de instalação
-
CP Electronics MWS3A-DBB Guia de instalação
-
CP Electronics EBMPIR-MB-DD Guia de instalação
Outros documentos
-
 Thorn SensaLite / SWITCHLITE MRE SLD Guia de instalação
-
 Thorn SensaLite / SWITCHLITE MRE SLDD PC Guia de instalação
-
 Thorn SensaLite / SENSA MRE DDM MR Guia de instalação
-
Chacon 34302 Manual do usuário
-
-
Pyronix XDL15TT-AM Guia de instalação
-
-
-
-
 Thorn SensaLite / SWITCHLITE SLDM Guia de instalação


