
COLOR MONITOR
AD9410
AD9414
AD9421A
User’s Guide
Mode d’emploi
Bedienungsanleitung
Guía del usuario
Manual de utilizador

COLOR MONITOR User’s Guide
e-2
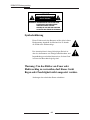
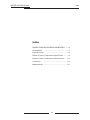
Explanation of Symbols
The triangle with lightning symbol represents the pres-
ence of uninsulated, dangerous voltage within the prod-
uct’s enclosure. This high voltage poses a risk of electric
shock to the user.
The triangle with exclamation point represents important
operating and maintenance (service) instructions found in
the manuals included with the product.
Warning-To Prevent Fire or Shock Hazard,
Do Not Expose This Monitor To Rain or Moisture.
Product specification is subject to change without notice.
CAUTION
CAUTION : TO REDUCE THE RISK OF ELECTRIC
SHOCK, DO NOT REMOVE COVER
(OR BACK). NO USER SERVICEABLE
PARTS INSIDE. REFER SERVICING TO
QUALIFIED SERVICE PERSONNEL.
RISK OF ELECTRIC SHOCK
DO NOT OPEN

COLOR MONITOR User’s Guide Contents
e-3
Contents
Important Safeguards .............................................. e-4
General .................................................................... e-8
Specifications .......................................................... e-9
Front Panel Components and Controls ................. e-10
Rear Panel Components and Controls .................. e-12
Connections ........................................................... e-13
Maintenance .......................................................... e-14

COLOR MONITOR User’s Guide IMPORTANT SAFEGUARDS
e-4
IMPORTANT SAFEGUARDS
Warning
The power source is located on the rear of the set. It contains high-voltage
parts. If you remove the cover, it may cause fire or electric shock. Do not
remove the cover by yourself. (Control switches are at the front of the moni-
tor).
1. Read Instructions : All the safety and operating instructions
should be read before the monitor is operated.
2. Retain Instructions : The safety and operating instructions
should be kept for future reference.
3. Heed Warnings : All warnings on the monitor and in the oper-
ating instructions should be followed.
4. Follow Instructions : All operating and use instructions should
be followed.
5. Cleaning : Unplug this monitor from the wall outlet before
cleaning.
Do not use liquid cleaners or aerosol cleaners. Use a damp cloth
for cleaning.
Note. The monitor may be used in a situation where uninterrupt-
ed service is required. In these situations, such as the possibility
of loss of an authorization code for a CATV converter, the user
may disregard the instructions to unplug the monitor for clean-
ing purposes noted in Item 5.
6. Attachments : Do not use attachments not recommended by
Sensormatic as they may cause hazards.
7. Water and Moisture : Do not use this monitor near water.
For example, do not use near a bath tub, in a wet basement, near
a swimming pool, or in any environment where the monitor is
may get wet.

COLOR MONITOR User’s Guide IMPORTANT SAFEGUARDS
e-5
8 Accessories : Do not place this monitor on an unstable cart,
stand, tripod, bracket or table. The monitor may fall, causing
serious injury to a child or adult, and serious damage to the
monitor. Use only with a cart, stand, tripod, bracket or table rec-
ommended by Sensormatic, or sold with the monitor. Any
mounting of the should follow Sensormatic instructions and
should use a mounting accessory recommended by Sensormatic.
9. Ventilation : Slots and openings in the cabinet are provided for
ventilation, to ensure reliable operation of the monitor, and to
protect it from overheating. These openings should never be
blocked by placing the monitor on a bed, sofa, rug, or other sim-
ilar surface. This monitor should never be placed near or over a
radiator or heat register.
This monitor should not be placed in a built-in installation such
as a bookcase or rack unless proper ventilation is provided or
Sensormatic’s instructions have been adhered to.
10. Power Sources : This monitor should be operated only from the
type of power source indicated on the manufacturing label. If
you are not sure of the type of power supply to your installation
site, consult your Sensormatic dealer or local power company.
11. Grounding or Polarization : Some monitors are equipped with
3-prong grounded plugs. This plug will only fit into a grounded
power outlet. This is a safety feature. If you are unable to insert
the plug into the outlet, contact your electrician to replace the
obsolete outlet. Do not attempt to defeat the safety purpose of
the grounding-type plug.
12. Power Cords : Power supply cords should be routed to prevent
the ability to walk on the cord or pinch the cord by placing items
on or against them. Pay particular attention to cords at the plugs,
outlets, and the point where the cord exits from the monitor.
13. Lightning : For added protection for this monitor during a light-
ning storm, or when it is left unattened and unused for long peri-
ods of time, unplug it from the wall outlet and disconnect the
cable system. This will prevent damage to the monitor due to
lightning and power-line surges.
14. Overloading : Do not overload wall outlets and extension cords
as this can result in a risk of fire of electric shock.

COLOR MONITOR User’s Guide IMPORTANT SAFEGUARDS
e-6
15. Object and Liquid Entry : Never push objects of any kind into
this monitor through openings as they may touch dangerous
voltage points or short-out parts that could result in a fire or
electric shock.
Never spill liquid of any kind on the monitor.
16. Servicing : Do not attempt to service this monitor yourself as
opening or removing covers may expose you to dangerous volt-
age or other hazards. Refer all servicing to qualified service per-
sonnel.
17. Damage Requiring Service : Unplug this monitor from the
wall outlet and refer repair to qualified service personnel under
the following conditions:
a. When the power-supply cord or plug is damaged.
b. If liquid has been spilt, or objects have fallen into the
monitor.
c. If the monitor has been exposed to rain or water.
d. If the monitor does not operate normally by following the
operating instructions. Adjust only those controls that are
covered by the operating instructions. Improper adjustment of
other controls may result in damage to the monitor. Such
damage will often require extensive work by a qualified tech-
nician to restore the monitor to normal operation.
e. If the monitor has been dropped or the cabinet has been dam-
aged.
f. When the monitor exhibits a noticeable change in perfor-
mance – this indicates a need for service.
18. Replacement Parts : When replacement parts are required, be
sure the service technician has used replacement parts specified
by Sensormatic or have the same characteristics as the original
parts.
Unauthorized substitutions may result in fire, electric shock or
other hazards.
19. Safety Check : Upon completion of any service or repairs to this
monitor, ask the service technician to preform safety checks to
determine that the monitor is in proper operating condition.

COLOR MONITOR User’s Guide IMPORTANT SAFEGUARDS
e-7
FCC & ICES Information
Warning
This equipment has been tested and found to comply the limits for a
Class A digital device, pursuant to Part 15 of the FCC Rules and
ICES-003 of Industry Canada. These limits are designed to provide
reasonable protection against harmful interference when the equip-
ment is operated in a commercial environment. This equipment gen-
erates, uses, and can radiate radio frequency energy and, if not
installed and used in accordance with the instruction manual, may
cause harmful interference to radio communications. Operation of
this equipment in a residential area is likely to cause harmful interfer-
ence in which case the user will be required to correct the interfer-
ence at his own expense.
User/Installer Caution
Your authority to operate this FCC verified equipment could be void-
ed if you make changes or modifications not expressly approved by
the party responsible for compliance to Part 15 of the FCC Rules.

COLOR MONITOR User’s Guide General
e-8
General
Scope
The information in this instruction manual covers the installation and
operation of the Color Monitors.
These units should be installed using approved materials and wiring
practices in accordance with the National Electrical Code and applic-
able local wiring ordinances.
Introduction
The Color Monitors produce high quality images on a screen with a
resolution of greater than 450 lines at center.
(14" : more than 360line,10" : more than 280line).
Designed primarily for industrial applications this monitor accepts
standard NTSC/PAL color input signals.
Operating controls (BRIGHTNESS, CONTRAST, COLOR, TINT,
SHARP, VOLUME) are located on the front panel. A power switch is
also located on the front panel.
A regulated power supply maintains excellent performance during
fluctuations in line voltage.
The Color Monitors are housed in a metallic black color cabinet
(with a black bezel around the screen).

COLOR MONITOR User’s Guide Specifications
e-9
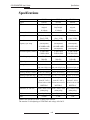
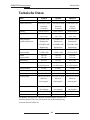
Specifications
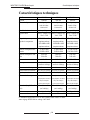
Model
System
CRT
Horizontal resolution
Input signal
Subcarrier
frequency sync. range
Horizontal frequency stability
Vertical frequency stability
High voltage
Convergence
Power consumption
Operating humidity condition
Operating temperature range
Power
Dimensions (W X D X H)
Weight
Audio
AD9410
NTSC/PAL
10-inch diagonal, 0.63mm
stripe pitch,
90° deflection
More than 280 lines
Video A/B : Compose 1Vp-p
Video C : S-VHS
3.579545MHz ± 400Hz
(room temperature)
4.433618MHz ± 400Hz
(room temperature)
15.75kHz ± 500Hz
15.625kHz ± 500Hz
60Hz ± 5Hz
50Hz ± 5Hz
18kV ± 2kV
less than 0.4mm
(at the center of display area)
50 watts (maximum)
0 to 90% (non-condensing)
0°C to 40°C (32°F to 104°F)
Control range of main
section 90V ~ 260V or
“Indicated on the rear of the
MONITOR set”
265mm x 260mm x 330mm
(without packing)
Approx. 8kg (with packing)
0.8s watts
AD9421A
NTSC/PAL
21-inch diagonal, 0.7mm
stripe pitch,
90° deflection
More than 450 lines
Video A/B : Compose 1Vp-p
Video C : S-VHS
3.5795MHz ± 400Hz
(room temperature)
4.433618MHz ± 400Hz
(room temperature)
15.75 kHz ± 500 Hz
15.625 kHz ± 500 Hz
60 Hz ± 4Hz
50 Hz ± 4Hz
25kV ± 1.5kV
less than 0.4mm
(at the center of display area)
70 watts (maximum)
0 to 90% (non-condensing)
0°C to 40°C (32°F to 104°F)
Control range of main
section 90V ~ 260V or
“Indicated on the rear of the
MONITOR set”
490mm x 444mm x 482mm
(without packing)
Approx. 25kg (with packing)
1 watts
AD9414
NTSC/PAL
14-inch diagonal, 0.66mm
Stripe Pitch,pitch.
90° deflection
More than 360 lines
Video A/B : Compose 1Vp-p
Video C : S-VHS
3.579545MHz ±400Hz
(room temperature)
4.433618MHz ±400Hz
(room temperature)
15.75kHz ± 500Hz
15.625kHz ± 500Hz
60Hz ± 5Hz
50Hz ± 5Hz
24kV ± 1kV
less than 0.4mm
(at the center of display area)
62 watts (maximum)
0 to 90% (non-condensing)
0°C to 40°C (32°F to 104°F)
Control range of main
section 90V ~ 260V or
“Indicated on the rear of the
MONITOR set”
365mm x 342mm x 391mm
(without packing)
Approx. 12kg (with packing)
0.7watts
Monitor will operate on NTSC or PAL video standard.
The monitor is self-adjusting to NTSC/PAL and voltage 100~240V.

COLOR MONITOR User’s Guide Front Panel Components and Controls
e-10
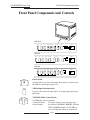
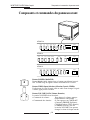
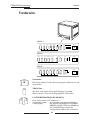
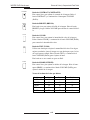
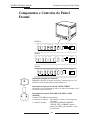
Front Panel Components and Controls
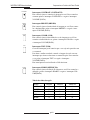
Power Switch
On/off switch. If you press this button, the monitor is turned on and
the LED of selected input signal is lit.
VIDEO Input Selection Switch
It selects video and audio input signal. To change input signal, press
this button.
VOLUME, DATA Control Switch
VOLUME key has two functions :
• Volume Controls : To change volume, press only these keys.
• Data Controls If you press CONTRAST, BRIGHT, COLOR,
TINT or SHARP and then a VOLUME key,
you can change the setting for each control.
SHARP TINT COLOR BRIGHT CONTRAST VOLUME
DATA
ABC
VIDEO POWER
SHARP TINT COLOR BRIGHT CONTRAST VOLUME
DATA
GRN : A
ORG : B
VIDEO POWER
CONTRASTSHARP TINT COLOR BRIGHT
VOLUME
DATA
POWER
VIDEO
A
B
POWER
VIDEO
VOLUME
DATA
AD9421A
AD9414
AD9410

COLOR MONITOR User’s Guide Front Panel Components and Controls
e-11
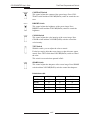
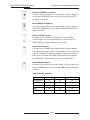
CONTRAST Switch
This control adjusts the contrast of the screen image. Press CON-
TRAST switch and then VOLUME(DATA) switch to control the con-
trast.
BRIGHT Switch
This control adjusts the brightness of the screen image. Press
BRIGHT switch and then VOLUME(DATA) switch to control the
brightness.
COLOR Switch
This control adjusts the color intensity of the screen image. Press
COLOR switch and then VOLUME(DATA) switch to control the
color intensity.
TINT Switch
With this switch, you can adjust the color to natural.
For the best result, adjust the screen image so that skin tones appear
natural. Press TINT switch then VOLUME(DATA) switch to control
the color.
This switch is not used when operated in PAL.
SHARP Switch
This control adjusts the sharpness of the screen image. Press SHARP
switch and then VOLUME(DATA) switch to control the sharpness.
Default data table
CONTRAST
BRIGHT
COLOR
TINT
SHARP
Model
CONTRAST
BRIGHT
COLOR
TINT
SHARP
AD9410
35
55
50
50
75
AD9414
40
50
50
50
75
AD9421A
60
50
50
50
50

COLOR MONITOR User’s Guide Rear Panel Components and Controls
e-12
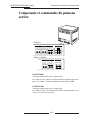
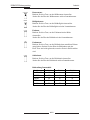
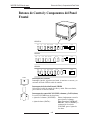
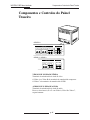
Rear Panel Components and Controls
VIDEO LINE
Input/output terminals for video signal.
Video A and Video B are composite input/output terminals. Video C
is S-VHS input/output terminals.
AUDIO LINE
Input/output terminals for audio signal.
A, B, and C must be selected with Video A, Video B, Video C
respectively.
IN
Video A
OUT IN
Video B
OUT IN
IN
Video C
OUT
OUT
ABC
VIDEO LINE AUDIO LINE
IN
Video A
OUT IN
Video B
OUT
VIDEO LINE AUDIO LINE
A
B
IN OUT
AD9421A
AD9414 / AD9410

COLOR MONITOR User’s Guide Connections
e-13
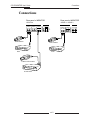
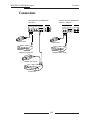
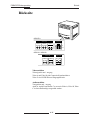
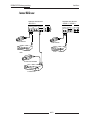
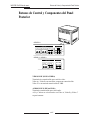
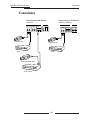
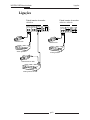
Connections
IN
Video A
OUT IN
Video B
OUT IN
IN
Video C
OUT
OUT
ABC
VIDEO LINE AUDIO LINE
IN
Video A
OUT IN
Video B
OUT
VIDEO LINE AUDIO LINE
A
B
IN OUT
Rear panel of MONITOR
AD9421A
Rear panel of MONITOR
AD9414 / AD9410
CCD Camera
S-VHS CCD Camera
S-VHS VCR
VCR
CCD Camera
VCR

COLOR MONITOR User’s Guide Maintenance
e-14
Maintenance
If the quality of the picture on the COLOR MONITOR is poor and
cannot be improved, inspect all system connections and cable runs.
Repairs should be performed by a qualified technician with adequate
test equipment and facilities.

MONITEUR COULEUR
AD9410
AD9414
AD9421A
Mode d’emploi

MONITEUR COULEUR Mode d’emploi
f-2
Explication Des Symboles
La flèche en forme d’éclair, représentée dans un triangle
équilatéral signale la présence d’une haute tension élec-
trique dangereuse á l’intérieur de l’appareil.
Le point d’exclamation, représenté, dans un triangle
équilatéral, vous signale des instructions importantes
concernant le produit.
Avertissement-Pour Prevenir Le Risque D’incendie
Ou De Decharges Electriques, Evitez Tout Contact
Du Moniteur Avec L’eau Ou L’humidite.
Les spécifications du produit sont susceptibles d’être modifiées sans
préavis.
CAUTION
CAUTION : TO REDUCE THE RISK OF ELECTRIC
SHOCK, DO NOT REMOVE COVER
(OR BACK). NO USER SERVICEABLE
PARTS INSIDE. REFER SERVICING TO
QUALIFIED SERVICE PERSONNEL.
RISK OF ELECTRIC SHOCK
DO NOT OPEN
Cet appareil numérique de la classe A est conforme à la
norme NMB-003 du Canada.

MONITEUR COULEUR Mode d’emploi Sommaire
f-3
Sommaire
Consignes de Sécurité ............................................... f-4
Généralites ................................................................ f-7
Caractéristiques techniques ...................................... f-8
Composants et commandes du panneau avant ........ f-9
Composants et commandes du panneau arrière ...... f-11
Connexions ............................................................. f-12
Maintenance ............................................................ f-13

MONITEUR COULEUR Mode d’emploi Consignes de Sécurité
f-4
Consignes de Sécurité
Avertissement
Ce moniteur fonctionne sur l’alimentation électrique indiquée sur la plaque à
l’arrière du coffret. Il contient des pièces sous haute tension. Si vous retirez le
couvercle, il y a des risques d’incendie ou d’électrocution. Ne retirez pas le
couvercle vous-même(Les boutons de commande sont situés à l’avant du moni-
teur).
1. Connaissances requises : Avant d’utiliser le moniteur, il est
recommandé de lire les consignes de sécurité et les instructions
d’utilisation.
2. Conservation du mode d’emploi : Les consignes de sécurité et
les instructions d’utilisation doivent être conservées en lieu sûr
pour consultation ultérieure.
3. Prise en compte des avertissements : Vous devez tenir compte
des avertissements mentionnés sur le moniteur et dans le mode
d’emploi.
4. Instructions d’utilisation : Vous devez vous conformer aux
instructions d’utilisation fournies.
5. Nettoyage : Débranchez le moniteur de la prise secteur avant de
le nettoyer. N’employez pas de nettoyant liquide ou en aérosol,
mais un simple chiffon humide.
Exception. L’obligation de débrancher le moniteur avant nettoy-
age, précisée à l’alinéa 5, peut être ignorée dans le cas d’un
moniteur connu pour une utilisation constante, qui ne doit pas
être éteint pour une raison spécifique, telle que pour éviter la
perte d’un code d’autorisation d’accès à un convertisseur CATV.
6. Accessoires : Minimisez les risques en utilisant uniquement des
accessoires recommandés par Sensormatic.
7. Eau et humidité : N’utilisez pas le moniteur près de l’eau,
comme par exemple, près d’une baignoire, d’un lavabo, d’un
évier, d’une machine à laver, d’une piscine, dans un sous-sol
humide.

MONITEUR COULEUR Mode d’emploi Consignes de Sécurité
f-5
8. Emplacement : Ne placez pas le moniteur sur un support insta-
ble : charriot, pupitre, trépied, étagère, table... Outre que le
moniteur en tombant serait endommagé, il pourrait blesser
quelqu’un. N’utilisez que les supports recommandés par
Sensormatic ou vendus avec l’appareil. De même, utilisez les
instructions et accessoires de montage fournis par Sensormatic.
9. Ventilation : Des ouvertures et des ouies sont prévues dans l’ha-
billage pour ventiler l’appareil et lui assurer un fonctionnement
correct en empêchant toute surchauffe. Ces ouvertures ne
doivent pas être obstruées en plaçant l’appareil sur un lit, un
canapé, un tapis ou toute autre surface similaire. Le moniteur ne
doit pas être placé à proximité d’un radiateur ou d’une source de
chaleur (à plus forte raison dessus). Il ne doit pas être encastré
dans un meuble (bibliothèque, casier). à moins qu’une ventila-
tion appropriée ne soit prévue ou que le meuble ne soit certifié
par Sensormatic.
10. Alimentation : L’alimentation à utiliser figure sur l’étiquette de
fabrication. Si vous n’êtes pas sûr du type d’alimentation
disponible sur votre site, renseignez-vous auprès de la compag-
nie d’électricité dont vous dépendez.
11. Mise à la terre : Le moniteur est équipé d’une prise à trois
broches avec terre. Ce dispositif de sécurité s’adapte uniquement
à une prise murale aves terre. Si vous ne disposez pas d’une
prise de ce type, faítes en installer une par un électricien agréé.
N’essayez en aucun cas de passer outre ce dispositif de sécurité.
12. Cordon d’alimentation : Le cordon d’alímentaíon doit être
positionné de façon à ne pas être coincé par quelque objet ni
gêner la circulation. Faites attention notamment aux extrémités
du cordon.
13. Orage : Pendant un orage ou pendant une longue période d’in-
activité, protégez le moniteur en le débranchant de la prise
murale et en déconnectant les câbles.
Vous éviterez ainsi les risques de surtension dus à l’orage ou
autres.
14. Surcharge : Ne surchargez pas les prises murales ni les cordons
d’extension, it peut en résulter des risques d’incendie ou de
court-circuit.

MONITEUR COULEUR Mode d’emploi Consignes de Sécurité
f-6
15. Intrusion d’objets/liquides : Parce qu’ils pourraient toucher des
parties sous tension du moniteur ou créer des couets-círcuíts,
n’introduisez aucun objet dans les ouvertures.
Ne projetez ou ne renversez aucun liquide sur l’appareil.
16. Maintenance : N’essayez pas d’effectuer vous-même la mainte-
nance du moniteur. L’ouverture de l’habillage vous exposerait à
des tensions élevées ou à d’autres dangers de ce type. Confiez la
maintenance à un personnel qualifié.
17. Dépannage : Débranchez le moniteur et faites appel à un per-
sonnel de maintenance qualifié dans les cas suivants.
a. Lorsque le cordon d’alimentation ou la prise est défectueux.
b. Si un liquide a été projeté sur l’appareil, ou si un objet est
tombé à l’intérieur.
c. Si l’appareil a été mouillé.
d. Si le moniteur ne fonctionne pas correctement bien que les
instructions d’utilisation aient été suivies. Dans ce cas, n’in-
tervenez que sur les réglages décrits dans les instructions.
Un réglage inadapté des autres eléments peut provoquer des
dommages et aura souvent pour résultat d’accroître le temps
des réparations efectuées par un technicien qualifié.
e. Si le moniteur est tombé ou si l’habillage est endommagé.
f. Si les performances de l’appareil baissent sensiblement.
18. Remplacement de pièces : Lors du remplacement d’une pièce,
assurez-vous que le technicien a utilisé une pièce certifiée par
Sensormatic ou une pièce possédant les caractéristiques exactes
de la pièce d’origine. Sinon, il pourrait en résulter des risques
d’incendie, de de décharges électriques ou autres.
19. Contrôles de sécurité : Aprés toute réparation ou opération de
maintenance du moniteur, assurez-vous que le technicien teste
l’appareil pour vérifier qu’il est apte à l’utilisation.
A página está carregando ...
A página está carregando ...
A página está carregando ...
A página está carregando ...
A página está carregando ...
A página está carregando ...
A página está carregando ...
A página está carregando ...
A página está carregando ...
A página está carregando ...
A página está carregando ...
A página está carregando ...
A página está carregando ...
A página está carregando ...
A página está carregando ...
A página está carregando ...
A página está carregando ...
A página está carregando ...
A página está carregando ...
A página está carregando ...
A página está carregando ...
A página está carregando ...
A página está carregando ...
A página está carregando ...
A página está carregando ...
A página está carregando ...
A página está carregando ...
A página está carregando ...
A página está carregando ...
A página está carregando ...
A página está carregando ...
A página está carregando ...
A página está carregando ...
A página está carregando ...
A página está carregando ...
A página está carregando ...
A página está carregando ...
A página está carregando ...
A página está carregando ...
A página está carregando ...
A página está carregando ...
A página está carregando ...
A página está carregando ...
A página está carregando ...
A página está carregando ...
A página está carregando ...
A página está carregando ...
A página está carregando ...
A página está carregando ...
A página está carregando ...
A página está carregando ...
A página está carregando ...
-
 1
1
-
 2
2
-
 3
3
-
 4
4
-
 5
5
-
 6
6
-
 7
7
-
 8
8
-
 9
9
-
 10
10
-
 11
11
-
 12
12
-
 13
13
-
 14
14
-
 15
15
-
 16
16
-
 17
17
-
 18
18
-
 19
19
-
 20
20
-
 21
21
-
 22
22
-
 23
23
-
 24
24
-
 25
25
-
 26
26
-
 27
27
-
 28
28
-
 29
29
-
 30
30
-
 31
31
-
 32
32
-
 33
33
-
 34
34
-
 35
35
-
 36
36
-
 37
37
-
 38
38
-
 39
39
-
 40
40
-
 41
41
-
 42
42
-
 43
43
-
 44
44
-
 45
45
-
 46
46
-
 47
47
-
 48
48
-
 49
49
-
 50
50
-
 51
51
-
 52
52
-
 53
53
-
 54
54
-
 55
55
-
 56
56
-
 57
57
-
 58
58
-
 59
59
-
 60
60
-
 61
61
-
 62
62
-
 63
63
-
 64
64
-
 65
65
-
 66
66
-
 67
67
-
 68
68
-
 69
69
-
 70
70
-
 71
71
-
 72
72


Samsung Tyco AD9410 Manual do usuário
- Tipo
- Manual do usuário
em outros idiomas
- español: Samsung Tyco AD9410 Manual de usuario
- français: Samsung Tyco AD9410 Manuel utilisateur
- English: Samsung Tyco AD9410 User manual
- Deutsch: Samsung Tyco AD9410 Benutzerhandbuch
Artigos relacionados
Outros documentos
-
 American Dynamics AD9414 Manual do usuário
-
 American Dynamics AD9421 Manual do usuário
-
3B SCIENTIFIC 1023416 Manual do proprietário
-
 ASA Electronics WVOM713AP Manual do usuário
-
 ASA Electronics AOM7694 Manual do proprietário
-
NEC PlasmaSync® 42XR5 Manual do usuário
-
-


