Hamilton Beach 53600 Guia de usuario
- Categoria
- Liquidificadores
- Tipo
- Guia de usuario

READ BEFORE USE
LIRE AVANT UTILISATION
LEA ANTES DE USAR
Visit www.hamiltonbeach.com for our
complete line of products and Use and
Care Guides – as well as delicious recipes,
tips, and to register your product online.
Rendez-vous sur www.hamiltonbeach.ca
pour notre liste complète de produits et de
nos manuels utilisateur – ainsi que nos
délicieuses recettes et nos conseils.
Visite www.hamiltonbeach.com (
EE. UU.)
o
www.hamiltonbeach.com.mx (México)
para ver otros productos de Hamilton Beach
o para contactarnos.
Questions
Please call us – our friendly
associates are ready to help.
USA: 1.800.851.8900
Preguntas
Por favor llámenos – nuestros
amables representantes están
listos para ayudar.
EE. UU.: 1.800.851.8900
MEX: 800 71 16 100
Le invitamos a leer cuidadosamente este
instructivo antes de usar su aparato.
Questions
N’hésitez pas à nous appeler –
nos associés s’empresseront
de vous aider.
CAN : 1.800.267.2826
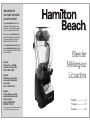
Blender
Mélangeur
Licuadora
English ...................... 2
Français .................. 15
Español ................... 28

2
IMPORTANT SAFEGUARDS
When using electrical appliances, basic safety precautions should always be followed to reduce the risk of fire, electric shock, and/or
injury to persons, including the following:
1. Read all instructions.
2. This appliance is not intended for use by persons with
reduced physical, sensory, or mental capabilities, or lack of
experience and knowledge, unless they are closely supervised
and instructed concerning use of the appliance by a person
responsible for their safety.
3. This appliance shall not be used by children. Keep the
appliance and its cord out of reach of children.
4. Close supervision is necessary when any appliance is used
near children. Children should be supervised to ensure that
they do not play with the appliance.
5. To protect against risk of electrical shock, do not put cord,
plug, base, or motor in water or other liquid.
6. Turn the appliance OFF( ), then unplug from outlet when
not in use, before putting on or taking off parts, and before
cleaning. To unplug, grasp the plug and pull from the outlet.
Never pull from the power cord.
7. Flashing light indicates ready to operate. Avoid any contact
with blades or moveable parts.
8. Do not operate any appliance with a damaged supply cord or
plug, or after the appliance malfunctions or has been dropped
or damaged in any manner. Supply cord replacement and
repairs must be conducted by the manufacturer, its service
agent, or similarly qualified persons in order to avoid a hazard.
Call the provided customer service number for information on
examination, repair, or adjustment.
9. The use of attachments, including canning jars, not
recommended or sold by the appliance manufacturer may
cause a risk of injury to persons.
10. Do not use outdoors.
11. Do not let cord hang over edge of table or counter or touch
hot surfaces, including stove.
12. Do not place on or near a hot gas or electric burner, or in a
heated oven.
13. Keep hands and utensils out of the jar and away from the
cutting blade, while blending or chopping food, to reduce the
risk of severe personal injury and/or damage to the blender
(attachments may not be provided with blender). A rubber
spatula may be used but only when blender is not running.
14. Blades are sharp; handle carefully—especially when
assembling, disassembling, or cleaning inside blender jar.
15. Do not use a broken, chipped, or cracked blender jar.
16. To reduce the risk of injury, never place cutting blade
assembly on base without blending jar or personal jar
attached.
17. Do not blend hot liquids in the personal jar.
18. Do not use broken, cracked, or loose cutting blade assembly.
19. Always operate blender with lid in place. Open vent area only
for adding ingredients.
20. Be careful if hot liquid is poured into blender as it can be
ejected out of appliance due to sudden steaming.
21. When blending hot liquids, open the center vent lid and close
any edge cover opening intended for pouring. To prevent
possible burns: Do not exceed the 3-cup (710-ml) level. Hot
liquids may push off lid during blending; therefore, with the
protection of an oven mitt or thick towel, place one hand on
top of the lid, keep exposed skin away from the lid, and start
blending at lowest speed.
22. Ensure collar on base of blending jar and personal jar are tight
and secure. Injury can result if moving blades accidentally
become exposed.

3
SAVE THESE INSTRUCTIONS
Other Consumer Safety Information
This product is intended for household use only. Use for food or
liquid only.
w WARNING
Electrical Shock Hazard: This appliance is
provided with a polarized plug (one wide blade) to reduce the
risk of electric shock. The plug fits only one way into a polarized
outlet. Do not defeat the safety purpose of the plug by modifying
the plug in any way or by using an adapter. If the plug does not
fit fully into the outlet, reverse the plug. If it still does not fit, have
an electrician replace the outlet.
The length of the cord used on this appliance was selected to
reduce the hazards of becoming tangled in or tripping over a
longer cord. If a longer cord is necessary, an approved extension
cord may be used. The electrical rating of the extension cord
must be equal to or greater than the rating of the appliance. Care
must be taken to arrange the extension cord so that it will not
drape over the countertop or tabletop where it can be pulled on
by children or accidentally tripped over.
If the cutting blade assembly locks and will not move, it will
damage the motor. Do not use. Call the toll-free customer service
number for information.
Do not place blender jar in the freezer filled with food or liquid.
This can result in damage to the cutting blade assembly, jar,
blender, and possibly result in personal injury.
The wattage/ampere rating of the blender is determined by an
Underwriters Laboratory test and is based on available cutting
blade assembly, jar combinations, and attachments that may
not be provided with your unit, but are available as replacement
parts. This is a measure of input wattage/amperes after 30
seconds of operation. The blender as provided may draw
significantly less power.
Peak power is the measure of the motor wattage during the first
seconds of operation. This is when a blender requires the most
power to crush ice, frozen fruit, etc. This is a better measure of
what a blender motor can consume when power is needed most.
Wattage/Peak Power Information
23. If the jar should twist or rotate when motor is switched ON,
switch OFF ( ) immediately and tighten jar in collar or on
blender base.
24. Do not leave blender unattended while it is operating.
25. Check that the appliance is OFF ( ) before plugging cord into
wall outlet. To disconnect, turn the control to OFF ( ); then
remove plug from wall outlet. To unplug, grasp the plug and
pull from the outlet. Never pull from the power cord.
26. Do not use appliance for other than intended purpose.
27. CAUTION! In order to avoid a hazard due to inadvertent
resetting of the thermal cut-out, this appliance must not be
supplied through an external switching device, such as a
timer, or connected to a circuit that is regularly switched on
and off by the utility.

4
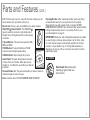
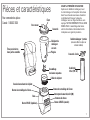
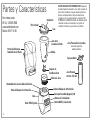
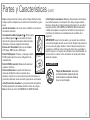
Glass Blender Jar
Parts and Features
BEFORE FIRST USE: After unpacking blender, wash everything except
blender base in hot, soapy water. Dry thoroughly. Wipe blender base with a
damp cloth or sponge. DO NOT IMMERSE BASE IN WATER. Care should be
taken when cleaning inside of blender jar as cutting blade assembly is very
sharp.
Lid
To order parts:
US: 1.800.851.8900
www.hamiltonbeach.com
Canada: 1.800.267.2826
Mexico: 800 71 16 100
Two-Piece Removable
Quiet Shield
Cutting Blade
Assembly
Sound-Absorbing Jar Pad
20-oz. Personal Jar
Drinking Lid
Personal Blender Jar
(optional accessory
on select models)
Handle
ON(I)/OFF( ) (Power) Switch
Pour Spout
Jar Collar
CANCEL Button
Base
Shield Locking Button
Vent
Shield Locking Button
PULSE Button
3 Speed Buttons

5
Parts and Features (cont.)
Lid: The lid is easy to put on, take off, and clean. Always use lid
when machine is in operation and to pour.
Blender Jar: Ounces, cups, and milliliters are clearly marked.
ON(I)/OFF( ) (Power) Switch: The ON(I)/OFF( )
(power) switch is located on right-hand side of
blender base. This lighted switch controls power
to blender.
3 Speed Buttons: There are three speeds: LOW,
MED, and HIGH.
PULSE Button: Press and hold down PULSE
button to blend at high speed setting.
CANCEL Button: Stops blender at any time.
Quiet Shield: The quiet shield reduces amount
of noise from your blender. When placed over
blender jar, it muffles the sound that your blender
produces.
Personal Blender Jar: The personal blender jar makes it easier to
make beverages to take on the go.
Base: Contains motor. DO NOT IMMERSE BASE IN WATER.
Preparing Blender: After unpacking blender, wash everything
except blender base in hot, soapy water. Dry thoroughly.
Wipe blender base with a damp cloth or sponge. DO NOT
IMMERSE BASE IN WATER. Care should be taken when handling
cutting blade assembly since it is very sharp. Refer to care
recommendations on page 11.
IMPORTANT: Blender jar and cutting blade assembly are subject
to wear during normal use. Always inspect jar for nicks, chips,
or cracks. Always inspect cutting blade assembly for broken,
cracked, or loose blades. If jar or cutting blade assembly is
damaged, do not use. Call our customer care center to obtain
replacement parts.
w WARNING
Burn Hazard. Metal parts under
blending jar get hot after use.
Do not touch.

6
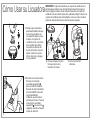
Using Your Blender
IMPORTANT: The blender jar and cutting blade assembly are subject
to wear during normal use. Always inspect jar for nicks, chips, or
cracks. Always inspect cutting blade assembly for broken, cracked, or
loose blades. If jar or cutting blade assembly is damaged, do not use.
Call toll-free customer service number to obtain replacement parts.
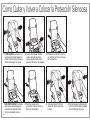
1. Make sure blender is
unplugged. Place blender
base on clean, dry surface.
Place cutting blade assembly,
blade side up, through
opening in blending jar
before twisting collar
onto bottom of jar. Add
Ingredients.
2. Place lid on jar. Place blender
jar on base.
3. Close quiet shield.
4. Plug into outlet. Press
ON(I)/OFF( ) switch to turn
on power to the blender. The
control panel will flash and
CANCEL button will continue
to flash, indicating blender
is ready for blending. Press
ON(I)/OFF( ) switch to OFF
( ) position anytime machine
is left unattended.

7
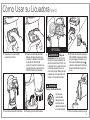
Using Your Blender (cont.)
5. Select speed and push
button.
6. Press a different speed button
during blending to increase
or decrease blending speed.
If using PULSE, blender will
run at high speed only when
PULSE button is held down.
7.
w WARNING
Burn
Hazard. Do not fill blender jar
with hot liquid beyond 3-cup
(710-ml) level. With protection
of an oven mitt or thick towel,
place one hand on top of lid.
Keep exposed skin away from
lid. Start blending at lowest
speed.
8. At the end of blending cycle,
press CANCEL button to stop
blending. Turn off blender
with the ON(I)/OFF( ) switch
on right side of base. Unplug.
9. Lift quiet shield.
OPTIONAL
w WARNING
Burn Hazard.
Metal parts
under blending
jar get hot after
extended use.
10. Remove blender jar. 11. Pour with lid on.

8
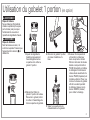
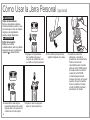
Using Personal Jar (optional)
1. Add ingredients. Carefully
place cutting blade assembly
and collar onto personal jar.
2. Turn personal jar upside
down and shake. Place onto
base.
3. Lift quiet shield and plug
blender into outlet. Push
desired speed button.
When using PULSE button,
blender will only run when
the PULSE button is held
down. Place hand on top of
jar to hold while blending.
Press CANCEL button to stop
blending.
w WARNING Burn Hazard.
Do not blend hot ingredients.
Pressure may build, causing jar
to pop off and hot ingredients to
erupt.
w WARNING Laceration Hazard.
Handle blade carefully; it is very
sharp. Make sure unit is turned
OFF ( ) and is unplugged.
4. Unplug. Remove personal jar
from base. Turn bottom up;
remove collar and cutting
blade assembly from jar.
5. Hand-tighten drinking lid onto
personal jar.

9
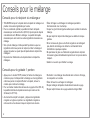
• ALWAYS place liquid in blender jar first, then remaining
ingredients.
• For best performance, minimum amount of liquid needed per
recipe is 1 cup (8 ounces/237 ml). Add more liquid if food is not
blending properly. The amount of liquid needed will vary based
on other ingredients required for blending.
• If blending action stops during blending or ingredients stick to
sides of jar, stop blending and try pulsing or add more liquid to
blender jar.
• Do not store food or liquids in blender jar.
• Avoid bumping or dropping blender when in operation or at any
time.
• Cutting large whole fruits and vegetables may allow them to blend
more quickly.
• Do not fill blender jar past highest graduation marking.
• If ice or frozen fruit pieces are not blending, stop blender and pulse
a few times.
• Do not allow ice to stand or freeze in jar. Immediately crush ice
after placing in jar.
• Keep lid on for easy pouring.
Blender Tips
Personal Jar Tips
Blender Jar Tips
• If blending action does not start, stops during blending, or
ingredients stick to sides of the jar, press STOP button. Remove jar,
shake contents, and return to blending.
• For best performance in the 20-oz. (591-ml) personal jar, minimum
amount of liquid needed per recipe is 3/4 cup (6 ounces/177 ml).
• When filling jar, place frozen ingredients or ice into jar first. When
turned upside down to blend, frozen items will be on top.
• Do not chop or process hard foods such as cheese, crackers, or
meat.
• Avoid bumping or dropping blender.
• Do not blend hot liquids in personal jar.
• Do not fill personal jar above MAX fill line.

10
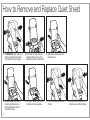
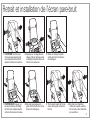
How to Remove and Replace Quiet Shield
1. TO REMOVE: Start with front
shield; separate front shield
from back at rubber hinges.
2. Press tabs on both sides of
blender while moving back
shield back with your thumbs.
3. Slide back shield away from
blender base.
1. TO REPLACE: Press both
shield locking buttons in
while sliding back shield
around the base.
2. To secure, press back shield
and blender base together.
3. Pull front shield around rear
shield.
4. Secure round hinges of front
shield around rubber hinges.

11
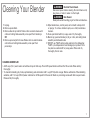
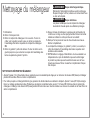
Cleaning Your Blender
1. Unplug.
2. Remove quiet shield.
3. Remove blender jar and lid. Rotate collar counterclockwise until
collar and cutting blade assembly come apart from blender jar.
OR
3. Remove personal jar from base. Rotate collar counterclockwise
until collar and cutting blade assembly come apart from
personal jar.
4. Wipe blender base, control panel, and cord with a damp cloth
or sponge. To remove stubborn spots, use a mild, nonabrasive
cleanser.
5. Clean quiet shield with hot, soapy water. Dry thoroughly.
6. Blender jar, personal blender jar, lid, jar collar, and cutting blade
assembly are dishwasher-safe.
7. DO NOT use “SANI” setting when washing in the dishwasher.
“SANI” cycle temperatures could damage your product. Parts
may also be washed with hot, soapy water. Rinse and dry
thoroughly. Do not soak.
w WARNING
Electrical Shock Hazard.
Disconnect power before cleaning. Do not immerse cord,
plug, base, or motor in water or other liquid.
w WARNING
Burn Hazard.
Metal parts under blending jar get hot after extended use.
CLEANING BLENDER JAR:
• Add 5 cups (1.2 L) warm water and add two drops of dish soap. Press LOW speed button and blend for 30 seconds. Rinse and dry
thoroughly.
• To clean after blending oily foods, sprinkle baking soda in blender. Add 1 cup (237 ml) white vinegar. Mixture will bubble. When bubbling
subsides, add 1 1/2 cups (355 ml) water and blend on LOW speed for 30 seconds. Wash any remaining residue with dish soap and water.
Rinse and dry thoroughly.

12
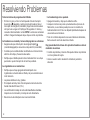
Troubleshooting
All program buttons are flashing.
• The motor is not rotating and is experiencing a locked rotor
condition. Turn power switch to OFF ( ) and remove the blender
jar. Turn power switch to ON (I), run blender without jar in place
on HI for 30 seconds to 1 minute, and resume normal operation.
NOTE: Buttons start flashing 2–3 seconds after a problem has
occurred.
Blender fails to start.
• Make sure main power ON(I)/OFF( ) switch is in the ON (I)
position.
• Check to see if unit is securely plugged into an electrical outlet of
proper voltage and frequency.
• Check to see if fuse for electrical outlet has blown or if a circuit
breaker has tripped.
Ingredients will not mix properly.
• Check to see if enough liquid has been added to ingredients.
Mixture should be fluid and free-running at all times.
• Solid pieces are too large.
• Container is too full. Do not fill past highest (6.5 cups/1.5 L)
graduation marking.
• Cutting blade assembly blades are not sharp or are damaged.
Inspect container and cutting blade assembly daily.
• Select speed to create a fluid blend.
Blender smells like it is burning.
• Turn off blender and allow unit to cool.
• Although motors are tested during the manufacturing process,
heavy use may cause curing of motor windings. The smell may
quickly dissipate after a few heavy uses.
• If smell continues after additional heavy uses, call our customer
care center.
There is grease around bottom of blender jar or on counter top.
• Monitor problem and source. This may indicate an issue with jar
bearings.
• Call our customer care center if condition persists.

13
Notes

14
This warranty applies to products purchased and used in the U.S. and Canada. This is the only express warranty for this product and
is in lieu of any other warranty or condition.
This product is warranted to be free from defects in material and workmanship for a period of five (5) years from the date of original
purchase in Canada and three (3) years from the date of original purchase in the U.S. During this period, your exclusive remedy is
repair or replacement of this product or any component found to be defective, at our option; however, you are responsible for all
costs associated with returning the product to us and our returning a product or component under this warranty to you. If the product
or component is no longer available, we will replace with a similar one of equal or greater value.
This warranty does not cover glass, filters, wear from normal use, use not in conformity with the printed directions, or damage to
the product resulting from accident, alteration, abuse, or misuse. This warranty extends only to the original consumer purchaser or
gift recipient. Keep the original sales receipt, as proof of purchase is required to make a warranty claim. This warranty is void if the
product is used for other than single-family household use or subjected to any voltage and waveform other than as specified on the
rating label (e.g., 120 V ~ 60 Hz).
We exclude all claims for special, incidental, and consequential damages caused by breach of express or implied warranty. All
liability is limited to the amount of the purchase price. Every implied warranty, including any statutory warranty or condition
of merchantability or fitness for a particular purpose, is disclaimed except to the extent prohibited by law, in which case such
warranty or condition is limited to the duration of this written warranty. This warranty gives you specific legal rights. You may have
other legal rights that vary depending on where you live. Some states or provinces do not allow limitations on implied warranties or
special, incidental, or consequential damages, so the foregoing limitations may not apply to you.
To make a warranty claim, do not return this appliance to the store. Please call 1.800.851.8900 in the U.S. or 1.800.267.2826 in Canada
or visit hamiltonbeach.com in the U.S. or hamiltonbeach.ca in Canada. For faster service, locate the model, type, and series numbers
on your appliance.
Limited Warranty

15
PRÉCAUTIONS IMPORTANTES
Pour utiliser un appareil électroménager, vous devez toujours prendre des mesures élémentaires de sécurité pour réduire le risque
d’incendie, d’électrocution et/ou de blessure corporelle, en particulier les mesures suivantes :
1. Lire toutes les instructions.
2. Cet appareil n’est pas destiné à être utilisé par des personnes dont
les capacités physiques, sensorielles ou mentales sont réduites,
ou manquant d’expérience et de connaissance, sauf si elles sont
étroitement surveillées et instruites sur l’utilisation de l’appareil par
une personne responsable de leur sécurité.
3. Cet appareil ne devrait pas être utilisé par des enfants. Garder
l’appareil et son cordon hors de la portée des enfants.
4. Une surveillance étroite est requise pour tout appareil utilisé près
des enfants. Surveiller que les enfants ne jouent pas avec l’appareil.
5. Pour éviter les risques d’électrocution, ne pas immerger le cordon, la
fiche, la base ou le moteur dans l’eau ou tout autre liquide.
6. Fermer l’appareil ( ), puis le débrancher de la prise lorsqu’il n’est
pas utilisé, avant d’assembler ou de désassembler des pièces ou
avant de le nettoyer. Pour le débrancher, tenir la fiche et la retirer de
la prise. Ne jamais tirer sur le cordon.
7. L’appareil est prêt à fonctionner lorsque les témoins clignotent.
Éviter tout contact avec les lames et les parties mobiles.
8. Ne pas faire fonctionner un appareil électroménager avec un cordon
ou une fiche endommagée, ou lorsque l’appareil ne fonctionne pas
bien ou a été échappé ou endommagé d’une manière quelconque.
Le remplacement et la réparation du cordon d’alimentation doivent
être faits par le fabricant, son agent de service ou toute personne
qualifiée de façon à éviter tout danger. Appeler le numéro de service
à la clientèle fourni pour des renseignements concernant l’examen,
la réparation ou l’ajustement.
9. L’utilisation d’accessoires, incluant les boîtes de conserve, non
recommandés par le fabricant ou vendus par le fabricant de
l’appareil peut provoquer des blessures.
10. Ne pas utiliser à l’extérieur.
11. Ne pas laisser pendre le cordon de la table ou du comptoir et éviter
tout contact entre le cordon et les surfaces chaudes incluant la
cuisinière.
12. Ne placer jamais votre appareil sur ou à proximité d’un brûleur
électrique ou à gaz chaud, ou dans un four chauffé.
13. Garder les mains et les ustensiles à l’extérieur du récipient et
éloignés de la lame pendant le mélange ou le hachage des aliments
afin de réduire le risque de blessures graves et/ou de bris du
mélangeur et de ses accessoires (les accessoires ne sont pas fournis
avec ce mélangeur). Une spatule en caoutchouc peut être utilisée
seulement lorsque le mélangeur ne fonctionne pas.
14. Les lames sont tranchantes ; manipuler avec soin lors du nettoyage
de l’intérieur du récipient du mélangeur.
15. Ne pas utiliser un récipient de mélangeur brisé, craqué ou fissuré.
16. Afin de réduire le risque de blessure, ne jamais placer l’assemblage
des lames coupantes sur la base sans avoir installé le récipient du
mélangeur ou le gobelet.
17. Ne pas mélanger de liquides chauds dans le gobelet pour portion
individuelle.
18. Ne pas utiliser des lames brisées, fissurées ou lâches.
19. Toujours faire fonctionner le mélangeur avec le couvercle. Ouvrir
seulement l’évent pour ajouter des ingrédients.
20. Prendre garde au liquide chaud versé dans le mélangeur parce
que ce dernier peut jaillir hors de l’appareil à cause de la formation
soudaine de vapeur.
21. Pour mélanger des liquides chauds, retirer le bouchon de
remplissage au centre du couvercle et fermer l’ouverture du bec
verseur. Pour prévenir les brûlures : Ne pas remplir au-delà de la
marque 3 tasses (710 ml) du récipient. Les liquides chauds peuvent
pousser sur le couvercle pendant le mélange. À l’aide d’un gant de
cuisinier ou d’une serviette épaisse, placer une main sur le dessus
du couvercle. Garder la peau exposée éloignée du couvercle.
Commencer à mélanger en utilisant la vitesse minimale.
22. S’assurer que le collier de la base du récipient du mélangeur et du
gobelet est serré fermement. Les lames en mouvement exposées
accidentellement représentent un risque de blessure.

16
23. Si le récipient tourne ou se déplace lors de la mise en marche du
moteur, éteindre ( ) immédiatement l’appareil et serrer le collier du
récipient ou réinstaller correctement et fermement le récipient sur la
base.
24. Ne pas laisser le mélangeur sans surveillance pendant le
fonctionnement.
25. S’assurer que l’appareil est OFF ( /arrêt) avant de brancher la fiche
dans la prise de courant. Pour débrancher, tourner la commande
à et mettre à OFF ( /arrêt) puis débrancher la fiche de la prise de
courant. Pour débrancher, saisir la fiche et la retirer de la prise. Ne
pas tirer sur le cordon d’alimentation.
26. N’utiliser cet appareil que pour les fonctions auxquelles il est destiné.
27. ATTENTION ! Afin d’éviter un danger découlant d’une réinitialisation
accidentelle du rupteur thermique, se dispositif ne doit pas être
alimenté par l’entremise d’un appareil de connexion externe, comme
une minuterie, ou connecté à un circuit qui est régulièrement mis
sous et hors tension par le service public.
CONSERVER CES INSTRUCTIONS
Autres consignes de sécurité pour le consommateur
Cet appareil est destiné à un usage domestique uniquement. Utiliser
seulement pour les aliments et les liquides.
w AVERTISSEMENT
Risque de choc électrique : Cet appareil est fourni
avec une fiche polarisée (une broche large) pour réduire le risque
d’électrocution. Cette fiche n’entre que dans un seul sens dans une prise
polarisée. Ne contrecarrez pas l’objectif sécuritaire de cette fiche en la
modifiant de quelque manière que ce soit ou en utilisant un adaptateur.
Si vous ne pouvez pas insérer complètement la fiche dans la prise,
inversez la fiche. Si elle refuse toujours de s’insérer, faire remplacer la
prise par un électricien.
La longueur du cordon installé sur cet appareil a été sélectionnée afin
de réduire les risques d’enchevêtrement ou de faux pas causés par un fil
trop long. L’utilisation d’une rallonge approuvée est permise si le cordon
est trop court. Les caractéristiques électriques de la rallonge doivent
être équivalentes ou supérieures aux caractéristiques de l’appareil.
Prendre toutes les précautions nécessaires pour installer la rallonge de
manière à ne pas la faire courir sur le comptoir ou sur une table pour
éviter qu’un enfant ne tire sur le cordon ou trébuche accidentellement.
Les lames qui se bloquent ou refusent de bouger peuvent endommager
le moteur. Ne pas utiliser. Appeler le centre de service à la clientèle pour
obtenir des renseignements.
Ne pas stocker le récipient du mélangeur au congélateur s’il contient
des aliments ou du liquide. Ceci pourrait endommager les lames, le
récipient, le mélangeur et éventuellement, occasionner des blessures.
La puissance et l’intensité nominales du mélangeur sont déterminées
par un essai du Underwriters laboratories basé sur des combinaisons
de lames, de récipient et des accessoires pouvant ne pas être offerts
pour votre appareil, mais offertes comme pièces de rechange. Ceci est
une mesure d’entrée de tension et d’intensité suite à un fonctionnement
d’une durée de 30 secondes sous une charge spécifiée. Le mélangeur,
comme fourni, peut être plus éconergétique.
La puissance maximale est la mesure de la puissance restituée du
moteur au cours des premières secondes de fonctionnement. Ceci
représente la puissance maximale requise par votre mélangeur pour
piler la glace, les fruits congelés, etc. Ceci est une mesure plus juste du
moteur du mélangeur lors de sa demande énergétique maximale.
Information au sujet de la tension et de la puissance maximale

17
Récipient du
mélangeur
en verre
Pièces et caractéristiques
Couvercle
Pour commander des pièces :
Canada : 1.800.267.2826
Écran pare-bruit en
deux parties amovible
Assemblage
des lames coupantes
Coussin insonorisant du récipient
Gobelet de
20 oz (591 ml)
Couvercle à boire
Gobelet mélangeur 1 portion
(accessoire offert en option sur
certains modèles)
Poignée
Interrupteur de marche/arrêt (I/ )
Bec verseur
Collier du récipient
Bouton CANCEL (annuler)
Base
Bouton de verrouillage de l’écran
Évent
Bouton de verrouillage de l’écran
Bouton PULSE (impulsion)
3 boutons de vitesse
AVANT LA PREMIÈRE UTILISATION :
Après avoir déballé le mélangeur, laver
tout le mélangeur à l’exception de la base
dans l’eau chaude savonneuse. Assécher
complètement. Essuyer la base du
mélangeur avec un linge humide ou une
éponge. NE PAS IMMERGER PAS LA BASE
DANS L’EAU. L’assemblage des lames
est très tranchante et demandent à être
manipulée avec grande prudence.

18
Pièces et caractéristiques (suite)
Couvercle : Ce couvercle est facile à installer, retirer et nettoyer.
Toujours utiliser le couvercle lorsque l’appareil est en marche et pour
verser.
Récipient du mélangeur : Les onces, tasses et millilitres sont
clairement indiqués.
Interrupteur de marche/arrêt (I/ ) : L’interrupteur
de marche/arrêt est situé sur le côté droit de la base
du mélangeur. Cet interrupteur illuminé contrôle
l’alimentation du mélangeur.
3 boutons de vitesse : Il y a trois intensités de
vitesse : LOW, MED et HIGH (basse, moyenne et
élevée).
Bouton PULSE (impulsion) : Appuyer et maintenir le
bouton PULSE pour effectuer un mélange à vitesse
élevée.
Bouton CANCEL (annuler) : Pour arrêter le
mélangeur en tout temps.
Écran pare-bruit : L’écran pare-bruit réduit le niveau
sonore du mélangeur. Ce dernier, lorsqu’installé par-
dessus le récipient du mélangeur, permet d’atténuer le bruit émis par
le mélangeur.
Gobelet mélangeur 1 portion : Le gobelet mélangeur 1 portion
facilite la préparation de boissons à emporter.
Base : Elle contient le moteur. NE PAS IMMERGER LA BASE DANS
L’EAU.
Préparation du mélangeur : Une fois l’appareil déballé, laver toutes
les pièces avec de l’eau savonneuse à l’exception de la base du
mélangeur. Sécher entièrement le tout. Essuyer la base du mélangeur
avec un linge ou une éponge humide. N’IMMERGER PAS LA BASE
DANS L’EAU. Soyer prudent lorsque vous manipulez l’assemblage
des lames coupantes, car elle est très coupante. Consulter les
recommandations d’entretien à la page 24.
IMPORTANT : Le récipient du mélangeur ainsi que l’assemblage des
lames coupantes sont sujets à de l’usure lors d’un usage normal.
Assurez-vous de toujours inspecter le récipient afin d’y déceler
des entailles, des ébréchures ou des fissures. Inspecter toujours
l’assemblage des lames coupantes afin de vérifier si elle est brisée,
fissurée ou desserrée. Si le récipient ou l’assemblage des lames
coupantes est endommagé, ne les utiliser pas. Contacter le service à
la clientèle afin d’obtenir des pièces de rechange.
w AVERTISSEMENT
Risque de brûlures. Les pièces
métalliques situées sous le
récipient du mélangeur deviennent
chaudes après utilisation. N’y
toucher pas.

19
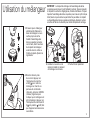
Utilisation du mélangeur
IMPORTANT : Le récipient du mélangeur et l’assemblage des lames
coupantes peuvent s’user lors de l’utilisation normale. Toujours inspecter
le récipient à la recherche d’égratignures, d’éclats et de fissures. Toujours
inspecter l’assemblage des lames coupantes pour s’assurer qu’il n’est pas
brisé, fissuré et que les lames ne pas lâches. Ne pas utiliser un récipient
ou l’assemblage des lames coupantes endommagé. Appeler le numéro
sans frais du Service à la clientèle pour obtenir des pièces de rechange.
1. S’assurer que le mélangeur
est débranché. Déposer la
base du mélangeur sur une
surface propre et sèche.
Installer l’assemblage des
lames coupantes, les lames
vers le haut, dans l’ouverture
du récipient du mélangeur
avant de visser le collier au
fond du récipient. Ajouter les
ingrédients.
2. Installer le couvercle sur le
récipient. Installer le récipient
du mélangeur sur la base.
3. Fermer l’écran pare-bruit.
4. Brancher dans la prise
de courant. Appuyer sur
l’interrupteur de marche/
arrêt (I/ ) pour mettre le
mélangeur en marche. Le
panneau de commande
clignotera, le bouton CANCEL
(annuler) clignotera pour
indiquer que le mélangeur est
prêt à mélanger. Appuyer sur
l’interrupteur de marche/arrêt
(I/ ) à la position (arrêt) dès
que l’appareil sera laissé sans
surveillance.

20
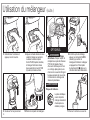
Utilisation du mélangeur
(suite.)
5. Sélectionner la vitesse et
appuyer sur le bouton.
6. Appuyer sur d’autres boutons de vitesse
pendant le mélange pour augmenter
ou abaisser la vitesse. Lorsque la
fonction PULSE (impulsion) est utilisée,
le mélangeur fonctionnera à vitesse
élevée seulement si le bouton PULSE
(impulsion) est maintenu enfoncé.
7.
w AVERTISSEMENT
Risque
de brûlures. Ne pas remplir le
récipient avec plus de 3 tasses
(710 ml) de liquide chaud.
Avec une mitaine pour le four
ou un linge épais, placer une
main sur le couvercle. Éloigner
la peau exposée du couvercle.
Commencer le mélange à la
vitesse la plus basse.
8. À la fin du cycle de mélange,
appuyer sur le bouton CANCEL
(annuler) pour arrêter le
mélangeur. Éteindre le mélangeur
en appuyant sur l’interrupteur
de marche/arrêt (I/ ) situé sur le
côté droit de la base. Débrancher.
9. Soulever l’écran pare-bruit.
OPTIONNEL
w AVERTISSEMENT
Risque de brûlures.
Les pièces métalliques
sous le récipient du
mélangeur deviendront
chaudes après une
utilisation prolongée.
10. Retirer le récipient du mélangeur.
11. Verser à même le couvercle.
A página está carregando...
A página está carregando...
A página está carregando...
A página está carregando...
A página está carregando...
A página está carregando...
A página está carregando...
A página está carregando...
A página está carregando...
A página está carregando...
A página está carregando...
A página está carregando...
A página está carregando...
A página está carregando...
A página está carregando...
A página está carregando...
A página está carregando...
A página está carregando...
A página está carregando...
A página está carregando...
-
 1
1
-
 2
2
-
 3
3
-
 4
4
-
 5
5
-
 6
6
-
 7
7
-
 8
8
-
 9
9
-
 10
10
-
 11
11
-
 12
12
-
 13
13
-
 14
14
-
 15
15
-
 16
16
-
 17
17
-
 18
18
-
 19
19
-
 20
20
-
 21
21
-
 22
22
-
 23
23
-
 24
24
-
 25
25
-
 26
26
-
 27
27
-
 28
28
-
 29
29
-
 30
30
-
 31
31
-
 32
32
-
 33
33
-
 34
34
-
 35
35
-
 36
36
-
 37
37
-
 38
38
-
 39
39
-
 40
40


Hamilton Beach 53600 Guia de usuario
- Categoria
- Liquidificadores
- Tipo
- Guia de usuario
em outras línguas
- español: Hamilton Beach 53600 Guía del usuario
- français: Hamilton Beach 53600 Mode d'emploi
- English: Hamilton Beach 53600 User guide
Artigos relacionados
-
Hamilton Beach Professional 58870 Guia de usuario
-
Hamilton Beach 53602 Guia de usuario
-
Hamilton Beach 53620 Guia de usuario
-
Hamilton Beach 53531F Manual do usuário
-
-
-
Hamilton Beach 50129 Guia de usuario
-
-
Hamilton Beach 58176 Guia de usuario
-
Hamilton Beach 56206 Guia de usuario
Outros documentos
-
Proctor Silex 51152A Guia de usuario
-
BLACK+DECKER BL1500SG Manual do proprietário
-
-
 decakila KEJB001W Manual do proprietário
-
 Ront Dégrippant choc thermique 520ml aérosol RontProduction Manual do usuário
-
Windmere BD140 Manual do usuário
-
-
Vitamix Venturist V1200/Certified Reconditioned Venturist V1200 Manual do proprietário
-
-

