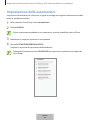
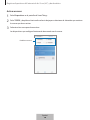
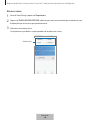
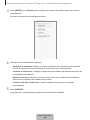
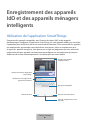
Samsung ETWV525KWEGUS Manual do usuário
- Categoria
- Roteadores
- Tipo
- Manual do usuário
Este manual também é adequado para

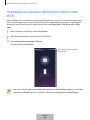
User Manual
www.samsung.com11/2018. Rev.1.0
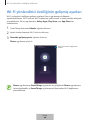
SmartThings Wifi
ET-WV525


3
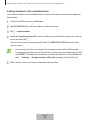
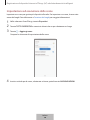
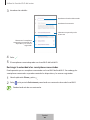
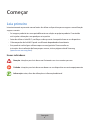
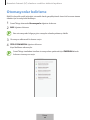
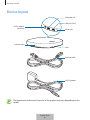
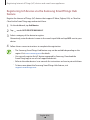
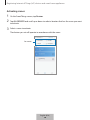
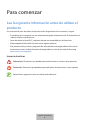
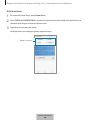
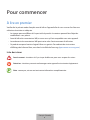
Getting started
Read me first
Please read this manual before using the device to ensure safe and proper use.
•
Images may differ in appearance from the actual product. Content is subject to change
without prior notice.
•
Before using the Wi-Fi hub, make sure it is compatible with your device.
•
The Wi-Fi hub’s performance may differ depending on the environment.
•
This product includes certain free/open source software. To see the instructions for
viewing the open source licence, go to the Samsung website (opensource.samsung.com).
Instructional icons
Warning: situations that could cause injury to yourself or others
Caution: situations that could cause damage to your device or other equipment
Notice: notes, usage tips, or additional information
English
1

Getting started
4
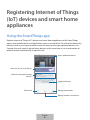
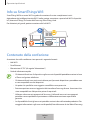
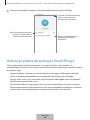
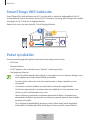
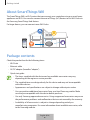
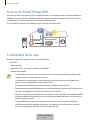
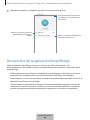
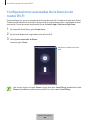
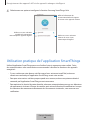
About SmartThings Wifi
The SmartThings Wifi is a Wi-Fi router that can connect your smartphone to your smart home
appliances via Wi-Fi. You can also connect Internet of Things (IoT) devices to this Wi-Fi hub via
the Samsung SmartThings Hub feature.
For larger homes, you can connect more Wi-Fi hubs.
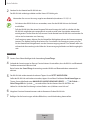
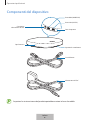
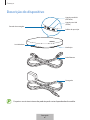
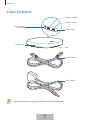
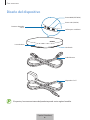
Package contents
Check the product box for the following items:
•
Wi-Fi hub
•
Ethernet cable
•
AC/DC adapter (hereafter “adapter”)
•
Quick start guide
•
The items supplied with the device and any available accessories may vary
depending on the region or service provider.
•
The supplied items are designed only for this device and may not be compatible
with other devices.
•
Appearances and specifications are subject to change without prior notice.
•
You can purchase additional accessories from your local Samsung retailer. Make
sure they are compatible with the device before purchase.
•
Use only Samsung-approved accessories. Using unapproved accessories may cause
the performance problems and malfunctions that are not covered by the warranty.
•
Availability of all accessories is subject to change depending entirely on
manufacturing companies. For more information about available accessories, refer
to the Samsung website.
English
2

Getting started
5
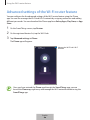
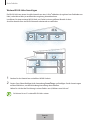
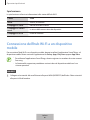
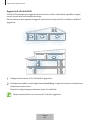
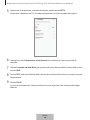
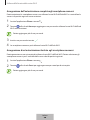
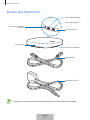
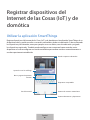
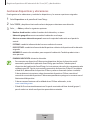
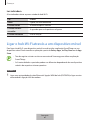
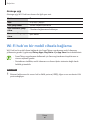
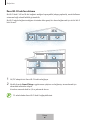
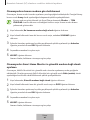
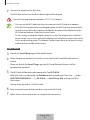
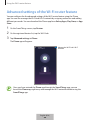
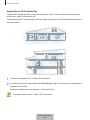
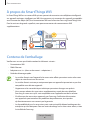
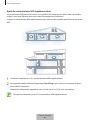
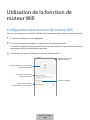
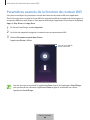
Device layout
AC/DC adapter
connector
WAN port (IN)
LAN port (OUT)
Reset hole
Vent
Indicator light
Ethernet cable
AC/DC adapter
The appearance and internal structure of the product may vary depending on the
model.
English
3

Getting started
6
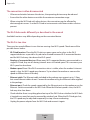
Indicator light
The indicator light alerts you to the Wi-Fi hub status.
Colour Status
Green Power on, Working
Flashes green Booting/resetting the system
Flashes green and red Waiting for devices to connect
Flashes red Function error
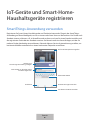
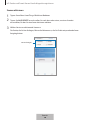
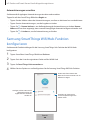
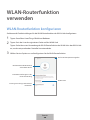
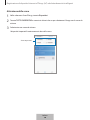
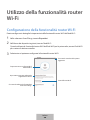
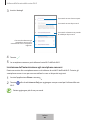
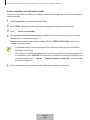
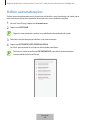
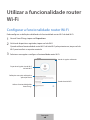
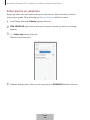
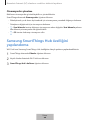
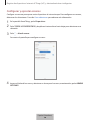
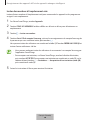
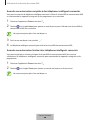
Connecting the Wi-Fi hub with a mobile device
To connect the Wi-Fi hub with a mobile device, you must install the SmartThings app on the
mobile device. You can download the app from
Galaxy Apps
,
Play Store
, or
App Store
.
•
You must register and sign in to your Samsung account to use the SmartThings
app.
•
Supported features may vary depending on your mobile device and its operating
system.
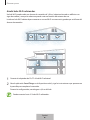
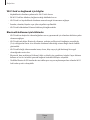
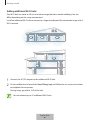
Wi-Fi hub
1
Connect one end of the Ethernet cable to the hub’s WAN port (IN) and the other end to
the modem’s LAN port.
English
4

Getting started
7
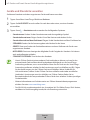
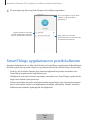
2
Connect the adapter to the Wi-Fi hub.
The Wi-Fi hub will turn on and the indicator light will flash green.
Use only Samsung-approved adapters (12 V/2.1 A or higher).
•
You can use the Wi-Fi hub only when you connect the Wi-Fi hub to an adapter.
•
If the Wi-Fi hub overheats for a prolonged period, the Wi-Fi hub may automatically
turn off or reset. When this happens continually, disconnect the adapter from the
Wi-Fi hub and contact a Samsung Service Centre.
•
To save energy, unplug the adapter when not in use. The adapter does not have a
power switch, so you must unplug the adapter from the electric socket when not in
use to avoid wasting power. The adapter should remain close to the electric socket
and be easily accessible while using it.
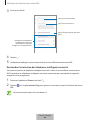
Mobile device
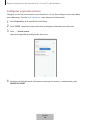
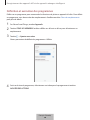
3
Launch the
SmartThings
app on the mobile device.
4
Follow the pop-up window’s instructions to turn on the Wi-Fi and Bluetooth auto on
feature.
When you launch the
SmartThings
app, the Wi-Fi and Bluetooth features will be
automatically activated.
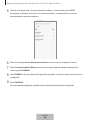
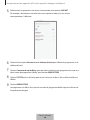
5
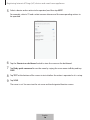
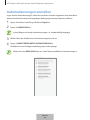
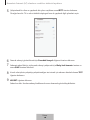
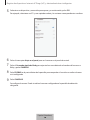
The Wi-Fi hub will be detected automatically. Tap
ADD NOW
.
If the Wi-Fi hub is not detected, tap
Add device
on the dashboard. Then, tap under
ADD DEVICE MANUALLY
→
Wi-Fi/Hub
→
SmartThings Wifi
, and tap your Wi-Fi
hub’s name.
During setup, get within 4.6 m of the hub.
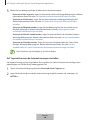
6
Enter a network name and password to assign to the Wi-Fi hub.
7
Follow the on-screen instructions to complete the connection.
English
5

Getting started
8
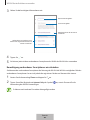
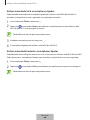
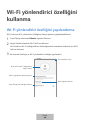
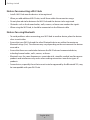
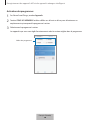
Adding additional Wi-Fi hubs
One Wi-Fi hub can cover a 140 m
2
connection range (based on timber buildings) but can
differ depending on the usage environment.
Install an additional Wi-Fi hub to connect to a larger area beyond the connection range with a
Wi-Fi network.
1
Connect the AC/DC adapter to the additional Wi-Fi hub.
2
On the mobile device, launch the
SmartThings
app and follow the on-screen instructions
to complete the connection.
During setup, get within 4.6 m of the hub.
You can connect up to 31 additional Wi-Fi hubs.
English
6

Getting started
9
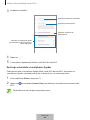
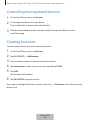
Notices for connecting a Wi-Fi hub
•
Install a Wi-Fi hub near the devices to be registered.
•
When you add additional Wi-Fi hubs, install them within the connection range.
•
Do not place obstacles between the Wi-Fi hub and the devices to be registered.
•
Obstacles such as the human bodies, walls, corners, or fences can weaken the signals.
•
When using the Wi-Fi hub, it should be connected via the Ethernet cable.
Notices for using Bluetooth
•
To avoid problems when connecting your Wi-Fi hub to another device, place the devices
close to each other.
•
Ensure that your Wi-Fi hub and the other Bluetooth device are within the maximum
Bluetooth range (5 m). The distance may vary depending on the environment the devices
are used in.
•
Ensure that there are no obstacles between the Wi-Fi hub and a connected device,
including human bodies, walls, corners, or fences.
•
Bluetooth uses the same frequency as some industrial, scientific, medical, and low power
products and interference may occur when making connections near these types of
products.
•
Some devices, especially those that are not tested or approved by the Bluetooth SIG, may
be incompatible with your Wi-Fi hub.
English
7

10
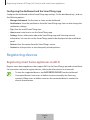
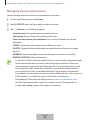
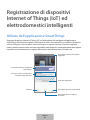
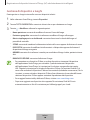
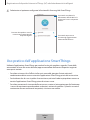
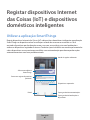
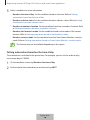
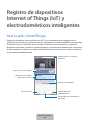
Registering Internet of Things
(IoT) devices and smart home
appliances
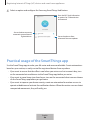
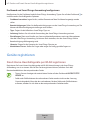
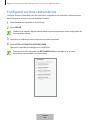
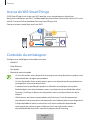
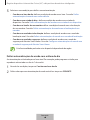
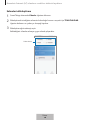
Using the SmartThings app
Register Internet of Things (IoT) devices and smart home appliances to the SmartThings
app on your mobile device, and check their status or control them. To control the devices by
location, such as your home or office, create a location and assign registered devices to it.
You can also set a scene to control many devices at the same time or set an automation to
perform actions automatically at a preset time.
Access additional options.
Learn how to use SmartThings.
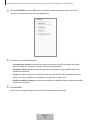
Dashboard
Supported devices
Search for and register nearby
devices.
Manage locations and devices.
Manage automations.
English
8

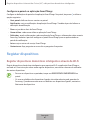
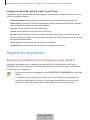
Registering Internet of Things (IoT) devices and smart home appliances
11
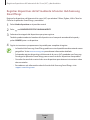
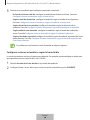
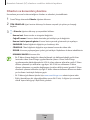
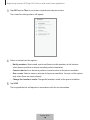
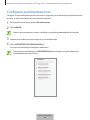
Configuring the dashboard and the SmartThings app
Configure the dashboard and the SmartThings app settings. On the dashboard, tap and use
the following options.
•
Manage dashboard
: Set the items to show on the dashboard.
•
Notifications
: View the notifications from the SmartThings app. You can also change the
notification settings.
•
Tips
: View the useful SmartThings tips.
•
How to use
: Learn how to use the SmartThings app.
•
Settings
: Access information about the SmartThings app and Samsung account
information. You can also set the SmartThings panel to be displayed on the notification
panel.
•
Notices
: View the notices from the SmartThings service.
•
Contact us
: Ask questions or view frequently asked questions.
Registering devices
Registering smart home appliances via Wi-Fi
Register smart home appliances that support Wi-Fi to the SmartThings app and control them.
For instructions on how to register devices, refer to the other devices’ user manuals.
•
To view the supported devices, tap
SUPPORTED DEVICES
on the dashboard.
•
Connected devices’ own errors or defects are not covered by the Samsung
warranty. When errors or defects occur on the connected devices, contact the
device’s manufacturer.
English
9

Registering Internet of Things (IoT) devices and smart home appliances
12
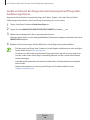
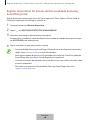
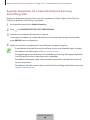
Registering IoT devices via the Samsung SmartThings Hub
feature
Register the Internet of Things (IoT) devices that support Z-Wave, Zigbee, LAN, or Cloud-to-
Cloud to the SmartThings app and control them.
1
On the dashboard, tap
Add device
.
2
Tap under
ADD DEVICE MANUALLY
.
3
Select a category of the device to register.
Alternatively, enter the device’s name in the search input field and tap
ADD
next to your
device.
4
Follow the on-screen instructions to complete the registration.
•
The Samsung SmartThings Hub feature may not be available depending on the
region. Visit www.samsung.com for details.
•
You can only register the IoT devices approved by Samsung. Download the
SmartThings app to see a list of supported devices.
•
Refer to the other devices’ user manuals for instructions on how to pair with them.
•
To learn more about the Samsung SmartThings Hub feature, visit
support.smartthings.com.
English
10

Registering Internet of Things (IoT) devices and smart home appliances
13
Controlling the registered devices
1
On the SmartThings screen, tap
Devices
.
2
On the registered devices list, tap a device.
The controller for the device will be downloaded.
3
With the downloaded controller, remotely control the registered devices via the
SmartThings app.
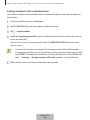
Creating locations
You can register devices by location and manage them.
1
On the SmartThings screen, tap
Devices
.
2
Tap
ALL DEVICES
→
Add location
.
3
Enter a location name and select an icon for the location.
4
Tap
Geolocation
to select a location on the map and tap
DONE
.
5
Tap
SAVE
.
Your location will be added.
6
Tap
ADD DEVICE
to register devices.
If you want to manage the location room by room, tap
→
Add room
, and set the room and
devices for it.
English
11

Registering Internet of Things (IoT) devices and smart home appliances
14
Inviting members to the created location
Invite other members to the created location to control the devices and scenes assigned to
that location.
1
On the SmartThings screen, tap
Devices
.
2
Tap
ALL DEVICES
and scroll up or down to select a location.
3
Tap
→
Invite member
.
4
Tap
Enter Samsung account ID
, enter the Samsung account for the person you want to
invite, and then tap
.
You can invite users by scanning the QR code. Tap
CREATE QR CODE
and invite other
users to scan it.
•
You can only invite the users login the Samsung account via SmartThings app.
•
To accept the invitation, on the SmartThings screen, tap the invitation pop-up and
tap
ACCEPT
. To accept the invitation by scanning the QR code, on the dashboard,
tap
→
Settings
→
Accept invitation (QR code)
and then scan the QR code.
5
Follow the on-screen instruction to complete the invitation.
English
12

Registering Internet of Things (IoT) devices and smart home appliances
15
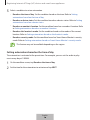
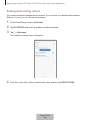
Setting and running scenes
Set a scene to operate multiple devices at once. To set a scene, you should create locations.
Refer to Creating locations for more information.
1
On the SmartThings screen, tap
Devices
.
2
Tap
ALL DEVICES
and scroll up or down to select a location.
3
Tap
→
Add scene
.
The screen for setting scenes will appear.
4
Enter the scene’s title, select an icon for the scene, and then tap
ADD ACTIONS
.
English
13

Registering Internet of Things (IoT) devices and smart home appliances
16
5
Select a device and an action to be operated, and then tap
NEXT
.
For example, select a TV and a robot vacuum cleaner and the corresponding actions to
be operated.
6
Tap the
Shortcut on dashboard
switch to view the scene on the dashboard.
7
Tap
Bixby quick command
to run the scene by saying the scene name to Bixby and tap
SAVE
.
8
Tap
TEST
at the bottom of the screen to test whether the action is operated as it is set up.
9
Tap
SAVE
.
The scene is set. You can view the set scene on the designated location screen.
English
14

Registering Internet of Things (IoT) devices and smart home appliances
17
Activating scenes
1
On the SmartThings screen, tap
Devices
.
2
Tap
ALL DEVICES
and scroll up or down to select a location that has the scene you want
to activate.
3
Select a scene to activate.
The devices you set will operate in accordance with the scene.
Set scenes.
English
15

Registering Internet of Things (IoT) devices and smart home appliances
18
Managing devices and locations
You can manage locations and their assigned devices and scenes.
1
On the SmartThings screen, tap
Devices
.
2
Tap
ALL DEVICES
and scroll up or down to select a location.
3
Tap
→
Edit
and use the following options.
•
Location name
: Change the location name and its icon.
•
Geolocation
: View or change the location on the map.
•
Show location summary on dashboard
: Set to show the location card on the
dashboard.
•
SCENES
: Change the scene information or delete the scene.
•
DEVICES
: Change the device information or delete the device from the assigned
location.
•
MEMBERS
: View the members to share the location. You can also invite others.
•
REMOVE LOCATION
: Delete the location.
•
To connect a Z-Wave device to another device, on the currently connected mobile
device, remove the device from the SmartThings app to exclude it. When you
remove the device from the SmartThings app, the instructions for exclusion will
be provided via a URL. Follow the instructions to exclude the Z-Wave device. If
you reset the Wi-Fi hub, you should exclude the Z-Wave device and reconnect
(re-include) it. For instructions on how to exclude Z-Wave devices, refer respective
Z-Wave device’s user manual or contact the device’s manufacturer.
•
For additional Z-Wave network utility functions, visit www.smartthings.com.
•
The Wi-Fi hub automatically sends an Association Set for Lifeline/group1 for
4 nodes after adding a device that supports Association.
English
16

Registering Internet of Things (IoT) devices and smart home appliances
19
Setting automations
Set an automation for devices assigned to a location to automatically perform actions at a
specific condition.
1
On the SmartThings screen, tap
Automations
.
2
Tap
ADD
.
Some automations may be set by default depending on the region.
3
Select a location to set an automation.
4
Tap
CUSTOM AUTOMATION
.
The screen for setting conditions will appear.
Select the automation under
RECOMMENDED
to set automations recommended by
SmartThings.
English
17

Registering Internet of Things (IoT) devices and smart home appliances
20
5
Select a condition to set an automation.
•
Based on the time of day
: Set the condition based on the time. Refer to Setting
automations based on the time of day.
•
Based on a device status
: Set the condition based on a device status. Refer to Setting
automations based on a device status.
•
Based on a member’s location
: Set the condition based on a member’s location. Refer
to Setting automations based on a member’s location.
•
Based on this location’s mode
: Set the condition based on the mode of the current
location. Refer to Setting automations based on the location’s mode.
•
Based on security mode
: Set the condition based on Smart Home Monitor’s security
mode. Refer to Setting automations based on Smart Home Monitor’s security mode.
This feature may not be available depending on the region.
Setting automations based on the time of day
The automation is activated at the preset time. For example, you can set the audio to play
music every day at 7:00 AM.
1
On the condition screen, tap
Based on the time of day
.
2
Set the time for the automation to activate and tap
NEXT
.
English
18
A página está carregando...
A página está carregando...
A página está carregando...
A página está carregando...
A página está carregando...
A página está carregando...
A página está carregando...
A página está carregando...
A página está carregando...
A página está carregando...
A página está carregando...
A página está carregando...
A página está carregando...
A página está carregando...
A página está carregando...
A página está carregando...
A página está carregando...
A página está carregando...
A página está carregando...
A página está carregando...
A página está carregando...
A página está carregando...
A página está carregando...
A página está carregando...
A página está carregando...
A página está carregando...
A página está carregando...
A página está carregando...
A página está carregando...
A página está carregando...
A página está carregando...
A página está carregando...
A página está carregando...
A página está carregando...
A página está carregando...
A página está carregando...
A página está carregando...
A página está carregando...
A página está carregando...
A página está carregando...
A página está carregando...
A página está carregando...
A página está carregando...
A página está carregando...
A página está carregando...
A página está carregando...
A página está carregando...
A página está carregando...
A página está carregando...
A página está carregando...
A página está carregando...
A página está carregando...
A página está carregando...
A página está carregando...
A página está carregando...
A página está carregando...
A página está carregando...
A página está carregando...
A página está carregando...
A página está carregando...
A página está carregando...
A página está carregando...
A página está carregando...
A página está carregando...
A página está carregando...
A página está carregando...
A página está carregando...
A página está carregando...
A página está carregando...
A página está carregando...
A página está carregando...
A página está carregando...
A página está carregando...
A página está carregando...
A página está carregando...
A página está carregando...
A página está carregando...
A página está carregando...
A página está carregando...
A página está carregando...
A página está carregando...
A página está carregando...
A página está carregando...
A página está carregando...
A página está carregando...
A página está carregando...
A página está carregando...
A página está carregando...
A página está carregando...
A página está carregando...
A página está carregando...
A página está carregando...
A página está carregando...
A página está carregando...
A página está carregando...
A página está carregando...
A página está carregando...
A página está carregando...
A página está carregando...
A página está carregando...
A página está carregando...
A página está carregando...
A página está carregando...
A página está carregando...
A página está carregando...
A página está carregando...
A página está carregando...
A página está carregando...
A página está carregando...
A página está carregando...
A página está carregando...
A página está carregando...
A página está carregando...
A página está carregando...
A página está carregando...
A página está carregando...
A página está carregando...
A página está carregando...
A página está carregando...
A página está carregando...
A página está carregando...
A página está carregando...
A página está carregando...
A página está carregando...
A página está carregando...
A página está carregando...
A página está carregando...
A página está carregando...
A página está carregando...
A página está carregando...
A página está carregando...
A página está carregando...
A página está carregando...
A página está carregando...
A página está carregando...
A página está carregando...
A página está carregando...
A página está carregando...
A página está carregando...
A página está carregando...
A página está carregando...
A página está carregando...
A página está carregando...
A página está carregando...
A página está carregando...
A página está carregando...
A página está carregando...
A página está carregando...
A página está carregando...
A página está carregando...
A página está carregando...
A página está carregando...
A página está carregando...
A página está carregando...
A página está carregando...
A página está carregando...
A página está carregando...
A página está carregando...
A página está carregando...
A página está carregando...
A página está carregando...
A página está carregando...
A página está carregando...
A página está carregando...
A página está carregando...
A página está carregando...
A página está carregando...
A página está carregando...
A página está carregando...
A página está carregando...
A página está carregando...
A página está carregando...
A página está carregando...
A página está carregando...
A página está carregando...
A página está carregando...
A página está carregando...
A página está carregando...
A página está carregando...
A página está carregando...
A página está carregando...
A página está carregando...
A página está carregando...
A página está carregando...
A página está carregando...
A página está carregando...
A página está carregando...
A página está carregando...
A página está carregando...
A página está carregando...
A página está carregando...
A página está carregando...
A página está carregando...
A página está carregando...
A página está carregando...
A página está carregando...
A página está carregando...
A página está carregando...
A página está carregando...
A página está carregando...
A página está carregando...
A página está carregando...
A página está carregando...
A página está carregando...
A página está carregando...
A página está carregando...
A página está carregando...
A página está carregando...
A página está carregando...
A página está carregando...
A página está carregando...
A página está carregando...
A página está carregando...
A página está carregando...
A página está carregando...
A página está carregando...
A página está carregando...
A página está carregando...
A página está carregando...
A página está carregando...
A página está carregando...
A página está carregando...
A página está carregando...
A página está carregando...
A página está carregando...
A página está carregando...
A página está carregando...
A página está carregando...
A página está carregando...
A página está carregando...
A página está carregando...
A página está carregando...
A página está carregando...
A página está carregando...
A página está carregando...
A página está carregando...
A página está carregando...
A página está carregando...
A página está carregando...
A página está carregando...
A página está carregando...
A página está carregando...
A página está carregando...
A página está carregando...
A página está carregando...
A página está carregando...
A página está carregando...
A página está carregando...
A página está carregando...
A página está carregando...
A página está carregando...
A página está carregando...
A página está carregando...
A página está carregando...
A página está carregando...
A página está carregando...
A página está carregando...
A página está carregando...
A página está carregando...
A página está carregando...
A página está carregando...
A página está carregando...
A página está carregando...
-
 1
1
-
 2
2
-
 3
3
-
 4
4
-
 5
5
-
 6
6
-
 7
7
-
 8
8
-
 9
9
-
 10
10
-
 11
11
-
 12
12
-
 13
13
-
 14
14
-
 15
15
-
 16
16
-
 17
17
-
 18
18
-
 19
19
-
 20
20
-
 21
21
-
 22
22
-
 23
23
-
 24
24
-
 25
25
-
 26
26
-
 27
27
-
 28
28
-
 29
29
-
 30
30
-
 31
31
-
 32
32
-
 33
33
-
 34
34
-
 35
35
-
 36
36
-
 37
37
-
 38
38
-
 39
39
-
 40
40
-
 41
41
-
 42
42
-
 43
43
-
 44
44
-
 45
45
-
 46
46
-
 47
47
-
 48
48
-
 49
49
-
 50
50
-
 51
51
-
 52
52
-
 53
53
-
 54
54
-
 55
55
-
 56
56
-
 57
57
-
 58
58
-
 59
59
-
 60
60
-
 61
61
-
 62
62
-
 63
63
-
 64
64
-
 65
65
-
 66
66
-
 67
67
-
 68
68
-
 69
69
-
 70
70
-
 71
71
-
 72
72
-
 73
73
-
 74
74
-
 75
75
-
 76
76
-
 77
77
-
 78
78
-
 79
79
-
 80
80
-
 81
81
-
 82
82
-
 83
83
-
 84
84
-
 85
85
-
 86
86
-
 87
87
-
 88
88
-
 89
89
-
 90
90
-
 91
91
-
 92
92
-
 93
93
-
 94
94
-
 95
95
-
 96
96
-
 97
97
-
 98
98
-
 99
99
-
 100
100
-
 101
101
-
 102
102
-
 103
103
-
 104
104
-
 105
105
-
 106
106
-
 107
107
-
 108
108
-
 109
109
-
 110
110
-
 111
111
-
 112
112
-
 113
113
-
 114
114
-
 115
115
-
 116
116
-
 117
117
-
 118
118
-
 119
119
-
 120
120
-
 121
121
-
 122
122
-
 123
123
-
 124
124
-
 125
125
-
 126
126
-
 127
127
-
 128
128
-
 129
129
-
 130
130
-
 131
131
-
 132
132
-
 133
133
-
 134
134
-
 135
135
-
 136
136
-
 137
137
-
 138
138
-
 139
139
-
 140
140
-
 141
141
-
 142
142
-
 143
143
-
 144
144
-
 145
145
-
 146
146
-
 147
147
-
 148
148
-
 149
149
-
 150
150
-
 151
151
-
 152
152
-
 153
153
-
 154
154
-
 155
155
-
 156
156
-
 157
157
-
 158
158
-
 159
159
-
 160
160
-
 161
161
-
 162
162
-
 163
163
-
 164
164
-
 165
165
-
 166
166
-
 167
167
-
 168
168
-
 169
169
-
 170
170
-
 171
171
-
 172
172
-
 173
173
-
 174
174
-
 175
175
-
 176
176
-
 177
177
-
 178
178
-
 179
179
-
 180
180
-
 181
181
-
 182
182
-
 183
183
-
 184
184
-
 185
185
-
 186
186
-
 187
187
-
 188
188
-
 189
189
-
 190
190
-
 191
191
-
 192
192
-
 193
193
-
 194
194
-
 195
195
-
 196
196
-
 197
197
-
 198
198
-
 199
199
-
 200
200
-
 201
201
-
 202
202
-
 203
203
-
 204
204
-
 205
205
-
 206
206
-
 207
207
-
 208
208
-
 209
209
-
 210
210
-
 211
211
-
 212
212
-
 213
213
-
 214
214
-
 215
215
-
 216
216
-
 217
217
-
 218
218
-
 219
219
-
 220
220
-
 221
221
-
 222
222
-
 223
223
-
 224
224
-
 225
225
-
 226
226
-
 227
227
-
 228
228
-
 229
229
-
 230
230
-
 231
231
-
 232
232
-
 233
233
-
 234
234
-
 235
235
-
 236
236
-
 237
237
-
 238
238
-
 239
239
-
 240
240
-
 241
241
-
 242
242
-
 243
243
-
 244
244
-
 245
245
-
 246
246
-
 247
247
-
 248
248
-
 249
249
-
 250
250
-
 251
251
-
 252
252
-
 253
253
-
 254
254
-
 255
255
-
 256
256
-
 257
257
-
 258
258
-
 259
259
-
 260
260
-
 261
261
-
 262
262
-
 263
263
-
 264
264
-
 265
265
-
 266
266
-
 267
267
-
 268
268
-
 269
269
-
 270
270
-
 271
271
-
 272
272
-
 273
273
-
 274
274
-
 275
275
-
 276
276
-
 277
277
-
 278
278
-
 279
279
-
 280
280
-
 281
281
-
 282
282
-
 283
283


Samsung ETWV525KWEGUS Manual do usuário
- Categoria
- Roteadores
- Tipo
- Manual do usuário
- Este manual também é adequado para
em outras línguas
- español: Samsung ETWV525KWEGUS Manual de usuario
- français: Samsung ETWV525KWEGUS Manuel utilisateur
- italiano: Samsung ETWV525KWEGUS Manuale utente
- Deutsch: Samsung ETWV525KWEGUS Benutzerhandbuch
- Türkçe: Samsung ETWV525KWEGUS Kullanım kılavuzu
Artigos relacionados
-
Samsung EF-NG980 Manual do usuário
-
-
Samsung The Sero QE43LS05T 2020 Manual do usuário
-
Samsung QE43LS05TCU Manual do usuário
-
-
Samsung UE65NU6025K Manual do usuário
-
-
Samsung UE49RU7305K Manual do usuário


