Toyotomi RS 220 Manual do proprietário
- Categoria
- Aquecedores de ambiente
- Tipo
- Manual do proprietário
Este manual também é adequado para

RS – 220
GB OPERATING MANUAL .............................. PAGE 2
DE GEBRAUCHSANWEISUNG............................ PAGE 16
FR MANUAL D’UTILISATION ............................ PAGE 30
NL GEBRUIKSAANWIJZING ............................. PAGE 44
ES INSTRUCCIONES DE USO ............................ PAGE 58
IT ISTRUZIONI D’USO ................................. PAGE 72
PT MANUAL DE INTRUÇÕES ............................ PAGE 86
DK BRUGERVEJLEDNING ............................... PAGE 100

AFNOR CERTIFICATION - 11, RUE FRANCIS DE PRESSENSE
93571 LA PLAINE SAINT-DENIS CEDE
PRINCIPALES CARACTERISTIQUES CERTIFIEES:
CONSEILS D’UTILISATION ET D’ENTRETIEN
Référence et numéro de lot ou de série de l’article : se reporter au produit
Distributed in Europe by:
TOYOTOMI EUROPE SALES B.V.
Huygensweg 10,
5466 AN Veghel, The Netherlands
Si une difficulté subsistait, vous pouvez écrire à:
En cas d´insatisfaction, consultez d´abord:
La marque NF garantit
la qualité de cet article
suivant les normes françaises
et Référentiel de certification
de l’application NF 128
Se reporter à la notice jointe à l’appareil et à la plaque de sécurité sur
l’appareil
CONFORME A LA NORME NF D 35-300 : 1992, NF EN 60335-1 : Mai 2013,
NF EN 50106 : septembre 2009 ET AUX DECRET 92-1280 et DECRET 2004-954,
AUX SPECIFICATIONS COMPLEMENTAIRES DEFINIES PAR LES REGLES DE
CERTIFICATION DE LA MARQUE NF 128
• Sécurité du dispositif d’allumage
• Débit calorifique
• Efficacité des dispositifs de sécurité
• Stabilité
• Contrôle de la teneur en NOx dans les produits de combustion
• Contrôle de la qualité de la combustion (absence de CO)
• Endurance
• Intermittence
Email: [email protected] Website: www.toyotomi.eu
EUROVENT CERTITA CERTIFICATION
48/50, rue de la Victoire
75009 PARIS
FICHE INFORMATIVE

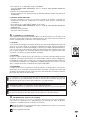
100 cm
150 cm
50 cm
50 cm
20 cm
50 cm
4
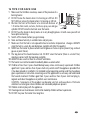
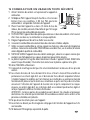
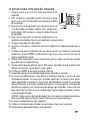
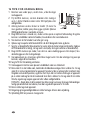
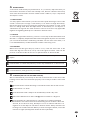
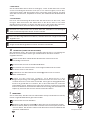
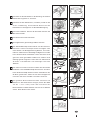
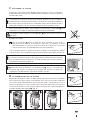
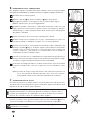
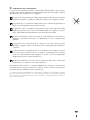
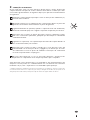
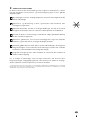
15 TIPS FOR SAFE USE
1 Make sure that children are always aware of the presence of a
burning heater.
2 DO NOT move the heater when it is burning or still hot. DO
NOT refill nor service the heater when it is burning or still hot.
3 Position the front of the heater at a minimum distance of
1.5 metres from walls, curtains, furniture, spray can and gas
cylinder. DO NOT store the fuel tank near the heater.
4 DO NOT use the heater in dusty rooms or in very draughty places. In both cases you will not
have optimum burning.
5 Switch off the heater, before you go to sleep.
6 Store and move fuel only in suitable tanks and jerrycans.
7 Make sure that the fuel is not exposed to heat or extreme temperature changes. ALWAYS
store the fuel in a cool, dry and dark place (sunlight will affect the quality).
8 NEVER use the heater in places where harmful gasses or fumes may be present (e.g. exhaust
gasses or paint fumes).
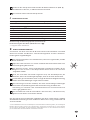
9 The top plate of the heater becomes hot. DO NOT cover the heater (there is a risk of fire).
Avoid any contact with the top plate and grille.
10 ALWAYS make sure that there is sufficient ventilation.
11 The heater must not be located immediately below a socket-outlet.
12 Children of less than 3 years should be kept away unless continuously supervised. Children
aged from 3 years and less than 8 years shall only switch on/off the appliance provided that
it has been placed or installed in its intended normal operating position and they have been
given supervision or instruction concerning use of the appliance in a safe way and understand
the hazards involved. Children aged from 3 years and less than 8 years shall not plug in,
regulate and clean the appliance or perform user maintenance.
CAUTION - Some parts of this product can become very hot and cause burns. Particular
attention has to be given where children and vulnerable people are present.
13 Children shall not play with the appliance.
14 Cleaning and user maintenance shall not be made by children without supervision.
15 DO NOT stay near the heater for a long time.

100 cm
150 cm
50 cm
50 cm
20 cm
50 cm
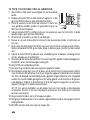
15 SICHERHEITSRATSCHLÄGE
1 Machen Sie Kinder immer auf die Anwesenheit eines brennenden
Ofens aufmerksam.
2 Transportieren Sie den Ofen NICHT, wenn er brennt oder noch heiß
ist. In diesem Fall auch KEINE Wartungsarbeiten durchführen.
3 Stellen Sie den Heizofen so auf, daß er sich mit der Vorderseite
minimal 1,5 Meter von Mauern, Gardinen, Möbeln, Sprühdoce und
Gas Zylinder befindet. Bewahren Sie den Brennstofftank NICHT
neben dem Ofen auf.
4 Benutzen Sie den Heizofen NICHT in staubigen Räumen und NICHT an Stellen, an denen es stark
zieht. In beiden Fällen erhalten Sie keine optimale Verbrennung.
5 Schalten Sie den Heizofen aus, bevor Sie das Haus verlassen oder zu Bett gehen.
6 Lagern und transportieren Sie den Brennstoff ausschließlich in den dazu bestimmten Tanks und
Kanistern.
7 Achten Sie darauf, daß der Brennstoff nicht Hitze oder extremen Temperaturunterschieden
ausgesetzt wird. Lagern Sie den Brennstoff IMMER an einem kühlen, trockenen und dunklen Ort
(Sonnenlicht schadet der Qualität).
8 Benutzen Sie den Heizofen NIEMALS an Stellen, an denen schädliche Gase oder Dämpfe auftreten
könnten (zum Beispiel Auspuffgase oder Farbdämpfe).
9 Die Oberseite des Ofens wird heiß. Der Ofen darf NICHT abgedeckt werden (Feuergefahr).
Berühren Sie die Oberseite und das Gitter nicht.
10 Achten Sie IMMER auf ausreichende Belüftung.
11 Das Heizgerät darf nicht direkt unter einer Steckdose stehen.
12 Kinder unter 3 Jahren dürfen nicht in die Nähe kommen oder sind ständig zu beaufsichtigen. Kinder
von 3-8 Jahren dürfen das Gerät nur dann ein- oder ausschalten, wenn es in seiner vorgesehenen
Betriebsstellung aufgestellt bzw. installiert ist und wenn die Kinder in die sichere Bedienung des
Geräts eingewiesen wurden und die damit einhergehenden Gefahren verstanden haben. Kinder
von 3-8 Jahren dürfen das Gerät nicht anschließen, steuern, reinigen oder instand halten.
ACHTUNG - Einige Teile dieses Produkts können sehr heiß werden und Verbrennungen
verursachen. Achten Sie besonders auf Kinder und andere gefährdete Menschen.
13 Kinder nicht mit dem Gerät spielen lassen.
14 Reinigungs- und Wartungsarbeiten sollten nicht von Kindern ohne Aufsicht ausge-führt werden.
15 Bleiben Sie NICHT zu lange neben dem Ofen stehen.
'

100 cm
150 cm
50 cm
50 cm
20 cm
50 cm
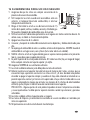
15 CONSEILS POUR UN USAGE EN TOUTE SÉCURITÉ
1 Attirez l’attention des enfants sur la présence d’un appareil en
combustion.
2 NE déplacez PAS l’appareil lorsqu’il chauffe ou s’il est encore
brûlant. Dans ces conditions, il NE faut PAS ajouter du
combustible ni entreprendre l’entretien de l’appareil.
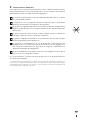
3 Placez l’avant de l’appareil à au moins 1,5 mètre du mur, des
rideaux, des meubles, aérosol et bouteille de gaz. NE rangez
PAS le réservoir de combustible près du poêle.
4 N’UTILISEZ PAS l’appareil dans des pièces poussiéreuses ni dans des endroits à fort courant
d’air. Dans ces deux cas, la combustion ne sera pas optimale.
5 Eteignez l’appareil avant de sortir ou d’aller vous coucher.
6 Conservez le combustible exclusivement dans des réservoirs et bidons adaptés.
7 Veillez à ce que le combustible ne soit pas exposé à la chaleur ou à des écarts de température
extrêmes. Conservez le combustible TOUJOURS dans un endroit frais, sec et sombre (la lumière
solaire dégrade la qualité du combustible).
8 N’UTILISEZ JAMAIS l’appareil dans des endroits où des gaz, solvants ou vapeurs nocives (par
exemple: gaz d’échappement ou vapeurs de peinture) peuvent être présents.
9 Le plateau supérieur et la grille devant deviennent chauds. L’appareil NE doit JAMAIS être
couvert (risque d’incendie). Il faut éviter tout contact avec le plateau supérieur et la grille.
10 Aérez TOUJOURS suffisamment.
11 L’appareil de chauffage ne doit pas être situé immédiatement en dessous d’une prise de
courant.
12 Les enfants de moins de 3 ans devraient être tenus à l’écart à moins d’être surveillés en
permanence. Les enfants âgés de 3 ans et de moins de 8 ans doivent uniquement allumer
/ éteindre l’appareil à condition qu’il ait été placé ou installé dans sa position normale de
fonctionnement prévue et qu’ils soient sous surveillance ou qu’ils aient reçu des instructions
concernant l’utilisation de l’appareil de manière sûre et qu’ils comprennent les risques
encourus. Les enfants âgés de 3 ans et de moins de 8 ans ne doivent pas brancher, régler et
nettoyer l’appareil ni effectuer l’entretien d’utilisateur.
ATTENTION - Certaines parties de ce produit peuvent devenir très chaudes et provoquer
des brûlures. Une attention particulière doit être accordée aux endroits où les enfants et les
personnes vulnérables sont présents.
13 Ne pas laisser les enfants jouer avec l’appareil.
14 Les enfants ne doivent pas être chargés du nettoyage et de l’entretien de l’appareil sauf s’ils
sont encadrés.
15 NE demeurez PAS longtemps à proximité du poêle.
+

100 cm
150 cm
50 cm
50 cm
20 cm
50 cm
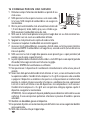
15 TIPS VOOR EEN VEILIG GEBRUIK
1 Wijs kinderen altijd op de aanwezigheid van een brandende
kachel.
2 Verplaats de kachel NIET als deze brandt of nog heet is. In dat
geval ook NIET bijvullen en geen onderhoud verrichten.
3 Plaats de voorkant van de kachel op minimaal 1,5 meter van
muur, gordijnen, meubels, spuitbus en gascylinder. De jerry can
NIET naast de kachel opslaan.
4 Gebruik de kachel NIET in stoffige ruimtes en niet op plaatsen waar het sterk tocht. In beide
gevallen krijgt u geen optimale verbranding.
5 Zet de kachel uit voordat u vertrekt of naar bed gaat.
6 Bewaar en vervoer de brandstof uitsluitend in de daarvoor bestemde wisseltankjes en
jerrycans.
7 Zorg ervoor dat de brandstof niet bloot staat aan hitte of extreme temperatuurverschillen.
Bewaar de brandstof ALTIJD op een koele, droge en donkere plaats (zonlicht tast de kwaliteit
aan).
8 Gebruik de kachel NOOIT op plaatsen waar schadelijke gassen of dampen aanwezig kunnen
zijn (bv. uitlaatgassen of verfdampen).
9 De bovenzijde van de kachel wordt heet. De kachel mag NIET afgedekt worden (brandgevaar).
Vermijd elk contact met de bovenplaat en de grille.
10 Zorg ALTIJD voor voldoende ventilatie.
11 De kachel mag niet direct onder een stopcontact geplaatst worden.
12 Houd kinderen jonger dan 3 jaar uit de buurt van de kachel, tenzij zij continu onder toezicht
staan. Kinderen in de leeftijd van 3 tot 8 jaar mogen het apparaat uitsluitend in-/uitschakelen
mits het in de beoogde, normale bedrijfsstand is geplaatst of geïnstalleerd en mits zij begeleid
worden of instructies hebben gekregen over het veilige gebruik van de machine en de gevaren
ervan begrijpen. Kinderen in de leeftijd van 3 tot 8 jaar mogen het apparaat niet aansluiten,
reguleren, reinigen of er onderhoud op uitvoeren.
LET OP - Een aantal onderdelen van dit product kan zeer heet worden en brandwonden
veroorzaken. Toezicht is met name belangrijk op plaatsen waar kinderen en kwetsbare
personen aanwezig zijn.
13 Zorg ervoor dat kinderen niet met het apparaat spelen.
14 Reiniging en onderhoud dient niet te worden uitgevoerd door kinderen waarop geen toezicht
wordt gehouden.
15 Blijf NIET voor de kachel staan voor een langere tijd.
1

100 cm
150 cm
50 cm
50 cm
20 cm
50 cm
)
15 SUGERENCIAS PARA UN USO SEGURO
1 Asegúrese de que los niños son siempre conscientes de la
presencia de una estufa encendida.
2 NO transportar la estufa cuando esté encendida o esté aún
caliente, ni tampoco llenarla de combustible, ni efectuar
trabajos de mantenimiento.
3 Ponga el frontal de la estufa a una distancia mínima de 1,5
metros de la pared, cortinas, muebles, aerosol y cilindro de gas.
NO guardar el depósito de combustible cerca de la estufa.
4 NO use la estufa en habitaciones polvorientas o en lugares con fuertes corrientes de aire. En
ambos casos, no habrá un funcionamiento óptimo.
5 Apague la estufa antes de ir a dormir.
6 Conserve y transporte el combustible únicamente en los depósitos y bidones destinados para
ello.
7 No exponga el combustible al calor o a cambios extremos de temperatura. SIEMPRE Guarde el
combustible en un lugar oscuro, seco y fresco (la luz solar afecta a la calidad).
8 NUNCA utilice la estufa en lugares donde gases o vapores nocivos puedan estar presentes
(por ej., gases de escape o vapores de pintura).
9 La parte superior de la estufa puede calentarse. NO cubra la estufa (hay un riesgo de fuego).
Evite cualquier contacto con la parte superior y la rejilla.
10 Asegúrese SIEMPRE de una ventilación suficiente.
11 La estufa no deberá colocarse justo debajo de una toma de corriente.
12 Deberá mantenerse el aparato fuera del alcance de menores de 3 años, a menos que se
encuentren bajo supervisión constante. Los niños entre 3 y 8 años de edad solo podrán
encender o apagar el aparato siempre y cuando este haya sido colocado o instalado en su
posición operativa normal y el menor esté supervisado o haya sido instruido sobre su uso
seguro y comprenda los riesgos que entraña. Los menores de 3 a 8 años de edad no deben
enchufar, ajustar, limpiar ni realizar tareas de mantenimiento en el aparato.
PRECAUCIÓN - Algunas partes de este producto pueden alcanzar temperaturas elevadas
y causar quemaduras. Se debe prestar especial atención cuando haya menores y personas
vulnerables.
13 Los niños no deben utilizar el aparato como un juguete.
14 Las tareas de limpieza y mantenimiento reservadas al usuario no deben ser realizadas por
niños sin supervisión.
15 NO permanezca cerca de la estufa durante mucho tiempo.

100 cm
150 cm
50 cm
50 cm
20 cm
50 cm
15 CONSIGLI PER UN USO SICURO
1 Richiamare sempre l’attenzione dei bambini sui pericoli di una
stufa accesa.
2 NON spostare la stufa se questa è accesa o se è ancora calda.
In tal caso, NON riempirla di combustibile e non eseguire la
manutenzione.
3 Porre la parte anteriore della stufa ad una distanza minima di
1,5 metri da pareti, tende, mobili, spray can e cilindro a gas.
NON conservate il combustibile vicino alla stufa.
4 NON usare la stufa in locali polverosi e non porla in luoghi dove vi è una forte corrente d’aria.
In entrambi i casi non si avrà una combustione ottimale.
5 Spegnere la stufa prima di uscire o prima di andare a letto.
6 Conservare e trasportare il combustibile nei contenitori appositi.
7 Assicurarsi che il combustibile non sia esposto a fonti di calore o a forti escursioni termiche.
Conservare SEMPRE il combustibile in un luogo fresco, secco ed asciutto (la luce del sole ne
intacca la qualità).
8 NON usare mai la stufa in luoghi dove possono essere presenti gas o vapori pericolosi (ad
esempio, gas di scarico o vapori di vernici).
9 La parte superiore della stufa diventa molto calda. La stufa NON può essere coperto (pericolo
d’incendio). Evitare ogni contatto con il tettuccio e la griglia.
10 Assicurarsi SEMPRE che la ventilazione sia sufficiente.
11 Non posizionare il dispositivo di riscaldamento immediatamente sotto ad una presa di
corrente.
12 Tenere fuori dalla portata dei bambini di età inferiore ai 3 anni, se non continuamente sotto
la supervisione adulta. I bambini di età compresa tra i 3 e gli 8 anni possono solo accendere
o spegnere il dispositivo a condizione che questo sia stato posizionato o installato nella
posizione in cui dovrà rimanere una volta in funzione e a condizione che siano supervisionati
o istruiti in merito all’utilizzo sicuro del dispositivo e che comprendano i rischi connessi.
I bambini di età compresa tra i 3 e gli 8 anni non potranno collegare, regolare e pulire il
dispositivo o eseguirne la manutenzione.
ATTENZIONE - Alcuni componenti di questo prodotto possono diventare molto caldi e causare
scottature. È necessario prestare particolare attenzione in presenza di bambini e persone
vulnerabili.
13 I bambini non dovrebbero giocare col dispositivo.
14 Le operazioni di pulizia e manutenzione da parte dell’utente non vanno eseguite dai bambini
senza supervisione.
15 NON state vicino alla stufa per troppo tempo.
3

100 cm
150 cm
50 cm
50 cm
20 cm
50 cm
=
15 DICAS PARA UTILIZAÇÃO SEGURA
1 Assegure-se que as crianças têm noção da presença de um
aquecedor.
2 NÃO transportar o aquecedor quando está aceso ou ainda
quente, nem encher de combustível ou fazer qualquer trabalho
de manutenção.
3 Posicione a frente do aquecedor a uma distância mínima de
1.5m de paredes, cortinados, mobílias, latas sob pressão e
botijas de gás. NÃO armazene o tanque de combustível perto
do aquecedor.
4 NÃO utilize o aquecedor em divisões empoeiradas ou em
ambientes muito húmidos. Nestes casos não obterá uma queima eficaz.
5 Desligue o aquecedor antes de ir dormir.
6 Armazene e transporte o combustível somente em depósitos ou bidões destinados para o
efeito.
7 Certifique-se de que o combustível não está exposto ao calor nem mudanças extremas de
temperatura. Guarde SEMPRE o combustível em lugar fresco, seco e escuro (a luz solar irá
afetar a qualidade do mesmo).
8 NUNCA utilize o aquecedor em locais onde existam gases ou vapores nocivos (por exemplo
gases de escape ou vapores de tinta).
9 O prato superior do aquecedor fica quente. NÃO cubra o aquecedor (risco de incêndio). Evite
qualquer contacto com o prato superior e com a grelha.
10 Certifique-se SEMPRE de que existe ventilação suficiente.
11 O aquecedor não deve estar colocado imediatamente abaixo de uma tomada.
12 As crianças com idade inferior a 3 anos devem ser mantidas à distância, a não ser que sejam
continuamente vigiadas. As crianças com uma idade a partir dos 3 e inferior a 8 anos apenas
podem ligar/desligar o aparelho se o mesmo tiver sido colocado ou instalado na sua posição
operativa normal, e caso tenham recebido indicações ou instruções quanto à utilização do
aparelho com segurança, com conhecimento dos perigos aqui envolvidos. Crianças com uma
idade a partir dos 3 e inferior a 8 anos não devem ligar, regular e limpar o aparelho ou efetuar
a manutenção do utilizador.
CUIDADO - Algumas partes deste produto podem ficar muito quentes e provocar queimaduras.
Deve ser prestada especial atenção na presença de crianças e pessoas vulneráveis.
13 As crianças não devem brincar com o aparelho.
14 A limpeza e manutenção pelo utilizador não será feita por crianças sem supervisão.
15 NÃO permaneça demasiado tempo junto ao aquecedor.

100 cm
150 cm
50 cm
50 cm
20 cm
50 cm
15 TIPS FOR UFARLIG BRUG
1 Børn bør være under opsyn, så det sikres, at de ikke leger
med apparatet.
2 Flyt ALDRIG kaminen, når den brænder eller stadig er
varm. I dette tilfælde må den heller IKKE påfyldes eller
vedligeholdes.
3 Anbring kaminen så dens forkant er mindst 1,5 meter fra
mure, gardiner, møbler, spray dåse og gas cylinder. Opbevar
IKKE brændstoftanken i nærheden af ovnen.
4 Brug IKKE kaminen i støvede rum, da der så ikke opnås en optimal forbrænding. Brug ikke
kaminen i umiddelbar nærhed af badekar, brusekabiner eller svømmebassiner.
5 Sluk kaminen før De forlader huset eller går i seng.
6 Opbevar og transporter altid brændstoffet i de dertil beregnede tanke og dunke.
7 Sørg for, at brændstoffet ikke udsættes for varme eller ekstreme temperaturforskelle. Opbevar
ALTID brændstoffet et køligt, tørt og mørkt sted (sollys forringer kvaliteten af brændstoffet).
8 Brug ALDRIG kaminen på steder, hvor der kan være skadelige gasser eller dampe (f.eks.
udstødningsgasser eller malingsdampe).
9 Vær opmærksom på, at kaminens gitter bliver meget varmt. Hvis der anbringes ting oven på
kaminen, udgør det en brandfare.
10 Sørg ALTID for tilstrækkelig ventilation.
11 Varmeapparatet må ikke være placeret umiddelbart under en stikkontakt.
12 Børn under 3 år skal holdes væk, medmindre de løbende overvåges. Børn i alderen fra 3 år og
under 8 år må kun tænde/slukke for apparatet forudsat at den er anbragt eller installeret i den
tilsigtede normale driftsposition, og de har fået tilsyn eller instruktion om brugen af apparatet
på en sikker måde og forstår de involverede farer. Børn i alderen fra 3 år og under 8 år må ikke
tilslutte, regulere og rengøre apparatet eller udføre vedligeholdelse.
FORSIGTIG - Nogle dele af dette produkt kan blive meget varme og forårsage forbrændinger.
Særlig opmærksomhed skal udvises, hvor børn og udsatte personer er til stede.
13 Børn må ikke lege med apparatet.
14 Rengøring og brugervedligeholdelse må ikke foretages af børn uden vejledning.
15 Ophold dig IKKE tæt på ovnen i længere tid.
6


2
4
Thank you for choosing a “TOYOTOMI” product!
Toyotomi products are used by satisfied customers worldwide. In order to
assure the comfortable and safe use of our products by customers in each
country, our products conform to the safety standards not only in Japan but
also in every country around the world we do business with.
Toyotomi tailors its products to satisfy its customer’s needs by always pursuing
our business philosophy, “sharing joys in daily living”. We will continue to
research, develop and manufacture products that match people’s lifestyle for
efficiency, safety and comfort.
We hope that you’ll enjoy your Toyotomi appliance for years to come!
We invite you to read this instruction manual first, to ensure the maximum
lifetime for this appliance.
Get to know us better…visit us at www.toyotomi.eu for our full line of
products.
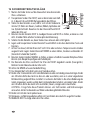
1 READ THE DIRECTIONS FOR USE FIRST.
2 IN CASE OF ANY DOUBT, CONTACT YOUR DEALER.
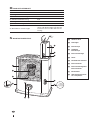
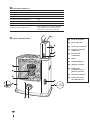
3 BEFORE YOU START READING, CONSULT THE MAIN COMPONENTS LIST ON THE LAST PAGE.

3
4
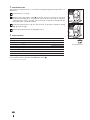
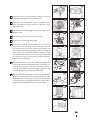
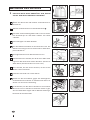
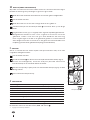
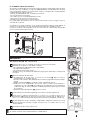
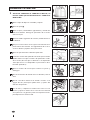
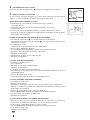
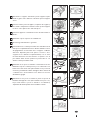
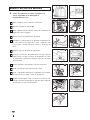
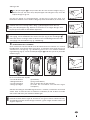
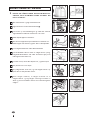
GENERAL DIRECTIONS FOR USE
Below you will find the main steps to be taken for
using your heater. For more details, please refer to
the MANUAL.
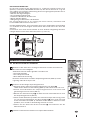
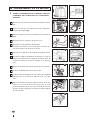
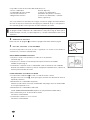
Remove all packaging materials (refer to Section A, Fig. A).
Fill the removable tank and wait 30 minutes before you
ignite the heater (refer to Section B, Fig. I).
Insert the batteries into the battery holder
(refer to Section A, Fig. F).
Check whether the combustion chamber is fully upright (refer
to Section A, Fig. E).
Ignite the heater by turning the knurled wick adjustment knob
as far to the right as possible
(refer to Section C, Fig. L).
After igniting the heater it will take 30 minutes before you can
check if the heater burns well (refer to Section D).
Switch off the heater (refer to Section E).
1
2
3
4
5
6
7
• As a fire precaution, the tank must be filled either when the heater has been
switched off or in another room than the room where the heater is installed.
• Always ensure that the tank is closed properly after filling it at a safe distance from
all sources of heat and open flames (see Section B).
• The first time you ignite your heater it will smell like ’new’ for a short time.
• Store all fuel containers with their original caps and seals in a cool and dark place.
• Fuel ages. Use new fuel at the start of every heating season.
• Only use high quality and water-free pure paraffin in accordance with local
legislation (TOYOTOMI fuel).
• Before changing brands and/or types of fuel make sure that the mobile heater first
completely empties all of the remaining fuel inside the heater.
3 BEFORE YOU START READING, CONSULT THE MAIN COMPONENTS LIST ON THE LAST PAGE.

4
4
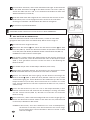
WHAT YOU NEED TO KNOW IN ADVANCE
ALWAYS MAKE SURE THAT THERE IS SUFFICIENT VENTILATION
Read this user manual carefully before using the appliance and keep it for future
reference. Install this device only when it complies with local/national legislation,
ordinances and standards. This product is intended to be used as a heater in resi-
dential houses and is only suitable for use in dry locations, in normal household
conditions, indoors in living room, kitchen and garage.
This heater is equipped with an air quality control system . When there is insuf-
ficient ventilation in the room or when the heater is being used in a room which is
too small, the heater will shut off automatically.
For comfortable and safe heating ensure that there is sufficient ventilation.
NOTE: To avoid unexpected shut off, we recommend to put a door or window ajar
when the heater is operating.
Regardless of the model, you must always make sure that the heater is used in a
room large enough to enable the heater to be used safely without extra ventilati-
on (refer to Section J). If the room is smaller than required, you must always open
a door or window slightly (ensuring an opening of approx. 2.5 cm). It is important
that every room where the heater is used has sufficient air intake and efficient air
outflow (both openings must have a minimum cross section of 50 cm
2
).
We also recommend doing this in highly insulated or draught-free rooms and/or
at altitudes above 1500 metres. Do not use your heater in cellars or other under-
ground areas.
No modifications to the safety system are allowed, as that will invalidate the gua-
rantee that the air probe will work properly. Consult your dealer in case of doubt.
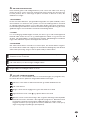
Be aware that the grid and the top plate become hot. If the appliance is covered
there is a risk of fire. Due to high surface temperature, keep away from children.
ESPECIALLY FOR FRANCE: Your heater was designed to operate exclusively on fuel
for liquid fuel-operated mobile heaters in accordance with the Decrees of 18-07-
2002 and 25-06-2010. The use of other fuels is forbidden. Ask your dealer or check
our website for the addresses of our retailers. The liquid fuel-operated mobile
heater is intended as an extra heater, and not as a continuous source of heat.
ESPECIALLY FOR UNITED KINGDOM: Only use Class C1 paraffin fuel in accordance
with BS2869; Part 2, or equivalent.
The user must comply with the following instructions for proper use:
DO NOT
- use petrol.
- use the liquid fuel-operated mobile heater in caravans, boats, and vehicle cabins.
- use the liquid fuel-operated mobile heater in insufficiently ventilated rooms
(consult the table of properties for the minimum dimensions of the room to be
heated), underground rooms and / or at a height of over 1500 metres.
- modify the heater safety features.
The use of this type of heating in public rooms is subject to prior regulatory per-
mission. Obtain proper information on this in advance.
THE RIGHT FUEL
Your heater has been designed for use with high-quality water-free pure paraffin
oil (TOYOTOMI fuel). Only fuels of this kind will ensure clean and proper burning.
Lower quality fuel may result in:
increased possibility of malfunctioning
incomplete burning
reduced heater lifetime
smoke and/or smells
deposits on the grid or mantle
Using the right fuel is therefore essential for safe, efficient, and comfortable use
of your heater.
Damage and/or malfunctions of the heater due to the use of other than high
quality water-free pure paraffin oil is not covered by the warranty.
Always refer to (www.toyotomi.eu) for the right fuel for your heater.
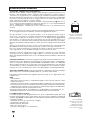
This transportation cap
is packed separately in
the box. Only this cap
ensures trouble-free
transportation of the
heater after use.
Store it well!
Only the use of the
correct fuel will ensure
safe, efficient, and
comfortable use of your
heater.

!
5
4
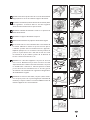
MANUAL
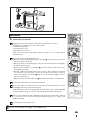
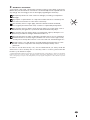
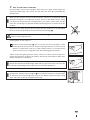
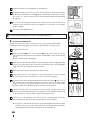
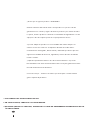
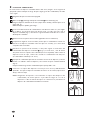
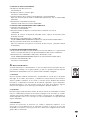
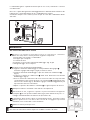
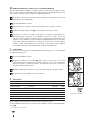
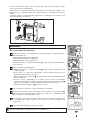
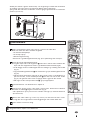
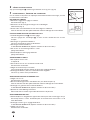
A INSTALLING THE HEATER
1
Carefully remove your heater from the box and check the contents.
In addition to the heater you also need to have:
a manual fuel pump
a transportation cap
these directions for use
Keep the box and the packaging materials (Fig. A) for storage and/or
transportation.
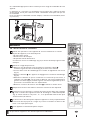
2
Remove the other packaging materials:
Remove the packaging material from the grill . Lift the grill from the slot
(Fig. B) and pull it forward.
Pull both ends of the packaging to the rear and at the same time slightly
downwards (see Fig. C).
Remove the combustion chamber from the heater and remove the
packaging (see Fig. D).
Put the combustion chamber back into its place. The combustion chamber
is positioned correctly when it can be smoothly moved a little to the left
and to the right by its handle (Fig. E). Close the grill: Slightly lift it to
reposition it in its slot.
Open the lid of the removable tank and remove the piece of cardboard.
3
Fill the removable tank as indicated in Section B.
4
By removing the screw remove the cover and insert the batteries into their
holder at the back of the heater (Fig. F).
Ensure that the positive and negative poles match the + and - marks indicated
on the battery housing. It is best to use new alkaline batteries (4x D-size).
5
The floor should be firm and completely level. Reposition the heater, when it
is not level. Do not correct the situation by placing books or other goods
under the heater.
6
Your heater is now ready for use.
Do not use the heater at a height of over 1500 meters.
A
B
C
D
E
F

!
6
4
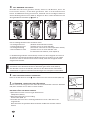
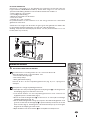
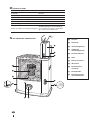
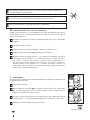
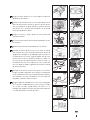
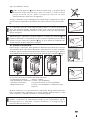
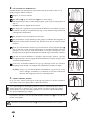
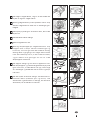
B FILLING FUEL
Fill the removable tank in a suitable place since there can always be some spillage.
Follow the procedure below:
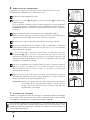
1
Make sure that the heater is switched off.
2
Open the upper lid and lift the removable tank out of the heater (Fig. G).
Put down the removable tank (cap pointing upwards, handle on the floor)
and screw off the fuel cap (Fig. H).
NOTE: Some drops may leak from the tank.
3
Take the manual fuel pump and insert the smooth, most rigid tube into the
jerrycan. Make sure that it is in a higher position than the removable tank
(Fig. I). Insert the ribbed hose into the opening of the removable tank.
4
Lock the valve on top of the pump (turn clockwise).
5
Squeeze the pump a few times, until fuel starts flowing into the removable
tank. As soon as this happens, there is no need to press any longer.
6
Check the fuel guage of removable tank while filling the tank (Fig. J). Stop
filling by loosening the valve on top of the pump (turn anti-clock-wise), once
the gauge indicates that the tank is full. Never overfill the tank, especially not
when the fuel is very cold (fuel expands when it heats up).
7
Let the remaining fuel in the pump flow back into the jerrycan and carefully
remove the pump. Carefully screw the fuel cap back on the tank (Fig. K).
Clean off any spilled fuel.
8
Check whether the fuel cap is straight and tightened properly. Reinstall the
removable tank in the heater (cap down). Close the lid.
NOTE: Be sure to tighten the fuel tank cap and confirm that there is no
leakage of the fuel when the cap side is placed down. Then insert the
removable fuel tank into the heater.
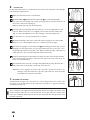
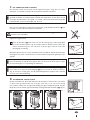
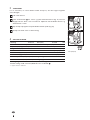
C IGNITING THE HEATER
A new heater may give off some smells for a short while, when it is used for the
first time. You should therefore provide extra ventilation or ignite the heater
outside the living room.
When you use the heater for the first time, first put the filled removable tank into
place, and then wait approximately 30 minutes before you ignite the heater. This
allows the glass fibre wick to soak up the fuel. Follow the same procedure when
you have completely burnt up all fuel from the tank, and after the glass fibre wick
has been replaced.
J
I
empty full
H
K
G

!
!
7
4
Before igniting the heater, always check the fuel indicator to see whether the
removable tank needs filling up.
Always ignite the heater with the knurled wick adjustment knob . Never use
matches or a cigarette lighter.
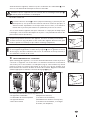
Follow the procedure below:
1
Turn the knurled wick adjustment knob clockwise to its stop (Fig. L). If you
apply more pressure you may turn it slightly further; however, it will
automatically return to the start position. When you have set the wick to its
highest position, this action will automatically activate the safety device.
When you have ignited the heater and it shuts off again shortly after, the batteries
need to be replaced. It is best to use new alkaline batteries (4x D-size).
If the heater has been used only a few times and the wick adjustment knob is
not locked, first turn the wick adjustment knob (Fig. M) completely left, before
putting the wick in the highest position for ignition (Section C).
After having ignited the heater, always check whether the combustion
chamber is level, by sliding it slightly to the left and the right by combustion
chamber handle (Fig. E). This should be a smooth movement. If the combustion
chamber is not level, this will cause smoke and soot to develop.
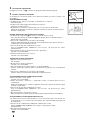
D BURNING OF THE HEATER
After you have ignited the heater, it will take 30 minutes before you can check
whether the heater is burning well. Too high a flame may cause smoke and
soot, whereas too low a flame causes smells (Fig. R). Adjust by the knurled wick
adjustment knob until becoming an appropriate flame (Fig. S).
Burning that is too low may be caused by:
insufficient fuel (fill the tank)
poor fuel quality (contact your dealer)
insufficient ventilation (put window or door ajar)
wastage of the wick (contact your dealer or replace the wick, refer to section L)
When there is insufficient ventilation in the room, the heater shuts off
automatically.
After improving the ventilation of the room (e.g. by opening a door or window a
little more), the heater can be ignited again.
L
M
E
S
R

!
8
4
This heater is equipped with a safety mechanism which switches off the heater
when the removable fuel tank is taken out of its compartment (Fig. G). To
re-ignite the heater, place the removable fuel tank back in the heater and follow
the instructions as described in Section C.
E SWITCHING OFF THE HEATER
Push the OFF-button . The flame will extinguish after a little while (Fig. N).
F MALFUNCTION, CAUSES AND SOLUTIONS
If any malfunctioning cannot be solved from the directions below, please contact
your dealer.
THE HEATER DOES NOT IGNITE
The batteries are not positioned correctly in the holder.
Check (Fig. F).
There is not enough power left in the batteries for the ignition.
Replace (Fig. F).
You have run out of fuel from the tank or the wick has been replaced.
After having refilled and replaced the removable tank, wait for 30 minutes
before igniting the heater.
IRREGULAR FLAME AND/OR SOOT AND/OR SMELLS
The combustion chamber has not been positioned correctly.
Use the combustion chamber handle to put it level, until you can easily slide it
slightly to the left and to the right and the chamber is level.
You are using fuel which is past its ‘use by’ date.
Start every heating season with fresh fuel.
You are using the incorrect type of fuel.
Refer to THE RIGHT FUEL (See Section ’What you need to know in advance’).
Dust has gathered in the lower part of the heater.
Contact your dealer.
The wick height is not correct.
Contact your dealer.
THE HEATER SLOWLY EXTINGUISHES
The removable tank is empty.
See Section B.
The lower reservoir is contaminated by water.
Contact your dealer.
The wick has hardened on the upper side.
Burn the heater until all fuel is used (Section G). Use the right fuel.
You are using fuel which is past its ‘use by’ date.
Start every heating season with fresh fuel.
THE HEATER REMAINS BURNING LOW
Wick position too low.
Contact your dealer.
Before you refilled the tank, the heater had burnt up almost all the fuel.
After having refilled and replaced the removable tank, wait for 30 minutes
before igniting the heater.
You are using the incorrect type of fuel.
Refer to THE RIGHT FUEL (See Section ’What you need to know in advance’).
The room is insufficiently ventilated.
Leave a window or a door wide open for a while.
THE HEATER IS BURNING TOO HIGH
The flame at the initial stage is tending to make higher flame due to the
brand new components. The flame will be lower after approximately 10 hours
combustion.
You are using an incorrect, too volatile type of fuel.
Refer to THE RIGHT FUEL (See Section ’What you need to know in advance’).
Wick position too high.
Contact your dealer.
N
F

!
!
!
9
4
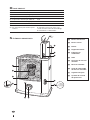
G MAINTENANCE
Your heater needs hardly any maintenance. It is, however, important that you
remove dust and stains in time with a damp cloth, because otherwise these may
cause stains that are hard to remove. Under normal conditions, only 3 components
are subject to wear:
1. THE BATTERIES
You may replace the batteries yourself. Check the spark discharge sound. If the
sound is cracked, the voltage of the battery is low. Please change the battery.
Check the ignition plug following the maintenance procedure 3 if the sound
does not change even after the replacement of the battery. Do not dispose of
old batteries along with the other domestic waste. Follow the locally applicable
regulations regarding the disposal of domestic chemical waste.
2. THE WICK
To extend the glass fibre wick life, you must occasionally let the heater burn until
the tank is completely emptied and the heater extinguishes by itself. Do this when
you notice that the flame is weakening. The burn-out will cause some smells, so it
is recommended that you take the heater outside of the living room.
3. ELECTRODES
When the electrodes gets dirty by carbon or tar, clean the electrodes. If the
electrodes digs into the wick, it may cause the ignition failure. Then fix the
position of the electrodes. Be sure not to spill the water on the electrodes.
Do not remove any heater components yourself. Always contact your dealer for
repairs.
Let the heater cool down first, before you start any maintenance or service work.
For maintenance, wear gloves for your safety.
H STORAGE (END OF THE HEATING SEASON)
We recommend that you burn up all the fuel in the fuel tank at the end of the
heating season and store the heater properly. Follow the procedure on the next
page:
1
Ignite the heater outside the living room and let it burn until all fuel is used.
2
Let the heater cool down.
3
Clean the heater with a damp cloth and then dry it with a dry cloth.
4
Remove the batteries from the holder and store them in a dry place.
5
Store the heater in a dust-free place, if possible in its original packaging.
Unused fuel cannot be used for the next heating season. If there is still some
fuel left, do not throw it away, but dispose of it in accordance with the local
regulations for the disposal of domestic chemical waste. Always start the new
heating season with fresh fuel. When you start re-using the heater, follow the
instructions again (starting from Section A and as specified).

10
4
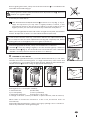
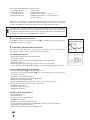
I TRANSPORTATION
Take the following measures to avoid fuel leakage during the transportation of
the heater:
1
Let the heater cool down.
2
Remove the removable tank from the heater and remove the fuel
acceptance fitting (Fig. P). Some drops may leak from the fuel acceptance
fitting; keep a cloth at hand. Store the fuel acceptance fitting and the
removable tank outside the heater.
3
Place the transportation cap into the position of the fuel acceptance fitting
(Fig. Q). Press it tight.
4
Always move the heater in an upright position.
J SPECIFICATIONS
Ignition electrical Dimensions (mm) width 422
Fuel paraffin
(including base plate)
depth 281
Capacity (kW) 1.87-2.20 height 446
Suitable space (m
3
)
**
35-80 Accessories: manual fuel pump
transportation cap
Fuel consumption (l/hr) 0.195-0.229 Required batteries
4x LR20, MIN 1300
Fuel consumption (g/hr) 156-183 1.5V, size D
Burning time per tank (hr)
17.5-20.5 Wick type F
Capacity removable tank (litres)
4.0 Weight (kg) 7.5
Monitoring of the quality of ventilation (air renewal):
Direct measurement of the CO
2
level (NDIR CO
2
sensor ).
** Specified values are indicative
Transportation cap
P
Q
A página está carregando ...
A página está carregando ...
A página está carregando ...
A página está carregando ...
A página está carregando ...
A página está carregando ...
A página está carregando ...
A página está carregando ...
A página está carregando ...
A página está carregando ...
A página está carregando ...
A página está carregando ...
A página está carregando ...
A página está carregando ...
A página está carregando ...
A página está carregando ...
A página está carregando ...
A página está carregando ...
A página está carregando ...
A página está carregando ...
A página está carregando ...
A página está carregando ...
A página está carregando ...
A página está carregando ...
A página está carregando ...
A página está carregando ...
A página está carregando ...
A página está carregando ...
A página está carregando ...
A página está carregando ...
A página está carregando ...
A página está carregando ...
A página está carregando ...
A página está carregando ...
A página está carregando ...
A página está carregando ...
A página está carregando ...
A página está carregando ...
A página está carregando ...
A página está carregando ...
A página está carregando ...
A página está carregando ...
A página está carregando ...
A página está carregando ...
A página está carregando ...
A página está carregando ...
A página está carregando ...
A página está carregando ...
A página está carregando ...
A página está carregando ...
A página está carregando ...
A página está carregando ...
A página está carregando ...
A página está carregando ...
A página está carregando ...
A página está carregando ...
A página está carregando ...
A página está carregando ...
A página está carregando ...
A página está carregando ...
A página está carregando ...
A página está carregando ...
A página está carregando ...
A página está carregando ...
A página está carregando ...
A página está carregando ...
A página está carregando ...
A página está carregando ...
A página está carregando ...
A página está carregando ...
A página está carregando ...
A página está carregando ...
A página está carregando ...
A página está carregando ...
A página está carregando ...
A página está carregando ...
A página está carregando ...
A página está carregando ...
A página está carregando ...
A página está carregando ...
A página está carregando ...
A página está carregando ...
A página está carregando ...
A página está carregando ...
A página está carregando ...
A página está carregando ...
A página está carregando ...
A página está carregando ...
A página está carregando ...
A página está carregando ...
A página está carregando ...
A página está carregando ...
A página está carregando ...
A página está carregando ...
A página está carregando ...
A página está carregando ...
A página está carregando ...
A página está carregando ...
A página está carregando ...
A página está carregando ...
A página está carregando ...
A página está carregando ...
A página está carregando ...
A página está carregando ...
-
 1
1
-
 2
2
-
 3
3
-
 4
4
-
 5
5
-
 6
6
-
 7
7
-
 8
8
-
 9
9
-
 10
10
-
 11
11
-
 12
12
-
 13
13
-
 14
14
-
 15
15
-
 16
16
-
 17
17
-
 18
18
-
 19
19
-
 20
20
-
 21
21
-
 22
22
-
 23
23
-
 24
24
-
 25
25
-
 26
26
-
 27
27
-
 28
28
-
 29
29
-
 30
30
-
 31
31
-
 32
32
-
 33
33
-
 34
34
-
 35
35
-
 36
36
-
 37
37
-
 38
38
-
 39
39
-
 40
40
-
 41
41
-
 42
42
-
 43
43
-
 44
44
-
 45
45
-
 46
46
-
 47
47
-
 48
48
-
 49
49
-
 50
50
-
 51
51
-
 52
52
-
 53
53
-
 54
54
-
 55
55
-
 56
56
-
 57
57
-
 58
58
-
 59
59
-
 60
60
-
 61
61
-
 62
62
-
 63
63
-
 64
64
-
 65
65
-
 66
66
-
 67
67
-
 68
68
-
 69
69
-
 70
70
-
 71
71
-
 72
72
-
 73
73
-
 74
74
-
 75
75
-
 76
76
-
 77
77
-
 78
78
-
 79
79
-
 80
80
-
 81
81
-
 82
82
-
 83
83
-
 84
84
-
 85
85
-
 86
86
-
 87
87
-
 88
88
-
 89
89
-
 90
90
-
 91
91
-
 92
92
-
 93
93
-
 94
94
-
 95
95
-
 96
96
-
 97
97
-
 98
98
-
 99
99
-
 100
100
-
 101
101
-
 102
102
-
 103
103
-
 104
104
-
 105
105
-
 106
106
-
 107
107
-
 108
108
-
 109
109
-
 110
110
-
 111
111
-
 112
112
-
 113
113
-
 114
114
-
 115
115
-
 116
116
-
 117
117
-
 118
118
-
 119
119
-
 120
120
-
 121
121
-
 122
122
-
 123
123
-
 124
124


Toyotomi RS 220 Manual do proprietário
- Categoria
- Aquecedores de ambiente
- Tipo
- Manual do proprietário
- Este manual também é adequado para
em outros idiomas
- español: Toyotomi RS 220 El manual del propietario
- français: Toyotomi RS 220 Le manuel du propriétaire
- italiano: Toyotomi RS 220 Manuale del proprietario
- Nederlands: Toyotomi RS 220 de handleiding
- Deutsch: Toyotomi RS 220 Bedienungsanleitung
- dansk: Toyotomi RS 220 Brugervejledning
Artigos relacionados
Outros documentos
-
Zibro RS 122 Manual do proprietário
-
-
-
-
-
-
Qlima - Zibro R7127TC Manual do usuário
-
SENDAI SENDAI 301C Manual do proprietário
-
Zibro Kamin R 50C Manual do proprietário
-
QLIMA SRE 3131 C Instruções de operação