Hamilton Beach 34510 Guia de usuario
- Categoria
- Pequenos aparelhos de cozinha
- Tipo
- Guia de usuario

English ...................... 2
Français .................. 14
Español ................... 26
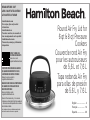
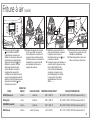
Round Air Fry Lid for
6 qt & 8 qt Pressure
Cookers
Couvercle rond Air Fry
pour les autocuiseurs
de 5,6 L et 7,6 L
Tapa redonda Air Fry
para ollas de presión
de 5.6 L y 7.6 L
READ BEFORE USE
LIRE AVANT UTILISATION
LEA ANTES DE USAR
hamiltonbeach.com
For recipes, tips and product
information.
hamiltonbeach.ca
Pour des recettes, des conseils et
des renseignements sur le produit.
hamiltonbeach.com.mx
Para recetas, consejos, y información
del producto.
ENTER TO WIN $100
TO SPEND ON WEBSITE
Scan code or visit
register.hamiltonbeach.com
PARTICIPEZ POUR COURIR LA CHANCE
DE GAGNER UN MONTANT DE 100 $
À DÉPENSER SUR NOTRE SITE WEB
Balayez le code ou visitez le
register.hamiltonbeach.ca
INGRESE PARA TENER LA OPORTUNIDAD
DE GANAR $100 PARA GASTAR EN
NUESTRO SITIO WEB
Escanee el código o visite
register.hamiltonbeach.com
Open to US customers only • Ce concours
s’adresse aux clients des États-Unis seulement
• Este concurso está disponible sólo a clientes
de los Estados Unidos
Le invitamos a leer cuidadosamente este
instructivo antes de usar su aparato.

2
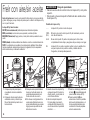
IMPORTANT SAFEGUARDS
1. Read all instructions.
2. This appliance is not intended for use by persons (including
children) with reduced physical, sensory, or mental capabilities,
or lack of experience and knowledge, unless they are closely
supervised and instructed concerning use of the appliance by
a person responsible for their safety.
3. Close supervision is necessary when any appliance is used by or
near children. Children should be supervised to ensure that they do
not play with the appliance.
4. Do not touch hot surfaces. Use handles or knobs. Use pot holders
when removing hot containers.
5. To protect against electric shock, do not immerse cord, plug,
or lid assembly in water or other liquid.
6. Unplug from outlet when not in use and before cleaning. Allow to
cool before putting on or taking off parts. To unplug, grasp the plug
and pull from the outlet. Never pull from the power cord.
7. Do not operate any appliance with a damaged supply cord or
plug, or after the appliance malfunctions or has been dropped or
damaged in any manner. Supply cord replacement and repairs
must be conducted by the manufacturer, its service agent, or
similarly qualified persons in order to avoid a hazard. Contact
Customer Service for information on examination, repair, or
adjustment as set forth in the Limited Warranty.
8. The use of accessory attachments not recommended by the
appliance manufacturer may cause injuries.
9. Do not use outdoors.
10. Intended for countertop use only.
11. Do not let cord hang over edge of table or counter, or touch hot
surfaces, including stove.
12. Do not place on or near a hot gas or an electric burner, or in a
heated oven.
13. Extreme caution must be used when moving an appliance
containing hot oil or other hot liquids.
14. To disconnect appliance, turn (off); then remove plug from wall
outlet. To unplug, grasp the plug and pull from the outlet. Never
pull from the power cord.
15. Do not use appliance for other than intended use.
16. CAUTION! To prevent damage or shock hazard, do not cook in
base. Cook only in removable pot.
17. WARNING! Spilled food can cause serious burns. Keep appliance
and cord away from children. Never drape cord over edge of
counter, never use outlet below counter, and never use with an
extension cord.
18. Cooking pot and heating element may remain hot after unit is
turned off.
19. Do not operate the appliance by means of an external timer or
separate remote-control system.
20. Do not lift or carry the pressure cooker using lid handle; use both
handles provided on base.
21. CAUTION! HOT SURFACE. The temperature of accessible
surfaces may be high during and after operation.
22. Never rest air fry lid directly on countertop or supporting surface;
always rest on provided stand.
23. Always read and understand the Important Safeguards provided
with the pressure cooker approved for use with the air fry lid.
24. Do not clean air fry lid with metal scouring pads. Pieces can break
off the pad and touch electrical parts, creating a risk of electrical
shock.
When using electrical appliances, basic safety precautions should always be followed to reduce the risk of fire, electric shock, and/or injury to
persons, including the following:

3
SAVE THESE INSTRUCTIONS
Lid: Precautions and Information
• Please handle Lid carefully to ensure long life.
• Avoid hitting Lid against hard surfaces.
• Do not use Lid if cracked or otherwise damaged.
• Do not use abrasive cleansers or metal scouring pads.
• Lid can become very hot. Use caution. Do not place directly on
any unprotected surface or countertop. Lid should only be placed
on cooking pot or lid stand.
• Do not place Air Fryer Lid in a microwave oven, conventional
oven, refrigerator, or on stove top.
Removing Lid
When removing the Air Fry Lid from Pressure Cooker, lift using the
Air Fry Lid Handle. Lid gets very warm because the Heating Element
is located here. Place Lid on Air Fry Lid Stand before stirring or
turning food, and after cook cycle ends.
Other Consumer Safety Information
This appliance is intended for household use only.
This appliance is only intended for the preparation, cooking, and
serving of foods. This appliance is not intended for use with any
nonfood materials or products.
w WARNING Electrical Shock Hazard: This appliance is provided
with a grounded (3-prong) plug to reduce the risk of electric shock.
The plug fits only one way into a grounded outlet. Do not defeat the
safety purpose of the plug by modifying the plug in any way or by
using an adapter. If the plug does not fit fully into the outlet, reverse
the plug. If it still does not fit, have an electrician replace the outlet.
A short power-supply cord is used to reduce the risk resulting from it
being grabbed by children, becoming entangled in, or tripping over
a longer cord.
25. Do not place air fry lid on pressure cooker when pressure cooker is
plugged in. 26. Do not place air fry lid on cooking pot unless pot is inside of
pressure cooker.

4
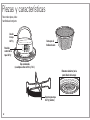
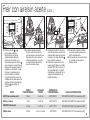
Parts and Features
To order parts, visit :
hamiltonbeach.com/parts
Air Fry Basket
Air Fry Lid
Stand (open)
Air Fry
Lid Handle
Heating Element
(on bottom of Lid)
Air Fry Lid
Control Panel
Stepped Lid
(fits 6 qt and 8 qt pots)

5
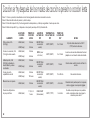
Air Fry Lid is compatible with the following Hamilton Beach Pressure Cookers (Type and Model Number can be found on the Pressure
Cooker Rating Label [see above] on Base):
PC03 - 34500, 34501, and
34502 PC06 - 34508
Air Fryer Lid is compatible with the following Crock-Pot® Pressure Cookers*:
SCCPPC600 SCCPPC800
Air Fryer Lid is compatible with the following Instant Pot® Pressure Cookers*:
DUO 60 DUO NOVA 60 DUO PLUS 60 LUX 60 VIVA 60
DUO SV 60 ULTRA 60 DUO 80 DUO NOVA 80 DUO PLUS 80
LUX 80 VIVA 80 ULTRA 80 DUO EVO PLUS 60 DUO EVO PLUS 80
NOTE: Air Fry Lid can be used with aluminum or stainless steel cooking pot included with your Pressure Cooker.
*Crock-Pot and Instant Pot are registered trademarks of Sunbeam Products, Inc. and Instant Brands Inc., respectively.
Use of the marks does not imply any affiliation with or endorsement by the mark owners.
Pressure Cooker Rating Label
(on bottom or side of product)
Pressure Cookers to Use the Air Fry Lid With
Always read and understand all instructions provided with your pressure cooker before using with the Air Fry Lid.

6
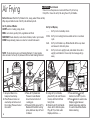
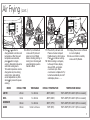
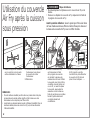
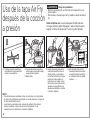
Air Frying
1. Set up Lid Stand on a
heatproof countertop.
2. Place Pressure Cooker on
countertop and remove Lid.
Do not plug Pressure Cooker
into outlet.
3. Place Air Fry Basket into
Pressure Cooker. Basket
should rest on bottom of
cooking pot.
4. If desired, lightly spray Air Fry
Basket with nonstick cooking
spray. Add even layer of food
to Basket.
5. Using Air Fry Lid Handle,
place Air Fry Lid onto Pressure
Cooker, with Control Panel
facing front.
6. Rotate the Air Fry Lid Handle
down until it clicks into place.
Plug Air Fry Lid into outlet.
Display will show - - - -.
7. Press and hold (on/off)
button to turn Air Fry Lid on.
8. Press button to select mode.
Display toggles between
default temperature and time
for each mode. Mode flashes
before selecting.
Air Fry Lid has 4 Modes:
AIR FRY: use for creating crispy foods
BROIL: cook meats, poultry, fish, vegetables and fruits
BAKE/ROAST: make desserts, cook whole chickens, beef or pork roasts
WARM: keeps already pressure cooked or cooked foods warm
NOTE: Food should never touch Heating Element. For best results,
allow at least 2 inches (5 cm) between the food and Heating Element.
w WARNING Burn Hazard.
• Never move the pressure cooker with the air fry lid on top.
• Only lift or move the air fry lid using the air fry lid handle.
Before first use: Wash Air Fry Basket in hot, soapy water. Rinse and dry.
Wipe top and bottom side of Air Fry Lid with damp cloth.
Air Fry Lid Display:
- - - - Air Fry Lid is in standby mode
COOL Air Fry Lid cooking time has ended and is in cool-down
cycle
hndL Air Fry Lid Handle is up. Rotate Handle all the way down
and ensure it clicks into place
tiLt Air Fry Lid is not upright, level, and stable. Once Lid is
upright, and stable for 3 seconds, the message will go
away

7
Air Frying (cont.)
MODE DEFAULT TIME TIME RANGE DEFAULT TEMPERATURE TEMPERATURE RANGE
AIR FRY 20 min 1 to 60 min 400°F (204°C) 150°F–400°F (65°C–204°C [25° increments])
BROIL 8 min 1 to 60 min 400°F (204°C) 150°F–400°F (65°C–204°C [25° increments])
BAKE/ROAST 30 min 1 to 60 min 350°F (177°C) 150°F–400°F (65°C–204°C [25° increments])
WARM 30 min 5 min to 2 hours 150°F (65°C) 150°F–250°F (65°C–121°C [25° increments])
9. Press or button to
change default cook time and
temperature. After time and
temperature are selected,
press button to begin
cooking. Selected mode turns
solid and cooking starts.
Time and temperature can be
changed at any time during
cooking time; and settings
can be adjusted at any time
when ( ) is pressed to pause
cooking.
10. Lift Air Fry Lid Handle to
remove Air Fry Lid and
place Lid on Lid Stand
before checking, stirring or
turning food. Cooking will
automatically stop when
Handle is lifted.
11. Place Air Fry Lid back onto
Pressure Cooker and push
Handle down to click in place.
Press to continue cooking.
12. When cooking is complete,
Lid beeps 5 times, display
shows COOL, and enters
cool-down cycle. Once
cool-down is complete Air Fry
Lid will automatically shut off
and display shows - - - -.
13. Unplug. Place Lid on Lid Stand
to cool completely.
14. Use oven mitts to carefully
remove Air Fry Basket.

8
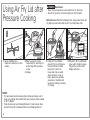
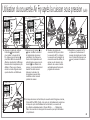
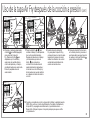
Using Air Fry Lid after
Pressure Cooking
1. Set up Lid Stand on a
heatproof countertop or other
surface.
2. Refer to pressure cooker
instructions for removing Lid
and turning off the pressure
cooker.
3. Unplug.
4. Using Air Fry Lid Handle,
place Air Fry Lid on Pressure
Cooker with Control Panel
facing front. Use Lid to
brown and crisp a cooked
whole chicken or roast; or
before placing Lid, sprinkle
casseroles or cobblers with
topping for melting, browning
or crisping.
5. Rotate the Air Fry Lid Handle
down until it clicks into place.
Plug Air Fry Lid into outlet.
Display will show - - - -.
w WARNING Burn Hazard.
• Never move the pressure cooker with the air fry lid on top.
• Only lift or move the air fry lid using the air fry lid handle.
Before first use: Wash Air Fry Basket in hot, soapy water. Rinse and
dry. Wipe top and bottom side of Air Fry Lid with damp cloth.
NOTES:
• For best results when browning whole chicken and larger cuts of
meat, use roasting rack included with your pressure cooker, instead
of Air Fry Basket.
• Food should never touch Heating Element. For best results, allow
at least 2 inches (5 cm) between the food and Heating Element.

9
Using Air Fry Lid after Pressure Cooking (cont.)
6. Press and hold (on/off)
button to turn Air Fry Lid
on. Press button to scroll
modes and select. Display
toggles between default
temperature and time for
each mode. Mode flashes
before selecting.
7. Press or button to
change default cook time and
temperature. After time and
temperature are selected,
press button to begin
cooking. Selected mode turns
solid and cooking starts.
Time and temperature can be
changed at any time during
cooking cycle.
8. Lift Air Fry Lid Handle to
remove Air Fry Lid and
place Lid on Lid Stand
before checking, stirring or
turning food. Cooking will
automatically stop when
Handle is lifted.
9. Place Air Fry Lid back onto
Pressure Cooker and push
Handle down to click in place.
Press to continue cooking.
10. When cooking is complete,
Lid beeps 5 times, display
shows COOL, and enters
cool-down cycle. Once
cool-down is complete Air
Fry Lid will automatically shut
off and display shows - - - -.
Unplug. Place Lid on Lid
Stand to cool completely.

10
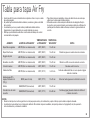
FOOD AIR FRY LID
SETTING AIR FRY LID
TEMPERATURE AIR FRY LID TIME NOTES
Chicken, whole, 5 pounds AIR FRY 400°F (204°C) 5 to 10 min Chicken should reach 165°F (73°C) before
browning.
Pot Roast, 3 pound rump
roast BROIL 400°F (204°C) 5 to 10 min Pot Roast should be fork tender before
browning.
Chicken wings, 5 pounds,
cut at joint, tips trimmed AIR FRY 400°F (204°C) 15 min Turn wings every 5 minutes during Air Frying.
Pork, Boston Butt AIR FRY 400°F (204°C) 15 to 20 min Turn every 5 minutes.
Macaroni and Cheese AIR FRY 400°F (204°C) 4 to 5 min Can brown top with extra cheese or add a
crumb topping.
Coffee Cake/Cobbler
Desserts BAKE/ROAST 350°F (177°C) 5 to 8 min Cakes should test done before adding topping
to brown.
Air Fry Cooking after Pressure
or Slow Cooking Modes
Step 1: Pressure cook/slow cook following recipe instructions.
Step 2: Unplug Pressure Cooker and remove Lid.
Step 3: Plug in Air Fry Lid. Cook following suggested temperature and time, or until browned.
Step 4: Remove Air Fry Lid and place on Air Fry Lid Stand. Unplug.

11
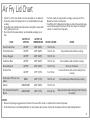
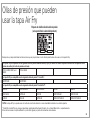
Air Fry Lid Chart
FOOD AIR FRY LID
SETTING AIR FRY LID
TEMPERATURE AIR FRY LID TIME NOTES
Frozen French Fries AIR FRY 400°F (204°C) 12 to 14 min
Fresh Potato Fries AIR FRY 400°F (204°C) 14 to 16 min Toss potatoes with oil before cooking.
Chicken Nuggets AIR FRY 400°F (204°C) 10 to 15 min
Cauliflower Bites AIR FRY 400°F (204°C) 10 to 15 min Toss cauliflower with oil before cooking.
Brussels Sprouts AIR FRY 400°F (204°C) 10 to 15 min Stir every 5 minutes.
Zucchini Fries AIR FRY 375°F (191°C) 5 to 10 min Coat zucchini fries with crumb coating before
cooking.
Hamburgers 75% lean, 6 oz.
patties BROIL 350°F (177°C) 10 to 15 min Turn hamburgers halfway through cooking.
Salmon BAKE/ROAST 400°F (204°C) 10 to 15 min
Pork Tenderloin Sheet Pan
Dinner BAKE/ROAST 350°F (177°C) 25 to 30 min Glaze should be added during the last 5 minutes
of cooking.
NOTES:
• Review food package suggested cook times for these and other foods, or adjust time for desired crispness.
• Food should never touch Heating Element. For best results, allow at least 2 inches (5 cm) between the food and Heating Element.
• Use Air Fry Lid to crisp foods or brown using little or no added oil.
• Foods may need to be flipped, stirred, or rotated halfway through
cooking.
• Foods that cannot be flipped might need to be lightly covered with
foil, if getting too brown.
• Check food for doneness before recommended packaging cook
time.
• For best results, arrange foods in a single, even layer in Air Fry
Basket for shorter cooking time.
• Overfilling Air Fry Basket will lengthen cooking time and will cause
uneven browning and crispness. Food may require to be flipped,
stirred, or rotated more frequently.

12
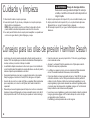
Care and Cleaning
Tips for Hamilton Beach Pressure Cookers
• Cooking times for pressure cooker recipes can be up to 70%
faster than traditional methods. To adapt recipes, start by reducing
time by half.
• The amount of liquid needed is much less than traditional cooking
methods. To adapt favorite recipes to a pressure cooker, reduce
liquid by about half.
• Liquid is required to create steam and build pressure in the
Cooker. Always add a minimum of 1 cup (237 mL) water or other
liquid.
• Fill Cooking Pot no more than 2/3 full. For foods that expand such
as rice or beans, fill 1/2 full.
• Remember that the countdown for cooking time will not start until
Lid is locked and pressure has built in the Cooker. Average time is
10 to 15 minutes but can be much longer.
• When cooking rice, use a 1:1 ratio for rice to water. Rinse rice
before cooking.
• Add 1 tablespoon (15 mL) oil to rice or beans to reduce foaming
and splattering.
• Beans do not require soaking, but soaking beans for at least 3
hours will yield softer, more consistent results.
• Steam foods by adding at least 1 cup (237 mL) water to bottom of
Cooking Pot. Place food on Roasting Rack in Cooking Pot. Press
steam/vegetables mode button and follow desired recipe. Frozen
vegetables can be steamed from frozen state: add 1 to
2 minutes to the time indicated on package directions.
• Frozen meat and poultry can be cooked from frozen state.
A general guideline is to add 50 % more cooking time than
recipe recommends. Visit FoodSafety.gov for safe doneness
temperatures.
w WARNING Electrical Shock Hazard. Disconnect
power before cleaning. Do not immerse cord, plug,
air fry lid or pressure cooker base in any liquid
1. Unplug. Set up Lid Stand.
2. Lift Air Fry Lid by Handle and place on Lid Stand. Cool
completely. NOTE: Leave Cooking Pot in Pressure Cooker Base to
cool due to high temperatures when air frying.
3. Air Fry Basket is dishwasher-safe, or wash in hot, soapy water.
Rinse and dry.
4. Wipe top of Air Fry Lid with a damp towel and dry.
5. Wipe underside of Air Fry Lid with a damp, soapy cloth. Then
wipe with a clean damp cloth and dry.
6. DO NOT immerse Air Fry Lid in water or use any abrasive
cleansers or pads.

13
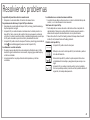
Troubleshooting
Control Panel display is not showing anything.
• Appliance is not plugged in. Plug into outlet.
Buttons were pressed and Air Fry Lid isn’t working.
• Ensure Air Fry Lid Handle has been rotated down and has clicked
into place.
• Air Fry Lid is not positioned correctly on Pressure Cooker. Air
Fry Lid has an internal position sensor that will pause or prevent
cooking if not upright and level. Ensure Air Fry Lid is positioned
upright and level on Pressure Cooker.
• Air Fry Lid is in standby mode. Press and hold (on/off) button to
turn on Air Fry Lid.
Food is not cooked.
• Too much food was added to Air Fry Basket. Flip, stir or rotate food
if needed; then add more time and continue cooking.
• Temperature was too low. Increase temperature and continue
cooking.
Food is not cooked evenly.
• Food should be flipped, stirred or rotated halfway through cooking,
or more frequently if needed.
Smoke coming from Air Fry Lid.
• Excessive oil or food has splattered onto heating coil. Unplug and
cool completely. Wipe away excess oil or food from heating coil
with a damp cloth.
• Never allow food to touch the Heating Element. Always allow at
least 2 inches (5 cm) between food and Heating Element.
Air Fry Lid Display Messages.
• Air Fry Lid is in standby mode.
• Air Fry Lid cooking time has ended and is in cool-down
cycle.
• Air Fry Lid handle is up. Rotate handle all the way down
and ensure it clicks into place.
• Air Fry Lid is not upright, level, and stable. Once Lid is
upright, and stable for 3 seconds, the message will go
away.

14
Limited Warranty
This warranty applies to products purchased and used in the U.S. and Canada. This is the only express warranty for this product and
is in lieu of any other warranty or condition.
This product is warranted to be free from defects in material and workmanship for a period of five (5) years from the date of original
purchase in Canada and one (1) year from the date of original purchase in the U.S. During this period, your exclusive remedy is
replacement of this product or any component found to be defective, at our option; however, you are responsible for all costs
associated with our returning a product or component under this warranty to you. If the product or component is unavailable, we will
replace with a similar one of equal or greater value.
This warranty does not cover glass, filters, wear from normal use, use not in conformity with the printed directions, or damage to
the product resulting from accident, alteration, abuse, or misuse. This warranty extends only to the original consumer purchaser or
gift recipient. Keep the original sales receipt, as proof of purchase is required to make a warranty claim. This warranty is void if the
product is used for other than single-family household use or subjected to any voltage and waveform other than as specified on the
rating label (e.g., 120 V ~ 60 Hz).
We exclude all claims for special, incidental, and consequential damages caused by breach of express or implied warranty. All
liability is limited to the amount of the purchase price. Every implied warranty, including any statutory warranty or condition
of merchantability or fitness for a particular purpose, is disclaimed except to the extent prohibited by law, in which case such
warranty or condition is limited to the duration of this written warranty. This warranty gives you specific legal rights. You may have
other legal rights that vary depending on where you live. Some states or provinces do not allow limitations on implied warranties or
special, incidental, or consequential damages, so the foregoing limitations may not apply to you.
To make warranty claim, do not return this appliance to the store. Please write Hamilton Beach Brands, Inc., Customer Service
Department, 4421 Waterfront Dr., Glen Allen, VA 23060, or visit hamiltonbeach.com/customer-service in the U.S. or hamiltonbeach.ca/
customer-service in Canada. For faster service, locate the model, type, and series numbers on your appliance.

15
Notes

16
PRÉCAUTIONS IMPORTANTES
1. Lire toutes les instructions.
2. Cet appareil n’est pas destiné à être utilisé par des personnes
(y compris les enfants) dont les capacités physiques, sensorielles
ou mentales sont réduites, ou manquant d’expérience et de
connaissance, sauf si elles sont étroitement surveillées et instruites
sur l’utilisation de l’appareil par une personne responsable de leur
sécurité.
3. Une surveillance étroite est requise pour tout appareil utilisé par
ou près des enfants. Surveiller que les enfants ne jouent pas avec
l’appareil.
4. Ne pas toucher les surfaces chaudes. Utiliser les poignées ou les
boutons. Utiliser des sous-plats pour déposer les récipients chauds.
5. Afin de vous protéger contre les chocs électriques, ne pas
immerger le cordon d’alimentation, la fiche ni le couvercle dans de
l’eau ni dans tout autre liquide.
6. Débrancher l’appareil de la prise de courant électrique lorsqu’il n’est
pas utilisé et avant un nettoyage. Le laisser refroidir avant
un nettoyage et avant d’y placer ou d’y enlever des pièces. Pour
débrancher, saisir la fiche et la retirer de la prise. Ne pas tirer sur le
cordon d’alimentation.
7. Ne pas faire fonctionner un appareil électroménager avec un
cordon ou une fiche endommagée, ou lorsque l’appareil ne
fonctionne pas bien ou a été échappé ou endommagé d’une
manière quelconque. Le remplacement et la réparation du cordon
d’alimentation doivent être faits par le fabricant, son agent de
service ou toute personne qualifiée de façon à éviter tout danger.
Veuillez communiquer avec le service à la clientèle pour obtenir de
l’information concernant l’inspection, la réparation ou le réglage,
comme précisé dans la garantie limitée.
8. L’utilisation d’accessoires non recommandés par le fabricant de
l’appareil peut causer des blessures.
9. Ne pas utiliser à l’extérieur.
10. Conçu pour être utilisé sur un comptoir seulement.
11. Ne pas laisser le cordon pendre du bord d’une table ou d’un
comptoir, ou toucher des surfaces chaudes, y compris la cuisinière.
12. Ne pas placer sur une cuisinière électrique ou à gaz chaud ou dans
un four chaud.
13. Une grande précaution doit être prise lors du déplacement d’un
appareil électroménager contenant de l’huile chaude ou autres
liquides chauds.
14. Pour débrancher l’appareil, tourner le bouton à OFF ( /arrêt),
puis retirer ensuite la fiche de la prise murale. Pour débrancher,
saisir la fiche et la retirer de la prise. Ne pas tirer sur le cordon
d’alimentation.
15. Ne pas utiliser l’appareil électroménager à une fin autre que
celle prévue.
16. ATTENTION ! Afin de prévenir l’endommagement ou le risque
de choc, ne pas cuire dans la base. Cuisiner seulement dans la
marmite amovible.
17. AVERTISSEMENT ! Les éclaboussures d’aliments peuvent causer
des brûlures sérieuses. Garder l’appareil et son cordon hors de la
portée des enfants. Ne jamais laisser pendre le cordon sur le bord
du comptoir, ne jamais utiliser une prise située sous le comptoir et
ne jamais utiliser avec une extension.
18. La marmite et l’élément chauffant peuvent rester chauds une fois
que l’appareil est éteint.
19. Ne pas faire fonctionner l’appareil à l’aide d’une minuterie externe
ou d’un système de contrôle à distance indépendant.
20. Ne pas soulever ou transporter l’autocuiseur à l’aide de la poignée
du couvercle. Veuillez utiliser les deux poignées situées sur la base.
Pour utiliser un appareil électroménager, vous devez toujours prendre des mesures élémentaires de sécurité pour réduire le risque d’incendie,
d’électrocution et/ou de blessure corporelle, en particulier les mesures suivantes :

17
CONSERVER CES INSTRUCTIONS
Couvercle : Précautions et informations
• Manipuler le couvercle avec soin pour assurer une longue durée
de vie.
• Éviter de frapper le couvercle contre des surfaces dures.
• Ne pas utiliser le couvercle s’il est fissuré ou endommagé.
• N’utiliser pas de nettoyeurs abrasifs ou de tampons métallique à
récurer.
• Le couvercle peut devenir très chaud. Faire preuve de prudence.
Ne pas placer directement sur une surface ou un comptoir non
protégé. Le couvercle doit être placé uniquement sur la marmite
de cuisson ou sur le support de couvercle.
• Ne pas placer le couvercle Air Fry dans un four à micro-ondes, un
four conventionnel ni sur une cuisinière.
Retrait du couvercle
Lorsque vous enlevez le couvercle Air Fry de l’autocuiseur, soulever
à l’aide de la poignée du couvercle pour friture à air. Le couvercle
devient très chaud parce que l’élément chauffant est situé ici. Placer
le couvercle Air Fry sur le support du couvercle de la friteuse à air
avant de remuer ou de retourner les aliments et après la fin du cycle
de cuisson.
Autres consignes de sécurité pour le consommateur
Cet appareil est destiné à un usage domestique uniquement.
Cet appareil est conçu uniquement pour préparer, faire cuire et servir
des aliments. Cet appareil n’est pas conçu pour une utilisation avec
toute autre matière ou produit non alimentaire.
w AVERTISSEMENT Risque de choc électrique : Cet appareil est
fourni avec une fiche à prise de terre (3 broches) pour réduire le
risque de choc électrique. La fiche ne tient que dans un sens dans
une prise mise à la terre. Ne pas transformer le dispositif de sécurité
de la fiche en modifiant celle-ci de quelconque façon ou en utilisant
un adaptateur. Si vous ne pouvez pas insérer la fiche dans la prise,
faire remplacer la prise par un électricien.
Un cordon d’alimentation court est utilisé pour réduire le risque
d’emmêlement, de trébuchement ou de saisie par un enfant.
21. ATTENTION ! SURFACE CHAUDE : La température des
surfaces extérieures sera plus élevée pendant le
fonctionnement de l’appareil.
22. Ne jamais poser le couvercle rond air fry directement sur le
comptoir ni sur la surface de support ; toujours le poser sur le
support fourni.
23. Veuillez toujours lire et comprendre les consignes de sécurité
importantes fournies avec l’autocuiseur dont l’utilisation du
couvercle air fry est approuvée.
24. Ne pas nettoyer le couvercle rond air fry à l’aide de tampons à
récurer en métal. Des morceaux peuvent se détacher du tampon et
entrer en contact avec les pièces électriques, entraînant un risque
de choc électrique.
25. Ne pas placer le couvercle air fry sur l’autocuiseur lorsque
l’autocuiseur est branché.
26. Ne pas placer le couvercle air fry sur la marmite de cuisson à
moins que la marmite soit à l’intérieur de l’autocuiseur.

18
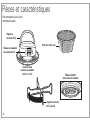
Pièces et caractéristiques
Pour commander des pièces, visiter :
hamiltonbeach.ca/parts
Panier pour friture à air
Support du couvercle
Air Fry (ouvert)
Poignée du
couvercle Air Fry
Élément chauffant
(situé en bas du couvercle)
Panneau de commande
du couvercle Air Fry
Couvercle étagé
(convient aux marmites
de 5,6 L et 7,6 L)

19
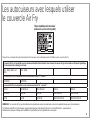
Les autocuiseurs avec lesquels utiliser
le couvercle Air Fry
Le couvercle Air Fry est compatible avec les autocuiseurs Hamilton Beach suivants (vous trouverez le numéro de type et de modèle sur l’étiquette signalétique
de l’autocuiseur [voir ci-dessus], sur la base) :
PC03 - 34500, 34501, and
34502 PC06 - 34508
Le couvercle Air Fry est compatible avec les autocuiseurs Crock-Pot® suivants* :
SCCPPC600 SCCPPC800
Le couvercle Air Fry est compatible avec les autocuiseurs Instant Pot® suivants* :
DUO 60 DUO NOVA 60 DUO PLUS 60 LUX 60 VIVA 60
DUO SV 60 ULTRA 60 DUO 80 DUO NOVA 80 DUO PLUS 80
LUX 80 VIVA 80 ULTRA 80 DUO EVO PLUS 60 DUO EVO PLUS 80
REMARQUE : Le couvercle Air Fry peut être utilisé avec les marmites de cuisson en aluminium ou en acier inoxydable incluses avec votre autocuiseur.
*Crock-Pot et Instant Pot sont des marques commerciales déposées de Sunbeam Products, Inc. et Instant Brands Inc., respectivement.
L’utilisation des marques n’implique aucune affiliation ni approbation par les propriétaires de ces marques.
Plaque signalétique de l’autocuiseur
(en dessous ou sur le côté du produit)
Toujours lire et comprendre toutes les instructions fournies avec votre autocuiseur avant de l’utiliser avec le couvercle Air Fry.

20
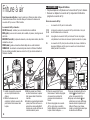
Friture à air
1.
Installer le support du couvercle
sur un comptoir résistant à la
chaleur.
2.
Mettre l’autocuiseur sur le
comptoir et retirer le couvercle. Ne
pas brancher l’autocuiseur dans
la prise.
3.
Mettre le panier pour friture à
air dans l’autocuiseur. Le panier
doit reposer dans le fond de la
marmite.
4.
Si désiré, vaporiser légèrement le
panier pour friture à air avec un
aérosol de cuisson antiadhésif.
Ajouter une couche uniforme de
nourriture dans le panier.
5.
Placer le couvercle Air Fry sur
l’autocuiseur à l’aide de la poignée
du couvercle en orientant le
panneau de commande vers
l’avant.
6.
Tourner la poignée du couvercle
Air Fry vers le bas, en position
fermée. Brancher le couvercle dans
la prise. L’écran indiquera - - - -.
7.
Appuyer et maintenir enfoncé le
bouton (marche/arrêt) pour
activer le couvercle Air Fry.
8.
Appuyer sur le bouton pour
sélectionner un mode. L’affichage
bascule entre la température par
défaut et l’heure pour chaque
mode. Le mode clignote avant que
la sélection soit effectuée.
Le couvercle Air Fry a 4 modes :
AIR FRY (friture à air) : à utiliser pour créer des aliments croustillants
BROIL (griller) : pour cuire de la viande, de la volaille, du poisson, des légumes et
des fruits
BAKE/ROAST (cuire/rôtir) : prépare des desserts, cuire des poulets entiers, des rôtis
de bœuf ou de porc
WARM (chaud) : garde au chaud les aliments déjà cuits ou cuits lentement
REMARQUE : Les aliments ne devraient jamais toucher à l’élément chauffant.
Pour de meilleurs résultats, laisser au moins 5 cm (2 po) entre les aliments et
l’élément chauffant.
w AVERTISSEMENT
Risque de brûlures.
• Ne jamais déplacer la mijoteuse avec le couvercle air fry sur le dessus.
• Soulever ou déplacer le couvercle air fry uniquement à l’aide de la
poignée du couvercle air fry.
Avant la première utilisation : Laver le panier pour friture à air dans de l’eau
chaude savonneuse. Rincer et sécher. Essuyer le dessus et le dessous du
couvercle Air Fry avec un chiffon humide. Écran du couvercle Air Fry :
- - - - Le couvercle Air Fry est en mode veille
COOL
(froid) Le temps de cuisson du couvercle Air Fry est terminé et le cycle
de refroidissement a commencé
hndL La poignée du couvercle Air Fry est relevée. Tourner la poignée
complètement vers le bas et s’assurer qu’elle s’enclenche en place
tiLt Le couvercle Air Fry n’est pas à la verticale, de niveau et stable. Le
message s’effacera une fois que le couvercle est à la verticale et
stable pendant 3 secondes
A página está carregando...
A página está carregando...
A página está carregando...
A página está carregando...
A página está carregando...
A página está carregando...
A página está carregando...
A página está carregando...
A página está carregando...
A página está carregando...
A página está carregando...
A página está carregando...
A página está carregando...
A página está carregando...
A página está carregando...
A página está carregando...
A página está carregando...
A página está carregando...
A página está carregando...
A página está carregando...
A página está carregando...
A página está carregando...
A página está carregando...
A página está carregando...
-
 1
1
-
 2
2
-
 3
3
-
 4
4
-
 5
5
-
 6
6
-
 7
7
-
 8
8
-
 9
9
-
 10
10
-
 11
11
-
 12
12
-
 13
13
-
 14
14
-
 15
15
-
 16
16
-
 17
17
-
 18
18
-
 19
19
-
 20
20
-
 21
21
-
 22
22
-
 23
23
-
 24
24
-
 25
25
-
 26
26
-
 27
27
-
 28
28
-
 29
29
-
 30
30
-
 31
31
-
 32
32
-
 33
33
-
 34
34
-
 35
35
-
 36
36
-
 37
37
-
 38
38
-
 39
39
-
 40
40
-
 41
41
-
 42
42
-
 43
43
-
 44
44


Hamilton Beach 34510 Guia de usuario
- Categoria
- Pequenos aparelhos de cozinha
- Tipo
- Guia de usuario
em outras línguas
- español: Hamilton Beach 34510 Guía del usuario
- français: Hamilton Beach 34510 Mode d'emploi
- English: Hamilton Beach 34510 User guide