Simplicity 131D05-0002-01 Manual do usuário
- Categoria
- Acessórios para veículos motorizados
- Tipo
- Manual do usuário
Este manual também é adequado para

Models
en
en
80090330
Revision B
Copyright © Briggs & Stratton, LLC
Milwaukee, WI, USA. All rights reserved.
English
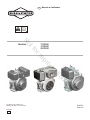
Operator’s Manual
131D000
181D000
261D000
Not for reproduction

2
BRIGGSandSTRATTON.COM
A
B
C
D
E
F
G
H
I
J
K
L
M
N
N
O
P
A
C
B
A
B
B
A
D
E
C
D
Q
F
Not for reproduction

3
D
F
E
A
D
C
B
A
B
C
A
B
C
A
B
C
D
E
F
G
A
C
D
F
G
B
E
Not for reproduction

4
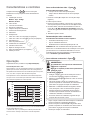
This ma
nual contains safety information to make you aware
of the hazards and risks associated with engines and how to
avoid them. It also contains instructions for the proper use and
care of the engine. Because Briggs & Stratton Corporation does
not necessarily know what equipment this engine will power, it
is important that you read and understand these instructions
and the instructions for the equipment. Save these original
instructions for future reference.
For replacement parts or technical assistance, record below the
engine model,
type, and code numbers along with the date of
purchase. These numbers are located on your engine (see the
page).
Date of Purchase:
Engine Model
MM/DD/YYYY
Model: Type: Code:
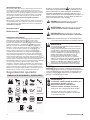
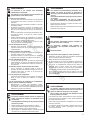
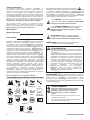
SAFETY SYMBOLS AND MEANINGS
FIRE
TOXIC FUMES
FUEL SHUT
OFF
ON/OFF
WEAR EYE
PROTECTION
FUEL
KICKBACK
MOVING
PARTS
FAST
HAZARDOUS
CHEMICALS
SHOCK
EXPLOSION
SLOW
HOT
SURFACE
Oil
STOP
CAUTION indicates a hazard which, if not avoided, could
result in minor or moderate injury.
READ MANUAL
The gross power rating for individual diesel engine models
is labeled in accordance with SAE (Society of Automotive
Engineers) code J1940 (Small Engine Power & Torque Rating
Procedure), and rating performance has been obtained and
corrected in accordance with SAE J1995 (Revision 2002-05).
Horsepower values are derived at 3600 RPM. Net power values
are taken with exhaust and air cleaner installed whereas gross
power values are collected without these attachments. Actual
gross engine power will be higher than net engine powe
r and is
and engine-to-engine variability. Given the wide array of products
on which engines are placed, the diesel engine may not
develop the rated gross power when used in a given piece of
including, but not limited to, the variety of engine components
(air cleaner, exhaust, charging, cooling, carburetor, fuel pump,
etc.), application limitations, ambient operating conditions
(temperature, humidity, altitude), and engine-to-engine variability.
Due to manufacturing and capacity limitations, Briggs & Stratton
may substitute an engine of higher rated power for this Series
engine.
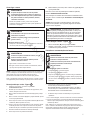
General Information
WARNING
indicates a hazard which, if not avoided,
could result in death or serious injury.
WARNING
Briggs & Stratton Engines are not designed for and
are not to be used to power:
fun-karts; go-karts; children’s, recreational, or sport
all-terrain vehicles (ATVs); motorbikes; hovercraft;
aircraft products; or vehicles used in competitive
events not sanctioned by Briggs & Stratton. For
information about competitive racing products, see
www.briggsracing.com. For use with utility and side-
by-side ATVs, please contact Briggs & Stratton Engine
Application Center, 1-866-927-3349. Improper engine
application may result in serious injury or death.
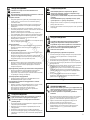
Operator Safety
WARNING
Engines give off carbon monoxide, an odorless,
colorless, poison gas.
Breathing carbon monoxide can cause nausea,
fainting or death.
• Start and run engine outdoors.
• Do not start or run engine in enclosed area, even if
doors or windows are open.
Power Rating
DANGER indicates a hazard which, if not avoided, will
result in death or serious injury.
NOTICE indicates information considered important but no
hazard-related.
NOTICE: This engine was shipped from Briggs & Stratton
without oil. Before you start the engine, make sure you add
oil according to the instructions in this manual. If you start the
engine without oil, it will be damaged beyond repair and will not
be covered under warranty.
The safety alert symbol is used to identify safety information
about hazards that can result in personal injury. A signal word
(DANGER, WARNING, or CAUTION) is used with the alert
symbol to indicate the likelihood and the potential severity of
injury. In addition, a hazard symbol may be used to represent the
type of hazard.
BRIGGSandSTRATTON.COM
Not for reproduction

5
WARNING
Fuel and its vapors ar
e extremely flammable and
explosive.
Fire or explosion can cause severe burns or
death.
When Adding Fuel
•
before removing the fuel cap.
• Fill fuel tank outdoors or in well-ventilated area .
•
•
heat, and other ignition sources.
•
cracks or leaks. Replace if necessary
• If fuel spills, wait until it evaporates before starting
engine.
When Starting Engine
•
equipped) are in place and secured.
When Operating Equipment
• Do not tip engine or equipment at angle which causes
fuel to spill.
• Never start or run the engine with the air cleaner
removed.
When Changing Oil
•
When Tipping Unit for Maintenance
• When performing maintenance that requires the unit to
be tipped, the fuel tank must be empty or fuel can leak
When Transporting Equipment
•
valve OFF.
When Storing Fuel Or Equipment With Fuel In Tank
• Store away from furnaces, stoves, water heaters or
other appliances that have pilot lights or other ignition
sources because they can ignite fuel vapors.
WARNING
Unintentional sparking can result in fire or electric
shock.
Unintentional start-up can result in entanglement,
traumatic amputation, or laceration.
Fire hazard
Before performing adjustments or repairs:
• Disconnect battery at negative terminal (only engines
with electric start.)
• Use only correct tools.
• Do not tamper with governor spring, links or other parts to
increase engine speed.
• Replacement parts must be of the same design and
installed in the same position as the original parts. Other
parts may not perform as well, may damage the unit, and
may result in injury.
•
WARNING
Rotating parts can contact or entangle hands,
feet, hair, clothing, or accessories.
Traumatic amputation or severe laceration can
result.
• Operate equipment with guards in place.
• Keep hands and feet away from rotating parts.
• Tie up long hair and remove jewelry.
•
or items that could become caught.
WARNING
Running engines produce heat. Engine parts,
especially muffler, become extremely hot.
Severe thermal burns can occur on contact.
Combustible debris, such as leaves, grass,
brush, etc. can catch fire.
•
touching.
•
cylinder area
WARNING
Rapid retraction of starter cord (kickback) will
pull hand and arm toward engine faster than you
can let go.
Broken bones, fractures, bruises or sprains could
result.
• When starting engine, pull the starter cord slowly until
resistance is felt and then pull rapidly to avoid kickback.
• Remove all external equipment/engine loads before
starting engine.
• Direct-coupled equipment components such as, but not
limited to, blades, impellers, pulleys, sprockets, etc., must
be securely attached.
When you drain the oil from the upper oil fill access,
the fuel tank must be empty or fuel can leak out and
result in a fire or explosion.
Not for reproduction

6
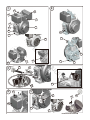
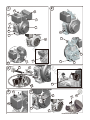
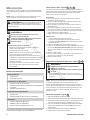
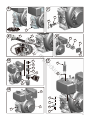
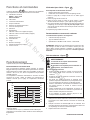
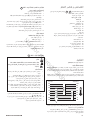
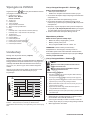
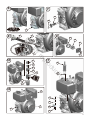
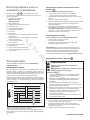
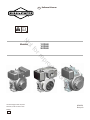
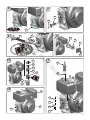
Features and Controls
Operation
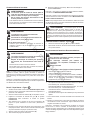
Oil capacity (see the section)
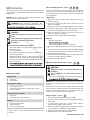
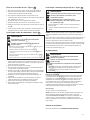
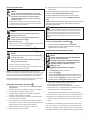
* Below 14°F (-10°C) the use of 15W-40 will result in hard starting.
** Above 80°F (27°C) the use of 10W-30 may cause increased oil
consumption. Check oil level more frequently.
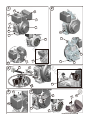
Before adding/checking the oil
• Place engine level.
•
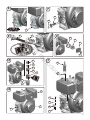
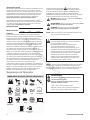
1. Remove the dipstick (A
(Figure 3).
2. Insert and tighten the dipstick.
3. Remove the dipstick and check the oil level. It should be at the
top of the full indicator (B) on the dipstick.
4.
C) or (D). Do not
overfill. After adding oil, wait one minute and then recheck the
oil level.
5. Replace and tighten the dipstick.
1. Clean the fuel cap area of dirt and debris. Remove the fuel
cap (A, Figure 4).
2. Fill the fuel tank (B) with fuel. To allow for expansion of the
fuel, do not fill above the bottom of the fuel tank neck .
3. Reinstall the fuel cap.
WARNING
Fuel and its vapors are extremely flammable and
explosive.
Fire or explosion can cause severe burns or
death.
When Adding Fuel
•
before removing the fuel cap.
• Fill fuel tank outdoors or in well-ventilated area.
•
•
heat, and other ignition sources.
•
cracks or leaks. Replace if necessary.
• If fuel spills, wait until it evaporates before starting
engine.
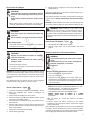
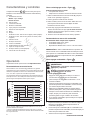
Model - Type - Code
Serial Number
B. Oil Filter
C. Throttle Control
D. Fuel Pump
E. Fuel Tank and Cap.
F. Decompression Lever
H. Exhaust
I. Air Cleaner - Paper Air Filter (if equipped)
J. Air Cleaner - Oil Bath Air Filter (if equipped)
K. Air Intake
L. Recoil Starter
Oil Recommendations
Fuel Recommendations
We recommend the use of Briggs & Stratton Warranty Certified
oils for best performance. Other high-quality detergent oils are
acceptable if classified for service CK-4, CJ-4, CI-4, CH-4 or
higher. Do not use special additives.
Outdoor temperatures determine the proper oil viscosity for the
engine. Use the chart to select the best viscosity for the outdoor
temperature range expected.
Fuel must meet these requirements:
• Clean, fresh, diesel fuel.
• Diesel fuel type #0.
•
CAUTION: Do not use unapproved diesel fuel. Do not mix oil in
fo esU .sleuf etanretla no nur ot enigne eht yfidom ro leuf leseid
unapproved fuels will damage the engine components and void
the engine warranty.
10W-30
15W-40
5W-30 Synthetic
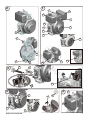
Compare the illustration with your engine to familiarize
yourself with the location of various features and controls.
How To Check/Add Oil -
How To Add Fuel -
BRIGGSandSTRATTON.COM
N. Dipstick.
O. Oil Drain Plug
P. Electric Starter (if
equipped)
Q. Rope Starter
M. Fuel shutoff
Not for reproduction

7
WARNING
Fuel and its vapors are extremely flammable and
explosive.
Fire or explosion can
cause severe burns or death.
When Starting Engine
• Ensure that muffler, fuel cap and air cleaner (if equipped)
are in place and secured.
NOTICE: This engine was shipped from Briggs & Stratton without
oil. Before you start the engine, make sure you add oil according
to the instructions in this manual. If you start the engine without
oil, it will be damaged beyond repair and will not be covered under
warranty.
1. Check the oil level. See the section.
2. Make sure equipment drive controls, if equipped, are
disengaged.
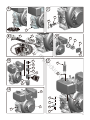
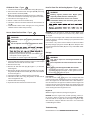
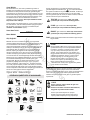
3. Move the fuel shutoff (A) to the open position.
4. Move the throttle control (B) to the START position. Operate
the engine in the START position.
5. Pull the Starter cord handle (C) slowly until resistance is felt.
(Recoil Starter)
7. Fully press the decompression lever (D).
8. Pull the starter grip briskly.
Note: If the engine does not start after repeated attempts, go to
BRIGGSandSTRATTON.COM.
WARNING
Engines give off carbon monoxide, an odorless,
colorless, poison gas.
Breathing carbon monoxide can cause nausea,
fainting or death
• Start and run engine outdoors.
• Do not start or run engine in enclosed area, even if doors
or windows are open.
Note: Equipment may have remote controls. See the equipment
manual for location and operation of remote controls.
1. Move throttle control (B) to STOP position.
2. After the engine stops, turn the fuel shutoff to the closed
position.
WARNING
Rapid retraction of starter cord (kickback) will pull
hand and arm toward engine faster than you can
let go.
Broken bones, fractures, bruises or sprains could
result.
• When starting engine, pull the starter cord slowly until
resistance is felt and then pull rapidly to avoid kickback.
How To Start The Engine
Recoil / Rope Starter - Figure
WARNING: Rapid retraction of the starter cord
(kickback) will pull your hand and arm toward the engine
faster than you can let go. Broken bones, fractures, bruises
or sprains could result. When starting engine, pull the starter
cord slowly until resistance is felt and then pull rapidly to avoid
kickback.
How To Stop The Engine -
•
1. With the engine off, connect the cables to the battery
connectors.
2. Correctly connect the battery connectors to the battery
terminals and properly tighten. Always connect the negative
battery terminal last.
Note: The battery and the battery connectors are not supplied with
the engine. See the Illustrated Parts List for further information
relating to the electrical setup via wiring diagram which is available
from any Briggs & Stratton Authorized Service Dealers.
Battery Connections and Recomendations
WARNING
Unintentional sparking can result in fire or electric
shock.
Unintentional start-up can result in entanglement,
traumatic amputation, or laceration.
Fire hazard
Before performing adjustments or repairs:
• Disconnect battery at negative terminal.
• Use only correct tools.
• Replacement parts must be of the same design and
installed in the same position as the original parts. Other
parts may not perform as well, may damage the unit, and
may result in injury.
9. Electric Starter (if equipped): Turn the key switch (E) to the
START position.
Note: Ensure the battery is correctly connected before starting the
engine. See the Battery Connections and Recomendations
section.
NOTICE: To extend the life of the starter, use short starting cycle
(5 seconds maximum). Wait one minute between starting cycles.
6.
Wind the starter rope(F) around the pulley in direction shown
by arrow. Pull the starter cord handle slowly until resistance
is felt. ( Rope Starter)
Engine starter battery capacity 12V 36Ah is recommended to
261261D05000101HH0001, 261D05000601HH0001 and 261-
D05000201CF0001 , 12V 28Ah is recommended to
131D0-5000201R0001, 181D05000101U0001,
181D05000201U0001 and 181D05000601U0001.
professional.
Not for reproduction

8
Maintenance Chart
First 20 Hours
• Change oil.
• Clean oil filter.
Every 8 Hours or Daily
• Check engine oil level.
• Check area around muffler or exhaust and controls.
• Check air cleaner.
Every 100 hours or Annually
• Change oil.
• Check and clean oil and fuel filters.
Annually
• Replace air filter element.
• Replace fuel filter.
• Clean air cooling system.*
Various models use either a foam or paper filter. Some models
may also have an optional pre-cleaner that can be washed and
reused. Compare the illustrations in this manual with the type
installed on your engine and service as followed.
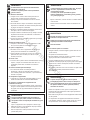
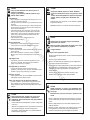
1. Loosen the fasteners (A) that hold the cover (B).
2. Open the cover and remove the pre-cleaner (D) and the filter
element (C).
3. To loosen debris, gently tap on a hard surface. If filter is
excessively dirty, replace with a new filter.
4. Wash the pre-cleaner in liquid detergant and water. Then allow
it to thoroughly air dry. Do not oil the pre-cleaner.
5. Install the dry pre-cleaner and the air filter element.
6. Install cover and secure with the fasteners.
NOTICE: Do not use pressurized air or solvents to clean the filter.
Pressurized air can damage the filter and solvents will dissolve
the filter.
Used oil is a hazardous w
aste
product and must be disposed
of properly. Do not discard with household waste. Check with
your local authorities, service center, or dealer for safe disposal/
recycling facilities.
Remove Oil
1. With engine off but still warm, remove the key from the key
switch (if equipped).
2. Remove the oil drain plug (A, Figure 6). Drain the oil into an
approved receptable.
3. After the oil has drained, install and tighten the oil drain plug.
4. On models equipped with oil filter shown in Figure 7, remove
the oil filter fastener (B) and remove the oil filter (C).
5. Wash and clean the oil filter in kerosene or diesel fuel to
remove dirt. Replace if damaged.
6. Install the oil filter and tighten the oil filter fastener.
How To Change The Oil -
How To Service The Air Filter -
Paper Air Filter -
* In dusty conditions or when airborne debris is present, clean
more often.
We recommend that you see any Briggs & Stratton Authorized
Service Dealer for all maintenance and service of the engine and
engine parts.
NOTICE: All the components used to build this engine must
remain in place for proper operation.
Maintenance
WARNING
Fuel and its vapors are extremely flammable and
explosive.
Fire or explosion can cause severe burns or
death.
• Never start or run the engine with the air cleaner assembly
Add Oil
• Place the engine level.
•
• See the section for oil capacity.
1. Remove the dipstick (D) and wipe with a clean cloth (Figure
8).
2. Pour the oil slowly into the engine oil fill (F). Do not overfill.
After adding oil, wait one minute and then check the oil level.
3. Install and tighten the dipstick.
4. Remove the dipstick and check the oil level. It should be at the
top of the full indicator (E) on the dipstick.
5. Install and tighten the dipstick.
WARNING: When performing maintenance that
requires the unit to be tipped, the fuel tank must be empty or
WARNING
Unintentional sparking can result in fire or electric
shock.
Unintentional start-up can result in entanglement,
traumatic amputation, or laceration.
Fire hazard.
Before performing adjustments or repairs:
• Disconnect battery at negative terminal (only engines
with electric start).
• Use only correct tools.
• Do not tamper with governor spring, links or other parts to
increase engine speed.
• Replacement parts must be of the same design and
installed in the same position as the original parts. Other
parts may not perform as well, may damage the unit, and
may result in injury.
•
BRIGGSandSTRATTON.COM
Not for reproduction

9
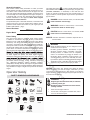
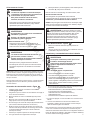
How to Clean The Fuel Filter -
1. Loosen the hook and remov
e the oil filter sump (A, Figure 10).
2. Remove the filter retainer lower and upper (D & G), the O-ring
(F) and the filter elements (C & E).
3. Wash and clean the filter elements in kerosene or with fuel to
remove dirt. If the filter is excessively dirty, replace a new filter.
4. Then allow it to thoroughly air dry.
5. Add 80 - 120ml of oil into the oil filter sump.
6. Check the oil level. It should be between the hole inside the oil
cup (B).
7. Install the filter retainer lower and upper, the O-ring, the filter
elements and the oil filter sump securely.
Oil Bath Air Filter -
WARNING
Fuel and its vapors are extremely flammable and
explosive.
Fire or explosion can cause severe burns or death.
•
heat, and other ignition sources.
•
cracks or leaks. Replace if necessary.
• Replacement parts must be the same and installed in the
same position as the original ones.
• If fuel spills, do not start engine until evaporated.
NOTICE: Do not use water to clean the engine. Water could
contaminate the fuel system. Use a brush or dry cloth to clean
the engine.
This is an air cooled engine. Dirt or debris can restrict air flow and
cause the engine to overheat, resulting in poor performance and
reduced engine life.
Use a brush or dry cloth to remove debris from the recoil starter
(A). Keep linkage, springs and controls (B) clean. Keep the area
around and behind the muffler (C) free of any combustible debris
(Figure 12).
How To Clean The Air Cooling System -
Storage
WARNING
Fuel and its vapors are extremely flammable and
explosive.
Fire or explosion can cause severe burns or death.
When Storing Fuel Or Equipment With Fuel In Tank
• Store away from furnaces, stoves, water heaters or other
appliances that have pilot lights or other ignition sources
because they can ignite fuel vapors.
Troubleshooting
Need Assistance? Go to BRIGGSandSTRATTON.COM.
Fuel System
Fuel can become stale when stored over 30 days.. Stale fuel
causes acid and gum deposits to form in the fuel system. If diesel
fuel in the engine has not been treated with a fuel stabilizer, it
must be drained into an approved container. Run the engine until
it stops from lack of fuel. Pull the starter cord handle slowly until
resistance is felt. At this stage, the intake and exhaust valves are
closed to help prevent the engine from rust.
Engine Oil
While the engine is still warm, change the engine oil.
NOTICE: Store the engine level (normal operating position). If
the engine is tipped for storage, the fuel tank must be empty.
If the fuel tank is not empty and if the engine is tipped in any
other direction, it may be difficult to start due to oil or diesel fuel
contaminating the air filter.
WARNING
Running engines produce heat. Engine parts,
especially muffler, become extremely hot.
Severe thermal burns can occur on contact.
Combustible debris, such as leaves, grass, brush,
etc. can catch fir
e.
•
touching.
•
cylinder area.
1. Close the fuel shut-off valve and let the engine run until it stops.
Otherwise, fuel can leak out and cause a fire.
2. Remove the fuel cap.
3. Remove the fuel tank drain plug (E, Figure 11) to drain the
remaining fuel.
4. Remove the nuts (A), the fuel shut-off valve (B), the O-ring (D),
the gaskets (C & F) and the fuel filter (G) out from the fuel tank
as shown in Figure 11.
5. Check the fuel filter for damage. Replace if necessary.
6. Install the fuel filter, the O-ring, the gaskets, the fuel shut-off
valve and tighten the nuts.
7. Install the fuel tank drain plug.
8. Open the fuel shut-off valve and check for leaks.
Not for reproduction

10
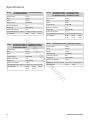
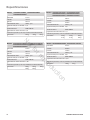
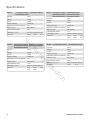
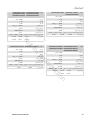
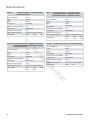
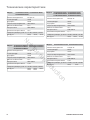
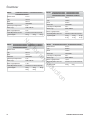
Specifications
BRIGGSandSTRATTON.COM
Model: 131D02000101R0001, 131D02000301R0001
131D05000201R0001
Displacement 212 cc
70 mmBore
55 mmStroke
Engine Speed 3600 RPM
Fuel Tank Capacity 2.5 L
Engine Oil SAE 15W-40
Engine Oil Capacity 0.8 L
Overall Dimensions L x W x H 411mm x 337 mm x 419 mm
Gross Weight
26 kg, 26 kg, 32 kg
Model: 181D02000301U0001, 181D02000501U0001
181D02000401U0001, 181D05000601U0001
181D05000201U0001, 181D05000101U0001
Displacement 296 cc
78 mmBore
62 mmStroke
Engine Speed 3600 RPM
Fuel Tank Capacity 3.5 L
Engine Oil SAE 15W-40
Engine Oil Capacity 1.1 L
Overall Dimensions L x W x H 423 mm x 385 mm x 461mm
Gross Weight
35 kg, 35 kg, 36 kg
41 kg, 41
kg, 42 kg
Model: 261D02000301HH0001, 261D02000701HH0001
261D02000401HH0001, 261D05000101HH0001
261D05000601HH0001
Displacement 418 cc
86 mmBore
72 mmStroke
Engine Speed 3600 RPM
Fuel Tank Capacity 4.9 L
Engine Oil SAE 15W-40
Engine Oil Capacity 1.65 L
Overall Dimensions L x W x H 478 mm x 417 mm x 504 mm
Gross Weight
50 kg, 46 kg, 46 kg
52 kg, 52 kg
Model: 261D02000501CF0001, 261D05000201CF0001
Displacement 418 cc
86 mmBore
72 mmStroke
Engine Speed 3600 RPM
Fuel Tank Capacity 4.9 L
Engine Oil SAE 15W-40
Engine Oil Capacity 1.65 L
Overall Dimensions L x W x H 478 mm x 417 mm x 504 mm
Gross Weight
46 kg, 51 kg
Not for reproduction

11
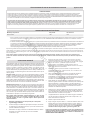
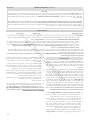
BRIGGS & STRATTON ENGINE WARRANTY POLICY
LIMITED WARRANTY
COM/SEA/EN. The purchaser must contact the Authorized Service Dealer, and then make the product available to the Authorized Service Dealer for inspection and
testing.
There is no other express warranty. Implied warranties, including those of merchantability and fitness for a particular purpose, are limited to one year from
purchase, or to the extent permitted by law. All other implied warranties are excluded. Liability for incidental or consequential damages are excluded to
the extent exclusion is permitted by law. Some states or countries do not allow limitations on how long an implied warranty lasts, and some states or countries do
legal rights and you may also have other rights which vary from state to state and country to country **.
ABOUT YOUR WARRANTY
August 2019
STANDARD WARRANTY TERMS *
esU laicremmoCesU remusnoCepyT tcudorP/dnarB
Diesel Engines raey 1raey 1
* These are our standard warranty terms, but occasionally there may be additional warranty coverage that was not determined at time of publication. For a listing of
current warranty terms for your engine, go to BRIGGSandSTRATTON.COM/SEA/EN or contact your Briggs & Stratton Authorized ServiceDealer.
** In Australia - Our goods come with guarantees that cannot be excluded under the Australian Consumer Law. You are entitled to a replacement or refund for a major
failure and for compensation for any other reasonably foreseeable loss or damage. You are also entitled to have the goods repaired or replaced if the goods fail to be
of acceptable quality and the failure does not amount to a major failure. For warranty service, find the nearest Authorized Service Dealer in our dealer locator
map
at BRIGGSandSTRATTON.COM, or by calling 1300 274 447, or by emailing or writing to [email protected], Briggs & Stratton Australia Pty
Ltd, 1 Moorebank Avenue, Moorebank, NSW, Australia, 2170.
The warranty period begins on the date of purchase by the first retail consumer or commercial end user, and continues for the period of time stated in the table above.
“Consumer use” means personal residential household use by a retail consumer.“Commercial use” means all other uses, including use for commercial, income producing or
rental purposes. Once an engine has experienced commercial use, it shall thereafter be considered as a commercial use engine for purposes of this warranty.
No warranty registration is necessary to obtain warranty on Briggs & Stratton products. Save your proof of purchase receipt. If you do not provide proof of the
initial purchase date at the time warranty service is requested, the manufacturing date of the product will be used to determine the warranty period.
Briggs & Stratton welcomes warranty repair and apologizes to you for being
inconvenienced. Any Authorized Service Dealer may perform warranty repairs. Most
warranty repairs are handled
routinely, but sometimes requests for warranty service
may not be appropriate. To avoid misunderstanding which might occur between the
customer and the dealer, listed below are some of the causes of engine failure that
the warranty does not cover.
Normal wear: Engines, like all mechanical devices, need periodic parts service and
replacement to perform well. Warranty will not cover repair when normal use has
exhausted the life of a part or an engine.Warranty would not apply if engine damage
occurred because of misuse, lack of routine maintenance, shipping, handling,
warehousing or improper installation. Similarly, warranty is void if the serial number
Improper maintenance: The life of an engine depends upon the conditions under
which it operates, and the care it receives. Some applications, such as tillers, pumps
and rotary mowers, are very often used in dusty or dirty conditions, which can cause
what appears to be premature wear. Such wear, when caused by dirt, dust, spark
plug cleaning grit, or other abrasive material that has entered the engine because of
improper maintenance, is not covered by warranty.
This warranty covers engine related defective material and/or workmanship
only, and not replacement or refund of the equipment to which the engine
may be mounted. Nor does the warranty extend to repairs required because
of:
1. Problems caused by parts that are not original Briggs & Stratton parts.
2. Equipment controls or installations that prevent starting, cause unsatisfactory
engine performance, or shorten engine life.(Contact equipment manufacturer.)
3. Leaking carburetors, clogged fuel pipes, sticking valves, or other damage,
caused by using contaminated or stale fuel.
4. Parts which
are scored or broken because an engine was operated with
OIL GARD may not shut down running engine. Engine damage may occur if oil
level is not properly maintained.
5. R
epair or adjustment of associated parts or assemblies such as clutches,
transmissions, remote controls, etc., which are not manufactured by Briggs
& Stratton.
6. Damage or wear to parts caused by dirt, which entered the engine because
of improper air cleaner maintenance, re-assembly, or use of a non-original air
cleaner element or cartridge. At recommended intervals, clean and/or replace
7. Parts damaged by over-speeding, or overheating caused by grass, debris, or
engine debris at recommended intervals as stated in the Operator’s Manual.
8. Engine or equipment parts broken by excessive vibration caused by a
loose engine mounting, loose cutter blades, unbalanced blades or loose or
unbalanced impellers, improper attachment of equipment to engine crankshaft,
over-speeding or other abuse in operation.
9. A bent or broken crankshaft, caused by striking a solid object with the cutter
blade of a rotary lawn mower, or excessive v-belt tightness.
10. Routine tune-up or adjustment of the engine.
11. Engine or engine component failure, i.e., combustion chamber, valves, valve
seats, valve guides, or burned starter motor windings, caused by the use of
Warranty service is available only through Briggs & Stratton Authorized
Service Dealers. Locate your nearest Authorized Service Dealer in our dealer
locator map on BRIGGSandSTRATTON.COM/SEA/EN.
Not for reproduction

Not for reproduction

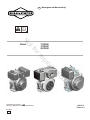
Modelos
es
es
80090330
Revisión B
Copyright © Briggs & Stratton, LLC
Milwaukee, WI, EE. UU. Todos los derechos reservados.
Español
Manual del operador
131D000
181D000
261D000
Not for reproduction

2
1
3
2
5
4
BRIGGSandSTRATTON.COM
A
B
C
D
E
F
G
H
I
J
K
L
M
N
N
O
P
A
C
B
A
B
B
A
D
E
C
Q
D
F
Not for reproduction

3
6
9
10
12
7
8
D
F
E
A
D
C
B
A
B
C
11
A
B
C
A
B
C
D
E
F
G
A
C
D
F
G
B
E
Not for reproduction

4
DD/MM/AAAA
Modelo: Tipo: Código:
SÍMBOLOS DE SEGURIDAD Y SIGNIFICADOS
INCENDIO
VAPORES
TÓXICOS
APAGADO DEL
COMBUSTIBLE
ENCENDIDO/
APAGADO
USE PROTECCIÓN
OCULAR
COMBUSTIBLE
CONTRAGOLPE
PIEZAS
MÓVILES
RÁPIDO
SUSTANCIAS
QUÍMICAS
PELIGROSAS
DESCARGA
ELÉCTRICA
EXPLOSIÓN
LENTO
SUPERFICIE
CALIENTE
ACEITE
PARE
LEA EL MANUAL
Información general
•
•
BRIGGSandSTRATTON.COM
Este manual contiene información de seguridad para ponerle al
tanto de los peligros y los riesgos asociados con motores y
cómo evitarlos. También contiene instrucciones para el
correcto uso
y cuidado del motor. Debido a que Briggs &
Stratton Corporation no necesariamente conoce los equipos
que este motor propulsará, es importante que lea y comprenda
estas instrucciones y las instrucciones de los equipos.
Conserve estas instrucciones originales para consulta futura.
Para obtener piezas de repuesto o asistencia técnica, anote a
continuación los números de modelo, tipo y código del motor
junto con la fecha de compra. Estos números se encuentran en
su motor (consulte la página Características y controles).
Fecha de compra:
Modelo del motor
Clasificación de potencia
La clasificación de potencia bruta para modelos individuales de
motores diésel se etiqueta de acuerdo con el código J1940
(Procedimiento de clasificación de potencia y torsión de motores
pequeños) de la SAE (Sociedad de Ingenieros de Automoción) y
el rendimiento de la clasificación ha sido obtenido y corregido de
acuerdo con el código J1995 de la SAE (revisión 2002-05). Los
valores de potencia en caballos de fuerza se obtienen a 3600
RPM. Los valores de potencia neta se obtienen con un filtro de
aire y escape instalado, mientras que los valores de potencia
bruta se recopilan sin estos accesorios. La potencia bruta real del
motor es superior a la neta y depende, entre otros factores, de las
condiciones ambientales de uso y de las variaciones entre
distintos motores del mismo modelo. Dada la amplia gama de
productos donde se instalan los motores, el motor diésel puede
no desarrollar la potencia bruta nominal cuando se utiliza en un
equipo de potencia determinado. Esta diferencia se debe, entre
otros, a los siguientes factores: accesorios (filtro de aire, escape,
carga, refrigeración, carburador, bomba de combustible, etc.),
limitaciones de la aplicación, condiciones ambientales de uso
(temperatura, humedad, altitud) y variaciones entre distintos
motores de un mismo modelo. A causa de las limitaciones de
fabricación y de capacidad, Briggs & Stratton podrá sustituir el
motor de esta serie por uno con mayor clasificación de potencia.
Seguridad del operador
El símbolo de aviso de seguridad se usa para identificar
información de seguridad acerca de los peligros que pueden
producir lesiones corporales. Se señaliza con una palabra
(PELIGRO, ADVERTENCIA o PRECAUCIÓN) con el símbolo de
aviso para indicar la probabilidad de una lesión y su potencial
gravedad. Además, se puede utilizar un símbolo de peligro para
representar el tipo de peligro.
PELIGRO indica un peligro que, si no se evita,
provocará la muerte o lesiones graves.
ADVERTENCIA indica un peligro que, si no se evita,
podría ocasionar la muerte o lesiones graves.
PRECAUCIÓN indica un peligro, que si no se evita,
podría ocasionar lesiones menores o moderadas.
AVISO indica información que se considera importante pero no
relacionada con peligros.
ADVERTENCIA
Los motores Briggs & Stratton no están diseñados ni
deben usarse para propulsar:
go-karts recreativos o deportivos; vehículos todo
terreno (ATV) para niños, recreativos o deportivos;
motocicletas; aerodeslizadores; productos
aeronáuticos o vehículos que se usan en eventos
competitivos no aprobados por Briggs & Stratton. Para
obtener información sobre productos para carreras
competitivas, consulte www.briggsracing.com. Para
uso con ATV utilitarios y lado a lado, comuníquese
con el Centro de Aplicaciones de Motores de Briggs &
Stratton llamando al 1-866-927-3349. Una aplicación
incorrecta del motor puede provocar lesiones graves
o la muerte.
AVISO Este motor se envió desde Briggs & Stratton sin aceite.
Antes de arrancar el motor, asegúrese de agregar aceite de
acuerdo con las instrucciones en este manual. Si arranca el
motor sin aceite, este se dañará de manera irreparable y no
estará cubierto por la garantía.
ADVERTENCIA
Los motores emiten monóxido de carbono, un
gas venenoso que carece de olor y de color.
Respirar monóxido de carbono puede
ocasionar náuseas, desmayos o incluso la
muerte.
Arranque y opere el motor en exteriores.
No arranque el motor ni lo opere en un área
cerrada, aún cuando las puertas o las ventanas se
encuentren abiertas.
Not for reproduction

5
ADVERTENCIA
El combustible y sus vapores son extremamente
inflamables y explosivos.
El fuego o la explosión pueden causar
quemaduras graves o la muerte.
Cuando agregue combustible
• Apague el motor y deje que se enfríe durante al menos
2 minutos antes de quitar la tapa de llenado de
combustible.
• Llene el tanque de combustible en exteriores o en un
área bien ventilada.
• No llene excesivamente el tanque de combustible.
Para permitir la expansión del combustible, no llene el
tanque por arriba de la parte inferior del cuello.
• Mantenga el combustible alejado de chispas, llamas,
luces piloto, fuentes de calor y otras fuentes de
ignición.
• Verifique con frecuencia las tuberías de combustible,
el tanque, la tapa y los conectores, para constatar si
presentan grietas o fugas. Cambie si es necesario.
• Si se derramó combustible, espere hasta que se haya
evaporado antes de arrancar el motor.
Cuando arranque el motor
• Asegúrese de que el silenciador, la tapa de llenado de
combustible y el purificador de aire (si corresponde)
estén colocados de manera segura en su lugar.
Cuando opere equipos
• No incline el motor o los equipos en un ángulo que
provoque derrame de combustible.
• Nunca arranque o ponga el motor en funcionamiento si
se ha quitado el conjunto del purificador de aire (si
corresponde) o el filtro de aire (si corresponde).
Cuando cambie el aceite
• Cuando vacíe el aceite desde el acceso superior del
orificio de llenado de aceite, el depósito de
combustible debe estar vacío o el combustible puede
escaparse y provocar un incendio o explosión.
Cuando incline la unidad para mantenimiento
• Cuando efectúe mantenimiento que requiere inclinar la
unidad, el depósito de combustible debe estar vacío o
el combustible puede escaparse y provocar un
incendio o explosión.
Cuando transporte equipos
• Transporte con el depósito de combustible VACÍO o
con la válvula de corte de combustible CERRADA.
Cuando almacene combustible o equipos con
combustible en el depósito
• Almacene lejos de hornos, estufas, calentadores de
agua u otros aparatos que utilicen luces piloto u otras
fuentes de encendido ya que estos pueden encender
los vapores de gasolina.
ADVERTENCIA
Las piezas giratorias pueden entrar en contacto o
atrapar manos, pies, cabello, ropa o accesorios.
Pueden provocar amputaciones traumáticas o
laceraciones graves.
• Opere los equipos con protectores instalados.
• Mantenga manos y pies lejos de las piezas giratorias.
• Sujétese el cabello si lo tiene largo y quítese las joyas.
• No use ropa holgada, cordones colgantes o elementos
que podrían quedar atrapados.
ADVERTENCIA
La rápida retracción de la cuerda de arranque
(contragolpe) tirará de su mano y brazo hacia el
motor antes de que pueda soltarla.
Podría provocar huesos rotos, fracturas,
contusiones o torceduras.
Cuando arranque el motor, tire lentamente de la cuerda de
arranque hasta sentir resistencia y luego tírela con rapidez
para evitar el contragolpe.
• Antes de arrancar el motor, retire todos los equipos
externos y las cargas del motor.
• Los componentes de acoplamiento directo como álabes,
impulsores, poleas, ruedas dentadas, etc., entre otros,
deben instalarse firmemente.
ADVERTENCIA
Los motores en funcionamiento producen calor.
Las piezas del motor, especialmente el silenciador,
se calientan muchísimo.
El contacto puede producir quemaduras térmicas
graves.
Los desechos combustibles, como hojas, pasto,
maleza, etc. pueden incendiarse.
• El contacto puede producir quemaduras térmicas
graves.
• Los desechos combustibles, como hojas, pasto, maleza,
etc. pueden incendiarse.
ADVERTENCIA
Las chispas accidentales pueden provocar un
incendio o una descarga eléctrica.
El arranque accidental puede provocar
atrapamiento, amputaciones traumáticas o
laceraciones.
Peligro de incendio
Antes de realizar ajustes o reparaciones:
• Desconecte la batería en el terminal negativo (solo
motores con arranque eléctrico).
• Use solamente las herramientas correctas.
• No manipule el resorte del regulador, las conexiones u
otras piezas para aumentar la velocidad del motor.
• Las piezas de repuesto deben ser del mismo diseño y
deben ser instaladas en la misma posición que las piezas
originales. Otras piezas pueden no funcionar de la misma
manera, pueden dañar la unidad, y pueden causar
lesiones.
• No golpee el volante con un martillo o un objeto duro, ya
que este puede romperse posteriormente durante la
operación.
Not for reproduction

6
04401
0368
0286
0105
023
01-41
02-4-
03-22-
C°F°
10W-30
15W-40
5W-30 sintético
2
1
3
Cómo agregar el combustible - Figura
4
BRIGGSandSTRATTON.COM
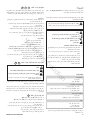
Características y controles
Compare las ilustraciones y con su motor para
familiarizarse con la ubicación de las diversas características y
controles.
A. Identificación del motor
Modelo - Tipo - Código
Número de serie
B. Filtro de aceite
C. Control del acelerador
D. Bomba de combustible
E. Depósito y tapa de llenado de combustible
F. Palanca de descompresión
G. Silenciador
H. Escape
I. Purificador de aire - Filtro de aire de papel (si corresponde)
J. Purificador de aire - Filtro de aire en baño de aceite
(si corresponde)
K. Entrada de aire
L. Arranque de retroceso
M. Corte de combustible
N. Varilla de aceite
O. Tapón de drenaje de aceite
P. Arranque eléctrico (si corresponde)
Q. Arranque con cuerda
Operación
Capacidad de aceite (consulte la sección Especificaciones)
Recomendaciones de aceite
Recomendamos el uso de aceites Briggs & Stratton con garantía
certificada para un mejor rendimiento. Otros aceites detergentes
de alta calidad son aceptables si están clasificados para servicio
CK-4, CJ-4, CI-4, CH-4 o superior. No use aditivos especiales.
Las temperaturas exteriores determinarán la viscosidad del
aceite adecuada para el motor. Use la tabla para seleccionar la
mejor viscosidad para el margen de temperatura exterior que se
espera.
Cómo revisar o agregar el aceite - Figura
Antes de agregar o revisar el aceite
• Coloque el motor nivelado.
• Limpie el área de llenado de aceite y retire la suciedad.
1. Retire la varilla de aceite (A) y límpiela sobre un trapo limpio
(Figura 3).
2. Inserte y apriete la varilla de aceite.
3. Retire la varilla y revise el nivel de aceite. Debe encontrarse
en la parte superior del indicador de lleno (B) en la varilla de
aceite.
4. Si está bajo, agregue aceite lentamente en el orificio de
llenado de aceite del motor (C) o (D). No lo llene en exceso.
Después de agregar aceite, espere un minuto y luego revise
nuevamente el nivel del aceite.
5. Vuelva a colocar la varilla de aceite y apriétela.
Recomendaciones de combustible
El combustible debe cumplir estos requisitos:
• Combustible diésel limpio y nuevo.
• Tipo de combustible diésel n.º 0.
• Especificación mínima ASTM D 975 n.º 2-D o n.º 1-D.
PRECAUCIÓN: No use combustible diésel no aprobado. No
mezcle aceite en el combustible diésel ni modifique el motor para
funcionar con combustibles alternativos. El uso de combustibles
no aprobados dañará los componentes del motor y anulará la
garantía del motor.
* Con menos de 14 °F (-10 °C), el uso de 15W-40 provocará un
arranque difícil.
** Sobre los 80 °F (27 °C), el uso de 10W-30 puede provocar un
aumento en el consumo de aceite. Revise el nivel de aceite con
más frecuencia.
1. Limpie la suciedad y los desechos en el área de la tapa de
llenado de combustible. Retire la tapa de llenado de
combustible (A, Figura 4).
2. Llene el depósito (B) con combustible. Para permitir la
expansión del combustible, no llene el tanque por arriba de la
parte inferior del cuello.
3. Vuelva a colocar la tapa de llenado de combustible.
ADVERTENCIA
El combustible y sus vapores son extremamente
inflamables y explosivos.
El fuego o la explosión pueden causar quemaduras
graves o la muerte.
Cuando agregue combustible
• Apague el motor y deje que se enfríe durante al menos 2
minutos antes de quitar la tapa de llenado de combustible.
• Llene el tanque de combustible en exteriores o en un área
bien ventilada.
• No llene excesivamente el tanque de combustible. Para
permitir la expansión del combustible, no llene el tanque
por arriba de la parte inferior del cuello.
• Mantenga el combustible alejado de chispas, llamas,
luces piloto, fuentes de calor y otras fuentes de ignición.
• Verifique con frecuencia las tuberías de combustible, el
tanque, la tapa y los conectores, para constatar si
presentan grietas o fugas. Cambie si es necesario.
• Si se derramó combustible, espere hasta que se haya
evaporado antes de arrancar el motor.
Not for reproduction

7
5
5
9
Cómo arrancar el motor
ADVERTENCIA
La rápida retracción de la cuerda de arranque
(contragolpe) tirará de su mano y brazo hacia el
motor antes de que pueda soltarla.
Podría provocar huesos rotos, fracturas,
contusiones o torceduras.
• Cuando arranque el motor, tire lentamente de la cuerda
de arranque hasta sentir resistencia y luego tírela con
rapidez para evitar el contragolpe.
ADVERTENCIA
La rápida retracción de la cuerda
de arranque (contragolpe) tirará de su mano y brazo hacia el
motor antes de que pueda soltarla. Podría provocar huesos
rotos, fracturas, contusiones o torceduras. Cuando arranque
el motor, tire lentamente de la cuerda de arranque hasta sentir
resistencia y luego tírela con rapidez para evitar el
contragolpe.
ADVERTENCIA
El combustible y sus vapores son extremamente
inflamables y explosivos.
El fuego o la explosión pueden causar
quemaduras graves o la muerte.
Cuando arranque el motor
• Asegúrese de que el silenciador, la tapa de llenado de
combustible y el purificador de aire (si corresponde)
estén colocados de manera segura en su lugar.
ADVERTENCIA
Los motores emiten monóxido de carbono, un gas
venenoso que carece de olor y de color.
Respirar monóxido de carbono puede ocasionar
náuseas, desmayos o incluso la muerte.
• Arranque y opere el motor en exteriores.
• No arranque el motor ni lo opere en un área cerrada, aún
cuando las puertas o las ventanas se encuentren abiertas.
ADVERTENCIA
Las chispas accidentales pueden provocar un
incendio o una descarga eléctrica.
El arranque accidental puede provocar
atrapamiento, amputaciones traumáticas o
laceraciones.
Peligro de incendio
Antes de realizar ajustes o reparaciones:
• Desconecte la batería en el terminal negativo.
• Use solamente las herramientas correctas.
• Las piezas de repuesto deben ser del mismo diseño y
deben ser instaladas en la misma posición que las piezas
originales. Otras piezas pueden no funcionar de la misma
manera, pueden dañar la unidad, y pueden causar
lesiones.
• La capacidad de la batería del arranque de motor de 12 V
36 Ah se recomienda para
261D05000101HH0001, 261D05000601HH0001 y
261D05000201CF0001, de 12 V 28 Ah se recomienda
para 131D05000201R0001, 181D05000101U0001,
181D05000201U0001 y 181D05000601U0001.
• Las baterías siempre debe instalarlas un profesional
calificado.
1. Con el motor apagado, conecte los cables en los conectores
de la batería.
2. Conecte correctamente los conectores de la batería en los
terminales de la batería y apriételos debidamente. Siempre
conecte al final el terminal negativo de la batería.
Nota: La batería y los conectores de la batería no vienen con el
motor. Consulte la lista ilustrada de piezas para obtener
información adicional relativa a la configuración eléctrica a través
del diagrama de cableado que está disponible en los
distribuidores de servicio autorizados de Briggs & Stratton.
AVISO: Este motor se envió desde Briggs & Stratton sin aceite.
Antes de arrancar el motor, asegúrese de agregar aceite de
acuerdo con las instrucciones en este manual. Si arranca el motor
sin aceite, este se dañará de manera irreparable y no estará
cubierto por la garantía.
Nota: Los equipos pueden tener controles remotos. Para conocer
la ubicación y operación de los controles remotos, consulte el
manual de cada equipo.
Arranque de retroceso o con cuerda - Figura
1. Revise el nivel de aceite. Consulte la sección Cómo revisar
o agregar el aceite.
2. Asegúrese de que los controles de accionamiento de
equipos, si están equipados, estén desactivados.
3. Mueva el corte de combustible (A) a la posición abierta.
4. Mueva el control del acelerador (B) a la posición de
ARRANQUE. Opere el motor en la posición de ARRANQUE.
5. Tire lentamente del asa de la cuerda de arranque (C) hasta
sentir resistencia. (Arranque de retroceso)
6. Enrolle la cuerda de arranque (F) alrededor de la polea en la
dirección que muestra la flecha. Tire lentamente del asa de
la cuerda de arranque hasta sentir resistencia. (Arranque
con cuerda)
7. Empuje al máximo la palanca de descompresión (D).
8. Tire de la agarradera de arranque de manera enérgica.
9. Arranque eléctrico (si corresponde): Gire el interruptor de
llave (E) a la posición de ARRANQUE.
Nota: Si el motor no arranca después de varios intentos, visite
BRIGGSandSTRATTON.COM.
Nota: Asegúrese de que la batería esté correctamente conectada
antes de arrancar el motor. Consulte la sección Conexiones y
recomendaciones de la batería.
AVISO: Para prolongar la vida útil del arranque, use el ciclo de
arranque corto (máximo 5 segundos). Espere un minuto en ciclos
de arranque.
Cómo detener el motor - Figura
1. Mueva el control del acelerador (B) a la posición de
DETENER.
2. Después de que el motor se detenga, mueva el corte de
combustible a la posición de cerrado.
Conexiones y recomendaciones de la batería
Not for reproduction

ADVERTENCIA: Cuando efectúe mantenimiento
que requiere inclinar la unidad, el depósito de combustible
debe estar vacío o el combustible puede escaparse y
provocar un incendio o explosión.
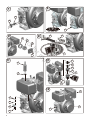
Cómo cambiar el aceite - Figuras
El aceite usado es un desecho peligroso y se debe desechar
adecuadamente. No lo deseche con los residuos domésticos.
Consulte con las autoridades locales, centros de servicio o con el
distribuidor para conocer instalaciones para desechar o reciclar
de manera segura.
Cómo extraer el aceite
1. Con el motor apagado pero aún tibio, retire la llave del
interruptor de llave (si está equipado).
2. Retire el tapón de drenaje de aceite (A, Figura 6). Vacíe el
aceite en un recipiente aprobado.
3. Después de vaciado el aceite, instale y apriete el tapón de
drenaje de aceite.
4. En modelos equipados con el filtro de aceite que se muestra
en la Figura 7, retire la fijación del filtro de aceite (B) y retire el
filtro de aceite (C).
5. Lave y limpie el filtro de aceite en parafina o combustible diésel
para eliminar la suciedad. Reemplácelo si está dañado.
6. Instale el filtro de aceite y apriete la fijación del filtro de aceite.
Cómo agregar el aceite
• Coloque el motor nivelado.
• Limpie el área de llenado de aceite y retire la suciedad.
• Consulte la sección Especificaciones para conocer la
capacidad de aceite.
1. Retire la varilla de aceite (D) y límpiela con un paño limpio
(Figura 8).
2. Vierta lentamente el aceite en el orificio de llenado de aceite
del motor (F). No lo llene en exceso. Después de agregar
aceite, espere un minuto y luego revise el nivel del aceite.
3. Instale la varilla de aceite y apriétela.
4. Retire la varilla y revise el nivel de aceite. Debe encontrarse en
la parte superior del indicador de lleno (E) en la varilla de aceite.
5. Instale la varilla de aceite y apriétela.
Cómo dar servicio al filtro de aire - Figuras
ADVERTENCIA
El combustible y sus vapores son extremamente
inflamables y explosivos.
El fuego o la explosión pueden causar
quemaduras graves o la muerte.
• Nunca arranque o ponga el motor en funcionamiento si se
ha quitado el conjunto del purificador de aire (si
corresponde) o el filtro de aire (si corresponde).
AVISO: No use aire presurizado o solventes para limpiar el filtro.
El aire presurizado puede dañar el filtro y los solventes lo
disolverán.
Varios modelos usan un filtro de espuma o papel. Es posible que
algunos modelos también cuenten con un prelimpiador que se
puede lavar y reutilizar. Compare las ilustraciones de este
manual con el tipo instalado en su motor y realice el servicio
como sigue.
Filtro de aire de papel - Figura
1. Afloje las fijaciones (A) que sujetan la cubierta (B).
2. Abra la cubierta y retire el prelimpiador (D) y el elemento del
filtro (C).
3. Para soltar la suciedad, golpéelo suavemente sobre una
superficie dura. Si el filtro está demasiado sucio, reemplácelo
por uno nuevo.
4. Lave el prelimpiador con detergente líquido y agua. Luego deje
que se seque completamente al aire. No aceite el prelimpiador.
5. Instale el prelimpiador seco y el elemento del filtro de aire.
6. Instale la cubierta y asegúrela con las fijaciones.
6
10
7 8
9
9
BRIGGSandSTRATTON.COM
ADVERTENCIA
Las chispas accidentales pueden provocar un
incendio o una descarga eléctrica.
El arranque accidental puede provocar
atrapamiento, amputaciones traumáticas o
laceraciones.
Peligro de incendio.
Antes de realizar ajustes o reparaciones:
• Desconecte la batería en el terminal negativo (solo
motores con arranque eléctrico).
• Use solamente las herramientas correctas.
• No manipule el resorte del regulador, las conexiones u
otras piezas para aumentar la velocidad del motor.
• Las piezas de repuesto deben ser del mismo diseño y
deben ser instaladas en la misma posición que las piezas
originales. Otras piezas pueden no funcionar de la misma
manera, pueden dañar la unidad, y pueden causar
lesiones.
• No golpee el volante con un martillo o un objeto duro, ya
que este puede romperse posteriormente durante la
operación.
8
Cuadro de mantenimiento
Primeras 20 horas
• Cambie el aceite.
Limpie el filtro de aceite.
•
Cada 8 horas o a diario
• Revise el nivel de aceite del motor.
Revise el área alrededor del silenciador o el escape
y los controles.
Revise el purificador de aire.
•
Cada 100 horas o anualmente
• Cambie el aceite.
Revise y limpie los filtros de aceite y de combustible.
•
Anualmente
• Reemplace el elemento del filtro de aire.
Reemplace el filtro de combustible.
Limpie el sistema de refrigeración por aire.*
Mantenimiento
Recomendamos que consulte a cualquier distribuidor de servicio
autorizado de Briggs & Stratton para todo mantenimiento y
reparación del motor y las piezas del motor.
AVISO: Todos los componentes que se usaron para fabricar
este motor deben mantenerse en su lugar para una correcta
operación.
* Cuando haya mucho polvo o desechos transportados por aire,
limpie con mayor frecuencia.
Not for reproduction
A página está carregando...
A página está carregando...
A página está carregando...
A página está carregando...
A página está carregando...
A página está carregando...
A página está carregando...
A página está carregando...
A página está carregando...
A página está carregando...
A página está carregando...
A página está carregando...
A página está carregando...
A página está carregando...
A página está carregando...
A página está carregando...
A página está carregando...
A página está carregando...
A página está carregando...
A página está carregando...
A página está carregando...
A página está carregando...
A página está carregando...
A página está carregando...
A página está carregando...
A página está carregando...
A página está carregando...
A página está carregando...
A página está carregando...
A página está carregando...
A página está carregando...
A página está carregando...
A página está carregando...
A página está carregando...
A página está carregando...
A página está carregando...
A página está carregando...
A página está carregando...
A página está carregando...
A página está carregando...
A página está carregando...
A página está carregando...
A página está carregando...
A página está carregando...
A página está carregando...
A página está carregando...
A página está carregando...
A página está carregando...
A página está carregando...
A página está carregando...
A página está carregando...
A página está carregando...
A página está carregando...
A página está carregando...
A página está carregando...
A página está carregando...
A página está carregando...
A página está carregando...
A página está carregando...
A página está carregando...
A página está carregando...
A página está carregando...
A página está carregando...
A página está carregando...
A página está carregando...
A página está carregando...
A página está carregando...
A página está carregando...
A página está carregando...
A página está carregando...
A página está carregando...
A página está carregando...
A página está carregando...
A página está carregando...
A página está carregando...
A página está carregando...
A página está carregando...
A página está carregando...
A página está carregando...
A página está carregando...
A página está carregando...
A página está carregando...
A página está carregando...
A página está carregando...
A página está carregando...
A página está carregando...
A página está carregando...
A página está carregando...
A página está carregando...
A página está carregando...
A página está carregando...
A página está carregando...
A página está carregando...
A página está carregando...
A página está carregando...
A página está carregando...
A página está carregando...
A página está carregando...
A página está carregando...
A página está carregando...
-
 1
1
-
 2
2
-
 3
3
-
 4
4
-
 5
5
-
 6
6
-
 7
7
-
 8
8
-
 9
9
-
 10
10
-
 11
11
-
 12
12
-
 13
13
-
 14
14
-
 15
15
-
 16
16
-
 17
17
-
 18
18
-
 19
19
-
 20
20
-
 21
21
-
 22
22
-
 23
23
-
 24
24
-
 25
25
-
 26
26
-
 27
27
-
 28
28
-
 29
29
-
 30
30
-
 31
31
-
 32
32
-
 33
33
-
 34
34
-
 35
35
-
 36
36
-
 37
37
-
 38
38
-
 39
39
-
 40
40
-
 41
41
-
 42
42
-
 43
43
-
 44
44
-
 45
45
-
 46
46
-
 47
47
-
 48
48
-
 49
49
-
 50
50
-
 51
51
-
 52
52
-
 53
53
-
 54
54
-
 55
55
-
 56
56
-
 57
57
-
 58
58
-
 59
59
-
 60
60
-
 61
61
-
 62
62
-
 63
63
-
 64
64
-
 65
65
-
 66
66
-
 67
67
-
 68
68
-
 69
69
-
 70
70
-
 71
71
-
 72
72
-
 73
73
-
 74
74
-
 75
75
-
 76
76
-
 77
77
-
 78
78
-
 79
79
-
 80
80
-
 81
81
-
 82
82
-
 83
83
-
 84
84
-
 85
85
-
 86
86
-
 87
87
-
 88
88
-
 89
89
-
 90
90
-
 91
91
-
 92
92
-
 93
93
-
 94
94
-
 95
95
-
 96
96
-
 97
97
-
 98
98
-
 99
99
-
 100
100
-
 101
101
-
 102
102
-
 103
103
-
 104
104
-
 105
105
-
 106
106
-
 107
107
-
 108
108
-
 109
109
-
 110
110
-
 111
111
-
 112
112
-
 113
113
-
 114
114
-
 115
115
-
 116
116
-
 117
117
-
 118
118
-
 119
119
-
 120
120


Simplicity 131D05-0002-01 Manual do usuário
- Categoria
- Acessórios para veículos motorizados
- Tipo
- Manual do usuário
- Este manual também é adequado para
em outras línguas
Artigos relacionados
-
Simplicity 12T432-2130-F8 Manual do usuário
-
Simplicity 19N132-0111-H1 Manual do usuário
-
Simplicity 100802-0115-B8 Manual do usuário
-
Simplicity 14B932-0028-F1 Manual do usuário
-
-
-
Simplicity 123P07-0016-F1 Manual do usuário
-
Briggs & Stratton 100602-0128-B1 Manual do usuário